HS016 - Mp3 player Hipstreet - Free user manual and instructions
Find the device manual for free HS016 Hipstreet in PDF.
Frequently Asked Questions - HS016 Hipstreet
User questions about HS016 Hipstreet
0 question about this device. Answer the ones you know or ask your own.
Ask a new question about this device
Download the instructions for your Mp3 player in PDF format for free! Find your manual HS016 - Hipstreet and take your electronic device back in hand. On this page are published all the documents necessary for the use of your device. HS016 by Hipstreet.
USER MANUAL HS016 Hipstreet
- Important safety instruction 3
- Package contents 4
- Minimum system requirements 4
- Description 5
- Use 6
5.1 Power ON/OFF 6
5.2 Recharge the Player 6
- Main Menu 7
6.1 Music Mode 8
6.1.1 Key Functions in MUSIC Mode 8
6.1.2 A-B Repeat Function 8
6.1.3 Lyric Display 9
6.2 VIDEO Mode 9
6.2.1 Key Functions in Video Mode 9
6.2.2 How to convert the movie file to AVI file 9
6.3 Radio (FM Radio) 12
6.3.1 Radio Submenu 12
6.3.2 Manual / Preset Search 12
6.3.3 Delete Channels 13
6.4 PHOTO (Photo Viewer) 13
6.5 TEXT 13
6.5.1 TEXTBookmark 13
6.6 Record (Voice messages recorder) 14
6.7 EXPLORER 14
6.8 Settings (Setup) 14
6.8.1 MUSIC Set 15
6.8.2 RADIO Set 15
6.8.3 RECORD Set 15
6.8.4 DISPLAY Set. 16
6.8.5 AUTO PLAY SET 16
6.8.6 SYSTEM Set. 16
6.8.7 POWER OFF TIME Set 16
- Computer installation 17
7.1 Windows® 98 Second Edition - Installation 17
7.1.1 Windows® 98 Second Edition - Safely Remove Hardware 17
7.2 Windows® ME, Windows® 2000, Windows® XP, Windows® VISTA 18
7.3 File transfer 18
Introduction
Thank you for your purchase of this MP3 digital video player. Please read this user manual carefully before operation and retain all the operating instructions.
- The contents of this user manual are subject to change based on newer developments.
- The display screen pictures contained in this user manual are used for indication purposes and may vary.
1. Important safety instruction
Please read the following instructions carefully for your safety and prevention of property damage.
- Do not use the unit in places that are extremely hot, cold, dusty, or humid.
- The battery life will differ with different usage conditions and modes.
- Please charge the unit when any of the following cases occur.
The battery indicator informs of a low battery.
The player turns off automatically, and turns off again after rebooting.
The keys become inactive.
- Do not disconnect the player while it is formatting, uploading or downloading. This may lead to errors.
- The player is charging while connected with computer via USB / AC adaptor, regardless if it is powered on or not.
- Do not disassemble. Please contact our support center if you need service.
- Specifications are subject to change and improvement without notice.
- Avoid water or foreign objects falling on this player.
2. Package contents
- MP3 Player
- USB data cable
- Earphones with audio cable
- CD-ROM with software driver
- Manual
- Warranty Card / Help Card
3. Minimum system requirements
- PC IBM® or 100% compatible with CPU Intel® Pentium® II at 233 MHz or more.
- One USB port.
- 64 MByte of RAM.
- 30 MB of free Hard Disk space.
- CD-ROM or DVD-ROM drive.
- Operating System Windows® 98 SE, Windows® ME, Windows® 2000 or Windows® XP, Windows® Vista.
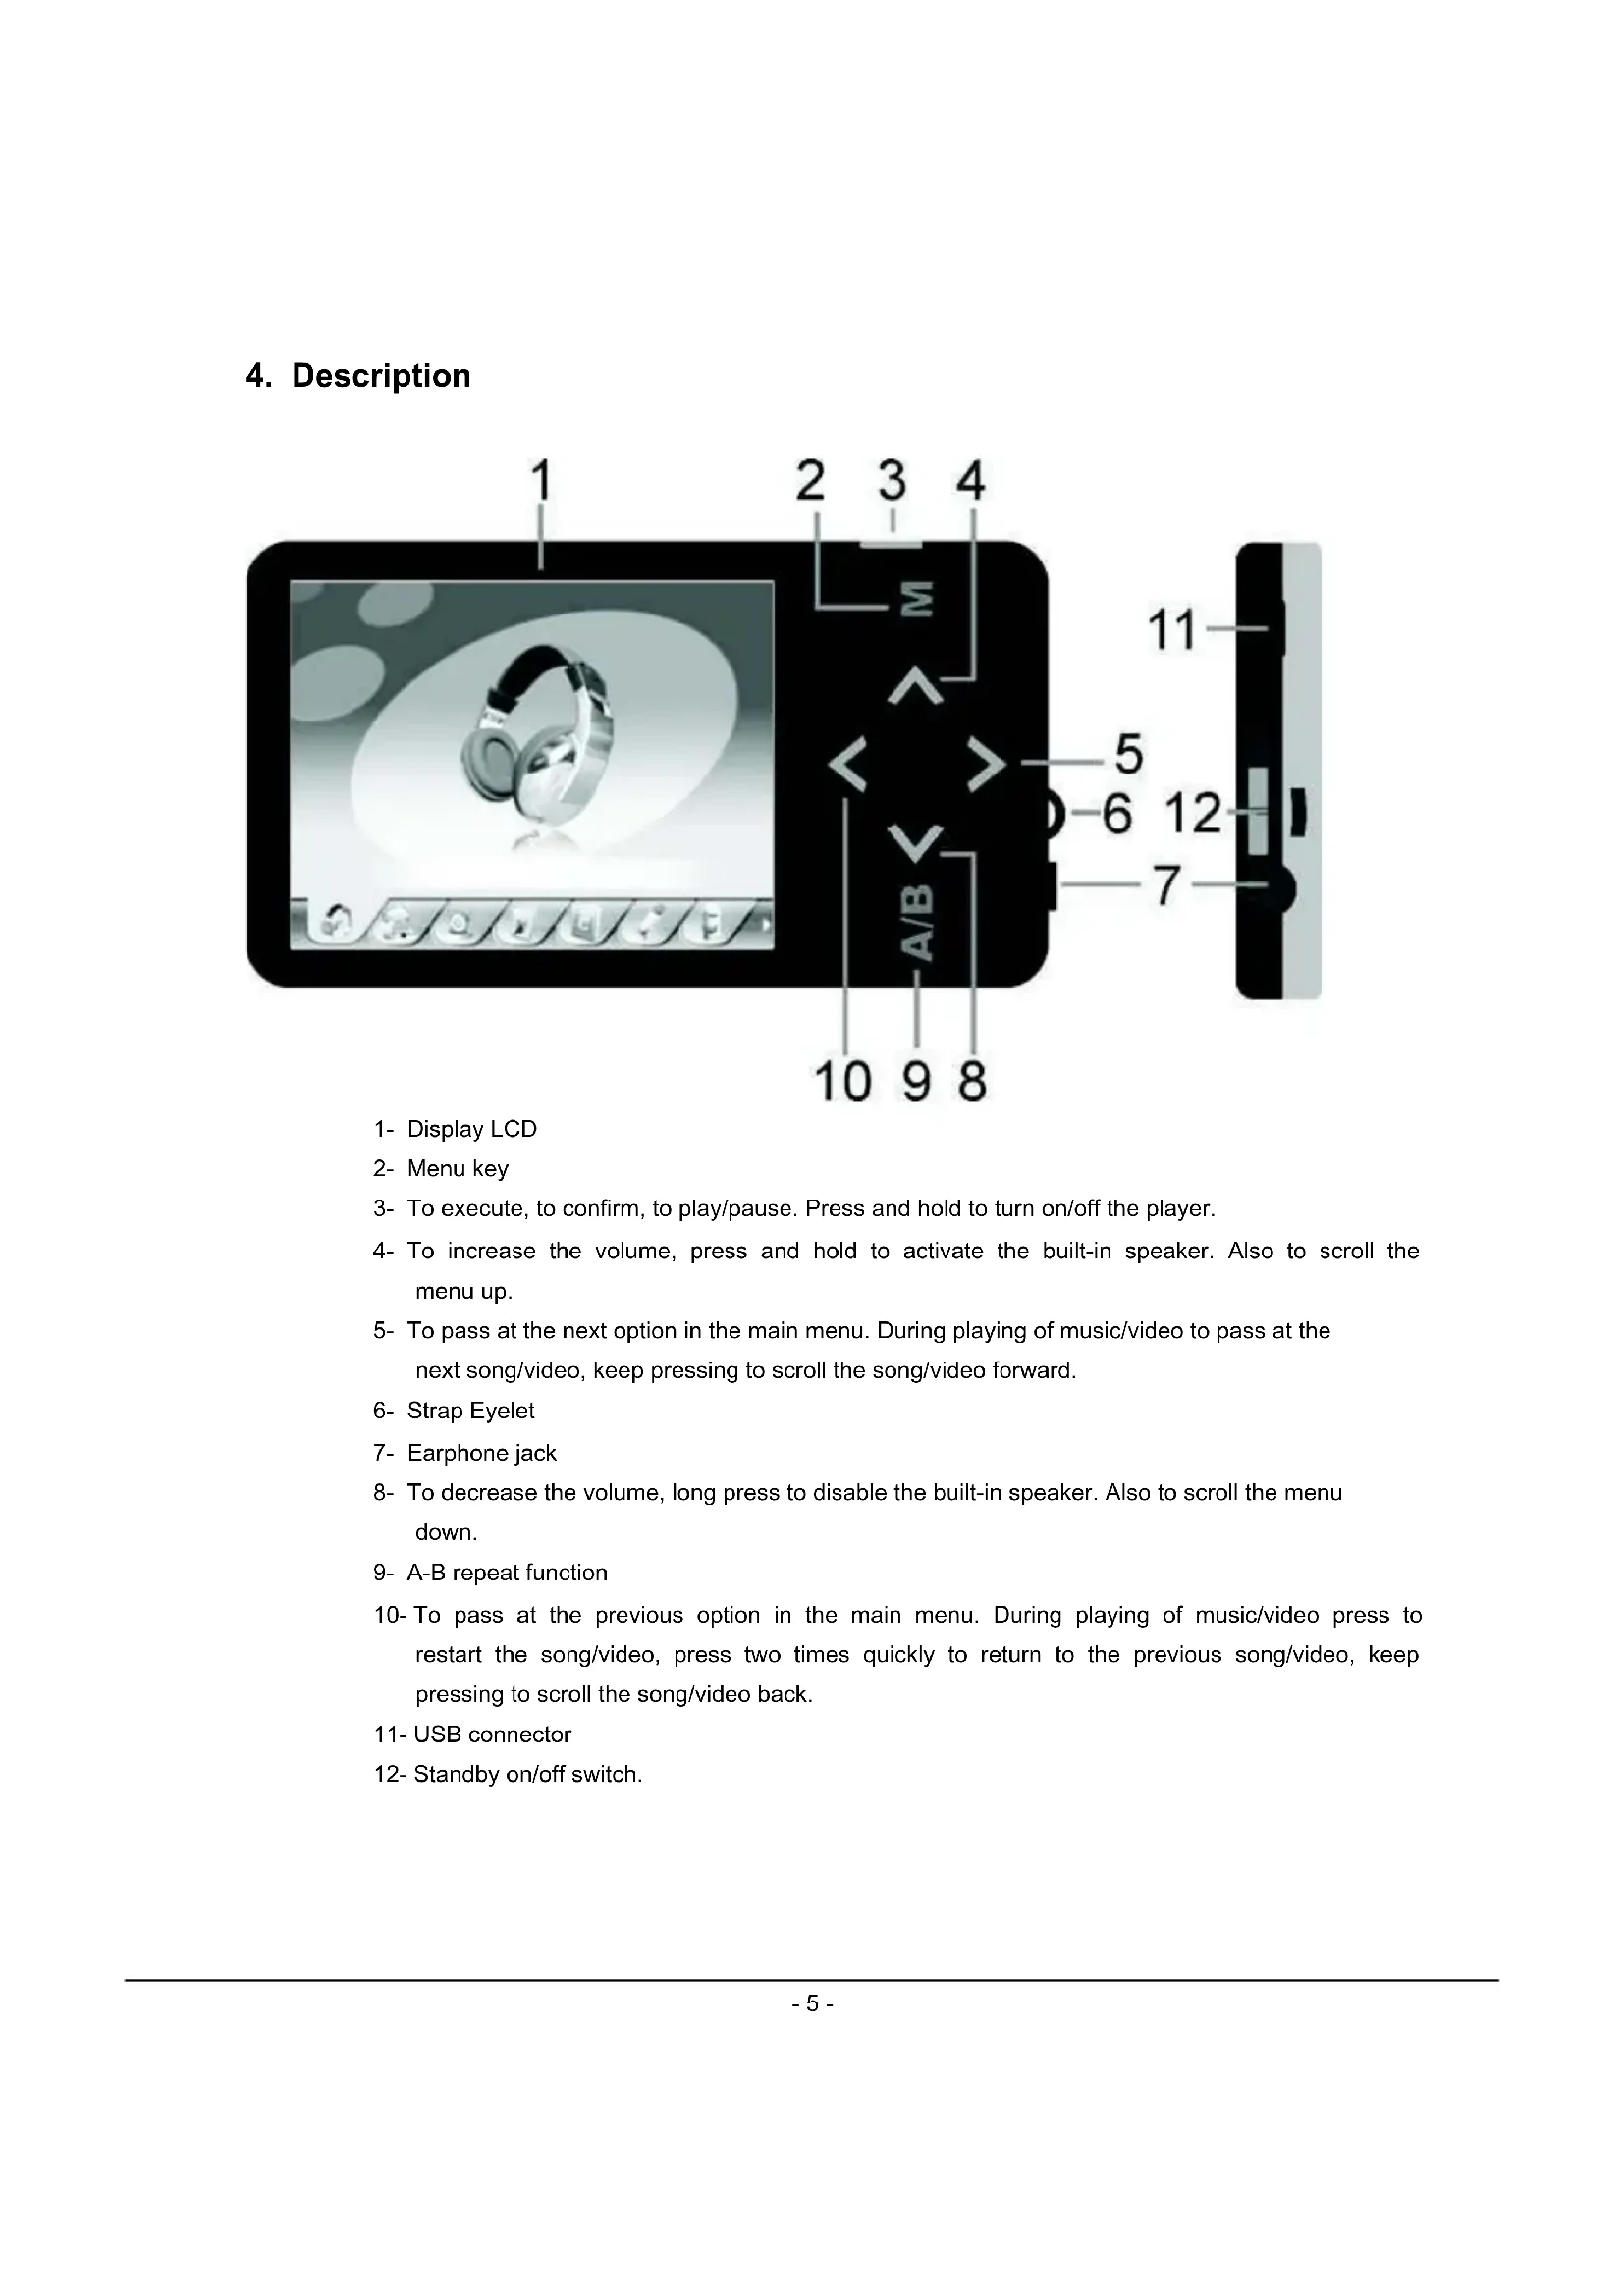
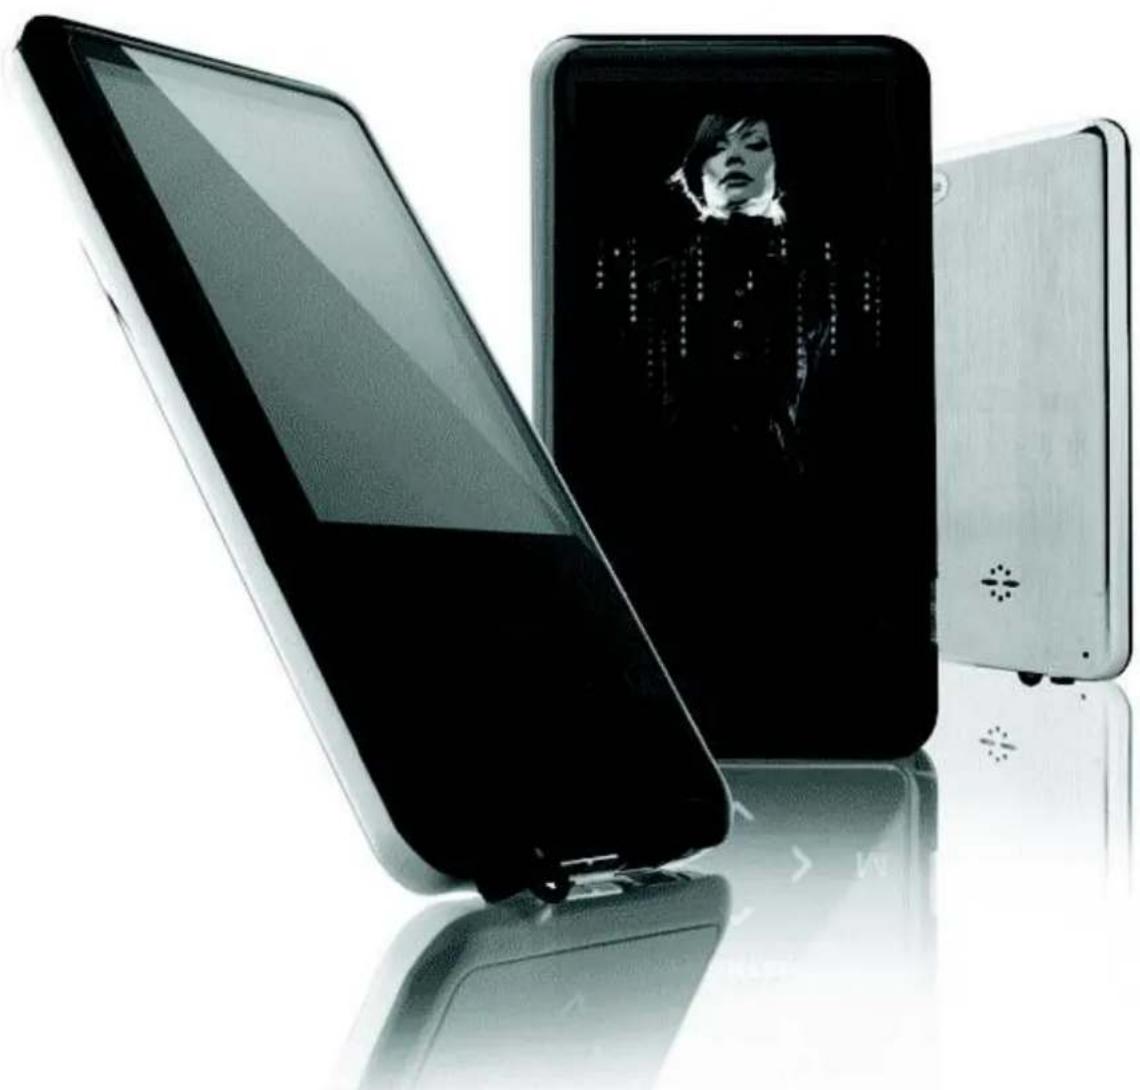
4.Description
1-Display LCD
2- Menu key
3- To execute, to confirm, to play/pause. Press and hold to turn on/off the player.
4- To increase the volume, press and hold to activate the built-in speaker. Also to scroll the menu up.
5- To pass at the next option in the main menu. During playing of music/video to pass at the next song/video, keep pressing to scroll the song/video forward.
6-Strap Eyelet
7-Earphone jack
8- To decrease the volume, long press to disable the built-in speaker. Also to scroll the menu down.
9-A-B repeat function
10- To pass at the previous option in the main menu. During playing of music/video press to restart the song/video, press two times quickly to return to the previous song/video, keep pressing to scroll the song/video back.
11-USB connector
12- Standby on/off switch.
5. Use
5.1 Power ON/OFF
The MP3 player has built-in a rechargeable lithium battery. Before first use, recharge the battery for 4 hours. To recharge the battery please connect the MP3 player to USB computer port with the cable provided.

- Computers when powered off, do not not supply power to USB ports. In order to charge the battery you must to power on the computer.
Before powering on the unit, make sure that the unit if fully charged
Powering On:
- Switch the power On/Off switch to the "On" position.
-
Keep press and hold the PLAY [▶ II] button until the display illuminates, then release the button. Powering Off:
-
Press and hold the PLAY [▶ II] button until the screen powers off.
- Then slide the power On/Off switch to Off position.
- Under the Stop status, the player may power off automatically if a Power Off is predefined in the System Menu.

- Turning the On/Off switch to Off position after powering off by holding the Play/ Pause key saves power and prevents accidental start-ups.
- Do not slide the ON/OFF switch directly to OFF position during power on status, or you might lose your settings.
Before powering on the unit, make sure that the unit is charged.
5.2 Recharge the Player
The player can be recharged with the USB cable provided by connecting to the PC. During charging, the icon on the right side will show the charging status. Full charge will take 3 to 4 hours.


- Please do not use other equipment to recharge. Any damage to the player caused by using other recharging equipment will void the warranty.
6. Main Menu
After powering on the MP3 player, you can see the main menu screen which will allow you to select different functions and options.
By using the
To return at the main menu while you are inside any of these submenus, press and hold the M key.
The available options are:
Music: Select this option to play music.

Video: Select this option to play video.
Radio: Select this option to use the FM radio.

Photo: Select this option to browse and see photos.
Text: Select this option to read text.

Record: Select this option to record voice messages.

Explorer: Select this option to explore folders.

Settings: Select this option to access the system setup options.

6.1 Music Mode
To activate this option please follow the below steps.
- Power ON the MP3 Player, the screen will display the main menu.
- By using the
buttons, select the MUSIC option, then press the PLAY [▶ II] button. - Choose the song and press the PLAY [▶ II] button to start playing.
6.1.1 Key Functions in MUSIC Mode

During music playback:
PLAY [▶ II]:
Press the PLAY [▶ II] button to start to play music. Press the play button again to pause the song. To restart the song, press play button again.
REW & FFWD [
Press and hold the play button to turn off the player.
Press [ ] or [> to select the previous or the next song.
Press and Hold the [ ] or [> button to rewind or fast forward the song.
Volume (A and
Press [ ] button to increase the volume and press [ ] button to decrease the volume.
Built-in speaker:
Press and hold the [A] button to activate the built-in speaker; press and hold the [V] button to de-activate the built-in speaker.
Navigator:
Press Menu [M] to open the folder navigator. Use [A] or [V] to choose the song you want to play, and press PLAY [▶ II] to play the selected song. Press Menu [M] again to go up a folder level. Press & hold Menu [M] key to return to main menu screen.
6.1.2 A-B Repeat Function
The player can loop and repeat a specified music interval of a song. While Playing Music, Press the A-B button to set the repeat start point A, and then press the A-B button again to set the repeat end point B. The player will then loop and repeat the content between point A and B. Press A-B button again to disable A-B repeat function.
6.1.3 Lyric Display
The Player supports Lyrics Display, in which the lyrics would be shown in sync with the actually lyrics of the song. The file format must be in“.lrc” format, have the exact same name with the song's file name and placed within the same folder with the song. You will see the lyrics automatically display on the screen if the proper lyrics file is present.
6.2VIDEO Mode
The VIDEO mode allows to play videos in AVI Format (320x240). To activate this option please follow the below steps.
- Power ON the MP3 Player, the screen will display the main menu.
-
By using the
buttons, select the VIDEO mode option then press the PLAY [▶ II] button. -
Choose the video and press the PLAY [▶ II] button to start playing.

Note
The Movie Player only plays AVI files in 320x240 resolution. The AVI format required is unique with this Player and must use the conversion software provided with the driver CD to convert the video files to a playable format for this Player.
6.2.1 Key Functions in Video Mode
During video play it is possible to activate the following controls.
PLAY [▶ II]: Press the PLAY [▶ II] button to start to play a movie. Press the play button again to pause the movie. To restart the movie, press the play button again. Press and hold the play button to turn off the player.
REW & FFWD [
Press [ ] or [> to select the previous or the next movie.
Press and Hold the [ ] or [> button to rewind or fast forward the movie.
Volume (A and V):
Press [A] button to increase the volume and press [B] button to decrease the volume.
Built-in speaker:
Press and hold the [] button to activate the built-in speaker; press and hold the [V] button to de-activate the built-in speaker.
Navigator: Press Menu [M] to open the folder navigator, use [A] or [Y] to choose the video you want to play, then press PLAY [▶ II] to play the selected video. Press Menu [M] again to go up a folder level. Press and hold the Menu [M] key to return to main menu screen.
6.2.2 How to convert the movie file to AVI file
The AVI converter allows you to convert movie files into AVI files. Even for common AVI files available on the internet, you still need to do the conversion as the player requires a specific AVI format. It is compatible with AVI, RM, RMVB, MPG, MPEG, MP4, ASF, WMV, MKV, DAT, VOB. Please follow the below procedures to do the conversion.
- From the driver CD, select Video Converter / setup.exe and double click it to start installing the AVI CONVERTER
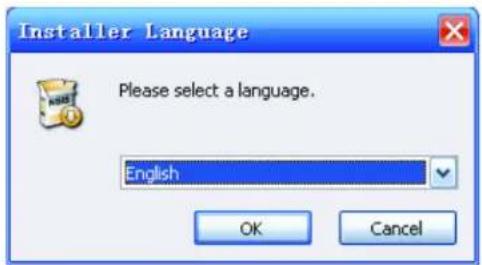
- Follow the instructions to install the programm.
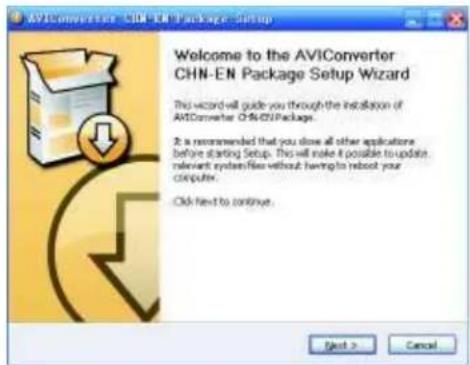
- Once installed, select and run the AVI Converter program.
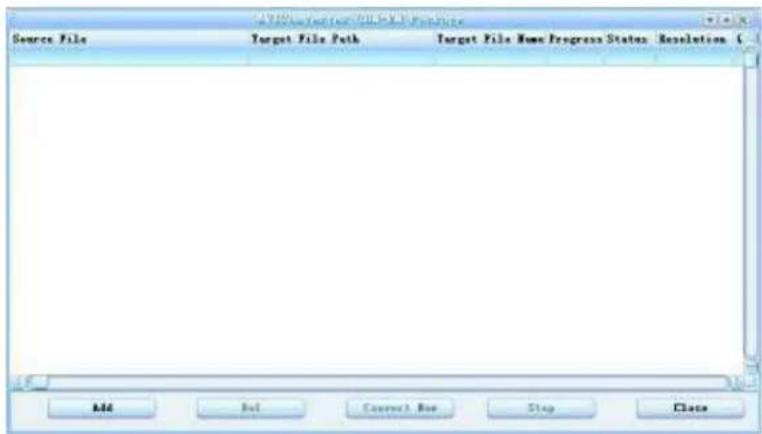
-
Click "ADD" to start adding the movie you want to convert
-
You will then see the CONVERSION SETTING.
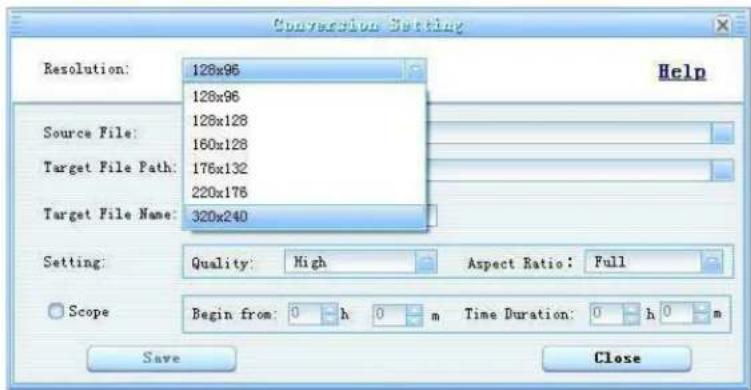
- Choose 320 × 240 in the "RESOLUTION" drop down menu.
- Browse and choose the source file in "SOURCE FILE".
- Choose the output destination folder in the "TARGET FILE PATH". (You can change the file name in "TARGET FILE NAME" if you want to.)
- You can also customize the quality and aspect ratio. The higher quality produces larger AVI file size, better video quality and vice versa. For Aspect Ratio, you are suggested to choose 4:3 format for this model.
- Click "SAVE", and you are done with the first file you want to convert. You can then proceed with the second file.
- Click "CLOSE" to finish adding source files.
- Click "CONVERT NOW" to start conversion, and you will see the progress by percentage.
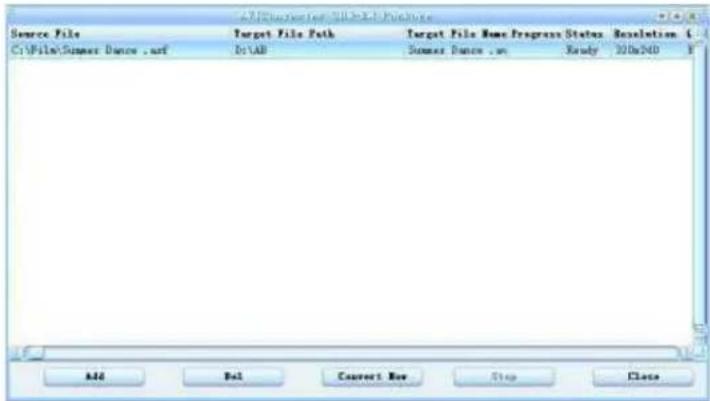
- After conversion is complete, you will see the converted file in your output destination folder.

- When you are trying to convert rm, ram, rmvb, mov and vob, you need a particular decoder. You can check if your Windows Media Player is able to play these files. If not, a decoder is required.
- Ensure that the program DirectX for your PC is 9.0 or above.
6.3 Radio (FM Radio)
When the FM Radio mode is activated you can listen to radio programs. To activate this option please follow the below steps.
-
Power ON the MP3 Player, the screen will display the main menu.
-
By using the
buttons, select the RADIO option, then press the PLAY [▶ II] button to confirm.

- The player will start broadcasting the last preset radio channel.
- Use the < or buttons to choose the previous or the next preset channel.
Use [] or [V] to increase/decrease the volume. Press and hold the [] button to activate the built-in speaker. Press and hold the [V] button to de-activate the built-in speaker.
Press and hold M button to exit from Radio mode and return to the main menu.
WARNING: In order to use the FM Radio function you must connect an earphone to the player, which acts as an antenna.
6.3.1 Radio Submenu
By pressing the MENU [M] button during radio play, you can find the following FM submenus. Use [ ±b ] or [ ±b ] to choose the selected sub-menu, and press the PLAY [▶ II] key to confirm. Use the same technique to navigate inside each of the submenus.
FM radio sub-menu options:
Manual: Select this option to start manual-searching for radio channels.
- Preset: Select this option to set the pre-set search mode, you will search only between the memorized pre-set radio stations.
Mem: Select this option to save radio channels.
Del: Select this option to delete radio channels.
Auto: Select this option to auto scan available channels.
6.3.2 Manual / Preset Search
To manually scan frequencies please follow the below steps.
- When the FM Mode is activated, press the MENU [M] button, use or to highlight "Manual" option and press the M button to confirm. Now the Player is on manual search mode.
- Press and hold the
button to start auto scanning. Scanning stops as an available channel is found. - Press the
button to step-up scanning.
To save a radio channel when the desired frequency is visualized, press the M key and the use [ ] or [ ] button to highlight "Mem" option. Press the M key and use or to select the position where to save the channel. Press the M key and use buttons to select "Yes", then press the [ II] button to confirm. Maximum of 20 radio channels can be stored.
6.3.3 Delete Channels
To delete a channel, please follow the below steps:
When the FM Mode is activated, press the MENU [M] button and use or to highlight "Del" option. Press the M button. Use or to select the channel to delete, then press the M key. Use buttons to select "Yes" (to delete) or "No" (not to delete) and press the [▶ II] button to confirm.
6.4 PHOTO (Photo Viewer)
The Photo option allows viewing photos (JPEG files, example .jpg or .jpeg file format). To use this option, please follow the below steps.
-
Power ON the Player, the screen will display the main menu.
-
By using the
buttons, select Photo, and press the PLAY [▶ II] button to enter the photo viewer. Use or to select the photo file to view and press PLAY [▶ II].
- Use < or > to scroll between photos.
- Press the PLAY [▶ II] button to start the slide show and press again to stop the slide show. To choose the timer for the slide show, please see the "Setting" section.
- Press MENU [M] to stop and escape to the folder menu.
Press and hold the M button to return to main menu screen.
6.5 TEXT
The TEXT option allows reading text files (.txt file format). To activate this option please follow the below steps.

- Power ON the Player, the screen will display the main menu.
- By using
buttons, select Text and press the PLAY [▶ II] button to confirm.
3.Use A or W choose the text file, then press PLAY [ II] to read. - By using the < or ≥ keys, you can scroll up or down in the text file.
- Press PLAY [▶ II] to start the auto scroll function. Press again to stop the auto scroll function.
- Press the [M] button to escape or press and hold the [M] button to return directly to the main menu screen.
6.5.1 TEXTBookmark
While you are reading the text file or when you want to stop reading, you can save the current page by using the bookmark function.
To save a bookmark:
- While you are reading, press the button and then you will see a small bookmark menu.
2.Use or buttons to choose the bookmark position (total 3). - Press the PLAY [▶ II] button to save the bookmark.
To load a bookmark:
-
While you are reading, press the v button and then you will see a small bookmark menu.
-
Use buttons to choose the bookmark position to load.
- Press the PLAY [▶ II] button to load the bookmark.
When a text file is deleted from the Player's memory the associated bookmark will also be deleted.
If the 3 bookmark positions are all full, simply save the new bookmark on an old position and the old bookmark will be deleted and the new bookmark will be saved.
6.6 Record (Voice messages recorder)
This option allows to record voice messages by using the built-in microphone. To record voice message, please follow the below steps.
- Power ON the MP3 Player, the screen will display the main menu.
- By using < or buttons, select Record option then press the PLAY [▶ II] button.
- Press the PLAY [▶ II] button to start to recording. During recording, press the PLAY [▶ II] button to pause recording. Press the play button again to resume the recording. Press and hold the PLAY [▶ II] button and it will stop the recording and save the file.
- You can listen to your file under the Music player mode. (Please refer to chapter 7.1 for more details). Press and hold M button to exit and return to main menu screen.

NOTE
To play the files recorded by the Player on your computer, a compatible audio CODEC may be needed. If you need more information about audio CODECs installed on you PC, please refer to Windows® help on-line.
The Players stores the recorded files in the VOICE folder.
6.7 EXPLORER
Under this menu, you can explore files located in memory including music, videos, recordings, photos, and text files. To use this option, please follow the below steps.
- Power ON the MP3 Player, the screen will display the main menu
- By using or buttons, select Explorer option and press the PLAY [▶ II] button to confirm.
- You will enter the folder menu, in which you will see all files/folders.
- Use to move through the files/folders and press the PLAY [▶ II] button to execute a file or enter into a folder. To exit from a folder press M button.
- Press and hold the MENU [M] button to return to the main menu.

6.8 Settings (Setup)
The SETTING option allows to access to Player's setup system. To access the system setup options, please follow the below steps.
- Power ON the MP3 player, the screen will display the main menu.
- By using the
buttons, select Settings option then press the PLAY [▶ II] button to enter the Setting menu.

- Use the ±b or v buttons to select the system setup option to change and press the PLAY [▶ II] button. To return to main menu press and hold M button.
The options available in the setup system are:
Music: This option allows setting the music playing parameters.
Radio: This option allows setting the FM mode parameters.
Record: This option allows setting the recording parameters.
Display: This option allows setting the display parameters.
Auto Play Set: This option allows setting the text and photo auto play time.
System: This option allows setting the system parameters.
Power off time: This option allows setting the power off time.
Default Set: This option allows to set the Player back to the factory default settings.
6.8.1 MUSIC Set
The Music sub-menu allows setting of the below parameters:
- Repeat Mode: you can set the repeat mode between: "Once", stop after playing one song, "Repeat once" repeat playing a single song, "Folder once" stop after playing all the songs in the folder, "Folder Repeat" repeat playing all the song in the same folder, "All Once" stop after playing all songs; "All Repeat" repeatedly play all the songs, "Intro" play the first 10 seconds of all songs. Use or button to select the desired play mode then press the PLAY button.
Play Mode:
You can choose between shuffle and play in order modes.
EQ Select
7 preset equalizers: Normal, 3D, Rock, Pop, Classic, Bass, Jazz and User EQ.
- User EQ Set
You can customize you own EQ. Use the buttons to move between the frequency column you wish to change, then use or buttons to change the value. When set, use the buttons to highlight "YES" and press PLAY [▶ II] to confirm. Choose NO to exit without saving any changes.
6.8.2 RADIO Set
The Radio submenu allows setting of the below parameters:
- Stereo Switch
You can choose to turn on or off the stereo sound option.
FM Region
You can choose from four different FM regions including CHINA, EUROPE, JAPAN and USA (Canada).
6.8.3 RECORD Set
The Record submenu allows setting of the below parameters:
REC Quality:
You can choose between HIGH and NORMAL recording quality. The higher the recording quality, the better the quality and more memory will be used.
REC Volume
You can choose from 5 different levels of recording volume.
6.8.4 DISPLAY Set
The Display submenu allows setting of the below parameters:
- BLight Time
You can choose the amount of time the Back Light will remain on from 5 to 30 seconds. You can also set the Back Light to remain ALWAYS ON. Please consider that the Back Light time will affect the battery life. The longer the Back Light remains on, the less battery life you will have.
Lum:
You can alter the brightness of the display screen. Higher brightness means a lower battery life.
- BLight Mode
You can choose between NORMAL and POWER SAVE Back Light modes.
6.8.5 AUTO PLAY SET
The AUTO PLAY SET submenu allows setting of the below parameters:
Text
You can choose the auto scroll time when reading text files from 1 to 5 seconds.
- Jpeg:
You can choose the slide show time when viewing photos from 1 to 5 seconds.
6.8.6 SYSTEM Set
The SYSTEM submenu allows setting of the below parameters:
Language:
You can choose the system language.
About
You can check the Firmware Version, Last Update Time and the Memory Status.
6.8.7 POWER OFF TIME Set
You can choose the automatic power off time from 10 minutes, 15 minutes, 30 minutes, 60 minutes or 120 minutes. If you want to disable the automatic power off feature, select "OFF".
7. Computer installation
This chapter describes how to install the Player in your computer system in order to transfer files to the memory device. The following instructions are intended for a PC which the CD-ROM drive is assigned as "D:" If in your computer's CD-ROM drive is assigned a different letter please replace "D:" with the correct one (for example E: or F:). To know the letter assigned to your CD-ROM drive please open "My Computer" or "Windows Explorer".
7.1 Windows® 98 Second Edition - Installation

During the hardware installation wizard, it will request for the Windows® 98 SE CD-ROM. Insert the driver CD provided when requested.
To install the Player in a computer with Windows® 98 SE, please follow here below steps.
- Power ON the computer without the Player connected to the USB port.
- When the operating system is ready insert the driver CD provided in the disk drive, find Driver/ setup.exe and double click it to start installation.
- The installation program will start. Follow the instructions on the screen and when the installation is complete, close the session and restart the PC.
- When the operating system is ready connect the Player to the USB port by using the USB data cable provided. The system will detect the new hardware and it will install the device driver automatically.
- Now, you can browse the Player's memory by using "My Computer" or "Windows Explorer".
7.1.1 Windows® 98 Second Edition - Safely Remove Hardware
The Windows® 98 SE driver will install the Safely Remove Hardware utility in the system tray.
Before disconnecting the Player from the USB port, please follow the below steps.
- Double click the utility available in the system tray.
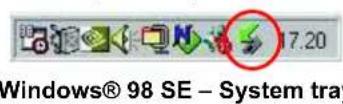
- Select the Player unit then click on the YES button (see the picture 2).
- Now you can disconnect the Player from the computer.
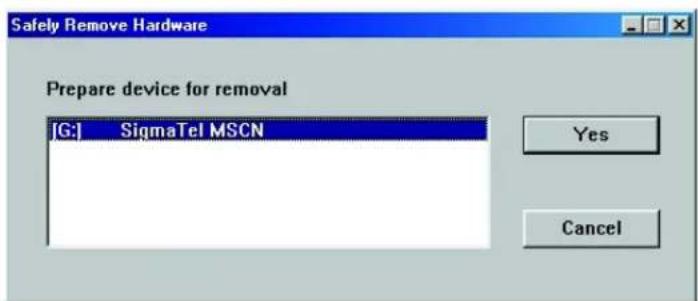
Windows® 98 SE - Hardware Safety Remove
7.2 Windows® ME, Windows® 2000, Windows® XP, Windows® VISTA

- Under Windows® 2000 and Windows® XP, it may necessary to logon the system as "Administrator" or user with administrator rights to install the new hardware. For more information about user accounts, please refer to Windows® documentation or to you network administrator.
To install the Player in a computer with Windows® ME, Windows® 2000 or Windows® XP please follow the below steps.
- Power ON the computer without connecting the Player to the USB port.
- When the operating system is ready connect the Player to the USB port. The system will detect the new hardware and it will install the device driver automatically.
- Now you can browse the Player's memory content by using "My Computer" or "Windows Explorer".
7.3 File transfer
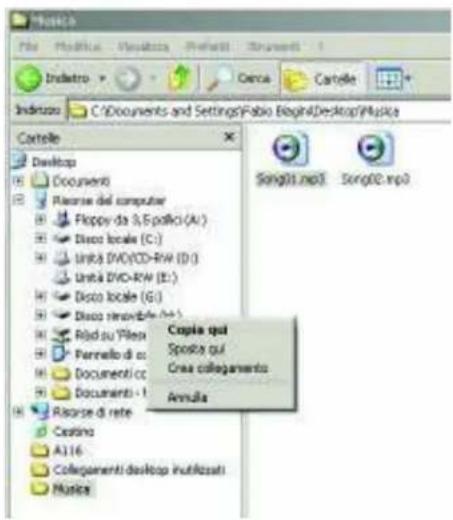
When the Player is connected to the computer, "My Computer" has a new "Removable Disc". This removable disc is the Player. The operating system automatically assigns a drive letter to the removable device (the picture below shows a Player where the operating system has assigned the H: drive letter).
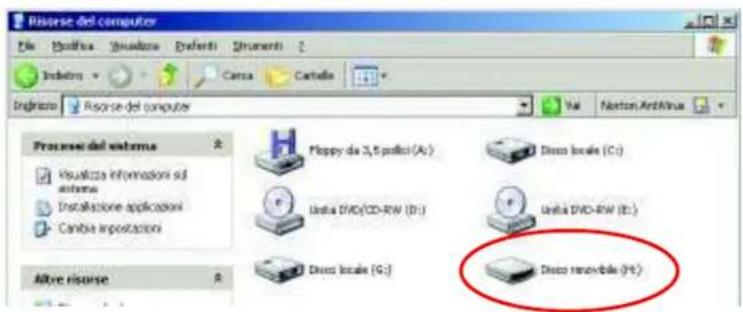
Windows® XP - My Computer
To transfer music files to the Player, please follow the below steps.
- Run "Windows Explorer" or open "My Computer".
- Select the hard disk folder where the music files are located.
- Select the song file and drag the file to the Player drive letter. You can also copy and paste the music file to the Player drive letter.
- Repeat step 3 and for each music file that you want to copy in the Player's memory.
Windows® XP - Windows Explorer

NOTE
- Windows® offers different ways to copy files. For more information please refer Windows® documentation or help on-line.
If you encounter any difficulties, our representatives are ready to help you with any questions about your new product. We can guide you through connections, first-time use, or any of the features. Just give us a call or send us an email.
Customer and technical support 1-888-4KOBIAN or 1-888-456-2426
Monday through Friday: 8:30am - 5pm EST
Email: support@hipstreetonline.com

LECTEUR MP3 VIDÉO
Guide d'utilisation
Table des matieres
6.3 Radio (radio FM) 13