HS2012 - Mp3 player Hipstreet - Free user manual and instructions
Find the device manual for free HS2012 Hipstreet in PDF.
| Product Type | Video MP3 Player |
| Brand | Hipstreet |
| Model | HS2012 |
| Screen | 1.5 inches, 65,000 colors |
| Audio Formats | MP3, WMA, WAV |
| Video Formats | MPEG-4 (AVI) |
| Image Formats | JPEG |
| Voice Recording | Yes, high quality |
| FM Radio | Yes, with station memory |
| A-B Repeat | Yes |
| Equalizer Modes | 6 modes: Normal, 3D, Rock, Pop, Classic, Jazz |
| Power | Built-in rechargeable lithium-ion battery |
| Connectivity | USB 2.0 |
| PC Compatibility | Windows 2000/XP/ME (no driver required) |
| Mobile Storage | Yes |
| 3D Sound | Yes |
| ID3 Tag Display | Yes (title, artist, lyrics) |
| Auto Power Off | Adjustable (10, 15, 30, 60, 120 minutes) |
| Available Languages | 15 |
| Customer Service | 1-888-456-2426 / support@hipstreetonline.com |
Frequently Asked Questions - HS2012 Hipstreet
User questions about HS2012 Hipstreet
0 question about this device. Answer the ones you know or ask your own.
Ask a new question about this device
Download the instructions for your Mp3 player in PDF format for free! Find your manual HS2012 - Hipstreet and take your electronic device back in hand. On this page are published all the documents necessary for the use of your device. HS2012 by Hipstreet.
USER MANUAL HS2012 Hipstreet
Thank you for your purchase of this Hip Street MP3 video player and we hope you enjoy using it. Please visit our website at www.hipstreetonline.com.
The display screen images contained in this user manual are used for identification purposes only; actual display pictures may vary.
Please ensure that you fully read and understand the information with this instruction manual prior to using your product. It is advised that you keep this instruction manual in a safe place for future reference.
This model supports MP3, WAV and AMV files. We sincerely hope that this high quality product offers you endless hours of entertainment.
Note:
- Do not use the unit in places that are extremely hot, cold, dusty, or humid.
- Avoid dropping the unit.
- The battery life may differ under different usage conditions.
- Please charge the unit when any of the following cases occur:
A. Low battery indicator
B. The player continuously turns off automatically
C. The keys become inactive
D. Can't turn on the player
- Do not disconnect the player while it is formatting or uploading/downloading files
- Do not disassemble as this will void the warranty
- Specifications are subject to change and improvement without notice
- While formatting the player, please select the file system as FAT32
- Do not immerse this product in liquids of any kind.
- Do not clean this product with chemical solvents or abrasive material.
Features:
1.5” 65K color display
MP3/WMA/WAV playback
MPEG-4 (AVI) movie function
Support JPEG format picture browsing
High quality voice recording; A-B repeat function
No driver necessary under Windows 2000/XP/ME
Mobile storage function
Support 3D sound
Various EQ modes
ID3 TAG support (title, artist, and lyrics)
Built-in rechargeable Lithium-ion battery
USB 2.0
Unit Diagram:


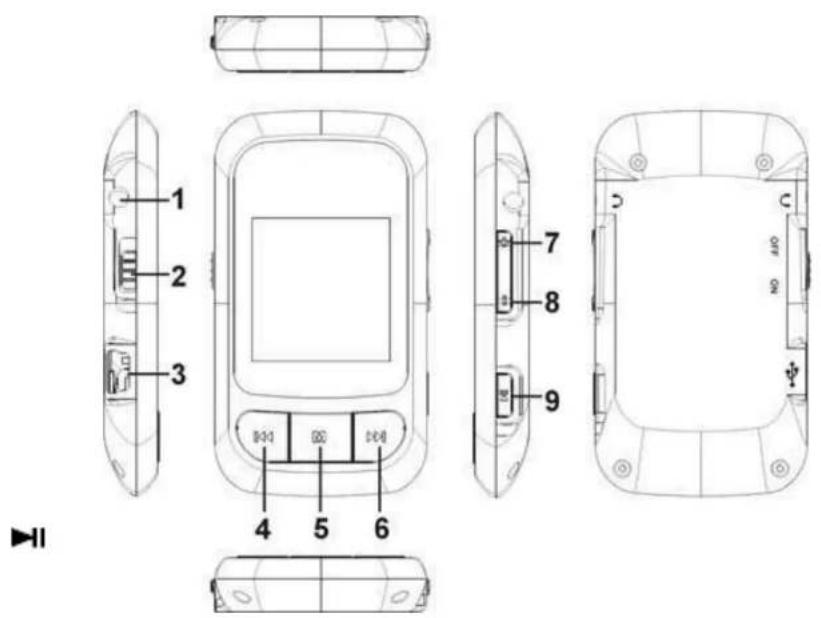
1. Basic operation
1). Power on/off
A). On: Slide the power switch to the "ON" position, and press and hold the "▶" button to turn on the unit. The LCD display will illuminate and the unit will enter the main interface.
B). Off: Press and hold the “▶” button, the player will turn off.
2).Charging
A) With provided USB cable, plug one end into an USB power source and the other into the USB jack of the player. The unit will charge whether it is on or off.
B) When charging through a computer, the player enters into the U-disk mode automatically. Exit the U-disk mode and the player will enter the charging mode.
Note: Do not charge for more than 8 hours. To maintain the life of the battery, only charge when the battery is fully exhausted.
3) Buttons
Under the main interface, press the "+" or "-" to select the menu you want and press the "▶" button to enter. In the various menus, press and hold the "M" button to return to the main interface.
4). FM tuner
The earphone acts as the antenna while listening to FM stations. Please plug the earphone in prior to starting in the FM mode.
2. MusicPlayback
The player allows you to enjoy MP3/WMA music files though its high fidelity sound processor.
1).Playback
Select "Music" in the main menu, and press the "▶" button to enter.
2). Buttons
A). Press "Prev./REW" or "Next/FF" to select audio files.
B). Press the “▶” button to start playback.
C). Press and hold the "M" button to return to the main interface.
3). Volume Adjustment
During playback, press and hold “-” to decrease the volume. Press and hold “+” to increase the volume.
4). Previous file/Next file; FF/RW
Press the “▶” button to skip to the next file and press the “▶” button to skip to the
previous file.
Press and hold "▶" or "▶to FF or RW.
5). Pause
During playback, press the “▶” button to pause and press it again to continue.
6). Play list
"▶" button to enter and start playback.
7). Output EQ Mode Setting:
Press and hold the "M" button to return to the main interface. Select "Settings> Music> EQ Select". EQ includes 6 modes: normal, MS PlayFX, rock, pop, Classic and Jazz. You can choose your setting by pressing the "+" or "-" button. Press the "▶" button to confirm and return.
Press and hold the "M" button to return to the main interface. Select "Settings> Music> Repeat mode". By pressing "+" or "-" button, the play mode will change in the below order: once, repeat 1, Folder once, Folder Repeat, All once, All Repeat and Intro. Press the "▶" button to confirm and return.
Press and hold the "M" button to return to the main interface. Select "Settings> Music> Play mode". By pressing "+" or "-" button, the play mode will change in below order: order and shuffle.
10). A-B repeat
While playing music, press the "+" button one time to set the start point "A", the LCD displays "A-"; press the "+" button again to set the end point "B", the LCD displays "A-B", and the player will start to repeat the chosen section. Press the "+" button a third time to exit.
"A-B" repeat function is not available under pause status.
Note: Under “A-” or “A-B” status, press and hold the “▶” or “▶” button to FF or REW, the A-B repeat will be cancelled.
3. Video Playback
1). Playback
Select "Video" in the main menu and press the button to enter the explorer mode. Select the file you want and press the button to start playback.
2). Buttons
A). Press "+" or "-" to select video files.
B). Press the “▶” button to start playback.
C). Press the "M" button to return to the previous menu.
3). Volume Adjustment
Under playback status, press “-” to decrease the volume. Press “+” to increase the volume.
4). Previous file/Next file; FF/RW
Press the “▶” button to skip to the next file and press the “▶” button to skip to the previous file. Under pause status, press and hold “▶” or “▶” to FF or RW.
5). Pause
Under playback mode, press the “▶” button to pause and press it again to continue.
4. FM tuner:
1). Enter FM tuner:
Select "FM" in the main menu and press the "▶" button to enter.
2). Buttons
A). Press the “▶” button to enter the sub menu.
B). Press "+" or "-" to select function menu.
C). Press the "M" button to return to the main menu.
3).Volume adjustment
Press " - " to decrease the volume. Press " + " to increase the volume.
Press the “▶” button to select “manual”, each time you press the “ or“ ” button the frequency will decrease or increase by 0.1MHz .
Press and hold the or button and the system will search for stations and save them automatically.
5). Auto-searching
Press the “▶” button to enter the sub menu. Select “auto” by pressing “+” or “-” button and then press the “▶” button to confirm. The unit will begin to search all stations and store them automatically. You can turn to the “preset” status to listen to the FM stations after finished searching.
6). Storing
Press the “▶” button to enter sub menu, select “mem” by pressing “+” or “-” button and then press the “▶” button to confirm to save the current station. Press the “▶” button to select the channel of saving the station: CH1, CH2.... Select “Yes” and press the “▶” button to save the station. Press the “M” button to exit.
7). Preset station
Press the “▶” button to enter the sub menu. Select “preset” by pressing “+” or “-” button
and press the “▶” button to confirm to start listening to the preset stations. Press the “▶” or “▶” button to select channels.
8). Delete Stations
Press the “▶” button to enter the sub menu. Select “del” by pressing “+” or “-” button and press the “▶” button to confirm. Press the “▶” button to select the channel want to delete. Select “Yes” and press the “▶” button to confirm. Press the “M” button to exit.
9) FM Recording
A). Enter FM recording: While listening to a FM station, press and hold the "M" button to enter the FM recording function. The LCD displays "Preparing..."
B). Start FM recording: under "Preparing" status, press the "▶" button to start recording, and the LCD will display "Recording..."
C). Pause FM recording: Under "Recording" mode, press the "▶" button to pause, press it again to continue.
D). Save and continue recording: Press the "M" button to save the recorded file, and skip to the FM recording status again.
E). Save and exit recording: Press and hold the "M" button to save the recorded file and exit FM recording.
5. Picture display
1). Enter Picture display: Select "Photo" in the main menu and press the "▶" button. The player enters the browser status. You can select the picture you want and view in full screen.
A). Press the "+" or "-" button to select the picture you want to display.
B). When the file is selected, press the “▶” button to view it in full screen.
While browsing pictures, press the “▶” button to auto view.
C). Press the “▶” or “ 串 button to skip to the next or previous picture.
D). Press the "M" button to return to the picture browser.
E). Press and hold the "M" button to exit and return to the main interface.
6. E-book
1) Enter E-book: Select "Text" in the main interface and press the "▶" button to enter. It displays the E-book file list.
(2). Reading E-book:
A). Press the "+" or "-" button to select the file you want.
B). Press the “▶” button to start reading.
C). Press the "+" or "-" button to skip to the next or previous page.
D). Press and hold the “ ” button to display the “save bookmark” list. Press the “+” or “-” button to select the bookmark, and press the “M” button to save.
F). Press and hold the “▶” button to display the “load bookmark” list. Press the “+” or “-” button to select the bookmark, and press the “M” button to load it.
G). While reading the E-book, press the "M" button to return to the file list. Press and hold the "M" button to exit.
Note: The bookmark is only available to the current file, and has to be re-set while reading other files.
7. Voice recording:
1). Enter recording: Under the main interface, select "Record" menu and press the button to enter.
2). Start recording: After entering the recording interface, the LCD will display "Prepare..." Press the "▶" button to start recording.
3). Pause recording: During "Recording", press the "▶" button to pause and press it again to continue.
4). Save and continue recording: Press the "M" button to save the recorded file, and skip to
the recording status again.
5). Save and exit recording: Press and hold the "M" button to save the recorded file and exit recording.
6). Play recorded file:
A). Enter the "Music" menu and press the "M" button to display the file list.
B). Press the "+" or "-" button to select the "VOICE" folder.
C). Press the “ ” button to enter and press the “+” or “-” button to select the file you wish to play.
D). Press the “▶” button to start playback.
8. Navigation
1). Enter Navigation: Select "Navigation" in the main menu, and press the "▶" button to enter.
2) File list: List all of the files of the player in Navigation.
3). Select Files:
A). Press "+" or "-" to select the folder or file.
B). Press the "▶" button to enter. The player enters the corresponding function interface. If the file is not recognized, there will be no response.
C). Press and hold the "M" button to return to the main menu.
4). Delete files:
A). Delete files: press and hold the button after you selected the file you want to delete, a dialog box pops up. Press or "to select "Yes" and press the button to confirm the delete.
B). Press and hold the "M" button to exit.
9. Settings
1). Enter Setting menu: Select "Settings" under the main menu, and press the "M" button to enter.
2). Buttons:
A). Press "+" or "-" to select the items.
B). Press the “▶” button to enter.
C). Press the "M" button to return to the previous menu.
D). Press and hold the "M" button to return to the main interface.
3). Music playback settings:
There are five options under this menu: Repeat Mode Setting, Play Mode Setting, EQ selection, User EQ and Speaker setting.
A). Repeat Mode Setting: Includes once, repeat 1, Folder once, Folder Repeat, All once,
All Repeat and Intro.
B). Play Mode Setting: Includes order and shuffle.
C). EQ Selection: Includes normal, 3D, rock, pop, Classic, Bass and Jazz.
D). User EQ set: five frequencies and 7 levels to adjust in each frequency
4). Record setting:
In this setting there are two options: record quality and record volume.
A). Record quality:
In this menu, there are two options: high quality and general quality.
B). Record volume:
In this menu, there are five options to be selected: +1 , +2 , +3 , +4 , +5 . The higher the level is, the louder the record volume will be.
5). Auto Browse:
To set the time of auto playing while viewing pictures or text.
6). Display setting:
In this menu there are three options: backlight time, lum and Backlight mode.
A).Backlight time:
In this menu there are 6 options to be selected: 5 seconds, 10 seconds, 15 seconds,
20seconds, 30 seconds and always on.
B). Lum:
In this menu, there are five options: 1, 2, 3, 4 and 5. The higher the level, the brighter it will be.
C).Backlight mode:
In this menu, there are two options: normal and power save.
7). System:
In this menu, there are three options to be selected: about, upgrade and default.
A). About
Press the “▶” button and the following information is displayed: the storage capacity, remaining capacity and system software version which is read only.
Press the “▶” button to exit.
B). Firmware upgrade:
In this menu pop up dialog box, press or to select "Yes"or"Cancel",and then press the button, connect the player with the PC via the USB provided and the system will enter the firmware upgrading status.
C). Default set:
Select this item and a dialog box will pop up. Press "▶" or "▶to select "Yes" and press
the “▶” button to confirm. The player will return to all factory default settings.
8). Power off time:
In this menu, there are six options to be selected: OFF, 10 minutes, 15 minutes, 30 minutes, 60 minutes and 120 minutes.
9) Language:
There are 15+ languages for you to select.
9. Converting a Video File
The Converter software needs the basic configuration as follows:
Operation steps:
1). Run convert tools in the attaché disc and install AVIConverter;
2). After the installation is completed, run the AVICoverter in the start menu;
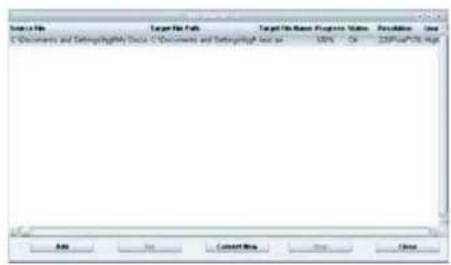
3). Show the interface.
Operation steps:
A). Add a converted file and select source file path, as shown in the picture below:
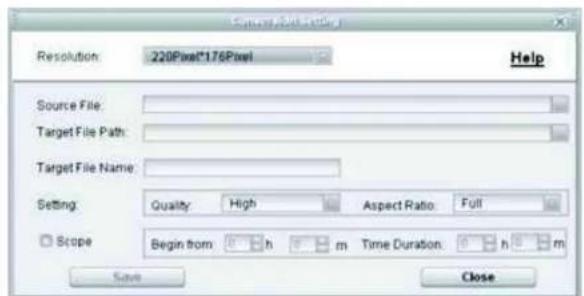
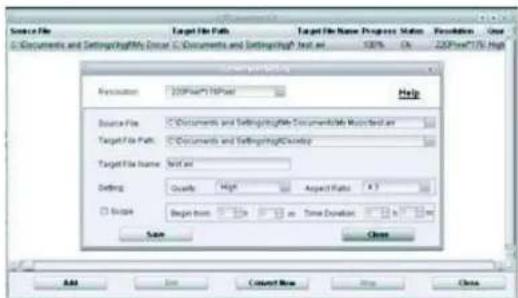
B). Select the target file path and press the key in the right of the target file.
C). Select the convert quality and aspect ratio.
D). After you set each parameter, press the "Save" key and continue to add a converted file or press the "End" key to return previous interface.
E). Press to start converting.
Use the USB cable to transfer the file to the player.
13. Specification
| Display 1.5 inch 65K color LCD | ||
| Connect with PC USB2.0 (HIGH SPEED) | ||
| Power source Built-in | Lithium batter y | |
| Recording | Sampling rate 8KHz/16KHz | |
| Recording format WAV | (32K bps/64Kbps) | |
| Recording | ||
| R m | ||
| MP3 bit rate 8K b | ps - 320K bps | |
| WMA bit rate 32K b | ps - 384K bps | |
| Frequency response 20Hz to 20KHz | ||
| FM tuner(Optional) | Frequency range 76MHz-90MHz/87.5MHz-108MHz | |
| Number of saved stations 20+20 | ||
| Earphone Max output (L)5mW+(R)5mW(32 ohm) | ||
| Operating temperature | -5 – 40 °C | |
| Language | English, French, Spanish, etc. (15+ Languages) | |
| OS | Windows98/SE/ME/2K/XP, MAC OS 10+ | |
Need assistance? Please call us!
If you encounter any difficulties with this product, please visit our website at www. hipstreetonline.com and review our support section or call us. Our representatives are ready to help you with any questions about your product. We can guide you through connections, first-time use, or any of the features. Just give us a call or send us an email.
Customer & Technical Support: 1-888-4KOBIAN or 1-888-456-2426 Monday through Friday: 8:30am - 5:00pm EST Email: support@hipstreetonline.com
We want you to start enjoying your product right away!

HIP STREET®
Guide d'utilisation
HS-2012
Lecteur MP3 video
| Display | .5 inch 65K color LCD | |
| Connect with PC USB2.0 (HIGH SPEED) | ||
| Power source Built-in Lithium batter | y | |
| Recording | Sampling rate 8KHz/16KHz | |
| Recording format WAV(32K bps/64Kbps) | ||
| Recording | ||
| MP3 bit rate 8K bps - 320K bps | ||
| WMA bit rate | 32K bps - 384K bps | |
| Frequency response | 20Hz to 20KHz | |
| FM tuner(Optional) | Frequency range | 76MHz-90MHz/87.5MHz-108MHz |
| Number of saved stations | 20+20 | |
| Earphone Max output | (L)5mW+(R)5mW(32 ohm) | |
| Operating temperature -5 - 40 °C | ||
| Language | English, French, Spanish, etc. (15+ Languages) | |
| OS Windows98/NE/ME/2K/NP, MAC OS 10+ | ||