SAS 7.4 LI A2 - Handheld vacuum SILVERCREST - Free user manual and instructions
Find the device manual for free SAS 7.4 LI A2 SILVERCREST in PDF.
Frequently Asked Questions - SAS 7.4 LI A2 SILVERCREST
Download the instructions for your Handheld vacuum in PDF format for free! Find your manual SAS 7.4 LI A2 - SILVERCREST and take your electronic device back in hand. On this page are published all the documents necessary for the use of your device. SAS 7.4 LI A2 by SILVERCREST.
USER MANUAL SAS 7.4 LI A2 SILVERCREST
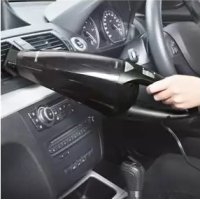
BURGSTRASSE 21 44867 BOCHUM GERMANY www.kompernass.com IAN 96715 IB_96715_SAS7.4LIA1_LB2.qxp 13.02.2014 14:22 Uhr Seite 19- 20 - IB_96715_SAS7.4LIA1_LB2.qxp 13.02.2014 14:22 Uhr Seite 20- 21 - Content Page Intended Usage 22 Items supplied 22 Appliance description 22 Important safety instructions 23 Technical data 25 Before taking into use 25 Information about the batteries 25 Installation of the wall holder 25 Charging 26 Operation 26 Cleaning 27 Disposal 27 Warranty and Service 28 Importer 28 IB_96715_SAS7.4LIA1_LB2.qxp 13.02.2014 14:22 Uhr Seite 21- 22 - Li-Ion Rechargeable Handheld Vacuum Cleaner Congratulations on the purchase of your new appliance. You have clearly decided in favour of a quality pro- duct. These operating instructions are a part of this product. They contain important information in regard to safety, use and disposal. Before using the product, familiarise yourself with all of these operating and safety instructions. Use the product only as described and only for the specified areas of application. In ad- dition, pass these documents on, together with the product, to any future owner. Intended Usage This cordless hand-held vacuum cleaner may only be used to vacuum dry or wet surfaces resp. dry or wet materials and fluids. People or animals may not be vacuumed with this appliance. Any other usage of, or modification to, the appliance is deemed to be improper usage and carries the risk of serious per- sonal injury. The manufacturer accepts no liability for damages that result from improper use of the ap- pliance or are caused by the incorrect operation of it. The appliance is not intended for commercial use. Items supplied Li-Ion Rechargeable Handheld Vacuum Cleaner Crevice nozzle Wet suction nozzle Wall holder Assembly material Power transformer Operating instructions Check the items supplied directly after unpacking for completeness. Appliance description 1 Wet suction nozzle 2 Crevice nozzle 3 Wall holder 4 Power adapter 5 Barrel plug 6 On/Off switch 7 Charge indicator lamp 8 Unlocking button 9 Dust filter bag 0 Dust filter q Dirt container Note: This appliance is supplied with non-charged batteries. The batteries must be charged for 24 hours before the first use. IB_96715_SAS7.4LIA1_LB2.qxp 13.02.2014 14:22 Uhr Seite 22- 23 - Important safety instructions To avoid potentially fatal electric shocks:
- Do not charge or use the appliance outdoors.
- Never use the hand vacuum cleaner if the cable, plug or casing are damaged.
- To avoid risks, arrange for damaged power cables and/or plugs to be replaced as soon as possible by a qualified specialist or by our Customer Services.
- Arrange for repairs to be carried out only by specialist workshops. Under no circumstances should you open the appliance yourself. Interferences that are not carried out by a specialist workshop could lead to physical injuries.
- Before switching the hand vacuum cleaner on, ensure that the mains voltage corresponds to the voltage indicated in the technical data for the appliance.
- Never touch the power supply or the appliance with wet or damp hands.
- Do not use the power adapter with an extension cable; connect the power adapter directly to a power socket. To avoid the risk of injury:
- Do not change any accessories while the appliance is switched on.
- Do not use the hand vacuum for vacuuming up sharp objects or glass shards.
- Never vacuum up burning matches, glowing ashes or cigarette butts.
- Do not use the hand vacuum for vacuuming up chemical products, stone dust, gypsum, cement or similar particles.
- This appliance is not suitable for use with inflammable and explosive substances or chemical and aggressive liquids.
- Always store the appliance indoors. To prevent accidents, keep the appliance in a dry location when not in use.
- Under extreme conditions, leaks in the battery cells may occur. In the event that battery fluid comes into contact with skin or eyes, the affected area must be rin- sed off with water immediately. Contact a physician. IB_96715_SAS7.4LIA1_LB2.qxp 13.02.2014 14:22 Uhr Seite 23- 24 -
- This appliance may be used by children aged 8 over and by persons with reduced physical, sensory or mental capabilities or lack of experience and knowledge, provided that they are under supervision or have been told how to use the appliance safely and are aware of the potential risks. Children must not play with the appliance. Cleaning and user maintenance tasks may not be carried out by children unless they are supervised. Tips for safety:
- Use only accessory parts recommended by the manufacturer.
- The power adapter may not be used for other purposes. Never carry the wall holder or the power adapter by the cable. Do not pull on the cable when you want to move the appliance.
- Always grip the power plug to disconnect the appliance from the power supply.
- Always be sure to keep the hand vacuum away from heating elements, ovens or other heated appliances and surfaces.
- Always make certain that the ventilation slits are open. A blocked ventilation circuit can result in overheating and damage to the appliance.
- This product contains rechargeable batteries. Do not thow the batteries into a fire and do not subject them to high temperatures. There is the risk of an explosion!
- Take special care when using the hand vacuum on stairs.
- Do not use the hand vacuum without the dust filter inserted.
- Do not use the power adapter for a different product and do not attempt to charge this appliance with a different charging station. Use only the charging station supplied with this appliance.
- Remove all packaging materials from the applian- ce, particularly the protective cap over the On/Off switch 6.
- Place the dirt container q onto the motor block:
- Slide the plastic tab on the underside of the handheld vacuum cleaner into the recess in the dirt container q.
- Press the unlocking button 8 and slide the dirt container q onto the motor block at the same time.
- Let go of the unlocking button 8 so that the lok- king mechanism engages in the recess. The dirt container q is now sitting securely on the motor block. Information about the batteries
1. This hand-held vacuum cleaner is powered by
rechargeable lithium-ion batteries. Before using the cableless hand vacuum cleaner for the first time, the batteries must be charged for at least 24 hours.
2. The batteries reach their full capacity after a
charging period of 24 hours. For care of the bat- teries we recommend the following: after the bat- teries are charged, remove the power adapter 4 from the mains power socket. Reconnect the power adapter 4 again with the mains power socket when the suction power of the appliance is noticeably weaker. Installation of the wall holder Mortal danger! Ensure that there are no power cables or other con- duits or pipes in the wall at the location where you intend to bore the holes for the wall holder 3. It would be a potentially fatal risk to bore into a current carrying electric cable!
1. Place the barrel plug 5 of the power adapter 4
into the wall holder 3 as shown in the diagramme. Secure the barrel plug 5 by turning it. IB_96715_SAS7.4LIA1_LB2.qxp 13.02.2014 14:22 Uhr Seite 25- 26 -
2. Select a suitable installation location for the wall
holder 3: It should present no problem with taking the hand vacuum cleaner out of it and a mains power socket for the power adapter 4 must be accessible.
3. Bore two holes with a spacing of approx. 68 mm.
Use the wall holder 3 to mark the boreholes: this will ensure the spacing is correct. The bore- holes must be suitable for 5 mm wallplugs.
4. Insert the wallplugs into the boreholes and, using the
screws, firmly screw the wall holder 3 to the wall.
5. You can place the nozzles on the lateral acces-
6. Connect the power adapter 4 to a mains power
socket. Charging Note: Check to ensure that the on/off switch 6 has been slid back (to the position "0") before starting the charging process.
- Place the hand vacuum cleaner from above into the wall holder 3, so that the barrel plug 5 slips into the socket on the hand vacuum cleaner. The charge indicator lamp 7 flashes red and the charging process begins. Important:
- When the hand vacuum again has enough ener- gy to vacuum, the charge indicator lamp 7 glows green. This does not mean that the batte- ries are fully charged. When the charge indica- tor lamp 7 glows green, it means the batteries are charged to about 80%.
- When charging is complete, which with fully discharged batteries can take approx. 5 hours, the appliance automatically switches to a trickle charge (maintenance function). Nevertheless, in order to avoid possible damage to the batteries, do not leave the appliance permanently con- nected to the power adapter 4.
- First recharge the batteries when the suction power of the hand vacuum cleaner is noticeably weaker and the charge indicator lamp 7 green is blinking. Note: The hand vacuum cleaner can also be charged directly via the power adapter 4. For this, remove the barrel plug 5 with a slight twist from the wall holder 3 and insert it into the socket on the hand vacuum cleaner. Operation Warning! The suction opening must always be open and unblocked. Blockages lead to overheating and da- mage to the motor. Tips:
- Make certain that the dust filter 0 is always inserted before using the appliance.
- As the maximum, suck up only as much liquid as will fill the dirt container q to the MAX mark.
1. Take the hand vacuum cleaner from the wall hol-
der 3 or, if you do not use the wall holder 3, remove the barrel plug 5 from the socket.
2. If required, place the appropriate nozzle into the
- the crevice nozzle 2, to clean narrow and difficult to reach locations.
- the wet suction nozzle 1 to vacuum liquids up. IB_96715_SAS7.4LIA1_LB2.qxp 13.02.2014 14:22 Uhr Seite 26- 27 - Note: After you have vacuumed up liquids, immediately clean the dirt container q. Otherwise bacteria and microbes could form in it! Ensure that the dust filter bag 9 is completely dry before using the appliance again.
3. To switch the appliance on, slide the on/off
switch 6 forwards. The charge indicator lamp 7 lights up green.
4. When you have finished using it, slide the on/
off switch 6 to the rear. Note: Place the hand vaccum cleaner into the wall holder 3 and start the charging process when the suction power is noticeably weaker and the charge indicator lamps 7 green is blinking. Cleaning To achieve the best results, empty the dirt container q and clean the dust filter 0 after every use. Important: Do not use aggressive, chemical or abrasive cleaning agents. These could damage the surfaces of the ap- pliance.
2. Remove the dust filter 0 from the dirt container q.
3. Empty the dirt container q.
4. Pull the dust filter bag 9 with its mounting out of
5. Rinse the dust filter bag 9 in cold water and
then wait until it is completely dry again before you place it back into the dust filter 0. Do not dry it with hot air.
6. Place the dust filter 0 back into the dirt contai-
ner q. Ensure that the dust filter 0 is seated squarely and that the rubber lip seals the dirt container q.
- Push the plastic nose on the underside of the hand vacuum cleaner into the recess on the dirt container q.
- Press the unlocking button 8 and, at the same time, slide the dirt container q onto the motor block.
- Release the unlocking button 8 so that the restraint grips into the recess. The dirt contai- ner q now sits firmly on the motor block.
8. Clean the housing and both nozzles with a lightly
moistened cloth. For stubborn soiling use a mild detergent on the cloth.
9. Dry all parts thoroughly before reusing the ap-
pliance or putting it into storage. Disposal The appliance and the batteries must be disposed of separately. Disposal of the device Do not dispose of this appliance in your normal domestic waste. This product is subject to the provisions of European Directive 2012/19/EU. Dispose of the appliance through an approved dis- posal centre or at your community waste facility. Observe the currently applicable regulations. In a case of doubt, please contact your waste dispo- sal centre. IB_96715_SAS7.4LIA1_LB2.qxp 13.02.2014 14:22 Uhr Seite 27- 28 - Disposal of batteries/cells Used batteries/cells may not be disposed of in house-hold waste. Every consumer is statutorily obliged to dispose of batteries at a collection site of his community/city district or at a retail store. The purpose of this obligation is to ensure that batteries are disposed of in a non-polluting manner. Only dispose of batteries/cells when they are fully discharged. To dispose of the appliance in an environmentally friendly manner you must remove the battery from the appliance. Risk of electric shock! Disconnect the appliance from the mains power supply when you remove the battery! Attention! Damage to property! Remove the battery from the appliance ONLY if you want to scrap/dispose of the appliance! The appliance is permanently defective after you have removed the battery!
1. Remove the dirt container q from the motor unit.
2. Undo the 4 cross-head screws on the side of the
motor unit and the cross-head screw on the round grill on the motor unit.
3. You can now dismantle the motor unit.
4. Snip the 3 cables connecting the printed circuit
board to the blue battery pack. You can now re- move the battery.
5. Dispose of the battery in an environmentally
friendly manner. Please observe the currently applicable regulations. Please contact your waste disposal centre if you are in any doubt. Dispose of all packaging materials in an environmentally friendly manner. Warranty and Service The warranty for this appliance is for 3 years from the date of purchase. The appliance has been ma- nufactured with care and meticulously examined before delivery. Please retain your receipt as proof of purchase. In the event of a warranty claim, please make contact by telephone with our Service Department. Only in this way can a post-free despatch for your goods be assured. The warranty covers only claims for material and mau- facturing defects, but not for transport damage, for wearing parts or for damage to fragile components, e.g. buttons or batteries. This product is for private use only and is not intended for commercial use. The warranty is void in the case of abusive and impro- per handling, use of force and internal tampering not carried out by our authorized service branch. Your statutory rights are not restricted in any way by this warranty. The warranty period will not be extended by repairs made under warranty. This applies also to replaced and repaired parts. Any damage and defects extant on purchase must be reported immediately after un- packing the appliance, at the latest, two days after the purchase date. Repairs made after the expiration of the warranty period are subject to payment. Service Great Britain Tel.: 0871 5000 720 (£ 0.10/Min.) E-Mail: kompernass@lidl.co.uk Hotline availability: Monday to Friday 08:00 - 20:00 (CET) Importer