FA50023 - Microwave Oven First Austria - Free user manual and instructions
Find the device manual for free FA50023 First Austria in PDF.



Frequently Asked Questions - FA50023 First Austria
User questions about FA50023 First Austria
0 question about this device. Answer the ones you know or ask your own.
Ask a new question about this device
Download the instructions for your Microwave Oven in PDF format for free! Find your manual FA50023 - First Austria and take your electronic device back in hand. On this page are published all the documents necessary for the use of your device. FA50023 by First Austria.
USER MANUAL FA50023 First Austria
Thank you for buying an ORIGINAL Product of FIRST AUSTRIA® Only GENUINE with this T2S
FRANÇAIS ...... PAGE 79 ESPANO ..... PÁGINA 87 الصنة ..... العربية
Please read these instructions carefully before installing and operating the oven. Keep them for further reference.
PRECAUTIONS TO AVOID POSSIBLE EXPOSURE TO EXCESSIVE MICROWAVE ENERGY
a) Do not attempt to operate this oven with the door open since open-door operation can result in harmful exposure to microwave energy. It is important not to defeat or tamper with the safety interlocks.
b) Do not place any object between the oven front face and the door or allow soil or cleaner residue to accumulate on sealing surfaces.
c) Do not operate the oven if it is damaged. It is particularly important that the oven door close properly and that there is no damage to the:
- Door (bent),
- Hinges and latches (broken or loosened),
- Door seals and sealing surfaces.
d) The oven should not be adjusted or repaired by anyone except properly qualified service personnel.
SPECIFICATIONS
Power Consumption: 230V \~ 50Hz · max. 1200W, 700W (Microwave), 900W (Griller)
Output: 700W
Operation Frequency: 2450MHz
Outside Dimensions: 262mm (H) x 452mm (W) x 356mm (D)
Oven Cavity Dimensions: 196mm (H) x 315mm (W) x 297mm (D)
Oven Capacity: 20 Litres
Cooking Uniformity: Turntable System Net Weight: Approx. 11.2kg
Net Weight. Approx. 11.3kg
INSTALLATION
- Make sure that all the packing materials are removed from the inside of the door.
- Check the oven for any damage, such as misaligned or bent door, damaged door seals and sealing surface, broken or loose door hinges and latches and dents inside the cavity or on the door. If there is any damage, do not operate the oven and contact a qualified service personnel.
- This microwave oven must be placed on a flat, stable surface to hold its weight and the heaviest food likely to be cooked in the oven.
- Do not place the oven where heat, moisture or high humidity are generated, or near combustible materials.
- For correct operation, the oven must have sufficient airflow. Allow 20cm of space above the oven, 10cm at back and 5cm at both sides. Do not cover or block any openings on the appliance. Do not remove feet.
- Do not operate the oven without glass tray, roller support, and shaft in their proper positions.
- Make sure that the power supply cord is undamaged and does not run under the oven or over any hot or sharp surface.
- The socket must be readily accessible so that it can be easily unplugged in an emergency.
- Do not use the oven outdoors.
GROUNDING INSTRUCTIONS
This appliance must be grounded. This oven is equipped with a cord having a grounding wire with a grounding plug. It must be plugged into a wall receptacle that is properly installed and grounded. In the event of an electrical short circuit, grounding reduces risk of electric shock by providing an escape wire for the electric current. It is recommended that a separate circuit serving only the oven be provided. Using a high voltage is dangerous and may result in a fire or other accident causing oven damage.
WARNING: Improper use of the grounding plug can result in a risk of electric shock.
Notes:
- If you have any questions about the grounding or electrical instructions, consult a qualified electrician or service person.
- Neither the manufacturer nor the dealer can accept any liability for damage to the oven or personal injury resulting from failure to observe the electrical connection procedures.
The wires in this mains cable are colored in accordance with the following code:
Green and Yellow = EARTH
Blue = NEUTRAL
Brown = LIVE
RADIO INTERFERENCE
- Operation of the microwave oven can cause interference to your radio, TV or similar equipment.
- When there is interference, it may be reduced or eliminated by taking the following measures:
a) Clean door and sealing surface of the oven.
b) Reorient the receiving antenna of radio or television.
c) Relocate the microwave oven with respect to the receiver.
d) Move the microwave oven away from the receiver
e) Plug the microwave oven into a different outlet so that microwave oven and receiver are on different branch circuits.
IMPORTANT SAFETY INSTRUCTIONS
When using electrical appliance basic safety precautions should be followed, including the following:
WARNING: To reduce the risk of burns, electric shock, fire, injury to persons or exposure to excessive microwave energy:
-
Read all instructions before using the appliance.
-
Use this appliance only for its intended use as described in this manual. Do not use corrosive chemicals or vapors in this appliance. This type of oven is specifically designed to heat, cook or dry food. It is not designed for industrial or laboratory use.
- Do not operate the oven when empty.
- Do not operate this appliance if it has a damaged cord or plug, if it is not working properly or if it has been damaged or dropped.
- WARNING: Only allow children to use the oven without supervision when adequate instructions have been given so that the child is able to use the oven in a safe way and understands the hazards of improper use.
- To reduce the risk of fire in the oven cavity:
a) When heating food in plastic or paper container, check the oven frequency to the possibility of ignition. b) Remove wire twist-ties from paper or plastic bags before placing bag in oven.
c) If smoke is observed, switch off or unplug the appliance and keep the door closed in order to stille any flames.
d) Do not use the cavity for storage purposes. Do not leave paper products, cooking utensils or food in the cavity when not in use. - WARNING: Liquid or other food must not be heated in sealed containers since they are liable to explode.
- Microwave heating of beverage can result in delayed eruptive boiling, therefore care has to be taken whe handle the container.
- Do not fry food in the oven. Hot oil can damage oven parts and utensils and even result in skin burns.
- Eggs in their shell and whole hard-boiled eggs should not be heated in microwave ovens since they may explode even after microwave heating has ended.
- Pierce foods with heavy skins such as potatoes, whole squash, apples and chestnuts before cooking.
- The contents of feeding bottles and baby jars should be stirred or shaken and the temperature should be checked before serving in order to avoid burns.
- Cooking utensils may become hot because of heat transferred from the heated food. Potholders may be needed to handle the utensil.
- Utensils should be checked to ensure that they are suitable for use in microwave oven.
- WARNING: It is hazardous for anyone other than a trained person to carry out any service or repair operation which involves the removal of any cover which gives protection against exposure to microwave energy.
- This product is a Group 2 Class B ISM equipment. The definition of Group 2 which contains all ISM (Industrial, Scientific and Medical) equipment in which radio-frequency energy is intentionally generated and/or used in the form of electromagnetic radiation for the treatment of material, and spark erosion equipment.
For Class B equipment is equipment suitable for use in domestic establishments and in establishments directly connected to a low voltage power supply network which supplies buildings used for domestic purpose.
- This appliance is not intended for use by persons (including children) with reduced physical, sensory or mental capabilities, or lack of experience and knowledge, unless they have been given supervision or instruction concerning use of the appliance by a person responsible for their safety.
- Children should be supervised to ensure that they do not play with the appliance.
-
WARNING: When the appliance is operated in the combination mode, children should only use the oven under adult supervision due to the temperatures generated.
-
The microwave oven is only used in freestanding.
- WARNING: Do not install oven over a range cooktop or other heat-producing appliance. If installed could be damaged and the warranty would be avoid.
- The accessible surface may be hot during operation.
- The microwave oven shall not be placed in a cabinet.
- The door or the outer surface may get hot when the appliance is operating.
- The temperature of accessible surfaces may be high when the appliance is operating
- The appliance shall be placed against a wall
- WARNING: If the door or door seals are damaged, the oven must not be operated until it has been repaired by a competent person.
- The instructions shall state that appliances are not intended to be operated by means of an external timer or separate remote-control system.
- The microwave oven is for household use only and not for commercial use.
- Never remove the distance holder in the back or on the sides, as it ensures a minimum distance from the wall for air circulation.
- Please secure the turn table before you move the appliance to avoid damages.
- CAUTION: It is dangerous to repair or maintain the appliance by no other than a specialist because under these circumstances the cover have to be removed which assures protection against microwave radiation. This applies to changing the power cord or the lighting as well. Send the appliance in these cases to our service centre.
- The microwave oven is intended for defrosting, cooking and steaming of food only.
- Use gloves if you remove any heated food.
- CAUTION! Steam will escape, when opening lids or wrapping foil.
- This appliance can be used by children aged from 8 years and above and persons with reduced physical, sensory or mental capabilities or lack of experience and knowledge. If they have been given supervision or instruction concerning use of the appliance in a safe way and understand the hazards involved. Children shall not play with the appliance. Cleaning and user maintenance shall not be made by children unless they are aged from 8 years and above and supervised.
- If smoke is emitted, switch off or unplug the appliance and keep the door closed in order to stifle
MICROWAVE COOKING PRINCIPLES
-
Arrange food carefully. Place thickest areas towards outside of dish.
-
Watch cooking time. Cook for the shortest amount of time indicated and add more as needed. Food severely overcooked can smoke or ignite.
-
Cover foods while cooking. Covers prevent spattering and help foods to cook evenly.
-
Turn foods over once during microwaving to speed cooking of such foods as chicken and hamburgers. Large items like roasts must be turned over at least once.
-
Rearrange foods such as meatballs halfway through cooking both from top to bottom and from the center of the dish to the outside.
UTENSILS GUIDE
-
The ideal material for a microwave utensil is transparent to microwave, it allows energy to pass through the container and heal the food.
-
Microwave can not penetrate metal, so metal utensils or dishes with metallic trim should not be use.
-
Do not use recycled paper products when microwave cooking, as they may contain small metal fragments which may cause sparks and/or fires.
-
Round/oval dishes rather than square/oblong ones are recommend, as food in corners tends to overcook.
-
Narrow strips of aluminum foil may be used to prevent overcooking of exposed areas. But be careful don't use too much and keep a distance of 1 inch (2.54cm) between foil and cavity.
The list below is a general guide to help you select the correct utensils.
| Cookware | Microwave Cooking | Grill Cooking | Combination Cooking |
| Heat-Resistant Glass | Yes | Yes | Yes |
| Non Heat-Resistant Glass | No | No | No |
| Heat-Resistant Ceramics | Yes | Yes | Yes |
| Microwave-Safe Plastic Dish | Yes | No | No |
| Kitchen Paper | Yes | No | No |
| Metal Tray | No | Yes | No |
| Metal Rack | No | Yes | No |
| Aluminum Foil & Foil Containers | No | Yes | No |
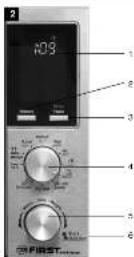
CONTROL PANEL (fig. 2)
1. MENU ACTION SCREEN
Cooking time, power, action indicators, and clock time are displayed.
2. MEMORY
Press the button to set multi-stage cooking program
3. PAUSE/CANCEL
- Press to cancel setting or reset the oven before setting a cooking program.
- Press once to temporarily stop cooking, or twice to cancel cooking altogether.
- It is also used for setting child lock.
4. MULTI-FUNCTIONAL KNOB
- Turn the knob to select one of five microwave power levels.
• Turn the knob to CLOCK to set clock time.
- Turn the knob to PRESET to set preset function.
• Turn the knob to COMBI. to set one of two combination cooking program.
• Turn the knob to GRILL to set grill cooking program.
• Turn the knob to DEODORIZE to set deodorize function.
5. MENU/TIME/WEIGHT (KNOB)
Turn the knob to enter time or weight or select menus.
6. START/QUICKSTART (MENU/TIME/WEIGHT knob)
- Press the knob to start a program.
- Press the knob repeatedly to set quick start function,
HOW TO SET THE OVEN CONTROLS
Each time a button is pressed, a beep will sound to acknowledge the press.
After a program total time elapsed, the system will sound beeps with END on display. Press PAUSE/CANCEL button or open door to clear it before programming another function.
SETTING DIGITAL CLOCK
With the oven ready for input, turn the multi-functional knob to CLOCK, then turn the MENU/TIME/WEIGHT knob once, the display show Hr 12, the clock is in 12-hour cycle, then press the knob once, the display show Hr24, the clock is in 24-hour cycle.
FOR EXAMPLE: Suppose you want to set the oven clock time to 8:30.
-
Turn the MULTI-FUNCTIONAL KNOB to CLOCK.
-
Turn MENU/TIME/WEIGHT knob clockwise for one-scale to show Hr12, then press the knob repeatedly to select Hr24 cycle or Hr12 cycle.
-
Turn the MENU/TIME/WEIGHT knob to set hour digit 8.
-
Press the START/QUICK START to confirm.
-
Turn the MENU/TIME/WEIGHT knob to set minute digit 30
-
Press the START/QUICK START to confirm the setting.
MICROWAVE COOKING
To cook with microwave power alone, Turn the MULTI-FUNCTIONAL knob to one of live microwave power levels, and then use the MENU/TIME/WEIGHT knob to set a desired cooking time. The longest cooking time is 95 minutes.
For example, suppose you want to cook for 5 minute at 60% of microwave power.
- Turn the MULTI-FUNCTIONAL knob to MEDIUM.
Turn the MULTI-FUNCTIONAL knob Cooking power
LOW 20%
M.LOW 40%
MEDIUM 60%
HIGH
100%
-
Turn the MENU/TIME/WEIGHT knob to 5:00.
-
Press the START/QUICK START to start
QUICK START
This feature allows you to start the oven quickly at full power.
Press the START/QUICK START a number of times to set the cooking time, the oven starts work at full power
level immediately. The longest cooking time is 10 minutes.
You can add cooking time by pressing START/QUICK START during cooking.
AUTO DEFROST
This function allows the oven defrost food based on the weight entered. The time and the defrosting power are adjusted automatically once the weight is programmed. The range weight of frozen foods varies between 100g and 1800g.
FOR EXAMPLE: Suppose you want to defrost 600g of shrimp.
-
Place the shrimp to be defrosted into the oven
-
Make the shrimp to be defrosted into the oven.
-
Turn the MULTI-FUNCTIONAL knob to DEFROST.
-
Turn the MENU/TIME/WEIGHT knob clockwise to select the weight of [pod
-
Press the START/QUICK START to start.
Note: During defrosting process, the system will pause and sound beeps to remind you to turn food over, then close door and press START/QUICK START to resume defrosting.
GRILL COOKING
Grill cooking is particularly useful for thin slices of meat, steaks, chops, kebabs, sausages and pieces of chicken. The longest cooking time is 95 minutes.
For example: Suppose you want to program grill cooking for 12 minutes.
-
Turn the MULTI-FUNCTIONAL knob to GRILL.
-
Tum MENU/TIME/WEIGHT knob to set desired cooking time.
-
Press the START/QUICK START to start.
PRESET FUNCTION
This function allow the oven start a cooking program at an appoint time automatically.
Suppose the present time is 8:00 (am), and you want to cook for 20 minutes at 80% power beginning at 11:30.
-
Tum the MULTI-FUNCTIONAL knob to HIGH.
-
Tum the MENU/TIME/WEIGHT knob to 20:00
-
Turn the MULTI-FUNCTIONAL knob to PRESET.
-
Turn the MENU/TIME/WEIGHT knob to 11:00
-
Press the START/QUICK START to confirm the hour digit.
-
Turn the MENU/TIME/WEIGHT knob to 11:30
-
Press the START/QUICK START to confirm
Note: the preset function indicator flickering until it time to the appoint time, and the packing start automatically.
Note: the preset function indicator thickening until it time to the appoint time, and the cooking start automatically. Quick start, deodorize, auto defrost, and auto conk functions can not be used in conjunction with preset
Quick start, deozenze, auto defrost, and auto cook functions can not be used in conjunction with preset function.
MULTI STAGE COOKING
Your oven can be programmed for up to 3 automatic cooking sequences.
Suppose you want to set the following cooking program.
Microwave cooking
(at High power for 10 minutes)

Grill cooking
(for 8 minutes)

Microwave cooking
(at Medium power for 5 minutes)
-
Turn the MULTI-FUNCTIONAL knob to MAX.
-
Turn the MENU/TIME/WEIGHT knob to 10:00.
-
Press MEMORY button once.
-
Turn the MULTI-FUNCTIONAL knob to GRILL.
-
Turn MENU/TIME/WEIGHT knob to set 8:00.
-
Press MEMORY button once
-
Turn the MULTI-FUNCTIONAL knob to MEDIUM
-
Tum the MENU/TIME/WEIGHT knob to 5:00.
-
Press START/QUICK START once to start.
Note:
When setting, the display will show 1S, 2S, 3S to indicate which stage you are setting.
Quick start, auto defrost, deodorize and auto cook functions can not be set in multi-stage cooking program.
DEODORIZE FUNCTION
-
Turn the MULTI-FUNCTIONAL knob to DEODORIZE.
-
Turn the MENU/TIME/WEIGHT knob clockwise, when the default time 5:00 and deodorize indicator are
displayed on screen.
- Press START/QUICK START to start.
COMBINATION COOKING
The longest cooking time in both combination 1 and 2 is 95 minutes.
COMBINATION 1
30% time for microwave cooking, 70% for grill cooking. Use for fish and au gratin.
For example: Suppose you want to set combination 1 cooking for 25 minutes.
-
Turn the MULTI-FUNCTIONAL knob to COMBI.
-
Turn MENU/TIME/WEIGHT knob once, when CO-1 display on screen.
-
Turn MENU/TIME/WEIGHT knob clockwise to enter cooking time.
-
Press START/QUICK START.
COMBINATION 2
55% time for microwave cooking, 45% for grill cooking. Use for pudding, omelets, baked potatoes and poultry.
For example: Suppose you want to set combination 2 cooking for 12 minutes.
-
Turn the MULTI-FUNCTIONAL knob to COMBI.
-
Turn MENU/TIME/WEIGHT knob once, when CO-1 display on screen.
-
Press START/QUICK START once, when CO-2 display on screen.
-
Turn MENU/TIME/WEIGHT knob clockwise to enter cooking time
-
Press START/QUICK START.
CHILD LOCK
Use to prevent unsupervised operation of the oven by little children. The CHILD LOCK Indicator will show up
on display screen, and the oven can not be operated while the CHILD LOCK is set.
To set the CHILD LOCK: Press and hold the PAUSE/CANCEL button for 3 seconds, a beep sounds and LOCK
indicator lights
To cancel the CHILD LOCK: Press and hold the PAUSE/CANCEL button for 3 seconds until lock indicator on
display turns off.
AUTO COOK
For food or the following cooking mode, it is not necessary to program the duration and the cooking power. It is
sufficient to indicate the type of food that you wish to cook as well as the weight of this food. In order to do this
rotate the MENU/TIME/WEIGHT knob anti-clockwise once, then rotate continually to select a desired menu,
then press START/QUICK START once, then rotate the MENU/TIME/WEIGHT to select weight or amount of
food. The oven begins cooking once the START/QUICK START is depressed.
You may need to turn food over at the middle of cooking time to obtain uniform cooking.
For example: to cook 2 units of potato.
-
Turn MENU/TIME/WEIGHT dial anti-clockwise once and rotate until code A-6 display.
-
Press START/QUICK START once.
-
Turn MENU/TIME/WEIGHT knob to select the amount of potato 2 units.
-
Press START/QUICK START to start.
AUTO COOK MENU
Code Food/cooking mode
A-1 POPCORN (99g)
A-2 FRESH VEGETABLE(g)
A-3 PIZZA (g)
A-4 GRILLED CHICKEN (a)
A-5 COFFEE (200ml/cup)
A-6 POTATO (each 230g)
A-7 REHEAT(q)
A-8 GRILLED STEAKS (g)
- The result of auto cooking depends on factors such as fluctuation of voltage, the shape and size of food, your personal preference as to the doneness of certain foods and even how well you happen to place food in the oven. If you find the result at any rate not quite satisfactory, please adjust the cooking time a little bit accordingly.
- For grilled chicken, grilled steaks, during cooking, the system will pause and sound beeps to remind you turn food over, then close door and press START/QUICK START to resume cooking.
CLEANING AND CARE
- Turn off the oven and remove the power plug from the wall socket before cleaning.
- Keep the inside of the oven clean. When food splatters or spilled liquids adhere to oven walls, wipe with a damp cloth. Mild detergent may be used if the oven gets very dirty. Avoid the use of spray and other harsh cleaners as they may slain, streak or dull the door surface.
- The outside surfaces should be cleaned with a damp cloth. To prevent damage to the operating parts inside the oven, water should not be allowed to seep into the ventilation openings.
- Wipe the window on both sides with a damp cloth to remove any spills or spatters.
- Do not allow the control panel to become wet. Clean with a soft, damp cloth. When cleaning the control panel, leave oven door open to prevent oven from accidentally turning on.
- If steam accumulates inside or around the outside of the oven door, wipe with a soft cloth. This may occur when the microwave oven is operated under high humidity conditions, this is normal.
- It is occasionally necessary to remove the glass tray for cleaning. Wash the tray in warm sudsy water or in a dishwasher.
- The roller ring and oven floor should be cleaned regularly to avoid excessive noise. Simply wipe the bottom surface of the oven with mild detergent. The roller ring may be washed in mild sudsy water or dishwasher. When removing the roller ring from cavity floor for cleaning, be sure to replace in the proper position.
- Remove odors from your oven by combining a cup of water with the juice and skin of one lemon in a deep microwaveable bowl, microwave for 5 minutes. Wipe thoroughly and dry with a soft cloth.
- When it becomes necessary to replace the oven light, please consult a dealer to have it replaced.
- The oven should be cleaned regularly and any food deposits removed. Failure to maintain the oven in a clean condition could lead to deterioration of the surface that could adversely affect the life of the appliance and possibly result in a hazardous.
- Please do not dispose this appliance into the domestic rubbish bin; it should be disposed to the particular disposal center provided by the municipalities.
- When the microwave oven with grill function is first used, it may produce slight smoke and smell. This is a normal phenomenon because the oven is made of a steel plate coated with lubricating oil, and the new oven will produce fumes and odor generated by burning the lubricating oil. This phenomenon will disappear after a period of using.
BEFORE YOU CALL FOR SERVICE
If the oven fails to operate:
A) Check to ensure that the oven is plugged in securely. If it is not, remove the plug from the outlet, wait 10 seconds and plug it in again securely.
B) Check for a blown circuit fuse or a tripped main circuit breaker. If these seem to be operating properly, test the outlet with another appliance.
C) Check to ensure that the control panel is programmed correctly and the timer is set.
D) Check to ensure that the door is securely closed engaging the door safely lock system. Otherwise, the microwave energy will not flow into the oven.
IF NONE OF THE ABOVE RECTIFY THE SITUATION, THEN CONTACT A QUALIFIED TECHNICIAN. DO NOT TRY TO ADJUST OR REPAIR THE OVEN YOURSELF.
Environment friendly disposal
You can help protect the environment! Please remember to respect the local regulations: hand in the non-working electrical equipments to an appropriate waste disposal center.
MIKROWELLENHERD
BEDIENUNGSANLEITUNG
A-5 KAFEEE (200ml/Tasse
A-6 KARTOEEELN (ie 230n)
A-7 AUEWÄRMEN (a
A-7 AGFWARMEN (g) A-8 GEGBILLTE STEAKS (n)
• Nacisnać pokrello, by uruchomić program
ZELENO/ŽUTO = ZEMLJA
PLAVO = NULA
SMEDA = FAZA
NAPONSKE SMETNJE:
A-5 KAFIJA (200mlitasite)
A-6 KARTUPELI (katrs 230g)
A-7 UZSILDĪŠĀNA (g)
A-8 GRILETS STEIKS (g)
MÉLYNAS = NULINIS LAIDAS
BUDAS = FAZÉ
TRUKDŽIŲ İTAMPOS:
A-4 KEPTA VIŠTIENA (a)
A-6 DOLVLS (KERNILA 200g) A-7 BAŠIL DYMAS (a)
A-7 PASILDTMAS A-B KERSNIAL(o)
A-6 KEPSNIAI (g)
198mm (H) x 315mm (W) x 297mm (D)
20 litri
placă rotalivă
aproximaliv 11,3kg
INSTALARE
1. ECRAN MENIU ACTIUNI
SETAREA CEASULUI DIGITAL
A-6 CANTOPIT (necare a 230g)
A-7 REINCALZIHE(g)
A-8 FRIPTURI LA GRIL (g)
A-5 CAFE (200ml/cup)
A-6 POMMES DE TERRE (230g chacune)
A-7 RECHAUFFER (g)
A-8 STEAK GRILLE (g)
text_image
Technical diagram of a microwave oven with labeled components and exploded view