Excelso Tp - Coffee machine Animo - Free user manual and instructions
Find the device manual for free Excelso Tp Animo in PDF.


Frequently Asked Questions - Excelso Tp Animo
User questions about Excelso Tp Animo
0 question about this device. Answer the ones you know or ask your own.
Ask a new question about this device
Download the instructions for your Coffee machine in PDF format for free! Find your manual Excelso Tp - Animo and take your electronic device back in hand. On this page are published all the documents necessary for the use of your device. Excelso Tp by Animo.
USER MANUAL Excelso Tp Animo
This appliance is in accordance with the following Directives:
All rights reserved.
Animo has the right to change parts of the machine at any time without preceding or direct announcements to the client. The contents of this manual can also be changed without any announcements. This manual is to be used for the standard model/type of the machine. Thus Animo cannot be held responsible for any damage resulting from the application of this manual to the version delivered to you. For extra information on adjustments, maintenance and repair, contact the technical department of your supplier. This manual has been written very carefully. However, Animo cannot be held responsible neither for mistakes in the book nor for their consequences.
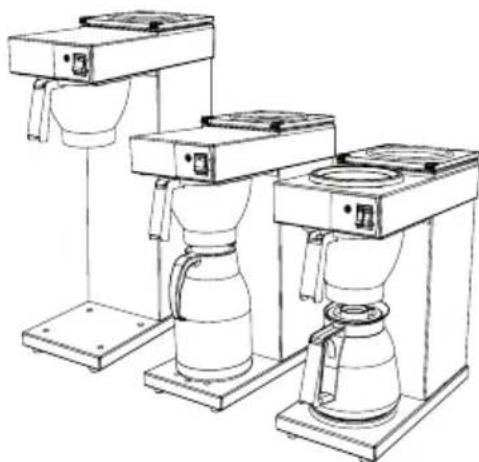
Fig.1 Excelso Tp Excelso T Excelso
Gebruiksdoel
Model Excelso Tp Excelso T Excelso
Excelso Tp Excelso T Excelso
Inschuiffilter 90/250 1 1 1
Glazen kan 1,8 L - - 1
Thermoskan 2,0 L - 1
Maatbeker 2,0L 1 - -
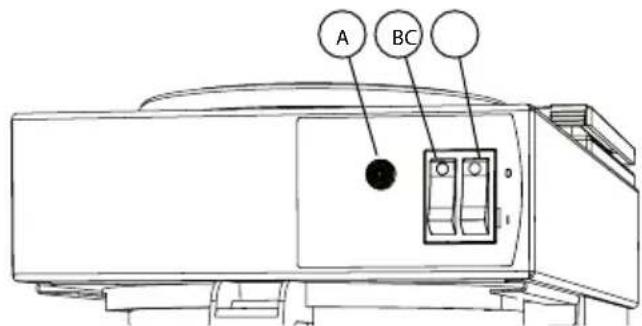
Fig.3 Fig.4 Excelso T/Excelso Tp (fig.3) Excelso (fig.4)
Congratulations on your purchase of one of our products. We hope that you will enjoy using it.
Models
This manual covers the following coffee makers:
Fig. 1
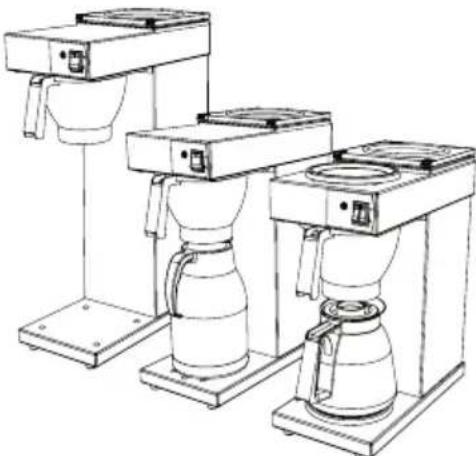
Excelso Tp Excelseo T Excelseo
Purpose of the appliance
The sole purpose of this appliance is to make coffee. The use of the appliance for other purposes is not permitted and may be hazardous. The manufacturer cannot be held liable for losses caused by using the appliance for purposes other than those indicated here or by incorrect use.
Guarantee conditions
The guarantee conditions applicable to this appliance form an integral part of the general terms of delivery.
Appliances and the environment
The packing material
Your new coffee maker has been carefully packaged to protect it against damage. The packing is not harmful to the environment and consists of the following materials:
Corrugated cardboard
- Filler elements made of polyurethane foam
covered with a polythene film (>PE-HD<). The waste processing plant in your municipality will be pleased to inform you about where you can dispose of the materials.
Discarding the appliance
No appliance lasts forever. When the time comes to discard your appliance it will usually be possible to return it to your dealer. If this is not the case, ask your municipal council about the alternatives for recycling the materials. All plastic parts have been given standard codes. The parts of the appliance such as the printed circuit board and accompanying parts form electrical and electronic waste. The metal pipes are made of stainless steel and can be completely dismantled.
Read these instructions for use carefully, before using this appliance. This will protect your safety and prevent damage being caused to the appliance. Perform the various actions in the order given. Always keep this manual close by the appliance.
1. GENERAL DESCRIPTION
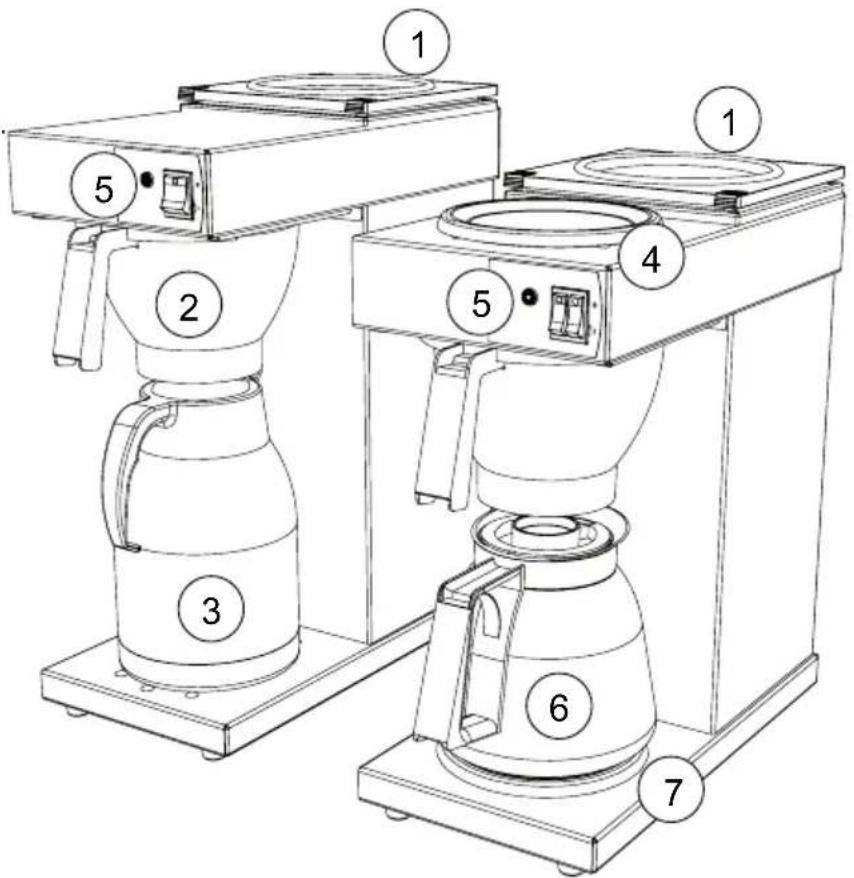
Figure 2:
Water reservoir1.
Removable filter2.
Thermos jug (only Excelso T)3.
Upper hot plate4.
Switch panel5.
Glass jug6.
Lower hot plate7.
Excelso T ExceIso
Excelso Tp
2. TECHNICAL DETAILS
| Model | Excelso Tp | Excelso T | Excelso |
| Article number 10390 | 10385 | 10380 | |
| Buffer supply coffee | 2,0ltr./16 cups | 2,0ltr./16 cups | 1,8ltr./14 cups |
| Hour capacity coffee | 18 ltr./144 cups | 18 ltr./144 cups | 18 ltr./144 cups |
| Coffee preparation time | 5-6 min. | 5-6 min. | 5-6 min. |
| Minimum amount of coffee | ½ jug | ½ jug | ½ jug |
| Paper filter size | 90-250 | 90/250 | 90/250 |
| Electrical connection | 1N~220-240 V | 1N~220-240 V | 1N~220-240 V |
| Frequency | 50-60 Cy | 50-60 Cy | 50-60 Cy |
| Power consumption | 2100 W | 2100 W | 2250 W |
| Weight empty | 6 kg | 6 kg | 6 kg |
| Weight filled | 8 kg | 8 kg | 8 kg |
| Dimensions see last page | Fig. 8 | Fig. 6 | Fig. 7 |
Technical alterations reserved
WARNING

Always remove the plug from the socket if the machine has to be opened for repair or maintenance.
- Do not position the machine in areas where the temperature drops below freezing point because there is always water left in the system.
Always plug the machine into an earthed wall socket.
- Do not submerge or spray the machine.
- Have all repairs carried out by a specially trained technician.
- Make sure that the mains cable does not come into contact with the hot plates (when present) which become extremely hot when is use.
3. INSTALLATION
only suitable for indoor use
not suitable for use in humid areas
not suitable for areas with explosion hazard

Preparation for positioning
Place the appliance at buffet height on a firm, level base that can withstand the weight of the machine when filled.
Make sure that the appliance is level and placed somewhere where it will not cause damage should leakage occur.
The power connection must be within half a metre of where the machine is positioned.
Unpacking
The machine has been carefully packed to prevent damage being caused to your new appliance.
Remove the packing carefully without using sharp objects. Check if the appliance is complete.
To protect the stainless steel parts from scratches these surfaces are temporary protected by a foil. This foil must be removed during installation.
The appliance is delivered with the following accessories:
Excelso Tp Excelso T Excelse
Basket filter 90/250 1 1 1
Glass jug 1.8 L - - 1
Thermos jug 2.0 L - 1
Water measuring cup 1
This manual 1 1 1
Please contact your dealer in case parts are missing or damaged.
4. CONTROL PANEL
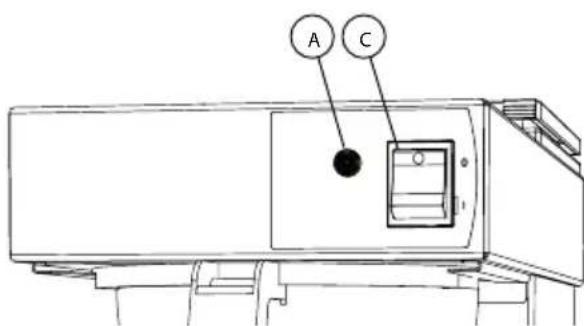
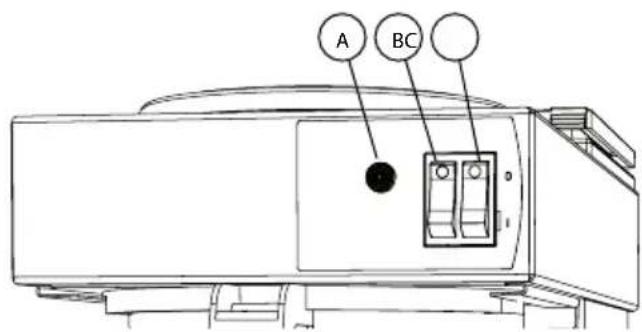
Fig. 3 Fig. 4
Excelso T/ Excelso Tp (fig. 3) Excelso (fig. 4)
A. Brew inducatir light A. Breinducatir light
C On-Off coffee maker B. On/Off upper hot plate
C. On/Off coffe maker and lower plate

5. FIRST TIME USE
This chapter will explain the coffee brewing and hot water system process: when the appliance is used for the first time, when the appliance has not been used for more than one week, for example after a holiday period.
Slide the empty basket filter into the appliance.1.
Pour one jug of cold water into the water reservoir and place an empty 2- jug (with lid) underneath the filter.
Wait for three minutes so that the entire heating system can de-aerate.3.
Place the plug in the socket and turn the machine on using the main 4. switch (fig. 3C or 4C).
The brew indicator light (fig. 3A or 4A) will now light up until the appli-5.
has run though. When the light goes out again and the jug has been emptied, the appliance is ready for use.
Tip: In case the light does not light up, there will probably be some air inside the system. Check the supply down in the water reservoir (fig.5), there might be some air bubbles inside. In that case they have to be removed with, for instance, a pencil.
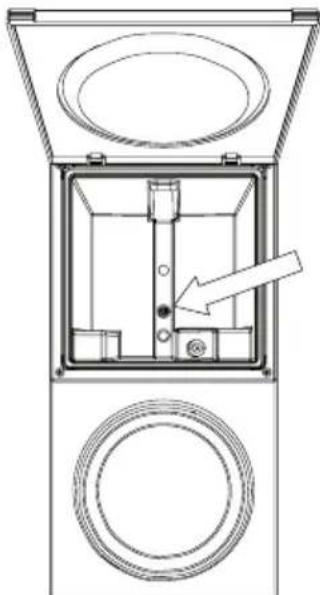
Fig. 5
6. MAKING COFFEE

Basic instructions for brewing coffee
Use fine-grind coffee.
Keep the jugs and the basket filter clean.
- Only use fresh cold water to fill the water reservoir.
| Jug Glas Thermos | ||
| Capacity | 1,8 litre | 2 litre |
| Coffee | 65-90 gram | 70-100 gram |
Place a sheet of basket filter paper (90/250) containing the desired amount 1.
of coffee (fine grind type) in the basket filter and slide it into the appliance.
See the table above for the amount of coffee required.
Pour one jug of 2. cold water into the water reservoir and place an empty jug
(with lid) underneath the filter. Attention: fill the machine with minimal 12 a jug of water.
otherwise the brewing process will not start!
Switch on the appliance using the on/off switch (fig. 3C / 4C). The lower hot 3.
plate (^*) will also switch on.
The brew indicator (fig. 3A / 4A) will light up and the coffee brewing process will begin.4.
When the indicator light switches off again, the hot water supply will stop. 5.
After about 1 minute, all of the coffee will have poured through the filter.
Stir the coffee in the jug briefly and pour the coffee out, or place it on the upper 6.
hot plate (^*) . The upper hot plate is switched on separately using switch (fig. 3B).
Always switch off the extra hot plate when it is not being used.
Once the basket filter has been cleaned you can immediately resume making coffee.7.
(^*) if present
7. MAINTENANCE
WARNING

Stay near the machine while maintenance is being carried out.
- When descending the machine, always observe the instructions for use provided with the descending agent.
- When descending the machine, it is advisable to wear safety goggles and protective gloves.
- Allow the machine to run through at least three times after it has been descaled.
- Wash your hands thoroughly after descaling.
The machine should not be submerged or sprayed.
- Never clean the hot plates (if present) with an abrasive or sharp object. This way scratches on the teflon surface will be prevented.
- Have all repairs carried out by a specially trained technician.
Cleaning of the appliance and accessories
Clean the outside of the appliance with a clean, damp cloth, if necessary using a mild (non-abrasive) cleaning agent.
Do not use an abrasive, as this will leave scratches and dull patches.
The glass jugs and the basket filter can be washed normally and rinsed clean. Please note, however, that it is inadvisable to clean the basket filter in an industrial dish washer as its lightness may cause it to float and sustain damage.
The coffee deposit in the coffee jugs and the filter can be cleaned with Animo coffee fur remover.
7.1 DESCALING
The machine can leave lime deposits during use. The machine should be descaled minimum once a month in order to ensure that it functions efficiently.
Before descending the appliance, carefully read the instructions for use on the scale remover. 1.
We advise you to use the tried and tested Animo scale remover.
- Dissolve one 50 gram sachet of Animo scale remover in 1 litre of warm water (approx. 60 - 70^ ).
Slide an empty basket filter into the filter holder and place an empty jug under it.3.
Carefully pour the solution into the reservoir and switch on the appliance (fig. 3A / 4A). 4.
The solution will now run through the heating system and discharge into the jug.
Leave the lid of the reservoir open!
Switch off the appliance using switch (fig. 3A / 4A) after 1 minute.5.
Now wait about 2 minutes. The solution will react with the deposit in the heating system.6.
After the waiting time, switch the appliance back on and allow the rest of the solution to run 7. through the system.
Wash away the solution in the jug until the filter has finished dripping.8.
After descending the appliance, flush the system by following the coffee brewing procedure tree 9. times but without using filter paper or coffee. Remember to empty the jug in the meantime.
Switch off the appliance and thoroughly clean the basket filter and the jug.10.
- The appliance is now ready for use.
8. TRANSPORT
The following procedure should be followed when the appliance is transported:
- Switch off the machine (fig. 3C & 4C) and remove the plug from the wall socket.
- Remove the jugs and the basket filter.
- Empty the machine, by turning it upside down above the sink, so that the remaining water runs out through the spray head (attention: the water can still be hot!) Wipe the machine dry, and replace all the components that have been removed.4.
- The machine is now ready for transport.
- When it is relocated, the procedures of "Installation", should be followed.
D
INHALTSVERZEICHNIS
VORWORT 18