Frit Prof Line 180701 - Deep fryer NOVA - Free user manual and instructions
Find the device manual for free Frit Prof Line 180701 NOVA in PDF.
Frequently Asked Questions - Frit Prof Line 180701 NOVA
User questions about Frit Prof Line 180701 NOVA
0 question about this device. Answer the ones you know or ask your own.
Ask a new question about this device
Download the instructions for your Deep fryer in PDF format for free! Find your manual Frit Prof Line 180701 - NOVA and take your electronic device back in hand. On this page are published all the documents necessary for the use of your device. Frit Prof Line 180701 by NOVA.
USER MANUAL Frit Prof Line 180701 NOVA
Instructions for use
Mode d'emploi
Anleitung
MAXIMALE HOEVEELHEID PRODUCT
| TYPE Liter Max. gram Max. gram |
| 180700 3 900 600 |
| 180701 4 1000 700 |
| 180702 2 x 3 2 x 900 2 x 600 |
BAKLABEL
| GERECHT BAKTEMPERATUUR | |
| Frites voorbakken | 170 °C |
| Frites afbakken | 175 °C |
| Fondue parmesan | 170 °C |
| Kaaskrok Ketten | 170 °C |
| Vlees- / vis- / aardappelkrokketten 190 °C | |
| Vis | 170 °C |
| Vissticks | 180 °C |
| Kaasbeignet | 180 °C |
| Oliebollen | 190 °C |
| Frikandel | 190 °C |
| Kip | 160 °C |
| Garnalenbeignet | 180 °C |
Read these instructions thoroughly first and keep them for future reference. Only connect this appliance to an earthed socket.
Before use, remove the packaging and wash the accessories and pan in warm water. Dry well before using. Ensure that all electrical parts remain completely dry.
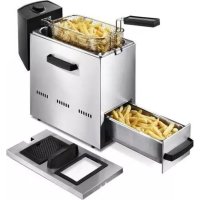
The Nova fryer comes complete with adjustable thermostat and indicator lights. The red light indicates that the appliance is connected. As soon as the green light goes off the set temperature has been reached. The 'open' frying system means you get the same professional results you'd expect from a restaurant and also makes cleaning a breeze.
OPERATING THE FRYER
This type of fryer is only suitable for use with oil or liquid fat, and not for solid fat. Using solid fat entails the risk of trapping water in the fat which will cause it to spatter violently when heated up. Also ensure that the oil/fat is not contaminated with water, for example from frozen products, as this will cause excessive spattering.
- Never use the fryer without oil or fat as this will damage the appliance. Never pour any other liquids, such as water, into the pan.
- Place the fryer on a dry, sturdy surface. As the fryer heats up during cooking, make sure it is not too close to any other objects.
- Open the lid of the fryer.
- Fill the appliance with the required amount of oil or fat. Ensure that the appliance is filled at least to the minimum level and not higher than the maximum level, as indicated on the inside of the fryer. For optimal results, we advise against mixing different types of oil.
- Select the temperature for the item you wish to fry. Consult the temperature table for information on this.
- Use the handle to place the basket in the deep fryer.
- Place the food to be fried in the basket. Ensure that the ingredients to be fried are taken out of the freezer well in advance so that there is no ice left on them. For best results, the food should be dry before being placed in the basket.
- Immerse the basket slowly to prevent the oil from bubbling up too strongly and place the lid back onto the fryer.
- The light will go out when the desired temperature has been reached. Always wait until the fryer reaches the set temperature. To ensure the oil stays at the correct temperature, the thermostat will switch on and off. The indicator light will also go on and off.
- Remove the lid and lift the basket when the frying time has elapsed and hang it on the hook in the pan so that the oil can drip off.
- After use, always pull the plug from the socket.
- Once the deep fryer has totally cooled off, you can put the fryer away. Store the deep fryer, with the lid closed, in a dry and dark place. You can leave the oil and the basket in the deep fryer.
FRYING TIPS
- Shake frozen products above the sink to remove excess ice.
- When fresh chips are used: dry the chips after washing them to ensure no water gets into the oil.
- Fry the chips in two turns: First time (blanch) 5 to 10 minutes at 170 degrees. Second time (finishing) 2 to 4 minutes at 175 degrees. Allow the oil to drip off.
MAXIMUM PRODUCT QUANTITY
| TYPE Litres max gr max gr |
| 180700 3 900 600 |
| 180701 4 1000 700 |
| 180702 2 x 3 2 x 900 2 x 600 |
FRYING TABLE
| DISH FRYING TEMPERATURE |
| Pre-fry chips 170 °C |
| Final fry chips 175 °C |
| Parmesan fondue 170 °C |
| Cheese croquettes 170 °C |
| Meat/fish/potato croquettes 190 °C |
| Fish 170 °C |
| Fish fingers 180 °C |
| Cheese fritter 180 °C |
| Doughnut balls 190 °C |
| Frozen sausage 190 °C |
| Chicken 160 °C |
| Prawn fritter 180 °C |
To minimise the development of acrylamide, do not fry products with a high starch content, such as potato and cereal products, at a temperature higher than 175^ .
CHANGING THE OIL
Make sure the fryer and the oil or fat have cooled down before changing the oil or fat (remove the plug from the socket). Change the oil regularly. This is particularly necessary when the oil or fat goes dark or the smell changes. Always change the oil after every 10 frying sessions. Change the oil in one go – never mix old and new oil. Used oil is harmful to the environment. Do not dispose of it with your normal rubbish but follow the guidelines issued by the local authorities.
CLEANING AND MAINTENANCE
Never immerse the appliance in water! Remove the plug from the socket.
- All the non-electrical parts can be washed in warm soapy water. Dry thoroughly before reusing.
- We do not recommend that you wash the parts in the dishwasher.
- Clean both inside and outside the fryer regularly.
- Regularly clean the outside of the fryer with a damp cloth and dry it with a soft, clean towel.
- Do not use abrasive detergents.
- When replacing the oil, you can also clean the inside of the fryer. Empty the fryer and first clean the inside with a paper towel and then wipe with a wet cloth dipped in soapy water. Then wipe the inside with a damp cloth and allow it to dry.
NOVA TIPS
- Always place the fryer on a stable surface and keep flammable materials away.
- Do not place the fryer on or near a switched-on hot plate.
- Before you use the fryer it must be filled with the required amount of fat or oil. Never use the fryer without oil or fat as this will break the appliance.
- Never move the appliance during use. The oil becomes hot and you can burn yourself. Wait until the oil has cooled down before moving the fryer.
- Never immerse the appliance in water!
- Do not leave the appliance unattended while in use. Close supervision is necessary when the fryer is used near children.
- Do not use the appliance if the cord is damaged. Send it to our service department to minimise any risk. With this type of appliance, a damaged cord should only be replaced by our service department using special tools.
- Make sure the thin pipes running along the heating element are not damaged (do not dent or bend).
- The electrical part comes complete with a safety switch which ensures that the heating element can only operate when the element is correctly positioned in the pan.
-
Children should be supervised to ensure that they do not play with the appliance.
-
The use of this appliance by children or persons with a physical, sensory, mental or motorial disability, or lack of experience and knowledge can give cause to hazards. Persons responsible for their safety should give explicit instructions or supervise the use of the appliance.
- While heating up and frying, do not keep the lid on the appliance to prevent condensation.
- This appliance is intended to be used in domestic and similar applications such as staff kitchen areas in shops, offices and other working environments; farm houses; by clients in hotels, motels and other residential type environments; bed-and-breakfast type environments.
- The appliance is not intended to be operated by means of an external timer or separate remote-control system.
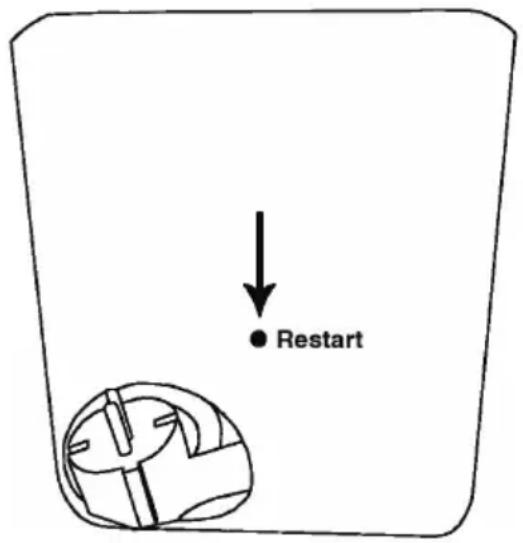
In the case of overheating, the pan will switch off automatically. This safety mechanism can be found on the bottom of the electrical part. If its switches off, it can be reactivated by pressing in the button with a long pointed object. The button is situated deep behind the hole and you should use the restart pin supplied. First remove the plug from the socket.
U.K. WIRING INSTRUCTIONS
The wires in the mains lead are coloured in accordance with the following code:
BLUE NEUTRAL
BROWN LIVE
GREEN/YELLOW
EARTH
As the colours of the wire in the mains lead of this appliance may not correspond with the colour markings identifying the terminals on your plug, proceed as follows:
The wire which is coloured BLUE must be connected to the terminal which is marked with the letter N or coloured black.
The wire which is coloured BROWN must be connected to the terminal which is marked with the letter L or coloured red.
The wire which is coloured GREEN/YELLOW must be connected to the terminal which is marked with the letter E or ± and is coloured GREEN or GREEN/YELLOW
WARNING: THIS APPLIANCE MUST BE EARTHED