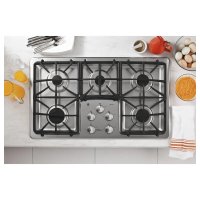
Profile PGP966SETSS - Cooker GE - Free user manual and instructions
Find the device manual for free Profile PGP966SETSS GE in PDF.


Frequently Asked Questions - Profile PGP966SETSS GE
User questions about Profile PGP966SETSS GE
0 question about this device. Answer the ones you know or ask your own.
Ask a new question about this device
Download the instructions for your Cooker in PDF format for free! Find your manual Profile PGP966SETSS - GE and take your electronic device back in hand. On this page are published all the documents necessary for the use of your device. Profile PGP966SETSS by GE.
USER MANUAL Profile PGP966SETSS GE
Cooktops Built-In Gas
Safety Instructions 2-4
Operating Instructions
Control Lock 5
Cookware 6
Dual Stack Burner 5
Flame Size 6
Lighting a Burner 5
PowerBoilBurner 5
Sealed Gas Burners 5
Care and Cleaning
Burners and
Cooktop Electrodes 8
Burner Bases. 8
Burner Caps and Heads. 8
Burner Grates 9
Burner Head and
Cap Replacement 9
Control Knobs 7
Electrodes 8
Glass Cooktop 10, 11
Porcelain Enamel Cooktop 7
Shipping Film and Tape 7
Stainless Steel Surfaces 7
Troubleshooting Tips 12, 13
Consumer Support
Consumer Support 20
Ownership Registration
for Customers in
Canada only 15, 16
Warranty (Canada) 19
Warranty (U.S.) 18
Write the model and serial numbers here:
Model #
Serial #
You can find them on a label under the cooktop.
Owner's Manual
JGP329
JGP333
JGP633
JGP940
JGP970
PGP943
PGP966
IMPORTANT SAFETY INFORMATION. READ ALL INSTRUCTIONS BEFORE USING.
WARNING
If the information in these instructions is not followed exactly, a fire or explosion may be a property damage, personal injury or death.
- Do not store or use gasoline or other flammable vapors and liquids in the vicinity of this or any other appliance.
- Do not install this product with air curtain hood or other range hood that blows air down on the cooktop. Airflow may interfere with operation of gas burners resulting in fire or explosion hazard.
- WHAT TO DO IF YOU SMELL GAS
Do not try to light any appliance.
Do not touch any electrical switch; do not use any phone in your building.
Immediately call your gas supplier from a neighbor's phone. Follow the gas supplier's instructions.
If you cannot reach your gas supplier, call the fire department.
- Installation and service must be performed by a qualified installer, service agency or the gas supplier.
WARNING
GENERAL SAFETY INSTRUCTIONS
WARNING
NEVER use this appliance as a space heater to heat or warm the room. Doing so may result in carbon monoxide poisoning and overheating of the oven.
Use this appliance for its intended purpose as described in this owner's manual.
Have your cooktop installed and properly grounded by a qualified installer in accordance with the provided installation instructions. Any adjustment and service should be performed only by qualified gas appliance installers or service technicians. Do not attempt to repair or replace any part of your cooktop unless it is specifically recommended in this manual.
- Your cooktop is shipped from the factory set for use with natural gas. It can be converted for use with Propane (LP) gas. If required, these adjustments must be made by a qualified technician in accordance with the installation instructions and local codes. The agency performing this work assumes responsibility for the conversion.
Have the installer show you the location of the cooktop gas shut-off valve and how to turn it off if necessary.
Before performing any service, unplug the cooktop or disconnect the power supply at the household distribution panel by removing the fuse or switching off the circuit breaker.
- Be sure all packing materials are removed from the product before operating to prevent ignition of these materials.
Avoid scratching or impacting glass cooktop. Doing so may lead to glass breakage. Do not cook on a product with broken glass. Shock, fire or cuts may occur.
Do not leave children alone or unattended in an area where an appliance is in use. They should never be allowed to climb, sit or stand on any part of the appliance.
Do not store items of interest to children above the cooktop - children climbing on the cooktop to reach items could be seriously injured.
Do not allow anyone to climb, stand or hang on the cooktop.
Use only dry pot holders-moist or damp pot holders on hot surfaces may result in burns from steam. Do not let pot holders touch surface burners or burner grates,
■ Be careful not to touch hot surfaces of the cooktop. Potentially hot surfaces include burners, grates, and cooktop.
Do not heat unopened food containers. Pressure could build up and the container could burst, causing an injury.
Cook meat and poultry thoroughly—meat to at least an internal temperature of 160^ and poultry to at least an internal temperature of 180^ . Cooking to these temperatures usually protects against foodborne illness.
WARNING
KEEP FLAMMABLE MATERIALS AWAY FROM THE COOKTOP
- Do not store or use flammable materials near the cooktop, including paper, plastic, pot holders, linens, wall coverings, curtains, drapes and gasoline or other flammable vapors and liquids.
Never wear loose-fitting or hanging garments while using the appliance. Avoid storing commonly used items in cabinets above the cooktop and be careful when
reaching over the cooktop. Clothing in close proximity to burners or hot surfaces may ignite causing severe burns.
- Do not let cooking grease or other flammable materials accumulate in or near the cooktop. Grease on the cooktop may ignite.
Clean ventilating hoods frequently. Grease should not be allowed to accumulate on the hood or filter.
WARNING
IN THE EVENT OF A FIRE, TAKE THE FOLLOWING STEPS TO PREVENT INJURY AND FIRE SPREADING:
Do not use water on grease fires. Never pick up a flaming pan. Turn the controls off. Smother a flaming pan on a surface burner by covering the pan completely with a well-fitting lid, cookie sheet or flat tray. If necessary, use a multi-purpose dry chemical or foam-type fire extinguisher.
WARNING
COOKTOP SAFETY INSTRUCTIONS
- Never leave the surface burners unattended at medium or high heat settings. Foods, especially oily foods, may ignite resulting in fire that could spread to surrounding cabinets.
Never leave oil unattended while frying. If allowed to heat beyond its smoking point, oil may ignite resulting in fire that may spread to surrounding cabinets. Use a deep fat thermometer whenever possible to monitor oil temperature.
To avoid oil spillover and fire, use a minimum amount of oil when shallow pan-frying and avoid cooking frozen foods with excessive amounts of ice.
Use proper pan size and avoid pans that are unstable or easily tipped. Select cookware that is matched to the size of the burner. Burner flames should be adjusted so that they do not extend beyond the bottom of the pan. Excessive flame may be hazardous.
Always use the LITE position when igniting the top burners and make sure the burners have ignited.
When using glass/ceramic cookware, make sure it is suitable for cooktop service; others may break because of sudden change in temperature.
To minimize the possibility of burns, ignition of flammable materials and spillage, the handle of a container should be turned toward the center of the cooktop without extending over nearby burners.
When preparing flaming foods under a hood, turn the fan on.
Do not use a wok with a round metal support ring. the ring may trap heat and block air to the burner resulting in a carbon monoxide hazard.
Do not attempt to lift the cooktop. Doing so may damage the gas tubing to the surface burners resulting in a gas leak and risk of fire.
- When disabling Gas/Control Lockout (on some models), make sure the surface controls are set to the OFF position. This will prevent unintended gas flow from the burners.
- Do not use aluminum foil to cover the grates or line any part of the cooktop. Doing so may result in carbon monoxide poisoning, overheating of the cooktop surfaces, or a potential fire hazard.
Throughout this manual, features and appearance may vary from your model.
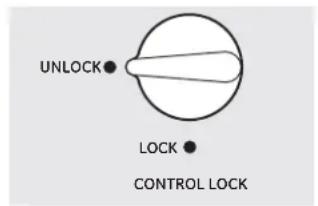
Control Lock (on some models)
To lock the cooktop and prevent unwanted use, turn the control lock knob counterclockwise to LOCK. An indicator light will glow to show that the cooktop is locked.
When locked, the cooktop will sound if any control knob is set to any position other than OFF.
To unlock, turn the control lock knob to UNLOCK.
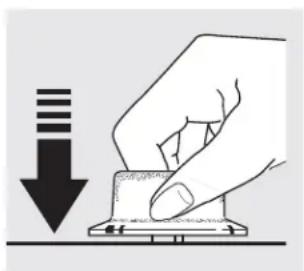
How to Light a Burner
Make sure the control lock knob is in the UNLOCK position.
Your cooktop burners are lit by electric ignition, eliminating the need for standing pilot lights with constantly burning flames.
Push the control knob down and turn it to the LITE position. After the burner ignites, turn the knob to adjust the flame size. To turn the burner off, turn the knob clockwise as far as it will go, to the OFF position.
Check to be sure the burner you turn on is the one you want to use.
Be sure you turn the control knob to OFF when you finish cooking.
In case of a power failure, you can light the burners with a match. Hold a lit match to the burner; then push in and turn the control knob to the LITE position. Use extreme caution when lighting burners this way. Burners in use when an electrical power failure occurs will continue to operate normally.
Do not operate the burner for an extended period of time without cookware on the grate. The finish on the grate may chip without cookware to absorb the heat.
Be sure the burners and grates are cool before you place your hand, a pot holder, cleaning cloths or other materials on them.
Sealed Gas Burners
The smallest burner in the right rear and the center burner (on some models) are the simmer burners. These burners can be turned down to LO or SIMMER (depending on model) for a very low setting. They provide precise cooking performance for delicate foods such as sauces or foods that require low heat for a long cooking time.
The medium (left rear) and the large (left front) burners are the general-purpose burners that can be turned down from HI to LO to suit a wide range of cooking needs.
Dual Stack Burner (on some models)
The extra large right front burner has maximum heating and precise simmer capability. It can be turned down from PowerBoil to SIMMER for a wide range of cooking applications.
PowerBoIFnBurner (on some models)
The extra large right front burner has special PowerBoil settings. This feature should only be used with cookware 11" or larger in diameter, and flames should never be allowed to extend
up the sides of the cookware. This feature is designed to quickly bring large amounts of liquid in pots 11" or larger in diameter to a boil.
Using the cooktop burners.
| How to Select Flame Size For safe handling of cookware, never let the flames extend up the sides of the cookware. Watch the flame, not the knob, as you reduce heat. The flame size on a gas burner should match the cookware you are using. | Any flame larger than the bottom of the cookware is wasted and only serves to heat the handle. |
| Wok This Way We recommend that you use a 14-inch or smaller flat-bottomed wok. They are available at your local retail store. Only a flat-bottomed wok should be used. Make sure the wok bottom sits flat on the grate. | Do not use a wok support ring. Placing the ring over the burner or grate may cause the burner to work improperly, resulting in carbon monoxide levels above allowable standards. This could be dangerous to your health. |
| Cookware Aluminum: Medium-weight cookware is recommended because it heats quickly and evenly. Most foods brown evenly in aluminum cookware. Use saucepans with tight-fitting lids when cooking with minimum amounts of water. Enamelware: Under some conditions, the enamel of some cookware may melt. Follow cookware manufacturer's recommendations for cooking methods. Glass: There are two types of glass cookware: those for oven use only and those for cooktop cooking (saucepans, coffee and tea pots). Glass conducts heat very slowly. Cast Iron: If heated slowly, most cookware will give satisfactory results. | Heatproof Glass-Ceramic: Can be used for either surface or oven cooking. It conducts heat very slowly and cools very slowly. Check cookware manufacturer's directions to be sure it can be used on a gas cooktop. Stainless Steel: This metal alone has poor heating properties and is usually combined with copper, aluminum or other metals for improved heat distribution. Combination metal cookware usually works satisfactorily if it is used with medium heat as the manufacturer recommends. |
| Home Canning Tips Be sure the canner is centered over the burner. To prevent burns from steam or heat, use caution when canning. | Use recipes and procedures from reputable sources. These are available from manufacturers such as Bal® and Kerr® and the Department of Agriculture Extension Service. |
Care and cleaning of the cooktop. GEAppliances.com
Be sure electrical power is off and all surfaces are cool before cleaning any part of the cooktop.
How to Remove Protective Shipping Film and Packaging Tape
Carefully grasp a corner of the protective shipping film with your fingers and slowly peel it from the appliance surface. Do not use any sharp items to remove the film. Remove all of the film before using the appliance for the first time.
To assure no damage is done to the finish of the product, the safest way to remove the adhesive left from packaging tape on new appliances is an application of a household liquid dishwashing detergent. Apply with a soft cloth and allow to soak.
NOTE: The adhesive must be removed from all parts before using the cooktop. It cannot be removed if it is baked on.
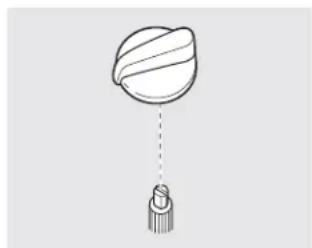
Pull the knob straight up off the stem.
Control Knobs
The control knobs may be removed for easier cleaning.
Make sure the knobs are in the OFF positions and pull them straight off the stems for cleaning.
The knobs can be cleaned in a dishwasher or they may also be washed with soap and water. Make sure the insides of the knobs are dry before replacing.
Replace the knobs in the OFF position to ensure proper placement.
Porcelain Enamel Cooktop (on some models)
The porcelain enamel finish is sturdy but breakable if misused. This finish is acid-resistant. However, any acidic foods spilled (such as fruit juices, tomato or vinegar) should not be permitted to remain on the finish.
If acids spill on the cooktop while it is hot, use a dry paper towel or cloth to wipe it up right away. When the surface has cooled, wash with an all-purpose cleaner and water. Rinse well.
For other spills such as fat spatterings, wash with soap and water or an all-purpose cleaner after the surface has cooled. Rinse well. Polish with a dry cloth.
Stainless Steel Surfaces (on some models)
Do not use a steel wool pad; it will scratch the surface.
To clean the stainless steel surface, use warm sudsy water or a stainless steel cleaner or polish. Always wipe the surface in the direction of the grain. Follow the cleaner instructions for cleaning the stainless steel surface.
To inquire about purchasing stainless steel appliance cleaner or polish, or to find the location of a dealer or Camco Parts Store nearest you, please call our toll-free number:
National Parts Center 1.800.626.2002 (U.S.) 1.800.661.1616
GEAppliances.com (U.S.)
www.GEApliances.ca (Canada)
Can
Care and cleaning of the cooktop.

WARNING
DO NOT OPERATE A BURNER
WITHOUT ALL BURNER PARTS IN PLACE.
Burners and Cooktop Electrodes
Turn all controls off before removing burner parts.
NOTE: Before removing the burner caps and heads, remember their size and location. Replace them in the same location after cleaning.
The burner assemblies should always be kept clean. Spillovers should be cleaned immediately; they can clog the openings in the burner assemblies.
Remove the burner grates, burner caps and burner heads for easy cleaning.
NOTES:
Do not attempt to remove the electrode from the cooktop or any screws from the burner head or burner base.
Do not use steel wool or scouring powders to clean the burners.
Burner Caps and Heads
Wash burner caps and burner heads in hot, soapy water and rinse with clean running water. You may scour with a plastic scouring pad to remove burned-on food particles.
Use a sewing needle or twist tie to unclog the small holes in the burner head, if required.
To remove burned-on food, soak the burner heads in a solution of mild liquid dishwashing detergent and hot water for up to 20-30 minutes, if required. For more stubborn stains, use a toothbrush.
If the spill went inside the burner head assembly (right front burner on models JGP333, PGP943, and PGP966), wash it under running water. Shake to remove any excess water. Air dry and make sure the small ignitor holes are open.
NOTE: Do not wash any burner parts in a dishwasher.
Burner Bases
The burner bases should not be removed for cleaning.
To clean the burner bases, use soapy water and a plastic scouring pad. Make sure that no water gets into the burner bases and the brass gas orifices.
Wipe clean with a damp cloth. Allow them to dry fully before using.
Cooktop Electrode
Clean this metal part
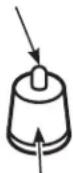
Do not clean this white ceramic part with an emery board.
NOTE: Do not attempt to remove the electrode from the cooktop.
Electrodes
The electrode of the spark igniter is exposed beyond the surface of the burner base. When cleaning the cooktop, be careful not to snag the electrode of the spark igniter with your cleaning cloth. Damage to the igniter could occur.
Be careful not to push in any cooktop controls while cleaning the cooktop.
A slight electrical shock might result which could cause you to knock over hot cookware.
Make sure that the white ceramic electrodes in the cooktop are clear of soil and dry. Clean the metal part of the electrode with a soft cloth. For stubborn, hardened soil, clean the metal portion of the electrode with an emery board. Do not clean the white ceramic portion of the electrode with the emery board. It is acceptable to clean the white portion of the electrode with a soft cloth, but not with an emery board.
Before reassembling the surface burners, push down on each of the white ceramic electrodes to make sure they are pressed against the burner bases.
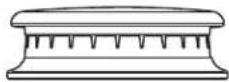
Burner cap properly seated
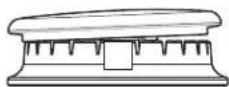
Burner cap not properly seated
Burner Head and Cap Replacement
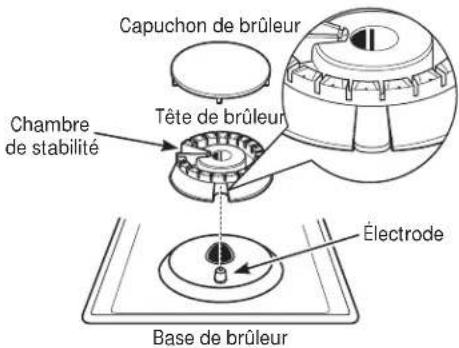
Replace the burner head onto the burner base, making sure that the head is properly oriented over the burner base and the electrode. Make sure to place the correct burner head on the correct burner base and that the burner head sits level on the burner base. The burner heads are not interchangeable.
Replace the burner cap onto the burner head, making sure to place the correct burner cap on the correct burner head. The burner caps are not interchangeable. Also, make sure that the burner caps are properly seated on the burner heads.
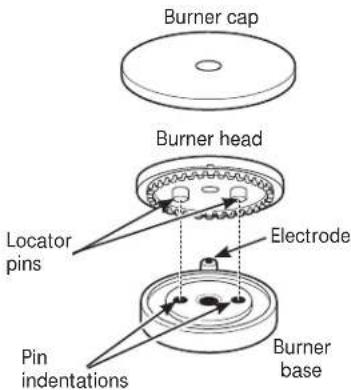
JGP940 and JGP970 (all burners)
Make sure the pins in the burner heads match the burner base indentations and that they are properly seated in them by rotating the heads until they are level.
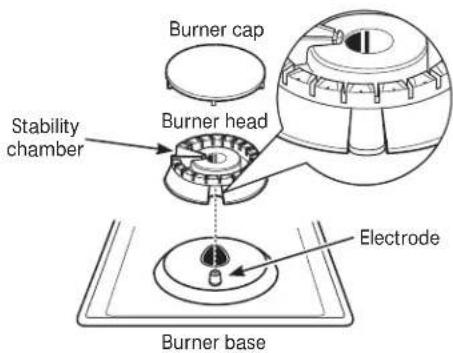
JGP329, JGP333, JGP633, PGP943 and PGP966
Make sure the slot in the burner head is positioned over the electrode. The burner cap has three to four pins. When replacing the cap, make sure none of the pins sits in the stability chamber.
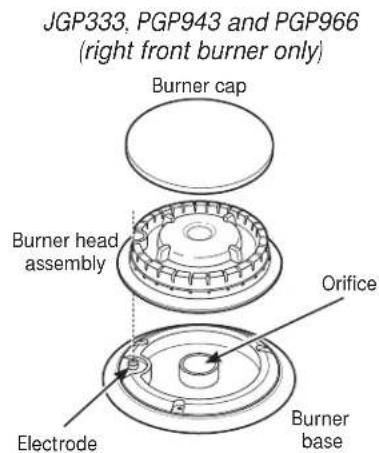
Make sure the hole in the burner head assembly is positioned over the electrode and that the burner head is fully inserted inside the burner base. A small gap between the base and head is normal.
Burner Grates
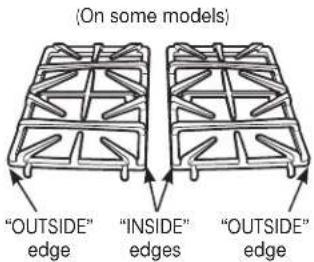
Your cooktop has professional style grates. These grates are designed for specific positions. These grates should only be used in their proper positions; they should not be interchanged. For your convenience, the undersides of the left and right grates are marked "OUTSIDE" and "INSIDE". Make sure that the sides marked "OUTSIDE" are facing the outer edge of the cooktop and the sides marked "INSIDE" are
facing each other. All grates should touch once they are fully assembled on the cooktop surface.
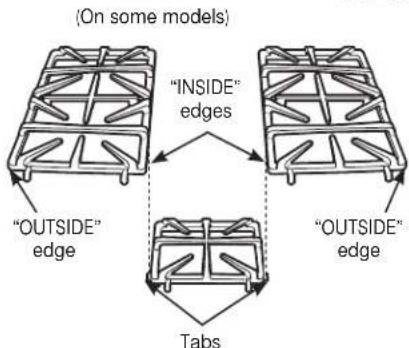
For cooktops with three grates, make sure that the tabs on either side of the center grate fit into the slots located on the "INSIDE" edge of the side grates.
Lift the burner grates out only when cool. Grates should be washed regularly and, of course, after spillovers. Wash them in the dishwasher or in hot, soapy water and rinse with clean water. When replacing the grates, be sure they are positioned securely over the burners.
Although they are durable, the grates will gradually lose their shine, regardless of the best care you can give them. This is due to their continual exposure to high temperatures. You will notice this sooner with lighter color grates.
Do not operate a burner for an extended period of time without cookware on the grate. The finish on the grate may chip without cookware to absorb the heat.
NOTE: Do not clean the grates in a self-cleaning oven.
Cleaning the glass cooktop surface. (on some models)
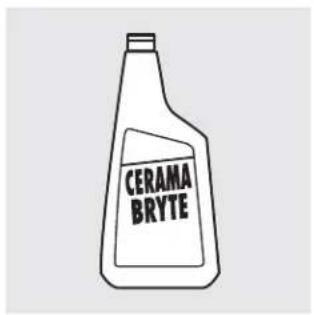
Clean your cooktop after each spill. Use CERAMA BRYTE Ceramic Cooktop Cleaner.
Normal Daily Use Cleaning
ONLY use CERAMA BRYTE Ceramic Cooktop Cleaner on the glass cooktop. Other creams may not be as effective.
To maintain and protect the surface of your glass cooktop, follow these steps:
Before using the cooktop for the first time, remove the burner grates and clean the cooktop with CERAMA BRYTE Ceramic Cooktop Cleaner. This helps protect the top and makes cleanup easier.
2 Daily use of CERAMA BRYTE Ceramic Cooktop Cleaner will help keep the cooktop looking new.
3 Shake the cleaning cream well. Apply a few drops of CERAMA BRYTE Ceramic Cooktop Cleaner directly to the cooktop.
Use a paper towel or CERAMA BRYTE Cleaning Pad for Ceramic Cooktops to clean the entire cooktop surface.
Use a dry cloth or paper towel to remove all cleaning residue. No need to rinse.
NOTE: It is very important that you DO NOT heat the cooktop until it has been cleaned thoroughly.
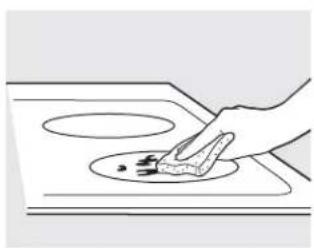
Use a CERAMA BRYTE Cleaning Pad for Ceramic Cooktops.
Burned-On Residue
WARNING: DAMAGE to your glass surface may occur if you use scrub pads other than those recommended.
1 Allow the cooktop to cool.
2 Remove the burner grates and spread a few drops of CERAMA BRYTE Ceramic Cooktop Cleaner on the entire burned residue area.
3 Using the included CERAMA BRYTE Cleaning Pad for Ceramic Cooktops, rub the residue area, applying pressure as needed.
If any residue remains, repeat the steps listed above as needed.
For additional protection, after all residue has been removed, polish the entire surface with CERAMA BRYTE Ceramic Cooktop Cleaner and a paper towel.
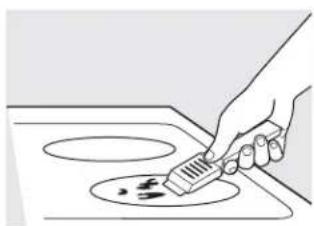
The CERAMA BRYTE Ceramic
Cooktop Scaper and all
recommended supplies are
available through our Parts Center.
See instructions under "To Order
Parts" section on next page.
NOTE: Do not use a dull or
nicked blade.
Heavy, Burned-On Residue
7 Allow the cooktop to cool.
2 Remove the burner grates. Use a single-edge razor blade scraper at approximately a 45^ angle against the glass surface and scrape the soil. It will be necessary to apply pressure to the razor scraper in order to remove the residue.
After scraping with the razor scraper, spread a few drops of CERAMA BRYTE Ceramic Cooktop Cleaner on the entire burned residue area. Use the CERAMA BRYTE Cleaning Pad to remove any remaining residue.
For additional protection, after all residue has been removed, polish the entire surface with CERAMA BRYTE Ceramic Cooktop Cleaner and a paper towel.
Metal Marks and Scratches
1 Be careful not to slide pots and pans across your cooktop. It will leave metal markings on the cooktop surface.
These marks are removable using the CERAMA BRYTE Ceramic Cooktop Cleaner with the CERAMA BRYTE Cleaning Pad for Ceramic Cooktops.
If pots with a thin overlay of aluminum or copper are allowed to boil dry, the overlay may leave black discoloration on the cooktop.
This should be removed immediately before heating again or the discoloration may be permanent.
WARNING:
the bottom of pans for roughness that would scratch the cooktop.
Glass surface-potential for permanent damage.
Our testing shows that if you are cooking high sugar mixtures such as jelly or fudge and have a spillover, it can cause permanent damage to the glass surface unless the spillover is immediately removed.
Damage from Sugary Spills and Melted Plastic
Turn off all surface burners and, with an oven mitt, remove hot pans and grates.
Wearing an oven mitt:
a. Use a single-edge razor blade scraper (CERAMA BRYTE Ceramic Cooktop Scaper) to move the spill to a cool area on the cooktop.
b. Remove the spill with paper towels.
3 Any remaining spillover should be left until the surface of the cooktop has cooled.
Don't use the surface units again until all of the residue has been completely removed.
NOTE: If pitting or indentation in the glass surface has already occurred, the cooktop glass will have to be replaced. In this case, service will be necessary.
To Order Parts
To order CERAMA BRYTE Ceramic Cooktop Cleaner and the cooktop scraper, please call our toll-free number:
National Parts Center 800.626.2002.
CERAMA BRYTE Ceramic
Cooktop Cleaner . . . . . . . . . . . . . . . . . . . . . . . . . . . . . . . . . . . . . . . . . . . . . . . . . . . . . . . . . . . . . . . . . . . . . . . . WX10X300
CERAMA BRYTE® Ceramic
Cooktop Scaper . . . . . . . . . . . . . . . . . . . . . . . . . . . . . . . . . . . . . . . . . . . . . . . . . . . . . . . . . . . . . . . . . . . . . . . . WX10X0302
Kit. # WB64X5027
KIT includes cream and cooktop scraper
CERAMA BRYTE® Cleaning Pads for Ceramic
Cooktops . . . . . . . . . . . . . . . . . . . . . . . . . . . . . . . . . . . . . . . . . . . . . . . WX10X350
Before you call for service...

Troubleshooting Tips Save time and money! Review the charts on these pages first and you may not need to call for service.
Problem Possible Causes What To Do
| Burners have yellow or yellow-tipped flames | The combustion quality of burner flames needs to be determined visually. | ·Use the illustrations below to determine if your burner flames are normal. If burner flames look like A, call for service. Normal burner flames should look like B or C, depending on the type of gas you use. With Propane (LP) gas, some yellow tipping on outer cones is normal. | |
| A-Yellow flames Call for service | B-Yellow tips on outer cones Normal for Propane | ||
| (LP) gas | C-Soft blue flames Normal for natural gas | ||
| Control knobs will not turn | Knob isn't pushed down. | ·To turn from the OFF position, push the knob down and then turn. | |
| Burners do not light | Plug on cooktop is not completely inserted in the electrical | ·Make sure electrical plug is plugged into a live, properly grounded outlet. outlet. | |
| or turned on. | Gas supply not connected cooktop. | ·See the Installation Instructions that came with your | |
| blown or the circuit breaker | A fuse in your home may be tripped. | ·Replace the fuse or reset the circuit breaker. | |
| burners are soiled. | Burner parts not replaced correctly. | ·See the Care and cleaning of the cooktop section. | |
| The electrodes under the | ·See the Care and cleaning of the cooktop section. | ||
| are not securely seated | The white ceramic electrodes under the | ·See the Care and cleaning of the cooktop section. | |
| models) is plugged. | Cooktop is locked. | ·Unlock the cooktop. See the Using the cooktop burners section. | |
| The igniter hole (on some | ·See the Care and cleaning of the cooktop section. | ||
| Ticking sound of spark igniter persists after burner lights | Control knob is still in the LITE position. | ·Turn the knob out of the LITE position to the desired setting. ·Turn the burner off and relight. If ticking is still present, call for service. | |
| Burner flames very large or yellow | Improper air to gas ratio. | ·If cooktop is connected to Propane (LP) gas, check all steps in the Installation Instructions that came with your cooktop. | |
| Problem Possible Causes What To Do | ||
| Cooktop makes sound when a control knob (on some models) is turned on | The cooktop is locked | ·Turn the control lock knob to UNLOCK. |
| Scratches on cooktop glass surface across the leaving deposits. | Cookware has been slid cooktop surface, | ·See the Cleaning the glass cooktop surface section. |
| methods being used. | Incorrect cleaning become less visible in time as a result of cleaning. | ·Scratches are not removable. Tiny scratches will |
| the cookware and the surface of the cooktop. | Cookware with rough bottoms being used or coarse particles (salt or sand) were between | ·To avoid scratches, use the recommended cleaning procedures. Make sure bottoms of cookware are clean before use, and use cookware with smooth bottoms. |
| Areas of discoloration on the glass cooktop surface | Hot surface on a model with a light-colored cooktop. | ·This is normal. The surface may appear discolored when it is hot. This is temporary and will disappear as the glass cools. |
| before next use. | Food spillovers not cleaned | ·See the Cleaning the glass cooktop surface section. |
| Plastic melted to the glass cooktop surface | Hot cooktop came into contact with plastic placed on the hot cooktop. | ·See the Glass surface-potential for permanent damage section in the Cleaning the glass cooktop surface section. |
| Pitting (or indentation) of the cooktop | Hot sugar mixture spilled on the cooktop. | ·Call a qualified technician for replacement. |
Please place in envelope and mail to:

For Canadian Customers
CUT ALONG THIS LINE AND RETURN CARD—THANKS
| OWNERSHIP REGISTRATION CERTIFICATE - FICHE D'INSCRIPION DU PROPRIÉTAIRE | |||||
| Please register your product to enable us to contact you in the remote event a safety notice is issued for this product and to allow for efficient communication under the terms of your warranty, should the need arise. | Veuillez enregistrer votre produit afin de nous permettre de communiquer avec vous si jamais un avis de sécurité concemant ce produit était émis et de communiquer facilement avec vous en vertu de votre garantie, si le besoin s'en fait sourir. | ||||
| REGISTER ON LINE: www.geappliances.ca ENREGISTREMENT SUR INTERNETÀ: www.electromagenersge.ca | MAIL TO: P.O. BOX 1780, MISSISSAUGA POSTER À: ONTARIO, L4Y 4G1 | ||||
| □ MR./M □ MRS./MME.□ MISS/MLLE.□ MS. | FIRST NAME /PRÉNOM | LAST NAME /NOM | |||
| STREET NO/N° RUE | STREET NAME/RUE | APT.NO/APP./RR# | |||
| CITY/VILLE | PROVINCE | POSTAL CODE/POSTAL | |||
| AREA CODE/IND. RÉG. | TELEPHONE | ||||
| DID YOU PURCHASE A SERVICE CONTRACT FOR THIS APPLIANCE? AVEZ-VOUS ACHETE UN CONTRAT DE SERVICE POUR CET APPAREIL? | YES/oui ☐ IF YES/SI OUI: EXPRESSION Y/A M D/J NO/NON ☐ | ||||
| NAME OF SELLING DEALER/NOM DU MARCHAND | MODEL/MODELE | ||||
| INSTALLATION DATE/DATE D'INSTALLATION Y/A M D/J | CORRESPONDENCE ☐ ENGLISH CORRESPONDANCE ☐ FRANÇAIS SERIAL/SÉRIE | ||||
| □ I do not wish to receive any promotional offers regarding this product. □ Je ne désire pas recevoir d'offres promotionnelles concernant ce produit. | |||||
GE Gas Cooktop Warranty. (For Customers in the United States)
All warranty service provided by our Factory Service Centers, or an authorized Customer Care technician. To schedule service, visit us on-line at GEAppliances.com, or call 800.GE.CARES (800.432.2737). Please have serial number and model number availa ble when calling for service.
Staple your receipt here. Proof of the original purchase date is needed to obtain service under the warranty.
For The Period Of: GE Will Replace:
One Year
From the date of the original purchase ar
Any part of the cooktop which fails due to a defect in materials or workmanship.
During this limited one-year warranty, GE will also provide, free of charge, all labor-related service costs to replace the defective part.
What GE Will Not Cover:
Service trips to your home to teach you how to use the product.
Improper installation, delivery or maintenance.
Failure of the product if it is abused, misused, or used for other than the intended purpose or used commercially.
Replacement of house fuses or resetting of circuit breakers.
Damage to the product caused by accident, fire, floods or acts of God.
- Incidental or consequential damage caused by possible defects with this appliance.
Damage caused after delivery.
Product not accessible to provide required service.
EXCLUSION OF IMPLIED WARRANTY--Your sole and exclusive remedy is product repair as provided in this Limited Warranty. Any implied warranties, including the implied warranties of merchantability or fitness for a particular purpose, are limited to one year or the shortest period allowed by law.
This warranty is extended to the original purchaser and any succeeding owner for products purchased for home use within the USA. If the product is located in an area where service by a GE Authorized Servicer is not available, you may be responsible for a trip charge or you may be required to bring the product to an Authorized GE Service location for service. In Alaska, the warranty excludes the cost of shipping or service calls to your home.
Some states do not allow the exclusion or limitation of incidental or consequential damages. This warranty gives you specific legal rights, and you may also have other rights which vary from state to state. To know what your legal rights are, consult your local or state consumer affairs office or your state's Attorney General.
Warrantor: General Electric Company, Louisville, KY 40225
Gas Cooktop Warranty. (For Customers in Canada)
All warranty service provided by our Factory Service Centres or an authorized Customer Care technician. To schedule service, visit us on-line at www.GEApliances.ca or call 1.800.561.3344. Please have serial number and model number avail ble when calling for service.
Staple your receipt here. Proof of the original purchase date is needed to obtain service under the warranty.
For The Period Of: Mabe Will Replace:
One Year
From the date of the
Any part of the cooktop which fails due to a defect in materials or workmanship.
During this limited one-year warranty, Mabe will also provide, free of charge, all labor
original purchase and related service costs to replace the defective part.
What Mabe Will Not Cover:
Service trips to your home to teach you how to use the product.
Improper installation, delivery or maintenance.
Failure of the product if it is abused, misused, or used for other than the intended purpose or used commercially.
Replacement of house fuses or resetting of circuit breakers.
Damage to the product caused by accident, fire, floods or acts of God.
- Incidental or consequential damage caused by possible defects with this appliance.
Damage caused after delivery.
Product not accessible to provide required service.
EXCLUSION OF IMPLIED WARRANTY--Your sole and exclusive remedy is product repair as provided in this Limited Warranty. Any implied warranties, including the implied warranties of merchantability or fitness for a particular purpose, are limited to one year or the shortest period allowed by law.
This warranty is extended to the original purchaser and any succeeding owner for products purchased in Canada for home use within Canada. In-home warranty service will be provided in areas where it is available and deemed reasonable by Mabe to provide.
Some provinces do not allow the exclusion or limitation of incidental or consequential damages, so the above exclusion may not apply to you. This warranty gives you specific legal rights, and you may also have other rights which vary from province to province. To know what your legal rights are in your province, consult your local or provincial consumer affairs office.
Warrantor: Mabe Canada Inc.,
Burlington, Ontario
Consumer Support
GE Appliances Website
Have a question or need assistance with your appliance? Try the GE Appliances Website 24 hours a day, any day of the year! You can also shop for more great GE Appliances products and take advantage of all our on-line support services designed for your convenience. In the US: GEAppliances.com
Register Your Appliance
Register your new appliance on-line at your convenience! Timely product registration will allow for enhanced communication and prompt service under the terms of your warranty, should the need arise. You may also mail in the pre-printed registration card included in the packing material. In the US: GEAppliances.com/register
Schedule Service
Expert GE Appliances repair service is only one step away from your door. Get on-line and schedule your service at your convenience any day of the year. In the US: GE Appliances.com/ge/service-and-support/service.htm or call 800.432.2737 during normal business hours.
Extended Warranties
Purchase a GE Appliances extended warranty and learn about special discounts that are available while your warranty is still in effect. You can purchase it on-line anytime. GE Appliances Services will still be there after your warranty expires. In the US: GEAppliances.com/ge/service-and-support/shop-for-extended-service-plans.htm or call 800.626.2224 during normal business hours.
Remote Connectivity
For assistance with wireless network connectivity (for models with remote enable), visit our website at GEAppliances.com/ge/connected-appliances/ or call 800.220.6899 in the US.
Parts and Accessories
Individuals qualit to service their own apianies can have parts or accessories sent directly to their homes (VISA, MasterCard and Discover cards are accepted). Order on-line today 24 hours every day. In the US: GEApplianceparts.com or by phone at 877.959.8688 during normal business hours.
Instructions contained in this manual cover procedures to be performed by any user. Other servicing generally should be referred to qualified service personnel. Caution must be exercised, since improper servicing may cause unsafe operation.
Contact Us
If you are not satisfied with the service you receive from GE Appliances, contact us on our Website with all the details including your phone number, or write to:
In the US: General Manager, Customer Relations | GE Appliances, Appliance Park | Louisville, KY 40225
GEAppliances.com/ge/service-and-support/contact.htm
Centre national de pieces 1.800.661.1616
www.electromagersge.ca
JGP329, JGP333, JGP633, PGP943 et PGP966
Comment commander des pieces
Au Canada: Prodsupport.mabe.ca/crm/Products/ProductRegistration.aspx
Au Canada: GEAppliances.ca/en/support/service-request ou composez le 800.561.3344
Prolongation de garantie
Au Canada: GEAppliances.ca/en/support/purchase-extended-warranty ou composez le 800.290.9029
Aux Etats-Unis : General Manager, Customer Relations | GE Appliances, Appliance Park | Louisville, KY 40225
GEAppliances.com/ge/service-and-support/contact.htm
Au Canada : Director, Consumer Relations, Mabe Canada Inc. | Suite 310, 1 Factory Lane | Moncton, N.B. E1C 9M3 GEAppliances.ca/en/contact-us