
TemeoTrend Sunny 7000001 - Weather Station BRESSER - Free user manual and instructions
Find the device manual for free TemeoTrend Sunny 7000001 BRESSER in PDF.
| Product type | Wireless weather station |
| Brand | Bresser |
| Model | TemeoTrend Sunny 7000001 |
| Base station power supply | 3 AAA 1.5V batteries (not included) |
| Outdoor sensor power supply | 2 AAA 1.5V batteries (not included) |
| Main functions | Indoor and outdoor temperature, indoor humidity, weather forecast (sunny, partly cloudy, cloudy, rainy), temperature trend, time and date (DCF77 reception), alarm with snooze, backlight, min/max values, up to 3 outdoor sensors |
| Indoor temperature range | 0°C to 50°C |
| Outdoor temperature range | -20°C to 60°C |
| Indoor humidity range | 20% to 90% |
| Transmission range | 30 meters in open area |
| Radio frequency | 433.92 MHz |
| Display | LCD with backlight (20 seconds) |
| Number of supported outdoor sensors | Up to 3 (one included) |
| Maintenance and cleaning | Remove batteries before cleaning. Clean with a dry cloth. Do not use liquids. |
| Safety | Choking hazard (packaging), electric shock, battery acid burn, explosion/fire. Do not disassemble. Keep out of reach of children. |
| Repairability | Do not disassemble. Contact dealer if defective. 2-year warranty, extension upon registration (www.bresser.de/warranty_terms). |
| General information | Delivered with base station, stand, outdoor sensor, instruction manual. Batteries not included. Private use only. |
Frequently Asked Questions - TemeoTrend Sunny 7000001 BRESSER
User questions about TemeoTrend Sunny 7000001 BRESSER
0 question about this device. Answer the ones you know or ask your own.
Ask a new question about this device
Download the instructions for your Weather Station in PDF format for free! Find your manual TemeoTrend Sunny 7000001 - BRESSER and take your electronic device back in hand. On this page are published all the documents necessary for the use of your device. TemeoTrend Sunny 7000001 by BRESSER.
USER MANUAL TemeoTrend Sunny 7000001 BRESSER
BRESSER® TemeoTrend Sunny
Art. No. 70-00001

DE BEDIENUNGSANLEITUNG
GB INSTRUCTION MANUAL
FR MODE D'EMPLOI
IT ISTRUZIONI PER L'USO
ES INSTRUCCIONES DE USO
Fig. 1
DE Bedienungsanleitung ....4
GB instRuCtiOn manual 11
FR mOde d'emploi 18
istRuziOni peR l'us0.... 26
ES instRuCCiOnes de usO.... 34
Fig. 3
Zu dieser Anleitung
GEFAHR EINES STROMSCHLAGS!
About this Instruction Manual
These operating instructions are to be considered a component of the device.
Please read the safety instructions and the operating instructions carefully before use.
Keep these instructions for renewed use at a later date. When the device is sold or given to someone else, the instruction manual must be provided to the new owner/user of the product.
This product is intended only for private use. It was developed as an electronic medium for the use of multimedia services.
General Warnings
RISK OF CHOKING!
Keep packaging material, like plastic bags and rubber bands, out of the reach of children, as these materials pose a choking hazard.
RISK OF ELECTRIC SHOCK!
This device contains electronic components that operate via a power source (batteries). Children should only use the device under adult supervision. Only use the device as described in the manual; otherwise, you run the risk of an electric shock.
RISK OF CHEMICAL BURN!!
Leaking battery acid can lead to chemical burns. Avoid contact of battery acid with skin, eyes and mucous membranes. In the event of contact, rinse the affected region immediately with a plenty of water and seek medical attention.

RISK OF FIRE/EXPLOSION!
Use only the recommended batteries. Do not short-circuit the device or batteries, or throw them into a fire. Excessive heat or improper handling could trigger a short-circuit, a fire or an explosion.
NOTE!
Do not disassemble the device. In the event of a defect, please contact your dealer. The dealer will contact the Service Centre and can send the device in to be repaired, if necessary.
Do not immerse the unit in water.
Do not subject the unit to excessive force, shock, dust, extreme temperature or high humidity, which may result in malfunction, shorter electronic life span, damaged batteries and distorted parts.
Use only the recommended batteries. Always replace weak or empty batteries with a new, complete set of batteries at full capacity. Do not use batteries from different brands or with different capacities. Remove the batteries from the unit if it has not been used for a long time.
The manufacturer is not liable for damage related to improperly installed batteries!
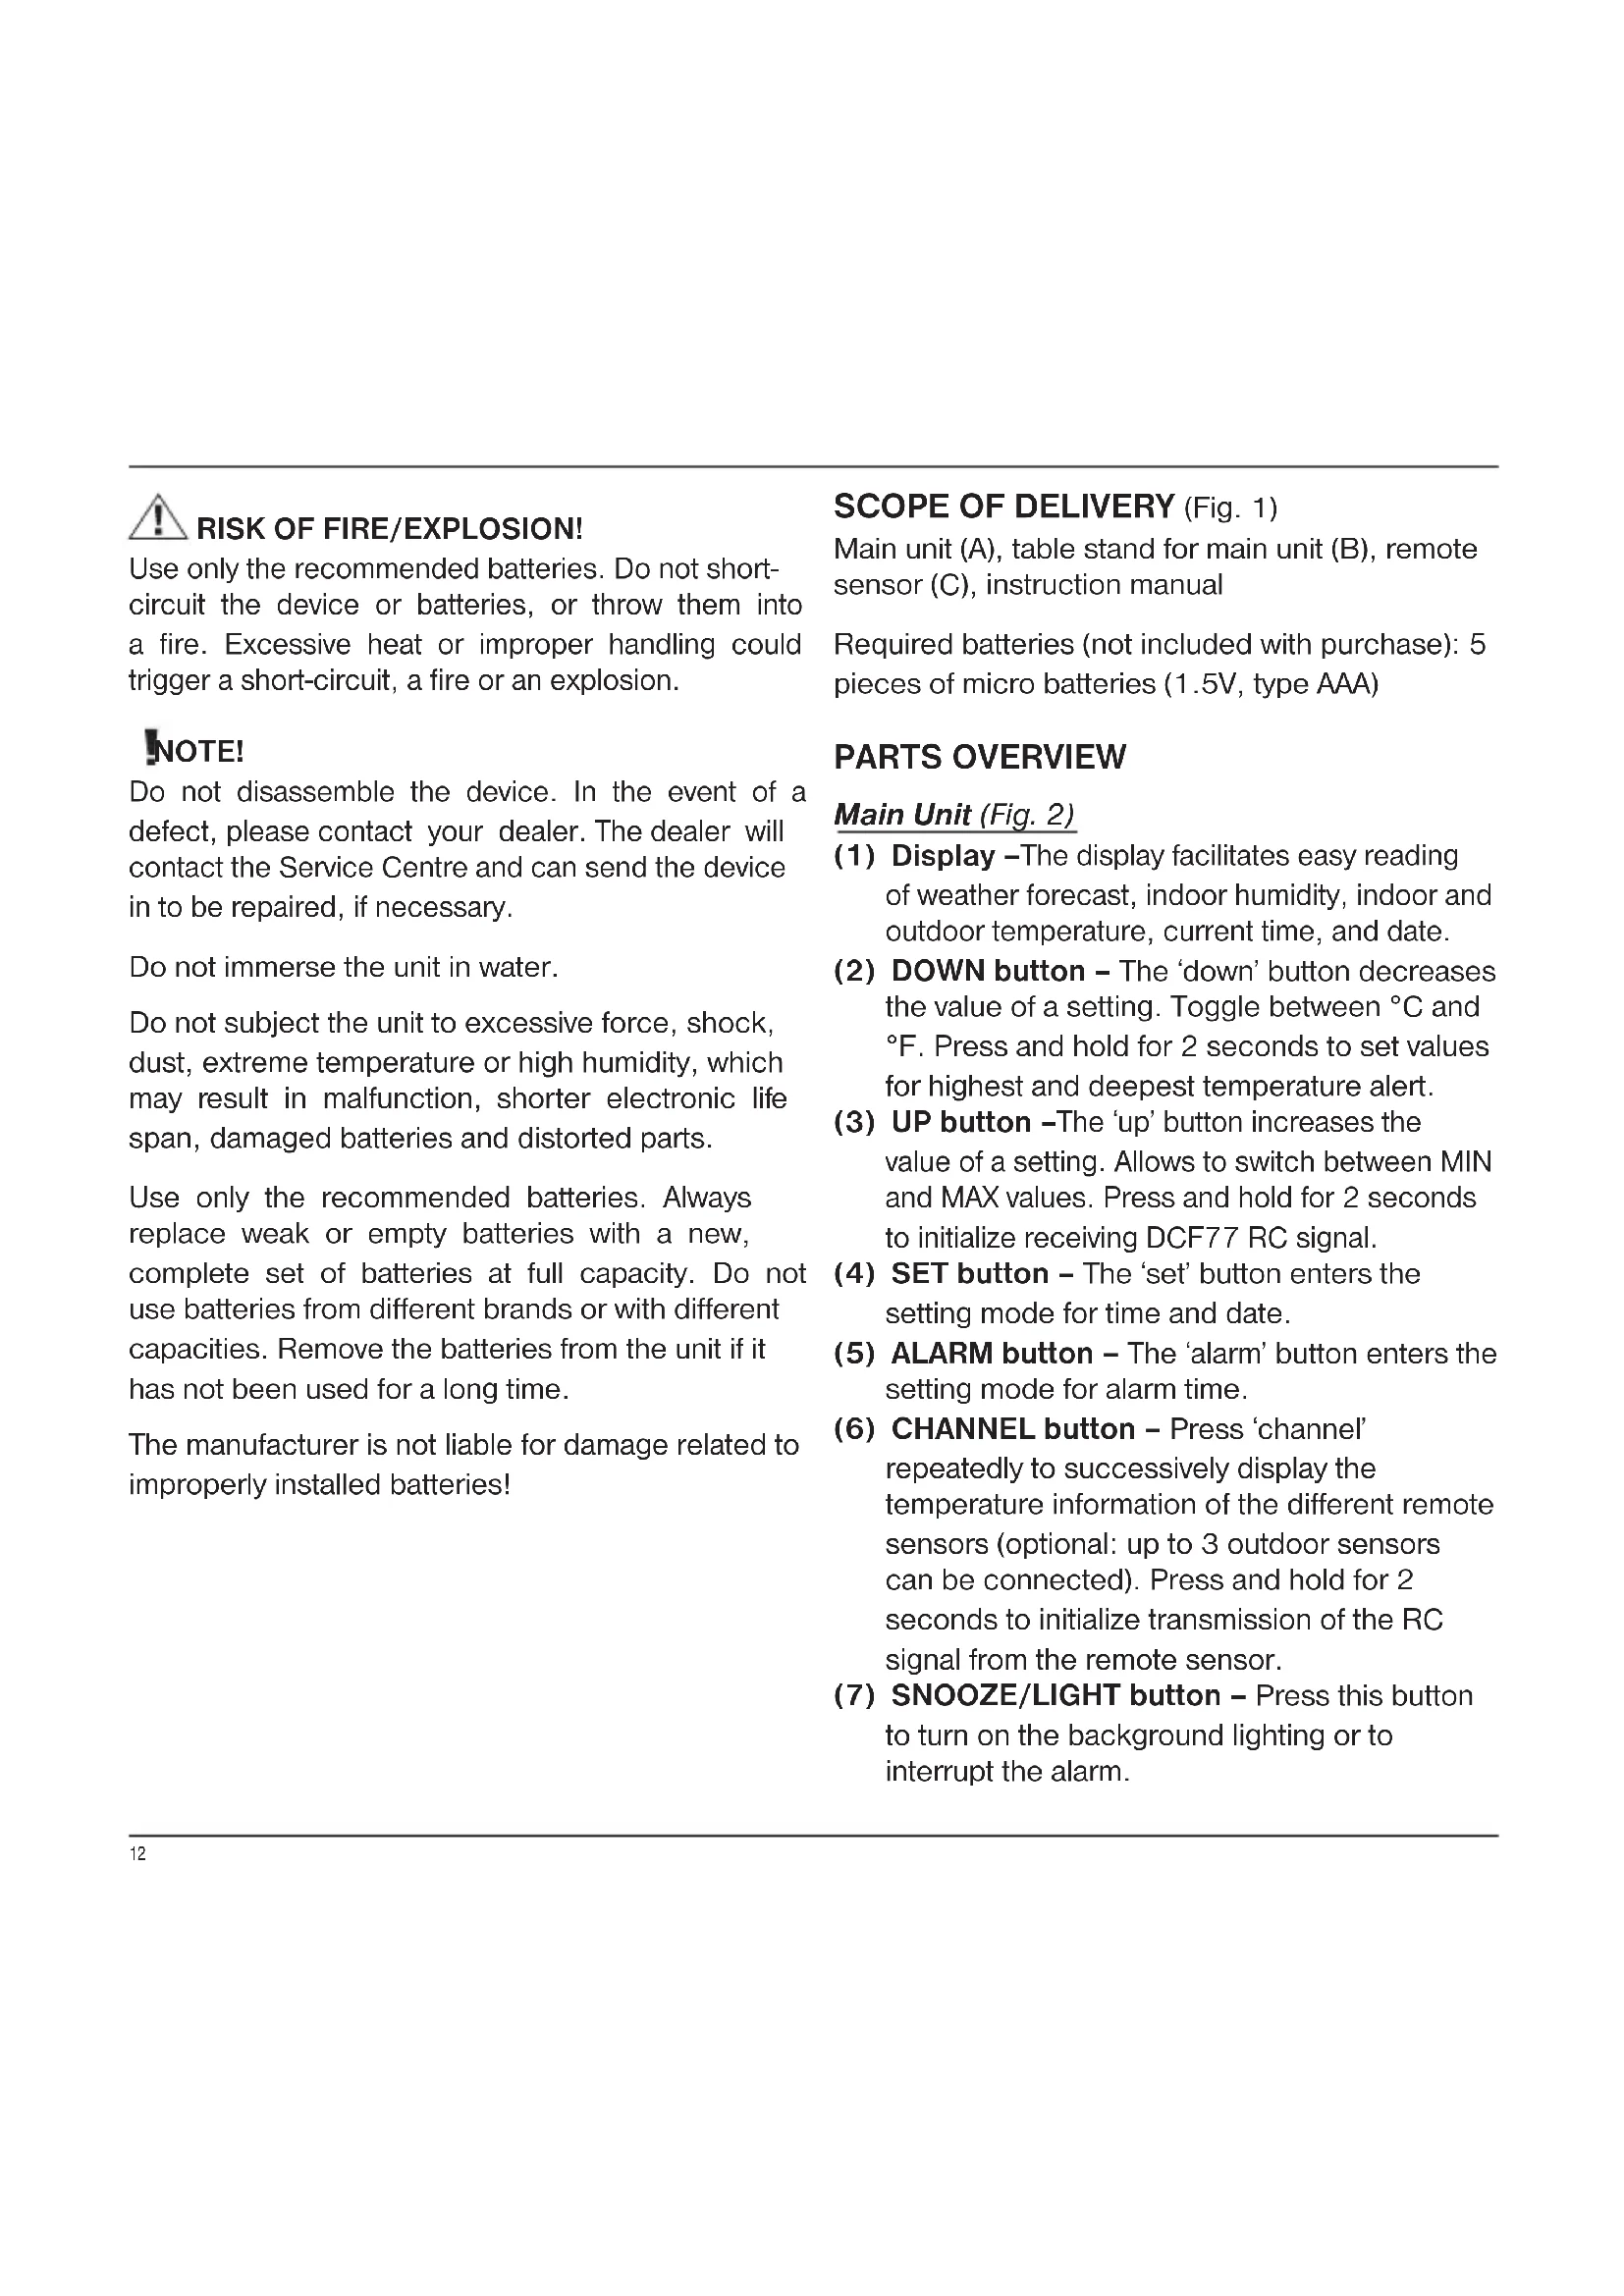
SCOPE OF DELIVERY (Fig. 1)
Main unit (A), table stand for main unit (B), remote sensor (C), instruction manual
Required batteries (not included with purchase): 5 pieces of micro batteries (1.5V, type AAA)
PARTS OVERVIEW
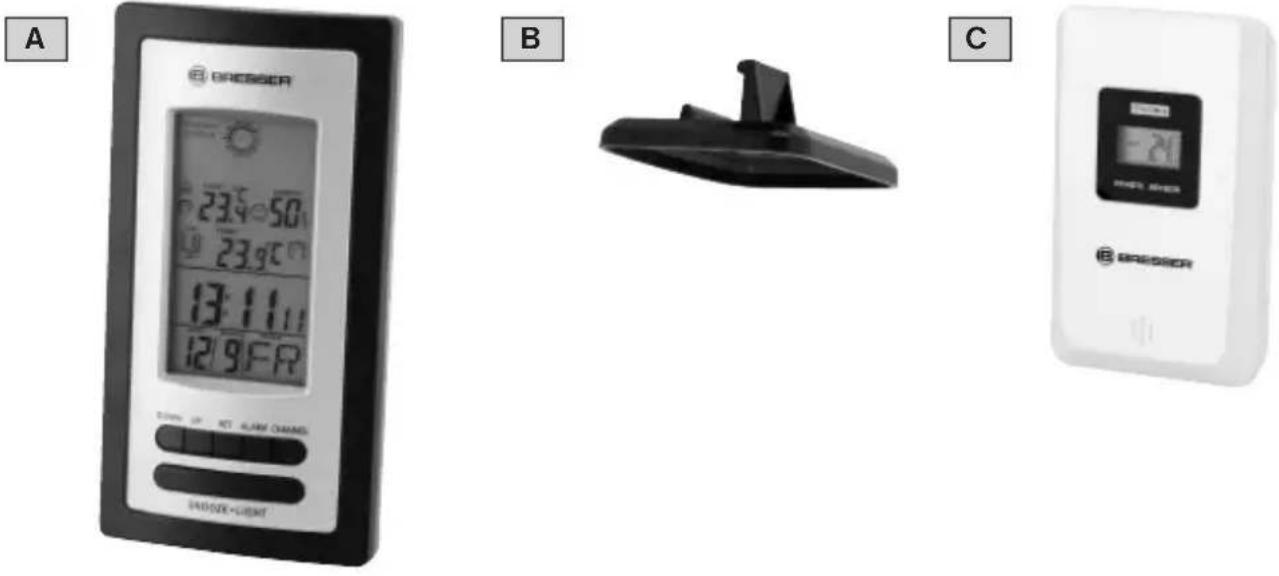
Main Unit (Fig. 2)
(1) Display – The display facilitates easy reading of weather forecast, indoor humidity, indoor and outdoor temperature, current time, and date.
(2) DOWN button – The 'down' button decreases the value of a setting. Toggle between °C and °F. Press and hold for 2 seconds to set values for highest and deepest temperature alert.
(3) UP button –The 'up' button increases the value of a setting. Allows to switch between MIN and MAX values. Press and hold for 2 seconds to initialize receiving DCF77 RC signal.
(4) SET button - The 'set' button enters the setting mode for time and date.
(5) ALARM button – The 'alarm' button enters the setting mode for alarm time.
(6) CHANNEL button – Press ‘channel’ repeatedly to successively display the temperature information of the different remote sensors (optional: up to 3 outdoor sensors can be connected). Press and hold for 2 seconds to initialize transmission of the RC signal from the remote sensor.
(7) SNOOZE/LIGHT button - Press this button to turn on the background lighting or to interrupt the alarm.
(8) Wall-mount recessed hole –This hole makes it possible to mount the main unit on a wall.
(9) Battery compartment
(10) Table stand - Add if station is to be placed on a flat surface.
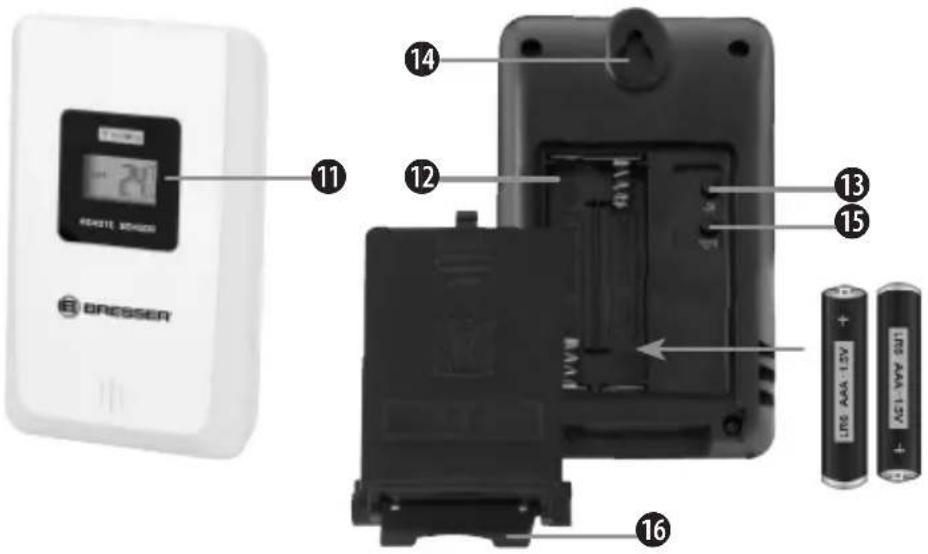
Remote sensor (Fig. 3)
(11) Outdoor temperature
(12) Battery compartment
(13) CH button - Channel is to be selected at channel 1.
(14) Wall mount hole –This hole makes it possible to mount the remote sensor on a wall.
(15) °C/°F button - This button selects between Celsius (°C) and Fahrenheit (°F).
(16) Table stand - Use this stand to place the device on a flat surface
BEFORE YOU START
IMPORTANT!
- Insert batteries for remote units before doing so for the main unit.
- Place the main unit as close as possible to the remote unit.
- Position the remote unit and main unit within the effective transmission range.
When changing batteries always change batteries in the main unit as well as all remote units and replace them in the correct order, so the remote connection can be re-established. If batteries are exchanged in only one of the devices (i.e. the remote sensor) the signal can't be received or can't be received correctly.
Note, that the effective range is vastly affected by building materials and position of the main and remote units. Due to external influences (various RC devices and other sources of interference), the maximum distance can be greatly reduced. In such cases we suggest to position the main unit and the remote sensor at other places. Sometimes all it takes is a relocation of one of these components of a few inches!
Though the remote unit is weather proof, it should be placed away from direct sunlight, rain or snow.
POWER SUPPLY
Remote sensor
- Open the battery compartment door.
- Install 2 batteries (AAA size 1.5V) strictly according to the polarities shown.
- Press CH button to select the channel.
- Reinsert the battery compartment door.
Main unit
- Open the battery compartment door.
- Install 3 batteries (AAA size 1.5V) strictly according to the polarities shown.
- Reinsert the battery compartment door.
Low battery warning
When it is time to replace the batteries, the respective low battery indicator will be shown near to the time display (batteries for main unit) or near to the outdoor temperature (batteries for remote sensor).
USING TABLE STAND OR WALL MOUNTING
The main unit has a removable table stand, which - when connected - can support the unit on a flat surface. It is possible to remove the stand and mount the unit on a wall using the recessed screw hole. The same applies to the remote unit; it can be placed on a flat surface or mounted on a wall using the recessed screw hole.
OPERATION
Receiving measurements and time signal
Once batteries are placed in the remote unit, it will start transmitting temperature readings at roughly 45 second intervals. As soon as batteries are installed in the main unit it will start searching for a signal from the remote sensor for about 3 minutes. Upon successful reception of the signal, the outdoor temperature will be displayed on the main unit. The main unit will automatically update its readings at about 45 second intervals.
Subsequently, the main unit will attempt to receive the DCF77 radio signal. The reception symbol flashes. When the time signal is received after 3-5 minutes, the current time and date appear in the display. The reception symbol will now be shown permanently in the display. Date and time are automatically updated daily at 2:05 o'clock (CET) by the main unit.
Temperature and humidity
-
Press the DOWN button to switch the displayed temperature between ^ C and ^ F.
-
Once the battery is installed, the main unit will start displaying the interior measurement information. The main unit will display the information from the remote sensor for the first time approximately 3 minutes after the power supply was established.
- There are 3 different icons to displaying the indoor climate as below:

humidity is same or lower than 40%

humidity is same or higher than 70%

humidity is higher than 40% but lower than 70%; at same time, the temperature is higher than 20°C (68°F), but lower than 27°C (80.6°F)
Max/Min records of temperature and humidity
- Pressing and releasing the UP button in short intervals repeatedly makes the display alternate between the current temperature and humidity as well as MIN/MAX recordings.
- In MIN/MAX temperature display mode, hold UP button to reset all indoor and outdoor MIN/MAX records to current values.
- The MIN/MAX temperature and humidity values will be recorded automatically.
- The MIN/MAX temperature and humidity records automatically will be reset at 0:00 o'clock (12:00 a.m.) every day.
Current weather and weather trend
The weather forecast is depending on the fluctuation of temperature and humidity. From
these values a weather forecast for the next 6 hours is calculated.
Current weather
| Sunny | |
| Partly cloudy | |
| Cloudy | |
| Rainy |
Temperature trend
| → | Rising |
| → | Steady |
| → | Falling |
Main unit signal receiving check
The transmission range is about 30 meters from the remote station to the main unit (in open area).
The main unit should receive the temperature/humidity information from the transmitter within 3 minutes after set-up.
Should the main unit not receive information from transmitter within 3 minutes after setting up, please check following steps:
-
Press and hold CHANNEL button for 2-3 sec to re-start receiving from the transmitter; the data will normally be received within 3 minutes.
-
If the first step does not yield a desirable solution, please remove the batteries and re-install them (hardware reset).
At the same time, please make sure the following:
- The main unit as well the as transmitter should be at least 5\~6.5 feet (1.5\~2 meters) away from any interfering sources, such as computer monitors or TV sets.
- The main unit should not stand close to metal window frames.
- Please do not using other electrical products, such as headphones or speakers, operating on the same signal frequency (433.92 MHz).
- Electrical devices operating on the same signal frequency may also cause interference. This can include devices used in the neighborhood as well.
Main unit channel setting
- The main unit can be connected with a maximum of up to 3 transmitters.
- Press the CHANNEL button to switch between the displays of each channel. The main unit will display the information of the corresponding transmitter.
Automatic time setting
- After the batteries are installed. The clock will automatically search for the radio signal. It takes about 3-5 minutes to finish this process.
- If the radio signal is received, the date and time will be set automatically and the radio control signal icon 🎨 turns on.
If the clock fails to receive the time signal, go ahead with the following steps:
-
Press and hold the UP button for 2 seconds to re-initialize RC signal receiving.
-
If the time signal receiving fails again, the time can be set manually.
Manual time setting
- Press and hold the SET button in normal display mode for 2 seconds to enter into time setting mode.
- The figure to be set will start flashing.
- Press DOWN or UP to change the value.
- Press SET button to confirm and go to the next value to be changed.
- The setting order is year >> month >> date >> language selection for display of the day (abbreviated) >> time zone >> 12/24hr >> hour >> minute >> save and exit.
- If there is no operation for 30 seconds, the existing setting will be saved and the device returns to normal display mode. Press SET button again to confirm and exit setting.
Alarm setting
- Press and hold the ALARM button in normal display mode for 2 seconds to enter into alarm time setting mode.
- The figure to be set will start flashing.
- Press the DOWN or UP button to change this setting.
- Press the ALARM button to confirm and go to the next setting.
- The setting order is hour >> minute >> save and exit.
- Press ALARM again to confirm and exit setting mode.
- Press SET button to turn on or off the alarm, When the alarm is activated, the icon is
showed on the screen. When this alarm bell symbol is not displayed the alarm is off.
- The alarm sounds for a total of 2 minutes and will change characteristics along that time.
Snooze/light function
- When alarm is ringing, you can press the SNOOZE/LIGHT button to silence it for 5 minutes. The icon Z^z will now flash as well.
- Press any other button to turn off the alarm. The alarm will activate again after 24 hours at the set time.
- During normal operation mode, a press of the SNOOZE/LIGHT button turns on the backlight for 20 seconds.
Temperature buzzer setting
- Press and hold the DOWN button in normal display mode for 2 seconds to enter into temperature buzzer setting.
Note: Make sure that you have set the correct channel for the desired sensor.
- Press the DOWN or UP button to turn on or off the temperature buzzer.
- Press the SET button to confirm and go to next setting.
- The setting order is: temperature buzzer ON/OFF >> highest temperature limit >> lowest temperature limit. If the UP or DOWN button is held and presses continuously, the value will change faster.
Note: The range for maximum upper limit is 70^ C and maximum limit for lower temperatures is -50^ C.
- Press SET button again to confirm and exit setting.
Note: As long as the outside temperature has exceeded or fallen below the set limits, the alarm will sound every minute for a duration of 2 seconds. Furthermore the display for the outdoor temperature and the symbols MAX are MIN flashing.
Sensor function
- Press CH button to set the channels 1 to 3 for each transmitter if you wish to connect more than one transmitter with the main unit.
- Press ^ C/ ^ F to change the temperature display of the transmitter
- Once the weather station receives radio signals from the sensors, the alternating temperature values of the different channels will be updated on the weather station every 1-2 minutes.
TROUBLESHOOTING
Signal disconnection
If without obvious reasons the display of the outdoor temperature goes blank, please check the following:
- The remote unit is still in place.
- The batteries of both the remote unit and main unit are not empty. Replace batteries with new ones if necessary.
Note: When the temperature falls below freezing point, the batteries of outdoor units will freeze, lowering their voltage supply, effective range, and life span.
- All units required are within range and the path is clear of obstacles and interference. Shorten the distance if necessary.
Transmission collision
Signals from other household devices, such as door bells, home security systems and entry controls, may interfere with those of this product and cause temporarily reception failure. This is normal and does not affect the general performance of the product. The transmission and reception of temperature readings will resume once the interference recedes.
SPECIFICATIONS
Measurement
Indoor temperature range: 0\~50°C
Outdoor Temperature Range: -20\~60°C
Resolution for temperature: 0.1°C
Humidity range: 20\~90%
Resolution for humidity: 1%
Transmission
Transmission range between transmitter and main unit: 30 meters (in open area)
Radio frequency: 433.92 MHz
Power supply
Main unit: 3x AAA 1.5V battery
Remote sensor: 2x AAA 1.5V battery
CLEANING AND MAINTENANCE
Before cleaning the device, disconnect it from the power supply (remove batteries)!
Only use a dry cloth to clean the exterior of the
device. To avoid damaging the electronics, do not use any cleaning fluid.
DISPOSAL
Dispose of the packaging materials properly, according to their type, such as paper or cardboard. Contact your local waste-disposal service or environmental authority for information on the proper disposal.

Do not dispose of electronic devices in the household garbage!
As per Directive 2002/96/EC of the European Parliament on waste electrical and electronic equipment and its adaptation into German law, used electronic devices must be collected separately and recycled in an environmentally friendly manner.
In accordance with the regulations concerning batteries and rechargeable batteries, disposing of them in the normal household waste is explicitly forbidden. Please make sure to dispose of your used batteries as required by law — at a local collection point or in the retail market. Disposal in domestic waste violates the Battery Directive. Batteries that contain toxins are marked with a sign and a chemical symbol. "Cd" = cadmium, "Hg" = mercury, "Pb" = lead.
EC DECLARATION OF CONFORMITY
CE Bresser GmbH declares that the device (TemeoTrend Sunny/Art.No.: 70-00001) is in accordance with applicable guidelines and corresponding standards of the 1999/5/EG directive.
DÉCLARATION DE CONFORMITÉ CE
The regular guarantee period is 2 years and begins on the day of purchase. To benefit from an extended voluntary guarantee period as stated on the gift box, registration on our website is required. You can consult the full guarantee terms as well as information on extending the guarantee period and details of our services at www.bresser.de/warranty_terms. Would you like detailed instructions for this product in a particular language? Then visit our website via the link below (QR code) for available versions. Alternatively you can also send an email to manuals@bresser.de or leave a message on +49 (0) 28 72 - 80 74-220*. Please always state your name, precise address, a valid phone number and email address, as well as the article number and name.
*Number charged at local rates in Germany (the amount you will be charged per phone call will depend on the tariff of your phone provider); calls from abroad will involve higher costs.
FR GARANTIE ET SERVICE
- BRESSER® TemeoTrend Sunny
- Zu dieser Anleitung
- GEFAHR EINES STROMSCHLAGS!
- About this Instruction Manual
- General Warnings
- RISK OF FIRE/EXPLOSION!
- NOTE!
- SCOPE OF DELIVERY (Fig. 1)
- PARTS OVERVIEW
- Main Unit (Fig. 2)
- Remote sensor (Fig. 3)
- BEFORE YOU START
- IMPORTANT!
- POWER SUPPLY
- Remote sensor
- Main unit
- Low battery warning
- USING TABLE STAND OR WALL MOUNTING
- OPERATION
- Receiving measurements and time signal
- Temperature and humidity
- Max/Min records of temperature and humidity
- Current weather and weather trend
- Main unit signal receiving check
- Main unit channel setting
- Automatic time setting
- Manual time setting
- Alarm setting
- Snooze/light function
- Temperature buzzer setting
- Sensor function
- TROUBLESHOOTING
- Signal disconnection
- Transmission collision
- SPECIFICATIONS
- Measurement
- Transmission
- CLEANING AND MAINTENANCE
- DISPOSAL
- EC DECLARATION OF CONFORMITY
- DÉCLARATION DE CONFORMITÉ CE
- FR GARANTIE ET SERVICE
Brand : BRESSER
Model : TemeoTrend Sunny 7000001
Category : Weather Station