
Parma - Bike rack Peruzzo - Free user manual and instructions
Find the device manual for free Parma Peruzzo in PDF.

| Product type | Towbar bike rack |
| Brand | Peruzzo |
| Model | Parma |
| Capacity (bikes) | 2, 3 or 4 depending on model (706: 2, 706/3: 3, 706/3A: 3, 706/4: 4) |
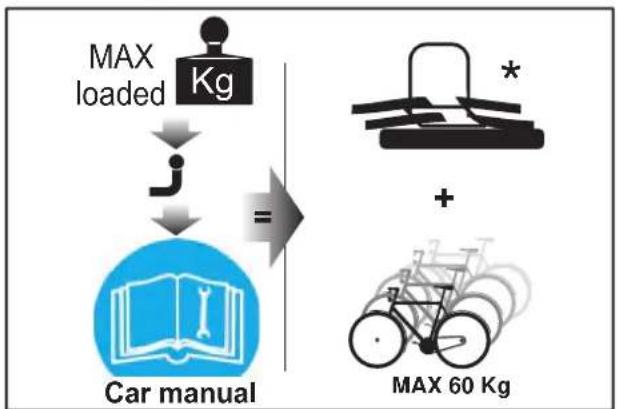
| Maximum load | 60 kg (all models) |
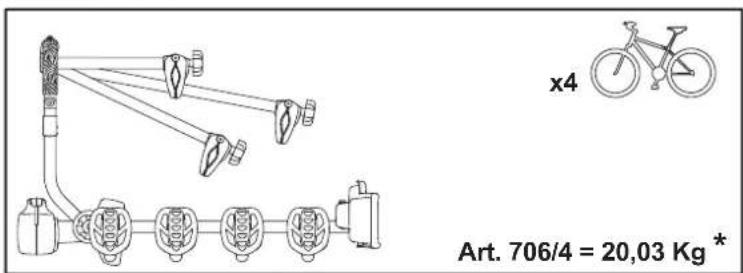
| Self weight | 15.58 kg (706) to 20.03 kg (706/4) |
| Attachment | On towball (diameter 50 mm) |
| Minimum closing force | 45 kg |
| Lighting | Rear lights (indicators, stop, fog, reverse) with license plate |
| Electrical supply | 13-pin socket (7-pin adapter possible depending on registration) |
| Tilt | Yes, via tilt hook for boot access |
| Materials | Steel and plastic |
| Included tie-down straps | Straps for wheels (4) and frame (1), additional strap for all bikes |
| Storage | Remove when not in use, store away from moisture |
| Cleaning | Warm water and mild detergent for vehicles |
| Spare parts | Original only, available on the Peruzzo website |
| Certification | CE, compliant with standards (document downloadable at www.peruzzosrl.com) |
| Manual | Available as free PDF at notice-facile.com |
| Use | Transport of bikes only (no additional accessories) |
| Adjustable accessories | Adjustable wheel supports, fixing arms for additional bikes |
Frequently Asked Questions - Parma Peruzzo
User questions about Parma Peruzzo
0 question about this device. Answer the ones you know or ask your own.
Ask a new question about this device
Download the instructions for your Bike rack in PDF format for free! Find your manual Parma - Peruzzo and take your electronic device back in hand. On this page are published all the documents necessary for the use of your device. Parma by Peruzzo.
USER MANUAL Parma Peruzzo
THE REAR CYCLE RACK FOR MOUNTING ON TOW BAR
GB Fitting instructions
D Montageanleitung
flowchart
graph TD
    A["MAX loaded Kg"] --> B["Car manual"]
    B --> C["="]
    C --> D["MAX 60 Kg"]

GB
ASSEMBLY AND USER INSTRUCTIONS
Whenever this product is used the following information must be taken into consideration: the bike rack is a safe product if used correctly, but if it is used incorrectly it can cause damages to you and to anyone driving behind you.
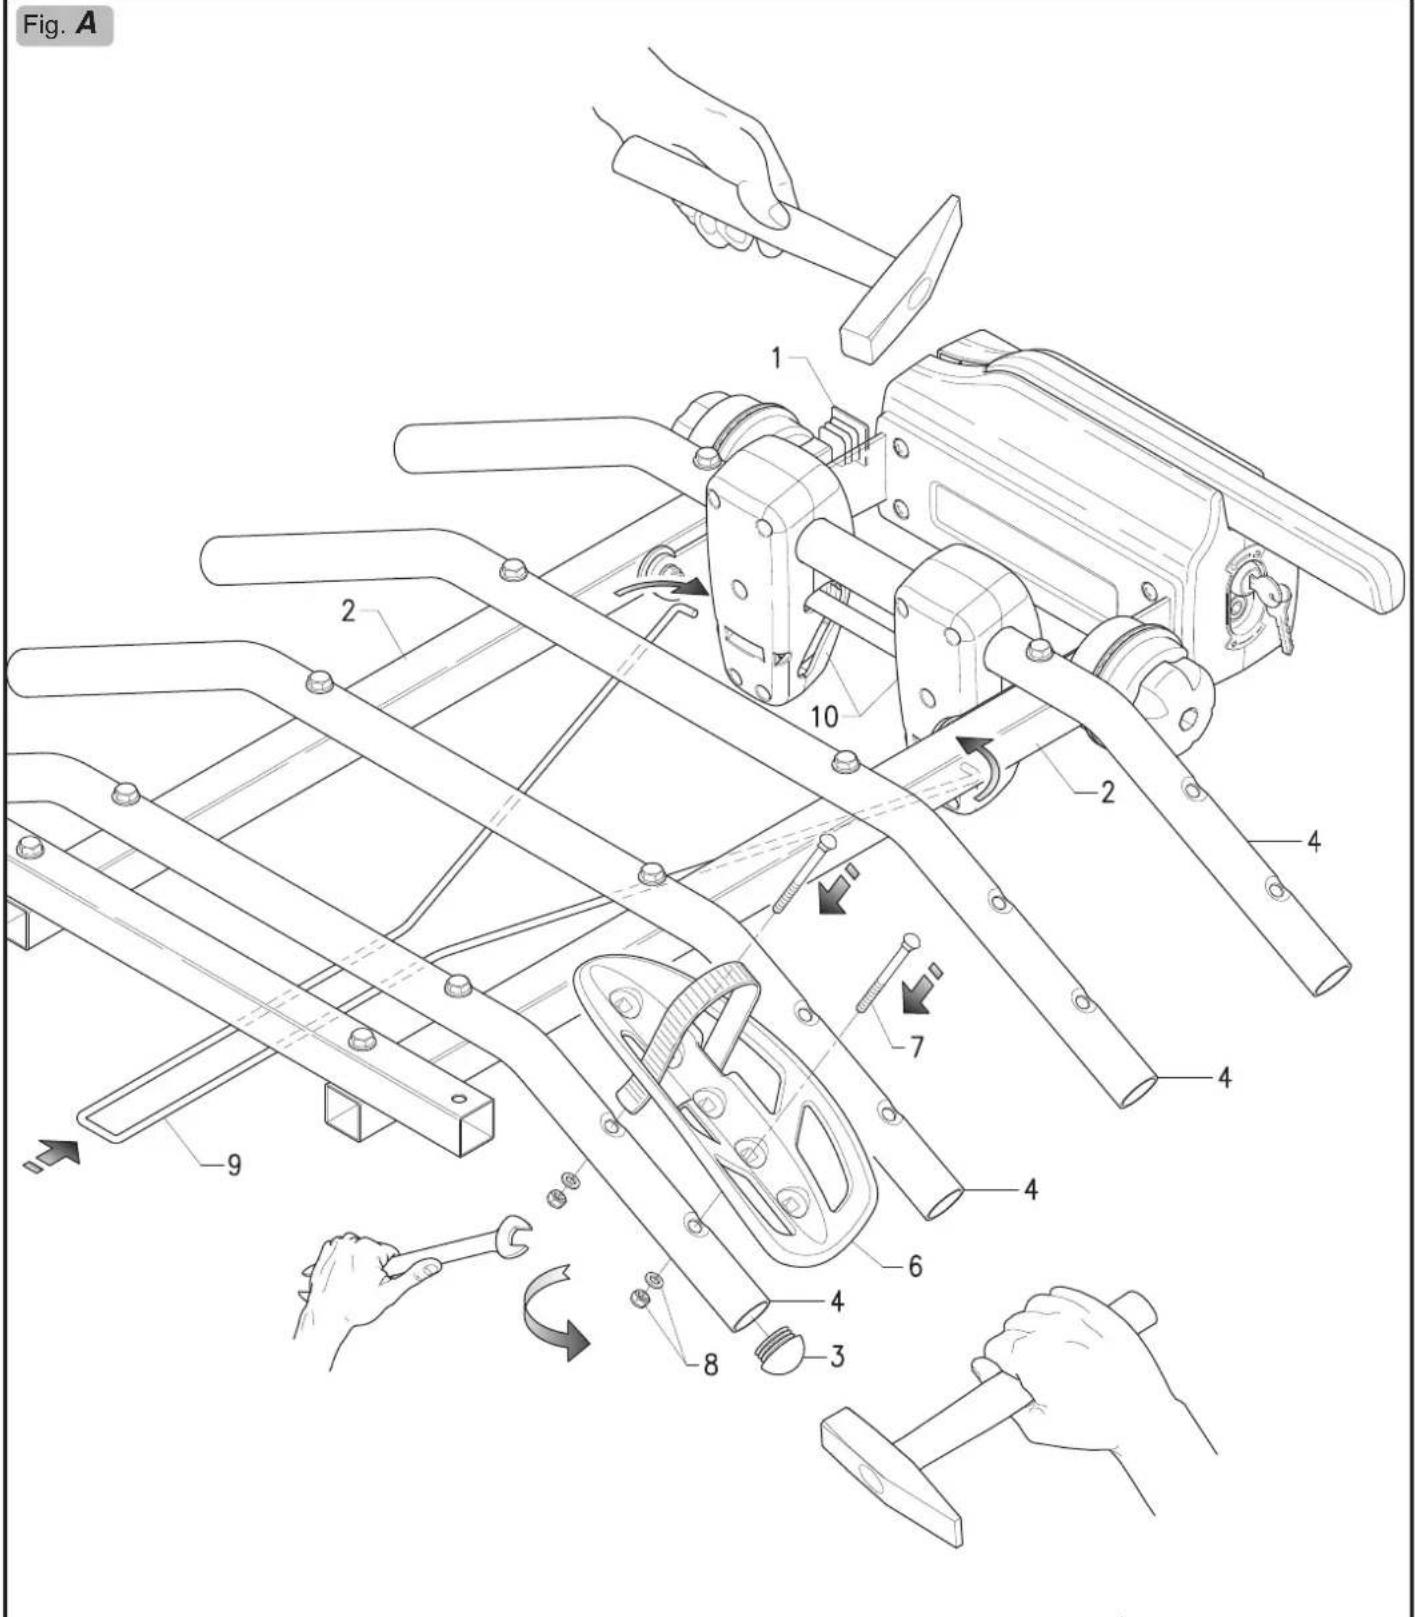
1) Insert the plugs 1 in the square bearing tubes 2 (Fig. A).
2) Insert the plugs 3 in the bike carrier bars 4 (Fig. A) and in the bike fixing arch 5 (Fig. D2).
3) Mount the tyre cradles 6 on the bike carrier bar 4 in the most suitable positions for the dimensions of your bike and fix them with the screws 7, nuts and washers 8 (Fig. A).
4) Fix the hook 9 to the tilt mechanisms 10 (Fig. A).
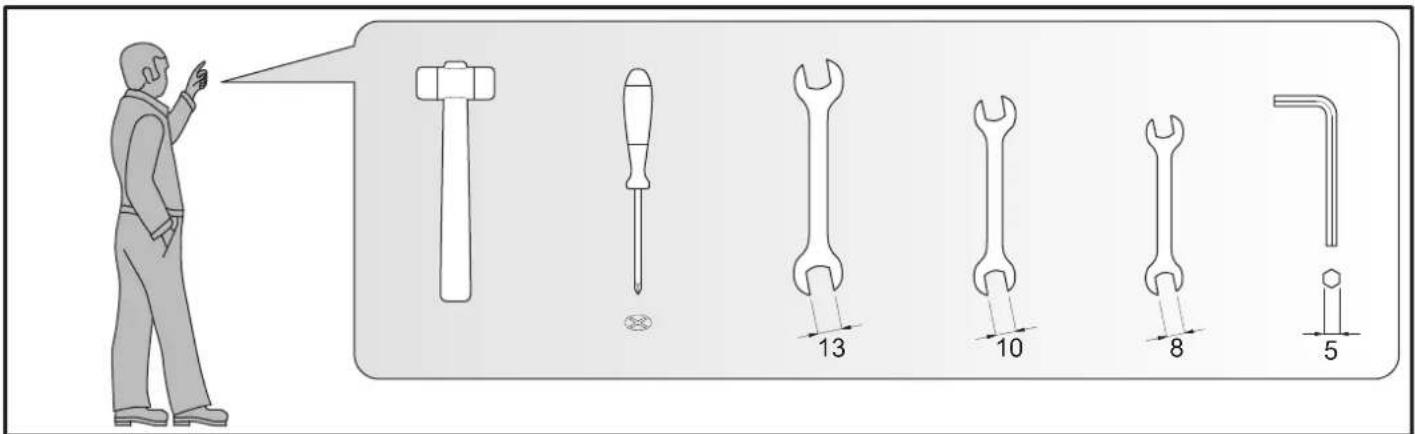
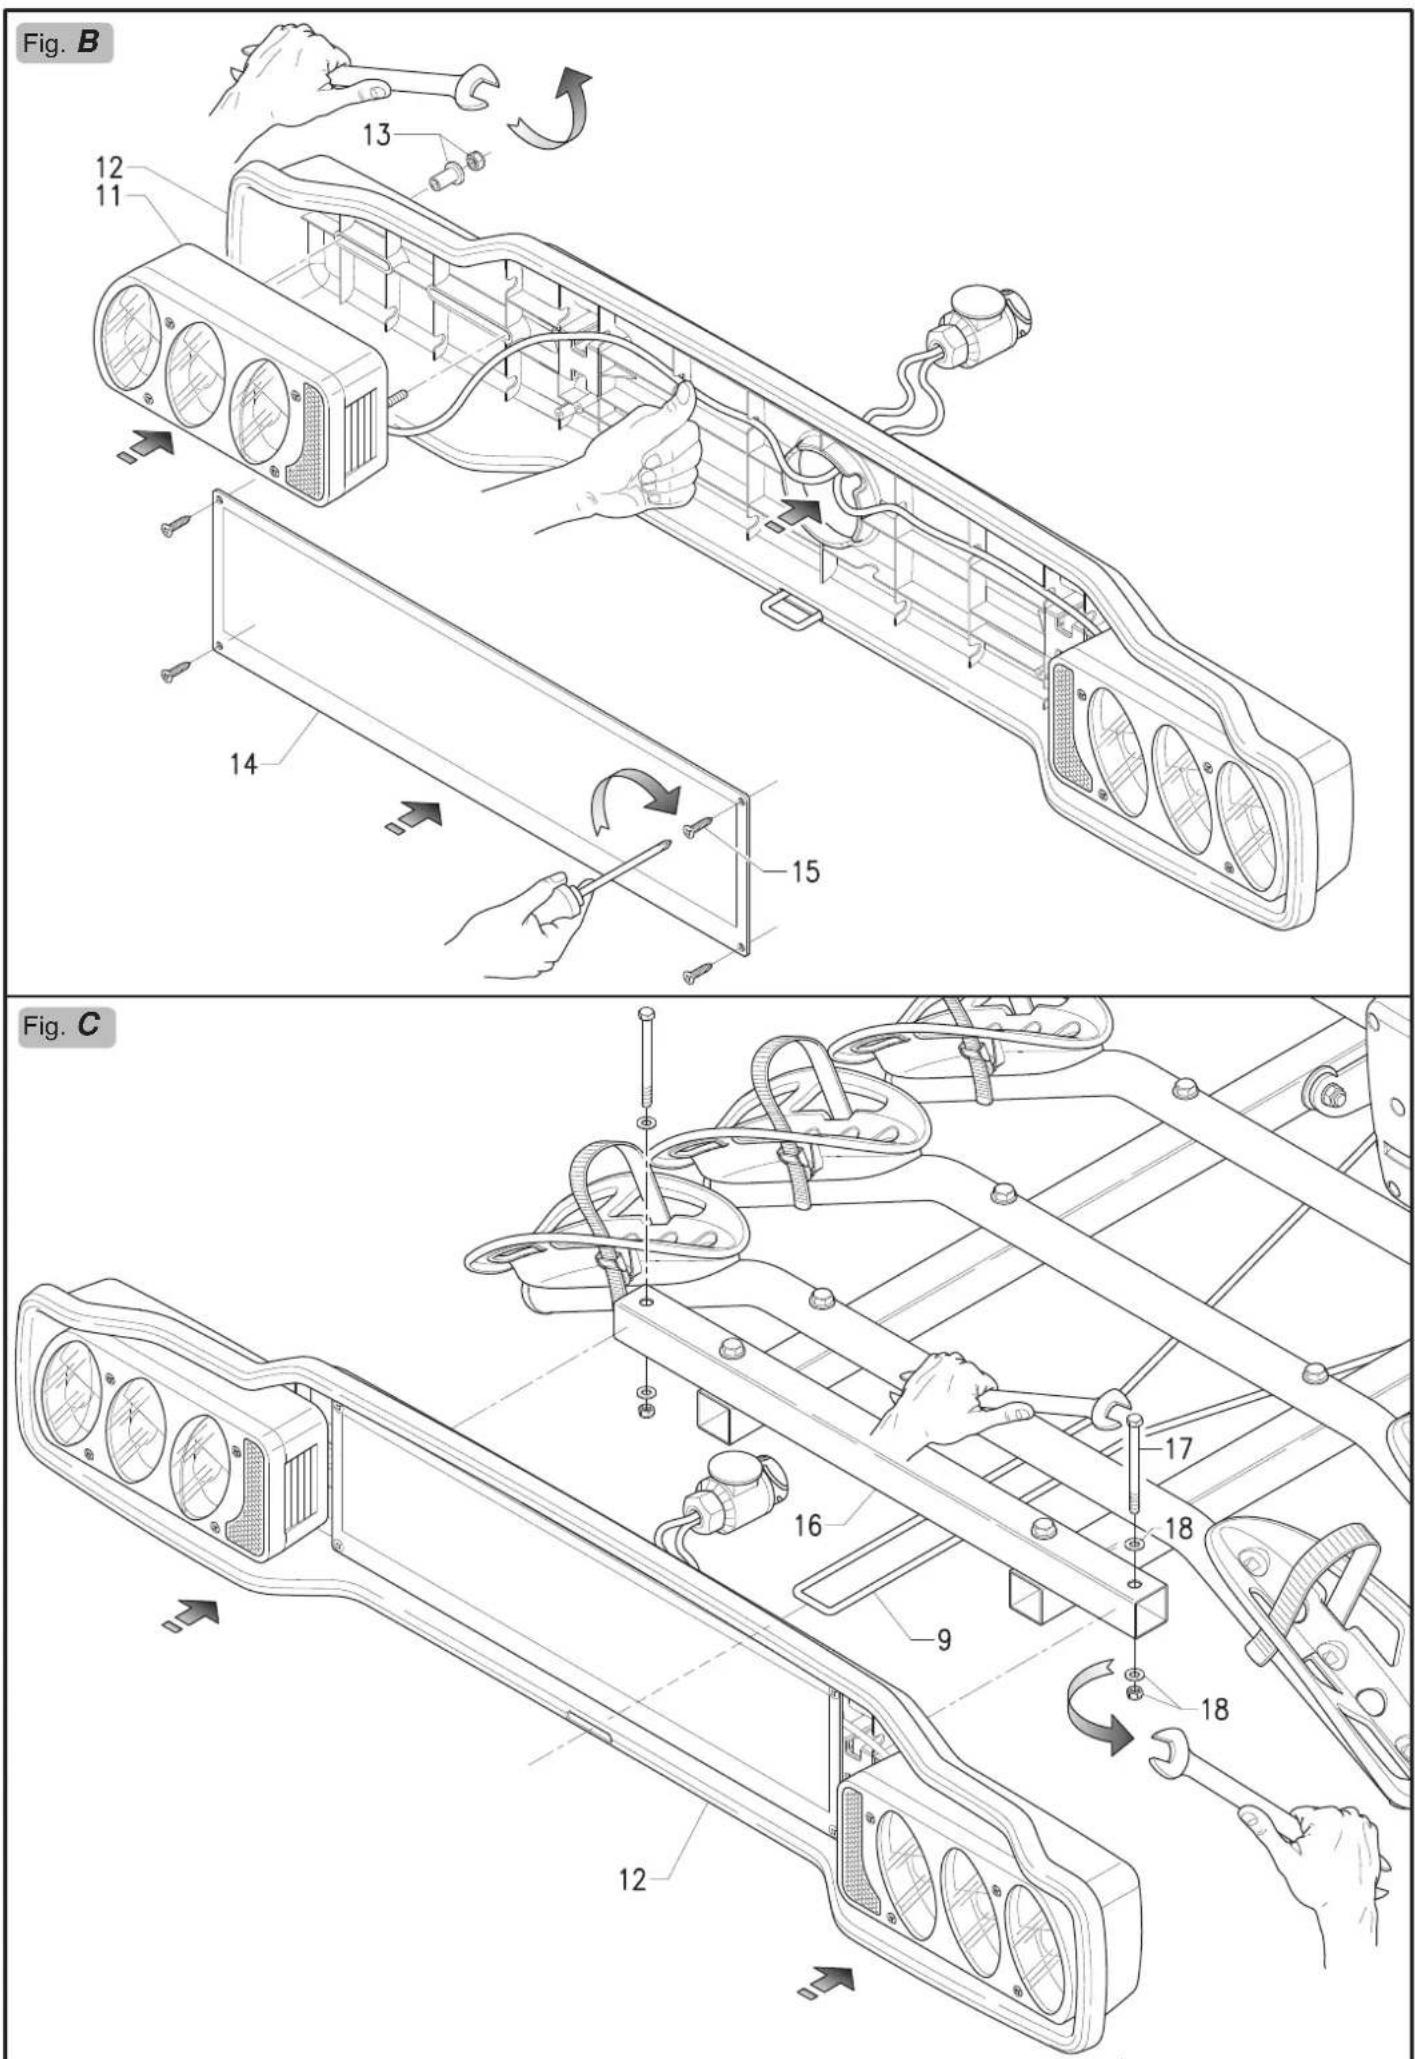
5) Mount the rear lights 11 to the lighting board 12 and fix together with the washers and nuts 13 (Fig. B); take care not to damage the wires and not to over-tighten the nuts as this could damage the plastic parts. Thread the 13 pin plug through the central hole of the lighting board 12.
6) Fix the number plate frame 14 to the lighting board 12 with the screws 15 (Fig. B).
7) Fix the lighting board assembly 12 to the square tube 16 with the screws 17, the nuts and the washers 18; make sure you thread the tilt hook 9 into the slot provided (Fig. C).
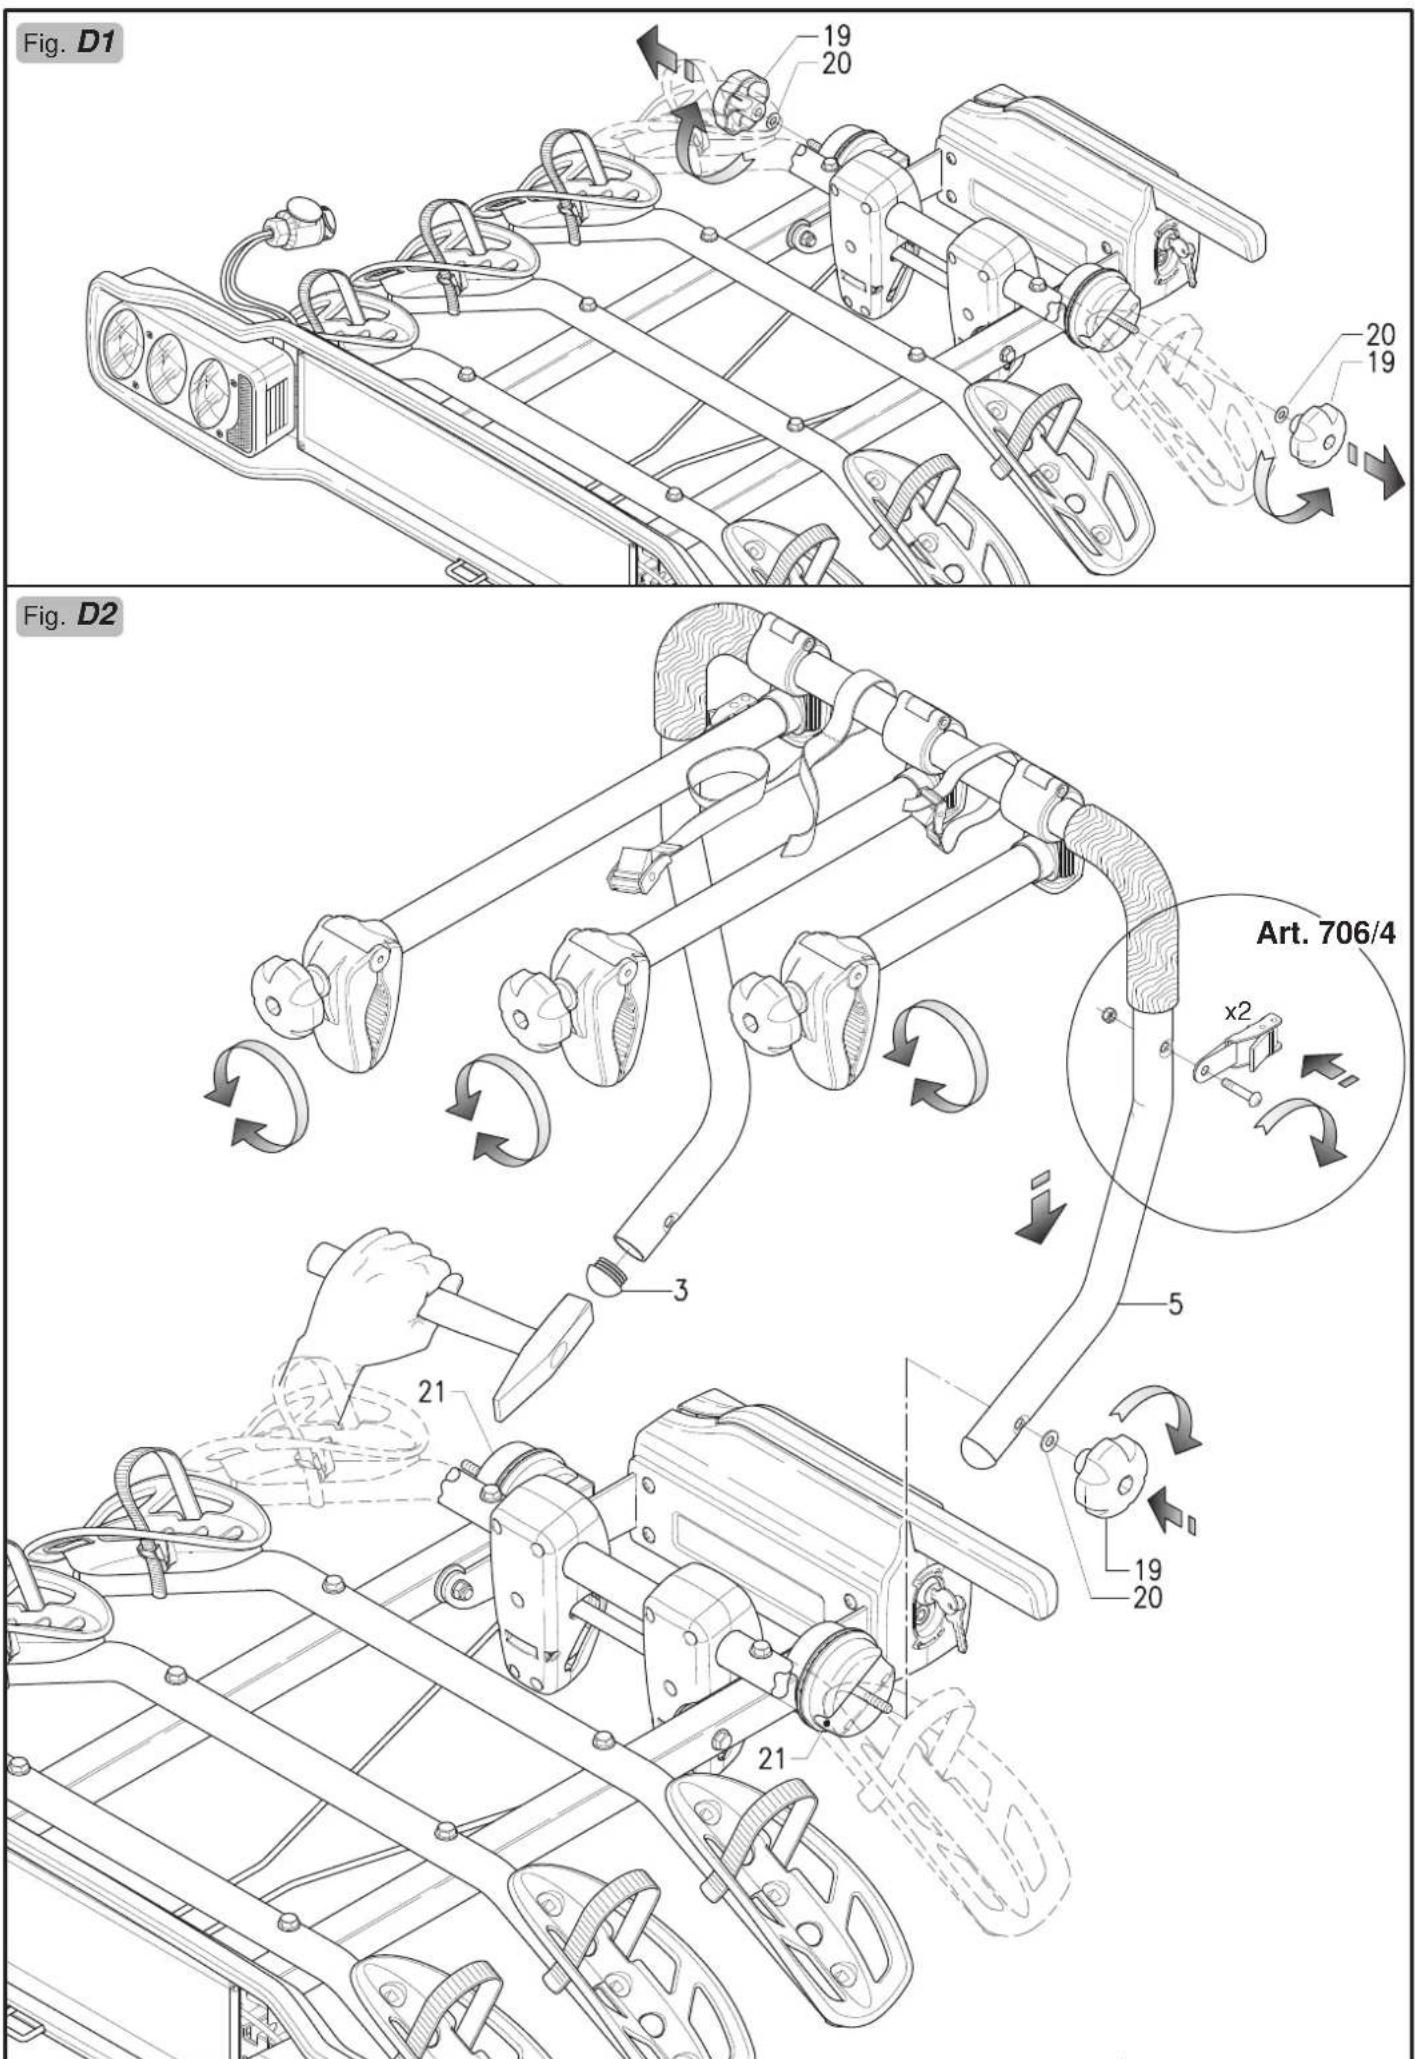
8) Mounting the bike fixing arch 5:
- Undo and remove the knobs 19 and the washers 20 from both sides (Fig. D1);
- Insert the bike fixing arch 5 in the half pipe of the adjustment elements 21, then fix it with the washers 20 and the knobs 19 (Fig. D2).
For personal safety and to avoid damaging the vehicle we recommend 2 people mount the bike carrier.
9) Push the lever 22 upwards, to disengage it turn the wrench 23 counter clockwise (Fig. E1).
10) Place the fixing block 24 on the towball 25 (Fig. E2).
11) Close the clamping device by lowering the lever 22: at least 45 kg. clamping force is required. (Fig. E2).
Adjustment of closing hand force
It is always necessary to make the first adjustment when the product is purchased. Then, every time the product is used, the clamping force must be checked and adjusted if necessary. In order to prevent accidents and damage it is advisable to ask a second person to assist you in this procedure as well. After disengaging and lifting the lever 22 the second person must hold the cycle carrier in a horizontal position. The screw 26 must be adjusted with the wrench provided 27 so that the clamping force on the lever is increased to a minimum of 45 Kg. (Fig. E2). Make sure that the bike rack does not rotate when the clamping device has been locked.
ONLY FOR ART.706/4
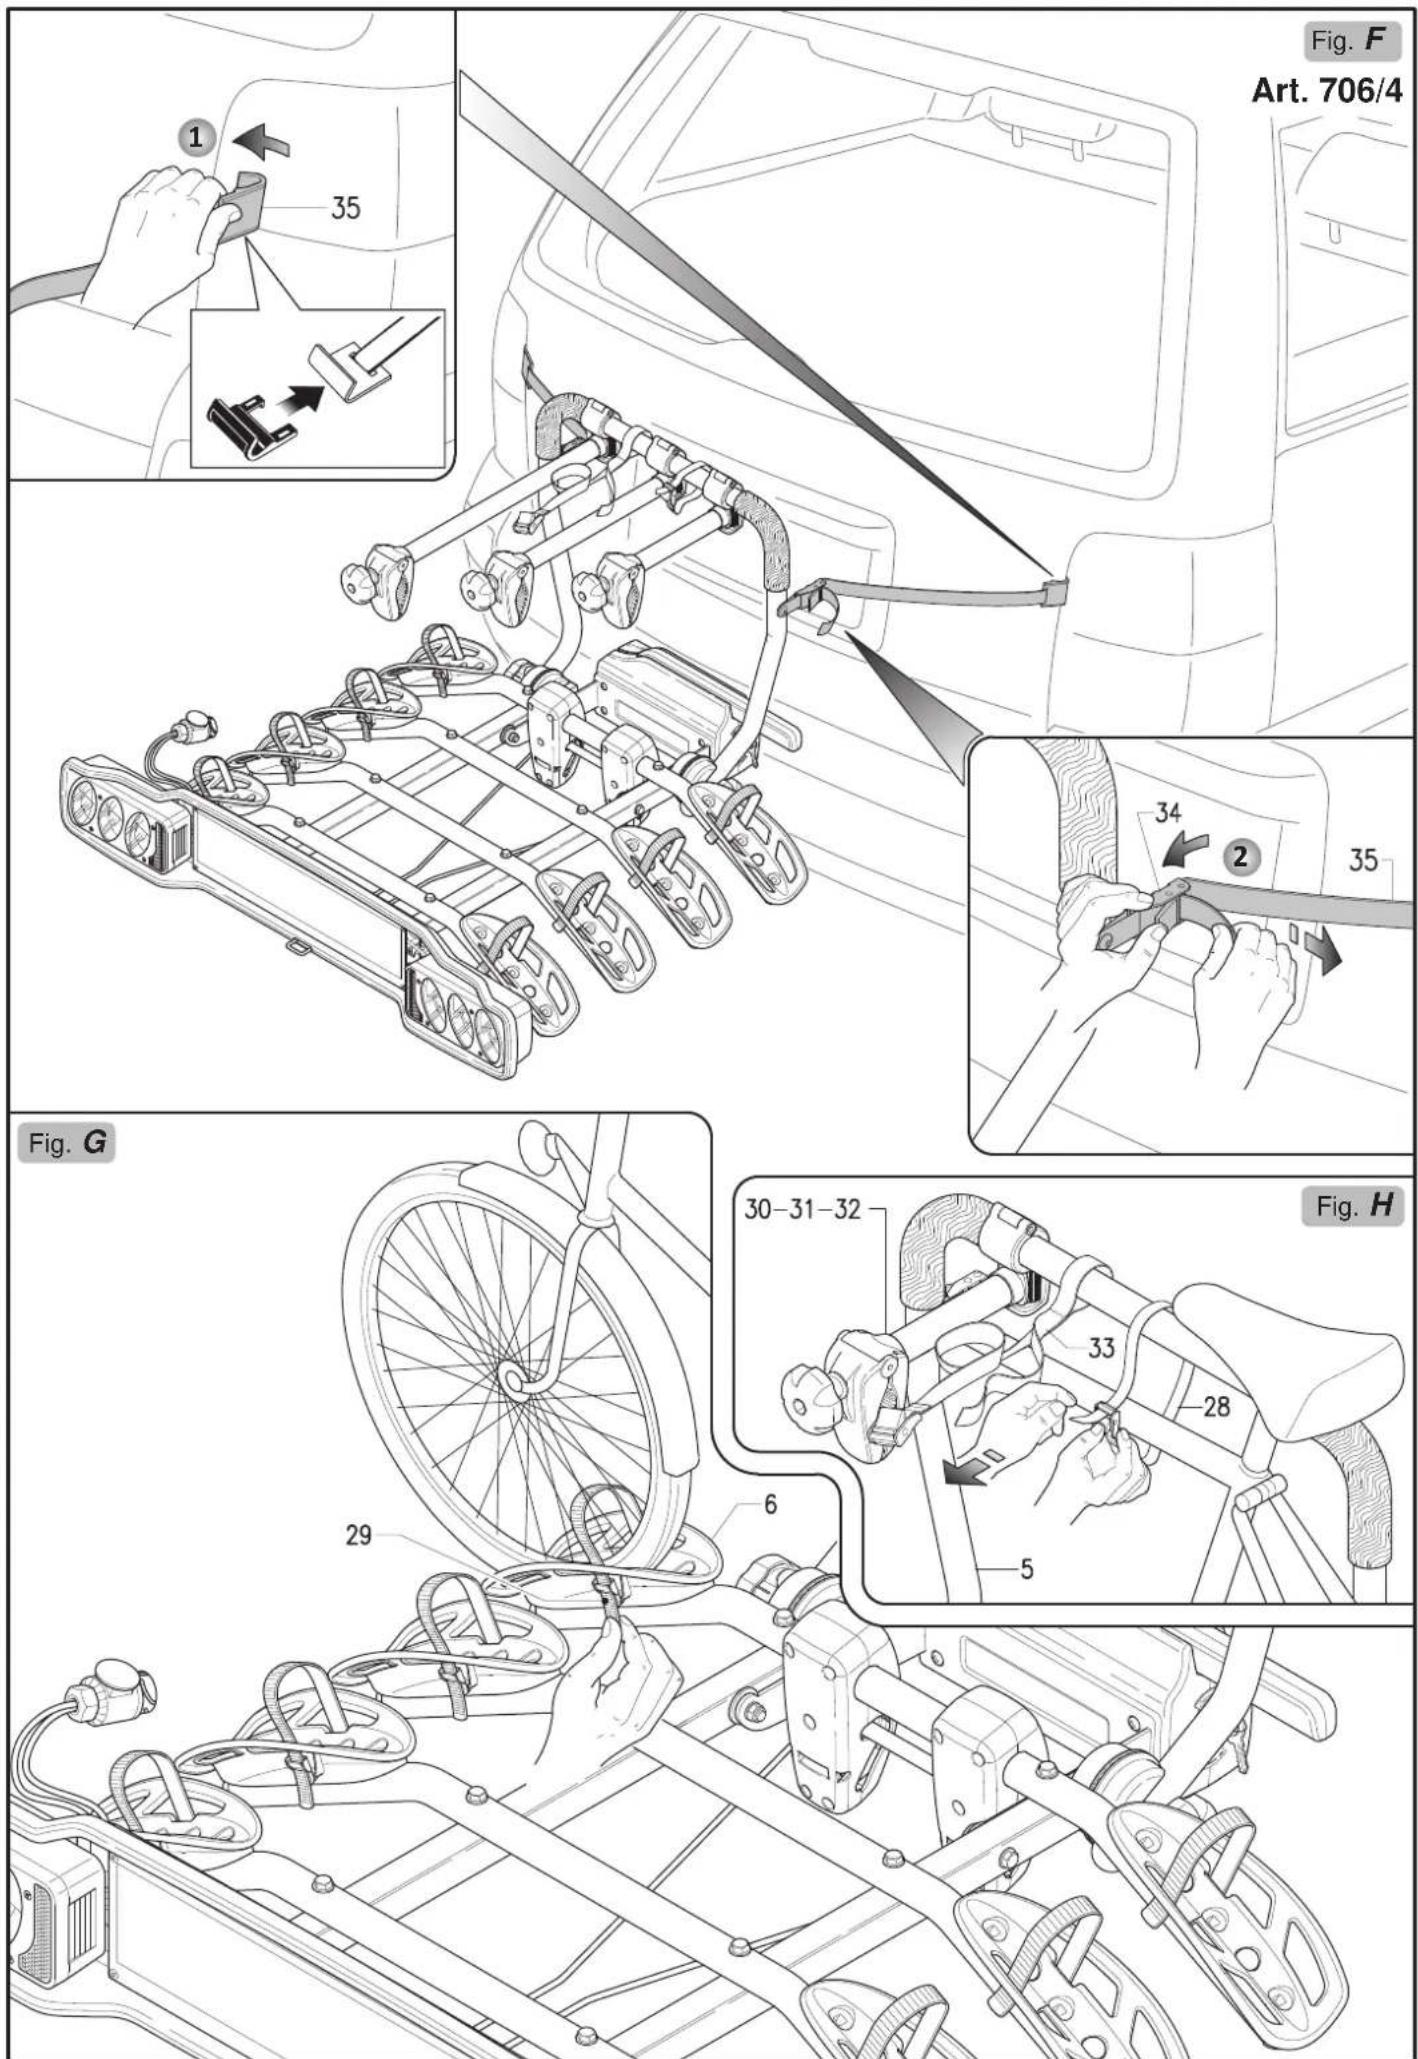
12) Attach the strap hooks 35 to the edges of the vehicle hatch, then insert the straps in the buckles 34 (make sure the inlet direction is correct) (Fig. F).
IMPORTANT: Give the straps a good tug to check for tightness. Check the tightness before starting and during the trip.
POSITIONING AND FIXING THE BIKES ON THE BIKE RACK
13) Place the biggest and heaviest bike on the bike rack first, position the wheels in the tire cradles 6 and lean it up against the bike fixing arch 5. Secure the bike to the bike fixing arch 5 with the fixing strap 28 (Fig. H). Secure the wheels by means of the fixing straps 29 (Fig. G).
14) Repeat the operations in 13) for the second, third and fourth bikes. The second, third and fourth bikes are secured to the fixing arch 5 with the fixing arms 30/31/32 (Fig. H).
IMPORTANT: For safe transportation of the load the bike carrier is supplied with a strap 33 for tying all the bikes to the fixing arch 5. Check that the belt is mounted correctly by pulling on it.
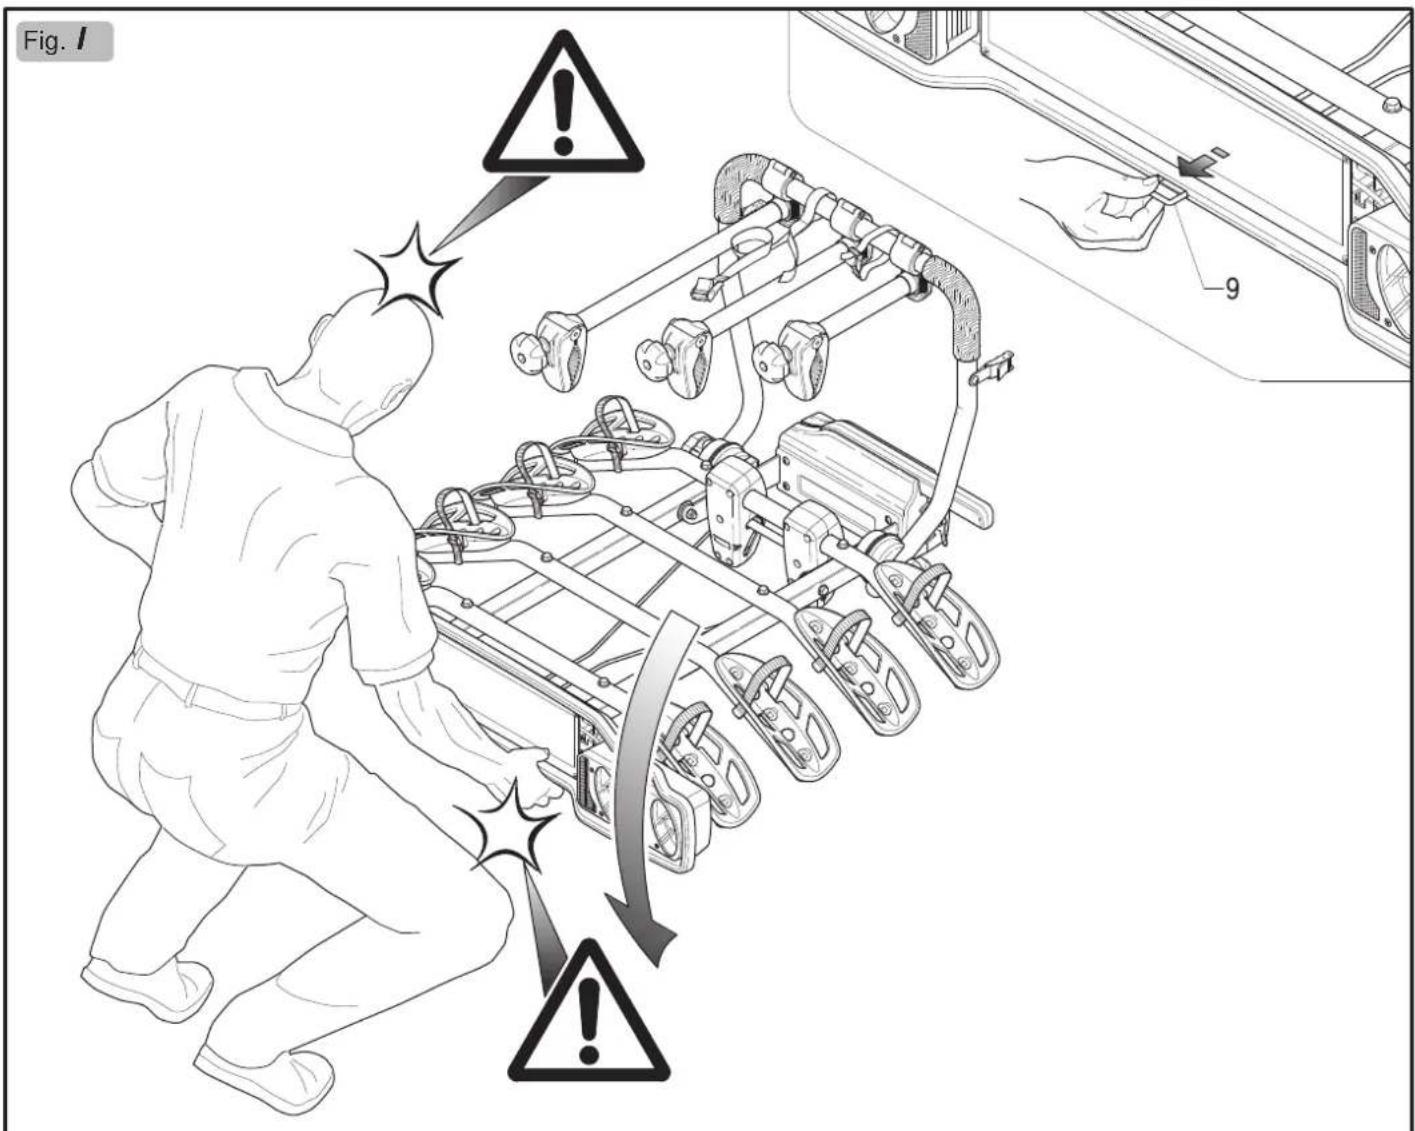
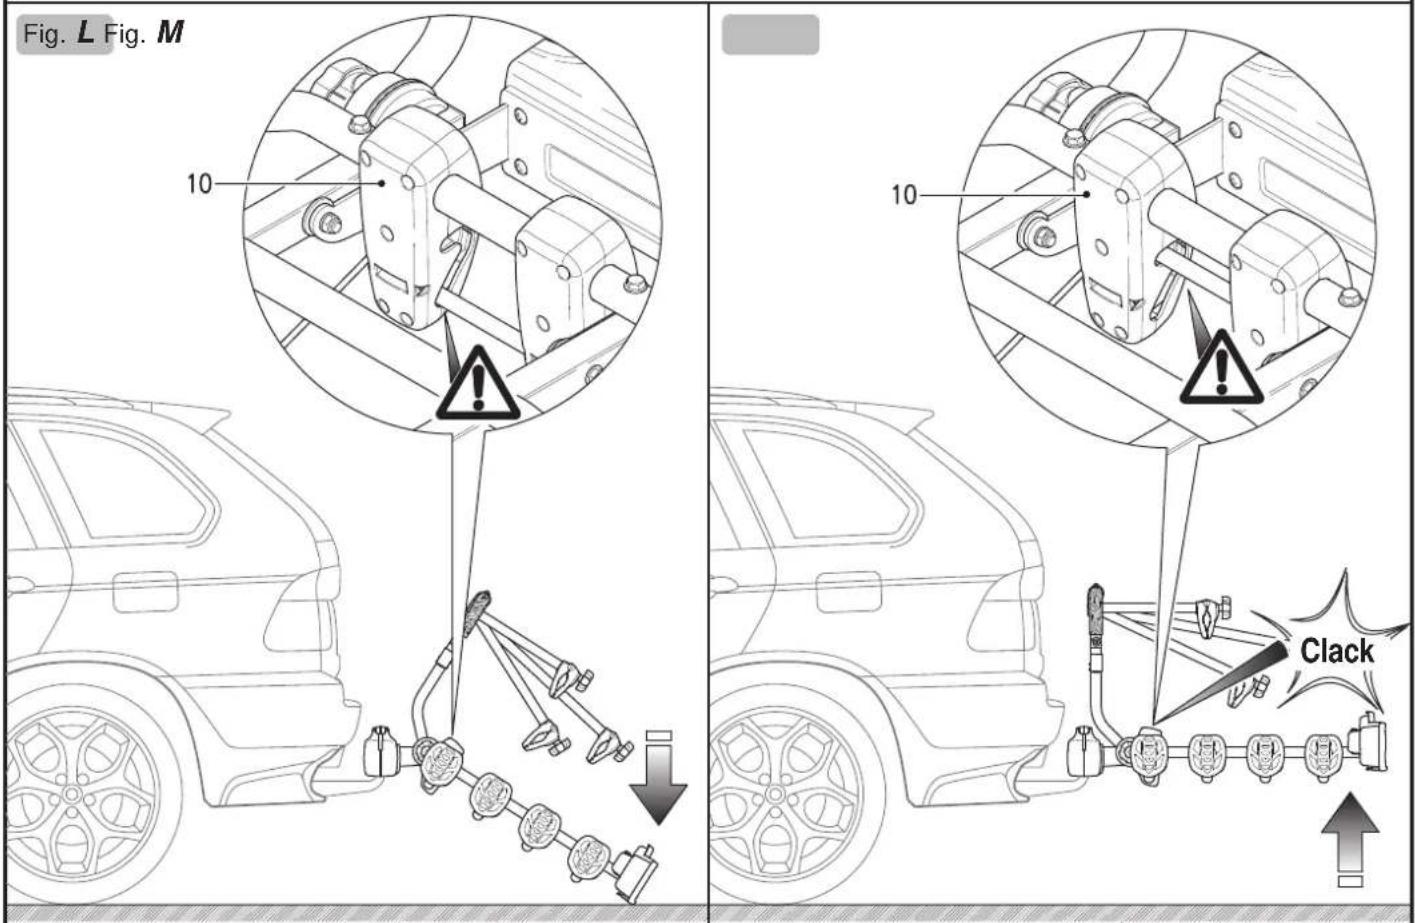
BIKE RACK INCLINATION (Fig. I/L/M)
To tilt the bike rack hold it up with one hand while you pull the hook 9 with the other (Fig. 1). To avoid injury or damage, this operation of tilting the bike rack should be carried out with the help of a third person. To close the bike rack, lift it until the tilt mechanism 10 engages completely by passing from the tilt position (Fig. L) to the closed position (Fig. M).
ATTENTION - SAFETY REQUIREMENTS
As well as the information described below please observe the "Conditions, suggestions and limits for use" specified in the EC type test certificate.
-
Weight and maximum capacity of "PARMA" bike racks:
* Model 706/4 (20,03 kg.) ---> 4 bikes, max. capacity 60 kg.
* Model 706/3 (17,38 kg.) ---> 3 bikes, max. capacity 60 kg.
* Model 706/3A (15,77 kg.) ---> 3 bikes, max. capacity 60 kg.
* Model 706 (15,58 kg.) ---> 2 bikes, max. capacity 60 kg. -
Never exceed the permitted capacity of the towing hook installed. The combined weight of the bike rack and the load must never exceed the permitted capacity. Keep the towing hook ball surface clean from dirt and oil.
- The driver is always responsible for the load he is transporting and consequently he is also responsible for checking the fastenings both before starting the trip and at regular intervals during the trip.
- Check the car manual for the specifications concerning the maximum permissible rear axle weight.
- Verify compliance with the value D (maximum load bearing capacity) of the towball specified by the car or towball manufacturer; the value D for the towball must be at least (760 Kg) 7.6kN; older towballs often only specify the permissible load on the towball G and the total permissible load of the towing vehicle Gk rather than value D; in this case the value D can be calculated using the values specified in the vehicle maintenance or registration booklet:
$$ D = \frac {9 , 8 1}{1 0 0 0} \times \frac {(G _ {A} \times G _ {K})}{(G _ {A} + G _ {K})} $$
(D in [kN] / GA in [kg] / GK in [kg])
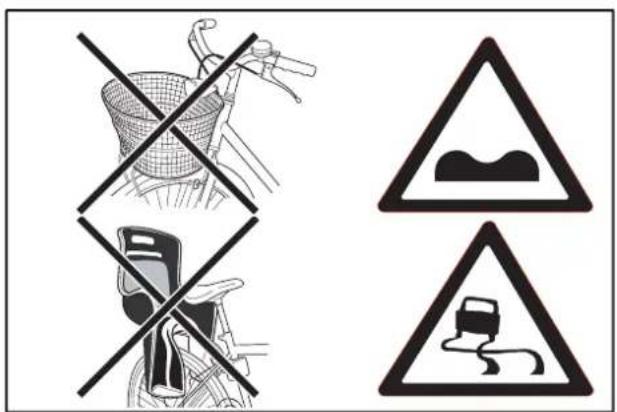
- Remove from the transported bikes children's seats, transport baskets, rain covers or other elements that could get lost or increase the air resistance.
- Do not carry more bikes than the number indicated for a specific model.
- Bike parts, such as for example the handlebars or pedals, must not be left in the normal position of use; they must be folded to avoid dangerous projections.
- Ensure that the bike rack is fitted correctly on the towing hook and that the bikes are secured as instructed.
- The bike rack is only suitable for transporting bicycles.
GB
- Before leaving, check that the rear lights function correctly. Also check that the indicator lights work correctly.
- Keep the connections clean (lighting board power plug and power outlet on the vehicle); use suitable cleaning materials when necessary.
- Do not use and/or attach the bike rack to the car before making the electrical connections.
- Check that the electrical cables are not damaged or likely to be damaged by interference with other elements of the vehicle or that they could, in any way, be accidentally cut.
- The lighting devices are not designed t be immersed in water.
- Any major work required to be done on the electrical system and connections must be performed by qualified personnel.
- Provide an additional number plate to be attached to the towball bike rack.
- Keep in mind that when driving a vehicle with a towball bike carrier the rear load projection is different to the normal projection, therefore, take care when reversing or parking as you need to consider the longer length of the vehicle; also be aware that the weight of the bikes loaded on the carrier alter the handling characteristics of the vehicle particularly in crosswind conditions, on bends or when braking; When on the road, respect the highway code speed limits and pay attention to the road conditions to prevent jolts.
- If the driver's rear view is obstructed the vehicle must be equipped with rearview mirrors to ensure safe driving.
- To avoid damage, if the boot lid is equipped with an automatic opening function, use this function with care.
- The rear lights of the vehicle are partially or completely covered when using the towball carrier which is why the model that you have purchased is equipped with an extra light and numberplate system. The necessary number and type of lights depend on the date of the vehicle's first registration, as set out below:
| REGISTRATION BEFORE01.01.1987 |
| It is not obligatory to use fog lights or reversing lights on the towball bike carrier. |
| Use of a 7 pin plug is permitted. |
| REGISTRATION BETWEEN01.01.1987 AND 31.12.1990 |
| It is not obligatory to use fog lights but it is mandatory to use the reversing lights of the towball bike carrier. |
| Use of a 7 pin plug is permitted.In the event of incompatibility between socket and plug use suitable adaptors that are readily available on the market. |
| REGISTRATION AFTER01.01.1991 |
| All the lights of the towball bike carrier must be operational. Fog lights and reversing lights are obligatory. |
| It is necessary to use a relay or electric plug with a cutoff system that ensures that the vehicle's fog lights switch off automatically when the towball bike carrier is used and come on as soon as the plug is removed (Only a 13 pin plug complies with this requirement). |
| REGISTRATION AFTER01.01.1998 |
| The towball bike carrier must not cover the third brake lights. The third brake light must be visible otherwise it must be repeated on the towball bike carrier. |
- If the load protrudes more than 40 cm beyond the surface of the lights of the towball bike carrier then a visual sign must be attached to it.
- Check all the bike rack fixing elements after a short while, then at regular intervals.
- Check the distance between the bike rack, the bikes and the exhaust pipe(s) to avoid heat damages.
- To increase road safety and to reduce fuel consumption, remove the bike rack when not in use.
- Modifications to the bike rack and its components are not permitted. Immediately replace any worn or damaged part using original spare parts exclusively.
- The bike rack can be cleaned by using warm water and/or car shampoo. Store the bike rack in dry conditions at moderate temperatures.
The manufacturer is not responsible for damage caused by improper use of this product, nor for any objection made by the competent authorities with regard to the highway code.
The manufacturer shall only be responsible for manufacturing defects in the bike rack and accessory components.
THE TYPE APPROVAL CERTIFICATE CAN BE DOWNLOADED FROM THE PRODUCT TECHNICAL DATA SHEET ON OUR WEB SITE
www.peruzzosrl.com
D
$$ (D \text { in } [ k N ] / G _ {A} \text { in } [ k g ] / G _ {K} \text { in } [ k g ]) $$
$$ (D \text { in } [ k N ] / G _ {A} \text { in } [ k g ] / G _ {K} \text { in } [ k g ]) $$
F
(D in [kN] / GA in [kg] / GK in [kg])
SOLO PARA ART. 706/4
$$ (D \text { in } [ k N ] / G _ {A} \text { in } [ k g ] / G _ {K} \text { in } [ k g ]) $$
E
TYLKO DLA ART. 706/4
(D in [kN] / GA in [kg] / GK in [kg])
(D in [kN] / GA in [kg] / GK in [kg])
(D in [kN] / GA in [kg] / GK in [kg])