XL Fashion 3 - Stroller QUINNY - Free user manual and instructions
Find the device manual for free XL Fashion 3 QUINNY in PDF.
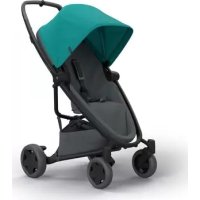
| Product Type | Stroller |
| Brand | Quinny |
| Model | XL Fashion 3 |
| Recommended Age | From birth to 4 years |
| Maximum child weight | 20 kg |
| Maximum shopping basket weight | 5 kg |
| Maximum storage compartments weight | 0.5 kg |
| Parking brake | Automatic, operated by handlebar lever |
| Safety harness | 5-point (abdominal, shoulders, crotch) height adjustable |
| Backrest positions | 4 positions (variable recline) |
| Footrest | Adjustable to 3 positions |
| Canopy | Removable, attaches to handlebar |
| Safety bar | Removable, attaches to seat |
| Front wheels | Swivel with lock |
| Rear wheels | Pneumatic, max pressure 26 PSI / 1.8 Bar |
| Adapters for carry cot/car seat | Included (compatible with Dreami and Maxi-Cosi) |
| Cleaning | Frame: damp cloth; Cover: wash with warm soapy water; No solvents or lubricants |
| Safety standards | NFS 54-001, prEN 1888:2002, BS 7409:1996 |
| Warranty | 12 months from date of purchase |
Frequently Asked Questions - XL Fashion 3 QUINNY
User questions about XL Fashion 3 QUINNY
0 question about this device. Answer the ones you know or ask your own.
Ask a new question about this device
Download the instructions for your Stroller in PDF format for free! Find your manual XL Fashion 3 - QUINNY and take your electronic device back in hand. On this page are published all the documents necessary for the use of your device. XL Fashion 3 by QUINNY.
USER MANUAL XL Fashion 3 QUINNY
natural_image
Blue circular icon with a stylized lowercase 'i' and a dot, no text or symbols present.Instructions for use/Warranty
WARNING: Keep for future reference
natural_image
Black and white stroller with gray seat cover and black frame, displayed against a plain blue background (no text or symbols visible)

Always Ahead
XL FASHION
3
natural_image
Mechanical assembly diagram showing a lever mechanism with a magnified inset view (no text or labels)
natural_image
Mechanical linkage diagram showing a lever system with an arrow indicating motion (no text or symbols)
natural_image
Circular diagram with radial lines and a central arrow, labeled '5/76' at the bottom (no text or symbols within the diagram itself)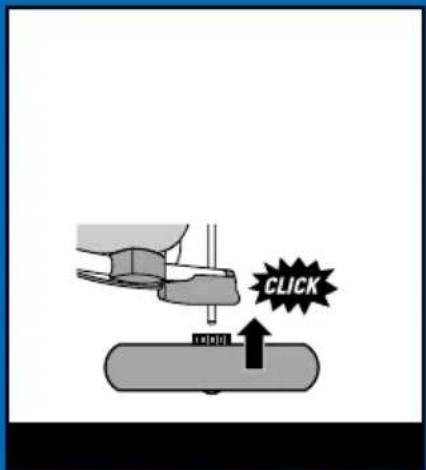
natural_image
Diagram showing a car tire being connected to a cable, with a magnified view of the wheel (no text or symbols)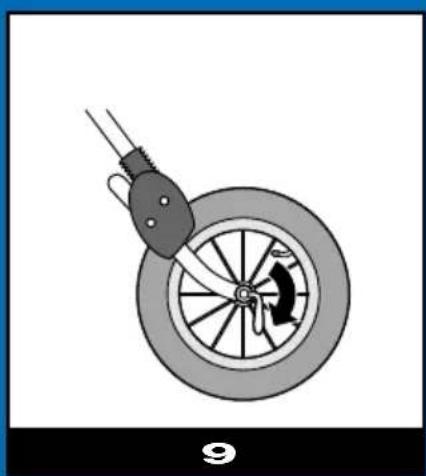
natural_image
Diagram of a car wheel with a brake lever and steering wheel (no text or symbols)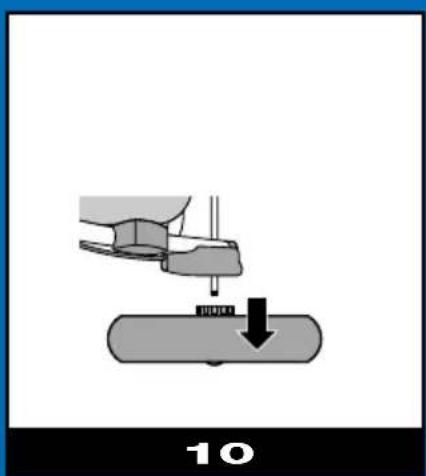
natural_image
Illustration of a hand using a tool to press or install a component, with a downward arrow indicating motion (no text or symbols)
natural_image
Diagram of a mechanical tool with two views showing a joint or bracket mechanism (no text or symbols present)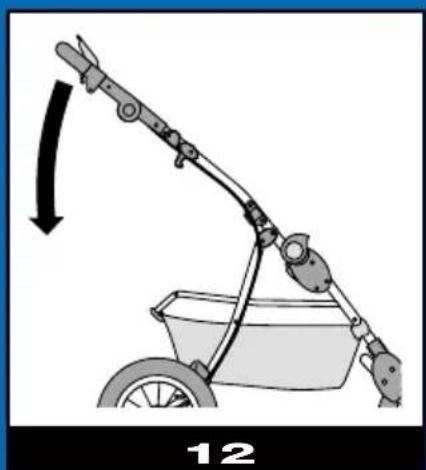
natural_image
Diagram of a bicycle tricycle with a lever mechanism and a bucket, showing motion direction (no text or symbols)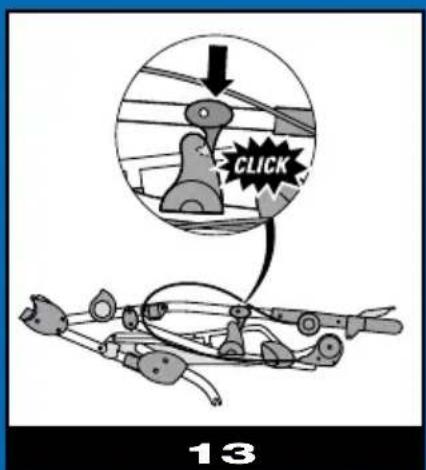
natural_image
Diagram of a mechanical component with two arrows indicating direction, labeled '14' at bottom (no text or symbols on diagram itself)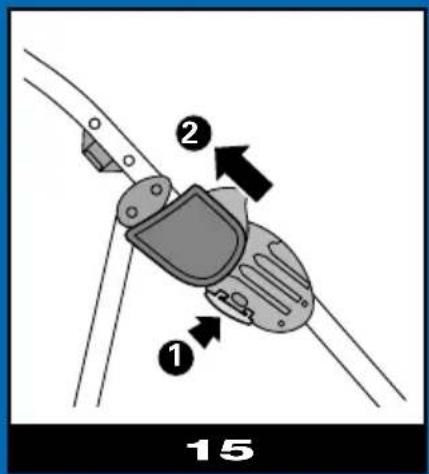

natural_image
Illustration of a small boat with wings and a waffle, showing a downward arrow (no text or symbols)
flowchart
graph TD
    A["Top Vehicle"] --> B["Downward Arrow"]
    A --> C["Upward Arrow"]
    A --> D["Downward Arrow"]
    B --> E["Downward Arrow"]
    C --> F["Upward Arrow"]
    D --> G["Downward Arrow"]

natural_image
Mechanical linkage diagram showing a lever mechanism with an inset close-up of a mechanical assembly (no text or symbols)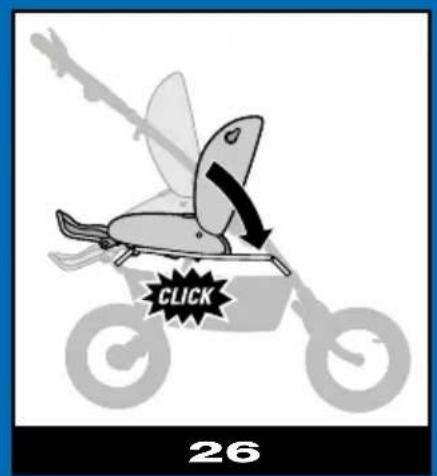


natural_image
Illustration of a folding object with an arrow indicating upward motion, labeled '36' at bottom (no text or symbols on the diagram itself)NL
1 Vandelwagenzitje
2 Veiligheidsharnas
3 Zonnekap
4 Duwer
5 Duwerrembeugel
6 Bijrem
7 Achterwiel
8 Voorwiel
9 Voetensteun
10 Boodschappenmandje
11 Adapters
12 Veiligheidsbeugel
13 Inklapbeveiliging
14 Transportbeveiliging/
duwervergrendeling
15 afdekkapje
D
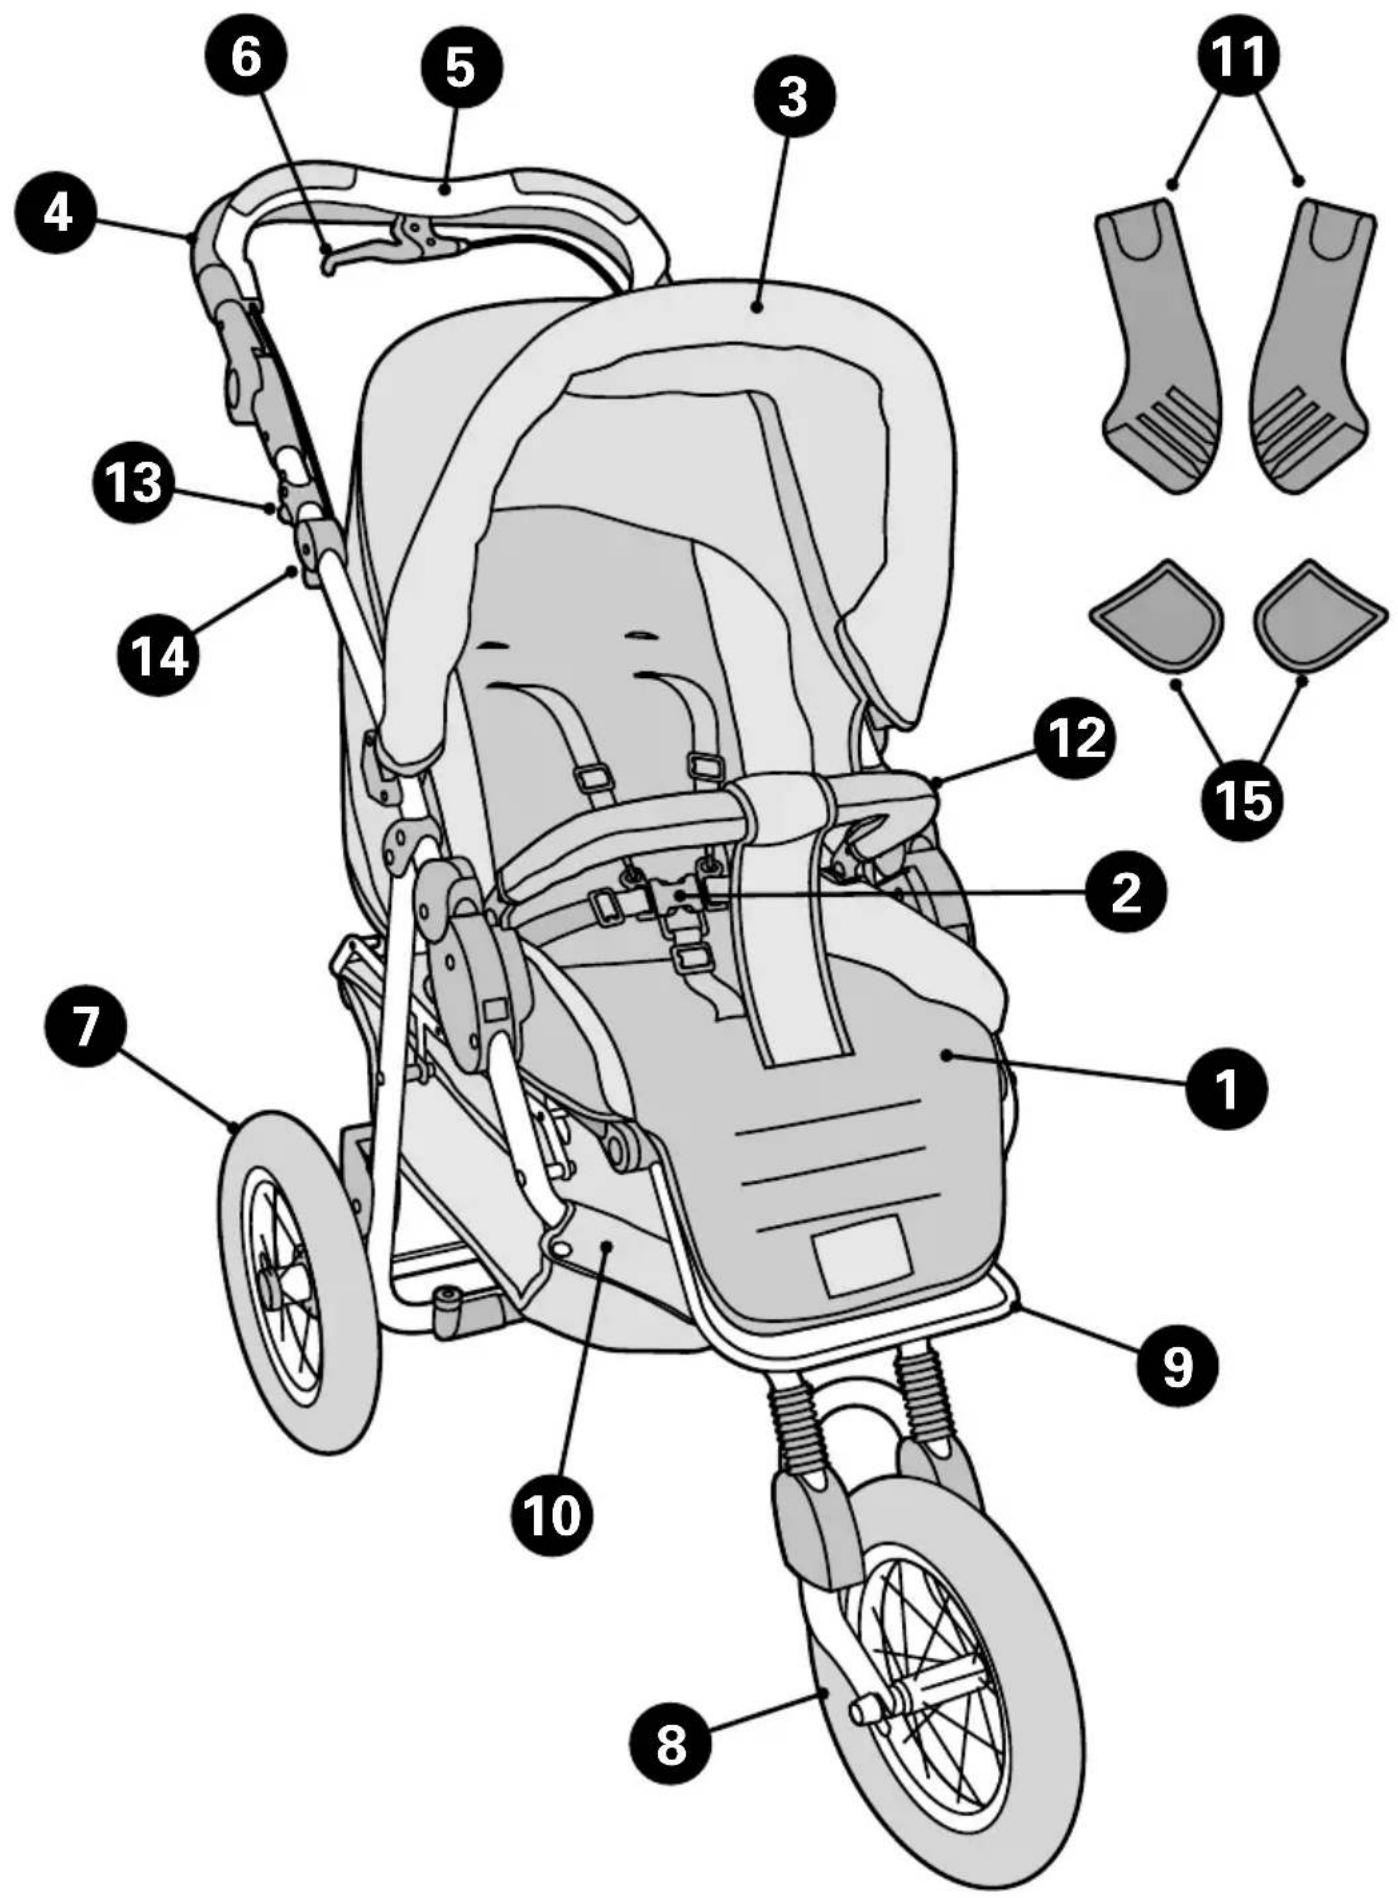
1 Pushchair seat
2 Safety harness
3 Sun canopy
4 Handlebar
5 Handlebar brake bar
6 Handbrake
7 Rear wheel
8 Front wheel
9 Footrest
10 Shopping basket
11 Adapters
12 Safety bar
13 Fold lock
14 Transport safety lock/
handlebar safety lock
15 Guard
F
Promenade Shopping Center C3
Curacao
Tel. 00 5999 7360755
Fax 00 5999 7360744
E-mail: lgiliam@cura.net
CYPRUS
Xen. J. Demetriades & Son Ltd.
156, Anexartisias Street
3604 Lemesos
Tel. 35 72 53 65 261
Fax 35 72 53 52 092
E-mail: xdl@spidernet.com.cy
www.demetriades.com.cy
DANMARK
BabySam A.m.b.A.
Egelund A 27-29
6200 Aabenraa
Denmark
Tel. 74 63 25 10
Fax 74 63 25 11
E-mail: mail@babysam.dk
DEUTSCHLAND
Dorel Germany
Unit 1B, G/F, Lippo Centre
89 Queensway
Admiralty
Hong Kong
Tel. (852) 28 10 86 22
Fax (852) 28 68 25 22
E-mail: customerservice@ebabyasia.com
Chup Shing Trading Co Ltd.
25-31 Kwai Fung Crescent
Marvel ind. Bldg.
Block A, 7/F, Unit J
Kwai Chung
Hong Kong
Tel. 24 22 21 01
Fax 24 89 10 92
ICELAND
Fifa Ltd.
P.O. Box 606
121 Reykjavik
Tel. 45 52 25 22
Fax 45 52 25 31
IRAN
Nab Kish
No. 47 Pardis Markt
Kis Island
Iran
ISRAEL
Shesek Ltd.
28B Halechi Street
Bnei Brak 51200
Tel. 97 23 57 75 133
E-mail: einatsh@shilav.com
KROATIË
Media Commerce d.o.o.
Majstorska 5
CMP Savica Sanci jug
10000 Zagreb
Kroatië
Tel. 00385-1-240 65 00 / -1-240 65 01
Fax 00385-1-240 64 99
E-mail: media-commerce@zg.te.lhr
LEBANON
Gebran Geahchan & Sons
Azar Bldg.
Horch Tabet
Po Box 55134
Sin El Fil
Tel. 961 1 482369
Fax 961 1 486997
MAGYARORSZÁG
Re-Con-Tra KFT
Badacsonyi u. 24
1113 Budapest
Tel. (01) 209 26 32/209 26 33
Fax (01) 209 26 34
E-mail: recontra@mail.matav.hu
MALAYSIA
Sin Lee Entre prises
2, Jalan Masyhur 3
Taman Perindustrian Cemerlang
81800 Ulu Tiram, Johor
Malaysia
Tel. (60) 7 861 8388
Fax (60) 7 861 8218
E-mail: bidhyper@singnet.com.sg
WARNING: Read the instruction manual carefully and keep it for future reference. Not following the instructions in this manual may endanger the safety of your child.
WARNING: Your child's safety is your responsibility.
WARNING: Never leave your child unattended in a pushchair.
WARNING: Prior to use, check to ensure all interlocking devices are secured.
WARNING: Articles hung on the handle bar may cause the pushchair to become unstable and can increase the risk of tipping.
WARNING: Always secure your child with the safety harness and always use the crotch strap together with the lap and shoulder belts, even when using the footmuff.
WARNING: The plugs and the valves of the wheels must be sufficiently tightened to avoid any hazard due to small parts which may be swallowed. Also keep the hand pump out of the reach of children.
WARNING: To ensure your child's safety, we advise against skating or running with the pushchair.
GENERAL INSTRUCTIONS
- Only use the Fashion 3 XL for one child at a time.
- The Fashion 3 XL is suitable for children from birth to 4 years of age (maximum weight 20 kg). When used with a Maxi-Cosi car safety seat or Dreami carry cot, the maximum weight shown on the car safety seat or carry cot applies.
- It is advisable to only use the Fashion 3 XL as a buggy once your child is able to sit unassisted.
- We advise against using the pushchair insert for children younger than 6 months old.
- Always make sure that the Fashion 3 XL is completely unfolded and that the safety locks are properly secured before placing your child in the Fashion 3 XL.
- Keep children away from moving parts while folding, unfolding or adjusting the Fashion 3 XL.
- Always use the parking brake when parking the Fashion 3 XL, even when just standing still.
- The bicycle-style handbrake should only be used as an extra brake. It should never be used as a parking brake.
- Inspect and clean the Fashion 3 XL regularly. Never use harsh cleaning agents or lubricants.
- Never lift the Fashion 3 XL or use on escalator or stairs when there is a child in the pushchair.
- Use original accessories and manufacturer-approved parts only.
- No alterations may be made to the product. If you have any complaints or problems, please contact your supplier or importer.
- Keep all plastic packaging material out of the reach of children and pets, as these materials pose a choking hazard.
- The Fashion 3 XL has been approved in accordance with: NFS 54-001, prEN 1888:2002, BS 7409:1996.
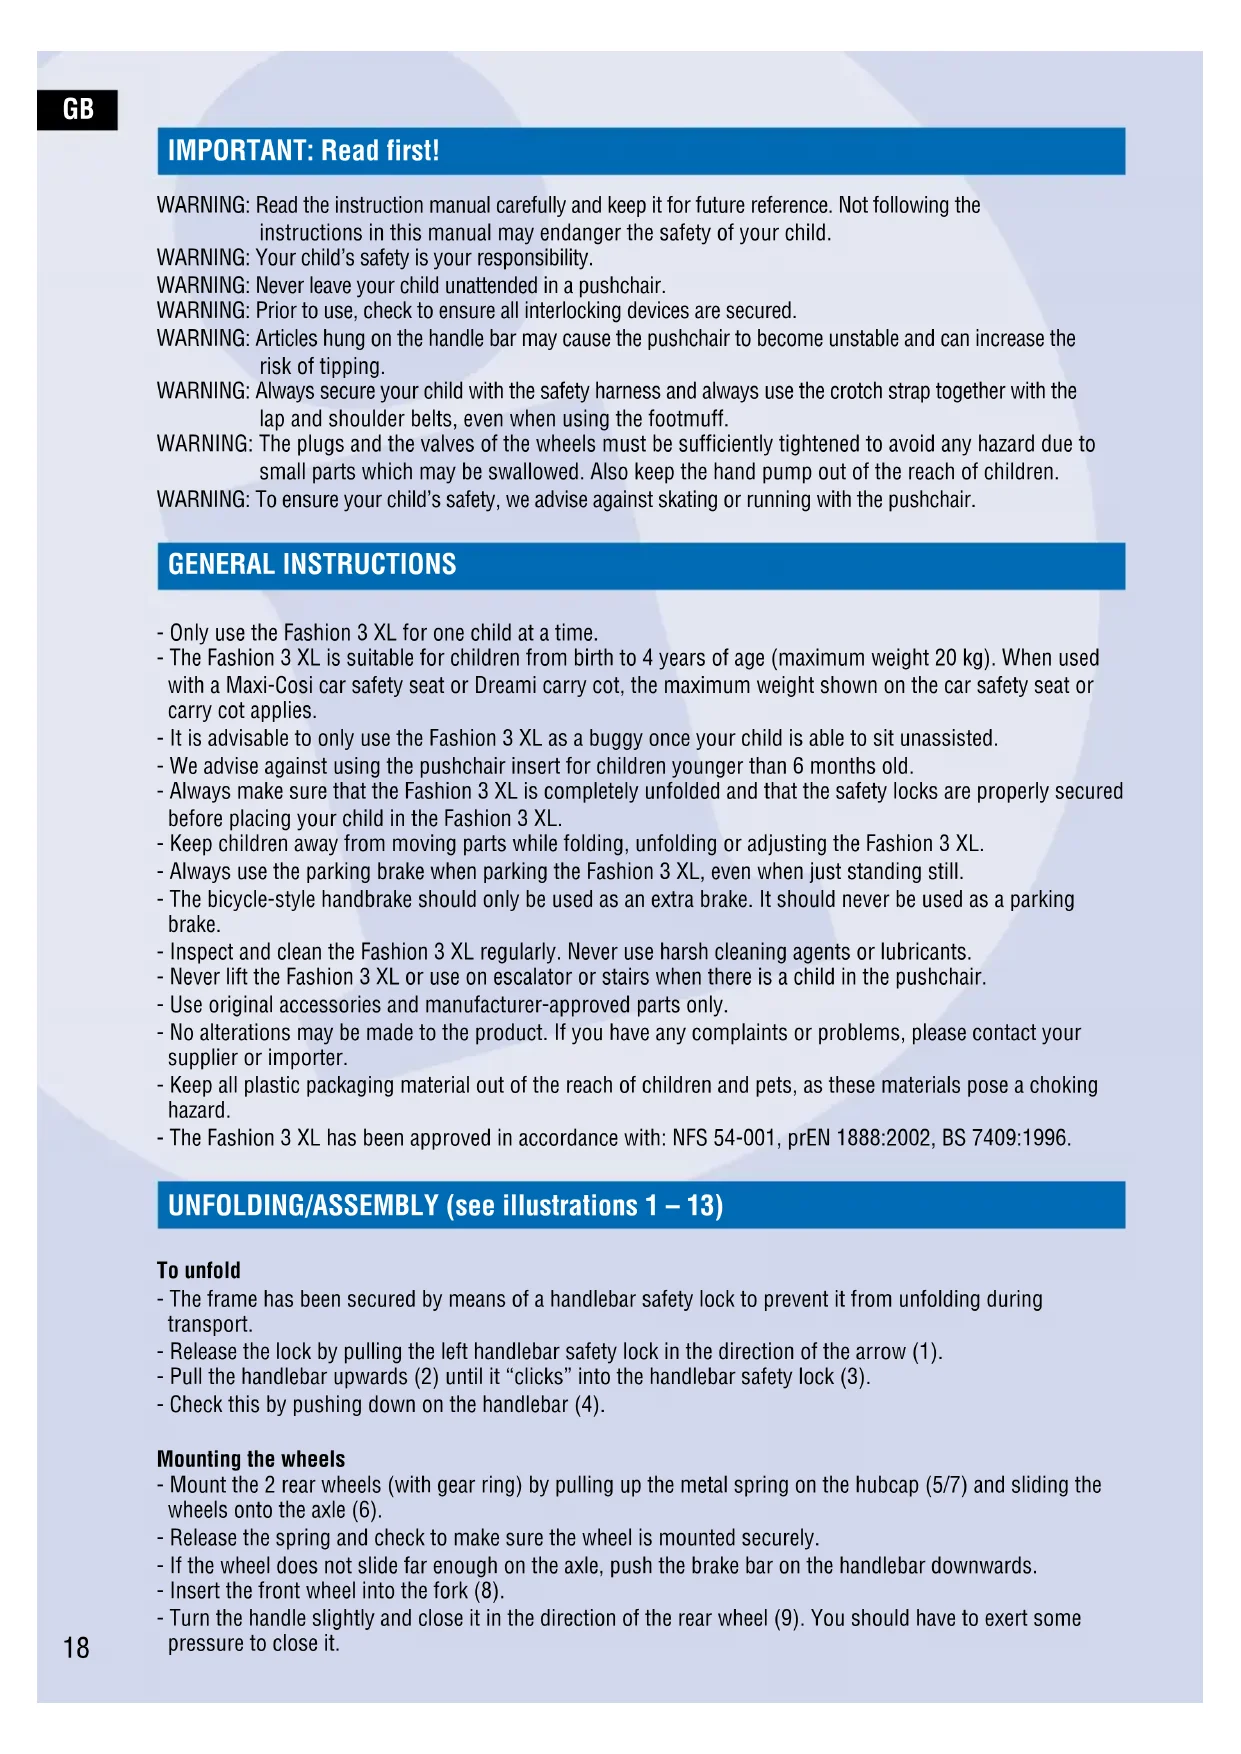
UNFOLDING/ASSEMBLY (see illustrations 1 – 13)
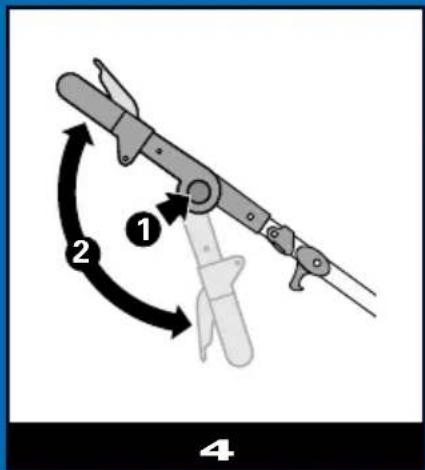
To unfold
- The frame has been secured by means of a handlebar safety lock to prevent it from unfolding during transport.
- Release the lock by pulling the left handlebar safety lock in the direction of the arrow (1).
- Pull the handlebar upwards (2) until it "clicks" into the handlebar safety lock (3).
- Check this by pushing down on the handlebar (4).
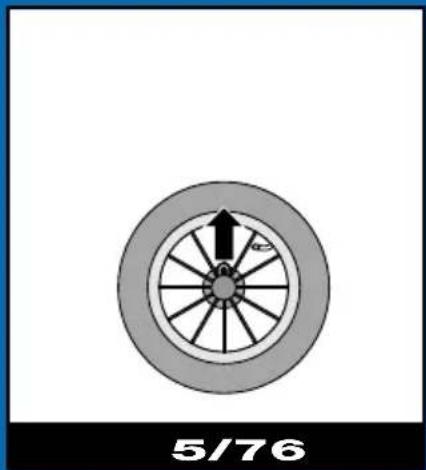
Mounting the wheels
- Mount the 2 rear wheels (with gear ring) by pulling up the metal spring on the hubcap (5/7) and sliding the wheels onto the axle (6).
- Release the spring and check to make sure the wheel is mounted securely.
- If the wheel does not slide far enough on the axle, push the brake bar on the handlebar downwards.
- Insert the front wheel into the fork (8).
- Turn the handle slightly and close it in the direction of the rear wheel (9). You should have to exert some pressure to close it.
- Check the tyre pressure and inflate the tyre if necessary (see maintenance section for the maximum tyre pressure allowance).
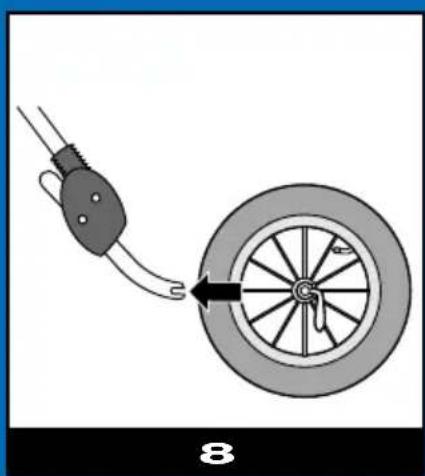
Removing the wheels
- To remove the rear wheels, pull up the metal spring on the hubcaps (5/7) and pull the wheels off the axle (10).
- Open the handle to remove the front wheel.
Attaching the handlebar
- Slide the handlebar with the handlebar brake over the tube ends on the frame, push in both spring catches and make sure they "click" securely into place in the black plastic part of the handlebar.
- Make sure there is no kink in the brake cables, and that they are positioned parallel to the handlebar.
- Adjust the handlebar to the desired position by pushing both control buttons on the adjusters at the same time (4/1-4/2).
Folding
- Fold up the sun canopy (see "Attaching/removing sun canopy").
- Place the back of the pushchair seat in the reclining position (see "Adjusting the back").
- Place the footrest in the highest position (see "Footrest").
- Tilt up the fold lock above the right handlebar safety lock (11).
- Pull the left and right handlebar safety lock upwards and push the handlebar forward until the Fashion 3 XL is folded (12).
- Make sure that the handlebar safety lock "clicks" into the transport safety lock (13).
- Remove the wheels and pushchair seat (see "Attaching pushchair seat") to make the pushchair even smaller.
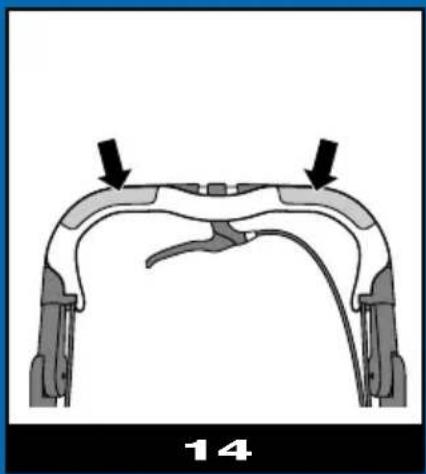
PARKING BRAKE (see illustration 14)
Always use the brake when parking the Fashion 3 XL, "also when at a standstill".
The Fashion 3 XL is equipped with an automatic parking brake. To operate the brake, push on the brake bar (14) on the handlebar. When using the Fashion 3 XL, you will need to push the brake bar continuously. The parking brake is activated once you release the brake bar.
NEVER hang anything on the brake bar, as this will prevent the Fashion 3 XL from braking upon the release of the brake bar.
The handbrake is for slowing down only and should not be used as a parking brake. Always check to make sure the wheels are locked.
USE
For use with the Dreami carrycot(up to 9 kg)
and the Maxi-Cosi car safety seat (up to 13 kg) (see illustrations 15 – 21)
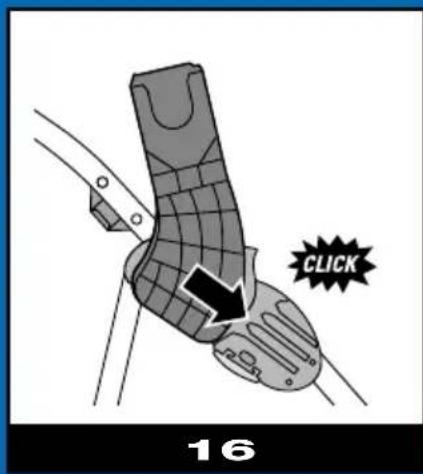
Attaching the adapters
- First remove the guards by moving the red button under the adapter connections outward while pushing the guards upward (15).
- Slide the adapter marked A into the right-hand side and the adapter marked B into the left-hand side of the adapter attachment.
- Continue sliding until you hear a "click" (16).
- Check to make sure the adapters are secure.
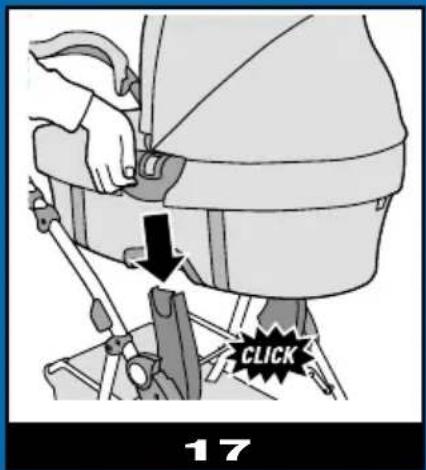
Placing the Dreami carrycot
- Unfold the pushchair and place the carrycot onto the adapters with the foot end between the sides of the handle (17).
- Check to make sure the carrycot is fastened securely.
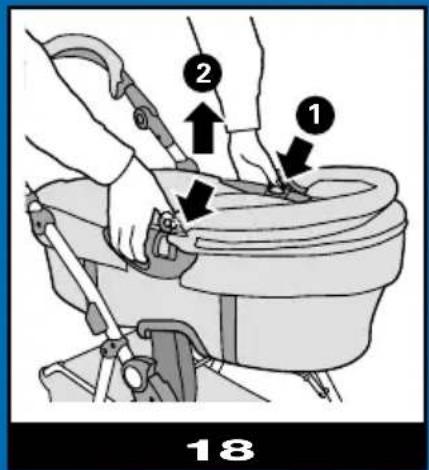
Removing the Dreami carrycot
- Place your thumbs on the control buttons on both sides of the carrycot (18/1).
- Push in the buttons while lifting the carry cot from the Fashion 3 XL (18/2).
Fitting the Maxi-Cosi car seat
- Unfold the pushchair and place the car safety seat onto the adapters with the foot end between the sides of the handle (19).
- Check to make sure the car seat is fastened securely.
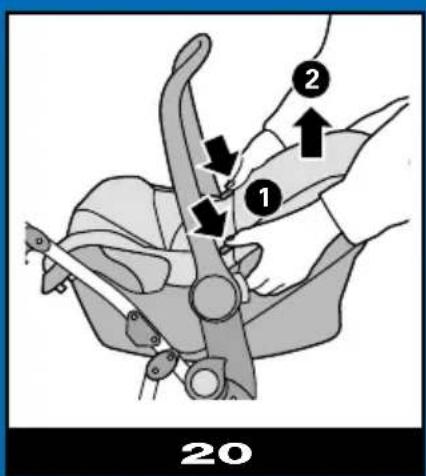
Removing the Maxi-Cosi car seat
- Place your thumbs on the control buttons on both sides of the car seat (20.1).
- Push in the buttons while lifting the car seat from the Fashion 3 XL (20.2).
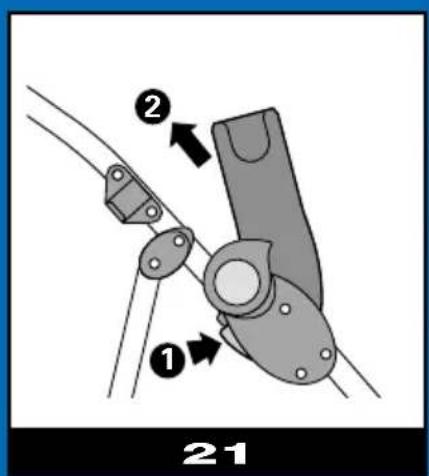
Removing adapters
- Remove the adapters by moving the red button under the adapters outward (21.1) while sliding the adapters upwards (21.2).
- Place both guards back in the adapter connections.
When used as a pushchair (see illustrations 22 - 35)
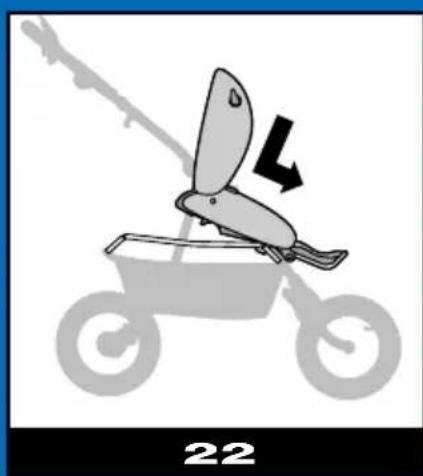
Placing the pushchair seat
- The pushchair seat can be attached in a forward-facing (22) or a backward-facing (26) position.
- Slide the hooks on the pushchair seat (22) onto the front or back projections (depending on the direction desired) on the frame (23).
- Now push the pushchair seat downwards onto the rod in the middle of the frame (24).
- You should hear a clearly audible "click".
- Check to make sure the pushchair seat is secure by pulling on it.
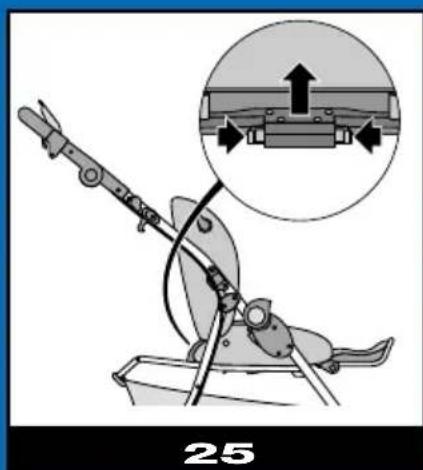
- Remove the pushchair seat by pressing both red buttons (behind the seat bottom) and pulling the seat upward (25).
Footrest
- The footrest can be adjusted into 3 positions.
- Press both buttons on the sides of the footrest at the same time and move the footrest to the desired position (27).
- IMPORTANT: Never let your child sit or stand on the footrest!
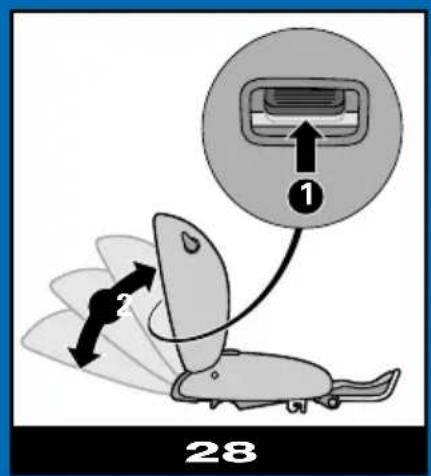
Adjusting the back
- The back of the pushchair seat has multi-positional adjustment.
- To lower the back: Pull up the handle on the back of the seat back and push the back downward (28).
- To raise the back: Simply pull the back upward.
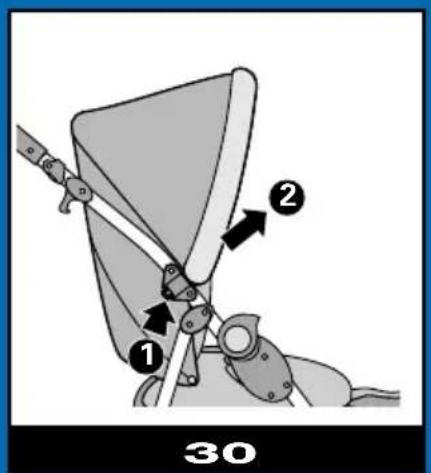
Attaching/removing sun canopy
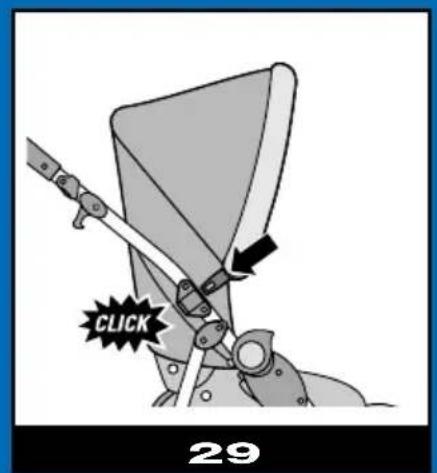
- Push both ends of the sun canopy into the plastic holders on the handlebar (29).
- Check to make sure the sun canopy is fastened securely.
- To remove the sun canopy, push in the spring catches on both ends (30.1) and pull the sun canopy out of the holders (30.2).
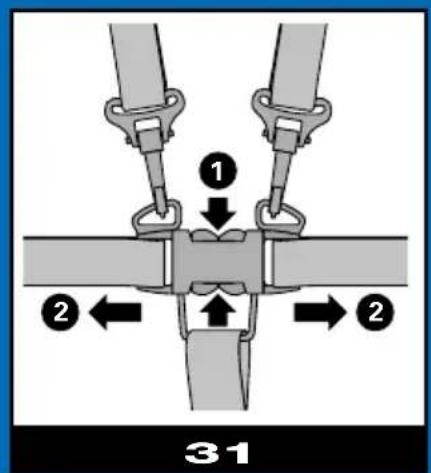
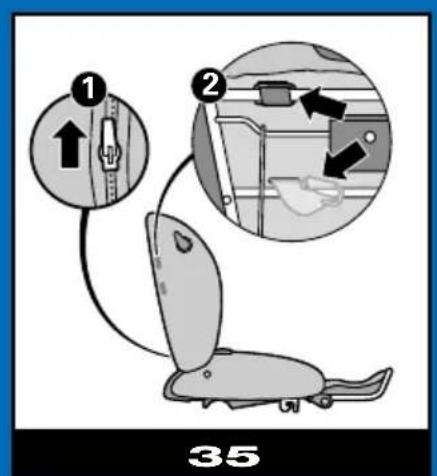
Safety harness
- Apply the brakes on the Fashion 3 XL.
- Make sure the safety harness is loosened before placing your child (carefully!) into the seat.
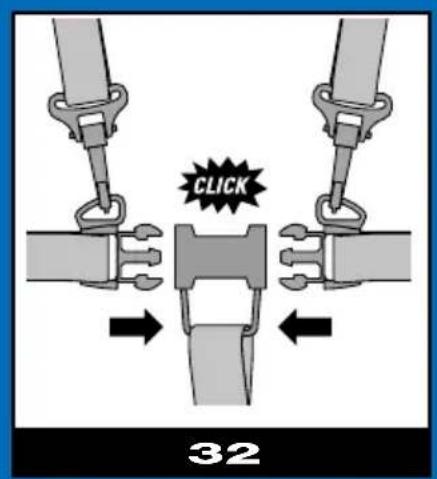
- Fasten the lap and shoulder belts to the crotch strap (32).
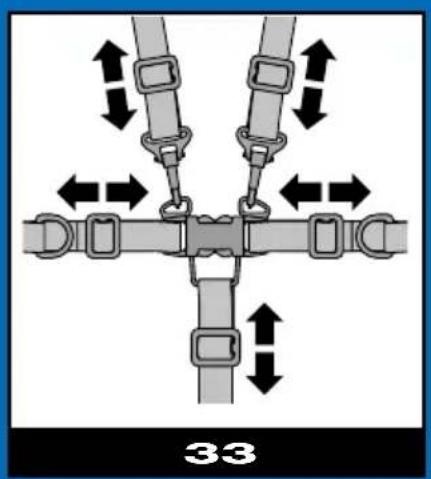
- Adjust the belts to the size of your child by lengthening or shortening the belts using the clasps (33).
- Push the buttons to open the fastener (31).
- There are D rings for securing an additional safety harness. Make sure any safety harness you use meets the following standard: BS 6684.
- The shoulder belts are height adjustable. To adjust the height, open the cover on the back and move the clasp in the cover and around the metal strip (35).
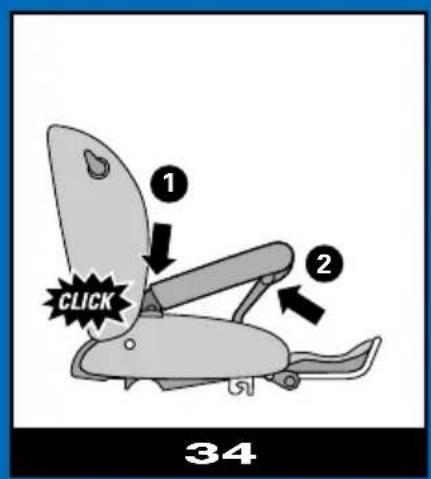
Safety bar
- Attach the safety bar by pushing the 2 ends into the openings on the pushchair seat (34.1).
- Attach the strip of fabric with snaps that is found on the pushchair seat around the safety bar by fastening the snaps (34.2).
- Important: Always fasten your child securely using the safety harness.
- Remove the safety bar by pushing both buttons on the end while pulling up the safety bar.
SHOPPING BASKET
- The maximum weight allowance for the shopping basket under the Fashion 3 XL is 5 kg.
- The other storage compartments on the pushchair have a maximum weight allowance of 0.5 kg.
- IMPORTANT: Only use the storage compartments provided and do not exceed the maximum weight allowance.
MAINTENANCE (see illustration 36)
- Check whether everything functions properly on a regular basis.
- If the Fashion 3 XL has been damaged (i.e. in-flight, transport damage), have the product checked/ repaired by your supplier before using it again.
- For reasons of safety, always use original parts.
- To ensure the long-lasting use of the Fashion 3 XL, dry it off with a soft cloth after using it in rainy weather.
- Clean the frame using a damp cloth. Do not use any abrasive detergents.
- Do not use lubricants, as these attract dirt and dust.
- The cover and basket can be cleaned using a damp cloth. The pillow can be cleaned in warm water using a normal detergent (see “Washing instructions”). To clean, remove the pillow (36) and harness system, and make sure to place the harnesses back carefully again afterwards.
Wheels
- The tyres can be inflated up to a maximum pressure of 26 PSI/1.8 Bar. The tyres are equipped with air valves and can be inflated using the pump supplied or a bicycle pump with adapter.
- If the inner tube has a puncture, you can repair it as you would a bicycle tire or have it repaired at a bicycle repair shop.
- Always deflate the tyres when taking the Fashion 3 XL on an aircraft, as the tyres could burst due to the pressure difference.
- The pushchair may be prone to rusting/tarnishing if used on a beach. Riding through seawater is therefore not advised. Clean the wheels thoroughly after visiting the beach.
- Clean the wheels and axles often and remove any sand or dirt before assembling them.
- The tyres may leave behind black marks on some surfaces (particularly smooth floors like parquet, laminate and linoleum).
ACCESSORIES
Dreami carrycot
Rain/wind cover
Footmuff
The use of non-original accessories can have an adverse effect on the working of the Fashion 3 XL.
QUESTIONS?
Contact your supplier or importer (see address on the back).
WARRANTY
- The guarantee period takes effect on the date of purchase and is valid for a period of 12 months.
The warranty applies to material and manufacturing faults only. The date of purchase can only be proven using an original sales receipt. The guarantee only applies to the first owner and is not transferable. The guarantee is only valid for products that have not been modified by the user. - In the case of defects contact your supplier. If your supplier cannot help you, he will send the product back to the manufacturer together with a clear description of the complaint and the original proof of purchase with date. Exchange or refund is not possible. Repairs do not give right to extension of the guarantee period.
- The manufacturer is not responsible for damage other than that to the product produced by the manufacturer.
The guarantee is not valid if
- The Product is not returned to the manufacturer with the original proof of purchase.
- The defects found are the result of incorrect use or maintenance, i.e. recommendations in the instruction manual have not been followed.
- Discolouration, damage to the fabric or watermarks due to washing or rainwater.
- The defect is the result of negligence or damage to the fabric or frame due to a blow to the pushchair.
- The defect is the result of an accident or aircraft travel.
- The defect is the result of overburdening (exceeding the maximum weight allowance for child and items being carried).
- The defect is the result of using a standing board for a second child.
- There is normal wear and tear to the wheels, tyres and/or fabric, which can be expected with daily use.
- The product has been involved in a “collision” with, for example, a pavement curb or heavy shop door. The wheels and/or axles will no longer be aligned or may bend, as a result of which the pushchair will not track well.
- Damage to surfaces, such as plastic laminate floors, due to tyre marks.
- The above guarantee conditions have not been fulfilled in some other way.