STH 13.84 W - Snow blower Kärcher - Free user manual and instructions
Find the device manual for free STH 13.84 W Kärcher in PDF.

Frequently Asked Questions - STH 13.84 W Kärcher
User questions about STH 13.84 W Kärcher
0 question about this device. Answer the ones you know or ask your own.
Ask a new question about this device
Download the instructions for your Snow blower in PDF format for free! Find your manual STH 13.84 W - Kärcher and take your electronic device back in hand. On this page are published all the documents necessary for the use of your device. STH 13.84 W by Kärcher.
USER MANUAL STH 13.84 W Kärcher
STH 8.66 W / STH 10.71 W / 13.84 W


3

4
6
5
7
8
9
10

11
12 13

STH 8.66 W, STH 10.66 W Crt, STH 10.71 W, STH 13.84 W)
Bild 11 A
Please read and comply with these instructions prior to the
initial operation of your appliance. Retain these operating instructions for future reference or for subsequent possessors. In case of transport damage inform vendor immediately
Contents
Environmental protection 16
Overview 16
Symbols on the machine 16
Symbols in the operating instructions 16
Safety instructions 16
Safety Devices 17
Proper use 17
Before Startup 17
Start up 17
Operation 17
Transport 19
Shutdown 19
Maintenance and care 20
Troubleshooting 21
Technical specifications 23
Warranty 23
CE declaration 23
Environmental protection
| The packaging material can be recycled. Please do not throw the packaging material into household waste; please send it for recycling. | |
| Old appliances contain valuable materials that can be recycled; these should be sent for recycling.. Batteries, oil, and similar substances must not enter the environment. Please dispose of your old appliances using appropriate collection systems. | |
| Pb | Please dispose off the normal or rechargeable batteries in an environment-friendly manner. Batteries and accumulators contain substances that must not enter the environment. Please dispose them off using appropriate collection systems. |
Please do not release engine oil, fuel oil, diesel and petrol into the environment Protect the ground and dispose of used oil in an environmentally-clean manner.
Overview
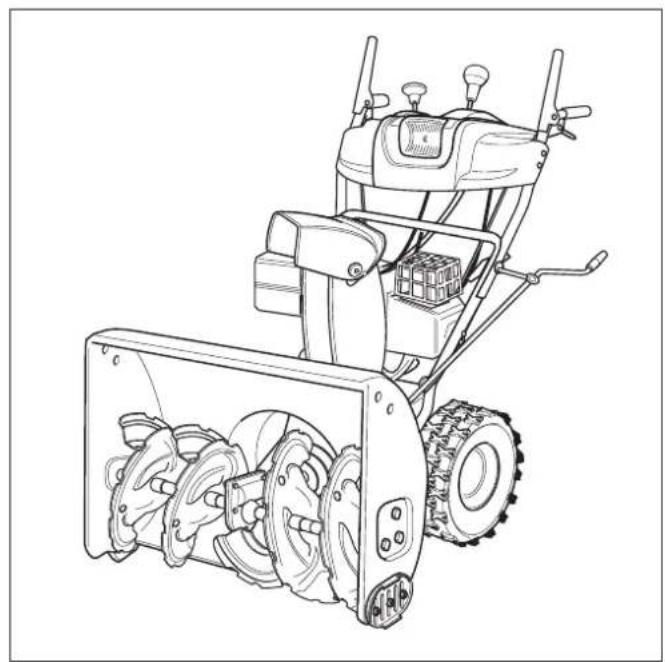
Device elements
Figure 1
1 Clutch bow/clutch lever for auger drive
2 Clutch lever for driving
3 One-way clutch lever, left
4 One-way clutch lever, right
5 Adjust the throw distance
6 Switching lever
Forward: Gears 1-5 (only STH 5.56), gears 1-6
Reverse: R1 slow/R2 fast
7 Adjust throw direction
8 Spar handle
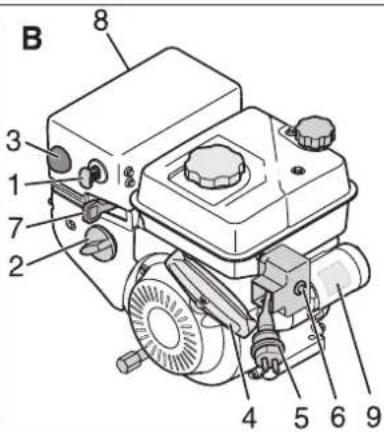
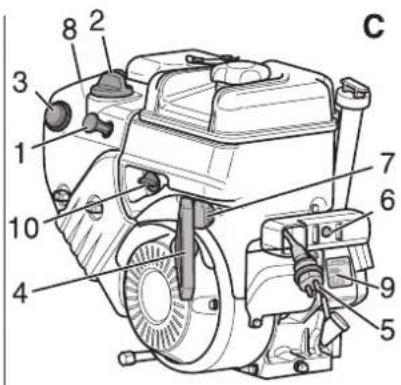
Figure 3
1 Ignition key
2 Choke
3 Cold start help (Tupfer)
4 Rope starter
5 Mains plug for electric starter
6 Starter knob
7 Gas lever
8 Ignition plug
9 Starter type plate
10 Fuel tap
11 Engine stop switch
Symbols on the machine
| Risk of burns! Keep safe distance from hot parts of the appliance. | |
| Wear eye and ear protection! | |
| Keep others out of the hazardous area! | |
| Risk of injury due to snow being thrown out or solid objects. | |
| Touch the parts of the appliance only when they have completely come to a standstill. | |
| Risk of injury on account of rotating parts. Keep hands and feet away from rotating parts. |
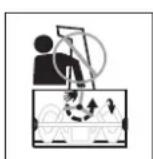
| Only clean the discharge chute with cleaning utensils.. | |
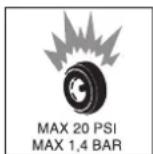
| MAX 20 PSI MAX 1,4 BAR | Risk of explosion! Never exceed the max. tyre pressure of 1.4 bar/20 PSI. |
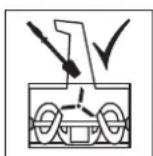
| Switch the machine off prior to any work, such as adjustments, cleaning, testing and pull the spark plug. | |
| Gas lever position "fast" | |
| Gas lever position "slow" |
Note
Keep these symbols on the machine legible at all times.
Symbols in the operating instructions
Danger
indicates an immediate threat of danger. Failure to observe the instruction may result in death or serious injuries.
Warning
indicates a possibly dangerous situation. Failure to observe the instruction may result in light injuries or damage to property.
Note
indicates useful tips and important information.
Safety instructions
The appliance should not be operated by persons below the age of 16 years (local conditions can specify the minimum age of the operator).
- Please keep children and pets away from the hazardous zones of the appliance.
- Please follow the national rules and regulations while operating the machine on public streets or paths.
- Do not use the appliance to transport persons.
Always wear gloves, ear protectors, safety goggles, tight winter clothing and firm shoes with anti-slip soles while working.
- Never use the appliance in closed rooms; do not tank up when the engine is hot or running.
- Do not bring any parts of the body or clothes in the vicinity of rotating or hot parts of the appliance.
- Switch off engine; remove the ignition key and ignition plug if you are not working with the appliance or are leaving the machine. The same is applicable while performing setting, maintenance or repairs.
- Let the engine cool down before storing away the appliance in closed rooms.
- Store the appliance and the fuel at a safe place away from sources of fire (sparks, flame) and out of children's reach.
- Get the appliance repaired only from a specialised workshop.
Safety Devices
Safety devices serve for the protection of the user and must not be put out of operation or bypassed with respect to their function.
Clutch bow
(only STH 953 W)
When the user releases this lever, the auger drive will turn off and the machine will stop moving.
Clutch lever for snail drive
Not STH 953 W
The snail drive switches off when the user releases this clutch lever.
This lever can be stopped in a depressed state (not STH 5.56 W) if the user presses the clutch lever for travel drive and keeps it depressed. Both the levers jump back as soon as the user releases the clutch lever for the travelling drive. The auger and travel drive are switched off simultaneously.
Clutch lever for driving
Not STH 953 W
The travel drive switches off when the user releases this clutch lever.
Safety grid in the discharge shaft
The safety grid prevents intervention in the discharge shaft.
Discharge flap
Figure 9
The discharge flap (2) prevent injuries from ejected objects.
Proper use
This appliance is only to be used for clearing snow from roads and other hard surfaces according to the descriptions and safety instructions given in this Instruction Handbook.
- Any other use is in contravention of the rules!
- Using the appliance in contravention of the rules or making any high-handed
changes to the machine will absolve the manufacturer from any warranty liability.
- The user is responsible for damages to third parties and their property caused by using the appliance.
Before Startup
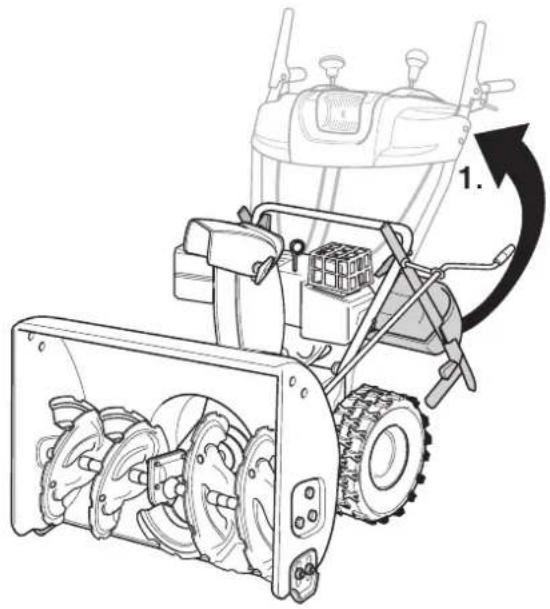
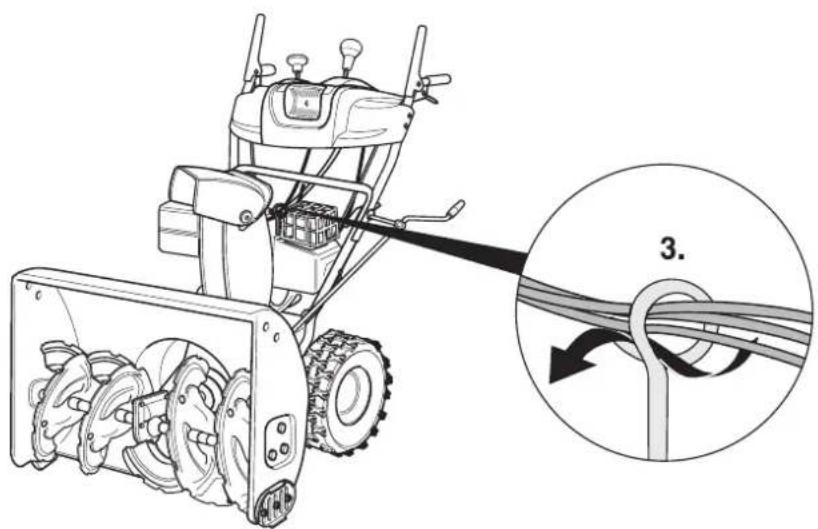
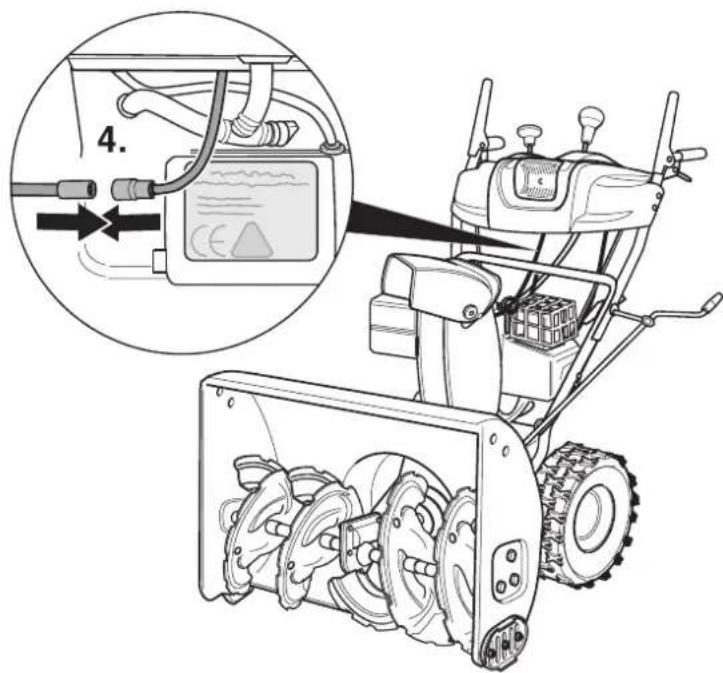
Unpack the appliance and assemble it
Check the contents of the pack before unpacking.
Assemble the appliance according to the instructions given at the end of this Instructions Handbook.
Start up
Danger
Risk of injury!
Before doing any work on the machine:
Switch off engine.
Pull out the ignition key and the ignition plug.
Allow engine to cool down.
Check the machine
Perform a visual inspection before each use.
Check and ensure that all safety equipment, operator control elements and the corresponding clutch tensions/cables and screw fittings are not damaged and are tight.
Replace damaged parts before operations.
Not STH 953 W: Check clutches for snail and travel drive (see "Maintenance tasks").
STH 8.66 W, STH 10.66 W Crt, STH 10.71 W, STH 13.84 W: Check switching lever (see "Maintenance tasks").
Check oil level
Check oil level; refill engine oil if required (see "Engine Instruction Booklet").
Refuelling
Danger
Risk of explosion and fire!
- Only use the fuels specified in the Operations Manual of the engine manufacturer.
- Do not refuel the machine in enclosed spaces.
Smoking and naked flames are strictly prohibited.
- Ensure that no fuel reaches the hot open surfaces.
- Fuel up only when the engine is switched off and is cold.
- Never tank up the fuel tank fully. Wipe off spilled fuel.
- Store fuel only in suitable containers.
Fuel up (for type of fuel see "Engine Instruction Booklet"); close the lid of the tank and wipe off fuel residues.
Check the tyre pressure
Not STH 953 W
For transportation, the tyres may show a higher level of air pressure.
Check air pressure in the tyres; adjust it if required (approx. 1 bar).
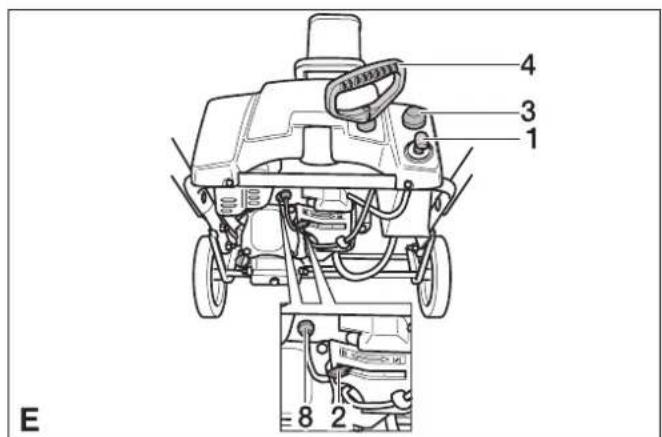
Adjust the machine to suit the snow and ground conditions
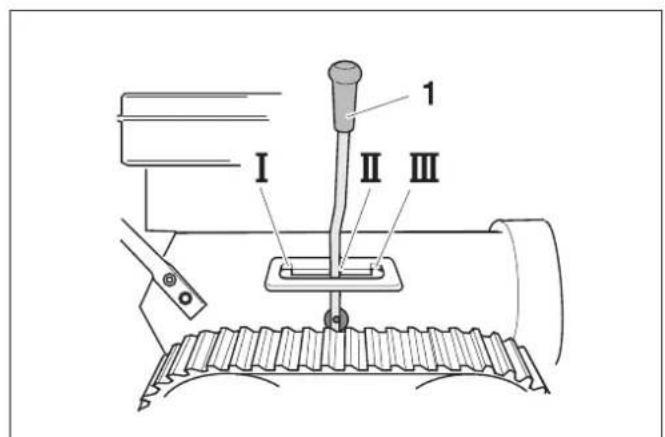
Setting the working position
(machines with track drive) Figure 4
Choose a suitable position using the adjustment lever (1).
- Position I: For heavy and icy snow. auger is pressed to the ground.
- Position II: For normal snow conditions.
- Position III: To clear uneven paths or to transport the machine. The auger has a greater distance to the ground.
Adjusting the clearing plate (only STH 953 W)
Figure 10
If the machine is sitting on even ground, the auger (1), clearing plate (2) and wheels (3) must touch the ground simultaneously.
-A clearing plate that is adjusted too high will cause the snow to be thrown to the rear.
- A clearing plate that is positioned too low will wear faster.
Tilt the appliance rearward.
Loosen nuts (5).
Adjust the clearing plate higher or lower (as required) and reattach.
Tilt the machine backwards, check adjustment and repeat if necessary.
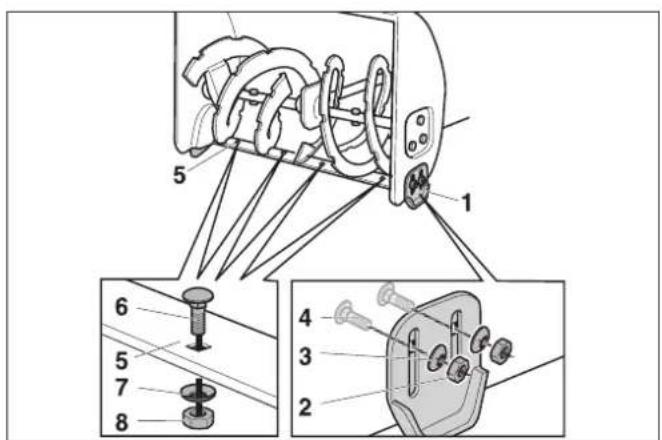
Adjusting the skids
Not STH 953 W
Figure 7
The landing skids (1) can be used to adjust the distance between the ground and the clearing plate (5) in such a way that no parts of the ground (such as soil or stones) are picked up.
Machines with track drive: Set the gear lever to position II.
Loosen the nuts (2) on both the sides of the appliance.
Adjust the landing skids according to the underground surface: Set it lower for uneven or loose parths; higher for even roads and paths.
Fasten the landing skids with nuts (2) in such a way that they uniformly touch the ground from the bottom.
Operation
Safety instructions
Danger
Risk of injury!
- Keeps persons, especially children, and pets away from the hazardous zones.
-
Operate the machine only in a safe and perfect working condition.
-
Check the area where the machine is to be used and remove all objects that can get picked up and thrown out by the machine.
- Work only with adequate lighting.
- Only use the machine in walking speed.
- Work slowly and safely especially on uneven or loose paths and while reversing.
- Adjust the distance between the snail casing and the underground floor in such a way that the appliance does not pick up any foreign bodies (such as stones).
Danger
Risk of suffocation on account of carbon monoxide! Only operate the combustion engine while out in the open.
Note
Follow the national/ local regulations for the usage times (ask the local authorities, if required).
Danger
Long hours of using the appliance can cause circulation problems in the hands on account of vibrations.
It is not possible to specify a generally valid operation time, since this depends on several factors:
- Proneness to blood circulation deficiencies (cold, numb fingers).
Low ambient temperature. Wear warm gloves to protect hands.
-A firm grip impedes blood circulation. - Continuous operation is worse than an operation interrupted by pauses.
In case of regular, long-term operation of the device and in case of repeated occurrence of the symptoms (e.g. cold, numb fingers) please consult a physician.
Tips for clearing the snow
- Clear up immediately after the snowfall; otherwise, the lower layer becomes ice and makes clearing difficult.
- If possible, clear the snow in the direction of the wind.
- Clear the snow in such a way that the clearing tracks overlap a little.
Working on slopes
△Danger
Risk of injury!
Danger of tipping if gradient is too high.
- Do not use the appliance on slopes with an inclination greater than 20% .
Work slowly and cautiously, especially while changing the direction of travel.
- Drive up and down the slope - never diagonally to the slope.
- Pay attention to hurdles - do not work close to the inclination.
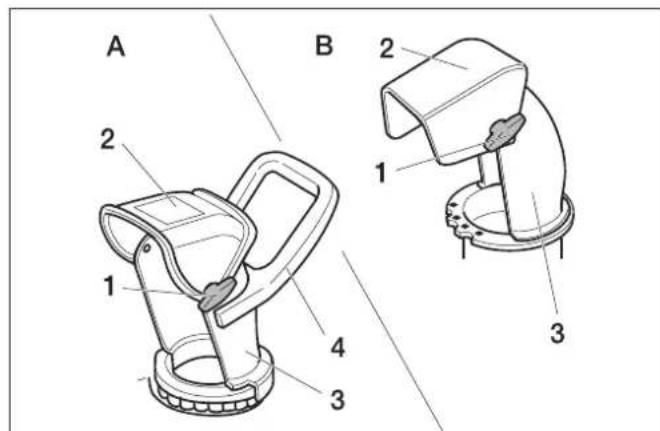
Setting the direction and distance of throw
Figure 9
Danger
Risk of injury! Do not direct the flap (2) of the discharge shaft (3) towards persons, animals, windows, cars and doors.
Adjust throw direction
Not STH 953 W:
Bring the discharge shaft (3) to the desired direction by turning the crank (figure 1, item 7).
Only STH 953 W:
Move the discharge chute (3) into the desired direction using the handle (4).
Note
Do not use the handle (4) to lift the machine.
Adjust the throw distance
Deeper the flap (2), so much higher and farther will be the snow discharge.
Machines with lever:
Press the lever (figure 1, item 5) towards the front to set the flap (2) higher and vice-versa.
Machines without lever:
Loosen the hand knob (1) and adjust the flap (2) higher/ lower as required.
Start the engine
Figure 3
Read the operating instructions of the engine manufacturer before start-up and follow the safety instructions carefully.
Release the clutch bow/clutch lever for auger and travel drive before starting.
Check tank contents and oil level; refill oil and fuel (see "Engine Instructions Booklet").
Note
Some models do not have a gas lever, the speed is adjusted automatically. The engine always runs with optimized speed.
Starting using rope starter
Set the fuel tank tap, if there is one, to "ON/OPEN".
Insert the ignition plug into the spark plug.
Not STH 953 W: Turn gas lever, if there is one, to "fast". On machines without gas levers, set the engine stop switch to "ON".
Set the choke for cold start to "ON/CHOKE".
Insert the ignition key into the ignition lock.
Press cold start help (Tupfer) once; press it twice to seven times during cold weather (depending on the engine type).
Pull the rope starter slowly till you feel the resistance and then give it a quick and hard tug. Do not allow the rope starter to recoil immediately - just let it go back slowly.
Reset the choke back to "RUN/OFF" in a step-by-step manner, if the engine is running.
Starting using electrical starter (optional)
Not STH 953 W
Danger
Risk of electric shock.
- Do not use the electric starter in the rain.
- Check whether the mains are secured with a leakage current protection switch. If not, get an electrician to install a suitable switch.
To connect the electrical starter to the mains, use only extension cables (not part of standard delivery) that have been approved for use in the open and have a safety conductor.
For example: for a max. length of 50m
-H07RN-F 3x1.5 mm ^2 up to -25 °C
-H07BQ-F 3x1.5 mm ^2 up to -40 °C
Danger
Risk of electric shock.
- Prior to each engine start, check the extension cables and the cables/connectors on the engine for damage.
- Please arrange immediately for the exchange of damaged parts by a skilled electrician.
- Never start the machine with damaged parts.
Warning
Improper connection of the electrical starter can cause damage to the machine or to property in its vicinity. Check whether the mains are being operated according to instructions on the type plate of the starter and is protected with appropriate fuses.
Set the fuel tank tap, if there is one, to "ON/OPEN".
Insert the ignition plug into the spark plug.
Turn gas lever, if there is one, to "fast". On machines without gas levers, set the engine stop switch to "ON".
Insert the ignition key into the ignition lock, do not turn it.
First connect the extension cable to the mains and then connect it to the mains socket.
Set the choke for cold start to "ON/CHOKE".
Press cold start help (Tupfer) once; press it twice to seven times during cold weather (depending on the engine type).
Press the starter button (max. 5 seconds) till the engine starts. Wait for at least 30 seconds before making a fresh start.
Reset the choke back to "RUN/OFF" in a step-by-step manner, if the engine is running.
First disconnect the extension cable from the mains and then from the electrical starter.
Putting/ changing gears
Not STH 953 W
Figure 1
Warning
Release the clutch lever for snail and travel drive before putting or changing a gear. Select the gear using the switch lever:
Forward: "1" (slow) to "5/6" (fast)
Reverse: R1 slow/R2 fast
Working with the appliance
Figure 1
Warning
Risk of damage!
- If the machine comes in contact with foreign objects (e.g. stones) or if there are unusual vibrations, switch off the machine and check the damage. Rectify the damage before starting to work again with the appliance.
- Let the engine warm up prior to using the machine.
Only STH 953 W:
Set the direction and distance of throw.
Start the motor.
Press the clutch bow and hold it. The auger is driven. The machine will move forward when the auger touches the ground.
Increasing the travel speed: Raise the spar handle slightly. The auger will have better ground traction and will drive the machine forward faster. If repeated frequently, this will cause a more rapid wear of the rubber lip on the auger.
Decreasing the travel speed: Press the spar handle downward.
Not STH 953 W:
Set the direction and distance of throw.
Start the motor.
Select the forward gear after releasing the clutch levers for snail and travel drives.
Press the clutch lever for snail drive and keep it depressed. The snail and the throwing turbine will start up.
Press the clutch lever for travel drive and keep it depressed. The appliance will move and clear the snow. The clutch lever for auger drive remains locked till this lever remains depressed (not STH 5.56 W) and can now be released.
To change the gears, first release the clutch lever for travel drive and then use the switching lever for changing the gears.
Machines with freewheeling levers: The machine can be lowered more easily using the freewheeling levers. To the right: Pull on the right freewheeling lever. To the left: Pull on the left freewheeling lever.
Stopping the engine
Figure 3
To avoid damage to the appliane and prevent starting problems due to humidity, let the engine run for a few minutes before switching it off (so that it gets dried).
Not STH 953 W:
Turn gas lever, if there is one, to "slow". On machines without gas levers, set the engine stop switch to "OFF".
Pull out ignition key.
Turn fuel tap, if there is one, to "OFF/CLOSE".
Remove the blockages from the snail or the discharge shaft
Danger
Risk of injury!
Before doing any work on the machine:
-
Switch off engine.
-
Wait till all the moving parts have come to a stand-still.
-
Pull out the ignition key and the ignition plug.
Figure 13
Remove the blockages using a plastic plunger or a shovel.
Snow chains (optional)
Snow chains can be purchased and used if the weather conditions are extreme.
Transport
Drive the machine
For maneuvering/ travelling short distances.
Start the appliance.
Select a forward or reverse gear.
Press the clutch lever for travel drive and keep it depressed.
Drive the machine carefully.
Transport without self-drive
Danger
Risk of injury!
Before doing any work on the machine:
Switch off engine.
Pull out the ignition key and the ignition plug.
Allow engine to cool down.
Empty fuel tank.
Transport the machine on or in a vehicle in the horizontal position.
Secure the machine against slippage or from rolling off.
Shutdown
Danger
Risk of explosion!
Smoking and naked flames are strictly prohibited.
- Ensure that no fuel reaches the hot open surfaces.
Please follow these instructions if the machine is not to be used for more than one month:
Prepare the engine (see "Engine Instruction Booklet").
Empty fuel tank.
Clean the device.
Wipe all metallic parts with an oily cloth to protect them against rusting or spray some oil on them.
Store the machine in a clean and dry room.
Maintenance and care
Maintenance schedule
Once in the season:
- Get the machine checked and serviced in an authorised workshop.
Every time before use:
-
Check oil level; refill engine oil if required (see "Engine Instruction Booklet").
-
Check whether all screw joints are tight; tighten them, if necessary.
-
Check safety equipment.
-
For machines without electric starter: Check the cables and connectors on the engine.
| Maintenance tasks After using | for | 25 h 50 h | after the | season | depending on requirements |
| Clean the discharge shaft, snail and snail casing. x | |||||
| Oil change 3) | x 4) | ||||
| Lubricate all moving and rotating parts x x | |||||
| Clean the spark plugs 1) | x | ||||
| Get the spark plugs replaced 2) | x | ||||
| Check air pressure in the tyres; increase it, if required x x | |||||
| Clean the exhaust and the air cooling system 1) | x | x | |||
| Check clutch setting; readjust, if required x | |||||
| Get the carburetor settings checked 2) | x | ||||
| Check clearing plate; replace worn out clearing plate x | |||||
| Check landing skids; replace worn out landing skids in pairs x | |||||
| Check track, adjust if necessary, replace defective track if required | x | ||||
| Replace tank lock x | |||||
| Get the exhaust checked 2) | x |
See "Engine Instruction Booklet"
2) Get these jobs done only from an authorised workshop
3) First oil change after 5 operating hours (h)
4) Change oil every 25 operating hours (h) if the machine is operated under heavy load or if the ambient temperature is high
Maintenance Works
Danger
Risk of injury! Before doing any work on the machine:
- Switch off engine.
- Pull out the ignition key and the ignition plug.
- Allow engine to cool down.
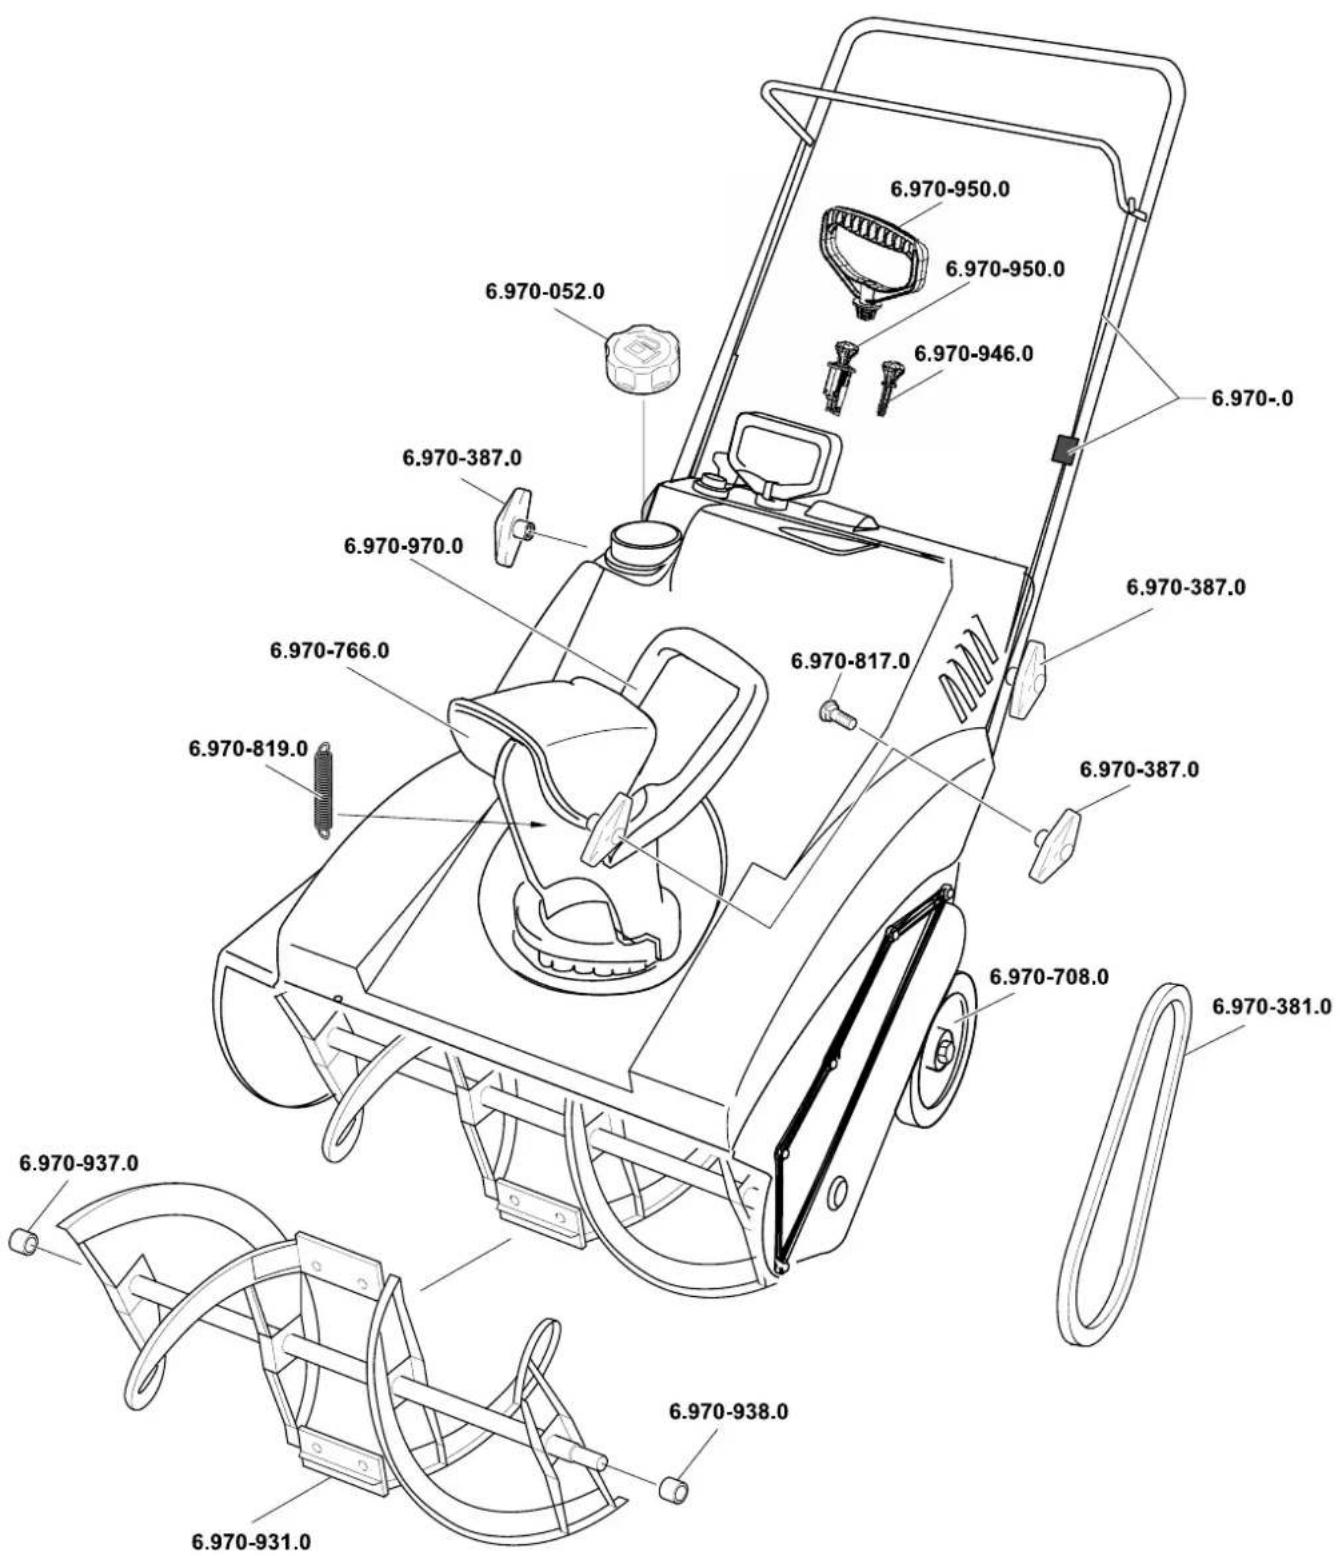
Accessories and Spare Parts
Only use accessories and spare parts which have been approved by the manufacturer. The exclusive use of original accessories and original spare parts ensures that the appliance can be operated safely and troublefree.
Cleaning the device
Park the machine on solid, even and horizontal ground.
Remove dirt that is stuck.
Clean the machine by letting in flowing water through the discharge shaft and let it dry.
Clean the engine using cloth and brush.
Lubricate the machine
Lubricate all rotating and moving parts with some light oil.
Adjust the air pressure in the tyres (Not STH 953 W)
△Danger
Risk of explosion! Never exceed the max. tyre pressure of 1.4 bar/20 PSI.
Recommended air pressure is approx. 1 bar
Maintenance jobs for the engine
See "Engine Instruction Booklet".
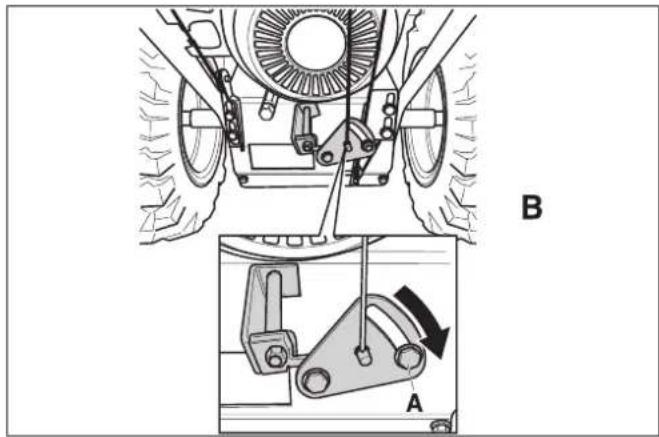
Adjust the clutch for the snail drive (Not STH 953 W)
Figure 2
Check clutch status:
Press the left clutch lever (1) forward (direction I); at the same time press the rubber (3) downward. The clutch tension (5) must be reduced. Otherwise loosen it (see "Changing the setting of the clutch tension").
Release clutch lever (1). Clutch tension (5) must be without tolerance but should also not be too tight. Else change the setting (see "Changing the clutch tension").
It should be possible to press down the clutch lever (1) completely. Otherwise, the clutch tension is too high and must be reduced (see "Changing the clutch tension").
Addition checks (see "Working with the appliance"):
Turn the auger drive on for 10 seconds with the engine running.
Release the clutch lever, the auger must stop rotating.
Adjust the clutch for the travel drive (Not STH 953 W)
Figure 1
Machines with track drive: Set the gear lever to position III.
Set the switching lever to the fastest forward gear (highest number).
Push the machine forward after releasing the clutch lever for travel drive.
While pushing, set the switching lever to the fastest reverse gear and then to the fastest forward gear.
If you feel any resistance during pushing or changing the gears, reduce the clutch tension (see "Changing the clutch tension setting").
While pushing the machine, keep the clutch lever of the travel drive depressed. The wheels/tracks must be locked. Otherwise tighten the clutch tension (see "Changing the setting of the clutch tension").
If the setting is still not complete or is doubtful, see "Check travel drive".
Changing the clutch tension setting (Not STH 953 W) Figure 2
For clutch tensions with adjustable covers (6):
Tightening: Loosen nuts (7) and screw in the adjustable covers (6).
Loosening: Loosen adjusting covers (6) and screw in the nuts (7) in the opposite direction.
For clutch tensions with release spring (8):
Before doing the setting, remove the spring and then reinsert it. The clutch tension is correct when the spring expands 2-3 cm while coupling.
Tightening: Screw the safety nut (9) upward.
Loosening: Screw the safety nut (9) downward.
For clutch cables with adjustment plates for travel drive (10) or for auger drive (11):
Tightening: Loosen screw (A) depending on the adjustment plate, slide adjustment plate down and reattach the screw (A).
Loosening: Loosen screw (A) depending on the adjustment plate, slide adjustment plate up and reattach the screw (A).
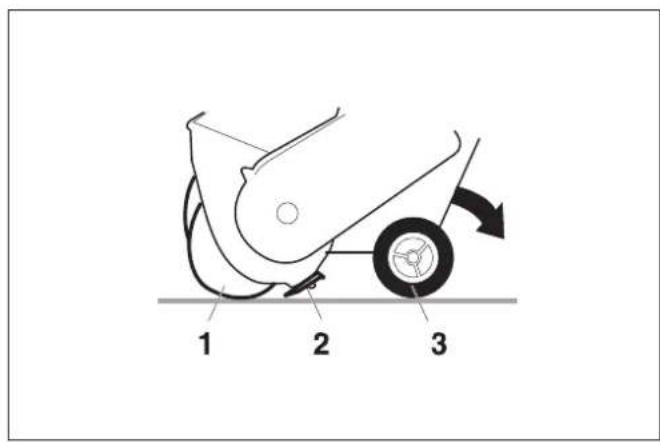
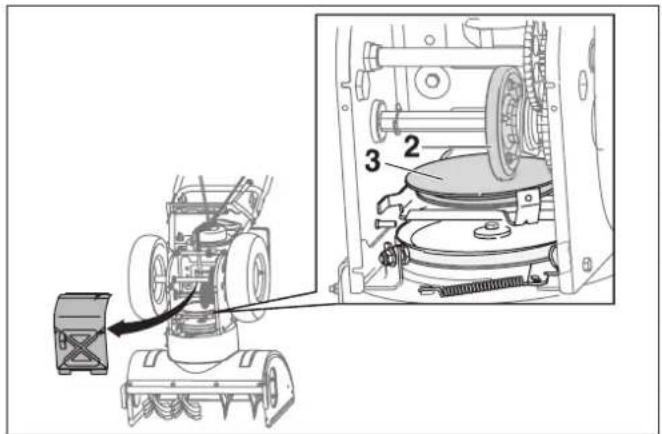
Checking the travel drive (Not STH 953 W)
Figure 12
Warning
Risk of damage to the machine! While tilting the machine, ensure that it retains its balance and no fuel or oil in the air filter leaks into the engine compartment or to the outside.
Loosen the screws of the frame; tilt the device forward, if required.
Release the clutch lever for travel drive and shift to all gears; while doing so, the friction wheel (2) should not touch the drive disc (3). Otherwise loosen coupling tension (see "Changing the clutch tension setting").
Press the clutch lever for travel drive in each gear; the friction wheel must always touch the drive disc. Otherwise tighten the clutch tension (see "Changing the clutch tension setting").
Clean the drive disc and rubber on the friction wheel, if required; they should be grease-free.
Remove ice pieces, if any.
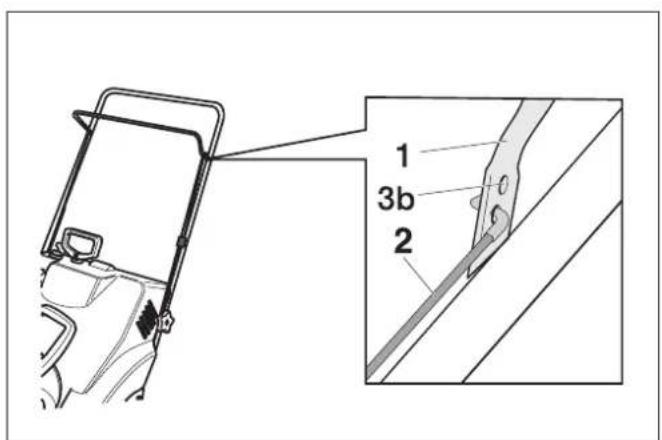
Tensioning the V-belt of the auger (only STH 953 W)
Figure 5
If the auger runs unevenly while the engine speed remains constant, the V-belt (5) must be retensioned.
If there is an additional boring (3b) on the clutch lever (1), hook the clutch cable (2) into the upper boring (3b).
If there is no additional (upper) boring or if it is already being used, visit an authorized workshop.
Setting the switching lever (STH 8.66 W, STH 10.66 W Crt, STH 10.71 W, STH 13.84 W)
Figure 11 A
(Machines with switching rod)
Remove spring pin (4) and underlying disc (5), remove the spindle nut (6) from the hole (7).
Press the switch arm (2) downward; set the switching lever (3) to gear "6".
Turn the spindle nut (6) in such a way that the pin can be inserted in the same whole (7).
Secure the spindle nut with an underlying disc and spring pin.
Figure 11 B
(Machines with switching tension)
Set the switching lever (3) to the fastest forward gear.
Loosen screw (A) and press the holder downward till the switching tension is tight.
Now tighten screw (A) again.
Check correct setting.
Note
This setting is required only if the fastest gear (forward or reverse) cannot be put.
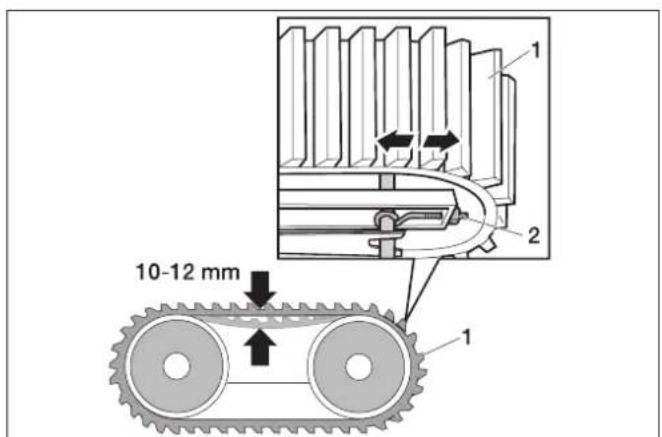
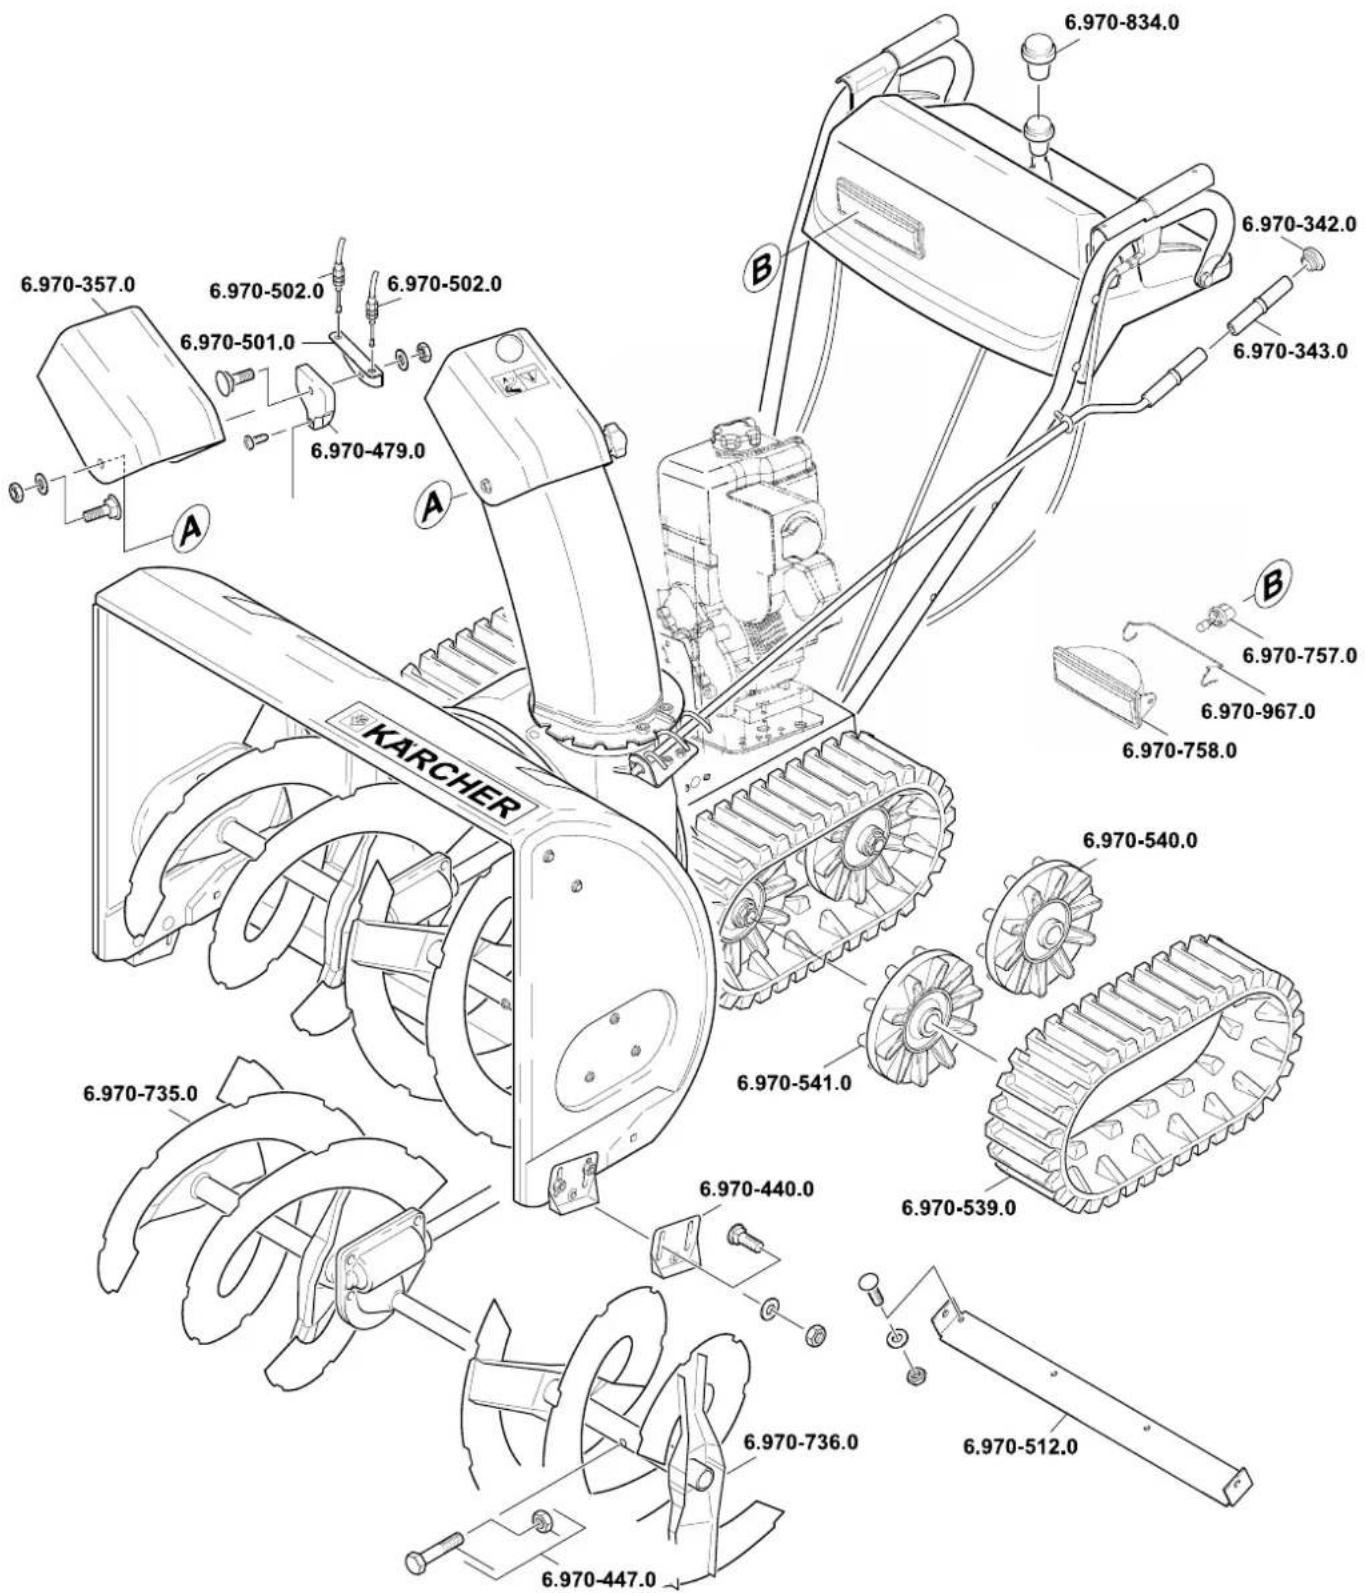
Adjusting the track belt (machines with track drive)
Figure 6
The track belt (1) is adjusted correctly if it can be deflected 10 - 12mm by hand. Otherwise it has to be readjusted.
Position the machine on an even and horizontal surface so that the tracks no longer touch the ground.
Turn the nut (2) until the track belt has the correct tension. In clock-wise direction: Tighten. Anticlockwise direction: Loosen.
Replacing the track belt (machines with track drive
Figure 6
Position the machine on an even and horizontal surface so that the tracks no longer touch the ground.
Turn the nut (2) anticlockwise until the track belt can be removed.
Replacing the track belt Retension the new track belt using the nut (2) (see "Adjusting the track belt").
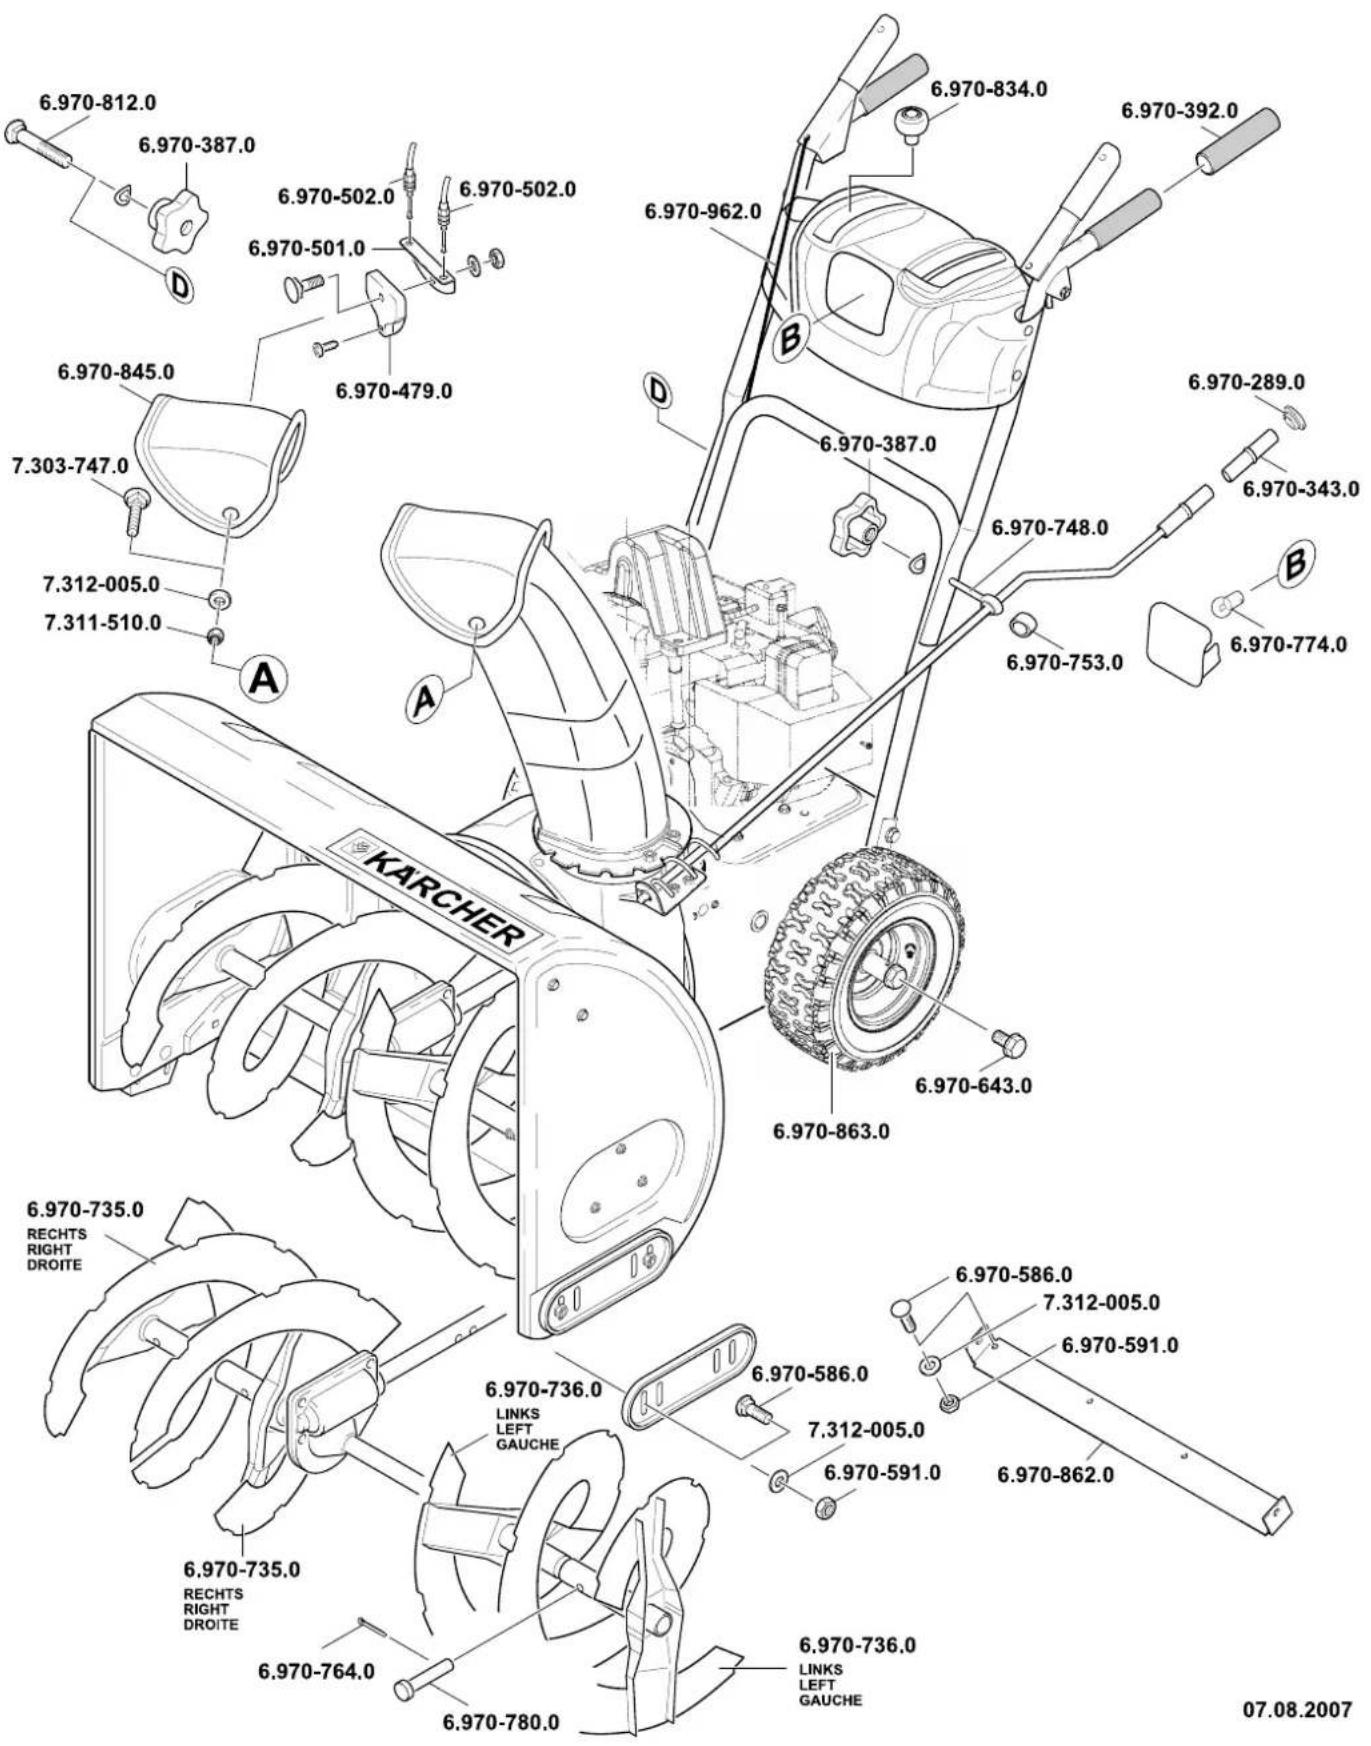
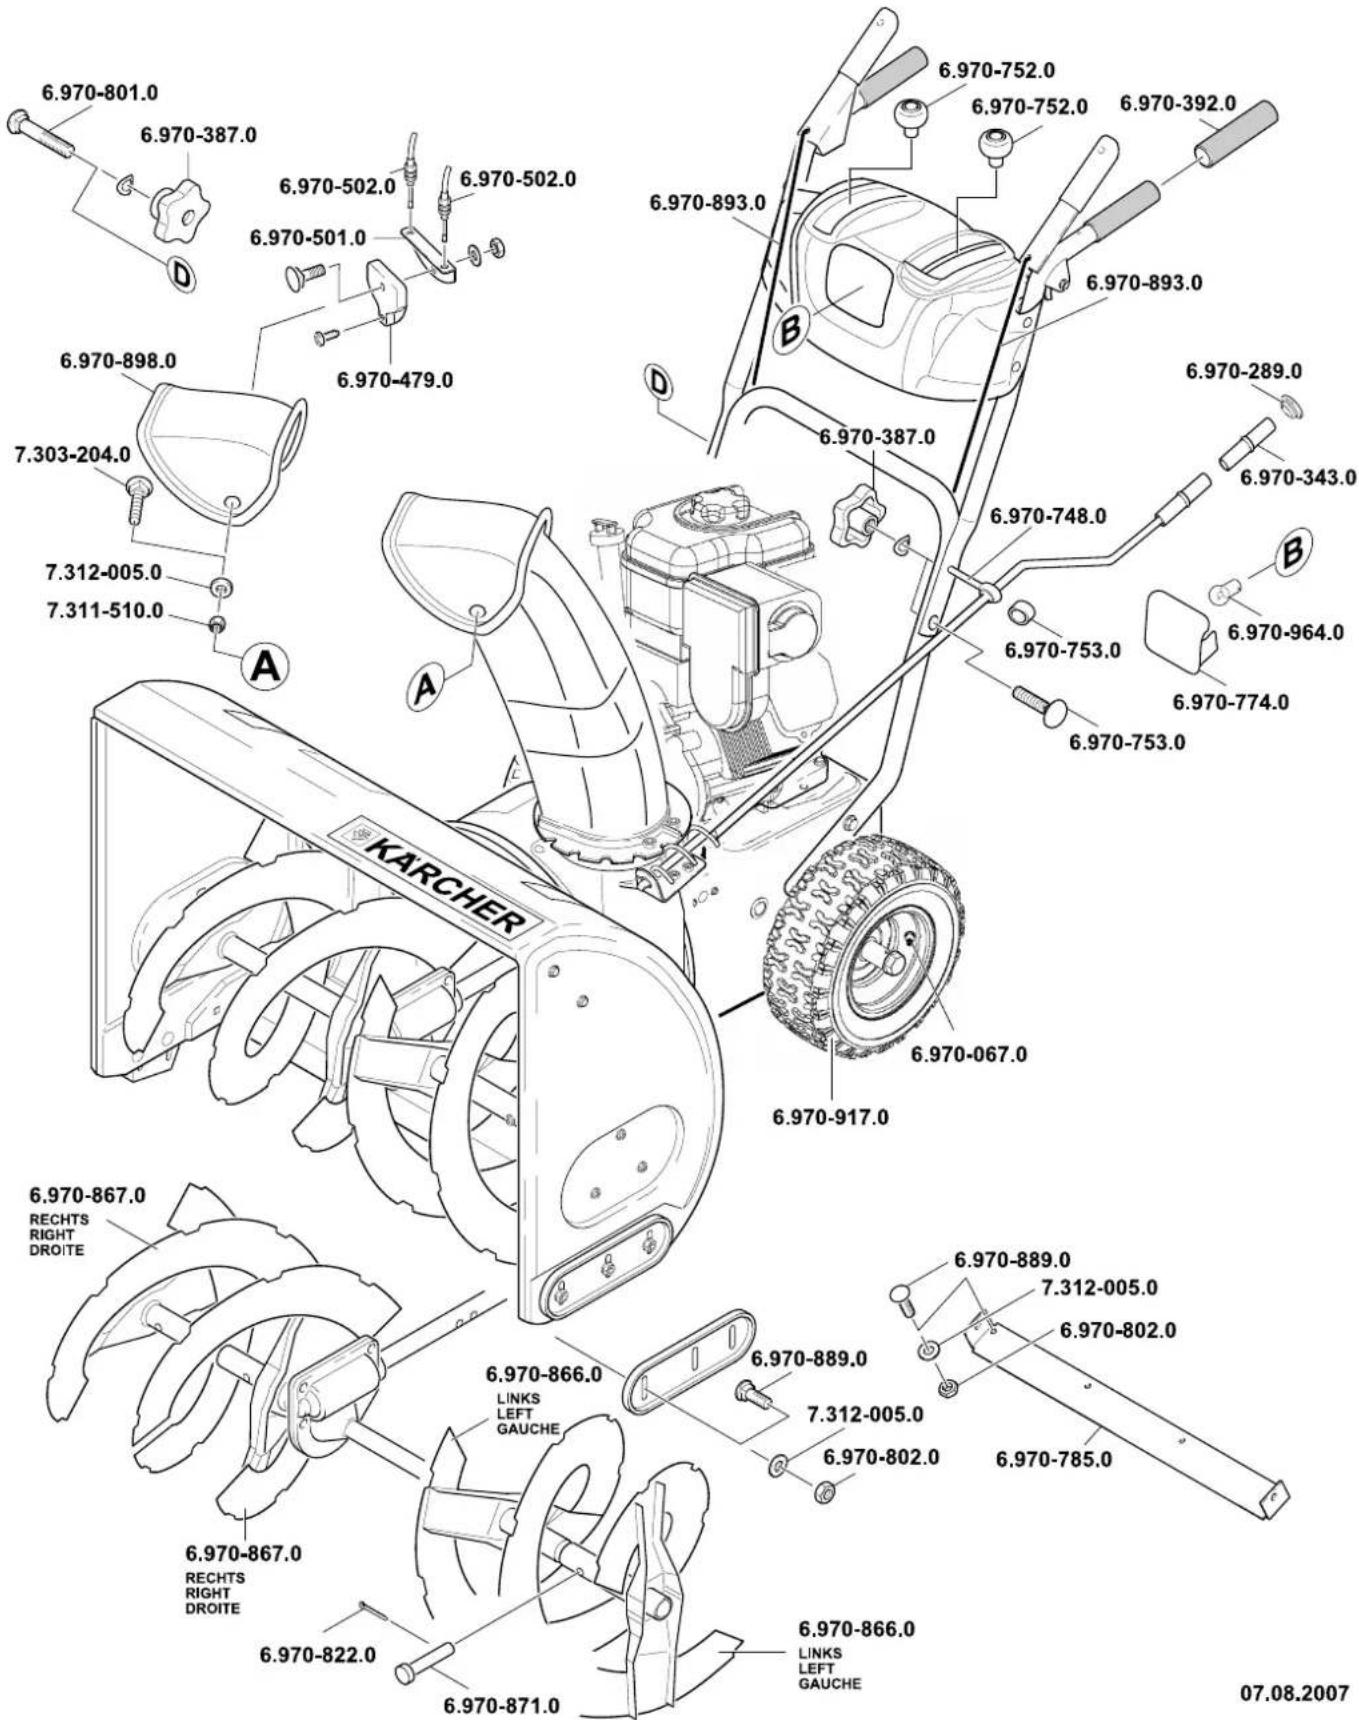
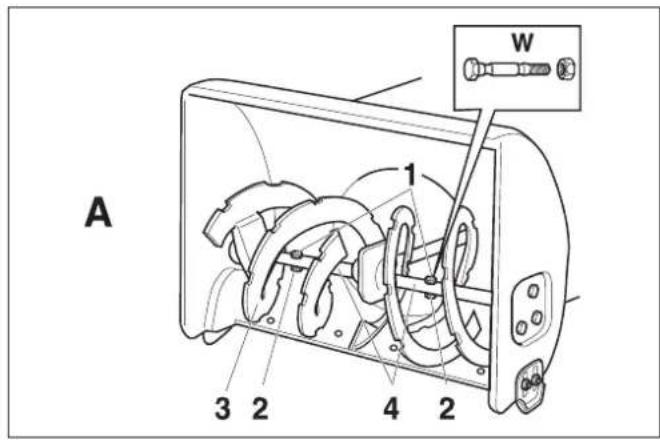
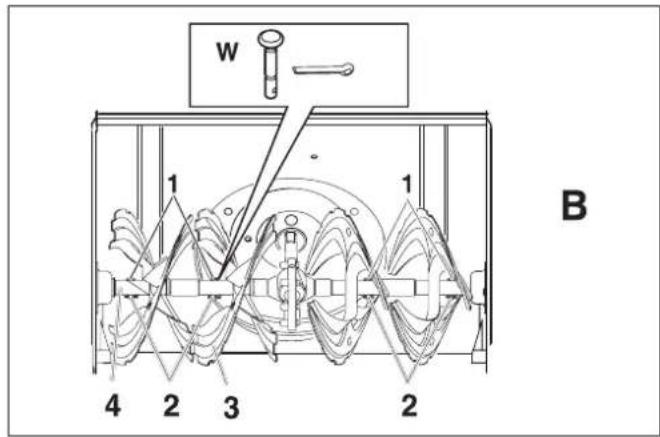
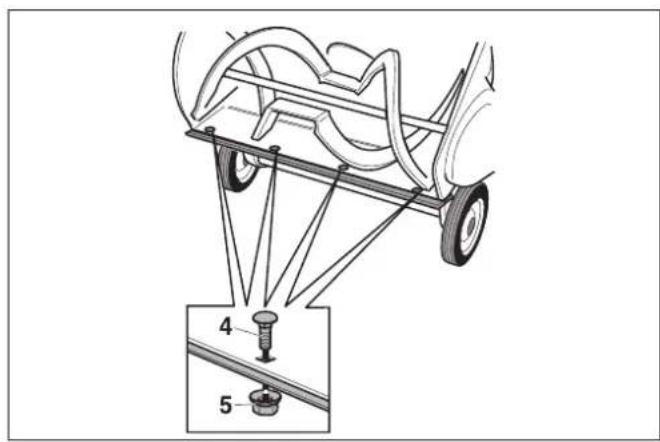
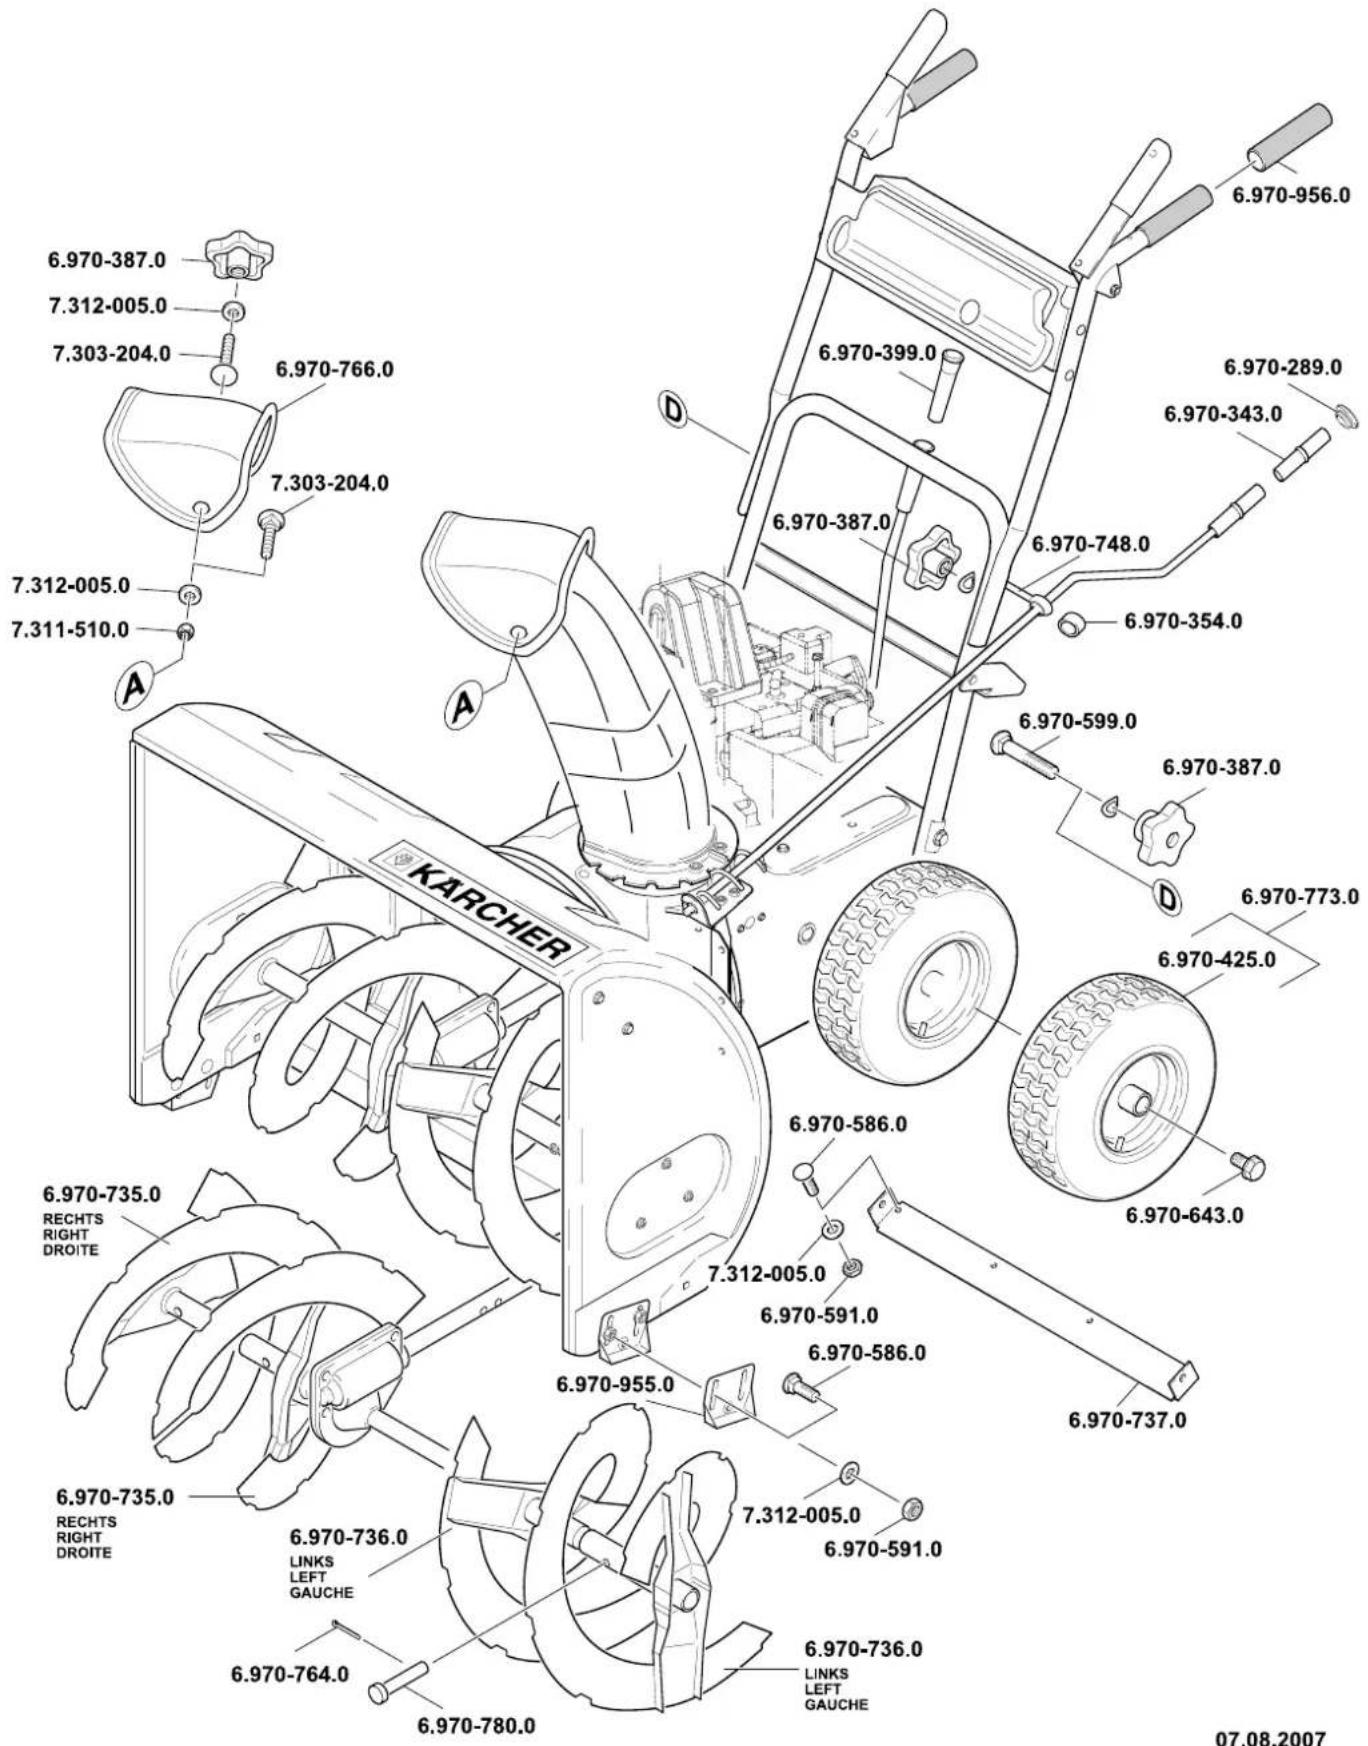
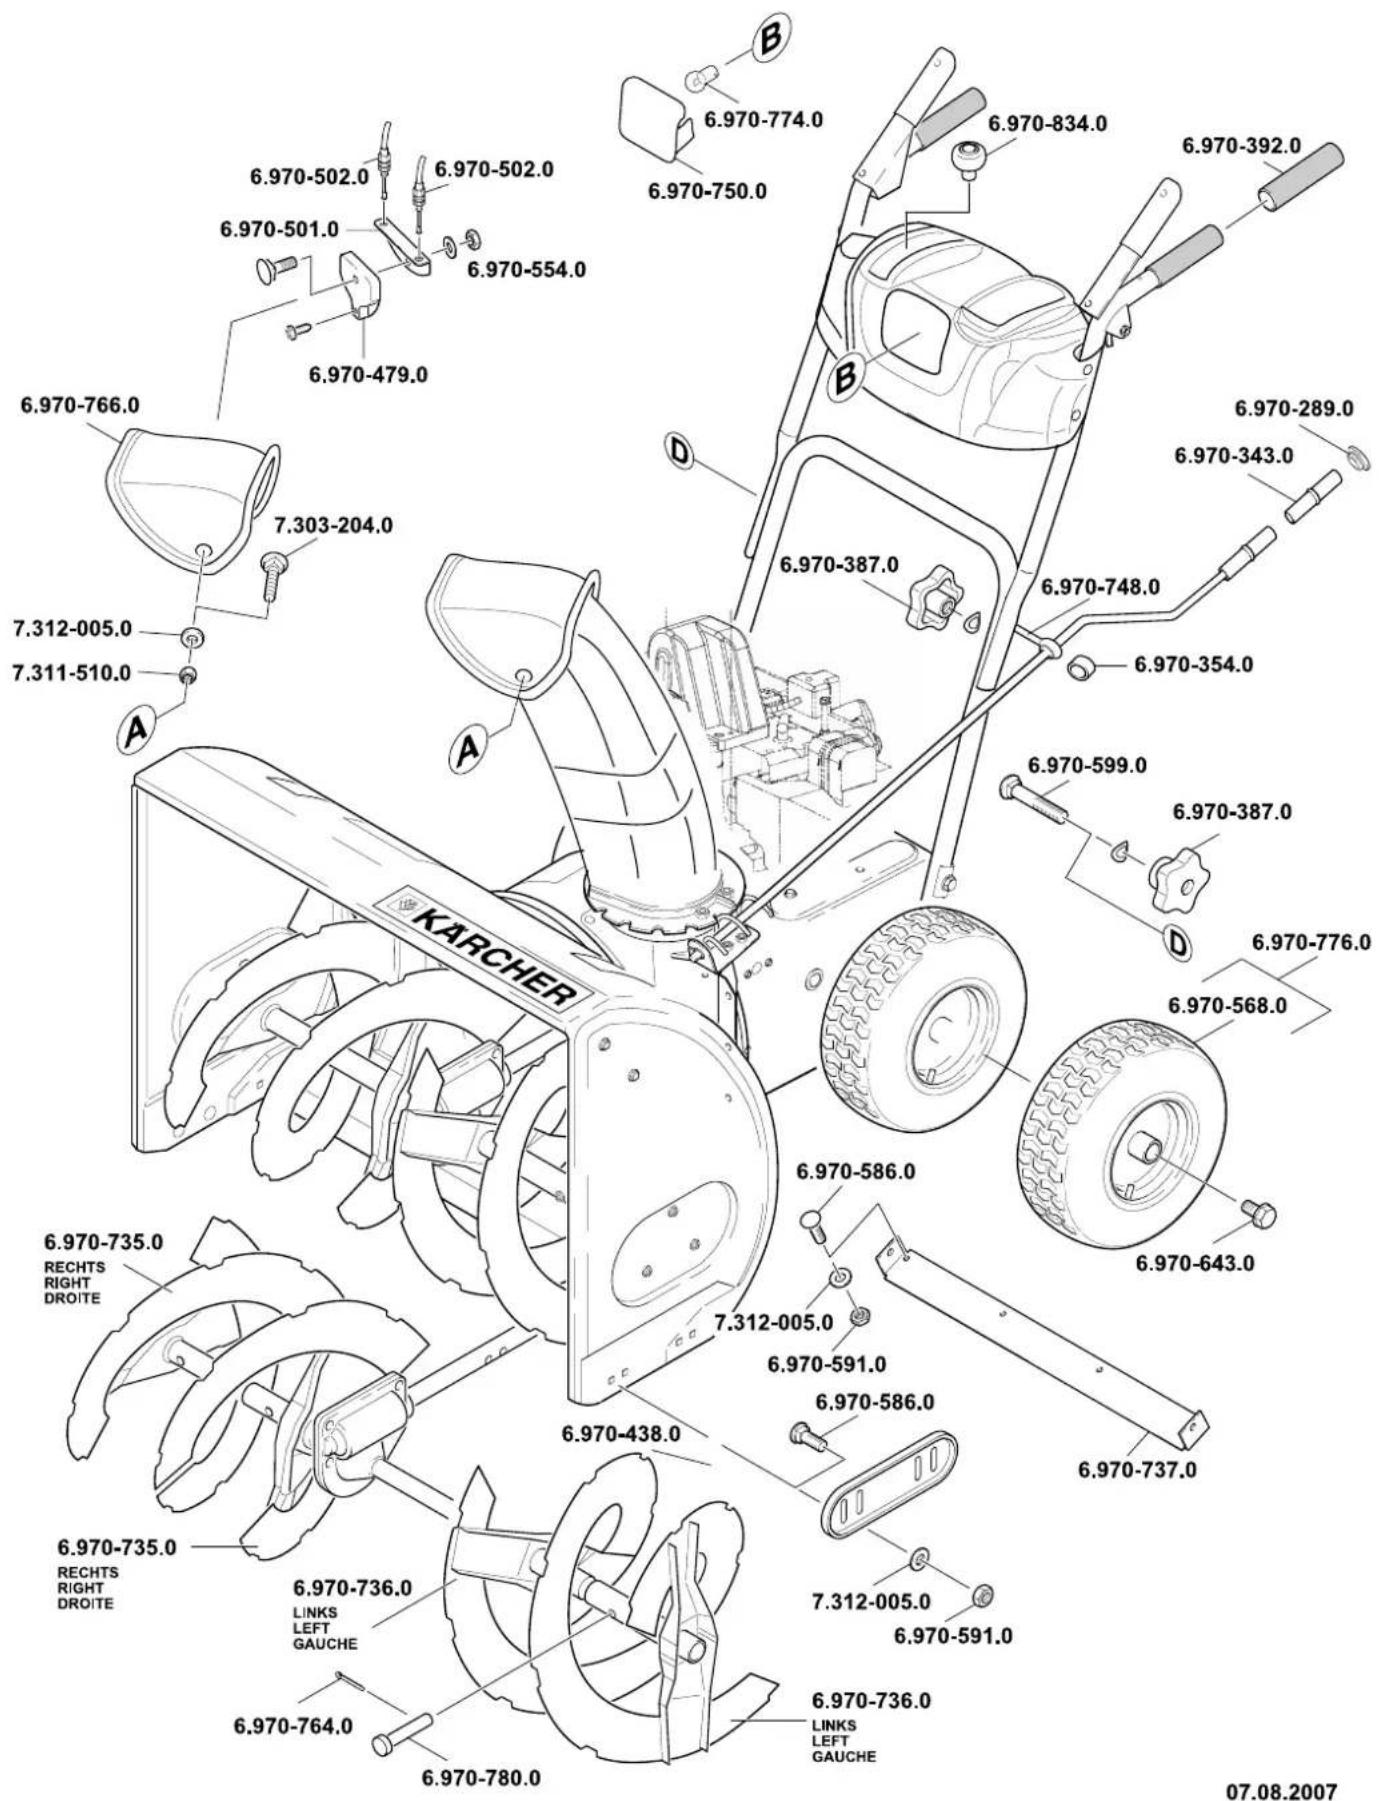
Replacing shearing bolts
Not STH 953 W
Figure 8
The auger (3) is fastened to the drive shaft (4) using shearing bolts (1) and locknuts or splints (2). The bolts are designed in such a way that they break (shear off) when the snail comes in contact with foreign bodies. This protects the machine against damages. These parts should only be replaced by original spare parts (Spare bolts and lock nuts or splints are included as options in standard delivery, part W).
Remove broken bolts (1) and locknut or splint (2); clean and lubricate the fastening point.
Use new shearing bolt and new locknut or splint.
Replacing the clearing plate
Only STH 953 W:
Figure 10
Tilt the appliance rearward.
Remove screws (4) and nuts (5).
Replace the clearing plate (2).
Fasten new clearing plate to the casing using screws and nuts.
Tilt the machine backwards, check (see "Adjusting the clearing plate").
Not STH 953 W:
Figure 7
Remove screws (6), underlying discs (7) and nuts (8).
Replace the clearing plate (5).
Fasten new clearing plate to the casing using screws, underlying disc and nuts.
Replacing the landing skids (Not STH 953 W)
Figure 7
Remove nuts (2), underlying discs (3) and screws (4).
Loosen the landing skids (1) on both the sides of the casing.
Adjust the new landing skids (see "Adjusting the landing skids").
Troubleshooting
Danger
Risk of injury!
Before doing any work on the machine:
- Switch off engine.
- Pull out the ignition key and the ignition plug.
- Allow engine to cool down.
Note
Some of the functioning problems have simple causes and you can rectify them easily. Call up an authorised workshop in case of doubt or if mentioned explicitly.
Note
Repairs should only be done by authorised workshops using original spare parts.
Troubleshooting
| Fault Possible cause | Remedy of whom | ||
| Engine does not start | Fuel tank empty. Refill the fuel tank. Operator | ||
| Fuel idling for a long time. Remove the old fuel in a | suitable container in the open (See "Engine Instruction Booklet"). Fill up the tank with clean, fresh fuel. | Operator | |
| Engine in cold state; choke not set to "ON/CHoke". | Set the choke to "ON/CHoke". Operator | ||
| Gas lever no set to "fast" (not STH 953 W). | Set the gas lever to "fast". | Operator | |
| Engine stop switch not set to "ON" (machines without gas levers). | Set the engine stop switch to "ON". Operator | ||
| Ignition plug not inserted. Insert the ignition plug into the spark plug. Operator | |||
| Spark plug is dirty. Clean the spark plug (see "Engine Instruction Booklet"). | Customer | Operator | |
| Spark plug is defective. Replace the spark plug. | and ventilation hole. Operator | ||
| Carburetor is overflowing. | Adjust the carburetor. | Customer Service | |
| Engine is running erratically | Choke set to "ON/CHoke". | Choke set to "RUN/OFF". | Operator |
| Ignition plug is loosely inserted. | Fix the spark-plug connector properly. | Operator | |
| Fuel idling for a long time. Water or dirt in the fuel system. | Remove the old fuel in a suitable container in the open (See "Engine Instruction Booklet"). Fill up the tank with clean, fresh fuel. | Operator | |
| Ventilation hole in tank lid blocked. Clean tank lid | and Vibration hole. | Customer Service | |
| Carburetor out of alignment. | Adjust the carburetor. | Customer Service | |
| Machine does not clear snow | Shearing bolts torn off. | Replace shearing bolts (see "Replacing shear-ing bolts"). | Operator |
| Snail or discharge shaft is blocked. | Stop the engine, pull out the ignition plug. Remove the blockage. | Operator | |
| Clutch tension for snail drive is not set properly. | Set clutch tension (see "Setting clutch for snail drive"). | Operator | |
| V-belt loose. | STH 953 W: Tension the V-belt (see "Tensioning the V-belt of the auger"). | Operator | |
| Not STH 953 W: Tighten V-Belt. | Customer Service | ||
| V-belt torn. | Replace V-belt. | Customer Service | |
| Machinen does not run (not STH 953 W) | Clutch tension for travel drive is not set properly. | Adjust clutch tension (see "Setting the clutch for travel drive"). | Operator |
| V-Belt is loose or torn. | Tighten the loose V-Belt. Replace torn V-Belt. | Customer Service | |
| Travel drive is coated with ice. | Remove the ice (see "Check travel drive"). | Operator | |
| Friction wheel rubber is torn. | Replace friction wheel rubber. | Customer Service | |
| Excessive vibration | Loose parts or damaged snail. | Stop the engine immediately, pull out the ignition plug. Tighten loose screws and nuts. Repair damaged snail. | Customer Service |
| Gears can be switched with great difficulty (not STH 953 W) | Clutch tension for travel drive is not set properly. | Adjust clutch tension (see "Setting the clutch for travel drive"). | Operator |
| Gear lever not adjusted correctly (not STH 5.56 W). | Check switching lever (see "Setting the switching lever"). | Operator | |
| Travel drive is coated with ice. | Remove the ice (see "Check travel drive"). | Operator |
Information about engine
The engine manufacturer assumes liability for all engine-related problems as regards output, output measurement, technical data, warranty and servicing. For further details, please refer the separate holder/ operator manual of the engine manufacturer.
Technical specifications
| STH 953 W | STH 5.56 W | STH 8.66 W | STH 10.66 W | Crt | STH 10.71 W | STH 13.84 W | ||
| Part no.: | -- | 1.332-101 | 1.335-101 | 1.335-201 | 1.335-302 | 1.335-203 | 1.335-204 | |
| Type -- Snow clearer | with wheels | Snow clearer with wheels | Snow clearer with wheels | Snow clearer with track belt | Snow clearer with wheels | Snow clearer with wheels | ||
| Motor -- MTD, 4- | stroke | MTD, 4- stroke | B&S, 4- stroke | B&S, 4- stroke | B&S, 4- stroke | B&S, 4- stroke | ||
| Rated power | kW/HP | 2,0/2,7 | 3,5/4,8 | 6,0/8,2 | 7,5/10,2 | 7,5/10,2 | 9,7/13,2 | |
| Cylinder capacity | cm3 | 123 | 179 | 250 | 305 | 305 | 342 | |
| Operating speed | 1/min | 3600 | 3600 | 3550 | 3600 | 3550 | 3400 | |
| Capacity of fuel tank, normal petrol (unleaded) | I | 1,9 | 1,9 | 3,8 | 3,8 | 3,8 | 7,6 | |
| Working width | mm | 530 | 560 | 660 | 660 | 710 | 840 | |
| Working speed | km/h | Step speed | Step speed | Step speed | Step speed | Step speed | Step speed | |
| Surface area, max. | m2/h | 1700 | 1700 | 2000 | 2000 | 2200 | 2500 | |
| Length | mm | 768 | 1111 | 1213 | 1257 | 1213 | 1492 | |
| Width | mm | 578 | 629 | 730 | 749 | 781 | 959 | |
| Height | mm | 645 | 800 | 800 | 851 | 800 | 864 | |
| Weight | kg | 36 | 80 | 100 | 98 | 102 | 135 | |
| Amount of oil | I | approx. 0.6 | approx. 0.6 | approx. 0.83 | approx. 0.83 | approx. 0.83 | approx. 0.83 | |
| Oil types above 0 °C | -- | SAE 30 | SAE 30 | SAE 30 | SAE 30 | SAE 30 | SAE 30 | |
| Oil types below 0 °C | -- | SAE 5W30 | SAE 5W30 | SAE 5W30 | SAE 5W30 | SAE 5W30 | SAE 5W30 | |
| Oil types below -18 °C | -- | SAE 0W30 | SAE 0W30 | SAE 0W30 | SAE 0W30 | SAE 0W30 | SAE 0W30 | |
| Noise emission | ||||||||
| Sound pressure level (EN 60704-1) | dB(A) | 92 | 92 | 98 | 98 | 94 | 98 | |
| Guaranteed sound power level (2000/14/EC) | dB(A) | 104 | 104 | 110 | 110 | 106 | 110 | |
| Machine vibrations | ||||||||
| Vibration total value (ISO 5349) | ||||||||
| Upper limbs | m/s2 | 5 | 5 | 5 | 5 | 5 | 5 | |
Warranty
The warranty terms published by our competent sales company are applicable in each country. We will repair potential failures of your appliance within the warranty period free of charge, provided that such failure is caused by faulty material or defects in fabrication. In the event of a warranty claim please contact your dealer or the nearest authorized Customer Service center. Please submit the proof of purchase.
CE declaration
We hereby declare that the machine described below complies with the relevant basic safety and health requirements of the EU Directives, both in its basic design and construction as well as in the version put into circulation by us. This declaration shall cease to be valid if the machine is modified without our prior approval.
Product: Snow clearer
Type: 1.332-xxx, 1.335-xxx
Relevant EU Directives
98/37/EC
89/336/EEC (+91 / 263 / EEC 92/31/EEC,
93/68/EEC)
2000/14/EC
Applied harmonized standards
EN ISO 12100-1
EN ISO 12100-2
EN ISO 14982
ISO 8437
Applied conformity evaluation method
Appendix V
Sound power level dB(A)
STH 953 W
Measured: 102
Guaranteed: 104
STH 5.56 W
Measured: 102
Guaranteed: 104
STH 8.66 W
Measured: 108
Guaranteed: 110
STH 10.66 W
Crt
Measured: 108
Guaranteed: 110
STH 10.71 W
Measured: 104
Guaranteed: 106
STH 13.84 W
Measured: 108
Guaranteed: 110
5.957-646
The undersigned act on behalf and under the power of attorney of the company management.


Type:1332-xxx,1335-xxx
89/336/CEE (+91/263/CEE, 92/31/CEE, 93/68/CEE)
2000/14/CE
(STH 8.66 W, STH 10.66 W Crt, STH
10.71 W, STH 13.84 W)
Fig. 11 A
(Maskine med gearstang)
Type: 1.332-xxx, 1.335-xxx
Gaelende EF-direktiver
98/37/EF
89/336/EØF(+91/263/EØF,92/31/EØF,
93/68/EØF)
2000/14/EF
Stille inn bunnplate
(Kun STH 953 W)
Bilde 10
När maskinen star på et jevnt underlag, skal snekken (1), bunnplaten (2) og hjul (3) samtidig berøre bakken.
Still in glideskoene.
(Ikke STH 953 W)
Bilde 7
Still inn kobling for kjaring
(Ikke STH 953 W)
Bilde 1
Maskiner med belter: Sett reguleringshandtak til posisjon III.
Sett gispalk til hurtigste forover (hoyeste siffer).
Skyv maskinen forover med Iosnet koblingshendel for kjoring.
STH 8.66 W, STH 10.66 W Crt, STH 10.71 W, STH 13.84 W)
Fig. 11 A
Type: 1332-xxx, 1335-xxx
89/336/EØF(+91/263/EØF,92/31/EØF,
93/68/EØF)
2000/14/EF
Anvende overensstemmende normer
EN ISO 12100-1
EN ISO 12100-2
EN ISO 14982
ISO 8437
Anvendt metode for samsvarsvurdering
Vedlegg V
| Lydeffektnivà dB(A) | |
| STH 953 W | |
| Målt: | 102 |
| Garanteret: | 104 |
| STH 5.56 W | |
| Målt: | 102 |
| Garanteret: | 104 |
| STH 8.66 W | |
| Målt: | 108 |
| Garanteret: | 110 |
| STH 10.66 W | |
| Crt | |
| Målt: | 108 |
| Garanteret: | 110 |
| STH 10,71 W | |
| Målt: | 104 |
| Garanteret: | 106 |
| STH 13,84 W | |
| Malt: | 108 |
| Garanteret: | 110 |
5.957-646
(STH 8.66 W, STH 10.66 W Crt, STH 10.71
W,STH 13.84 W)
Bild 11 A
(Aggregat med kopplingsstag)
Eteenpain: 1" (hidas) -5/6" (nopea)
Taaksepain: R1-hidas/R2-nopea
(STH 8.66 W, STH 10.66 W Crt, STH 10.71 W, STH 13.84 W)
Kuva 11 A
He donyckatbTrepbnx nucB onachy03ohy!
ONaCHOCbI NOnyehn
TpabMbI OT Ctpyn
BbIbpaCbIbAemOro Chera
HIN TBePdIX
NpeDMeTOB.
PnPKacTbC K Yactm annapata TOIbKO TOrda, KOrDa OHN NOLHOCTbIO OCTaHOBUNCb.

Onacnoctb nonyuhen TpaBmbl OT Bpaauounxcyaacte. He depkaTby pyknn HOrn B6bn3n Bpaauounxcyaacte.
OuHuaTb XaXTy BbIbPoCa TOnbKo C NcIOJIb3OBAHNEM MOIOUX INHCTpyMeHTOB.
3aunthbIe yctpoNCTBa
3aunTHbIe npncnocobneHn CnykAT nna 3aunTbI NOB3OBaTeN I He DOJXHbI BBIOuTbcra n3 CTPOHn pa6oTaB B 0xOcCBOxΦyHKU.
PbIur cuenneHn
(TonbkoSTH953W)
Korda onepatop onyctnt 3OT pbuar, cIeIIeHHe YepBraHoro npINbOda 3AMKHETcN np6Op octaHOBNTcR.
PbIur cUeHHeHnuepBryHoro npuBoDa
(He STH 953 W)
UepBryHbI npINBOD OTKIOUaETcA,ecnN noIb3OBAteJIb OTNyCKaET 3TOT pbIar CzIeJIeHra.
3TOTpbuvarMOKET6bITb3aFukCupoBaH B Haxatom COCTOHN (Kpome STH 5.56 W), KOrda Nolb3OBaTeNb HaxnMaet U ydepXnBAeT pbUar CcENHeHna XoIOBOr OnpBOda.Kak TOnbKO Nolb3OBaTeNb OTNyckaet pbUar CcENHeHna XoIOBOr npBOda, oba pbUar OtckAnBaOT Ha3ad.XoIOBON u cepBryhbl PnIBOdbI ONDHOpeMeHHO OTKIOHaOTcra.
PbUar cuenIeHnXoOBOrnpuBoda
(He STH 953 W)
XoIOBOI npINBOD OTKIIHOaETc,ecnIOJIb3OBaTeJIb OTNyCKaET 3TOT pIuArCcENNEHJ.
3aunTHa peWetka B waxTe BBipoca
3aunthnapeeuteKppeoXpaHre npOHKnOBHeH B WaxTy Bb6poca.
Klanahan BbipacbBaTeTn
Pnc.9
KlananBbIpaCbIbATEJ(2)n3aunTbOT TpaBM,NOlyuayemBX BCJeCDTBNEBbIpaCbIBAHN ppeDMTOB.
IcnoJIb3OBAHne nO Ha3HaYeHnIO
3TOT annapat npedha3auehen K
NcNoIb3OBAHnIO NCKJIouHTeHbHO KAK
CHero0oHCTnteJI,ДЯ ydaJIeHn CHera Ha
Doporax I JceTKIN NOBepxHOCTX
COrnaCHO pRBeDEHHbIM B 3TOM
pyKOBoDCTBe NO 3KcnnyatauIN ONuCAHnAM
n PpaBnJAM 6e3OnaChOCTn.
JIIO6oeDpyroe npIMHeHne cHTaETcH He ceJIeBbIM!
-Исповьане annapata He no
HA3haeHHIO JIN CAMOBOLbHbIe
N3MeHeHnAn annapata NCKJIIOVAIOT
OTBETCTBeHHOCTb IPOUN3BOIDTeIa.
- PONb3OBaTeIb HecET OTBETCTBeHHOCt b 3a NOBpeXJDeHn, KOTOpIe BO3HnKaIOT y TpeTbIX IInu INx IMyUeCTBa B pe3yJIbTaTe IcNOIb3OBaHn annapaTa.
IpeaHaanpa6oTbI
Pacnakobka n c6opka annapata
→Pn paacnakOBKe npoBepntb nepeHb coepxmo ynaKOBKn.
Co6paTb annapaT, KaK noka3aHO B KOHcE 3TOrO pyKOBOIDCTBa.
Hauano pa6oTbI
Onachocmb
Onachocmb noyuhenma pmae! Ipeed Bcem npoTaMn c annapatom:
BbIKHouHTb dBnraTeIb.
BbIHyTb KIOU 3axnraHnN CHrTb KOIIaQOK CBeu 3axnraHnN.
→ DaTb DnBnTaTeJIIO OCTbITb.
PpOBepka annapaTa
→ PpOBoDnTb Bn3yaIbHyIO npoBepKy nepeHauaIOM pa60Tbl.
PpOBepuTb Ha NoBpeKdEHHa I NIOTHOCb NocAkn IpeOxpaHHTeBbIX yCTPoiCTB, 3JemeHToB ynpabNeHn I npHaIeXaUnx K Hm TPOcIKOB/ Ka6JeN, a TaKke BCE BnHTObbie CoedInHeHH.
→Перед pa60ToI 3aMeHHTb BCE NOBpeKdEHHbIe YactN.
He STH 953 W:
YcTaHOBka DaJIbHOCTN Bbl6poca
Yem Kpyue yctanaHabnBaetc KpbIka (2), TEM Bblwe n daNbwe 6ydet BblpaCbIBaTbcr CHer.
Pnp60p c pykoTko:
HaxaBbBnepeDpbyar(pnc.1,no3.5),yTo6bl yCTaHOBnTB KpbIuKy (2) Bblue nHaobopot.
■Pn6op 6e3 pyKoTkn:
OcB6oDHTb KHOJky (1) u yCTaHOBuTb KpbIky (2) no Heo6xOIMOCTu Bblue HnHKe.
3anyck DnBntaTeTn
Pnc.3
→IpeπειδκπηγataúneɪnpoʊntaβpykoBOdCTBO npoɪn3BOdNTeŋMAOTopaⅠOICNθb3OBaHIO NOC6eHHO pInHmTaB BO BHmHaHne IpaBnla6e30NaCHOCTN.
Ipeed 3anyckom ocbo6oDntb MyfTy/ pbHar cuenIeHnuepeBraHoro npBbOa n pbHar cuenIeHnXoOBoro npBbOa.
→Пюверпь coideprxmoe 6aka И уровь Macna, пи Heo6xoIMOCTNdoINTb Macno I TOINBO (CM. „PykoBoOCTBO NO MOTOPy").
yka3aHue
Y HekomopbIX ModeneHem dpocceIbHO2O pbIa2a, Yucno obopomoe ycmaHaJIueaemc aemomamUeCKu. DeusameJIb 0ce2a paBomaem Ha onmumJIbHbIX obopomax.
3anyck npn nomoynyckOBoro shypa
→ NObepHyTb KpaHn Knoayn TOnnBa,ecnn HmeeTcB No3nUOn/OPEN"
YCTaHOBnTb KOIIaYOK CBeUH 3aXnRAHnHa CBeYb.
He STH 953 W:
YcTaHOBtB DpOcCEJIbHbI pbUar,ecn
IMeETCBA NOJIOKeHne,6bICTpo".y
np6OpOB 6e3 DpOcCEJIbHoro pbUara
ycTaHOBtBBIKIOuAteJIb OCTaHOba
DBINrAteTEn B No3NIOHOON
→ PnXoIOaHOM nyCe yCTaHOBNTb BO3dyHHy 3acJNoHky B noJoxHe,ON/CHOKE".
BCTaBnTb KIOU B 3aMOK 3aKnraHnA.
Odn pa3 hkaTb BCNOMORAteJIbHoe cpeCTBO DnI XOJIOHO rO NyCKA (noDCOC), npxXoIOHOM DBIRATeNE OT ODHORIO DO CEIM pa3 (B 3aBNCMOCTNOT TUNa DBIRATeJIa).
→MeIeHNO NotaHyb NcCKOBu ShHyp CTapTepa Do OUyTUMORO CnpoTnBneHn, 3aTEM DePHyt b erO 6bICTPO u CnMbHO. He No3BOJrTa b Hhypy CTapTepa 6bICTPO cMOTaTbCra, a MeIeHNO OTBeCTNu erO Ha3aJ.
→Korda DBnraTeIb BKNIOueHBO3DyUHHyO 3acHOky NOCTeNEHNO NepeBecTn B NcXoJHOe NOJOKeHHe,RUN/OFF".
3anyck 3JIeKtpocTapTePOM (Onu) (He STH 953 W)
Onachocmb
Onachocmb npaackehmokom.
He ucnonb3o8amb 3neKmpocmapmep 60 bpeMdoxkdo.
IpoBepbme,3auiueHa nI 3neKmpocemb aBmomamueckum 3aumhBM bIKIOuyameM.B npomueHOM cnyae bI3eamb 3neKmpuka umobbI mom ycmaHOBU coomemcmeyouu aemomamueckn npedoxpaHumeB.
IIOKIOHHe 3eKToCTapTepa K CETINCIOB3OBAbTOJbKO yDHHHTEN (HE BXODNT B KOMNKeT),KOTOpBle npNCOC6JIeHb IINCIOB3OBAHn NOt OKpbITbIM HebOM N IMeOT 3aUNTHOE COeHNHeHne.
Hanpimep,do MaKcMaJIbHOI dINHbI 50M: -H07RN-F3x1,5MM 2do-25C -H07BQ-F3x1,5MM 2do-40 C
Onachocmb
Onachocmb npapxeHn mokom.
- Ipeod kaxobim 3anyckom deuzamena npoeepumbyounhumenu kaebb/ wmencebnky bunky deuzamena Ha uenocmhocmb.
IoepeKdEHHa demanb doonxHa 6bimb He3ameJumEnbHO 3aMeHeHa CneuaJucmOM-3NeKmpkOM.
Huko2da He 3anyckamb npubop c HeucnpaehbIMu demaJIaMu.
△PepdynpkdeHue
Ipu HeHaJekxauem NodKnUoyHuu 3IeKmpocmapmepa Mozym Bo3HuKHymb noepexkdeHua e annapame unu eo OkpecmHocmu. Ipoepbme, Umo 3IeKmpocemb 3Kcnnyamupyemcra Co2nacho yka3aHuaM Ha 3aeOdcKo mabnuke c daHbIMu cmapmepa u 3auuueha coomBemcmyouum npedoxpahumenem.
→ NObepHyTb KpaHnK Noaun TOnnBa,ecnn nmeetcBn03nucuON/OPEN"
YctaHOBtB KOJINaOcK CBeu3aXnIraHna Ha CBeyb.
YctaHOBNTbДрOCEJIbHbIpyhar,ecnIMeETcB,BNoIOXKeHne,6bICTpo".Y np6OpOB 6e3DpOceJIbHoro pyuara
yCTaHOBNTbBbIKIOHATeJIbOCTaHOBa DBNtAEJINo3nIO,ON"
BCTaBtB KIOU B 3AMOK 3aKnraHn,HO He NOBOPaHbTb.
YdHnHTeBbHk6eBcHayana coeHNHTb COIeNCEbHbIM pa3bEMOM, a 3aTeM c p03eTKo.
→PnXoIOnHOMnycke yCTaHOBNTb BO3DyUHyo 3acNoHky B noLoKeHne,ON/CHOKE".
Odn pa3 hkaTb BCNOMORAteIbHoe cpeCTBO dna XOJIOHO rnycka (noDCOC), npn XOJIOHM DBNrAteNe OT OHOro Do CEMpa3 (B 3aBNCMOCTn OT Tnna DBnraTeJI).
→ДерхаТь KнОПКу CTapTeРа HAKaToI TAKdoIro(MaKc.5cekyH),noka He3anycTITcA DBIrataTeNb.PepeiNOBTOpHOI NOblTKO3anycaNoDOxJaTb MmHmMy 30cekyHd.
→Korda DBnraTeIb BkHoueHBO3dUHyIO 3acNoHKy nocTeNeHH nepeBecTn B IcxOJHOe noJooKeHe,RUN/OFF".
→ YdHHHTeHbHk6eHcpeBa OTOeHNHTb OT cETn, 3aTEM OT 3NEKTPoCTapTepa.
BknoueHne/nepeKnoueHne nepedaun
(He STH 953 W)
Pnc.1
△PpeDyptpeKdEneHue
Omnycmmbpbuae cuenlenuhaeepaH0o u xodo0o npueoda nepedekouehuem unu nepeknouehuemnepea.
Bbipatbpepaaypbaarom nepeknouehn:
BnepeД:1"(MeДпeнHo)do,5/6"(6bIcTpo)
Ha3a:R1-meIneHnHO/R2-6bICTpo
Pa6ota c annapaTOM
Pnc.1
△PpeDynpkeKdEHeue
Onachocmb noepekdeHua!
Koada annapam hamankueaemcna H uHopodhbme nla (Ha npumep, kAmnu) uu npu HeobbHybX bubpaucx, ezo cneyem biknoumb u npoepeumb Ha noepexdeHua. Neped mem kak npodonjumpbabomy c annapamom, ycmpaHumb obnapykenhble noepexdeHua.
- Paped hauanom 3kcnnyamau npubopa duaameIb Heo6xodmo npoapemb.
ToIbko STH 953 W:
YcTaHOBka DaJIbHOCTn HAnpaBHeHn Bbl6pOca.
3anyctntb DnBraTeIb.
HaxaTMyfTy cquenHeHn 3aepKaTb.1NeK npuBODITcB DeNCTBne.PocpeDCTBOM KOHTaTc 3emNe WHEK npuBODIT B DnHexHe np6op.
→ YBeIuHHe cKOpOCTn DnBxKeHnJrEko
npnoHrTbnonepuhyo pyky.y
UHEKa ynyuweHHbKOHTAKTC 3emnei
n OH N03BOJraET 6bICTpee nepemeuaTb
np6Op.3To npn 6Oonee Yactom
NOBTOpeHN pINBOINT K yCKopeHHOMY
N3HOcy pe3HOBO KnpOMKn UHEka.
→ CHNKeHne cKOpocTn
ДВиЖeHЯ:ПоpeчHyIO pyky HaxaTb
BHN3.
He STH 953 W:
YcTaHOBka DaJIbHOCTn HAnpaBJIeHnBAIbPOca.
3anyctntb dBnrgatenb.
→PnO tnyuehenbIXpbUaraxcuenneHnue HEPBRAHORIOXoDBOROMEXaHN3Ma pbIharOMpeekNHOeHnBBIpaTb nepeHIOIpepaHy.
→HakatbnydepknBaTbpyiar cenneHnuepeBryHoro npNBOda. IHeK n Typ6nHa npNBOaTcB DeIcTBne.
Hakatb uyepknbatb pbyar cenneHnXoOBOr npNbOda.Annapat nepeBnraeTcnybnpaet cher.Poka 3OT pbur Haxat (He STH 5.56 W),pbur cenneHn YepBraHoro npNbOda ocTaetc 3aФNKcnpOBaHHbIM MoKet 6bITb OTnyueH.
→Дляпескноченяпесдачсachayana OTnyuctNTb pbihar cцеленяnpBODa XOdaи3aTeM CMeHITbпесдачpbHuarOMпескноченя.
YcTpoiCTBa CpbHarOM CBO6OdHOro XOJa:
Pn nOMOu npHuarOB CBO6oHoro
XoJa neYe ynpabTb
np6Opom.HanpaBo:PiTuHyTb npaBbI
pbUar CBO6oHoro
XoJa,HaneBo:PiTuHyTb NeBbI pUHar
CBO6oHoro XoJa,
OctahOBka MOTopa
Pnc.3
Bo n36ekaHne NOBpeKdHn annapaT aNn npo5em C 3anyckom OT Bnarn DaTb MOTopy Nopa6oTaTb HeCKoJIbKO MInHyT (ДЯ BbCbxAHA) NepeTeM KAK NOCTaNTb annapaT Ha xpaHeHne.
He STH 953 W:
YcTaHOBtB DpOcCEJIbHbI pyUar,ecnIMMeetCBA NOJIOKeHne,MeJNeHNo.Y np6OpOB 6e3 dpocceJIbHoro pUyara YcTaHOBtBBIKNIOuATEJB OCTaHOBa DBnIaTeJI B No3NUHO,OFF".
BbITAHyTb KIOU 3aXnraHna.
Повернтукранн Кпадч.TOTПИBA, ecnIMeETcB.NO3nIIO.OFF/ CLOSE"
YcTpaHHe 3acopa uHEka nnuaxTbI Bbl6poca
Onachocmb
Onacnocmb noyuhenura mpaem! Ipeed Bcemnpaobtamnc annapaatom:
-BbIKNIOUHTb DBuRatJIb.
- IpoJoknTe, noka ocTaHOBaTcB BCE noDBNkHbIe qactn.
BbIHyTb KIOU 3aXnraHnN CHrTb KOIIaYOK CBeu 3aXnraHnN.
Pnc. 13
YcTpaHntb 3a60IπactMaccOBbIM WTOKOM NnCOBOM.
Lenn npotnbockonbkeHn (onu)
B KpaHnHX 3MHnx ycIOBnX MOKHO npNo6peCTN B CNEuNaIIN3npoBaHHoTTOPROBNe NcNOJb3OBAtB CEIN npOTnBOCKONBJxHEN.
TpaHcnopTpObKa
IpepeBnKHeHa annapate
MnMaHeBpnpObaHn/NpeoOneHn KOpOTKnX OTe3KOB NtN.
3anyctntb npn6op.
Bb6paTb nepeHIOI nn 3aHIOI nepedaCy.
HaxaTb uyeepKnBaTb pbuar cuenenHnXoDoboro npB0da.
OToPoxHNo nepeBnRaTb annapaT.
TpaHcnpToBka 6e3 co6ctBeHHoro npNBOda
Onachocmb
Onachocmb nonyuhenura mpaem! Ipeed BcEMn pa6oTAMC annapaTOM:
BbIKJIOHTb DBuRatEnb.
BbIHyTb KIIIOU 3aXnIraHnI n CHrTb KONaOH CBeu 3aXnIraHnI.
→ TaB DnIraTeJIHO OCTbITb.
→ OnopoxKHTb 6eH306ak.
→Ipebeo3ntb annapaT ha nnB TpaHcnpTHom CpeDCTBE, C rOpN3OHTaJIbHOM NIOJXeHN.
3aKpennb annapaT OTCOCKaNb3bIBaHn NJI CNKaTbIBaHn.
BbIBoN3 3KcnIyatauIN
Onachocmb
Onachocmb 83pbba!
- 3anpeuaemckypeHue u pa3eeedeHue omKpbim02o oHa.
Cneodume 3a mem, ymo6bl monnueo He nonadano ha 20p7ue noeepxHocmu.
Ecn annapat He nncnoj3yetc Donbwe Ondoro Meca, nokaJynta, c6nIouTe CneyuOuNe IyHkTbI:
→ ΠΟДΙΓΟΤΟΒΑ ΑΝΙΒΑτΕΝΑ (CM.,PyKOBODCTBO NO MOTOPY")
OnopoxHNtB 6eH3o6aK.
OuHCTnTb annapaT.
→ДлЯЗштбOTРЖАИньпОТЕрБВCEMeTAPINUeCKNueчAtnIpOMaCJIeHHOITPRAKNOHNHaBЛNTbHAHIXMACJIO.
→ NocTaBnTb annapaT B cyXOM n YnCTOM NOMeueHnn.
YxodI TexHnueckoe 06cnyxuBaHne
- PpOBePHTb yPoBcHb MaCna, npn Heo6XoDmOcTn DoJNTb (CM. "PyKoBOdCTBO NO MOTOPy").
- PpOBepnTB BInHTOBbIe CoEiHHeHnHa HnpOChyIO NocAky, npn Heo6xoDnMoCTn NOdTaHyTb.
-Поверпь 3ацHTье npсncocobня.
B npnbopax c mexaHn3MOM 3neKtpueckoro cTape:PpOBepntb Ka6eIb n wTeNceJIbHyIO BUNKy DnurataJIa.
MOToUacOB (4) npn 3KcNpyaTaun C
60nbHnHarpy3KOnnnnpBbICOKO
okpykaoueien TemnepaType
Pa60TbI no TexHnueckomy
06cnyxmbHnO
Onachocmb
Onachocmb nolyuehenmaepm
Ipeed Bcem npoTaMn cannapaTOM:
- BbiklnouHTb dBnraTeJIb.
BbIHyTb KIIOU 3aXnraHnN nCHrTb KOJNaOc CBeu 3aXnraHnN.
-ДаыдыгателLOOCTbITb.
PpHaJdxKHOCTn 3aNaChbIe DeTAn
Pa3pe7aetcN cNoIb30BaTbToIbKO Te npHaJNeXHocTn 3aNaChbIe YacTn, nCNoIb3OBAHne KOTopbIX 6bIIO Oo6peHo n3rTOBHTeEM. NcNoIb3OBAHne opRiHaJIbHbIX pNHaJdNexKHOCTeN 3aHaCTe rapaTHnpyET Bam HadEkhHyIO 6ecpe6oHyO pa6O TY np6Opa.
UncTkapn6opa
NocTabNTb annapaTHa JxcTko, POBHOI rOpN3OHTaJIbHOI NOBepXHOCTN.
→ Ydannb 3a6nBwUoc rpr3b.
Пожистпь са ппарл роюнов boдонуpee3 waxTy bbl6poca n daTbBbICOXHyTb.
→OuHCTnTbMOTOP TpIKNoN uTeKoN.
Cma3bIbaHne annapapa
Cma3aTbIeKIMMacnOM BCE
BpaaioueceN IOdBHXHbIe YactN.
YcTaHOBka DaBHeHnB NOKpbIiKax
(He STH 953 W)
Onachocmb
B3pIeOonachocmb!MaKcumalbHoe daenHeue 03dyxa He doJxho npeebiwamb 1,4 6ap.
PekomeHnyemoe daBHeHne BO3dyxa B nokpbIkwak npimepHO 16ap.
Texnueckoe 6cbnykBaHne MOTopa
CMOTPNPyKOBODCTBO NMO TOPTpy
PeynilpoBka cuenIeHna cepBryHoro
nPnBoda
(He STH 953 W)
Pnc.2
PpOBepKa COCToHn CcIeJIeHn:
HaxaTb neBbI pbUar cuenHeHnA (1) Bnepei (HanpaBHeHnIA), npn 3ToM npndaBtB pe3nHKy (3). HataKc CuenHeHnA (5)doJXHa HEMHOO ocna6ntbcra. B npoTHBOM clyae ocna6ntb (cm. N3MeHHeHne HataKKn CuenHeHnA").
OTnyctntb pbuacuenenHnra (1). HataKc cuenneHna (5) He doJnxHa mMeTb IooTa, Ho n He doJnxHa 6blb oehb tyroB. B npoTHBOM cnuyae n3MeHNt b HAcTpoKy (cm. "N3meHHe HaTAAKN CuenneHnra").
→PbUar cUeJIeHn(1)doJXeH HaxIMaTbCra do KOHua BnH3. IHaue HaTgKc CuenIeHn CInuKoM Tyra N DoJXHa 6bItb OcnlaBJeHa (CM. "ImMeHeHne HataKKn cUeJIeHn")
ДононтельhoeуnpablenHe(cM.
"Pa6ota c annapatom"):
→При pa6oTaIOUeM DBIraTeNe BKNIOHTb YepBryHbI IpiBOd Ha 10 cKyHd.
OTnycTntb pbIar cIeJIeHn,
pe3epHbI WHeK 6oNbIe He CMOKeT
BpaaTaBcra.
PerynipoBka cuenneHna XoDoboro npuBoa
(He STH 953 W)
Pnc.1
→Pn6opbIc ryeCHeHCHOM xoJOM:YCTaHOBOUHybI pBuHa npeBecTn B noJIOKeHHe III.
→ПepeKIOUHTb pIurHa 6Oonee BbICOKyIO nepeHIOIO nepeJaCy (Bblue YnCNo).
ToIkaTb annapaT BnepeD npu OTnyueHOM pbHare cuenJeHnXoIOBOrO npINBOda.
BoBpEMr TOnkAnnpeBecn npHar nepeKIOHeHn Ha camyIO 6bICTpyIO 3aHIOpepaHy n 3aTeM Ha camyIO 6bICTpyIO nepeHIOIO pepaHy.
Ecni npi ToIkaHn nnI nepeKIOUeHn nepeDaYyCTByetc conpotNBHeHne-OCna6ntb HATJxHeHne CzepJIeHn (CM. "N3MeHeHne HATJKKn CzepJIeHn").
ToIkaa annapaT, haxaTb pbUar cIeJIeHnXoIOBOrO npVBOba.Koneca/ rYceHnCbI dONKhbl3abJOKnpOBaTbCBA. B npOTNBOM Clyuae yCNNTb HATJkKy cIeJIeHn (CM.,N3MeHHe HATJkKn cIeJIeHn).
EcHn HAcTpoiKa Bce eue He nIealbHa NIN BB3bBAET COMHeHn, CM. "PpOBepKa XoIOBOrO npIBoDa".
N3MeHeHHe HaTAAKKn CzepJIeHnA
(He STH 953 W)
Pnc.2
MEXAHIN3MOB HATKKN CENHnC perynpoBOOH Mytoi (6):
→HaTjaKeHHe:OTdaTbraKy(7)n 3aKpyNTbpeRyNpOBOuHyoMyTy(6)B npOTNbONIOxHOM HApBaJIeHN.
Ocna6nHe:OTaTbpeyInpOBOHyIO MyfTy (6) n3akpyTNb raKy (7) B npOTUBONIOJXHOM HnPaBHeHH.
MEXAHN3MOB HATKKn CcENHeHn cpa3rpy3OHyn npyKnHn (8):
→ Npeed yctaHOBKO npyKHy HeobxOIMo OTcENITb, a 3aTeM CHOBa 3aCenITb. MexAHn3 M HATJKKn CcENJIeHn yCTaHOBNeH npaBNbHO, ECNI pN BbIXmAHn npyXHa paTARNBaETc Ha 2-3 CM.
→ HatakeHne: OTBepHyTb KOHTprAky (9) BBepx.
Ocna6nHeHne:3aBepHyTb KOHTprAky (9) BHN3.
MEXAHIN3MOB HATXKNU CENHNA cpeynpoBOUHOI PnAToN DnXoDBOro npBOda (10) nIN dnnepBraHoro npBOda (11):
→HataKeHe:OcnaBbBnHT(A)B 3aBnCmOCTNOTpeynpoBOuHOI PnATo,pepeBnHyTb BH3
yCTaHOBOUHyIITaTy I CHOBA 3aTAYb BnHT (A).
Ocna6JIeHHe:Ocna6Bt BnHT (A) 3aBnCmOCnOT peYnIpOBoHOn PnAToI, npeBnHyTb BBepx YcTaHOBOHyIO pAty IN CHOBA 3aTMyBnHT (A).
(He STH 953 W)
Onachocmb noepekdeHnna annapama!Ppu haknohe annapama obpamumb 6Humane Ha mo, ymboi OH coxpanr paehocecue u ymboi e nokanomhoe npocmpaHcmeo Unu Hany He meknlo macno unu monnueo.
OTdaTb BnHTbHa KOKyXe paMbI, B npOTNBOM Cnyae ONpOKHyTB annapaT Bnepe.
PnO OTnyeHOM pbuare cUeNHeH NxOIOBOro npIBoDA nepeKluOHTb Ha BCE nepeJaH, pPKNIOHOe KONEco (2) He DOJXHO KAcTaBcRA BeDyIero DnCKa (3). B IpOTNBOM cNyuae OcnaBt b MExAHm3M HATJKKn CcENHeHr (CM. "N3MeHHe HATJKKn CcENHeHr").
→HaKaKdoI nepeaue HaKImMaTb pbUar cKeJIeHnXoIOBOrO npNBOda, φpNKIOHOHe KOJECO DOJIKHO 6bITb B KOHTaKTe CBeNyUIM DnCKOM. B npOTNBOM Clyae yBEJIuHNTb HArKKy CKeJIeHnR (CM. "I3MeHeHne HATJKKn CKeJIeHnR").
→Pn Heo6xOJIMOCT N OCHNTb BeDyuN DnCK N pe3HKy Ha φpNKUOHHom KOine.
B daHHOM cnyuae ocBO6OuNTb OT Jbda 0bnpeHeBwne yactn.
(TonbkoSTH953W)
EcHnWHek npOdNHakOBom Yncne
obopotOB dBnratapepa0taeT
HepaBHomepHO, Heo6xOdmo NOdTHyTb
KNHOBOn peMeHb (5).
EcnnHa pblayare cuenlennna (1) npncytCTByeT DOONHHTeBHOE OTBepCTne (3b), BCTaBtB HataKky Cuenlennna (2) BpacnoIooKeHHoe Bblie OTBepCTne (3b).
→ Ecnn DOnonHnTeNbHoe OTBepCTne (pacnoonoxKeHHoe Bblwe) OTCyTCTByET NIN yKe INcNoIb3yETc8 ObpaTntEcB CneuNaaN3npoBaHaHbI cepBNC.
(STH 8.66 W, STH 10.66 W Crt, STH 10.71 W, STH 13.84 W)
(AnnapaTbI c Kynicn NepeKIOueHna)
→ CHaTb npyHnHHbI uTeKepe (4) n
noKnaHnyo wai6y (5), BbHyTb
xoOByu raKy (6) n3 OTBepCTn (7).
→ HaKaTb BnH3 BkNIOUOuIN pbIar (2), ycTaHOBNTb pbIur nepeKNIQUeHnra (3) HAppeDauy,6".
PpOBepka xoIOBOrnpBbOda
Puc. 12
△PpeDynpexdEneHue
HaTaNHyb KInHOBoI peMeHb fpe3epHorO uHeka
Pnc.5
YcTaHObKa pblaara nepeKIOueHn
Pnc. 11 A
→XoOBOyUraKy(6)noBepHyTbTaK, UTO6blBTOJxEOTBepCTne(7)MOKHO 6blIO6blBCtABNTbWIn.
3aФИКСИРОВАТ bXOДОВУЮ rAIky
ПОДКЛадношайби n ПуЖИНБIM
штЕКЕРМ.
Pnc.11B
(Annapata b c TpocnKOMpeeknueHna
YcTaHOBnTb pbUar nepeKJIoueHn3 (3) Ha camyio 6bIcTpuyo nepeDauy nepeDHeRo xOJa.
OTdaTb BnHT (A) n OTkaTb BnH3 DePkaTeJIb NOKa TPOC He HaTHeTc.
CHOBA 3aTAYbBHT (A).
→PpOBeepntb npaBnIbHOCTyCTaHOBKn.
Yka3aHue
3ma peaynpo8ka Heo6xoduma molbko 6 cnyuae ecnu He603MOXHO 6KIIIOUMb camyio bICOKyo nepedauy (pepeH2o unu 3aDHezo xoda).
OtperynipoBaTb rceHnHyu JeHTy
IyceHnHnaJeHTa(1)ycTaHOBHeHa npabINbHOeCN ee MOXHO npOaBNTb Ha 10-12 MM.B npOTNBOM cnYae ee Heo6xoDIMO OTpepyNIpOBaTb.
→ Pπp60p yctahOBnTB Ha HAdexKHyIO IROPn3OHTaIbHyIO ONopy TaKIM O6pa3OM, yTO6bl rCeHnCbI He KacaJIncb 3eMJI.
→Поворачиваь raиу (2)do tex nop, noka ryceHnUHЯ JIeHTa He noIyHIT npabInbHoe HataJxHHe.No yacBOi CTpeNke:HaTajxHHe.IpoTnB YacBOi CTpeKNi:Ocna6JIeHne.
3aMeHHb ryeHnHyu JeHTy
MOUHOCTN,3aMepa MOUHOCTN
TEXHnuecknxDaHHbIX,rapaHTmN CepBnca.
Bonee npo6Hyu HOpopMaucu Bbl
HaIeTe B OTJeIbHO IOCTaJIaREMOM B
KOMJIeKeTpepyKOBoDCTBe npON3BOdntTeJRA
MOTopa.
TexHnueckne daHHbIe
Tun: 1.332-xxx, 1.335-xxx
OchOBhIe DnpeKTHBbI EC
98/37/EC
89/336/E3C(+91/263/E3C,92/31/E3C,
93/68/E3C)
2000/14/EC
PpIMHeHHbIe rapMOHn3NpuOBaHHbIe HopMbI
EN ISO 12100-1
EN ISO 12100-2
EN ISO 14982
ISO 8437
PpIMHeHHbI NopAOK OueHKn COOTBETCTBn
PpIIOJKeHne V
YpOBeHb MoUHOCTn 3Byka dB(A)
STH 953 W
STH 8.66 W, STH 10.66 W Crt, STH 10.71 W, STH 13.84 W)
11. A. ábra
(STH 8.66 W, STH 10.66 W Crt, STH 10.71 W, STH 13.84 W)
Obr. 11A
89/336/EHS (+91 / 263 / EHS 92/31/EHS, 93/68/EHS)
2000/14/ES
Pouzité harmonizačni normy
EN ISO 12100-1
EN ISO 12100-2
EN ISO 14982
ISO 8437
STH 8.66 W, STH 10.66 W Crt, STH 10.71 W, STH 13.84 W)
Slika 11 A
(stroji prestavnim ogrodjem)
Odstranite vzmetni vtic (4) in podlozko (5), iz izvtrine (7) vzemite vretenasto matico (6).
Prestavno roko (2) pritisnite navzdol, prestavno rocico (3) preklopite v prestavo "6".
Vretenasto matico (6) obrite tako, da se laho zatič vstavi v isto izvrtino (7).
Vretenasto matico fiksirajte s podložko in vzmetnim vtičem.
Slika 11 B
(strojis prestavnim vlekom)
Prestavno ročico (3) preklopite v najhitrejso prestavo naprej.
Popustite vijak (A) in nosilec pritisnite navzdol, da se prestavni vlek napne.
Ponovno pritegnite vijak (A).
Preverite pravalno nastavitev.
Opozorilo
Tip: 1.332-xxx, 1.335-xxx
Zadevine ES-direktive:
98/37/ES
89/336/EGS (+91 / 263 / EGS 92/31/EGS, 93/68/EGS
2000/14/ES
STH 8.66 W, STH 10.66 W Crt, STH 10.71 W, STH 13.84 W)
Rys. 11 A
89/336/EWG(+91/263/EWG,92/31/
EWG, 93/68/EWG)
2000/14/WE
(STH 8.66 W, STH 10.66 W Crt, STH
10.71 W,STH 13.84 W)
Slika 11 A
(strojevi s polugama)
Uklonite utika ochruge (4) i podlošku (5), a vretenastu maticu (6) izvadite iz provrta (7).
Krak (2) pritisnite prema dolje temjenjač (3) postavite u brzinu "6".
Vretenastu maticu (6) okrenite takado se nastavak moze umetnuti u isti provrt (7).
Osigurajte vretenastu maticu podloznom pločicom i opruznim utikačem.
Slika 11 B
(strojevi s užetom)
Mjenjač (3) ubacite u najvišu brzinu za kretanje prema naprijed.
Otpustite vijak (A) pa pritisnite drzac prema dolje takdo se uze zategne.
Ponovo zategnite vijak (A).
Provjerite je li podeşenost ispravna.
Napomena
Ovo podesavanje je potrebno samo u slucaju da se ne moze ubaciti majviša brzina (prema naprijed ili unatrag).
Tip: 1.332-xxx, 1.335-xxx
(STH 8.66 W, STH 10.66 W Crt, STH 10.71 W, STH 13.84 W)
Joonis 11 A
STH 8.66 W/STH 10.71 W/STH 13.84 W


07.08.2007