12807 - Calculator VICTOR - Free user manual and instructions
Find the device manual for free 12807 VICTOR in PDF.

Frequently Asked Questions - 12807 VICTOR
User questions about 12807 VICTOR
0 question about this device. Answer the ones you know or ask your own.
Ask a new question about this device
Download the instructions for your Calculator in PDF format for free! Find your manual 12807 - VICTOR and take your electronic device back in hand. On this page are published all the documents necessary for the use of your device. 12807 by VICTOR.
USER MANUAL 12807 VICTOR
text_image
VICTOR 1280-7 123456789012 SEND TO PC VICTOR 1280-7 Wireless USBINSTRUCTION MANUAL MANUEL DU FONCTIONNEMENT MANUAL DE INSTRUCCIONES
Preface
Congratulations on your choice of the Victor 1280-7 electronic calculator. Careful design, quality materials, and advanced research and production facilities have given you a calculator that with proper care will provide years of trouble-free service.
Table of Contents
| Preparation | 1 | - | 2 | ||||||
| General Maintenance | 2 | ||||||||
| How to Feed the Paper 2 | |||||||||
| Replacing the Ribbon | 3 | ||||||||
| Keyboard Layout | 4 | ||||||||
| Key and Slide Switch Features 4 - 10 | |||||||||
| Display Symbols | 10 | ||||||||
| Reset Button | 10 | ||||||||
| Using the Wireless Data Relay 11 | |||||||||
| Resetting the Wireless USB Connection 12 | |||||||||
| S p e c i f | i | c | a | t | i | o | n | s | |
| Application Examples | 14 | - | 23 | ||||||
| Warranty | 24 |
Preparation
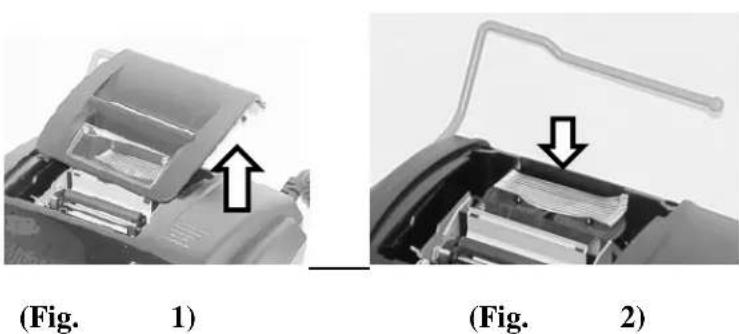
BEFORE USING THE PRINTER FOR THE FIRST TIME:
Remove the tape holding the ink ribbon in place.
- Remove the tape holding the printer cover in place.
- Dispose of the tape.
- Lift the printer cover up and then off.
- Remove and dispose of the tape holding the ribbon in place.
Before Beginning Calculation
- Plug in AC power
- Be sure the paper roll and ribbon have been installed properly.
- Turn power switch on and make sure the display lights. A "C" will automatically be printed on the paper tape.
- Set decimal point selector switch to the desired position.
.General Maintenance
- Do not place the calculator in hot, dusty, or damp locations.
- To clean the housing, use a moist towel.
- Do not place any items on the housing, particularly on the head of the printer mechanism.
- Turn off the power before removing the plug from AC wall outlet.
- Turn the power off while not in use.
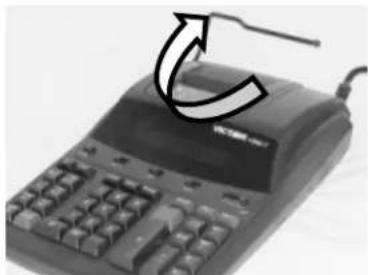
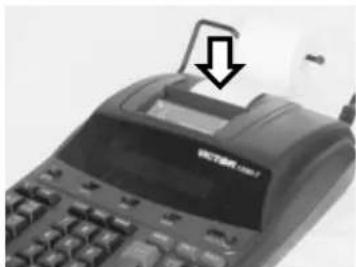
How to Feed the Paper Tape
- Plug in the calculator and turn it on.
- Cut or tear evenly the end of the paper roll to get a straight edge.
- Place the paper holder into position. (Fig. 3)
- Install the paper roll on the paper holder.
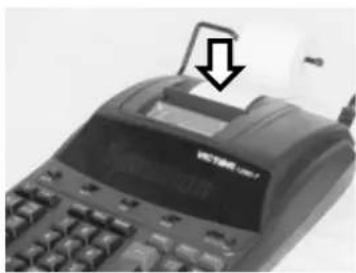
- Insert the paper end into the printer slot. (Fig. 4)
- Press the Paper Feed (↑) key to feed the paper to an adequate length.
natural_image
Close-up of a vintage desktop calculator with keyboard and control panel (no visible text or symbols)(Fig.
3)
natural_image
Close-up of a black-and-white photo of a digital telephone receiver with a downward arrow pointing to the top button (no visible text or symbols)(Fig.
4)
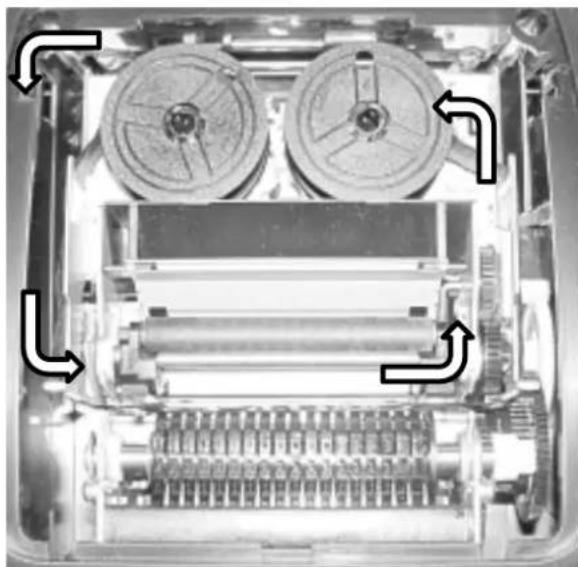
Replacing the Ribbon
Your calculator is shipped with a 2-color ribbon already in place. You do not need to install or change it before you begin using the calculator. When you have been using your calculator for some time, however, the print will gradually become faint, indicating that you should change the ribbon. To change the ribbon, follow these steps.
- Remove the paper roll, tearing the paper at the rear of the calculator. Use the Paper Advance ( ) key to feed the remaining paper tape through the printer. Then remove the printer cover.
- Remove the old ribbon by pulling it upward. (Fig 6 shows the printer without a ribbon.)
- Install the ribbon spool with the black edge up. Victor recommends the Victor 7010 (Fig. 5).
- Place the spool with the greater amount of ribbon on the left post.
- Next unwind the ribbon as it is placed along the outside of the guides and in front of the print wheel. (Fig. 7)
- Rotate the spools to take up any slack. Replace the printer cover and the paper tape.
(Replace with the Victor #7010 Ink Ribbon)
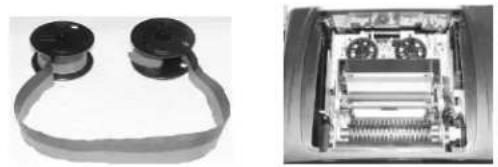
(Fig. 5)
(Fig. 6)
natural_image
Interior view of an electronic device showing internal components and circuitry (no visible text or symbols)(Fig. 7)
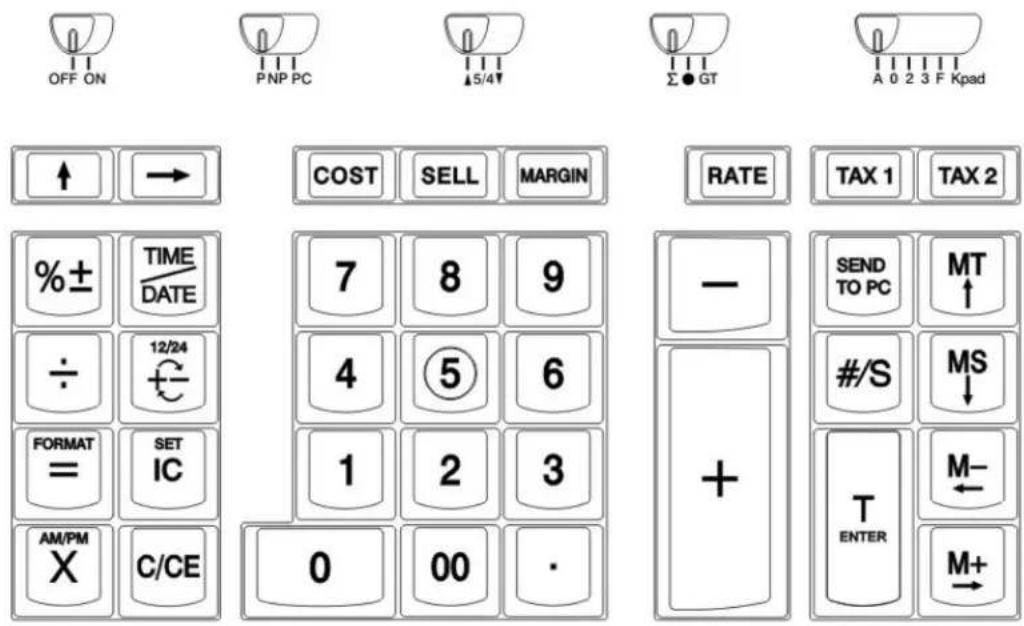
Keyboard Layout
text_image
OFF ON PNP PC 5/4↑ Σ ● GT A 0 2 3 F Kpad ↑ → COST SELL MARGIN RATE TAX 1 TAX 2 %± TIME DATE ÷ 12/24 FORMAT = SET IC AM/PM X C/CE 7 8 9 4 ⑤ 6 1 2 3 0 00 · - + SEND TO PC MT ↑ #/S MS ↓ T ENTER M- M+ →This section describes the mode switches, data entry keys, and operating keys provided on your calculator.
Key and Slide Switch Features


OFF ON
OFF The power is OFF.
ON The power is ON.
P NP PC
P Print Mode: The printer is activated as long as the calculator is turned on.
NP Non Print Mode: The printer is activated only when the paper feed key or the non-add / date key (#/S) is pressed. This is also called the display only mode.
PC PC Mode: In this mode the calculator will send the information entered to a computer just as it would to the paper in a printer. The number entered will appear in the first column and the operation performed will appear in the second column. This is also called the Paperless Tape Mode.
- The Wireless Data Relay device must be installed into the computer's USB port when using any of the three PC Modes.

text_image
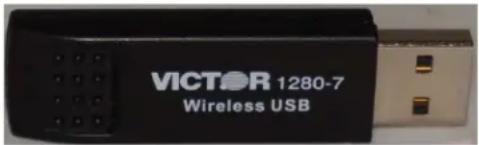
VICTOR 1280-7 Wireless USBWireless Data Relay (Fig. 9)
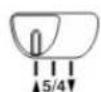
▲ 5/4 ▼
Round Up Mode: The ▲ setting causes an answer to a calculation to automatically round up.
5/4 Split Rounding Mode: This setting causes automatic round off. If the first digit of the answer beyond the decimal setting is 0 to 4, the value is rounded down. Otherwise the value is rounded up.
Round Down Mode: Causes calculations to automatically round down. (Truncate)
Σ · GT
Sigma Mode: When the slide switch is in the Sigma position, the results of multiplication or division calculations completed by the = or % keys are automatically added to the accumulator. The accumulated answer can be recalled by pressing the T key.
- The calculator is in neither Sigma mode nor Grand Total mode.
GT Grand Total Mode: Any total created with the T key is automatically accumulated to memory. The accumulated Grand Total can be recalled by pressing the MT key.
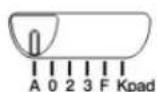
A 0 2 3 F Kpad
A Monetary Add Mode: In this setting, amounts entered are assumed to be monetary. The calculator automatically supplies a decimal point to the left of the last two digits entered.
0 2 3 Fixed Digit Mode: These settings specify the number of digits to the right of the decimal point that are shown in the result.
F Floating Decimal Point Mode: This setting specifies that all digits of the result are shown, up to a maximum of 12. If the result exceeds these capacities, excess digits to the right of the decimal point are dropped. No rounding takes place.
Kpad Keypad Mode: In this mode, the calculator acts as a keypad for the operator's computer. As numbers keys are pressed the entry is instantly sent to the computer's display. The T (Total) key acts as an Enter key and the Memory keys act as Arrow keys to move cell to cell in a spreadsheet.
- The Wireless Data Relay device must be installed into the computer's USB port when using any of the three PC Modes.
text_image
VICTOR 1280-7 Wireless USBKey Functions
0 - 9, 00, . Numeric Keys: The calculator uses the conventional 10 - key indexing keyboard, and includes the double zero and decimal point keys. Whole numbers are entered exactly as they are written.

Paper Feed Key: Used to advance the paper.

Right Shift Key: Used to delete the right most character of a live entry.

Percent Key: Completes percent calculations when Multiplication or Division keys are used.

Division Key: The Division key performs division, automatic constant division, and intermediate sequential operations. It establishes the next amount as a constant divisor. Each divisor entry is retained as a constant until the X, ÷, or Clear (C/CE) keys are depressed.

Equal Key: Press the equal key to get the result for a multiplication or division equation.
Format Key: The Equals key is also used as the Format Key when programming the Date. The operator may choose to change the way the date is displayed (MM/DD/YYYY, DD/MM/YYYY, OR YYYY/MM/DD) by pressing this key while in the Date setting mode.

Multiplication Key: The Multiplication key performs multiplication, automatic constant multiplication, and intermediate sequential operations. It establishes the amount as a constant multiplicand.
AM/PM Key: The Multiplication key is also used in the Time setting mode to switch from AM to PM or vice versa.

Time / Date Key: Used to display the Time or Date. Press once to see the Date and press a 2^nd time to see the Time. To change either the Date or the Time, press the IC / SET key while displaying the Date or the Time.

Change Sign Key: Inverts the sign of the displayed number at key entry.
12 / 24 Key: The change sign key is also used to toggle between the 12 (AM/PM) or 24 hour clock mode.

IC Key: Prints the current Item count.
SET Key: Used to set the Date and Time. Press and hold until the Date starts to flash on the display (Approximately 3 seconds). Enter the correct Date and press the Set key again to set the Time.

Clear / Clear Entry Key: Clears a live entry by pressing the key once. Press twice to clear the accumulator or pending calculation. The Clear key does not clear the Memory. To clear the memory, press the MT key.

Minus Key: Subtracts an amount from the accumulator. To subtract the same amount more than one time (repeat subtraction), enter that amount once and depress the Minus key as many times as necessary. If this key is depressed immediately after the (%) key, it works as a percent minus key.

Plus Key: Adds an amount to the accumulator. To add the same amount more than one time (repeat addition), enter that amount once and depress the Plus key as many times as necessary. If this key is depressed immediately after the (\%) key, it works as a percent add key.

Send To PC Key: This key is used to send the information in the calculator's display to the cursor of a personal computer. The information is sent exactly as it is displayed on the calculator.
- The Wireless Data Relay device must be installed into the computer's USB port when using any of the three PC Modes.

text_image
VICTOR 1280-7 Wireless USBWireless Data Relay (Fig. 10)

Non Add Key: Will print a live entry as an identifier or as an invoice number without adding the number to the accumulator. The number will appear on the left hand side of the tape with the “#” sign.
Subtotal Key: Prints a subtotal, but does not clear the accumulator.

Total Key: Prints and clears the accumulator. This key will also print the total of multiplication and division calculations when the slide switch is in the Sigma mode ( ).
Enter: When the calculator is in the Kpad mode, the T/Enter key acts as an Enter key on a computer keyboard.

Memory + Key: Adds an amount to Memory. If there is a live calculation pending, the Memory Plus key will complete the calculation and accumulate the amount.
→ Key: Acts as an arrow key on a computer keyboard to move the cursor to the right while the calculator is in the Kpad mode.

Memory – Key: Subtracts an amount from Memory. If there is a live calculation pending, the Memory Minus key will complete the calculation and subtract the amount from Memory.
← Key: Acts as an arrow key on a computer keyboard to move the cursor to the left while the calculator is in the Kpad mode.

Memory Subtotal Key: Displays a subtotal of the memory contents. If the calculator is in the Print mode, this subtotal will also print. Memory Subtotal does not clear the contents of Memory.
↓ Key: Acts as an arrow key on a computer keyboard to move the cursor down while the calculator is in the Kpad mode.

Memory Total Key: Prints and clears the total in Memory.
↑ Key: Acts as an arrow key on a computer keyboard to move the cursor up while the calculator is in the Kpad mode.
Cost Sell Margin Keys

Cost, Sell, Margin keys are used for calculating cost, selling price, and profit margin. Enter the value of any two variables to calculate the third. (Example: Enter the cost of an item and press the Cost key. Next enter the selling price of an item and press the Sell key. The Margin % will appear on the display and the paper tape.)
Rate and Tax Keys

text_image
RATE TAX 1 TAX 2Tax 1 and Tax 2 keys are used to calculate an amount of tax using the preset tax rate. Use the “+” key for calculating an amount including TAX, and the “-” key for calculating an amount excluding TAX.
To set TAX 1, press and hold the RATE key until the display flashes. Enter the TAX Rate and then press TAX 1. TAX 1 is now set. To set TAX 2, follow the same steps substituting TAX 2 for TAX 1.
Display Symbols
M A number has stored into memory.
E Error or over flow of capacity.
- The displayed value is negative.
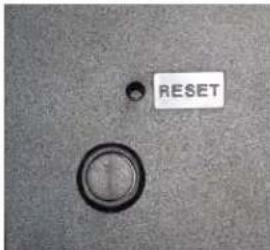
RESET Button
Electromagnetic interference or electrostatic discharge may cause the display to malfunction or the contents of the Memory to be lost or altered. Should this occur, use the tip of a ball point pen or a paper clip to press the RESET button at the back of the calculator.
After resetting the calculator set the calendar, clock, and tax rate again.
text_image
RESET
natural_image
Close-up of a mechanical component with a curved wire and a circular base, labeled 'RESET' (no other text or symbols visible)Using the Wireless Data Relay Device
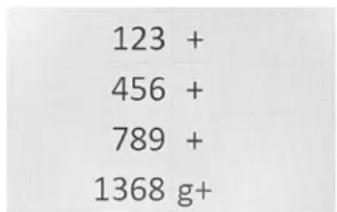
The Victor 1280-7 has three different modes of operation when connected via the USB device.
- SEND TO PC MODE – Press this key to send the contents of the display to the connected PC.
Example: User needs the total of the calculation 100 + 200 + 300 sent to the computer. Enter 100 + 200 + 300 T into the calculator. Next press the SEND TO PC key and the answer (600) will be sent to the computer. - KPAD MODE – In this mode, the calculator acts as a keypad for the operator's computer. As number keys are pressed the entry is instantly sent to the computer's display. The T (Total) key acts as an Enter key and the Memory keys act as Arrow keys to move cell to cell in a spreadsheet.
- PC / PAPERLESS TAPE MODE – In this mode the calculator will send the information entered to a computer just as it would to the paper in a printer. The number entered will appear in the first column and the operation performed will appear in the second column.
text_image
123 + 456 + 789 + 1368 g+(Fig. 9)
- The Wireless Data Relay device must be installed when using any of the three PC Modes.
text_image
VICTOR 1280-7 Wireless USBWireless Data Relay (Fig. 10)
*Note: The Victor 1280-7 Wireless Calculator will not work with Apple computers.
Resetting the Wireless USB Connection
There may be a need to occasionally repair or reset the connection between the calculator and the USB device. Symptoms that can cause the connection to be lost include periods of non-use, interference from another device, or connecting the USB device to a different computer. If the connection is lost, please follow these instructions to re-connect the calculator to the USB device:
- Start your computer and your spreadsheet program such as Microsoft Excel.
- Push the power switch to "ON" on your calculator.
- Push to the right-most slide switch to "Kpad" on your calculator.
- Plug the Victor 1280-7 Wireless USB receiver into a USB port on the computer.
- Wait until your computer recognizes the USB device. A pop-up box may appear in the lower right corner of your display. This should take no more than 30 seconds.
- Press the blue "RATE" key and hold for about 2 seconds. The calculator display will show "----" until the Wireless USB receiver is connected.
- Once the connection is complete, the calculator display will show “-PC-”
- Select a cell in your spreadsheet (position your cursor in the spreadsheet).
- Test the connection by pressing the number “3” on your calculator and pressing “ENTER” (the “T” key)
If the above steps do not result in a connection try this alternative method:
- Press the blue "RATE" key and hold for about 2 seconds. The calculator display will show "----".
- Plug the Victor 1280-7 Wireless USB receiver into a USB port on the computer.
- Wait until your computer recognizes the USB device. A pop-up box may appear in the lower right corner of your display. This should take no more than 30 seconds.
- Once the connection is complete, the calculator display will show “-PC-”
- Select a cell in your spreadsheet (position your cursor in the spreadsheet).
- Test the connection by pressing the number "3" on your calculator and pressing "ENTER" (the "T" key)
If the alternative method does not result in a connection, you may see “ERROR” on the display. Turn the machine off and on again and repeat the above procedures. If a connection is still not made, please call 1-800-628-2420 for assistance.
- The Wireless Data Relay device must be installed when using any of the three PC Modes.

text_image
VICTOR 1280-7 Wireless USBWireless Data Relay (Fig. 8)
If your Wireless Data Relay is lost or damaged and a new Relay is purchased from Victor, these steps will need to be completed the first time the Relay is used.
Specifications
Display 12 Digit, Fluorescent
Printing Speed 4.6 Lines / Second
Printing Paper Width 2.25", D Width 57mm, Diameter 80mm Max
Power Sources 120V / 60 Hz (USA, CANADA)
Ambient Temperature 0^ C \~ 40^ C ( 32^ F \~ 104^ F)
Power Consumption 120V / 0.16A / 19.2W
Dimension 12.75" (L) X 8.75" (W) X 3.25 " (H) 323 mm (L) X 220 mm (W) X 80 mm (H)
Ink Ribbon VICTOR 7010 (Twin Spool, C Wound Ribbon)
Printing Color 2 - Color (Negative numbers in red)
Weight 3.0 lbs. (1655 g)
Préface
natural_image
Close-up of a mechanical device with an arrow pointing to a component (no visible text or symbols)(Fig. 1)
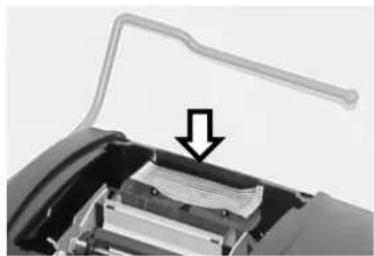
natural_image
Close-up of a mechanical component with a downward arrow indicating a feature (no text or symbols visible)(Fig. 2)
natural_image
Close-up of a black-and-white photo of a digital calculator with a curved arrow indicating rotation (no text or symbols visible)(Fig. 3) (Fig. 4)
natural_image
Close-up of a black-and-white photo of a vintage telephone receiver with a digital display and keyboard (no visible text or symbols)natural_image
Interior view of an electronic device showing internal components and circuitry (no visible text or symbols)(Fig. 7)
text_image
VICTOR 1280-7 Wireless USBtext_image
VICTOR 1280-7 Wireless USBtext_image
VICTOR 1280-7 Wireless USBtext_image
VICTOR 1280-7 Wireless USBtext_image
VICTOR 1280-7 Wireless USBPoids 3,0 lb (1 655 g)