Forward Ruby - Smartphone NGM - Free user manual and instructions
Find the device manual for free Forward Ruby NGM in PDF.


| Product Type | Smartphone |
| Brand | NGM |
| Model | Forward Ruby |
| Operating System | Android 4.4.2 KitKat |
| Screen Type | Capacitive touch screen |
| Number of SIM cards | Dual SIM (Micro SIM) |
| Memory card type | microSD |
| Connectivity | Wi-Fi, Bluetooth, GPS, 3G |
| Battery | Rechargeable lithium-ion |
| Charging connector | Micro USB |
| Rear camera | Yes, with flash |
| Front camera | Yes |
| Sensors | Light, proximity |
| FM Radio | Yes |
| Flashlight | Yes |
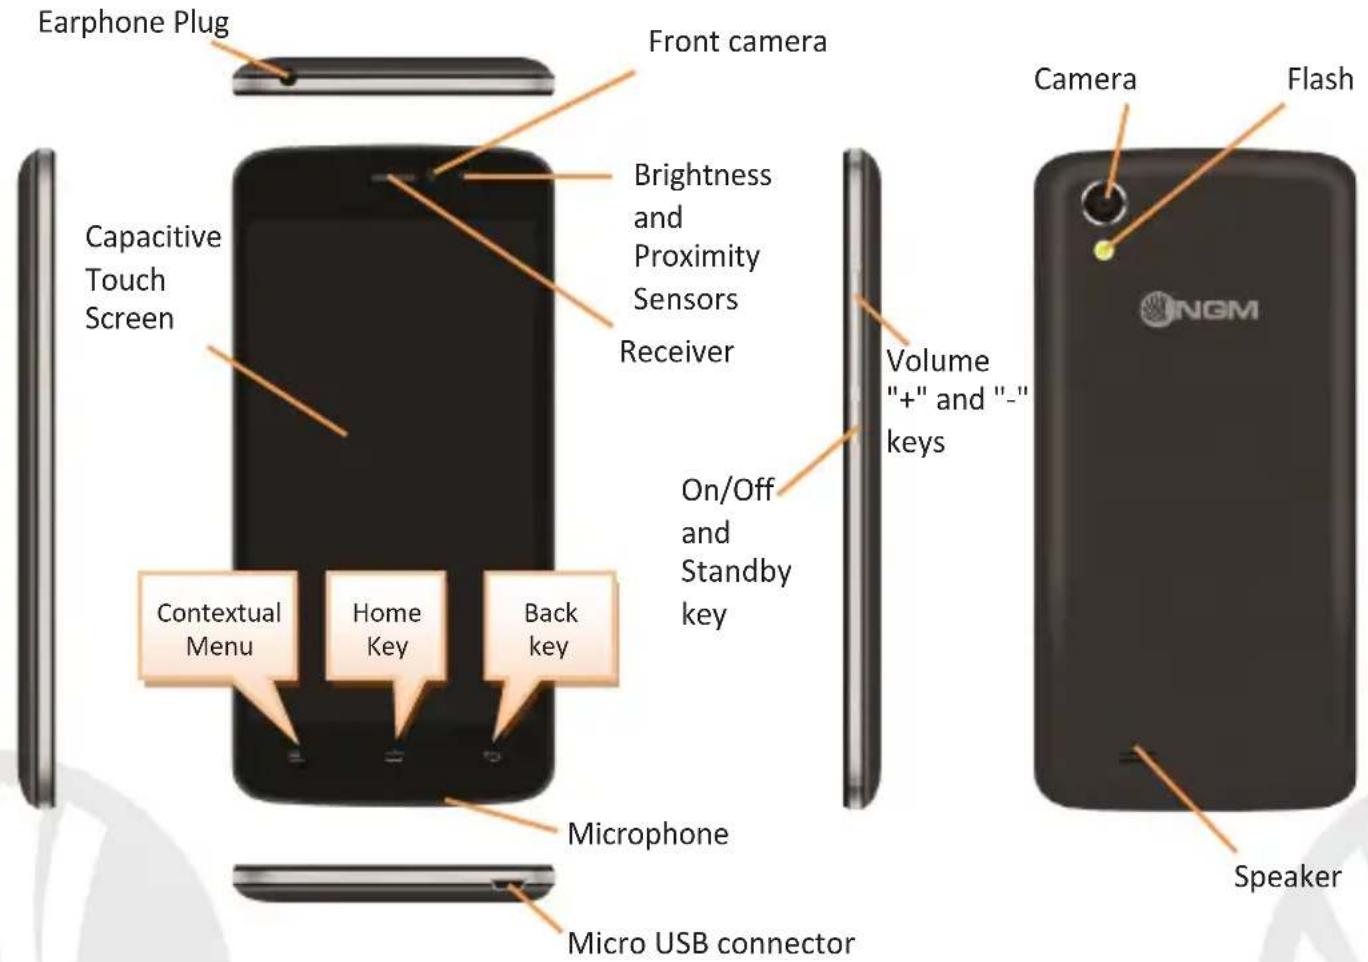
| Physical keys | ON/OFF, volume, home, back, context menu |
| Maintenance and cleaning | Use a soft, dry cloth. Do not use chemical products. |
| Security | Screen lock by pattern, PIN, password or face unlock |
| Spare parts and repairability | Removable battery and back cover. Use original NGM accessories. |
Frequently Asked Questions - Forward Ruby NGM
User questions about Forward Ruby NGM
0 question about this device. Answer the ones you know or ask your own.
Ask a new question about this device
Download the instructions for your Smartphone in PDF format for free! Find your manual Forward Ruby - NGM and take your electronic device back in hand. On this page are published all the documents necessary for the use of your device. Forward Ruby by NGM.
USER MANUAL Forward Ruby NGM

NGM
NEWGENERATIONMOBILE

NGM
English - Quick Guide....34
natural_image
3D diagram of a smartphone showing internal components and red arrows indicating movement or force (no text or symbols present)6DANSK
Oplad batteriet
Copyright © 2014 NGM Italia
natural_image
3D diagram of a smartphone showing internal components and red arrows indicating movement or force (no text or symbols present)Akku aufladen
Copyright © 2014 NGM Italia
Welcome to the NGM Android™ world. Thank you for purchasing NGM Forward Ruby. With this device you can have access to the many features of the new edition of the Android™ 4.4.2 KitKat OS to manage your contacts, email, social networks and to discover the opportunities of Internet with just a single touch! Discover the full potential of your new "smart" phone. Compared to the usual mono SIM Smartphones, NGM Dynamic Ruby offers the convenience of Dual SIM that has always characterized the entire range of NGM phones, i.e. the ability to handle two SIM cards and consequently two phone numbers at the same time. You will discover other useful features such as setting the preferred SIM for calls, video calls, messages and data connection. By visiting the official website www.ngm.eu you can appreciate the whole range of NGM mobile phones, ask for after sales assistance, access the forum for technical assistance and download software updates.
Warning: Data Connection of NGM Forward Ruby is active as soon as you first turn on the phone (and also after every factory data reset). If you do not have a special or "flat" rate for data connection with your SIM card, you are recommended to turn off data traffic and set up a Wi-Fi connection, in order to avoid additional costs.
34ENGLISH
Set up
Warning: insert SIM and SD Card only after removing the battery, in order to prevent data loss.
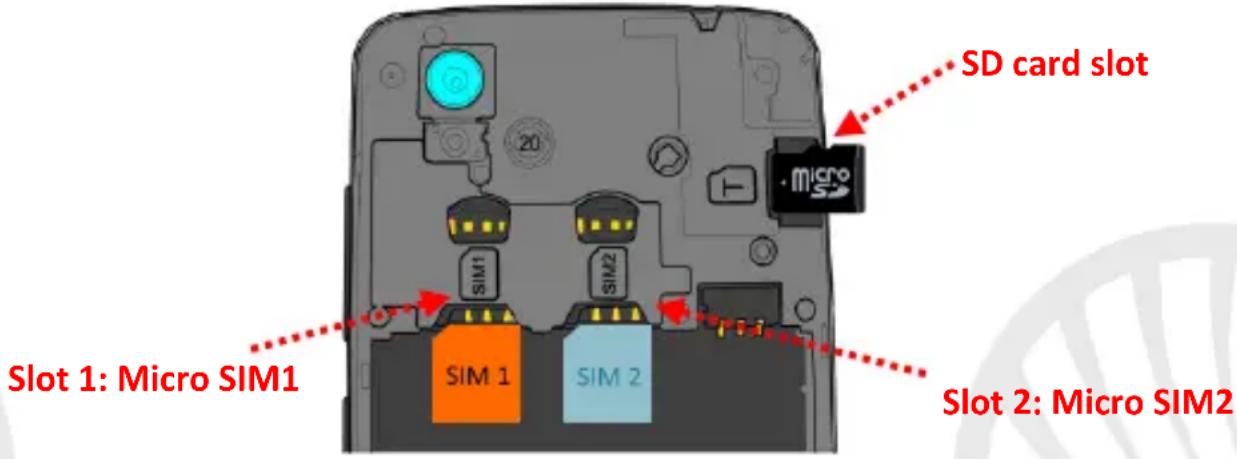
Insert SIM card: the SIM cards contain your phone number, PIN codes, links to external services, contacts and other important details. To access the compartment containing the SIM slots, turn off the phone and remove the cover starting from the bottom slit (USB connector). Remove the battery and insert the SIM cards into the slots with their gold contacts facing downwards.
Insert the memory card: to better manage all the functions of NGM Forward Ruby, you are recommended to use a micro-SD card; insert it into the back side of the phone. After turning off the phone, remove the back cover and the battery and insert the micro-SD, as shown in the figure, with its golden contacts turned downwards.
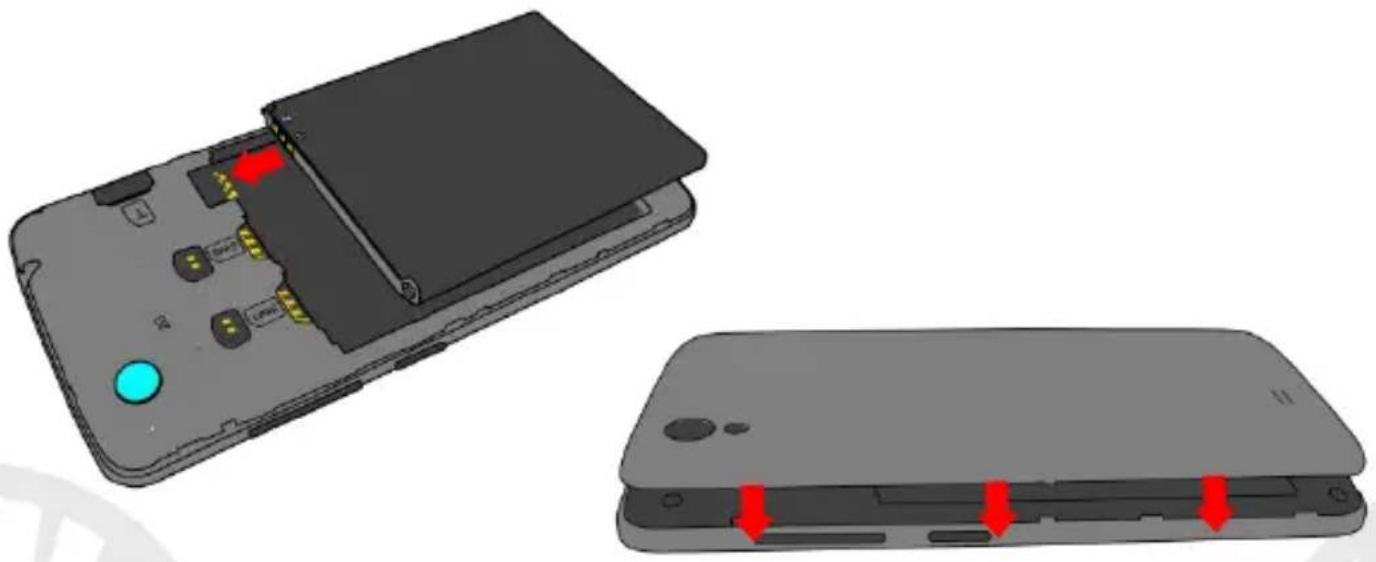
Inserting the battery
Your device is provided with a lithium-ion battery and is designed to be used exclusively with original NGM batteries and chargers. The battery must be inserted into the backside of the phone. Insert the battery into the battery compartment with the contacts facing up, matching those of the phone. When done, put the hind cover back into position as shown in the following illustrations.
natural_image
3D diagram of a smartphone showing internal components and battery casing, with red arrows indicating ports (no text or symbols present)36ENGLISH
Charge the battery
Charge the battery before starting to use the device. Use the supplied USB cable and the USB connector on the lower side of the phone. Connect the charger to the provided wall socket adapter, and then the device to the USB cable. You can also charge the phone by connecting it with the PC USB port, but in this case charging will take longer. When the battery is charging, an animated icon on the screen will show the charging progress if the phone is on. Once the battery icon is filled, it is fully charged and the phone can be disconnected from the grid.
Warning: Do not connect the phone to a booting-up or running down PC to avoid voltage jumps. To preserve the functionality of the product and the integrity of the warranty, we recommend the use of original NGM chargers. Please charge the battery indoors, in a dry and favorable environment. It's normal for the battery to get slightly warm during the charging process. The battery will reach its full capacity when cycled several times.
Power on, power off and standby
To turn on the phone, press and hold the power on/off key To turn off your device, press and hold the same key and confirm by selecting "Shutdown". A quick pressure sets the phone in stand-by mode (screen off) or allows you to go back to the lock screen (see below).
The main screen: use the touch screen by tapping, holding or dragging a finger across the screen. The main screen is the starting point for using all the applications on your phone. Other pages will be available to the right of the main page, as soon as you insert shortcuts or widgets into them: press and hold the desired application icon and drop it onto one of the desktop-thumbnails. By swiping to the right with the held icon, you will create new pages that you can fill with shortcuts and widgets. You also can customize the four widgets next to the central menu icon by pressing, holding and moving them onto the desktop. To delete a shortcut or widget, tap and hold the icon and drag it onto the "X Remove" symbol on the screen. By moving an icon over another, you can create folders on the desktop and by long pressing an empty space on the desktop you can change the wallpaper.
The main menu: select an application from the main menu or scroll left/right to view other applications. Press back key to return to the previous screen, press the Home key to return to the main screen. Press the contextual menu to access the phone settings.
38ENGLISH
Home Screen
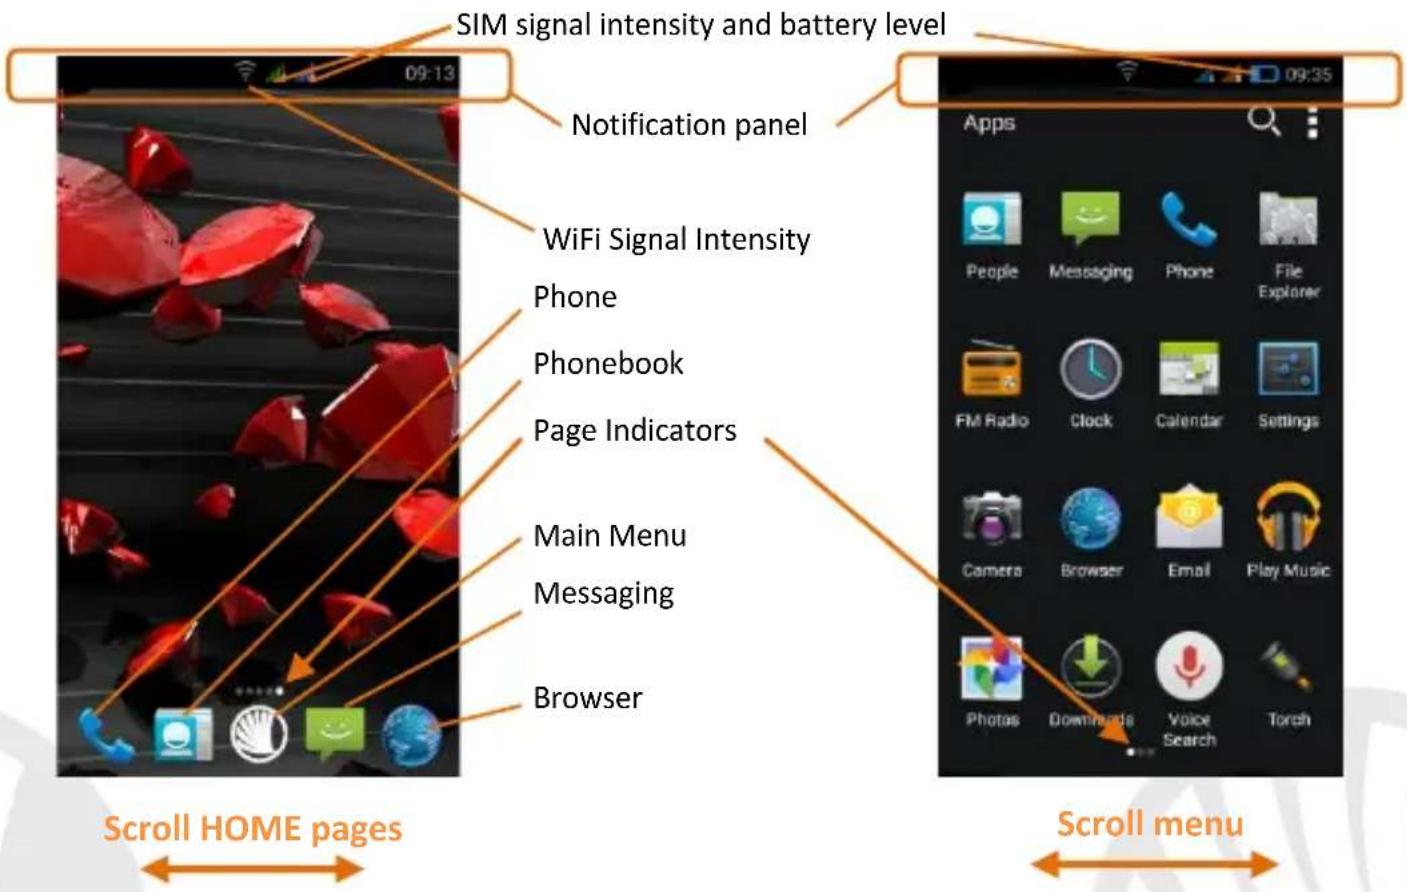
Main Menu
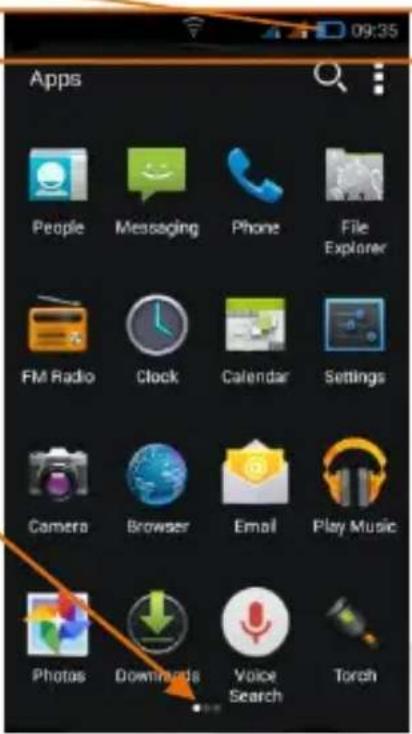
40ENGLISH
RAPID ACCESS
Notification panel: to open the Notification Panel, touch the upper bar containing the battery and signal-intensity icons and drag it downwards. Touch Notification to display notifications and touch Settings to access the quick setup keys. With ✗, you will erase all notifications in the panel. To hide the panel, drag up the bottom of the panel or tap the Back key.
Recent applications: when you are inside any application, press the ☐ key: a list of the applications you have recently accessed will be shown and can be directly selected.
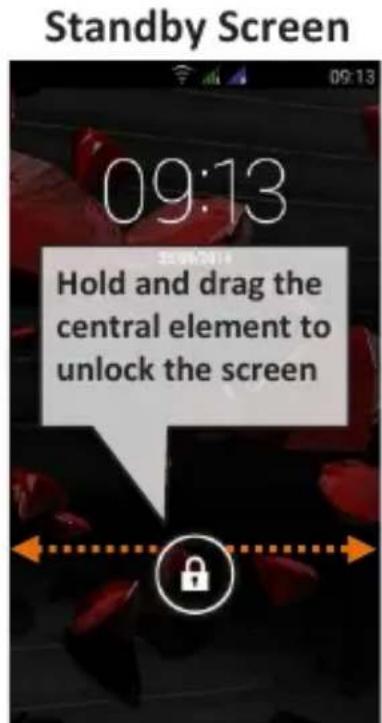
Lock screen and vibration: from the main menu, select Settings > Security > Screen Lock. Select the desired unlocking mode (None, Slide, Face Unlock, Pattern, PIN or Password) and confirm. To quickly lock the screen, briefly press the power on/off key. To unlock it, follow the instructions on the screen.
Contextual Menu: many apps have a Contextual Menu 📄. By selecting it, you can display a contextual menu referred to the application itself, with related functions.
Managing the two SIM cards: from the main menu, select Settings > SIM Management. Select the I/O keys next to the phone operators corresponding to "SIM1" and "SIM2" to activate or deactivate selectively the SIM at any time. From this menu you can also customize the color and name for each SIM icon and decide which SIM to use as default for calls, video calls, messages and data connection or choose "Always ask" if you don't want to set a SIM as default.
Dynamic 3G:
In Settings > Mobile Networks > 3G service > Enable 3G you can select the SIM card on which you wish to activate the 3G service. This is an innovative feature that allows you to move the 3G connection (normally available on slot1 only) from one SIM to the other without physically exchanging them.
MANAGING CALLS
From the main screen touch the Phone icon; use the virtual keypad to enter the desired phone number.
Press the handset icon and choose the desired SIM to call with.
To end the call press the red end call key.
To answer a call, press and hold the central element and scroll it down; scroll it up to reject it. To silence an incoming call, press Volume "+" or "-" (on the right side of the phone).
42ENGLISH
Call a number from the call log
From the main menu, select the Phone App; the call log is over the keyboard, showing the missed, received and outgoing calls.
In case no default SIM has been set, select the desired number and choose which SIM to call with.
MANAGE CONTACTS
Add a new contact:
Note: In the contact contextual menu, you can access the Import/Export functions and several other settings.
From the main menu select the Contacts icon.
Press the "+" icon on the bottom bar.
Select the storage where you want to save the contact (Account, Phone, SIM1 or SIM2).
Insert Name, Number and any other contact detail (if the contact is saved on the SIM card, name and phone number only can be saved) and confirm with Done.
Add a new contact from call log:
From the Phone menu, access the Call Logs.
Touch the empty contact picture ? near the number you want to save among the Missed, Received or Outgoing calls and confirm with OK.
Select New Contact or add the number to an Existing contact by selecting it from the list. Once you selected the saving path and added name and any further information (when saving in Phone), confirm with Done.
It is possible to associate contacts to one of the SIM cards in order to automatically call those contacts with a specific SIM; to manage associations with the inserted SIM cards, you can either press the contextual menu of a contact and choose Associate SIM card or, from Settings > Dual SIM Settings, choose Contact Association, select the SIM card and choose the contacts you want to associate to it.
Set ringtones
Note: you can set ringtones in *mid, *wav, *ogg or *mp3 formats.
From the main menu, select Settings > Ringtones and Vibration > Audio Profiles > General.
Select Voice call ringtone > SIM1 or SIM2 and choose the desired ringtone for each SIM card.
If you want to set a custom ringtone: from Music select the arrow next to the desired audio track and choose Ringtone. So, the audio file will be added to the available ringtones list.
Quickly turn on/off the vibration mode: to quickly disable the ringtone for calls and messages, you can press and hold volume "-". Once you reach the minimum volume, the phone will enter the vibration mode. By pressing volume "-" again, the phone will enter the silent mode.
44ENGLISH
Sending and reading SMS and MMS
Reading SMS and MMS: when you receive a new SMS or MMS, an icon appears in the notification panel. By clicking on the displayed icon, you can directly access to the conversation and read the incoming message. In any case, you can view the incoming messages from the home screen or menu by selecting Messaging.
Send SMS and MMS: From the Home page or from the main menu, choose Messaging and then the 📋 icon on the bottom. Type the first letters of a name into the recipients field to search for a contact and select it from the pop-up or directly enter the phone number; otherwise select the 📋+ icon next to the field and select the recipient(s) from the contacts.
Write the text into the dedicated space with the virtual keypad.
Select the 🎨 + icon to insert multimedia files (the message will automatically be converted into MMS). Press either Send key, selecting the SIM you want to use.
CONNECTIVITY: to better use the potentiality provided by the device and its operating system, you must have an active data connection; data connection of NGM Forward Ruby is ON when you first power on the phone. If it is not included into your mobile phone plan, data traffic may cause you extra costs, so it is recommended to configure an Internet connection via WiFi. To enable data traffic on one of the SIM cards, select Settings > Dual SIM Manager > Data connection, or activate it from the Quick Setup buttons in the notifications panel.
Connecting to Internet with WiFi®: you can connect to WLAN by using the Wi-Fi function. To activate it, choose Settings > WiFi. Please follow all warnings and indications concerning the use of wireless devices in areas where the use of such functions is restricted (airplanes, hospitals, etc.). Go offline mode when you have to use only the functions that do not require Network access.
Connecting to a Bluetooth ^® device: turn ON the Bluetooth device you want to connect with. Refer to the device documentation.
From the main menu, choose Settings > Bluetooth on/off to turn on Bluetooth. In the contextual menu you will find additional functions and settings.
Choose Search for devices to automatically find other Bluetooth devices.
Among the discovered devices, select the device name to associate with. The phone will attempt to associate with the device, which may be asked for a pairing code.
Connect to the Internet: from the main menu, choose Browser. Type the URL into the address bar to start browsing. If you choose to navigate using data connection, be aware of costs or choose a "flat" data contract with your service provider. Alternatively, use WiFi (see "Connectivity") where possible.
46ENGLISH
Account setup: in order to better manage the Android ^TM OS functionalities, it is recommended to configure a default account. When you first power on the phone, it will guide you in configuring a default account that allows you to access Android ^TM OS applications like Email sync, for example.
E-mail: by configuring a default account you can easily manage your e-mails and display them automatically on your phone. If you want to use also a different Email account, you can configure a new account with another provider within the Email app in the Main Menu.
Synchronization
Synchronization is the most efficient approach to manage your useful data because it allows you to make a backup of the data on your device with an internet account. In case of replacement, loss or damage of the phone you will not experience loss of data. The synchronization can be automatic (Settings > Data usage > Contextual menu > Auto-sync data) or can be activated manually, individually for each installed application to be synchronized; you can find the list of such applications in Settings > Account [installed App list]. To add a new account, select Add Account. The synchronization uses an active data connection, which could result in data traffic costs. It is advisable to use a WiFi connection when available.
GPS geolocalization: The Global Positioning System (GPS) is a satellite-based positioning system, with a global and continuous coverage. To access GPS, select Settings > Localization access I/O. When the GPS function is activated, the phone starts to collect data from satellites and determines the current position. The Fix Times (position detection) are variable and can be affected by several external factors (clouds, high buildings, etc.). Limit the use of battery and memory by switching off this function when you don't need it.
Warning: formatting and delivery of this user manual is based on the Android ^TM operating system, NGM Italia will not bear responsibility for any incompliance with the above guidelines or improper use of the mobile phone. NGM reserves the right to modify any of the content in this user guide without previous public announcement. The content of this manual may vary from the actual content displayed in the mobile phone. In that case, the latter shall govern.
Copyright © 2014 NGM Italia
No part of this manual may be reproduced, distributed, translated, or transmitted in any form or by any means, electronic or mechanical, including photocopying, recording, or storing in any information storage and retrieval system, without the prior written permission of NGM Italia.
Bluetooth® is a registered trademark of the Bluetooth SIG, Inc. worldwide.
Wi-Fi® and the Wi-Fi logo are registered trademarks of the Wi-Fi Alliance.
48ENGLISH
natural_image
3D diagram of a smartphone showing internal components with red arrows indicating movement or force (no text or symbols)Cargar la batería:
Copyright © 2014 NGM Italia
natural_image
3D diagram of a smartphone showing internal components and red arrows indicating movement or force (no text or symbols present)66FRANÇAIS
Charger la batterie
natural_image
Digital scene showing a red, fragmented object on black background with orange arrows and icons (no readable text or symbols)Panneau de notification
Copyright © 2014 NGM Italia
natural_image
Two views of a smartphone showing internal components and red arrows indicating movement or change (no text or symbols present)Copyright © 2014 NGM Italia
natural_image
3D diagram of a smartphone showing internal components and red arrows indicating movement or force (no text or symbols present)96NORSK
natural_image
Digital scene with red gemstones scattered on a dark surface, overlaid with orange arrows and icons (no readable text or symbols)Legge inn ringetoner
Copyright © 2014 NGM Italia
natural_image
3D diagram of a smartphone showing internal components and battery casing, with red arrows indicating ports (no text or symbols present)Akun lataaminen
Copyright © 2014 NGM Italia
natural_image
Two views of a smartphone showing internal components and red arrows indicating movement or force (no text or symbols present)126SVENSKA
Ladda batteriet
natural_image
Digital photo of red crystal drops falling on a black surface, with UI icons and date stamp (no readable text or symbols)Copyright © 2014 NGM Italia
- NGM
- 6DANSK
- Oplad batteriet
- Copyright © 2014 NGM Italia
- Akku aufladen
- 34ENGLISH
- Set up
- Inserting the battery
- 36ENGLISH
- Charge the battery
- Power on, power off and standby
- 38ENGLISH
- RAPID ACCESS
- Dynamic 3G:
- MANAGING CALLS
- 42ENGLISH
- Call a number from the call log
- MANAGE CONTACTS
- Add a new contact:
- Add a new contact from call log:
- Set ringtones
- 44ENGLISH
- Sending and reading SMS and MMS
- 46ENGLISH
- Synchronization
- Cargar la batería:
- Charger la batterie
- Legge inn ringetoner
- Akun lataaminen
- Ladda batteriet
Brand : NGM
Model : Forward Ruby
Category : Smartphone