HD50K - Drill Stayer - Free user manual and instructions
Find the device manual for free HD50K Stayer in PDF.

| Product type | Percussion drill |
| Brand | Stayer |
| Model | HD50K |
| Power supply | Mains 230-240 V ~ 50/60 Hz |
| Rated power | Not specified (estimated ~800 W) |
| No-load speed | Variable (electronic adjustment) |
| Hammer frequency | Variable (electronic adjustment) |
| Chuck | SDS-plus chuck |
| Drilling mode | Drilling with and without impact, chiseling (with accessories) |
| Safety clutch | Yes, overload coupling |
| Direction of rotation | Reversible (right/left) |
| Auxiliary handle | Yes, adjustable in position |
| Dust cap | Yes, protects the tool holder |
| Weight | Not specified (estimated ~2.5 kg) |
| Maintenance | Clean ventilation slots, replace dust cap if damaged, sharpen chiseling tools |
| Safety | Wear hearing protection, use the auxiliary handle, detect hidden pipes, hold by insulated gripping surfaces |
| Spare parts | Available from Stayer after-sales service (specify article number) |
| General information | Compliant with EN 60745, CE, RoHS. Declaration of conformity available. |
Frequently Asked Questions - HD50K Stayer
User questions about HD50K Stayer
0 question about this device. Answer the ones you know or ask your own.
Ask a new question about this device
Download the instructions for your Drill in PDF format for free! Find your manual HD50K - Stayer and take your electronic device back in hand. On this page are published all the documents necessary for the use of your device. HD50K by Stayer.
USER MANUAL HD50K Stayer
Area Empresarial Andalucia - Sector I
This manual is consistent with the date of manufacture of your machine, you will find information on the technical data of the machine acquired manual check for updates of our machines on the website: www.grupostayer.com
1.- Machine-specific SafetyWarnings
Wear hearing protection. Exposure to noise can cause hearing loss.
Always use the auxiliary handle supplied with the machine. Loss of control can cause personal injury.
Use suitable detectors to determine if utility lines are hidden in the work area or call the local utility company for assistance. Contact with electric lines can lead to fire and electric shock. Damaging a gas line can lead to explosion. Penetrating a water line causes property dama electric shock.ge or may cause an
Hold the power tool only by the insulated gripping surfaces when performing an operation where the cutting tool may contact hidden wiring or its own cord. Contact with a "live" wire will also make exposed metal parts of the power tool "live" and shock the operator.
When working with the machine, always hold it firmly with both hands and provide for a secure stance. The power tool is guided more secure with both hands.
Secure the workpiece. A workpiece clamped with clamping devices or in a vice is held more secure than by hand.
Do not work materials containing asbestos. Asbestos is considered carcinogenic.
Take protective measures when dust can develop during working that is harmful to one's health, combustible or explosive. Example: Some dusts are regarded as carcinogenic. Wear a dust mask and work with dust/chip extraction when connectable.
- Keep your workplace clean. Blends of materials are particularly dangerous. Dust from light alloys can burn or explode.
Always wait until the machine has come to a complete stop before placing it down. The tool insert can jam and lead to loss of control over the power tool.
Never use the machine with a damaged cable. Do not touch the damaged cable and pull the mains plug when the cable is damaged while working. Damaged cables increase the risk of an electric shock.
2.- Functional Description

Read all safety warnings and all instructions. Failure to follow the warnings and instructions may result in electric shock, fire and/or serious injury.
While reading the operating instructions, unfold the graphics page for the machine and leave it open.
2.1.- Intended Use
HD21K, HD27K / HD27BK, HD28K, HD5K, HD5BK, HD50K, HD55K, MH6K
The machine is intended for hammer drilling in concrete, brick and stone (Except HD21). It is also suitable for drilling without impact in wood, metal, ceramic and plastic. Machines with electronic control and right/left rotation are also suitable for screwdriving and thread cutting.
HD15K, HD17K, HD9BK, HD10K, MH8K
The machine is intended for heavy chiselling and demolition work as well as for driving in and compacting with the appropriate accessories.
The numbering of the product features refers to the illustration of the machine on the graphics
1 Chuck
2 SDS-plus/SDS-max tool holder
3 Dust protection cap
4 Locking sleeve
5 Rotational direction switch
6 Lock-on button for On/Off switch
7 On/Off switch
8 Release button for mode selector switch
9 Mode selector switch
10 Button for RPM adjustment
11 Auxiliary handle
12 Handle
13 Carrying handle
14 Knurled nut for carrying handle
15 Limit bolt
16 Tool shank
17 Tool holder
18 Chisel position selector
3.- Assembly
HD21K, HD27K / HD27BK, HD28K, HD5K, HD5BK, HD50K, HD55K, HD3K, HD6K, HD6BK, HD45K, MH2K, MH6K, MH8K
Before any work on the machine itself, pull the mains plug.
Operateryourmachineonlywiththeauxiliary handle11.
Rotating the Auxiliary Handle
The auxiliary handle 11 can be set to any position for a secure and low-fatigue working posture.
Turn the bottom part of the auxiliary handle 11 in counterclockwise direction and swivel the auxiliary handle 11 to the desired position. Then retighten the bottom part of the auxiliary handle 11 by turning in clockwise direction.
Pay attention that the clamping band of the auxiliary oned in the groove on the housing handle is positive as intended for.
3.2.- Changing the Tool
The dust protection cap 3 largely prevents the entry of drilling dust into the tool holder during operation. When inserting the tool, take care that the dust protection cap 3 is not damaged.
A damaged dust protection cap should be changed immediately. We recommend having this carried out by an after-sales service.
Inserting SDS-plus Drilling Tools
The SDS drill chuck allows for simple and convenient changing of drilling tools without the use of additional tools.
Clean and lightly grease the shank end of the tool. Insert the tool in a twisting manner into the tool holder until it latches itself.
Check the latching by pulling the tool.
As a requirement of the system, the SDS drilling tool can move freely. This causes a certain radial run-out at no-load, which has no effect on the accuracy of the drill hole, as the drill bit centres itself upon drilling.
Removing SDS Drilling Tools
Push back the locking sleeve 4 and remove the tool.
3.3.- Carrying Handle (HD15K / HD17K)
The carrying handle 13 can be turned to any position. Loosen the knurled nut 14, turn the carrying handle 13 around the machine axis to the desired position and tighten the knurled nut 14 again.
The carrying handle 13 can also be mounted facing to the other side. Completely unscrew the knurled nut 14 and then pull out the hexagon bolt upward. Pull off the carrying handle 13 to the side and tilt the remaining clamping element by 180^ . Mount the carrying handle 13 in reverse order.
3.4.- Changing the Tool (HD15K / HD17K/ MH2K / MH6K / MH8K)
Before any work on the machine itself, pull the mains plug.
Clean the tool shank 16 and apply a light coat of grease.
Pull out the lock bolt 15 and turn it 180^ in anticlockwise direction. Allow the lock bolt 15 to latch again.
Insert the tool into the tool holder to the stop. The groove of the tool shank 16 must face upward as shown in the figure.
Check the latching by pulling the tool.
4.-. Operation
4.1.-Starting Operation
Observe correct mains voltage! The voltage of the power source must agree with the voltage specified on the nameplate of the machine. Power tools marked with 230V can also be operated with 220V .
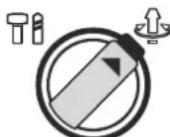
Setting the Operating Mode
With the selector switch for drilling/hammer drilling 9, the operating mode of the machine is selected. To change the operating mode, press the release button 8 and turn the drilling/hammer drilling selector switch 9 to the desired position until it can be heard to latch.
Note: Only change the mode of operation while disconnected from the machine! Otherwise you may damage the machine.
Position for hammer
drilling in concrete or
stone
HD5K, HD5BK, MH6K: 8'
Position for drilling without impact in wood, metal, ceramic and plastic as well as for screwdriving and thread cutting.
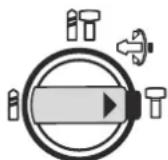
Position for adjustment of the chiseling position
Position for chiselling HD5K, HD5BK, MH6K: 8'
Reposition Chiseling Vario-lock (HD9CK)
The chisel 12 may be positioned at angles. Thus, the optimal working position can be set for each application.
Insert the chisel in the tool holder
- Push the ring 18 forward and turn the chisel in the desired position.
- Release the ring 18 to lock the position.
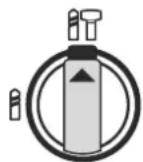
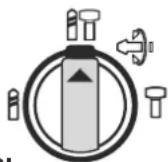
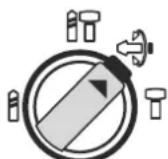
Reversing the Rotational Direction
The rotational direction switch 5 is used to reverse the rotational direction of the machine. However, this is not possible with the On/Off switch 7 actuated.
Right rotation: Turn the selector switch for drilling/hammer drilling 5 on both sides to the stop in the position
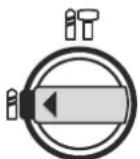
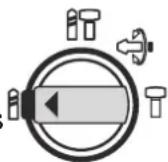
Left rotation: Turn the selector switch for drilling/hammer drilling 5 on both sides to the stop in the position
Set the direction of rotation for hammer drilling, drilling and chiselling always to right rotation.
Switching On and Off
To start the machine, press the On/Off switch 7. To lock the On/Off switch, keep it pressed and additionally push the lock-on button 6.
To switch off the machine, release the On/Off switch 7. When the On/Off switch 7 is locked, press it first and then release it.
Setting the Speed/Impact Rate
The speed/impact rate of the switched on power tool can be variably adjusted, depending on how far the On/Off switch 7/10 is pressed.
Light pressure on the On/Off switch 7/10 results in low speed/impact rate. Further pressure on the switch increases the speed/impact rate.
Safety Clutch
If the tool insert becomes caught or jammed, the drive to the drill spindle is interrupted. Because of the forces that occur, always hold the power tool firmly with both hands and provide for a secure stance.
If the power tool jams, switch the machine off and loosen the tool insert. When switching the machine on with the drilling tool jammed, high reaction torques can occur.
Changing the Chiselling Position
The chisel SDS can be locked in different positions. In this manner, the optimum working position can be set for each application.
Insert the chisel into the tool holder.
Turn the mode selector switch 8
Turn the tool holder to the desired chiselling position.
Turn the mode selector switch 8 to the "chiseling" position. The tool holder is now locked.
For chiselling, set the rotation direction to right rotation.
Switching On/Off: A
To start the machine, press the On/Off switch 6 and keep it depressed.
To switch off the machine, release the On/Off switch 6.
Switching On/Off: B
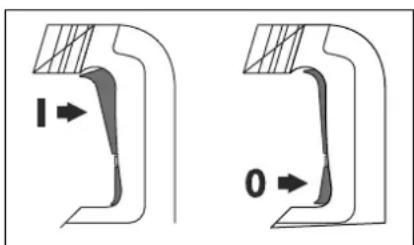
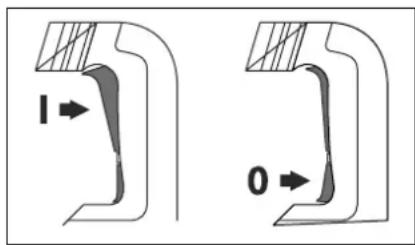
To start the machine, press the On/Off switch 6/7 at the top (I) until it locks.
To switch off the machine, press the On/Off switch 6/7 at the bottom (O) and release it.
For low temperatures, the power tool reaches the full hammer/impact capacity only after a certain time.
Setting the Speed/Impact Rate
The electronic control 10 enables stepless speed and impact preselection in accordance with the material to be worked.
The maximum hammering capacity is achieved when the thumbwheel 10 is set to position "6". (HD50K) For lower speed settings, the hammering capacity is lower due to technical reasons.
Operation HD15K / HD17K
4.3. - Starting Operation
Observe correct mains voltage! The voltage of the power source must agree with the voltage specified on the nameplate of the machine. Power tools marked with 230V can also be operated with 220V.
Switching On and Off
To start the machine, push the On/Off switch 6/7 to the "I" position.
To switch off the machine, push the On/Off switch 6/7 to the "O" position.
For low temperatures, the machine reaches the full impact rate only after a certain time.
This start-up time can be shortened by striking the chisel in the machine against the floor one time.
4.4.- Operating Instructions
While working, hold the power tool with both hands by the handle 1.
For the highest possible impact damping, work only with moderate pressure.
5.- Maintenance and Service
5.1.- Maintenance and Cleaning
Before any work on the machine itself, pull the mains plug.
For safe and proper working, always keep the machine and ventilation slots clean.
A damaged dust protection cap should be changed immediately. We recommend having this carried out by an after-sales service.
Clean the tool holder 2 each time after using.
WARNING! Important instructions for connecting a new 3-pin plug to the 2-wire cable.
The wires in the cable are coloured according to the following code:

Do not connect the blue or brown wire to the earth terminal of the plug.
Important: If for any reason the moulded plug is removed from the cable of this power tool, it must be disposed of safely.
When the carbon brushes wear below acceptable matically service tolerances, the machine will auto cut to customer out. The machine must be sent service for address, see the maintenance for "Service and Customer Assistance" section.
Sharpening Chisels
Good results are only achieved with sharp chisels; therefore, sharpen the chiselling tools in good time. This ensures a long service life of the tools and good working performance.
Re-sharpening
Sharpen chiselling tools using grinding wheels (e.g.ceramic bonded corundum wheel) with a steady supply of water. Reference values are shown in the figure. Take care that no annealing coloration appears on the cutting edges; this impairs the hardness of the chiselling tools.
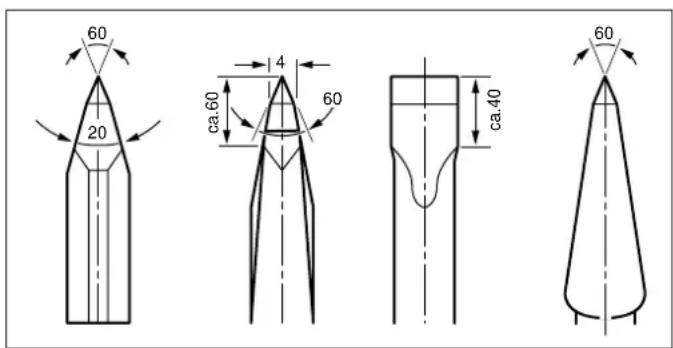
For forging, heat the chisel to between 850^ and 1050^ (bright red to yellow).
For hardening, heat the chisel to approx. 900^ and quench in oil. Then anneal in an oven for approx. one hour at 320^ (annealing colour = light blue).
If the machine should fail despite the care taken in man edures, repair ufacturing and testing proc should be carried out by an after-sales service centre for Stayer power tools.
In all correspondence and spare parts order, please always include the article number given on the type plate of the machine.
5.2.- Disposal
The machine, accessories and packaging should be sorted for environmental-friendly recycling.
Only for EC countries:
Do not dispose of power tools into household waste! According the European Guideline 2002/96/EC for Waste Electrical and Electronic Equipment and its implemen-tation into national right,
power tools that are no longer usable must be collected separately and disposed of in an environmentally correct manner.
Subject to change without notice.
5.3. Technical Data

= Power input

= Load speed

= Percussion

= Percusive energy

= Insertion

= Maximum drilling, steel

= Maximum drilling, stone

= Maximum drilling, with core bit

= Weight
LwA
=Sound power level
L A
=Sound pressure level

= Vibration
The values given are valid for nominal voltages [U] 230 / 240V 50 / 60Hz - 110 / 120V 60Hz . For lower voltage and models for specific countries, these values can vary. Please observe the article number on the type plate of your machine. The trade names of the individual machines may vary.
5.4.- Declaration of Conformity C
We declare under our sole responsibility that this product is in conformity with the following standards or standardization documents: UNE EN 60745-1:2010/A11:2011, UNE EN 60745-2-6:2011, EN 55014-1:2006, EN 61000-3-2:2006, EN 61000-3-3:1995+A1:2001+A2:2005, EN ISO 3744:1995 according to the provisions of the directives 2004/108/EC, 2006/42/EC, 2000/14/EC
Ramiro de la Fuente Director Manager

December 16, 2013
Açma / Kapama (On/Off)
Makineyi calistirmak icin acma/kapama dugmesine 7 basin.
AÇma / Kapama (On/Off): A
AÇma / Kapama (On/Off): B
Açma / Kapama (On/Off)
Toonotetnon εpyαλειou SDS
Me To T oK SDS mT opTe V a aXeTe To Ttooetnuevo epyaaleio aTAA kai avetα, xwiic vax npoiopoioe T AALA epyaaia.
Movo yia xwpe TNC EE:
Mnv piXVE T a NkpiK epyaleia
Oa anoppimuT aou oTIOU Oa!
UuWvA e Tnv Koivotn Ohnyia
2002/96/EK oxETIKa E TIC nAaiEc
NkTPiKc Ka Nktpovikc
OueKuec KAI Tn MEtoopap Tns
oyniaocuTcseEvoKoDikaoEvivai PAnoxpeWtko axpnoTa nEeKpiKaepyaleia vauAevovaiExwpiTgiaVavakukawouvptpiofkiKO TPOIO pIAKO TPOC TO EPIaALov.
Tnpoue to 8ikaiuαaλayv.