
0098N - Blood pressure monitor INOVALLEY - Free user manual and instructions
Find the device manual for free 0098N INOVALLEY in PDF.
| Product Type | Electronic wrist blood pressure monitor |
| Brand | Inovalley |
| Model | 0098N (HL168TA) |
| Measurement method | Oscillometric |
| Display | LCD screen |
| Measurement range (pressure) | 0 to 300 mmHg |
| Measurement range (pulse) | 40 to 199 beats/min |
| Accuracy | Pressure: ±3 mmHg, Pulse: ±5% |
| Inflation | Automatic (compressor) |
| Deflation | Automatic air control valve |
| Memory | 3 databases of 40 measurements each (120 measurements total) |
| Weight | Approximately 137 g (batteries included) |
| Wrist circumference | 135 to 195 mm |
| Power supply | 2 AAA alkaline batteries (1.5 V) |
| Battery life | Approximately 205 measurements |
| Operating conditions | +10°C to +40°C, relative humidity < 85% |
| Storage conditions | -20°C to +70°C, relative humidity < 85% |
| Included accessories | Storage case, instruction manual, 2 AAA batteries |
| Warranty | 2 years against manufacturing defects |
| Standards | CE 0197, EN 60601-1, EN 60601-1-2, EN 1060-1, EN 1060-3, EN 1060-4 |
| Special features | WHO risk category indicator, auto-off, multiple memory |
| Maintenance | Clean with a slightly damp soft cloth; do not use solvents |
Frequently Asked Questions - 0098N INOVALLEY
User questions about 0098N INOVALLEY
0 question about this device. Answer the ones you know or ask your own.
Ask a new question about this device
Download the instructions for your Blood pressure monitor in PDF format for free! Find your manual 0098N - INOVALLEY and take your electronic device back in hand. On this page are published all the documents necessary for the use of your device. 0098N by INOVALLEY.
USER MANUAL 0098N INOVALLEY
Rouge (hypertension grave)
Systole = 110 et diastole = 95
Blood Pressure Monitor Intended Use. 01
- About blood pressure 02
1-1. What is blood pressure ? 02
1-2. Why is it useful to measure blood pressure at home? 02
A. Blood pressure indicator classifications....03
B. Variations in blood pressure. 03
- Important information before use of the unit.....04
- Device description.. 06
3-1. Name of the parts. 06
3-2.Description of display symbols. 07
- Main feature:WHO Risk Category Indicator......08
- Changing Batteries 10
- Attaching pressure cuff 10
- Correct measurement position 11
Contents
8.How to Measure. 12
8-1. Inserting batteries in position 12
8-2. Setting date and time 12
8-3. Steps to take blood pressure measurement..13
8-4. Storing, recalling, and erasing measurement data 14
8-5. To change batteries. 15
9.Maintenance. 16
10. Safe-keeping. 16
11. To prevent malfunction. 17
12. Warning 17
13. Display Messages/Troubleshooting 18
14. Specifications 19
Note. 20
Medical Disclaimer
This manual and product are not meant to be a substitute for advice provided by your doctor or other medical professional. You are not to use the information contained herein, or this product for diagnosing or treating a health problem or prescribing any medication.
If you have or suspect that you have a medical problem, promptly consult your healthcare provider.
Blood Pressure Monitor Intended Use
The device is designed for non-invasive measurements and monitoring of adults' arterial blood pressure. It measures human's systolic blood pressure, diastolic blood pressure and heart rate on wrist by oscillometric measurement method.
The device is recommended for use by people over the age of 18 and is for home use and not clinical use.
*Attention!
To operate the device properly and get the best result from it, please read the Instruction Manual thoroughly before you begin measuring and keep it carefully so that you can access and consult it at any time.
1. About Blood Pressure
1-1. What is blood pressure?
Blood pressure is a measurement of the force of blood flowing against the walls of the arteries. Arterial blood pressure is constantly changing during the course of the cardiac cycle. The highest pressure in the cycle is called the systolic blood pressure and the lowest is the diastolic blood pressure. Both of pressure readings, the systolic and the diastolic, are necessary to enable a physician to evaluate the status of a patient's blood pressure. Many factors such as physical activity, anxiety or the time of day can influence your blood pressure. Blood pressure is typically low in the morning and increases from the afternoon to the evening. It is lower in the summer and higher in the winter.
1-2. Why is it useful to measure blood pressure at home?
Having one's blood pressure measured by a doctor in a hospital or a clinic, and a group health checks, tends to stimulate nervousness in the subject and may even create high blood pressure. Blood pressure also varies in accordance with a variety of conditions and so judgment is not possible on the basis of a single measurement. The blood pressure measured first thing in the morning after getting up, before taking any food and with the subject still, is known as the fundamental blood pressure. In practice it is rather difficult to record the fundamental blood pressure, but to come as near as possible to measuring the blood pressure in an environment that is close to this is why it is useful to take the measurement at home.
A. Blood pressure indicator classifications
Standards for assessment of high or low blood pressure without regard to age, have been established by the World Health Organization (W.H.O), as shown in the chart.
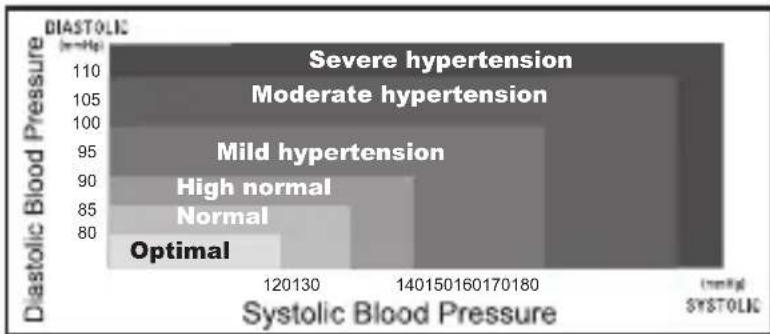
* Figure No.1
B. Variations in blood pressure
Individual blood pressures vary greatly both on a daily and a seasonal basis. These variations are even more pronounced in hypertense patients.
(Hypertense: means a person who has high blood pressure symptom.)
Normally the blood pressure rises while at work and is at its lowest during sleeping period.
The graph below illustrated the variations in blood pressure over a whole day with measurement taken every five minutes.
(The thick line represents sleep. The rise in blood pressure at 4 PM < A in the graph> and 12 PM < B in the graph> correspond to an attack of pain.)
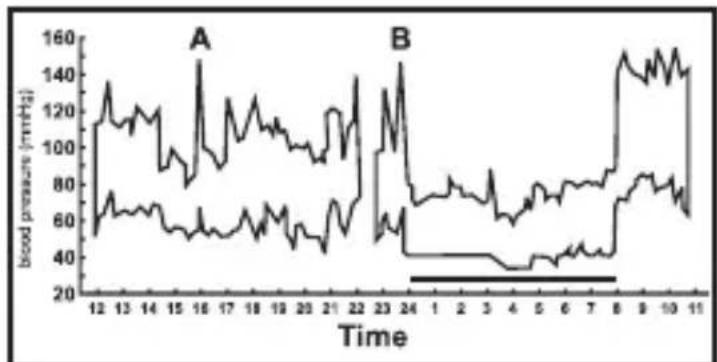
* Figure No.2
2. Important information before use of the unit
2-1. Please rest for at least 5~10 minutes before taking the measurement.
2-2. To allow your blood vessels to return to the condition prior to taking the measurement, please wait at least 3~5 minutes between measurements. You may need to adjust the wait time according to your personal physiological situation.
2-3. If you have one of the circulatory problems as arteriosclerosis, diabetes, liver disease, kidney disease, severe hypertension, peripheral circulation..., or if you are pregnant (as the blood pressure may vary drastically during pregnancy), please consult your healthcare professional before using the device.
2-4. Wait 30 45 minutes before measurement if you've just consumed caffeinated beverages or smoked cigarettes.
2-5. Blood pressure measurements should be interpreted by a physician or trained healthcare professional who is familiar with your medical history.
By using the unit regularly and recording the results for your physician to interpret, you keep your physician informed of the continuing trends in your blood pressure.
2-6. Wind the cuff snugly around your wrist and the cuff must be at the same level as your heart.
2-7. Do not vibrate the unit during measurement, or the proper measurement will not be achieved.
2-8. Perform measurement quietly in a relaxed position.
2-9. Do not wind the cuff over jacket or sweater sleeve, or measurement cannot be done.
2-10. Keep in mind that blood pressure naturally varies from time to time throughout the day and also is affected by lots of different factors such as smoking, alcohol consumption, medication and physical activity.
2-11. People with a condition that causes circulatory problems (diabetes, kidney disease, arteriosclerosis or poor peripheral circulation) may get lower readings with this monitor than with a blood pressure monitor that is used on the upper arm. Please consult your physician to determine if your wrist blood pressure accurately reflects your actual blood pressure.
2-12. Blood pressure measurements taken with the unit are equivalent to those obtained by a trained observer using the cuff / stethoscope auscultation method and are within the accuracy limits prescribed by the American National Standard for Electronic or Automated Sphygmomanometers.
3. Device Description
3-1. Name of the parts
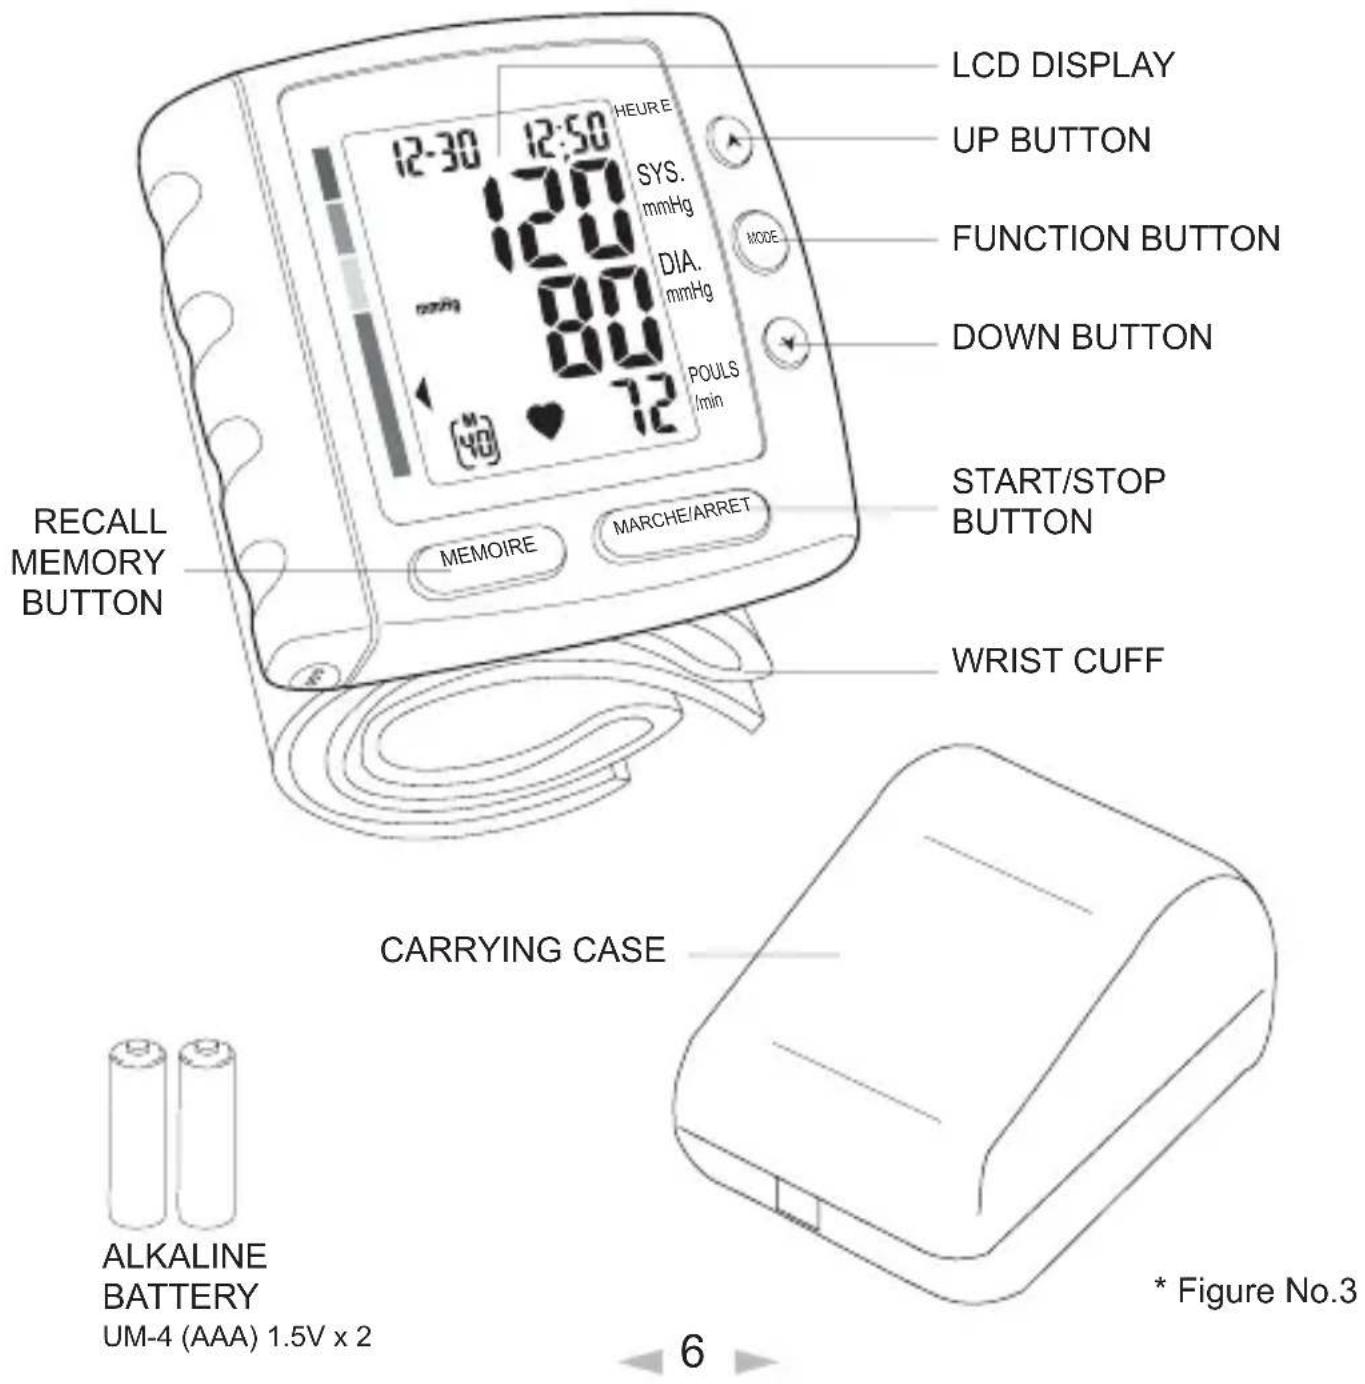
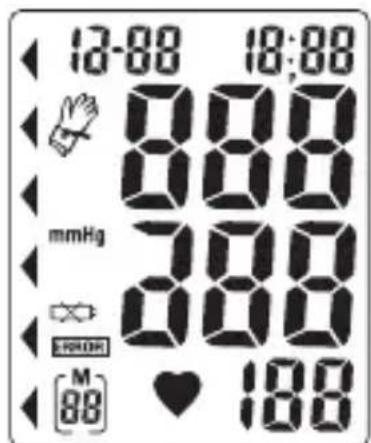
3-2. Description of display symbols
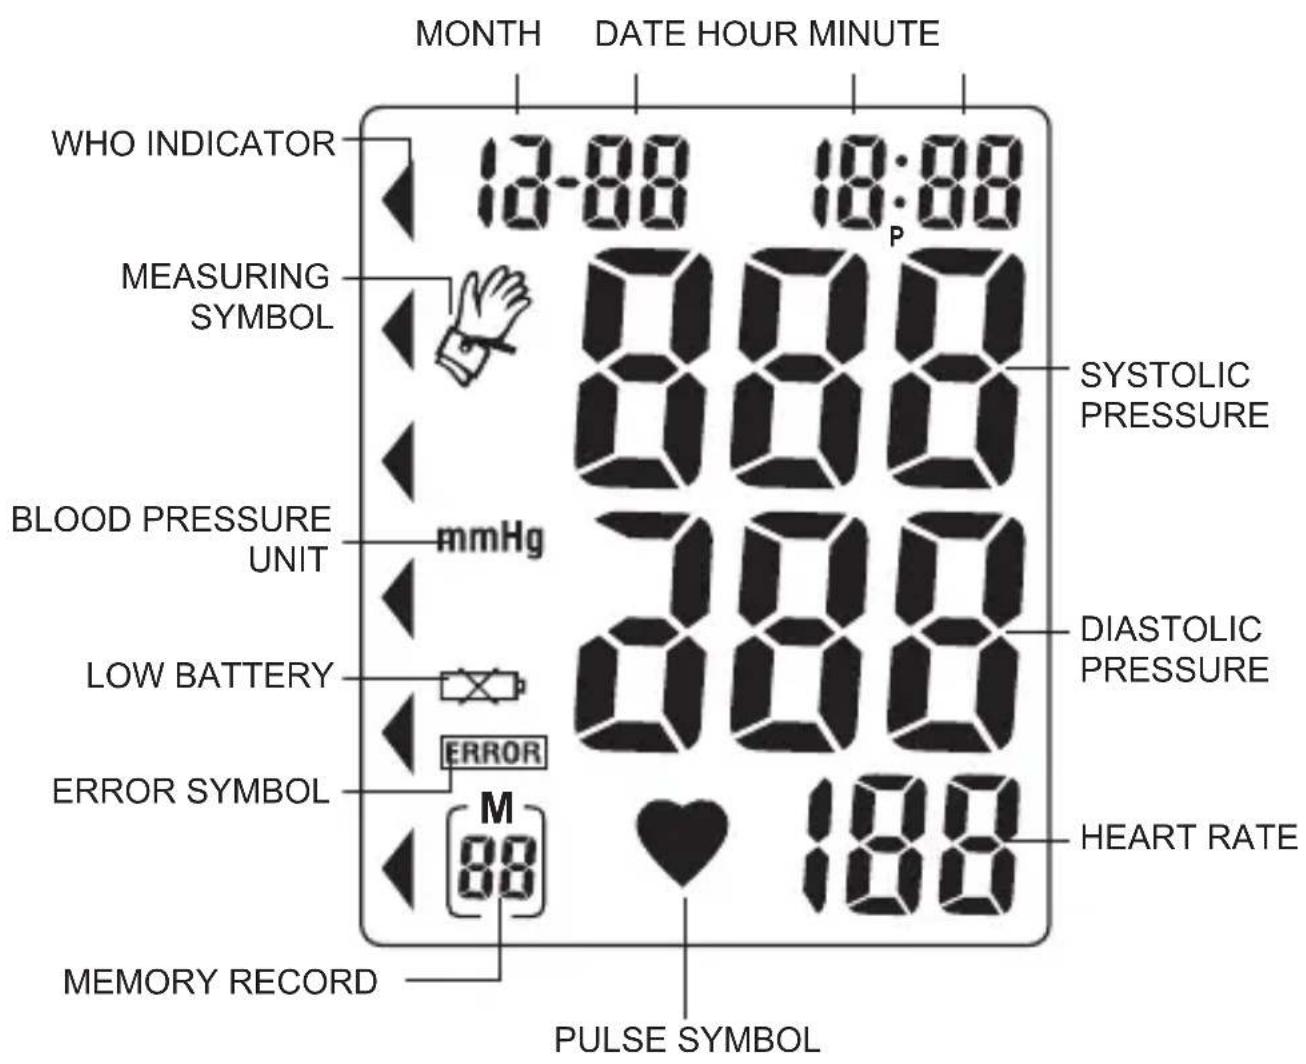
* Figure No.4
4. Main feature: WHO Risk Category Indicator
WHO Risk Category Indicator
This device is equipped with WHO Risk Category Indicator which classifies your blood pressure measurements into six stages (Optimal to Severe hypertension based on WHO classification on blood pressure levels as shown in below chart:
| Stages of blood pressure levels S | Systolic (in mmHg) | Diastolic (in mmHg) | Recommendation | |
| Grade 3 | Severe hypertension ≥180 | ≥110 | Reconfirm immediately and repeat BP in one day and again within one week depending on clinical situation. | |
| Grade 2 | Moderate hypertension | 160~179 | 100~109 | Serial blood pressures repeated within one month |
| Grade 1 | Mild hypertension 140~159 | 90~99 | Lifestyle modifications and recheck within 2 months | |
| 130~139High-normal 85- | 8 lifestyle modifications and recheck within 1 year | |||
| Normal | 120~129 | 80~84 | Recheck within 2 years (for > 75 years old, should have annual health check) | |
| <120Optimal | <80 | Recheck within 2 years (for > 75 years old, should have annual health check) | ||
*Source: MOS, 1999
After each measurement is completed, the LCD display will show your position automatically on the six segments of the bar indicator which corresponds to WHO Risk Category Indicator.
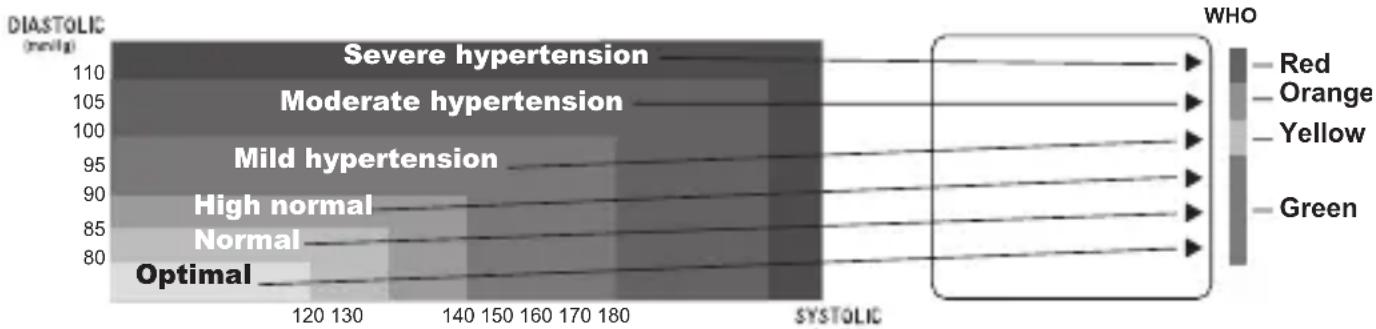
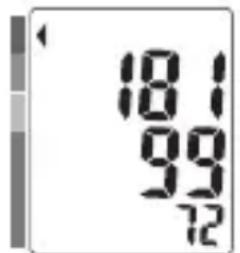
*Note!
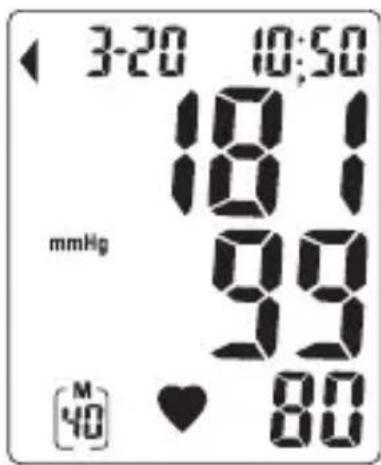
When a person's systolic and diastolic pressures fall into dierent categories, the higher category should apply.
e.g. systolic rate 181 & diastolic rate 99
the result should be in Red category (Severe hypertension)
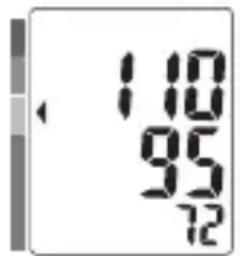
systolic rate 110 & diastolic rate 95
Yellow category (Mild hypertension)
*Note!
The WHO Risk Category indicator chart is only to be used as a guide in understanding non-invasive blood pressure measurements. We recommend you to consult your physician for proper diagnosis or seek medical advice according to your blood pressure level. Please note that the device should not be used to diagnose hypertension, and it is only for reference on your blood pressure monitoring.
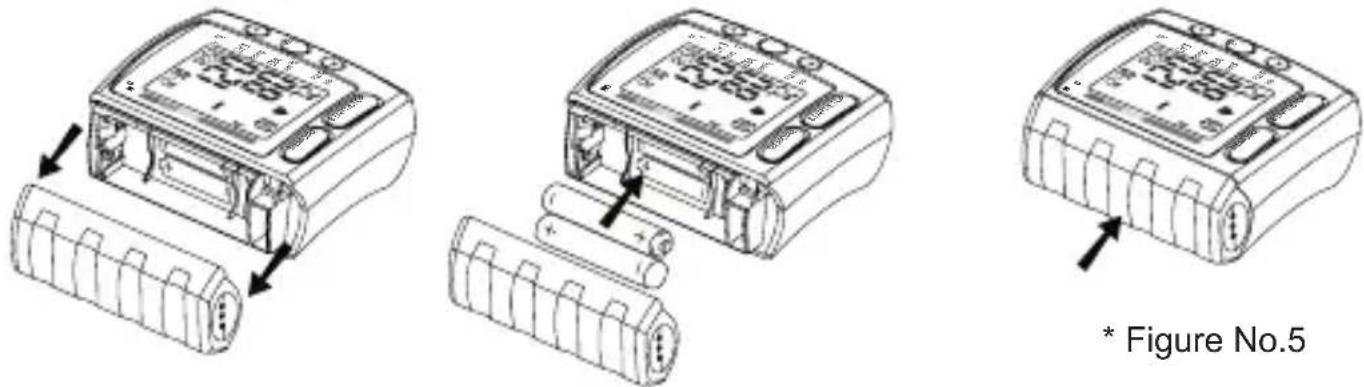
5. Changing Batteries
Remove the battery cover at the side of the unit and insert batteries into the battery compartment as shown, taking extreme care that the polarities + and - are observed.
Important notice: You might encounter difficulties to take the batteries out. If so, use a hard and tiny object such as a pen or others for help.
*Attention!
- Battery is a hazardous waste. Do not dispose it together with the household garbage.
6. Attaching Pressure Cuff
6-1. Wrap the pressure cuff around the left wrist.
A. The display of the unit should be placed on the palm side of the wrist.
B. The wrist should be bare.
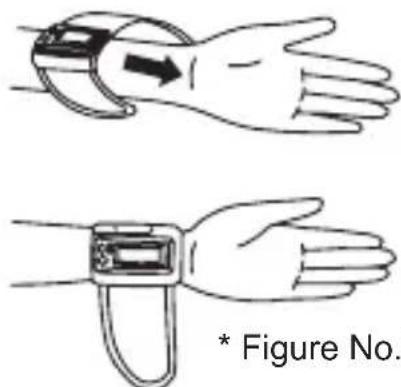
6-2. Fasten the pressure cuff snugly.
A. Do not pull strongly on the pressure cuff.
B. Do not make the pressure cuff too tight.
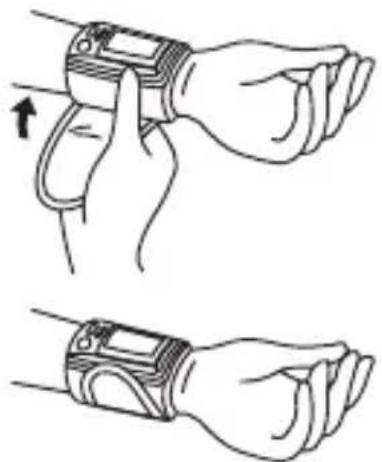
* Figure No.6
7. Correct Measurement Position
7-1. To get accurate measurements, make sure the cuff is at the same height as the heart. Having the cuff higher or lower may cause inaccurate results.
7-2. Measurement while sitting down:
A. Place your elbow on a table or other object (such as the carrying case).
B. Use the armrest to position the arms so that the pressure cuff is at the same height as the heart.
C. Relax your hand with the palm facing up.
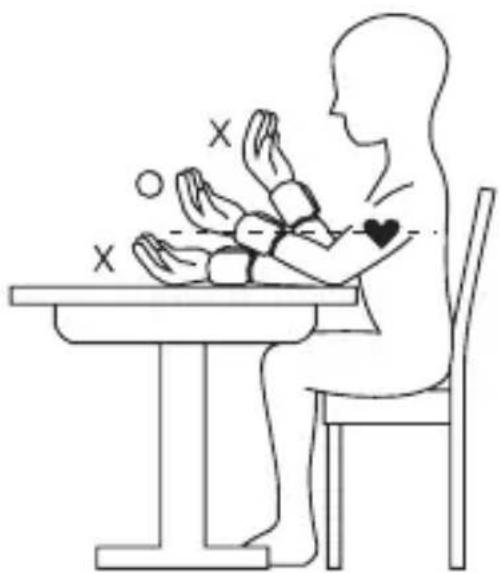
* Figure No.7
8. How to Measure
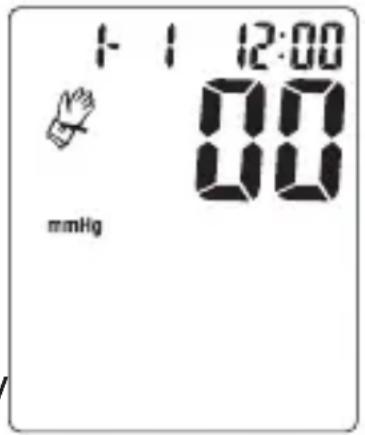
8-1. Inserting batteries in position:
A. Open battery cover.
B. Refer to the picture in positioning batteries. (Figure No.5)
C. All segments will appear on the display in 3 seconds.
D. Display 1 month 1 date, 12 hour 0 minute.

8-2. Setting Date and Time:
A. Press "MODE" button ("month" starts flashing)
Press "▲" or "▼" button to set the correct month (1, 2, 3,..., 12)
B. Press "MODE" button again ("date" starts flashing) Press "▲" or "▼" button to set the correct date
C. Press "MODE" button again ("hour" starts flashing) Press "▲" or "▼" button to set the correct hour in 12-hour format
D. Press "MODE" button again ("minute" starts flashing) Press " " or " " button to set the correct minute (0,1,2,3,...59)
E. Press "MODE" button again to switch to normal time (month, date, hour and minute appear on the display)
F. Device is ready to start measurement.
8-3. Steps to take blood pressure measurement:
A. Wrap the cuff around the wrist (Refer to Attaching Pressure Cuff as Figure No. 6)
B. Sit upright on the chair to have correct posture (Refer to Correct Measurement Position as Figure No. 7)
C. Press "▲" or "▼" button to select a particular number. Press "MARCHE/ARRET" button to start measurement. The monitor will automatically inflate to the level that is right for you.
- When taking repeat measurements, make sure to select the same particular number before pressing "MARCHE/ARRET" button so that the measurement is registered to the appropriate memory.
*Note!
- Do not move or talk during measurement.
D. After the air pressure is increased, it will slowly be decreased. When the pulse rate is detected, POULS symbol will start flashing.
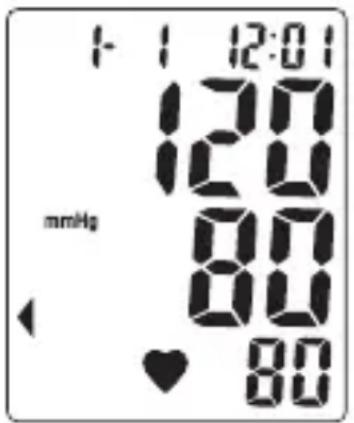
E. After taking blood pressure measurement, the systolic rate, diastolic rate will be on the display for 1 minute; and then the device will automatically go to standby mode if without any operation.
8-4. Storing, recalling, and erasing measurement data:
A. Storing data:
After each blood pressure measurement, the Systolic rate, Diastolic rate, heart pulse rate, time and date will be automatically stored. Each database holds the latest 40 measurements. If more than 40 measurements, the memory will automatically clear out the earliest data.
B. Recalling data:
- Press "▲" or "▼" button to select a particular number.
Press the "MEMOIRE" button.
If there is no data stored in the memory, nothing will appear on the display.
If there is data stored in the memory, the latest recorded set of measurement will appear.
-
Then press "▲" or "▼" button to review and scroll through the stored data from the latest measurement to the earliest one.
-
To stop reading memory, press "MARCHE/ ARRET" button. (system switches to standby mode).

C. Erasing data:
- Press "▲" or "▼" button to select a particular number.
Press "MEMOIRE" button.
- Press "MODE" and "▲" buttons
simultaneously, all stored data in your selected memory zone will be erased.
- To check if the data is erased, press
"MEMOIRE" button, no data should appear on the screen.
L8
8-5. To change batteries:
When " " symbol appears on the display, the battery is weak. Change the batteries or it will not be able to take blood pressure measurement.
Take out used batteries and put in 2 pieces of new Alkaline batteries.
*Attention!
- All batteries used must be the same type. Do not mix alkaline, standard(carbon-zinc) or rechargeable (cadmium) batteries.
- Do not mix old and new batteries.
*Note!
When batteries are changed, all stored data will not disappear.
9. Maintenance
9-1. Clean the device body, case and the cuff carefully with a clean, soft and slightly dampened cloth and then wipe them dry with another piece of dry cloth.
9-2. Do not use thinner, alcohol, petrol (gasoline) or any strong cleansers to clean.
9-3. Do not wash the cuff or make it wet, and never use chemical cleaner on it.
9-4. Make sure no water will enter the main unit.
9-5. When the unit is not to be used for a long time, remove the batteries. (Leaking of battery liquid can cause damage.)
10. Safe-keeping
10-1. Always keep the unit in the carrying case after its use.
10-2. Do not place the item directly under the sunlight, in high temperature, or humid and dusty places.
10-3. Do not store in extremely low (less than -20^ ) or high (more than 70^ ) temperature.
11. To prevent malfunction
11-1. Do not in any way twist the wrist cuff
11-2. Do not start the air pressure when the wrist cuff is not wrapped around the wrist.
11-3. Do not attempt to disassemble or change any parts of the monitor including wrist cuff.
11-4. Do not drop or strongly shock the unit.
11-5. Do not operate the unit close to devices, such as cellular or mobile phone, which are working on radio frequency.
12. Warning
12-1. The unit measures the blood pressure of adult only.
12-2. The unit should not be operated by children in order to avoid hazardous situations.
12-3. The unit is not supposed to be used if your wrist has any wound or injury.
12-4. In case the cuff kept pumping up non-stop, open the cuff at once.
12-5. To interrupt the measurement, you may press the "START/ STOP" button. The cuff will deflate immediately after a button is pressed.
13. Display Messages/Troubleshooting
| Display symbol | Condition/Cause Corrective action | |
| Pulse symbol | Symbol appears in the measurement condition and flashes when pulse is detected. | Measurements in progress. Do not talk or move. |
| Battery symbol | Appears when the battery voltage is excessively low. | Replace all two batteries with new ones. |
| Measuring error symbol | Appears when the accurate blood pressure could not be obtained. | Press "MARCHE/ARRET" button again and re-measure. Or check cuff if wrapped properly around the wrist according to instructions. Check palm if exerting effort. Check if there was movement during measurement. Check if posture is correct. |
| Measuring blood pressure symbol | Appears all the time till the measurement is completed. | |
14. Specifications
| Model Number | 0098-N |
| Method of Measurement | Oscillometric |
| Range of Measurement | Pressure 0 ~ 300 mmHg, Pulse 40 ~ 199 beats/minute |
| Accuracy Calibration | Pressure +/- 3 mmHg, Pulse +/- 5% |
| Fuzzy Pressure | Automatic Re-inflation pump system |
| Inflation | Automatic inflation (Air Pump) |
| Deflation of Pressure | Automatic air release control valve |
| Exhaust | Automatic exhaust valve |
| Display | Liquid Crystal Digital Display |
| Unit Weight | Approx. 137 g including batteries |
| Sets of Memory | 3 databases of 40 memory each = total 120 sets |
| Cuff Size | Wrist circumference approx. 135 ~ 195 mm |
| Operating Conditions | +10 °C to + 40 °C, less than 85% R.H. |
| Storage Conditions | - 20 °C to + 70 °C, less than 85% R.H. |
| Power Supply | AAA (1.5 V) Alkaline battery x 2 |
| Battery Life | Approx. 250 times measurement |
| Accessories | Carrying case, instruction manual, 2pcs”AAA” (1.5 V) battery |
| These specifications are subject to change without notice for purpose of improvement. | |
Note
CE 0197 This blood pressure monitor complies with the EC Directive and bears the CE mark. This blood pressure monitor also complies with mainly following standards (included but not limited):
Safety standard:
EN 60601-1 Medical electrical equipment part 1: General requirements for safety
EMC standard:
EN 60601-1-2 Medical electrical equipment part 1-2: General requirements for safety- Collateral standard: Electromagnetic compatibility- Requirements and tests
Performance standards:
EN 1060-1 Non-invasive sphygmomanometers - General requirements
EN 1060-3 Non-invasive sphygmomanometers - Supplementary requirements for electromechanical blood pressure measuring systems.
EN 1060-4 Non-invasive sphygmomanometers - Test procedures to determine the overall system accuracy of automated non-invasive sphygmomanometers.

Important /Note!
Read the operating instructions.

Consult instructions thoroughly before use.
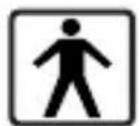
BF
Classification:
- Internally powered equipment
- BF type applied part
- IPX0
- Not suitable for use in presence of flammable anaesthetic mixture with air or with Oxygen or nitrous oxide
- Continuous operation with short-time loading
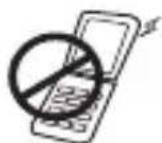
To avoid inaccurate results caused by electromagnetic interference between electrical and electronic equipments, do not use the device near a cell phone or microwave oven.
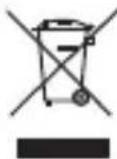
Discard the used product to the recycling collection point according to local regulations.
ECREP
Authorized Representative in the European Community EMERGO EUROPE
Molenstraat 15, 2513 BH, The Hague, The Netherlands
TEL: +31-70-3458570 FAX: +31-70-3467299
Imported by:
This device is warranted to be free from manufacturing defects for a period of 2 years from the date of purchase. Within the warranty period, should there be any manufacturing defect found and repair is needed, please contact your local distributor accordingly.
Please note warranty does not cover damage caused by, including but not limited: misuse or abuse; accident; the attachment of any unauthorized accessory; alteration to the product; improper installation; unauthorized repair or modification; improper use of electrical/ power supply; dropped product; failure to follow required maintenance and sake-keeping; transportation damage.
To ensure precise measurement reading, recalibration of the device is recommended after 2 years from the date of purchase. Shipping plus handling cost and recalibration service fee shall be charged accordingly.
Appendix:
| Guidance and manufacturer's declaration - electromagnetic emissions | ||
| The device is intended for use in the electromagnetic environment specified below. The customer or the user of the device should assure that it is used in such an environment. | ||
| Emissions test | Compliance | Electromagnetic environment - guidance |
| RF emissions CISPR 11 | Group 1 | The device uses RF energy only for its inter function. Therefore, its RF emissions are very low and are not likely to cause any interference nearby electronic equipment. |
| RF emissions CISPR 11 | Class B | The device is suitable for use in all establishments including domestic establishments and those directly connected to the public low-voltage supply network that supplies buildings used domestic purposes. |
| Harmonic emissions IEC 61000-3-2 | Not applicable | |
| Voltage fluctuations/ flicker emissions IEC 61000-3-3 | Not applicable | |
| Guidance and manufacturer's declaration - electromagnetic immunity | |||
| The device is intended for use in the electromagnetic environment specified below. The custo or the user of the device should assure that it is used in such an environment. | |||
| Immunity test | IEC 60601 test level | Compliance level | Electromagnetic environment - guidance |
| Electrostatic discharge (ESD) IEC 61000-4-2 | ±6 kV contact ±8 kV air | ±6 kV contact ±8 kV air | Floors should be wood, concrete or ceramic tile. If floors are covered with synthetic material, the relative humidity should be at least 30 %. |
| Power frequency (50/60 Hz) magnetic field IEC 61000-4-8 | 3 A/m | 3 A/m | Power frequency magnetic fields should be at levels characteristic of a typical location in a typical commercial or hospital environment. |
| The device is intended for use in the electromagnetic environment specified below. The customer or the user of the device should assure that it is used in such an environment. | |||
| Immunity test | IEC 60601 test level | Compliance level | Electromagnetic environment - guidance |
| Conducted RF IEC 61000-4-6 Radiated RF IEC 61000-4-3 | 3 Vrms 150 kHz to 80 MHz 3 V/m 80 MHz to 2,5 GHz | 3 Vrms 3 V/m | Portable and mobile RF communications equipment should be used no closer to any part of the device, including cables, than the recommended separation distance calculated from the equation applicable to the frequency of the transmitter. Recommended separation distance d = 1,2 √p d = 1,2 √p 80 MHz to 800 MHz d = 1,2 √p 800 MHz to 2,5 GHz where P is the maximum output power rating of the transmitter in watts (W) according to the transmitter manufacturer and d is the recommended separation distance in metres (m). Field strengths from fixed RF transmitters, as determined by an electromagnetic site survey should be less than the compliance level in each frequency rangeb) Interference may occur in the vicinity of equipment marked with the following symbol: (()) |
| NOTE 1 At 80 MHz and 800 MHz, the higher frequency range applies. NOTE 2 These guidelines may not apply in all situations. Electromagnetic propagation is affected by absorption and reflection from structures, objects and people. |
| a). Field strengths from fixed transmitters, such as base stations for radio (cellular/cordless) telephones and land mobile radios, amateur radio, AM and FM radio broadcast and TV broadcast cannot be predicted theoretically with accuracy. To assess the electromagnetic environment due to fixed RF transmitters, an electromagnetic site survey should be considered. If the measured field strength in the location in which the device is used exceeds the applicable RF compliance level above, the device should be observed to verify normal operation. If abnormal performance is observed, additional measures may be necessary, such as reorienting or relocating the device. b). Over the frequency range 150 kHz to 80 MHz, field strengths should be less than 3 V/m. |
| Recommended separation distances between portable and mobile RF communications equipment and the device | |||
| The device is intended for use in an electromagnetic environment in which radiated RF disturbances are controlled. The customer or the user of the device can help prevent electromagnetic interference by maintaining a minimum distance between portable and communications equipment (transmitters) and the device as recommended below, accor the maximum output power of the communications equipment. | |||
| Rated maximum output power of transmitter W | Separation distance according to frequency of transmitter m | ||
| 150 kHz to 80 MHz d = 1,2√P | 80 MHz to 800 MHz d = 1,2√P | 800 MHz to 2,5 GHz d = 2,3√P | |
| 0,01 | 0,12 | 0,12 | 0,23 |
| 0,1 | 0,38 | 0,38 | 0,73 |
| 1 | 1,2 | 1,2 | 2,3 |
| 10 | 3,8 | 3,8 | 7,3 |
| 100 | 12 | 12 | 23 |
For transmitters rated at a maximum output power not listed above, the recommended separation distance d in metres (m) can be estimated using the equation applicable to the frequency of the transmitter, where P is the maximum output power rating of the transmitter in watts (W) according to the transmitter manufacturer.
NOTE 1 At 80 MHz and 800 MHz, the separation distance for the higher frequency range applies.
NOTE 2 These guidelines may not apply in all situations. Electromagnetic propagation is affected by absorption and reflection from structures, objects and people.