ARF170BE - Digital photo frame AKAI - Free user manual and instructions
Find the device manual for free ARF170BE AKAI in PDF.
| Product type | Digital photo frame |
| Brand | AKAI |
| Model | ARF170BE |
| Screen | 7-inch TFT LCD screen, 16:9 format, 480x234 pixel resolution, 300:1 contrast, 250 cd/m² brightness |
| Power supply | 110V-240V~50-60Hz, standby power consumption 2W, operating power consumption 8W |
| Dimensions (with stand) | 213 x 219 x 78 mm |
| Weight | 504 g |
| Compatible formats | JPEG, MP3, WMA, MPEG4, XviD, AVI, MPEG-1/2 |
| Card reader | 4-in-1: MS, SD, MMC, XD (H version) |
| Internal memory | 16 MB, capacity up to 15 favorite photos |
| Main functions | Photo display, music, video, photo+music slideshow, calendar, clock, alarm with snooze function, weather station (temperature, humidity, weather pictograms) |
| Speakers | Stereo 2 x 2W (2 x 1W RMS) |
| Remote control | Credit card type, CR2025 battery included |
| Weather station | Display of temperature, humidity, forecasts by pictograms, 12/24h clock, calendar, alarm with chime |
| Maintenance and cleaning | Unplug the device before cleaning. Use a clean, slightly damp cloth. |
| Safety | Do not open the casing, avoid contact with liquids, do not expose to rain or moisture. Unplug during thunderstorms or prolonged non-use. |
| Spare parts and repairability | Call a qualified technician for any repairs. Only use parts specified by the manufacturer. |
| General information | User manual included. Table stand provided. 3.5 mm jack to RCA audio/video cable provided. |
Frequently Asked Questions - ARF170BE AKAI
User questions about ARF170BE AKAI
0 question about this device. Answer the ones you know or ask your own.
Ask a new question about this device
Download the instructions for your Digital photo frame in PDF format for free! Find your manual ARF170BE - AKAI and take your electronic device back in hand. On this page are published all the documents necessary for the use of your device. ARF170BE by AKAI.
USER MANUAL ARF170BE AKAI
natural_image
Black triangular warning symbol with exclamation mark (no text or numbers)natural_image
Symbol of a trash bin crossed with a diagonal line, no text or labels present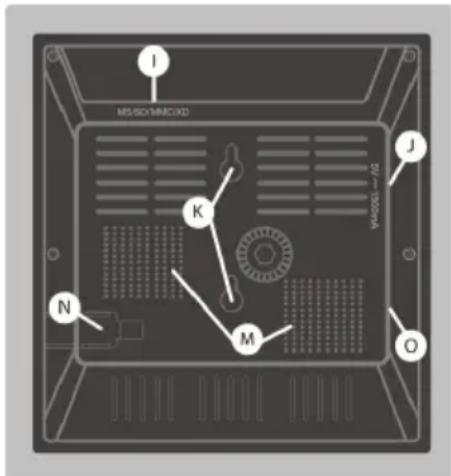

O.S.D (On Screen Display) Multi-langues
Carte mémoire
natural_image
Symbol of a trash bin with crossed lines indicating no waste or restriction (no text or labels)1 General 23
2 Contents.... 23
3 Product description.... 24
4 Remote description ......25
5 Use.... 26
6 Using the internal memory ....30
7 Adjusting time and date.... 32
8 Music alarm ....33
9 Factory reset ....33
10 Weather station ....34
General
Thank you for choosing this digital photo frame. We believe you will be fully satisfied with this product. The installation and settings are extremely simple.
As any other product equipped with an LCD screen, your digital photo frame is fragile. Make sure you take good care of it as the warranty does not cover mechanical damages due to a shock or being dropped.
To clean your digital photo frame or its remote, do not use any liquid or detergent. A dry or slightly humidified cloth will do perfectly to remove dust.
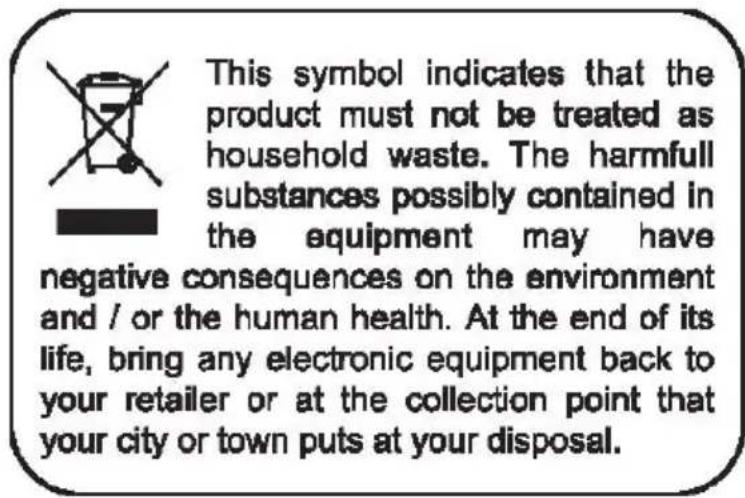
The remote is delivered with a CR2025 pre-installed battery. Before using the remote, pull the plastic strip to activate the battery. The digital photo frame is also delivered with a LR44 battery for the weather station. Please do not dispose of used batteries in your domestic bins. You should bring them back to your point of sale and place them in the right container.
In order for the product to work properly, please ensure you follow this instructions manual. Any additional function on the frame that is not described in this manual cannot be guaranteed. Some functions have also been disregarded as they are not considered essential.
This digital photo frame is compatible with the following cards formats: MMC (Multi Media Card), SD (Secure Digital), MS-PRO (Memory Stick PRO) and XD Picture Card (version H).
Table of Content
1 x digital photo frame
1 x remote control with CR2025 battery
1 x 5V power adaptor
1 x AV cable
1 x stand
1 x user manual
Description
A MENU – to access to the main menu
B ENTER – to validate a choice
C Infra-red receiver (detects the remote control signal)
D Weather station display screen
E ◀ ▶ ▲ ▼ - to navigate the menu and modify vairous parameters
F MODE, SET, ADJ, SNOOZE – to adjust parameters for the weather station
G 7" LCD screen
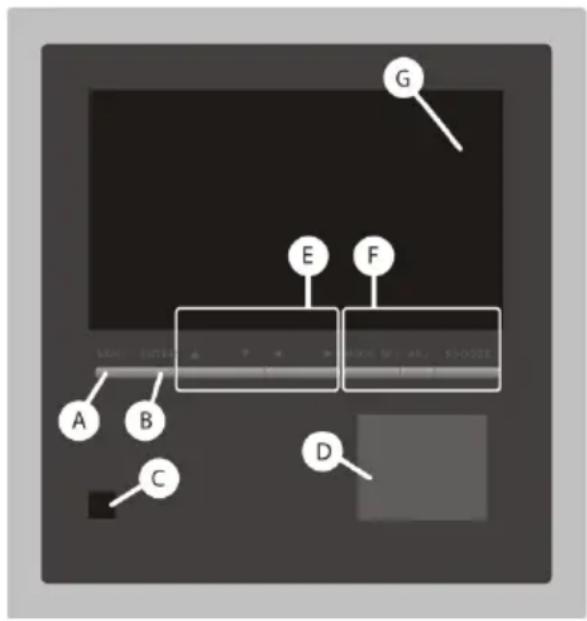
I MS/SD/MMC and XD cards reader
J Mains input
K Wall mounting hole
M Speakers
N Battery compartment for weather station
U AV output
Remote Description
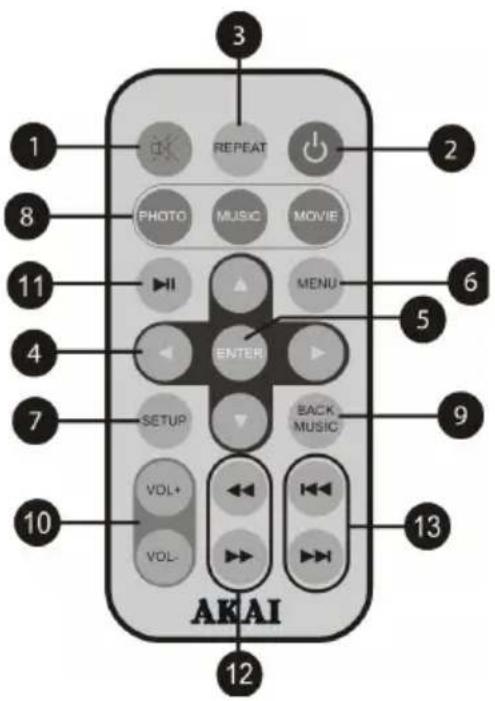
1- Press 🔗 key once to stop the sound and a second time for the sound to return.
2- Press ☑key to put the receiver on standby or switch it on.
3- Press REPEAT key to adjust the repetition mode for photo, audio and video files.
4- Press ◀ keys to navigate in the menus and modify various parameters.
5- Press ENTER key to validate a choice.
6- Press MENU key to access the main menu.
7- Press SETUP key to access the settings menu.
8- Press PHOTO, MUSIC and MOVIE keys to immediately play photos, songs and movies.
9- Press BACK MUSIC key – to start displaying photos accompanied with music.
10- VOL+ / VOL keys to adjust the sound level.
11- Press ▶key to play a file (photo, song or movie) or to pause it. If the file is paused press again to continue playing.
12- Backward ◀ and Forward ▶
13- Previous ◀ and Next ▶s
USE
As soon as you switch on your digital photo frame, the screen will display the menu.
Insert a memory card containing images, songs or movies. Your digital photo frame is then ready to use.
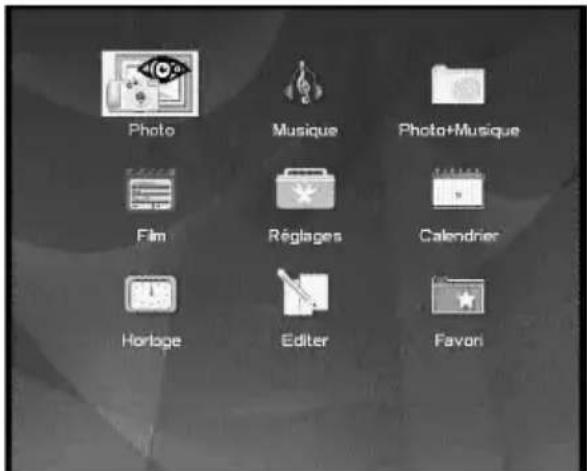
A - Photo To display photos on your digital photo frame, select the Photo icon in the main menu and press the ENTER key.
If there are no photos on the card, or that no memory support is connected to the digital photo frame, the main menu will be displayed again after a small charging time.
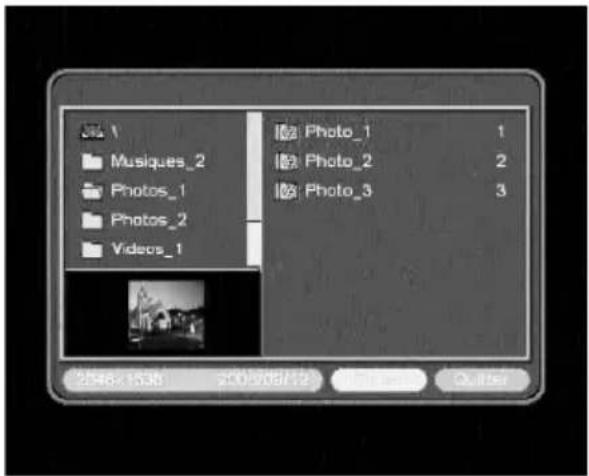
If there are photos on the card, the digital photo frame will display its files navigator and will select the first file containing photos.
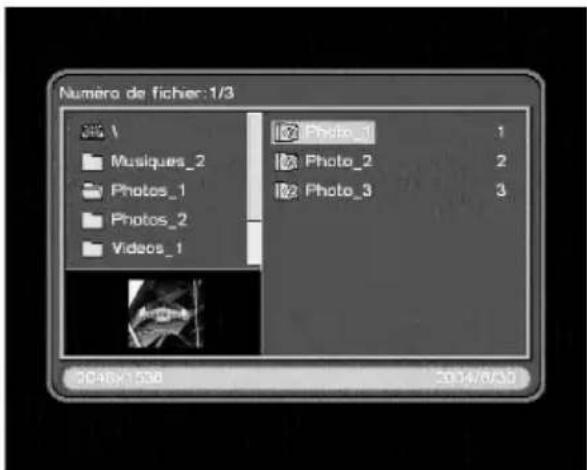
To go from one photo to another, use the ▲and▼arrows.
A miniature version of the photo is displayed at the bottom left of the screen. The date and resolution of the photo will appear in the information area at the bottom of the screen.
To display the images in full screen, press the ENTER. The digital photo frame will then display the photos from the file in the form of a slide show.
To stop the photos slide show, press the PHOTO key (to go back to the photos folder as long as the automatic photo slide show is not activated. See note 2 further down) or the MENU key (to go back to the main menu).
To select another file of photos in the navigator menu, press the ◀key and then use the ▲and ▼ arrows to go from one file to another.

The digital photo frame is only compatible with images in JPEG format.
Note 1 : The PHOTO key on the remote allows you to access the photo files directly.
Note 2 : By activating the photos slide show, the photos will be automatically displayed when you select the Photo file.
In order to do so, go to the Setup menu, press the ▶key to select Auto-Play, then press the ▼key to select Photo. Then successively press the ▶and▲ keys to select ON. Press ENTER to validate the parameter. Select Exit using the ◀and ▶keys and then leave the menu by pressing the ENTER key.
Note 3 : In the Setup / Photo menu, you can also adjust the display time for the photos as well as choose a transition effect between each photo. By default each photo is displayed for 10 seconds and no transition effect is activated.
B - Music
To play music on your digital photo frame, select the Music icon in the main menu and press the ENTER key.
Note : The MUSIC key allows you to access directly to the music contents.
If there are no audio files on the card, or that no memory support is connected to the digital photo frame, the main menu will be displayed again after a small charging time.
If there are audio files on the card, the digital photo frame will display its files navigator and will select the first audio file. You can then select a song using the ▲and ▼arrows.
To play the selected audio file, press the ENTER key.
Whilst a music file is being played, you can select another and start playing it by pressing ENTER.
There is no STOP key : in order to stop a song, either change mode (MENU, SETUP, PHOTO, ...) or switch off the device.
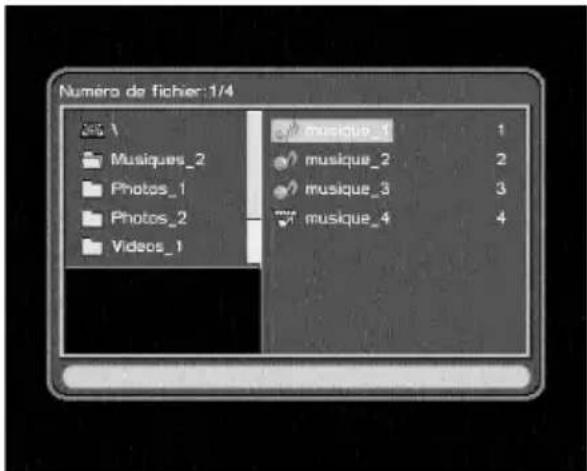
To select another audio file in the navigator menu, press the ◀key and then use the ▲and ▼arrows to go from one file to another.
Note : By activating the automatic music reader in the Setup / Auto-Play / Music menu, the songs will be automatically played when you select the Music file.
C - Photo + music
Your digital photo frame can display photos whilst playing some background music.
To launch this display mode, select the Photo+Music icon in the main menu and press the ENTER
To stop the photos slide show, press the MENU key. The main menu will be displayed.
D - Video
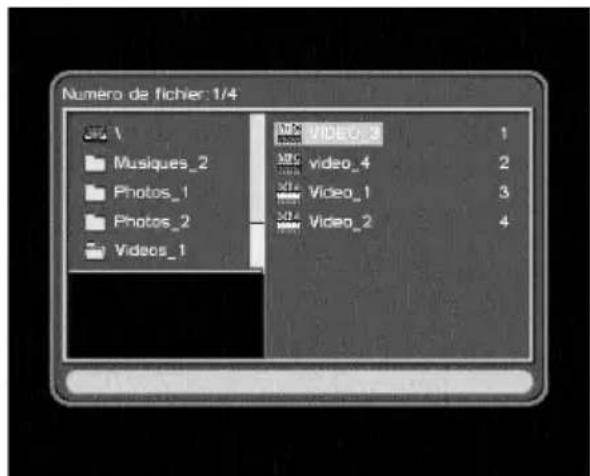
To watch videos on your digital photo frame, select the Video icon in the main menu and press the ENTER key.
If there are no video files on the card or the USB key, or that no memory support is connected to the digital photo frame, the main menu will be displayed again after a small charging time.
If there are video files on the card or the USB key, the digital photo frame will display its files navigator and will select the first video file. You can then select a movie using the ▲and ▼ arrows.
To select another video file in the navigator menu, press the ◀key and then the use the ▲ and ▼ arrows to go from one file to another.
To play the video, press the ENTER Key.
To stop playing the video, press the MENU key (to go back to the main menu).

The digital photo frame is compatible with most AVI and MPEG files. It is possible that some files may not be read, either because they are using unknown files or because they need a debit that is too high.
Note 1 : The MOVIE key on the remote allows you to access the video files directly. Note 2 : By activating the automatic video files reader in the Setup / Auto-Play / Video menu, the videos will be automatically played when you select the Video file.
Using the internal memory
Thanks to its internal memory, you can display photos without plugging a memory card into the digital photo frame. In order to do so, select the Favourite option in the main menu. When the digital photo frame comes out of the factory there are 3 photos already installed which you can delete and replace by yours (up to 15 photos) by following the next few steps.
A - Deleting
To delete the photos already saved in the memory of the digital photo frame, go to Edit / Delete in the main menu.
In the Deleting Mode menu, select the photo by positioning the yellow frame on it using the ▶ and ▶ arrows and the press ENTER to delete the photos.
To delete all the photos in one go, press the ▼key and select Delete All using the ◀ and arrows. Validate by pressing ENTER.
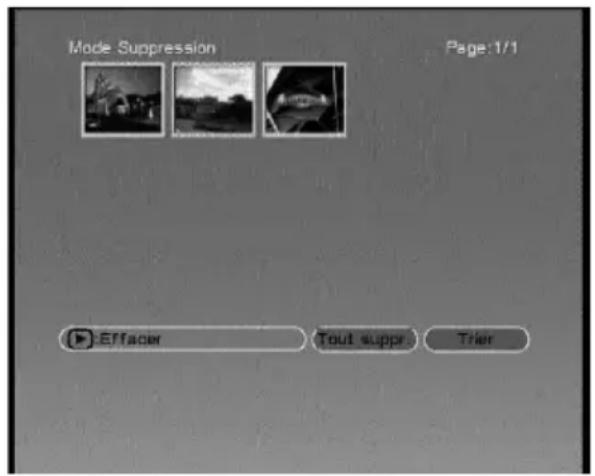
To leave this menu at any time, press the MENU key.

Deleting the photos is final. There is no backup.
B - Transferring photos to the internal memory
To add photos to the Favorite file, go to the menu Edit / Copy. The files navigator is now displayed.
Select a photo with the ▲ and arrows and then press ENTER.
When a photo is selected, the file name is framed in red. You can select up to 15 photos in one go, even if they are in different folders.
To add the photo to the Favorite file, press the ▶arrow to go the menus task bar at the bottom of the screen. Press the ◀arrow to select Copy. Copy the photo by pressing ENTER.
Once you have saved your favourite photos, leave the menu by selecting Exit from the task bar at the bottom of the screen.
Adjusting date and time
A - Calendar In the menu
Calendar / Calendar, you can also adjust the date and view a monthly calendar.
Use the ▲and ▼arrows to change the month. Use the ◀and ▶arrows to change the year.
In the menu Calendar / Set Date, use the ◀ and ▶ keys to select the day, month or year. The adjust the parameter by using the ▲ and ▼ arrows.
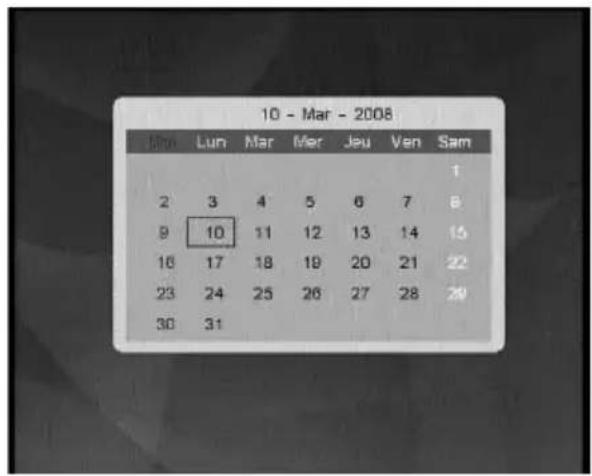
When the date has been updated, press ENTER to validate.
B - Clock
To display the clock, select the Clock icon and press ENTER.
To go back to the main menu, press the MENU key.
To adjust the time, go to the Setup menu, select Custom and select Set Time by pressing the ENTER key.
Use the ◀ and ▶ arrows to select the hour, the minutes or the seconds Then adjust the time by using the ▲ and ▼ arrows.
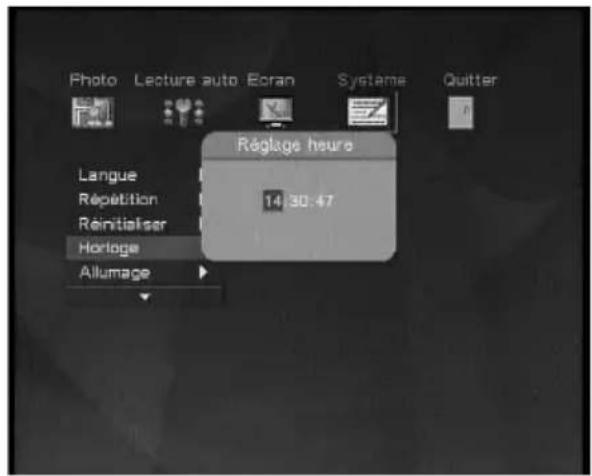
When the clock is up to date, press the ENTER key to validate.
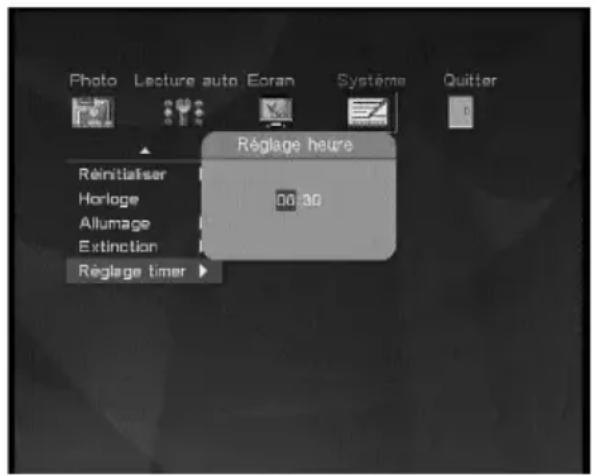
Alarm
Your digital photo frame has an internal clock that allows you to set a musical alarm. In order to do so, you should first set the clocI as indicated in the previous paragraph.
- Go to the Setup menu and select Custom / Set time.
- Press the ▶key to select Power On.
- Press ENTER to display the setting for the activation of the alarm call.
- Use the ▲ and ▼eys to adjust the time for your alarm.
- Then press the ▶key to select the minutes that you can then adjust using the ▲and arrow.
- When the time for your alarm is set, press the ENTER key to validate.
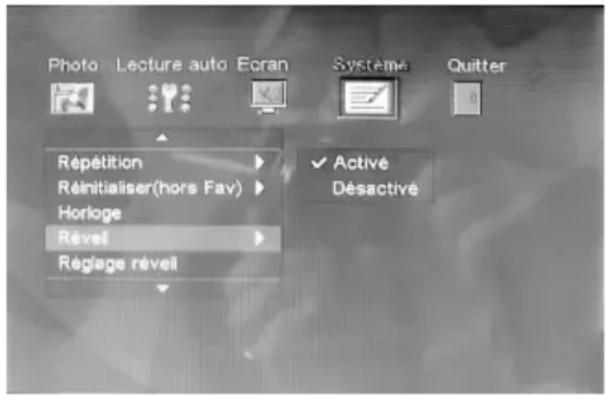
Then go to the Setup menu and select Custom / Power On Enable.
Press the ▶key and then the ▲key to select On.
Press OK to activate the alarm call.
Press ⏻ to put the digital photo frame on standby.
ALARM CLOCK
Go to SETUP menu and select
CUSTOM / Alarm Enable.
Press ▲▼ to On or Off the alarm.
Go to SETUP menu and select
CUSTOM / Alarm Time.
Press ◀ ▶ ▲ ▼ to set the alarm time.
When the alarm is activated, a ring
Sound will occur.
To stop the alarm completely, press ENTER on both frame of remote control. To snooze the alarm, press MENU, ◀ ▶ ▲ ▼ keys on the front panel of the frame, or any other keys on the remote control. The alarm is then on standby for 5 minutes.
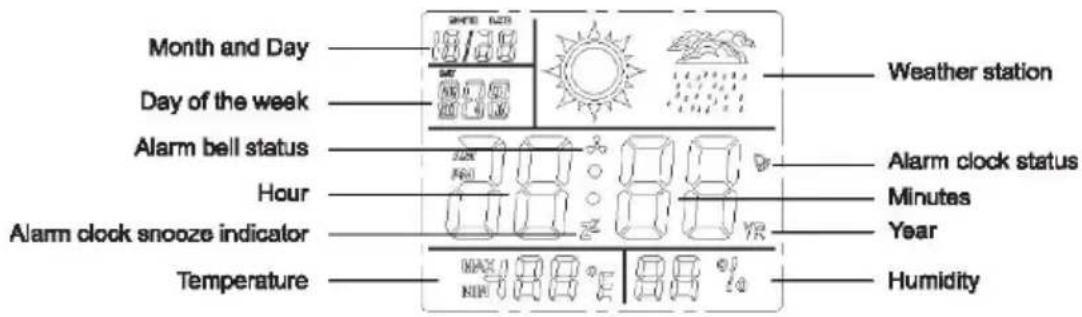
Weather Station
A - Features
The weather station has the following features :
- Hour
- Date
- Temperature (minimum and maximum)
- Humidity (minimum and maximum)
- Weather station
- Alarm clock
B - Description
C - Inserting the Battery
The battery allows the weather station to save parameter such as the time, date and alarm clock settings.
To insert the battery in the weather station :
- Unscrew the battery compartment at the back of the digital photo frame.
- Insert the LR44 1,5V type battery (included) making sure you respect the polarity.
- When the battery is inserted, the product will beep and the screen of the weather station will indicate 12:00.
- Close the battery compartment and screw it back properly.
Note : To reset the weather station, simply take the battery out for 10 seconds and then place it back in the compartment.
D - Settings
The weather station has 3 display modes: Time, Clock and Calendar. To go from one mode to another, use the MODE key.
The Time mode is the default mode. When you access the Clock or Calendar modes, if no action is carried out during 20 seconds, then the weather station will go back to the Time.
a. Clock Mode
With this mode, the double points in between hours and minutes will flash.
You can modify the following parameters :
Time Format Display :
- Press the SET key for 2 seconds to access the time format display (12 hours or 24 hours).
- Then press the ADJ key to select the correct parameter.
- Once the setting has been made, press the MODE key to exit the settings menu.
Setting the time :
- Press the SET key for 2 seconds to access the time format display (12 hours or 24 hours).
- Then briefly press the SET key to access the clock settings.
- Adjust the time using the ADJ key.
- Press the SET key briefly again to select the minutes settings.
- Set the minutes using the ADJ key.
- Once the settings have been entered, press the MODE key to exit the settings menu.
Temperature and humidity records :
- Briefly press the ADJ key to view the maximum temperature and humidity.
- Briefly press the ADJ key a second time to view the minimum temperature and humidity.
- Briefly press the ADJ key a third time to display again the current temperature and humidity rate.
Resetting the temperature and humidity records :
- Press the ADJ key for 2 seconds.
- The beeping sound means that the minimum and maximum temperature and humidity have been adjusted based on current values.
Temperature Unit :
- Briefly press the SET key to go from Celsius to Fahrenheit.
b. Alarm Mode
Press the MODE key twice to access the Alarm mode. In this second mode, you can modify the following parameters.
In this mode, the double points between the hours and minutes will not flash, and ALM is displayed in the day of the week box.
Setting the alarm time:
- Press the SET key for 2 seconds to access the setting for the alarm time.
- Set the time using the ADJ key.
- Press again the SET briefly to select the minutes setting.
- Set the minutes with the ADJ key.
- Once the settings have been entered, press the MODE key to exit the settings menu.
Activating the alarm and bell :
- Press repetitively the ADJ key to activate one of the following modes (in order):
- Activated clock, deactivated bell.
- Deactivated alarm, activated bell.
- Activated alarm, activated bell.
-
Activated alarm, activated bell.
-
When the bell is activated, a beeping sound will occur on the hour every hour.
- To snooze the alarm bell, press the SNOOZE key. The bell is then on standby for 5 minutes.
To stop the alarm bell completely, press the MODE key.
c. Calendar Mode Press the MODE key three times to access the Calendar mode. In this third mode, you can modify the following parameters.
In this mode, the year is displayed instead of the time.
- Press the SET key for 2 seconds to access the year settings.
- Set the year using the ADJ key.
- Briefly press the SET key again to select the month settings.
- Set the month using the ADJ key.
- Briefly press the SET key again to select the day settings.
- Set the day using the ADJ key.
- Once the settings have been entered, press the MODE key to exit the settings menu.
Factory Reset
A factory reset can be useful if you modify the parameters of your digital photo frame and that some features stop working. By restarting your digital photo frame you will go back to the original settings of the product when purchased.

The photos that you have saved in the Favorite folder will not be deleted. If you wish to delete them, you must do so manually in the Edit menu, as explained above.
To reset :
Go to the Setup menu and select Custom.
- Select the line Default
- Select Read with the ▶ arrow
- Press the ENTER key.
The factory parameters have now been restored.
TROUBLE SHOOTING
| SYMPTOM CAUSE AND/OR CORRECTIVE ACTIONS | |
| No start-up menu | The POWER connector to the unit is not securely inserted.Make sure you connect the AC adapter to the unit properly.When you connect the AC adapter to the unit and power up the unit,even without a memory card, you should see a start-up menu screen.If you don't see the menu screen, check if the power is connected to the unit and make sure it is securely attached. |
| The unit does not play | The save media memory card is not inserted correctly.No photo, music, or movie file on the save media.Incompatible file format. Verify if the way you inserted the card is correct, do not force the save media into the slot.Make sure there is at least one supported photo, Music or movie files on the memory card.Compatible Photo format: JPEG.Compatible Music format: MP3.Compatible Movie format: MPEG-1, MPEG-2 and MPEG-4. |
| Photo does not appear in full screen mode | This is normal since different digital cameras take pictures in varieties of resolutions (or pixels) and aspect ratios.Make sure the screen display mode was setto16:9 in the SETUP menu.Use a photo editing software to resize the picture's ratio to 16:9 |
| Small or distorted movie size on the screen | Low movie resolution or incorrect movie's aspect ratio.The movie file must be in 16:9 aspect ratio (Approximate resolution of 480x234) |
| No sound Mute or the volume | Increase the volume.Make sure there is at least one supported music or movie file on the save media. |
As per the EN 60065 norm requirements, please pay particular attention to the following safety guidelines. Do not obstruct the air vents with objects such as newspapers, table cloths, curtains etc. Allow at least 5 cm around the product to allow enough ventilation. Do not place the product on or near flammable objects such as lit candles. The device may not be exposed to dripping or splashing and no object filled with liquid, such as vases, must be put on the device.
Please respect the environment and the law : do not throw batteries with the household rubbish ; take them back to your retailer and dispose of them in the correct container.