
Photo Base - Digital photo frame INTENSO - Free user manual and instructions
Find the device manual for free Photo Base INTENSO in PDF.
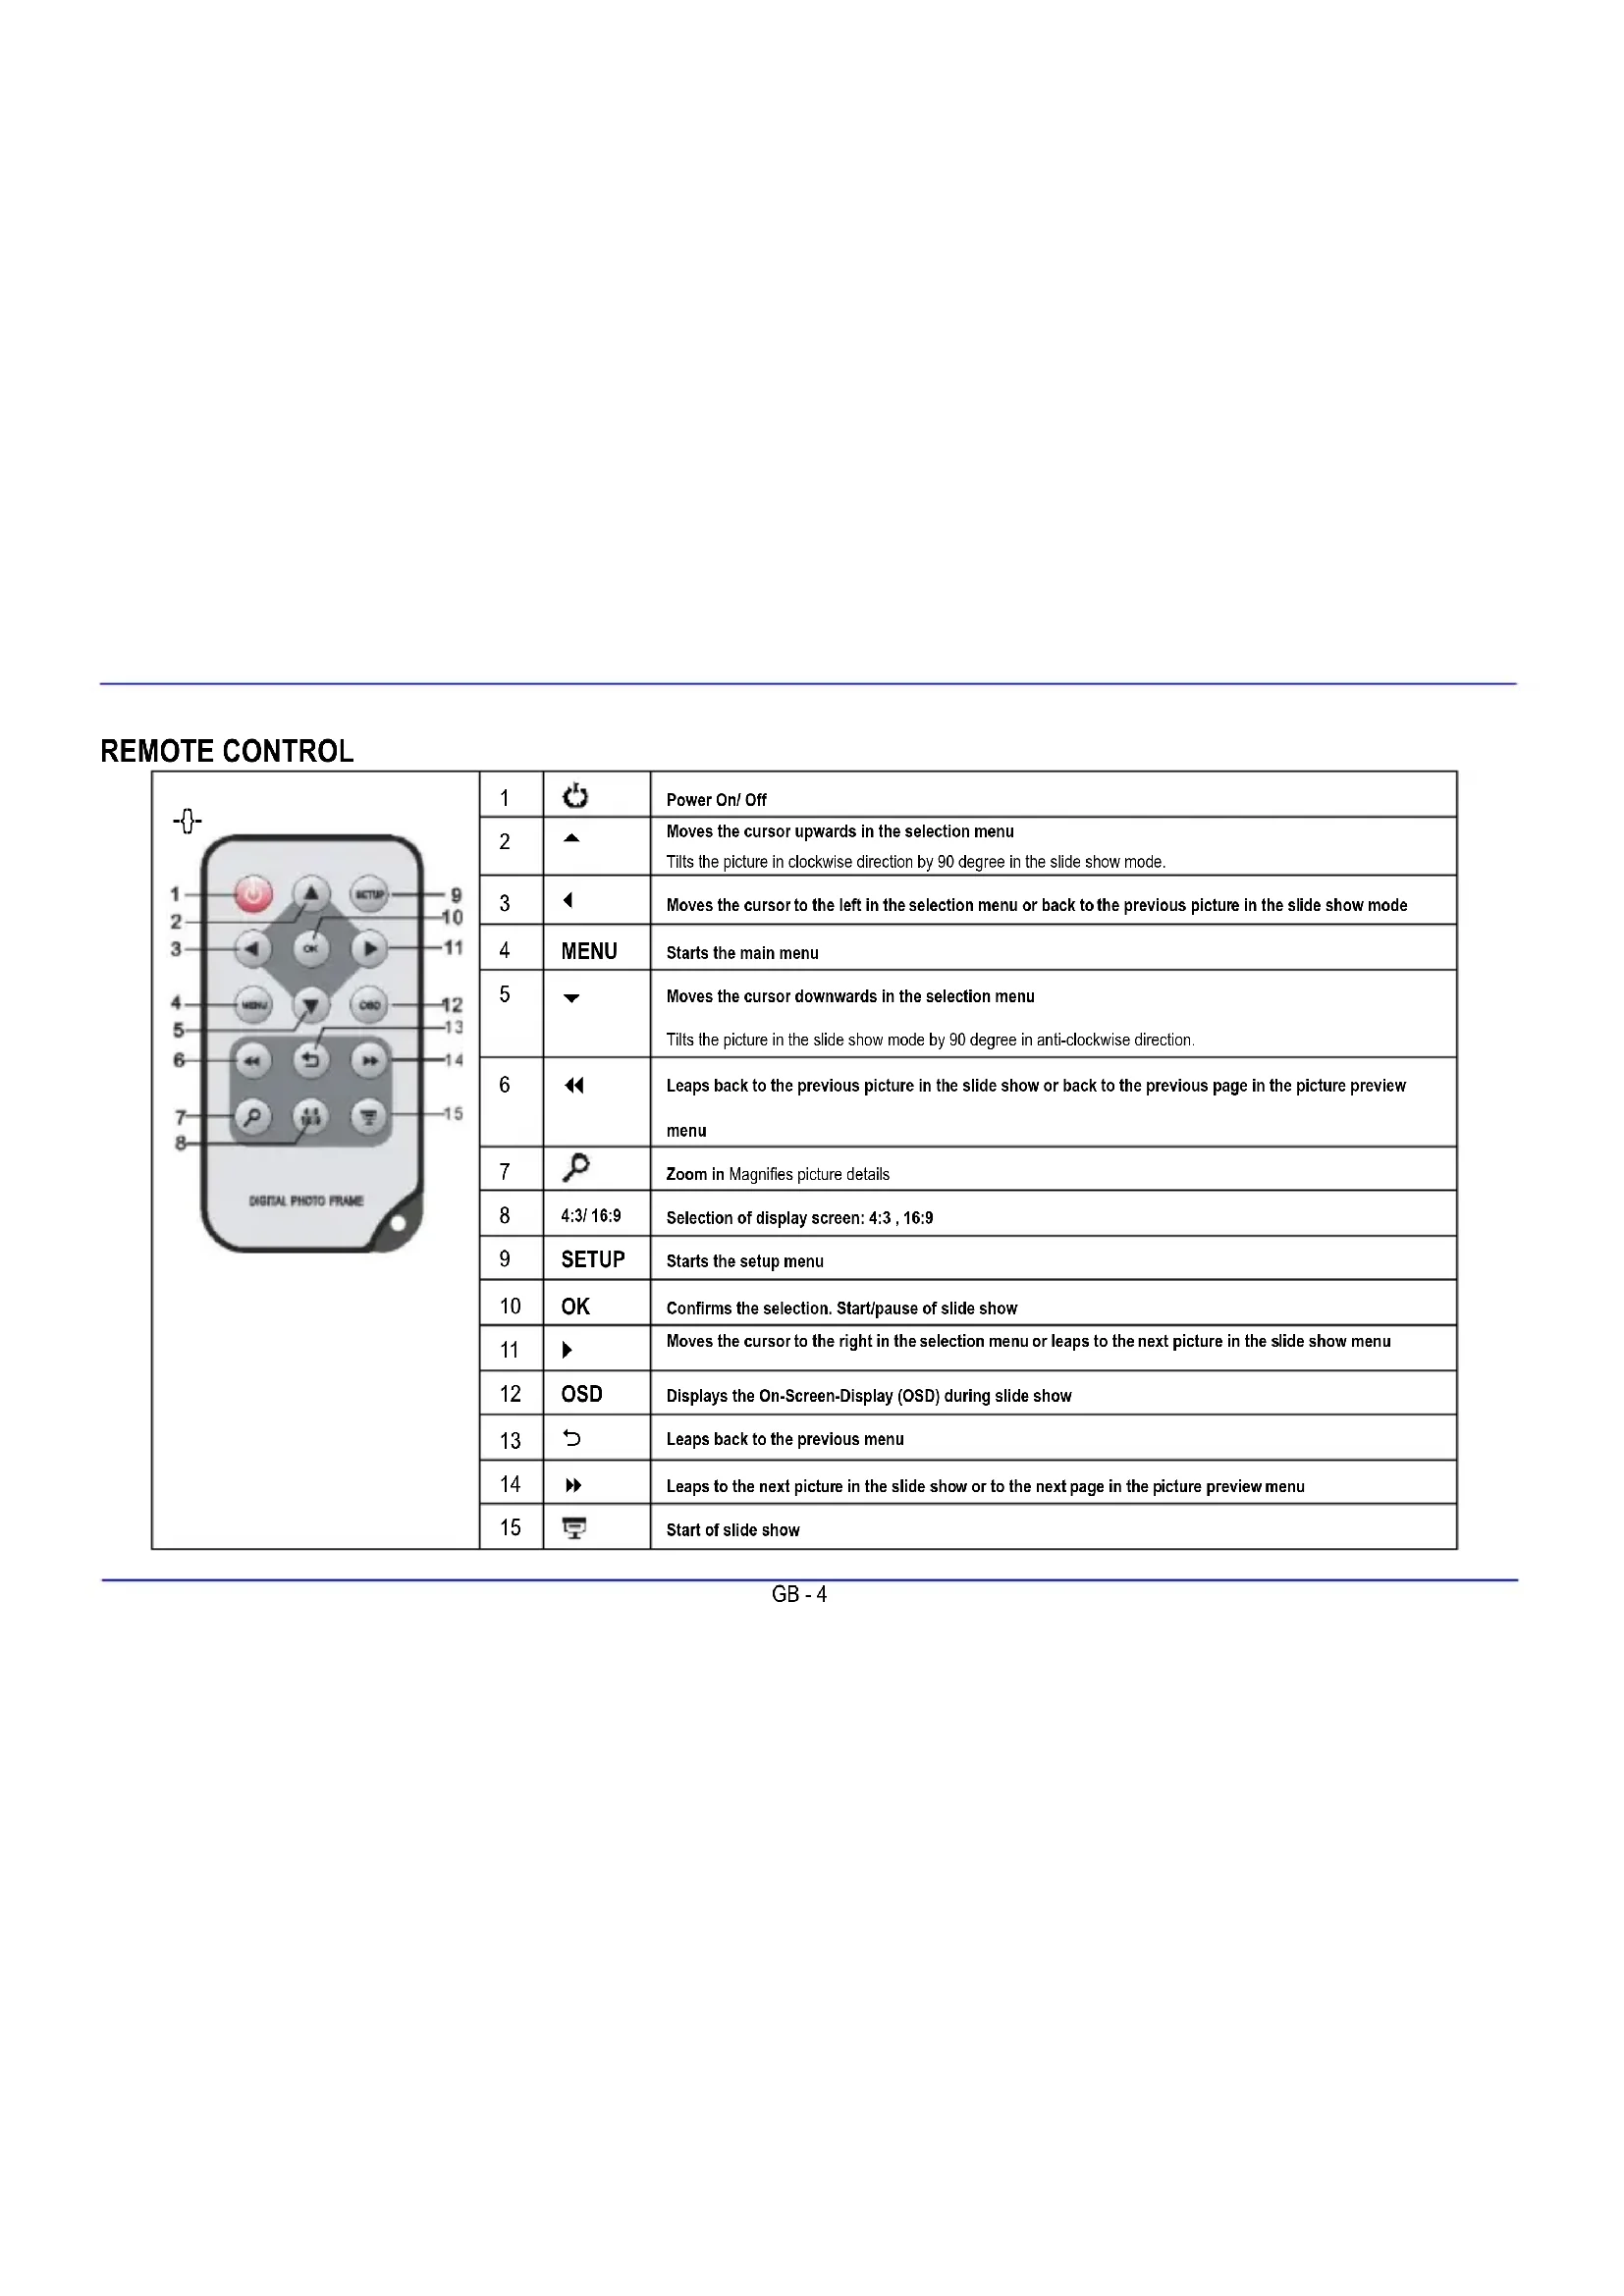
| Brand | Intenso |
| Model | Photo Base |
| Product type | Digital photo frame |
| Screen size | 8 inches (20.32 cm diagonal) |
| Screen resolution | 800 × 600 pixels |
| Display format | 4:3 |
| Supported memory card formats | SD, SDHC, MMC, Memory Stick |
| Supported image format | JPEG (up to 8000 × 8000 pixels) |
| Connectivity | USB Host 2.0, 3-in-1 card slot |
| Power supply | Power adapter 5V 1A, input 100–240V AC, 50/60 Hz |
| Dimensions | 222 × 181.5 × 22 mm |
| Weight | Approximately 470 g |
| Operating temperature | 0 °C to +45 °C |
| Included accessories | Remote control (CR2025 battery included), stand, power adapter, multilingual quick start guide |
| Main functions | Automatic slideshow with transition effects and adjustable duration, calendar, alarm, brightness/contrast/saturation settings, auto on/off |
| Navigation | 7 buttons on the back and infrared remote control |
| USB memory compatibility | Yes, via USB Host port |
| Care and cleaning | Clean with a soft, lint-free cloth; do not use chemicals; do not apply liquid directly to the screen or housing |
| Safety | Do not open the housing; do not expose to water or moisture; do not use near heat sources; do not insert metal objects during operation |
| Repairability | Repair by a specialist only; any unauthorized repair voids the warranty |
Frequently Asked Questions - Photo Base INTENSO
User questions about Photo Base INTENSO
0 question about this device. Answer the ones you know or ask your own.
Ask a new question about this device
Download the instructions for your Digital photo frame in PDF format for free! Find your manual Photo Base - INTENSO and take your electronic device back in hand. On this page are published all the documents necessary for the use of your device. Photo Base by INTENSO.
USER MANUAL Photo Base INTENSO
ALLGEMEINE PRODUKT MERKMALE
Operating Instructions
Intenso PHOTOBASE
Table of Contents
INTRODUCTION 1
GENERAL PRODUCT CHARACTERISTICS 2
OVERVIEW 3
REMOTE CONTROL 4
INSERTING BATTERIES INTO REMOTE CONTROL 5
FIRST STEPS. 6
USING MEMORY CARDS 7
WATCHING A SLIDE SHOW 8
MAIN MENU 9
WATCHING PHOTOS 10
Starting a Slide Show. 10
Displaying Individual Pictures 12
Changing the Display Mode. 13
Using the OSD Menu 14
SETUP MENU 16
Adjusting Date and Time 18
Activating Automatic Power On/Off. 19
CALENDAR DISPLAY 20
FAQs. 21
PRODUCT SPECIFICATIONS 24
SERVICE AND MAINTENANCE 25
INTRODUCTION
Thank you for buying the Intenso's DIGITAL PHOTO FRAME (DF).
Before using this device please carefully read these operating instructions and observe all safety notes. Please store these instructions at a safe place to have an answer at hand whenever you have questions. These instructions have been compiled with great care to enable you to safely use all functions of the DF.
The DF allows you watching digital photos directly from your camera's memory card. You can watch your photos in a slide show mode provided by the photo frame. The DF is compatible with the following card formats: SD™ (Secure Digital), SDHCTM (Secure Digital High Capacity), MMC™ (Multimedia Card), MS™ (Memory Stick) and USB flash drive.
We are not liable for any damages or loss of data in the case of malfunction, maloperation or if you repair the device yourself. Please do not disassemble the device into individual parts and do not try to repair it yourself; in such a case guarantee will expire. Software, hardware and the operating instructions can be all subject to change. We will not inform you hereof and reserve all rights in this matter.
GENERAL PRODUCT CHARACTERISTICS
- Decorative appearance, excellent quality
- Shows pictures (JPEG) without requiring a computer
Automatic slide show with transition effects and individual display duration
Calendar function - Timer function
- Compatible with SD / SDHC / MMC / MS cards
- USB slot to connect USB flash drives
2-way control: 7 buttons on the rear side of the DF, infrared remote control
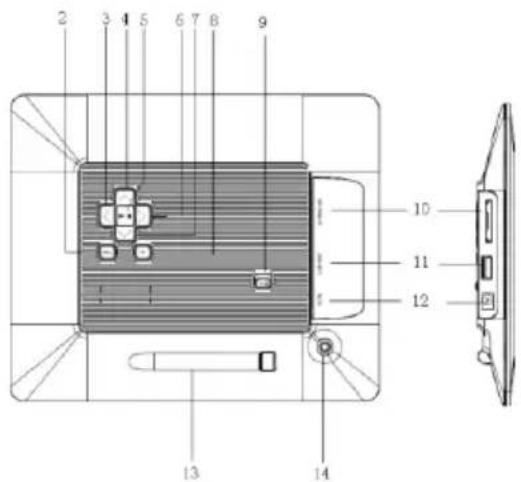
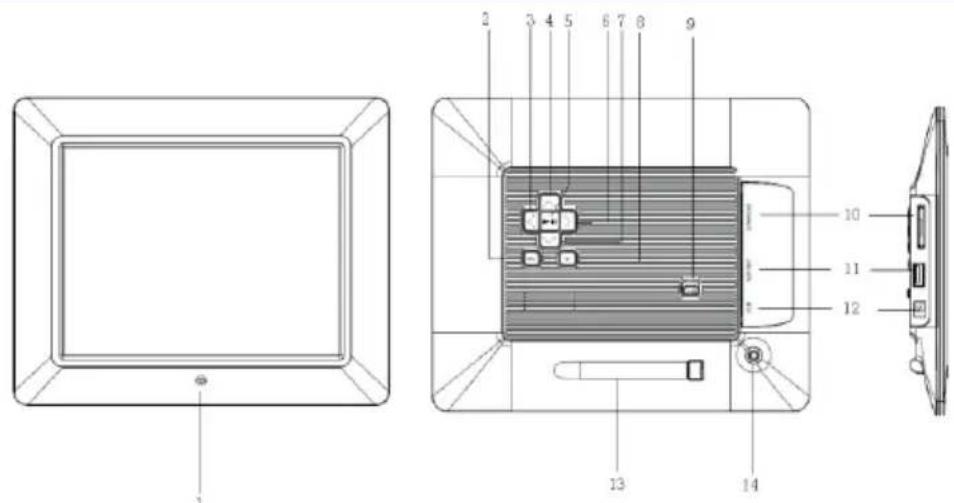
OVERVIEW
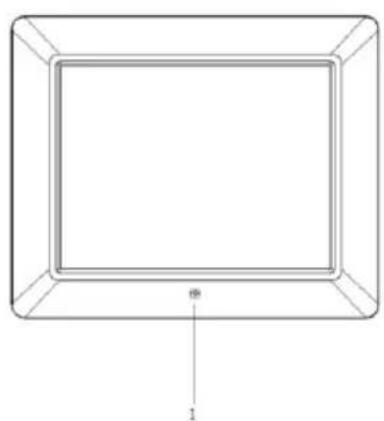
1 Infrared sensor
2 Menu button, opening the OSD menu
3 Left 4 button
4 Up [按钮
5 Play/Pause button
6 Right button
7 Down [按钮
8 Exit [?] button
9 Power On/Off
10 SD/SDHC/MMC/MS - card slot
11 USB host slot
12 DC 5V 1A input
13 Frame base
14 Threaded opening for stand
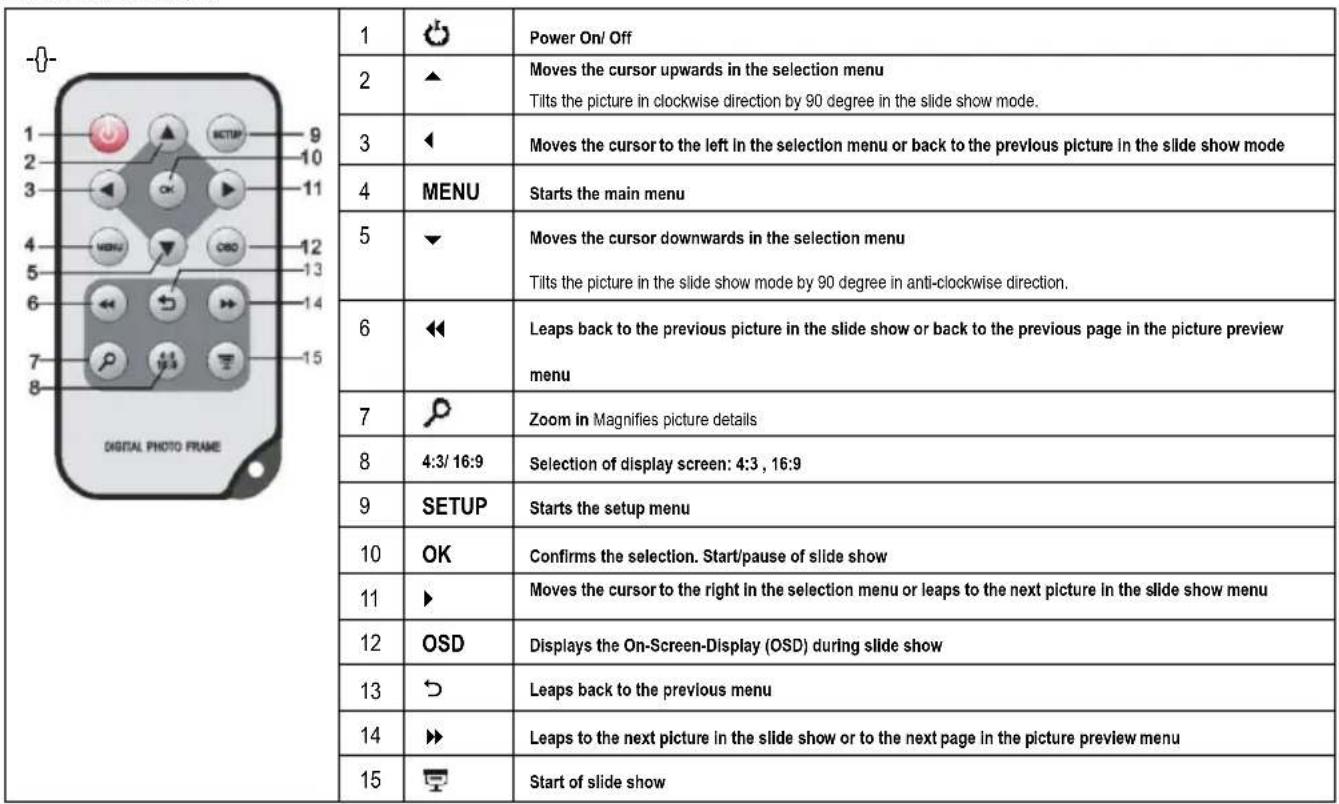
REMOTE CONTROL
INSERTING BATTERIES INTO REMOTE CONTROL
- Turn your remote control upside down with the buttons facing down.
There is a spring on the left side of the battery compartment. Hold it to the right and simultaneously pull out the battery compartment. - Insert a CR2025 Lithium battery to the battery compartment with the Plus symbol facing upwards.
- Reinsert the battery compartment into the housing of the remote control.
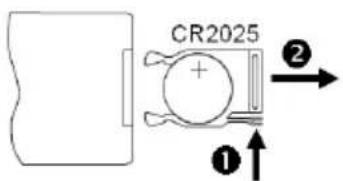
Please note: Please dispose batteries according to legal regulations.
FIRST STEPS
- Connect the frame base to the DIGITAL PHOOTE FRAME (DF).
Connect the mains adapter provided with the DF. Plug the other end of the provided mains adapter into the power outlet.
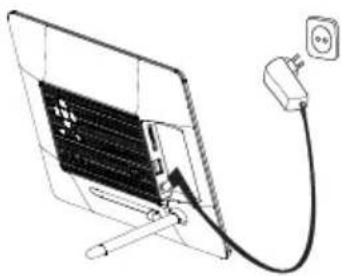
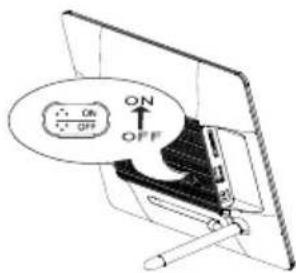
- Move the slider of the DF into "ON" position.
- Using the device for the first time please select the Language in the appearing window by use of the keys on the rear side or the remote control. Confirm your selection with the [▶] button on the rear side or the OK -button on the remote control.
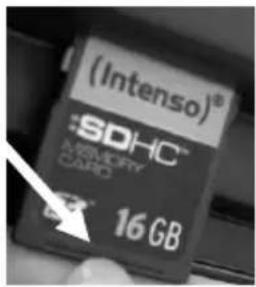
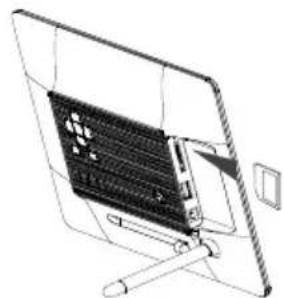
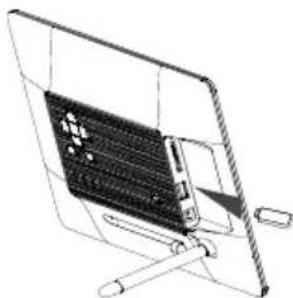
USING MEMORY CARDS
Insert SD / SDHC / MMC / MS cards into the 3-in-1 card slot with the contacts facing the display. USB storage mediums can be connected with the DIGITAL PHOTO FRAME by inserting these mediums into the USB port (USB host).
Please note:
- Please do not insert memory cards by use of force.
The 3-in-1 card reader can only read one card at a time. Thus, please connect only one SD / SDHC / MMC or MS card with the photo frame at a time.
To disconnect inserted cards from the DIGITAL PHOTO FRAME remove them carefully from the card slot. (Please note: SD/SDHC and MMC cards have a small notch in cross direction. By use of your finger nail you can remove the card from the slot)
WATCHING A SLIDE SHOW
After power-on you will be guided directly to the main menu.
If a memory card or a USB memory stick is connected to the DF, the slide show will start directly after power on.

Press the MENU button on the rear side of the DF or on the remote control and then the [A],[V] buttons on the rear side of the DF or the , buttons on the remote control to start the storage medium connected, the setup menu or the calendar.
Please note:
If a storage medium is connected to the DF the slide show will start automatically after power on.
If more than one storage medium is connected with the photo frame, after power on the DF will at first read the pictures from the SD / SDHC / MMC or MS card.
MAIN MENU
In the main menu you can select the storage mediums connected, the setup menu and the calendar.
-
- Press the MENU -button on the rear side of the DF or on the remote control to access the main menu.
| Menu | Description |
| USB | Displayed if a USB medium is connected. |
| SD/MMC/MS | Displayed if a SD, MS or MMC card is connected. |
| Clock | Display of calendar or time |
| Setup | Menu to make individual settings. |
- Press the [] , [] buttons on the DF or the , buttons on the remote control to select a storage medium or a menu item.
- Confirm your selection by pressing the [▶] button on the DF or the OK -button on the remote control.

WATCHING PHOTOS
Starting a Slide Show
In each menu you can use the [ ] button on the remote control to start the slide show, starting with the first photo. To stop the slide show and to display individual photos please press the [ ] button on the DF or the OK-button on the remote control. By repeatedly pressing the [ ] button on the DF or the OK-button on the remote control you can proceed with the slide show.
- Press the [ ] button on the remote control or the [ ] button on the DF to leave the slide show and to access the picture preview menu.
Press the MENU-button on the remote control or on the DF to leave the slide show and to access the main menu.
Please note:
- If an additional storage medium is inserted when watching a slide show, the slide show will automatically leap to the first picture of the new storage medium and the slide show will start with this picture.
If a SD/SDHC/MMC/MS-card and a USB drive are connected to the DF at the same time, only the pictures selected on the relevant medium will be continuously played during the slide show. The individual storage mediums are not automatically played one after the other in the slide show.
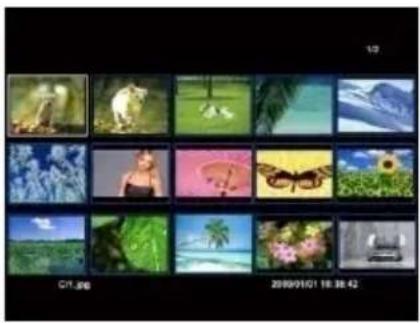
Picture Preview Menu
Picture Preview Menu
The pictures on the storage medium selected are depicted as thumbnails. It is possible to display up to 15 pictures at a time.
- In the main menu please select a storage medium (USB, SD/MMC/MS) and press the OK-button on the DF or on the remote control.
- To navigate within the thumbnails please use the [ ],[ ],[ ],[ ] buttons on the DF or the , , , buttons on the remote control. To directly access the next preview page please use the or button on the remote control.
Please note:
- During a slide show or the picture single view mode you can also access the picture preview menu by pressing the [ ] button on the remote control or the [ ] button on the DF.
Displaying Individual Pictures
You can select individual pictures without starting a slide show.
-
In the picture preview menu please select a picture and press the [▶] button on the DF or the OK-button on the remote control. The picture is now displayed in full screen mode. Now please press the [▶] button on the DF or the OK-button on the remote control within the selected display time. Now you will see the II symbol in the screen's lower left corner. For the selected notification time (see page 17).
-
To display previous or following pictures please press the [ ] , [> buttons on the DF or the , buttons on the remote control.
To rotate pictures please press the [A], [V] buttons on the DF or the , buttons on the remote control. -
To display a picture with a magnification, please repeatedly press the button on the remote control. If the picture is displayed as a magnified version, you can vary the depicted display window by using the [], [], [], [] buttons on the DF or the , , buttons on the remote control.
-
To return to the picture preview menu please press the [D] button.
- Press the [▶] button on the DF or the OK-button on the remote control to start the slide show, starting with the selected photo.
Changing the Display Mode
While watching a picture or during the slide show you can change the display mode by repeatedly pressing the [4:3/16:9] button on the remote control.
4:3: With this selection a picture which is saved in the 16:9 or a larger format is stretched and displayed as full screen picture.
16:9: With this selection a picture which is saved in the 16:9 or a larger format is displayed in its original format with a black bar at the upper and lower margin.
Please note:
- A photo which is saved in the 4:3 format can only be depicted in the format 4:3.
This function is not possible with photos whose resolution is lower than 800X600 pixels.
Using the OSD Menu
You can use the OSD menu carry out the following functions.
- Press the [OSD] button on the remote control when watching a picture or a slide show. The OSD menu will appear on the display and the slide show will be stopped.

-
Press the [], [] buttons on the DF or the , buttons on the remote control to navigate between the functions.
-
To stop or continue the slide show please select the symbol and press [▶] on the DF or OK on the remote control. The (Play) symbol in the OSD-menu will be replaced by the II (Pause) symbol.
-
To enlarge the picture please select the symbol and press the [ ] button on the DF or OK on the remote control. If the picture is displayed as magnified version, you can vary the depicted display window using the [ ],[ ],[ ],[ ] buttons on the DF or the , , , buttons on the remote control.
-
To rotate the picture by 90 degrees in clockwise direction please select the symbol and press the [▶] button on the DF or OK on the remote control.
- To rotate the picture by 90 degrees in anti-clockwise direction please select the symbol and press the [▶] button on the DF or OK on the remote control.
- By use of the symbol you can change between the 4:3 or 16:9. By pressing [▶] on the DF or OK on the remote control you can confirm the format change. See also at: "Changing the Display Mode (page 13)"
- By selecting the symbol and pressing [▶] on the DF or OK on the remote control the displayed picture will be deleted and removed from the data medium. (PLEASE NOTE: Prior to deleting there will be no security query !!)
- By selecting the symbol and pressing [▶] on the DF or OK on the remote control the DF will continue with the slide show.
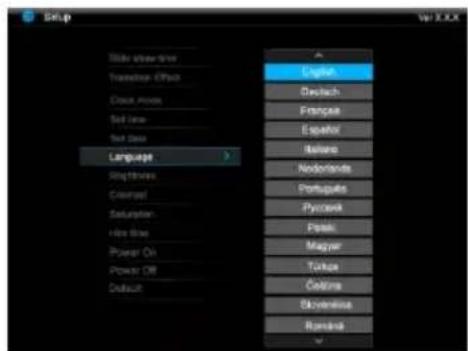
SETUP MENU
You can individually adjust the configuration of the DIGITAL PHOTFRAME (DF).
- In the main menu please select the menu item SETUP and confirm your selection with the [▶] button on the DF or the OK-button on the remote control. You can also access this menu by pressing the [SETUP] button on the remote control.
- To select a menu item please press the [] , [] buttons on the DF or the , buttons on the remote control.
- To change the relevant setting please press the [ ] , [] buttons or the [] button on the DF, alternatively the , buttons on the remote control and confirm your selection by pressing the [] button on the DF or the OK-button on the remote control.
- To leave the menu please press the [ ] button on the DF or the [ ] button on the remote control.
| Settings | Description |
| Display duration | Select how long a picture is displayed during a slide show. Settings: 3 sec., 5 sec., 15 sec., 1 min., 15 min. |
| Picture transitions | Select from random and continuous transition modes |
| Clock settings | Select the display mode of your calendar / clock. Options: Monthly calendar, digital clock, analogue clock |
| Time settings | Adjusting the time. |
| Date settings | Adjusting the calendar |
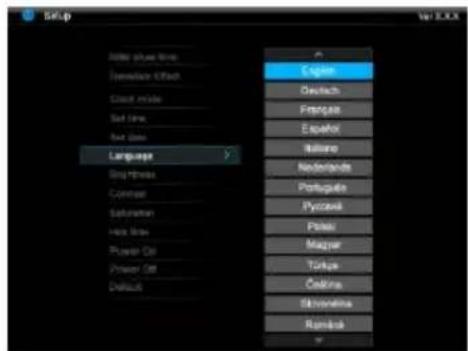
| Language | Select your preferred language. |
| Brightness | Adjusts the brightness of the TFT display. Options: -3, -2, -1, 0, 1, 2, 3. |
| Contrast | Adjusts the contrast of the TFT display. Options: -3, -2, -1, 0, 1, 2, 3. |
| Colour saturation | Adjusts the colour saturation of the TFT display. Options: -3, -2, -1, 0, 1, 2, 3. |
| Display time | Specify how long the notification window of the key's functions is displayed in the slide show mode and the status II (pause) or ▷ (play) in the lower picture. Options: 0 sec., 5 sec., 10 sec., 20 sec. |
| Autom. Power-on | Enables automatic power-on. On / Off. |
| Autom. Power-off | Enables automatic power-off. On / Off. |
| Default setting | Device is reset to factory settings. |
Adjusting Date and Time
How to adjust date and time on the Intenso DF:
- In the main menu select the menu item SETUP.
- Press the [A], [V] buttons on the DF or the , buttons on the remote control to select the menu item Time.
- Press the [], [] buttons on the DF or the , buttons on the remote control to select the next or previous element (hour, minute). Press the [\▲], [\▼] buttons on the DF or the , buttons on the remote control to adjust the desired values.
- To confirm your entries please press the button [▶] on the rear side of the DF or the OK-button on the remote control.
How to adjust the date on the Intenso DF:
- Press the [A], [V] buttons on the DF or the ▲, ▼ buttons on the remote control to select the menu item Date.
- Press the [], [] buttons on the DF or the , buttons on the remote control to select the next or previous element (month, day, year). Press the [], [] buttons on the DF or the , buttons on the remote control to adjust the desired values.
- To confirm your entries please press the button [▶] on the rear side of the DF or the OK-button on the remote control.
Activating Automatic Power On/Off
You can have Intenso's DIGITAL PHOTO FRAME switch on/off automatically at a preset time.
Please note: This function requires setting the correct time in advance.
- In the main menu select the menu item SETUP.
- Press the [] , [] buttons on the DF or the , buttons on the remote control to select the menu item autom. power-on or autom. power-off.
-
Press the [], [] buttons on the DF or the , buttons on the remote control to select the next or previous element (hour, minute). Press the [], [] buttons on the DF or the , buttons on the remote control to adjust the desired values and the time.
-
Off: Disables automatic power-on/off.
On: The DIGITAL PHOTO FRAME switches on and/or off at the preset time. -
To confirm your entries please press the button [▶] on the DF or the OK-button on the remote control.
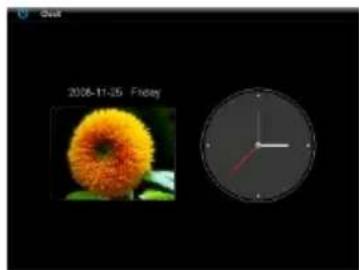
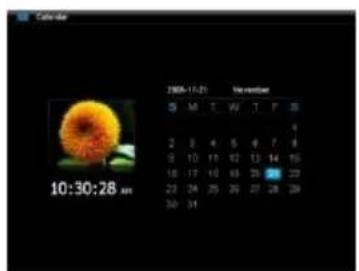
CALENDAR DISPLAY
The calendar mode displays the current date, the current time and a slide show with thumbnails in the background.
- In the main menu select the menu item CLOCK.
- To leave the calendar mode please press the [ ] button.
Please note:
- Date and time can only be set in the Setup menu.
- By pressing the [▶] button on the rear side of the DF or the OK-button on the remote control the display can show the Monthly Calendar, the Digital Clock or the Analogue Clock.
- By pressing the [], [] buttons on the rear side of the DF or , the buttons on the remote control the calendar can show the next months or leap back to the previous one.
FAQs
Why is the actual capacity of a memory card less than specified on the packaging?
The storage capacity of a flash storage medium is specified according to capacity specifications for hard drives and is subject to the SI regulations (International System of Units). This system does not use the binary system, which converts 1024 MB into one GB. The SI standard uses the powers of 1000, where 1000 Megabyte make 1 Gigabyte. Due to this different way of calculation, capacity specification might be different.
Why does the DF not display some pictures of my memory card?
Some not so widespread storage mediums are not compatible with the DF. Please use a compatible card. Please bear in mind that this photo frame can only play photos with the file format "JPEG".
A memory card is inserted but the DF cannot read this card. What can I do?
At first please check if this card is actually compatible with Intenso's DIGITAL PHOTOFRAME.
Then, please check if the card is properly inserted into the card slot. Please bear in mind that only the file format „JPEG“ is supported.
Please note: Some digital cameras do not save pictures by use of the standard format JPEG. In such a case please refer to the operating manual of your camera.
Why are some pictures loaded faster than others?
Pictures with a high resolution need longer times to be displayed. To increase the loading speed please use pictures with a lower resolution.
Please note: The photo frame supports a resolution of up to 8000*8000 pixels.
Why does the software not start although power supply is ensured and the power switch is in "On" position?
This might be a system error. Please reset the software by cutting off power supply for a few seconds.
Why is the main menu not displayed?
Please check if the DF is properly connected to the power outlet and the power switch is in "On" position.
Can I rotate pictures on the display?
Yes, please use your arrow keys [], [] on the DF or the , buttons on the remote control.
Please note: With a new start the rotated picture will be displayed in normal mode again.
Can I adjust the colours of pictures?
No. All colours are set when the picture is being taken. However, you can adjust the brightness and the contrast of the display. However, you can adjust the brightness and the contrast of the display.
What is the ideal resolution to display pictures on the DF?
The ideal resolution for this DF is 800^*600 pixels.
Why do the functions: Automatic power-on / off not work although I have enabled them?
Please make sure your time settings are correct. If the set time is in the past, the function will be enabled on the next calendar day for the first time.
Please do not move the slider on the rear side of the DF into POWER OFF position. Only change the status of the DF into standby.
PRODUCT SPECIFICATIONS
| Display | Digital TFT LCD Display size: 8" inch (20,32cm diagonal viewable image) Display modus: 4:3 Resolution: 800*600 pixels |
| Mains adapter | Input: 100~240V AC, 50/60Hz Output: 5V 1A DC |
| USB port | USB Host 2.0 Supports USB storage mediums |
| Memory cards supported | SD/SDHCTM (Secure Digital Card), MMC™ (MultiMedia Card), MSTM (Memory Stick) |
| Picture size supported | JPEG, max. resolution:8000*8000 pixels |
| Operating temperature | 0°C ~ +45°C |
| Dimensions | 222*181.5*22 mm |
| Weight | ~470 gr |
| Accessory | Remote control (incl. battery), foot, mains adapter, quick guides in more languages |
SERVICE AND MAINTENANCE
Service
- To avoid risks of electric shocks please do not remove screws or the housing.
Do not use the device in the vicinity of water. Do not expose the device to rain or moisture. Do not place any objects in the vicinity of the device that store water or any other liquids.
Do not install this picture frame in the vicinity of heating systems, ovens or other heat emitting devices.
Do not open the housing. Do not try to repair the device yourself. Leave any repairs to specialised personnel only. - Avoid using your device on sandy places.
- Please do properly connect the plug of the mains adaptor to the existing opening of the DF. Thus, you can avoid electro-static charge.
- Plug in all connections correctly and safely.
- Please do not touch the display. Do not expose the display to direct sunlight.
- The picture frame only plays compatible file formats.
Pictures might be protected by copyright law of third parties. Playing such pictures without licences might represent an infringement of such copyright laws. - Please do not touch the DF with metallic object during operation.
Please avoid operation on pillows, sofas or any other heat emitting home appliances since the device might overheat in such cases. - Please do not remove memory cards while the device is reading. Otherwise this might result in abnormal system ends or loss of data.
- Please do not switch off the device with the slide show running.
- Please do not directly wrap the device after longer operating hours. Please make sure the device has cooled down properly. Otherwise the device might overheat.
- To guarantee better service this operating instruction is subject to alterations.
Device Maintenance
The Device must be switched off.
Never spray or apply liquid substances directly onto the display or the housing.
Cleaning the display / housing / frame
Clean the housing, frame and LCD display carefully with a soft cloth which is free of lint and chemicals. Only use cleaning agents which are suitable for cleaning LCD displays.
Disposal of WEEE (Waste Electrical and Electronic Equipment)
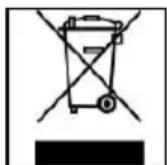
Devices marked with the WEEE logo are subject to the European Community Directive 2002/96/EC.
Waste Electrical and Electronic Equipment must be separated from household rubbish and disposed at sites that collect WEEE.
By orderly disposing WEEE you will avoid damage caused to the environment.
Istruzioni d'uso
Intenso PHOTOBASE
Indices
QUESTIONS FREQUEMMENT POSEES 21
SPECIFICATIONS DU PRODUIT 23
QUESTIONS FREQUEMENT POSEES
CUIDADO E MANUTENCAO 24
CUIDADO 24
INTRODUÇÃO
AgradecemosPGA
daMoldura Digital MD) da Intenso.
Posso rotar as imagens no visor?
Sim, selezione as flechas [ ] , [ ] na MD ou as teclas , no controle remoto.
OBUHEXAPAKTEPNCI INPODyKTA
-ДекаразибhoeоформпенHe,хоршeeKahectBo
- Ppocmotp foToIpaФm (JPEG) 6e3 KOMnIbIOTepe
- ABTomatnueckoe cnaI-d-woy c npexoHbIMN eΦeKtAmN INHdbNyabNbHO nnHO npocMOtpa
KaJIeHdApHaaФyHKcIa
ФункцяТаМерета
COBMECTHMOCTb C KapTAMN SD/SDHC/MMC/MS
- He3do USB pour NOdklueyen namTn 60bJoo koctn USB
2 cnoc6a ynpableny: 7 KHOK Ha 3aHne cToPoHe LΦ, INPpakpaCHOe nCTaHIOHoe ynpablenHe
OB3OP
1 HΦpaKpaChbI cHcOp
2 MeHIO KHOIIKa, OTKpbIbAeMeHIO OSD
3 BnpaBo KhoNka [
4BbepxKhONka[
5 PpOCMOTp KHOHa [1]
6 BneBo KhoNka [
7 BnH3 KHOIIKa [V]
8 Cton KhoNka [b]
9 BkIIOU./BbIKJ.
10 The3do nla KapT SD/MMC/MS
11 Tne3do USB Host
12 DC 5B 1ABxoD
13 Hoxxka
14 Pe3b6oBoe OTBepCTne In HoxKn
ДИСТАЦИОНHOЕУПРАЛЕHINE
- BbIbepnTe B rIaBHOM MeHIO HocHTeJIb NaMRTI (USB, SD/MMC/MS) n HaKMITE Ha LΦ nIIHa dNCTaHcNOHHom ynpabJeHN Ha KhoNky OK.
IcnoJb3yIte InHaBnaCmMexdy MInHaTHOpHbIMn φOTorpaΦnAMN KhoNKn [<],[>],[A],[V] Ha LΦ nnn KhoNkn ▲,▼,▲, ▷ Ha DnCTaHnOHHOM ynpabNeHn.HTobI npraMo nonactb Ha cTpaHnUy npedBaPntbHoro npocMOtpa, IcNoJb3yIte KhoNkn < nnn >Ha DnCTaHnOHHom ynpabNeHn.

3ameyahne:
B MeHIO npocmmpa fomopapu E O epMa cnaud-woy unu npocmnpa omdehbx xfmoepau Bbi maKke nonademe cnomoubIO Khonku []Ha ducmaHcuOHHom ynpaenehuu unu Khonku []Ha LΦ.
Ppocmtp oHoi OTdeJIbHOI FOtorpaqnn
BbMOxTe BbIpaTb OndHy OTdeJIbHyOΦOTOrpaΦnIO.
-
BbIbepnte B MeHIO npocMoTpa foToRaPn OndHy foToRaPn HaxMnte Ha KhoNk [▶] Ha LΦ nIN Ha KhoNk OK Ha nCTaHcHOM ynpabLeHn. FoToRaPn NOBtCBA pexime noHoro n3o6paXeHn. HaxMnte Ha npotJxHeHn BpeMeHn noka3a foToRaPn Ese pa3 Ha KhoNk [▶] Ha LΦ dIy nOdTBePjXeHn i Ha KhoNk OK Ha nCTaHcHOM ynpabLeHn. B hIXKem JEBOM yrny ekpana NoRbInc SCMBOI II . YTO6bl y3HaTb O BbIbpaHOM BpeMeHn dIy daY yka3aHm cmOTpnte ctp.17.
-
Дя порсмотра п体现在душх phOTorpaфи НжмITE Ha KHonKN [>, [>] Ha LΦ ИИн Ha KHonKN, > Ha ДиuctaHIOHOM ynpabNeHn.
-ДяВрашенифотоградин HabKMITE Ha KhoNKI [A], [V]Ha LΦИИн Ha KhoNKI ▲,▼HaДиCTaHIOHOMуnpaBneHIM. -
Дя Изобрахеня сбсг Вуьелчehном вide, NOВТОПно НжмITE Ha KONky 串 NaДИСТаHциоHOM ynpabNeHIM. EcпсфOTORpaФня NOBNTcB YbEJIuEHHom Bnide, c NOMOью KhoNOK [<], [>, [A], [>, [Y] Ha LΦ Илп KhoNOK ▲, ▼, ▴, ▷, HaДИСТаHциоHOM ynpaBNeHIM MoxHo ИЗМeHerTb ИзобрахжHHь сеКтОр kaJa.
-
TTo6bI BepHyTbcra K npocMoTpy foToTpaΦn, HaxKMITE HaKHOJky [].
- Haxmte Ha KhoKy [▶] Ha LΦ nn Ha KhoKy OK Ha nctaHnOHHom ynpabJIeHH, YTObI hauatb cnaJ-woy, HauHAR C Bb6paHHO φotorpaΦnn.
I3MeHeHne 3KpaHHoro pexHMa
Bo Bpem npocmotpa potoTpaonn BO Bpem cnaId-woy MOxHO MeHb T ekpaHHb I pexIM C nOmoUb IOBTOPO HaxaTHA HA KHONK [4:3/16:9] Ha dNCTaHcunOHOM ynpabHeHH.
4:3:ПиТakOM BbIbopeфOTorpaФИЯ,КOTOPa86bla 3aIIncAHaВфОрмATE16:9ип 6OJIbSe,yBENuHBAeTcN INOKa3bIbAEtCnB noHOM KaIpe.
16:9:Пи takOM BbIbope foToRaФИЯ, KOTopa 6bla 3aIncaHaВ fOpMaTe 16:9 mII 6OJIbSe, nOKa3bIbAeTcB OpUINHaJIbHOM fOpMaTe CчepHoi nolocoi Ha BepxHem I Ha HnKHeM Kpe.
3ameyahue:
-Фомаразьг,komорябылзaningaehoфopmame4:3,moxem6bimbakkeuzoobpaxeHa monko eфopmame 4:3.
3ma dyHKuJHe akmueupoBaHa dna fomooapdu c pa3deJbHO cnocobHcMbMehee yem 800X600 nukceJe.
IcnoJIb3OBAHHe MeHIO HnDnKaun Ha 3KpaHe OSD
MeHIOOSDMOXHOINCNOJB3OBaTbIJIYBbINOJIHeHnI CNeIyUxN DeiCTBnI.
- Haxmte KhoNky [OSD] Ha nCTaHIOHOM ynpabHeHH BO BpeM npocmotpa foTOrpaΦn nn CnaId-woy. MeHIO OSD noBnEeTaHaDCnnee n cnaI-d-woy octaHaBnBaetc.

2.ДЯ HabiramaM MEXkyФунклmaN NOIb3yIteCb KhoNKamn [<], [>]Ha LΦиIIN KhoNKamn , >Ha NcIstaHIOHOHOM ynpaBneHN.
- UTO6bI OCTaHOBtB HIN npOIOJXHTb Cnain-Isoy, Bbl6epnte CmB0N ▷ n HaxMITE Ha KhoNky [▶] Ha LΦ HnHa OK Ha DCCTaHcIOOHOM ynpabHeHH. BMeCTO CmB0Na ▷ (BOcPpO3BeDeHne) B MeHIO OSD NOBJIeTc CmB0N II (nay3a).
-
4To6bI yBéJnUHTb φOTOrpaΦnH, BbIePnte CnMBoJ n HαKmITE Ha KHOJky [▶] Ha LΦ nIi Ha OK Ha IInCTaHIOHHOM ynpabHeHn. Ecπn φOTOrpaΦnI3O6paxKaetcB yBéJIuYeHHOM BnIe, c NOMOùbIo KHOJOK [<], [>, [A], [V] Ha LΦ nIi KHOJOK ▲, ▼, ▲, ▷Ha IInCTaHIOHHOM ynpabJIeHn MOxHo I3MeHЯr b φpaarmEt I3O6paxKeHn.
-
Yto6bl noBepHyb pOToRpaΦnHO Ha 90 rpaIycOB HnPaBHeHn YacBOB cTpeKN, BbIePte CmBOB nn HaxMITE Ha KhoNkY [▶] Ha LΦ nnn Ha OK Ha nctaHIOHOM ynpabNeHm.
- Yto6bI noBepHyb foToRpaФnIO Ha 90 rpaDycOB H anpabNeHm npOTnb YacBOB cTpeKN, Bbl6epnte CnMBON HaxMnTe Ha KhoNky [▶] Ha LΦ nII HA OK Ha dncTaHcNoHHom ynpabNeHm.
C nOMOu cMbOa MoKHO nepeKIOUaTb MeJy 4:3/16:9.C nOMoUb KHOIN [▶] Ha LΦ mN OK Ha nCTaHIOHOM ynpAbeHm MOKHO nepeKIOUaTb fOpMaT. CmOTpIe TAKKe: «IImeHHeE 3KpaHHoro peKIMa (cTp. 13)»
BbIbOpom cMbOJa n HaxaTneM Ha [▶] Ha LΦ nn Ok Ha dNCTaHcHOM ynpabNeHNn FOtorpaFna Ha HocuTepe daHHbIX CTnpaETc. (BHIMAHNE: Neped CTnpaHmE FOtorpaFnn npOBepoHb Bonpoc O CTnpaHN He 3adaetca!!)
BbIbOpom CmBoJa n HaxaTneM Ha KhoNky [▶] Ha LΦ mnn Ha OK Ha nctaHcnoHHoM ynpabHeHn LΦ cnaJd-woy npoDOnXaetca.
MEHIO HACTPOIKI
HactpoKcncTeMbI LlΦPOBOOΦOTOPAMKl (LΦ) MoxHO npoBOAnTb INHnBnDyAJIbHO.
- Bb6epnte B rnaBHOM MeHIO NyHKT MeHIO HactoKa n noTBePnTe BaW Bbl6op KhoKo [ ] Ha LΦ NnN KhoKo OK Ha nctaHcNoHHom ynpabHeHN. B daHHOe MeHIO MoXHO nonactb npMbIM nyTEM, Haxab KhoKy [SETUP] Ha nctaHcNoHHom ynpabHeHN.
2.ДЯ Bbl6opa HactpoKn nonb3yItec b KhoNkaMn [A], [V] Ha LΦ nnn KhoNkaMn ▲, Na DnCTaHNoHHom ynpabNeHm.
3.ДЯИЗMEHENCOOTBETCTBEHHOHaCTPOIKNHAXMITEHaKHOKN[<],[>]nIN[>] HaUΦnINJxHeHa<,IOINOKHaNCTaHcNOHOMynpaBNEHNnNOITBePdTe BaW BbI6Op,HaxKaBaHa KHOKNy[>]HaUΦnINHaKHOKNyOKHaNCTaHcNOHOM ynpabNeHN. - YTO6bl BbIITN m3 MeHIO, HaxMITE Ha KNONky [ ] Ha LΦ nn Ha KNONky [ ] Ha DnCTaHIOHHOM ynpabNeHN.
5.
Noemy Ha dncnnee He noBraetc rnaBHOe MeHIO?
PpOBepbTe, npaBnIbHo IIN NOkNHOeHa LΦ K pO3eTke HaxoJNTc IIN BkNIOuTaTeB B no3uIN "On".
MoxhoBpaatabΦotorpaanHaDnCnnee?
Ja, noJIb3yIeTcB dIa 3TOrO cTepeIOHbIMn KhoNkAMn [A], [V] Ha LΦ nII IN KhoNkAMn ▲, ▼Ha nIctaHIOHOM ynpabIeHN.
06paTne BHHaHHe: Ppi NOBTOPOM npocMOTpe BpaauoJaaer cfoTOrpaqna 6ydt ONrNt NokaHa B OblyHOM BnIe.
Moxho np perynipobatb zbeta foTOrpaqn?
HeT. Bce cBeToBbIe HAcTpOoKn npOBoJrTa BO BpeM ChaTna CHmKOB. Ho B npi6ope MoXHO perynuPoBaTЯpKocTb I KOHTpaCT dncnner.
Kakon pa3dienbHoi cnoc6hocTbIO doJXHbI oBnadaTb foToRpaqHn, YTO6bl n3o6paxeHne Ha dncnnee 6blno ONTMajlbHbIM?
Jyua pa3eIbna cnooc6hoctb 30 800*600 nKceen.
Ipoemy He pa6oTaOT cyHKuH: ABToMaTHueCKoe BKnUoyehne / ABToMaTHueCKoe BbIKNoUeyHne, HecMOTpHa To, YTO OHn aKtNBupoBaHbI?
Y6eHntecb, yTo hAcIpoKb BpeMeH npabNlha. Ecnn BpeMHaCTpOKn OTHocNTcK npoJnomy, daHHa FyHKnra BnepBbIe AKTNBPuyETc TOnbKO Ha cNeDyUoUs KaneHapHy IeHb.
He cTabbTe bblKIOUaTeJIb Ha o6paTHoI CTOpOHe LΦ B nO3nIPO POWER OFF. NocTabbTe LΦ ToIbKO B pexIM OxkndaHna.
ONICAHNE IPOODYKTA