EH460 GK6 - Cooker PKM - Free user manual and instructions
Find the device manual for free EH460 GK6 PKM in PDF.
| Product type | Cooker with ceramic hob and electric oven |
| Brand | PKM |
| Model | EH460 GK6 |
| External dimensions (W x D x H) | 600 x 630 x 855 mm |
| Internal oven dimensions (W x D x H) | 465 x 410 x 355 mm |
| Approximate weight | 50 kg |
| Power supply | 230 V single-phase / 400 V three-phase, 50/60 Hz |
| Maximum total power | Approx. 7.5 kW |
| Number of hobs | 4 ceramic hobs |
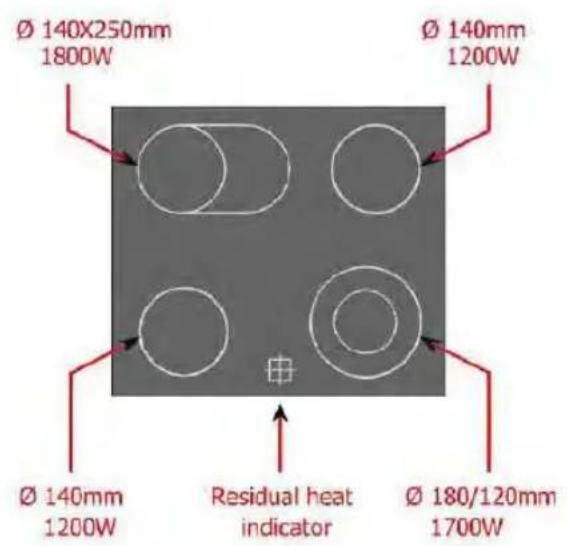
| Hob power | Front left zone ø140 mm: 1200 W; Rear left zone ø180 mm: 1800 W; Front right double zone ø180/ø120 mm: 1700 W; Rear right oval zone 140x250 mm: 1800 W |
| Oven type | Electric oven with convection, grill and rotisserie |
| Oven capacity | Approx. 75 L (calculated from internal dimensions) |
| Oven temperature range | 50 to 280 °C |
| Oven functions | Convection, conventional heat (top and bottom), grill, grill + fan, rotisserie, interior light |
| Timer | Electronic timer with automatic cooking programming and alarm |
| Safety | Residual heat indicator on hobs, automatic shut-off in case of overheating (not specified but typical), child lock not mentioned |
| Maintenance and cleaning | Clean hobs and oven with a damp cloth and mild detergent; do not use abrasive products or steam cleaners |
| Supplied accessories | Grid, drip tray, rotisserie (depending on model), control panel protection board |
| Spare parts and repairability | Spare parts are available from PKM after-sales service; call a professional for any repair |
| General information | Device intended for domestic use only; electrical installation by a qualified electrician; fuse required of minimum 32 A |
Frequently Asked Questions - EH460 GK6 PKM
User questions about EH460 GK6 PKM
0 question about this device. Answer the ones you know or ask your own.
Ask a new question about this device
Download the instructions for your Cooker in PDF format for free! Find your manual EH460 GK6 - PKM and take your electronic device back in hand. On this page are published all the documents necessary for the use of your device. EH460 GK6 by PKM.
USER MANUAL EH460 GK6 PKM
VITROCERAMIC TOP PLATE FREE STANDING COOKER USER MANUAL
Dear User,
We aim to provide you with a high quality product manufactured in our modern factory with great care and in compliance with total quality control principles.
Therefore, we suggest you read the user manual carefully before using the product and, keep it safe for future reference.
Warning : All our appliances are only for domestic use, not for commercial use.
Note:
This user manual covers more than one model. Some of the features specified in the Manual may not be available in your appliance.
CONTENTS
Installation of your oven
Technical features of your oven
Important warnings
If your oven does not operate
Description of oven & control panels
Using and description hob section for vitroceramic
Adjustment of electronic timer (optional
Using grill deflector plate
Maintenance and cleaning
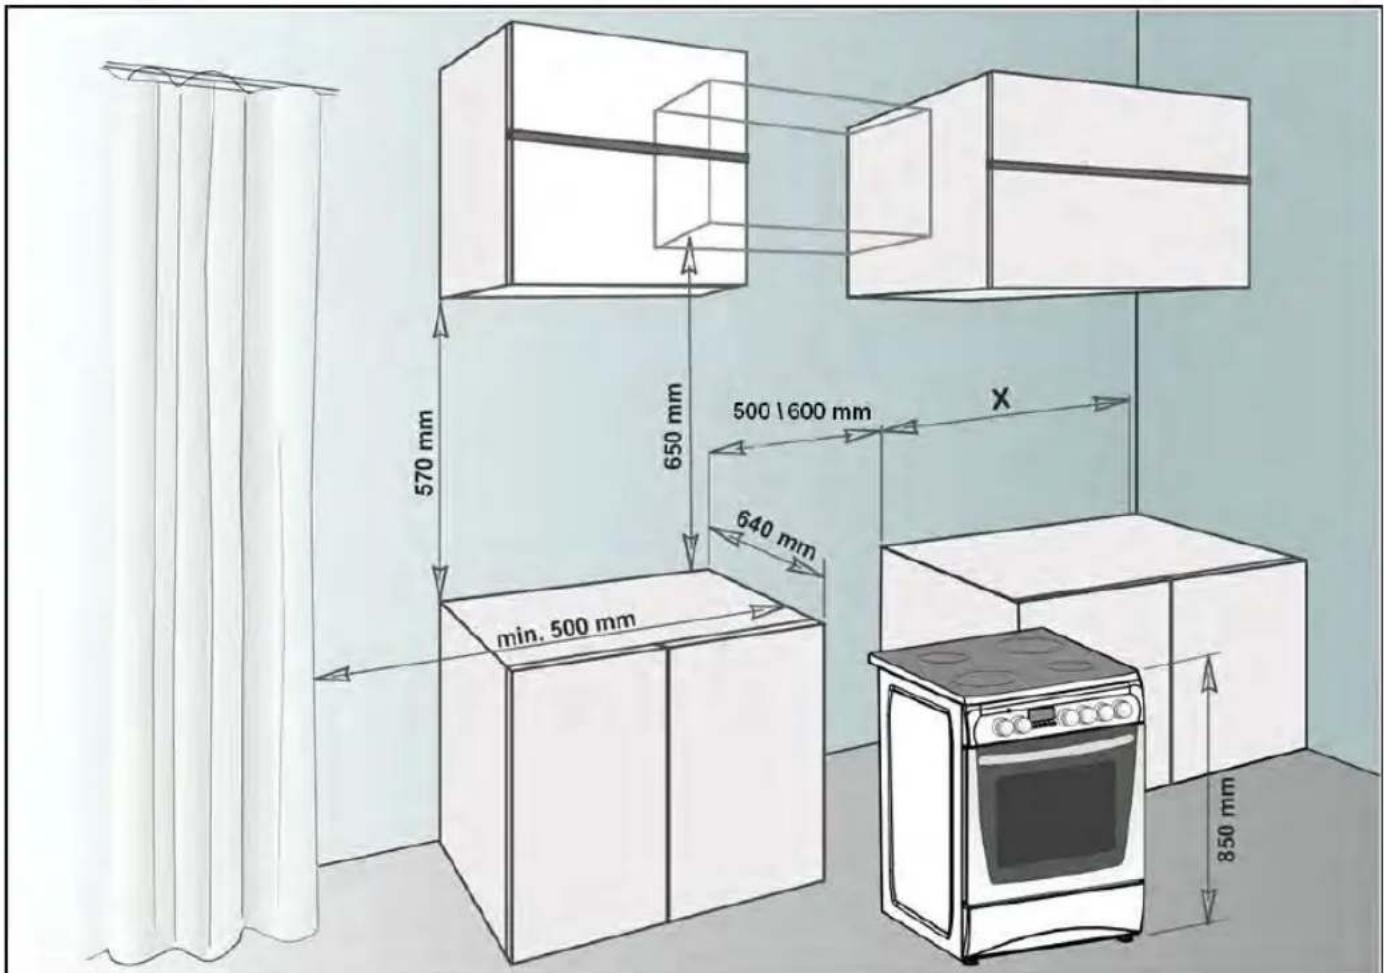
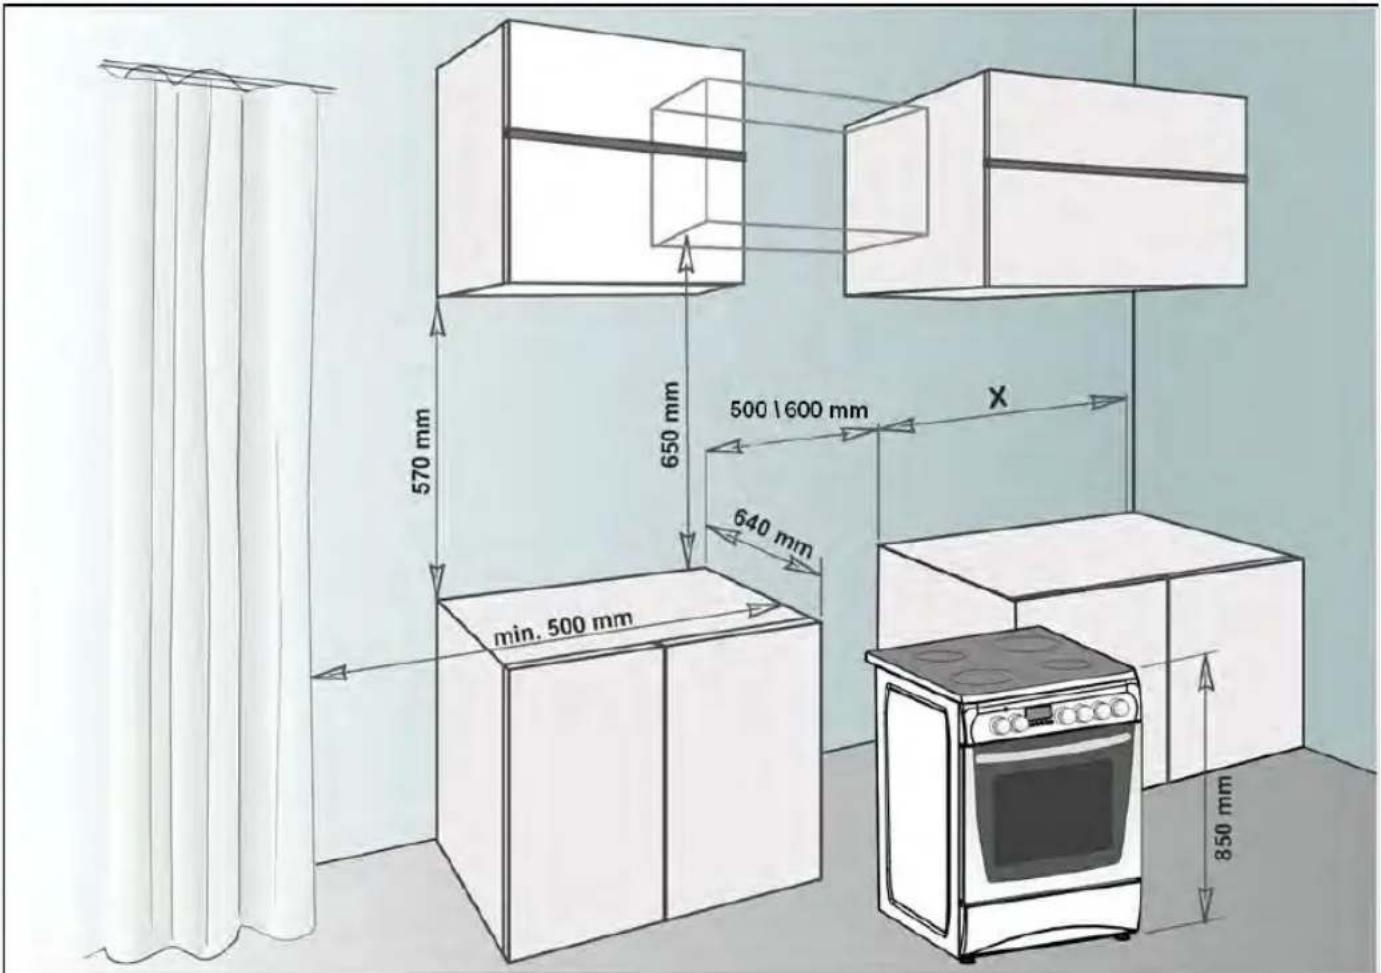
INSTALLATION OF YOUR OVEN
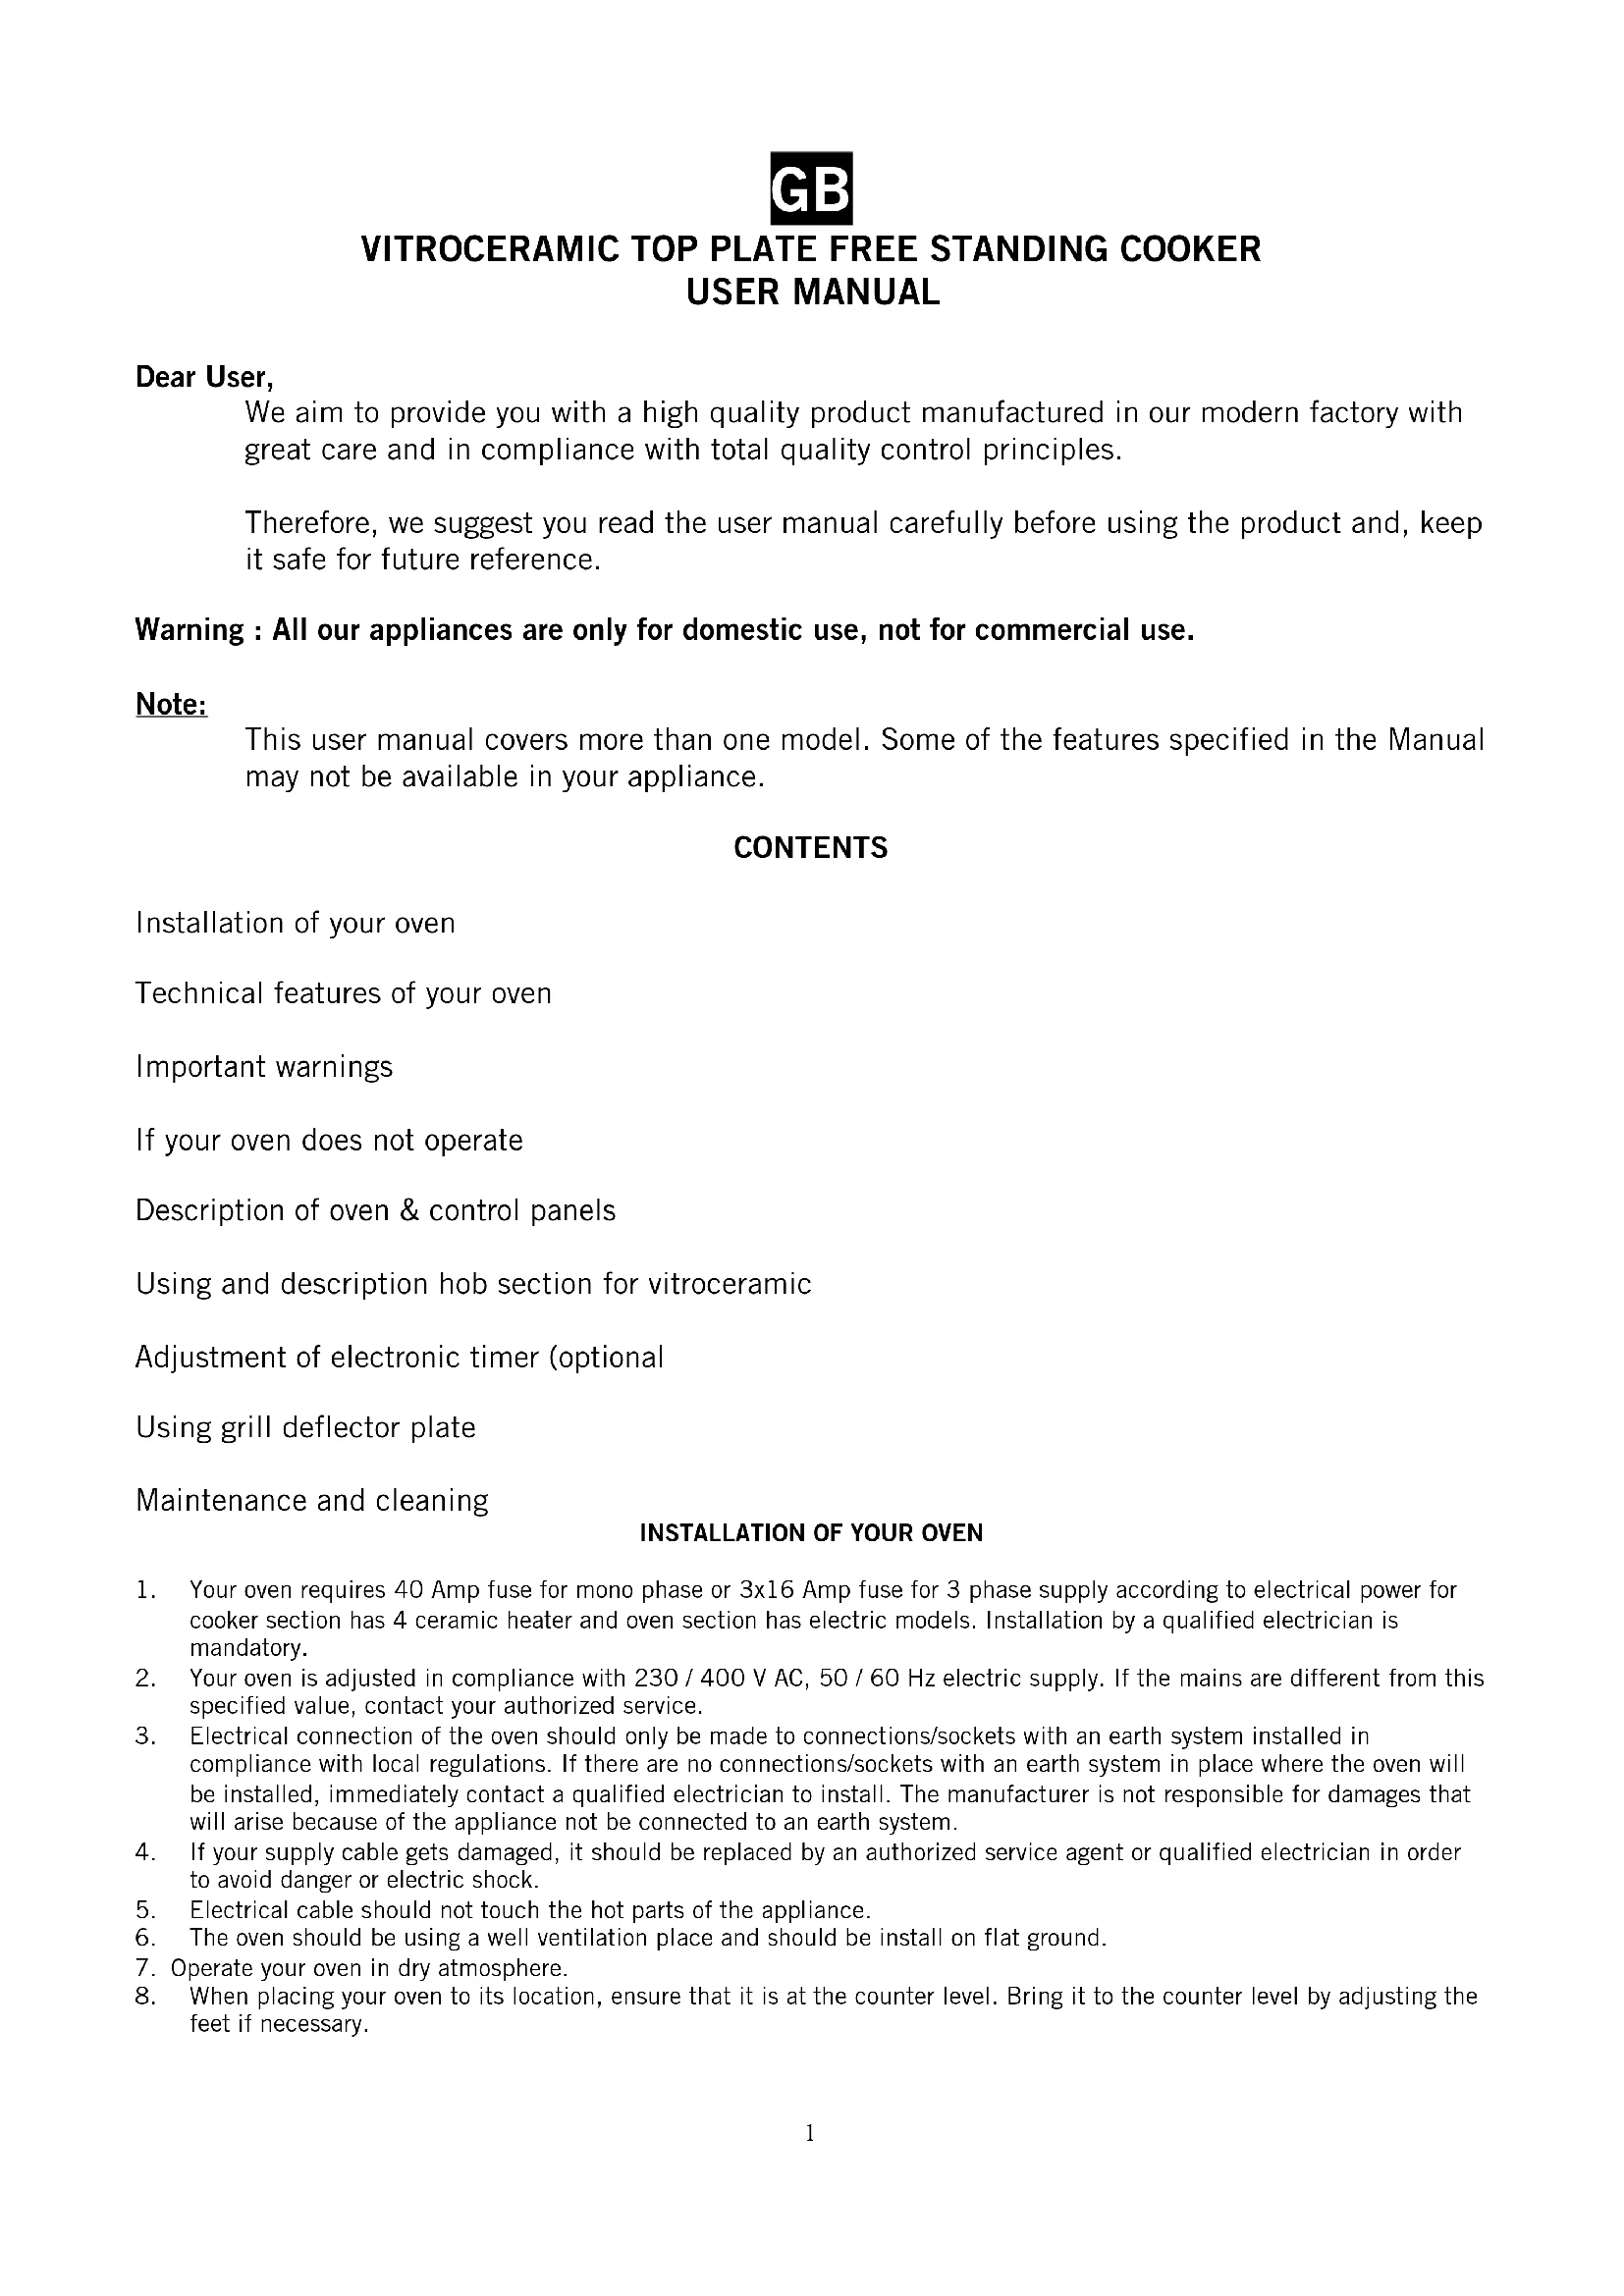
- Your oven requires 40 Amp fuse for mono phase or 3x16 Amp fuse for 3 phase supply according to electrical power for cooker section has 4 ceramic heater and oven section has electric models. Installation by a qualified electrician is mandatory.
- Your oven is adjusted in compliance with 230/400 V AC, 50/60 Hz electric supply. If the mains are different from this specified value, contact your authorized service.
- Electrical connection of the oven should only be made to connections/sockets with an earth system installed in compliance with local regulations. If there are no connections/sockets with an earth system in place where the oven will be installed, immediately contact a qualified electrician to install. The manufacturer is not responsible for damages that will arise because of the appliance not be connected to an earth system.
- If your supply cable gets damaged, it should be replaced by an authorized service agent or qualified electrician in order to avoid danger or electric shock.
- Electrical cable should not touch the hot parts of the appliance.
- The oven should be using a well ventilation place and should be install on flat ground.
- Operate your oven in dry atmosphere.
- When placing your oven to its location, ensure that it is at the counter level. Bring it to the counter level by adjusting the feet if necessary.
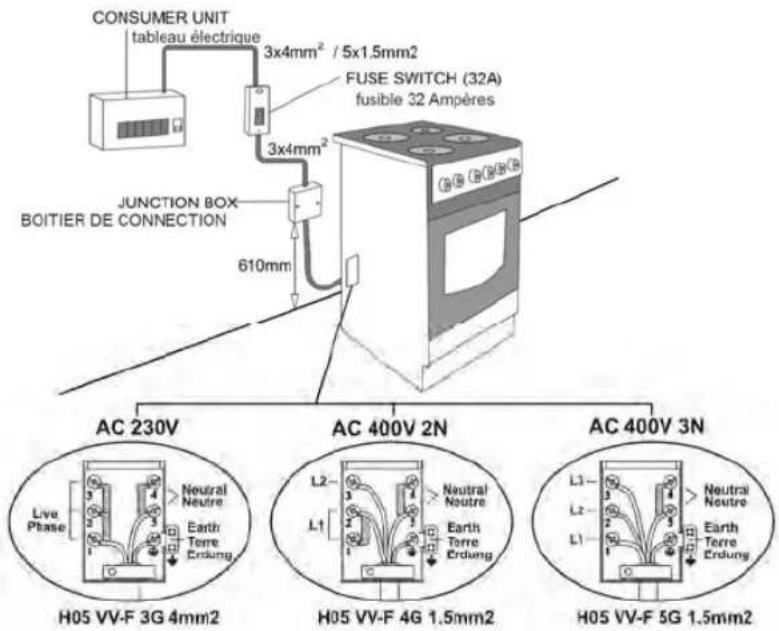
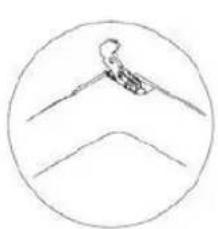
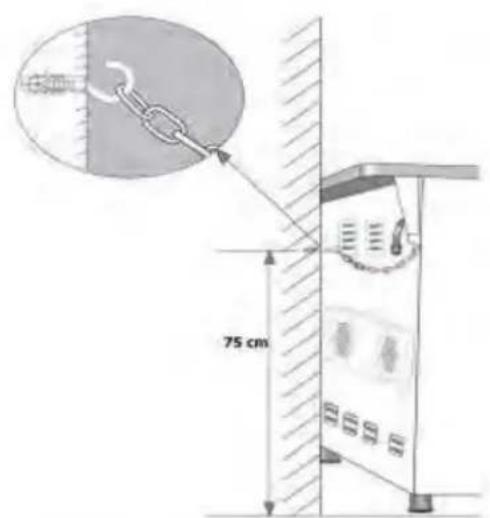
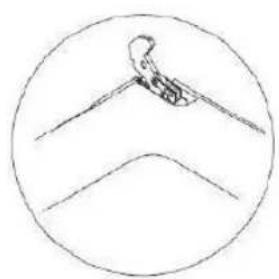
Before using the appliance, in order to ensure safe use, be sure to fix the appliance to the wall using the chain and hooked screw supplied. Ensure that the hook is screwed into the wall securely.
TECHNICAL FEATURES OF YOUR OVEN
| Specifications 50 x 60 60 x 60 | ||
| Outer width 500 mm 600 mm | ||
| Outer depth 630 mm 630 mm | ||
| Outer height 855 mm 855 mm | ||
| Inner width 365 mm 465 mm | ||
| Inner depth 410 mm 410 mm | ||
| Inner height 355 mm 355 mm | ||
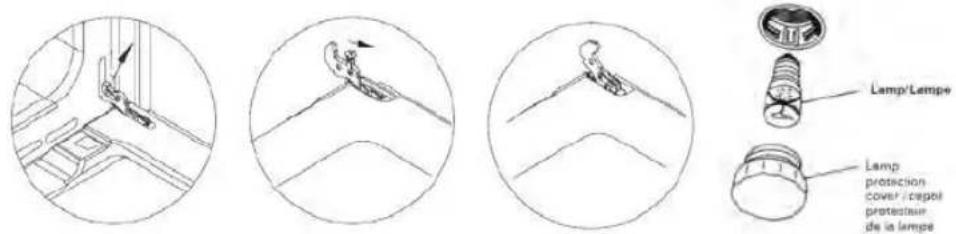
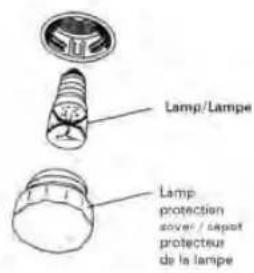
| Lamp power 15 W 15 W | ||
| Thermostat 50 - 280 C 50 - 280 | °C | |
| Bottom heating element 1000 W 1200 W | ||
| Top heating element 800 W | 1000 W | |
| Turbo heating element | 1800 W 2200 W | |
| Grill heating element | 1500 W 2000 W | |
| Supply voltage | 230 / 400 V, 50-60 Hz | 230 / 400 V, 50-60 Hz |
| Ceramic heater Ø140 | 1200 W 1200 W | |
| Ceramic heater Ø180 | 1800 W 1800 W | |
Before starting to use the appliance, read the user manual carefully. In this user Manual, there is important information regarding your safety, oven usage and maintenance.
- Keep this user manual somewhere safe, and make it available to anyone who uses the oven.
IMPORTANT WARNINGS
- Pay attention to minimum health and safety requirements.
- Children should be supervised to ensure that they do not play with the appliance
- This appliance is not intended for use by persons (including children) with reduced physical, sensory or mental capabilities, or lack of experience and knowledge, unless they have been given supervision or instruction concerning use of the appliance by a person responsible for their safety
- During use the appliance becomes hot. Care should be taken to avoid touching heating elements inside the oven
- Accessible parts may become hot during use. Young children should be kept away
- Metallic objects such as knives, forks, spoons and lids should not be placed on the hob surface since they can get hot.
- Keep the gas hose and electrical cable of your oven away from the hot areas; do not let them touch the appliance. Keep them away from sharp sides and heated surfaces.
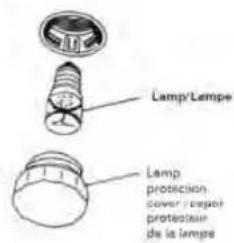
- Ensure that the appliance is switched off before replacing the lamp to avoid the possibility of electric shock.
- In case of power failure, readjust your timer definitely. Otherwise, the oven will not operate (Digital Timer).
- Usage of your appliance creates moisture and heath in the room it is placed, make sure that your kitchen is ventilated well. Maintain the natural ventilation ducts properly.
- When the oven is being used, some parts may become hot, even when you turned off the switches the parts can be hot still; children should be kept away and supervised at all times., do not touch to cooking zone on vitroceramic hob during warning indicators are lighting. The indicators stay lighting during danger temperature on the surface of cooker zone even you turned off cooking switches of hob.
- When the oven is hot never touch the oven glass by hand.
- Before starting to use your appliance, keep curtain, tulle, paper or inflammable things away from your appliance. Do not keep combustible or inflammable things in or on the appliance.
- The oven produced for cooking purpose. Please do not use except for purpose.
- For disconnection from the supply mains having a contact separation in all poles that provide full disconnection, must be incorporated in fixed wiring in accordance with the wiring rules.
- When connecting to a cooker panel, the supply switch must have a double pole switch with contact separation of 3 mm minimum
- Use glove when using cooker. Do not touch on hot surfaces and hot parts.
- Do not splash water onto the cooker.
- Do not use cooker in potentially explosive atmospheres.
- Do not carry cooker holding with handle.
- Some models are supplied without a plug-an-lead set. In this case please use a flexible cable to suitable for connection to mono phase: H05 VV-F 3 G 4 mm2 or for 3 phase: H05 VV - F 5 G 1.5 mm2
- The glass ceramic can be damaged by objects falling onto it.
- If the surface is cracked, switch off the appliance to avoid the possibility of electric shock, for hob surfaces of glass-ceramic or similar material which protect live parts
- Please check that the electrical supply is connected and turned-on to the oven
- Please check that there is electricity supply to the property.
- Please check the fuse.
- Please check the clock / auto programmer is set to the manual mode. (For Digital Timer option)
- If you cannot solve the problem, contact the manufacturer-supplier, services agent or similar qualified persons.
DESCRIPTION OF THE OVEN AND CONTROL PANELS
| Fan | Top+bottom heating element |
| Turbo heating element+fan | Lamp |
| Bottom/Top heating elemens+fan | Bottom heating element+fan |
| Grill heating element+fan | Electrical timer |
| Grill heating element | Turnspit |
| Top heating element | Bottom heating element |
THERMOSTAT KNOB; In order to operate the oven, thermostat must be adjusted to desire temperature. Your thermostat has a feature of adjustment to 50 - 280 degree.
MECHANIC TIMER KNOB (Optional); In order to operate the oven, timer switch should be adjusted to desired time.
DESCRIPTION OF THE OVEN AND CONTROL PANELS
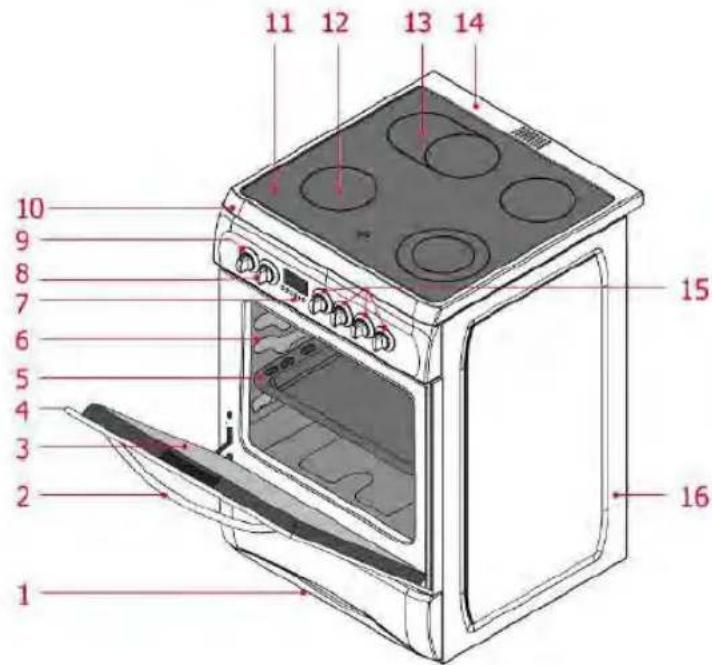
| 1. | Drawer |
| 2. | Handle |
| 3. | Inner glass of oven door |
| 4. | Glass oven door |
| 5. | Oven tray |
| 6. | Cavity |
| 7. | Digital timer (optional) |
| 8. | Command knob for oven |
| 9. | Thermostat knob |
| 10. | Command panel |
| 11. | Glass top plate |
| 12. | Heating place |
| 13. | Heating place |
| 14. | Metal top plate |
| 15. | Regulators for vitroceramic hobs |
| 16. | Side panel |
USING AND DESCRIPTION OF HOB SECTION FOR VITROCERAMIC
For rotary switch
- You operate the hob with the ring switches on the control panel of oven. This switch regulates the energy in order to reach desired temperature set by you.
- In order to have a good cooking result from the hob, the pans bottom should be as thick and flat as possible.
- Bottom of pans and cooking zones should be the same size. If possible, always place lids on the pans. Always place cookware on the cooking zone before it is switched on. Switch cooking zones off before the end of the cooking time, to take advantage of residual heat.
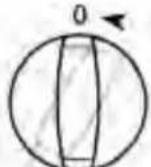
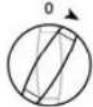
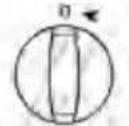
- Turn the knob to clockwise for starting to operate. Temperature set up by the knob position on the line gradually increasing up to max. (Single zone)
- For dual cooking zone the first ring operating like single zone; second ring starts to operate after extra turning by some more force to clockwise on the "max" region end of the ring sign. When you turn to counter clockwise, the first ring will operate as maximum range and the second ring's power will reduce up to you desire temperature.
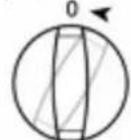
- At the "0" position, all the rings become off.

For ring control
You operate the hob with the ring switches on the control panel of the hob. This switch regulates the energy in order to reach the desired temperature which is set by you.
In order to have a good cooking result from the hobs, the pans bottom should be as thick and flat as possible.
The bottom of the pans and cooking zones should be the same size. If possible, always place lids on the pans. Always place cookware on the cooking zone before it is switched on. To take advantage of the residual heat switch cooking zones off before the end of the cooking time.
Turn the knob clockwise for starting to operate. Temperature is set up by the knob position on the line gradually increasing up to max.(Single zone)
At the "0" position, all the rings turn off.
| Features |
| 140mm hilight 1200W |
| 180mm hilight 1800W |
| 180/120mm Dual hilight 1700W |
| 140x250mm Oval hilight 1800W |

| LEVEL 1 LEVEL 2 LEVEL 3 LEVEL 4 LEVEL 5 LEVEL 6 | ||||||||
| 140 mm | 130 W | 206 W | 350 W | 500 W | 850 W | 1200 W | ||
| 180 mm | 180 W | 470 W | 790 W | 850 W | 1230 W | 1700 W | ||
USING OVEN SECTION
- When your oven is operated first time, an odor will be spread out which will be sourced from using the heating elements. In order to get rid of this, operate it at 250^ for 45 minutes while it is empty.
- In order to make cooking in your oven; oven switch must have been rotated; otherwise oven does not operate.
- Kinds of meals you will cook, cooking times and Thermostat positions were given in cooking table. The values given in the cooking table are characteristic values and were obtained as a result of the tests performed in our laboratory. You can find different flavors suitable for your taste depending on your cooking and using habits.
- You can make chicken revolving in your oven by means of the accessories.(optional)
- Cooking times: The results may change according to the area voltage and material having different quality, amount and temperatures.
- During the time when cooking is being performed in the oven, the lid of the oven should not be opened frequently.
- Otherwise circulation of the heat may be imbalanced and the results may change.
- Using cake forms while cooking cake gives better result.
COOKING TIME TABLE
| Meals Temperature (°C) Rack position Cooking time (min.) | ||
| Creamed cake 150 - 170 2 30 - 35 | ||
| Pastry 200 - 220 2 35 - 45 | ||
| Biscuit 160 - 170 3 20 - 25 | ||
| Cookie 160 - 170 3 20 - 35 | ||
| Cake 160 - 180 2 25 - 35 | ||
| Braided cookie 200 - 220 2 30 - 40 | ||
| Filo pastry 180 - 200 2 35 - 45 | ||
| Savory pastry 160 - 180 2 20 - 30 | ||
| Lamb meat 210 - 230 1 90 - 120 | ||
| Veal | 210 - 230 1 90-1 | 20 |
| Mutton | 210 - 230 1 90-1 | 20 |
| Chicken (in pieces) | 210 - 230 1 | 75 - 100 |
| Fish | 190 - 210 3 40 - | 50 |
Note: The values in the Table are the results obtained in our laboratories. You can find flavors different and suitable to your taste by experience. 5 - 10 min. preliminary heating should be done prior cooking.
ADJUSTMENT OF ELECTRONIC TIMER (OPTIONAL)
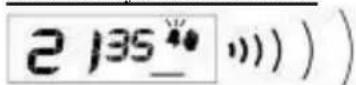
is an electronic timer, which enables your oven to get the food ready to serve at the desired time. The only thing to be done is to program the cooking time and ready time. It can also be used as an alarm clock, where you just give in the amount of time after which it should remind you by a buzzer tone.
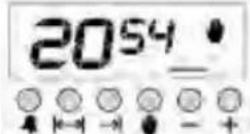
Time Of Day Adjustment
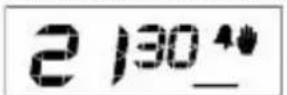
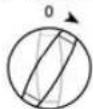
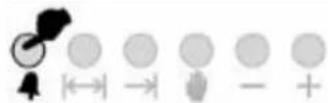
You can adjust the displayed time only if no automatic cooking program is in progress (there is just the time and the hand icon on the screen). Press the button, a small triangle between the hours and minutes will start to flash.(1) Use the + or - buttons for adjustment.(2) Long presses of those buttons will enable fast adjustments.


1) Switch into the time adjustment mode.
2) Adjust the time using the + or - buttons.
3) Screen will be stabilized in 5 seconds.
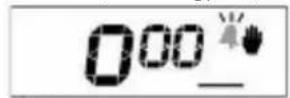
Adjusting The Buzzer Alarm
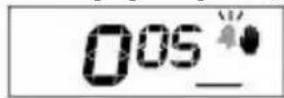
With this feature, you can program after how much elapsed time you should be warned by a buzzer sound.


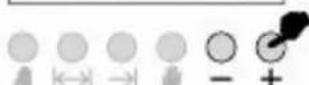

1) Switch into the buzzer alarm mode.
2) Give in the period of time to be counted down
3) After a few seconds, screen will return to clock mode
Note: Once programmed, the remaining time can be seen by pressing the 4 button once
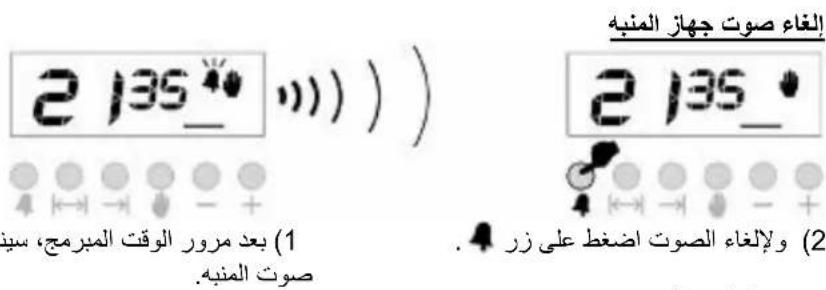
Cancelling The Buzzer Sound
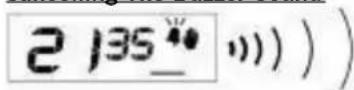
1) Buzzer will sound after the programmed amount of time elapses.
2) Press the button to cancel.
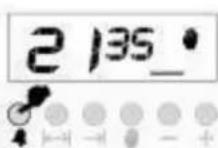
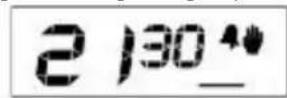
Automatic Cooking Program
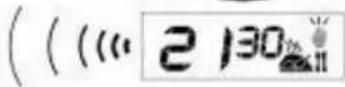
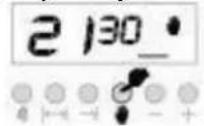
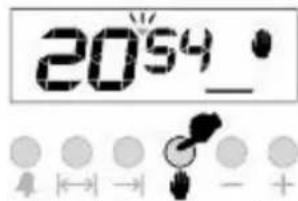
If you want to start cooking immediately, you just have to give in the cooking period. Example: We placed our food into the oven and want it to be cooked for 2 hours and 15 minutes

1) Current time. is 18:30
2) Switch into the cooking mode.
3) Adjust the cooking period using the + or - buttons.
4) After a few seconds, the screen will indicate That cooking has started and show the current time.
Now, you have programmed your oven to cook the food for 2 hours and 15 minutes. Please do not forget to bring the function and/or temperature knobs of your oven to appropriate positions.
NOTE: You may cancel the automatic cooking mode any time by pressing the button. Adjusting the Cooking Time That You Desire
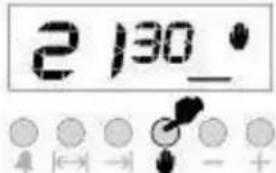
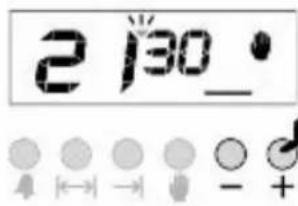
In the above example, cooking immediately started after giving the cooking period. By pressing the button, you can see the ready time which is when the food will be ready to serve, and if you want, you can also change it. In the example below, the ready time will be changed to 21:30.


1) Displayed is the ready
2) Set it to the desired time
3) In a few seconds, screen
time 18:30+2:15=20:45. by using the + or - buttons. switches to clock mode. Now, we have programmed our oven to get the food ready at 21:30. (1) Since the cooking time was preprogrammed as 2 hours 15 minutes, your oven will start cooking at 19:15, so that the food is ready at 21:30.

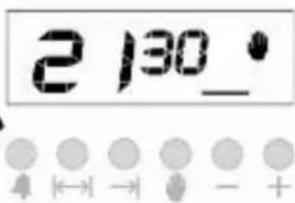
1) Screen just when cooking starts 2) Screen just when cooking ends
When automatic cooking is completed, a buzzer alarm is heard and will sound, if not stopped, for 7 minutes.
1) Switch your oven OFF
NOTE: Your oven will be inoperative until you reset the timer.
In the example above, cooking time has been programmed first; the ready time was calculated automatically and was edited by us. It is also possible first to program the ready time, in that case the cooking time will be calculated automatically and should be edited thereafter.
During the automatic cooking program, the backlight color of the screen will be green before and red during cooking.
Mains power interrupts will switch your oven into OFF mode. In that case the hand icon on the screen will flash and 12:00 will be displayed. Any cooking program will also be cancelled. Press the button to get your oven operative, press once again to the button switch to adjust the clock (See Time of Day Adjustment) NOTE: If you will not use your oven right now, be sure that it is in OFF position.
FLASHING ICON INDICATES THAT YOUR OVEN IS INOPERATIVE AND YOU SHOULD PRESS THE BUTTON TO RESET
Buzzer Volume Adjustment
1) Long press the button for 5 sec, you will hear the current tone.
2) Using the + or - buttons, you may adjust the volume (3 steps available).
3) Save your selection by pressing the button.
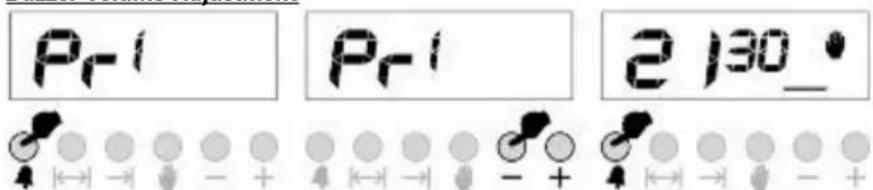
Programmable Options
Buzzer tone adjustment
- Press the button for 5 seconds ( till you see 'pr 1' on the screen).
- Press the button to decrease buzzer volume
- Press the button to increase buzzer volume (default is already high)
Press the button to record the last heard tone.
NOTE: to exit without recording press the button.
Defaults: Buzzer : High tone Click tone : On
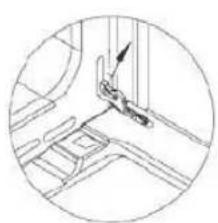
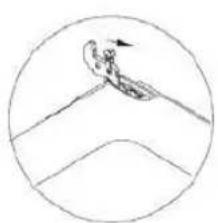
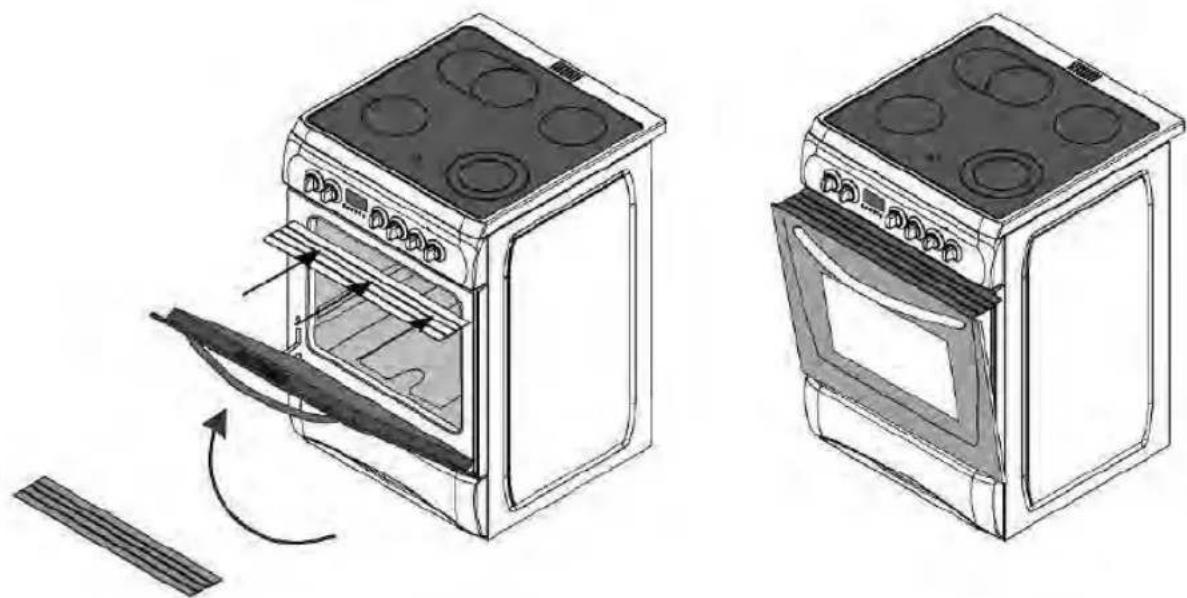
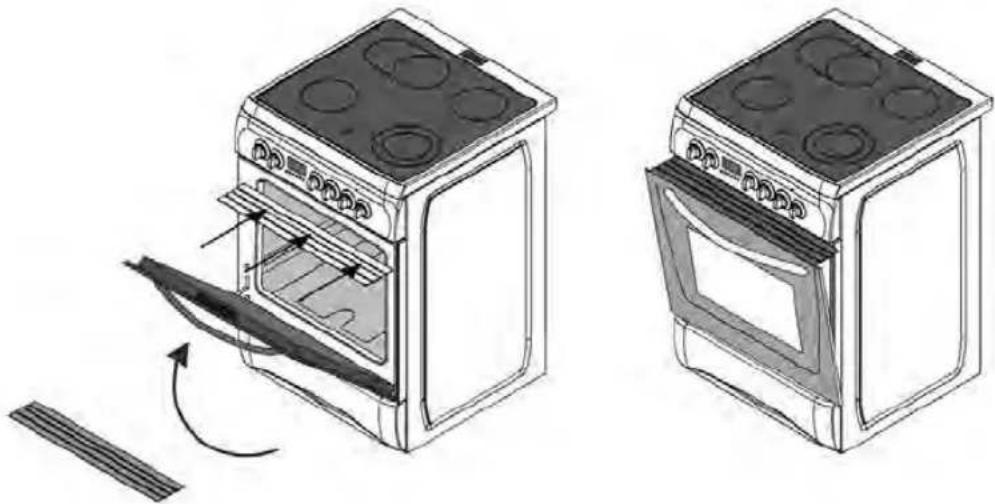
USING GRILL DEFLECTOR PLATE (optional)
- A safety panel is designed to protect control panel and the buttons when the oven is in Grill mode (Figure 1)
- Please use this safety panel in order to avoid the heat to damage control panel and the buttons when the oven is Grill mode.
- Place the safety panel under control panel by opening the oven front cover glass (Figure 2)
- And then secure the safety panel in between oven and front cover by gently closing the cover. (Figure 3)
- It is important for cooking to keep the cover open in specified distance when cooking in grill mode.
- Safety panel will provide an ideal cooking circumstance while protecting control panel and buttons.
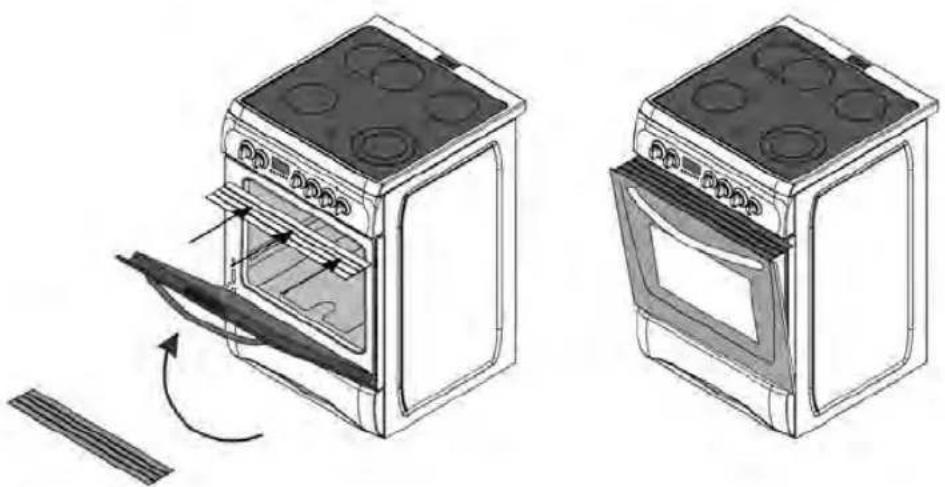
Figure 1 Figure 2 Figure 3
MAINTENANCE and CLEANING
- Disconnect the plug supplying electricity for the oven from the socket.
- While oven is operating or shortly after it starts operating, it is extremely hot. You must avoid touching heating elements.
- Never clean the interior part, panel, lid, trays and all other parts of the oven by the tools like hard brush, cleaning mesh or knife. Do not use abrasive, scratching agents and detergents.
- Do not use harsh abrasive cleaners or sharp metal scrapers to clean the oven door glass since they can scratch the surface, which may result in shattering of the glass.
- After cleaning the interior parts of the oven with a soapy cloth, rinse it and then dry thoroughly with a soft cloth.
- Clean the glass surfaces with special glass cleaning agents.
- Do not clean your oven with steam cleaners.
- Wash the heads of the burners sometimes with soapy water and clean the gas ducts by means of a brush.
- Never use inflammable agents like acid, thinner and gasoline when cleaning your oven.
- Do not wash any part of your oven in dishwasher.
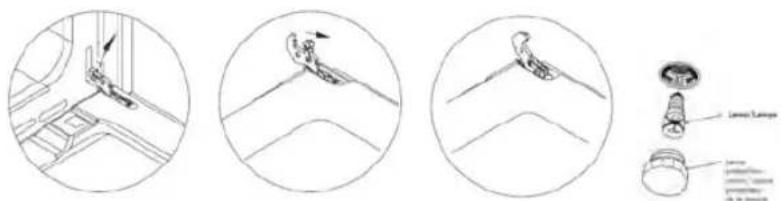
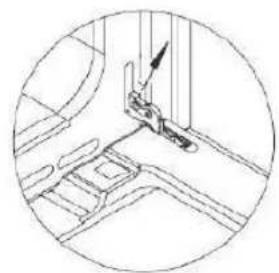
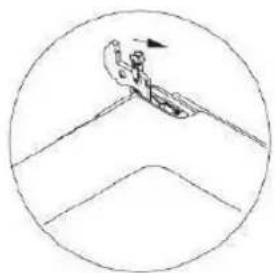
- In order to clean the front glass lid of the oven; remove the fixing screws fixing the handle by means of a screwdriver and, remove the oven door. Than clean and rinse it thoroughly. After drying, place the oven glass properly and re-install the handle.
GEBRAUCHSANWEISUNG
STANDHERDE MIT GLASKERAMIK - KOCHFELD
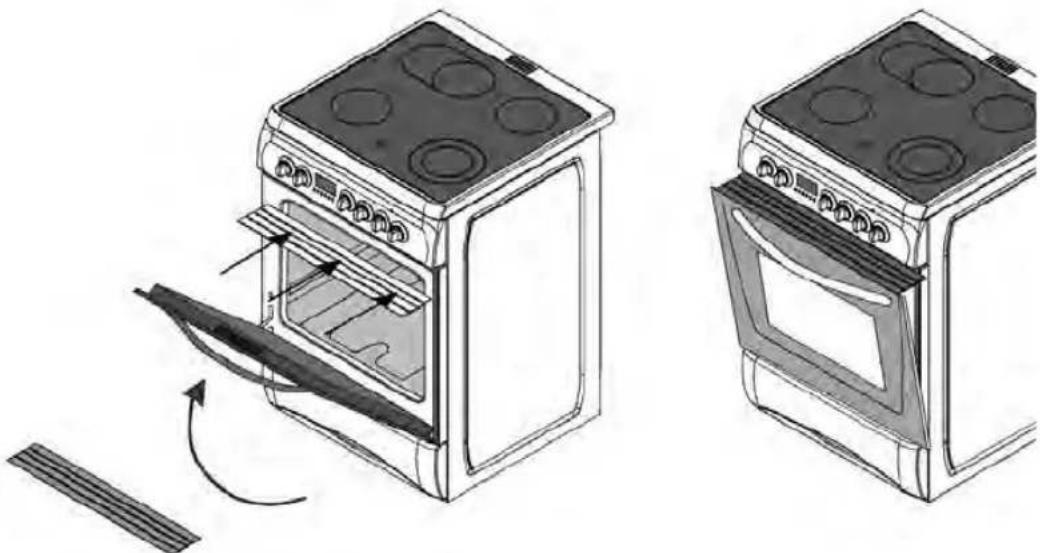
Figure 1 Figure 2 Figure 3
NETTOYAGE ET ENTRETIEN
Ecnn neub he pa6oTaet
OIIHcAHnIeunIHaHCJINyipaBJIeHNr
IcnoJIb3OBaHHe I OIIncAHne KOHΦopOK H3 KepaHa
Пльзоване духовков.
PerynpoBka 3IcktpoHHoro taMepa (OIIH)
HcnoJIb3OBaHHe oTpaKaTeJIa
06cnykBaHne nOuHCTKa
YCTAHOBKAIIEN
3eKtpnueckoe CoedHneHne H Beonacnoctb
- Ha neb tpe6yertc IIaBkn IpeoxpaHHTeJIb Ha 40 amepaIg 4 HarpBeBaTeJIe KepaIOBbIX KOHOpOK nIg dyXOBKn. PnHco6xoJIMOCTH 3Amchbl yctAHOBKa IOJTKHa BbIIIOJIHTbcr KBAJIHΦHIIHPOBAHHBM 3JCKTpKOM.
- Bannia ney otperyynpoBAnHa nepemEnnHbTOK HOMnHApom 230/400V,50/60Hz.Ecnn cetb OTnueaTeO TTHX 3naennn, o6paHTtecb B cepBncnHnIeHtp.
- 3EETKpHcckoe coeHHHe HcHIO KHO TOJbKO Hepe3 PO3TK C 3a3emHcHc B COOTBeCTBHN C HopMaH. EcHn Ha Mece TcAHOBKn Hc PO3TKC 3a3cmHcHcM, HcMeIJIeHIO O6paHTncB KBAIHpOBAHOMy 3EeKTPKy. IPOH3BOHNTbc Hc Hecet OTBcTcBEHOCtB 3a yIep6, BO3HKIIHN II pHUnHE IIoIKJIOueHH Hepe3 PO3TK 6e3 3a3eHHeH. EcHn KOHb II eKTPHeCKOro IIPOBOJa OTKpbITb, B 3aBHCHMOCTN OH YcTpOcTBA, IIocTaBBte IIpeKJIOaTeJB IIIOIKIIIOHeHH/OTKIOHeHH ceTH.
- Ecln 3JIeKTPnueckn IIpoBOH HEnCIIpaBEN, BO H36eKaHHe HEnPnTHOCTeI eRo HEnpeMeHHo DOJIKeH 3aMeHHb CIIeHaJInCT.
- 3JIeKTPueckn IIpoB0I He IOJIkeH cOIIpHKacatbC r TOpRHMn ITeTajIMn Neu.
- Huyxho yctahOBHTb Ha pOBhB II IOI B Xopoio IPOBertPbAemOM MecTe.
- 3KcIyatpyitne neB cyxoi aTMOcepe.
- Ipn yctaHOBKe neuHa MeCTO y6eHTecb, TTO OHa cTOnH HopMaJIbHo. Ipn HeoXoHNMOcTH OTperyIInpyIte HOKKn.

TEXHINUECKHEXAPAKTEPHCTHKIIECH
BAKHBIE IPEYIPEXHEHIA
- Co6IIOJaIe Tepe6oBaHnI No 6e3OpaHocTH n oxpae 3IopOBbIa.
- HanpKaHeHc 3JKeKtpoHHa Hn 230/400V,50/60Hz.
- IeYb pa6oTAcT OOr OINHOa3Horo HIN TpexΦa3Horo TOka. HeIOJIb3yIc IIpcOxpaHHTeJb MHHMyM 40 A dJa oINHOa3Horo H 3 x 16 A IO 3-Φa3Horo TOka.
- IockoIbky BnIka Ha BaIIe HneH HMeet 3a3emJIeHHe, 063aTeJIbHO HcIIIOJIb3yIte po3eTKy c 3a3emJIeHHem. EcIIH po3eTKa 6yIeT 6e3 3a3cMIeHHHaIIa QpMa He HccET OTBcTBeHHOCTH 3a BO3MOxHbYIep6.
- Depknte ra30bui IJIaHn H 3IeKtpueckn IIPOBOI IOdaJIbIe OT ROPyHX yactKO, He dOnyckar Hx cOpnKOCHOBEHHA. Depknte HXIOdaJIbIeOT OCTpbIX yIOB.
- EeH 3JIeKTPoPBOOIOI IOBpeKJII, BO H36eKaHHe IHe npTHOCTn erO cIeAyeT 3aMeHHtB, OpaTHBUnHcB B cepBCHbI ueHTp HIN K KBaIHnHPOBaHHOMy CIEuHaIHCTy.
- IpeH 3aMeHOI JAMIOKBO H36eKaHHe 3JIeKToPOJoka y6eHTecb, YTO npH6Op OTKIOUoyehOT cETH.
- B cnlyae otka3a nTaanrO tpeyHpyte TaMep. Hnane neB he 6ydt pa6oTaB (nHpOBoi TaMep).
- Ipn pa6oTe Ha IIeHN B IHomeIeHHN O6pa3yeTcB JlaHa N IOBBIIaetc TEmpeTaPya, IIOrOMy Ha KYXHe DoJIKHb 6bITb XopoIIa HBeHTHJIINH. CoIepKHTe KaHaJIbI cTeCTBCHHO BBeHTHJIINH B HAnCKaIIcM NoPjaKe.
- Bo BpempaobtIeHn HcKOTOpbIeTaTIN CHIbIO HArpeBaIOTcN OcTaIOTcR TOpAHMH NocJIe BblKIOueHH NHTaIIH; HN B KOCM Clyuae HeJIb3A IIOIIyCkATb DeTei 6IH3KO K IIeHN H cTAbJITbHX 6e3 IpHcMOTpa, He IIpHKacaiTecb K KOHOpKaM, IOKa TroprT IpeIyIpeKJaIOHc HnIHKAToPbI. IHINKaToPbI IpoIOJkaIOT RopETb, IOKa TeMIIepaTypa oCTAcTcN OIaHO BBICOKO, JaXe ccJIN BbIKIOUeHO IINTAHHe HA KOHOpKy.
- He troaIte cTeKIO IeHpyKaMn, Ioka IIeB rOpraJ.
- IpeKJHe YEM IOJIb3OBAtBcA JIEKTPOIIHToN y6ePHTe IIOaJIbIe 3aHaBeCckH, TIOJIb, 6yMaIy H npyrHe rOpUHe MaTePhaJIbI. He XpaHInTe Ha IIINTe HIN B dyXOBKe rOpUHe H JIEK0 BOcIIaMeHHeMbe MaTePhaJIbI.
- Bannnna npehna3nueHa nn npnrtoBJIeHHn HneHnoJb3yIte ce Ipynx neJe.
- ⅡIaOTKIOHIIHOOTcAIOHApIOHceTHBIEEBCOTBetCTBHNIPaBbIaMNIPOBOKnIOJIKHO6bITbBCTPOeHOpa3JeHeKoHTAKTOB HA BCEX IOIIOCAx,06ecNEuHBAIOOee NOJIIOE OTKIOHHe.
- Pn IOIOOCINHHH K NaHcHb BbIKHOaTcJIb NOJKeH HMeT b KaHTaKaTc c pacCTOHHem MeKJy HmH MHHM yMM. Pn pa6ote Ha IINTe POJIb3yIteCb NepaATkAMn. He pHKacaiTeCb K rOpayHM dTaJIM n NobepxHocTm.
- He pa3nHbaIte BOy nI nnIry.
17.He hnoJIb3yIte IIHTy BO B3pbIOOaHOH aTMOcpepe. - He nepchocnre pnnrty, npka ce 3a pyky.
- HeKOTOpBle MoEJIH IOCTABJHOHTcB 6e3 KOMIIIEKTA IIIAIIOKIIIOUeHHN.B TaKOM cIyae HCOJIb3yTe IINIOKIIIOUeHHN KOHOa3HOMy HcTOHHky: H05VV-F3G4MM2 IIINI3-Φa3HOrO: H05VV-F5G1.5MM2
- CTeKJIIOKepaMHky IeIKO IOBpeHITb, ypoHHBa Hc KaKoH-HHb II ppeIMET.
- Ecln Ha IOBepxHocTH NIOBHLINCB TpeuHHb, BbIKJIOHTe IINTy, YTObI He IIOJIYHTb yap TOKOM.
ECJH IIJNTA HE PABOTAET
- PpOBepe Te NODKJIIOUeHHe 3JIeKTPoINHTaHH K IJIHTe.
- PpOBepbTe HaJIHne TOKa B cETn.
- IpoBepbTe IIaBKn IIpeOxpaHrTeJIb.
- IpoBepbIe H y6eHITecb, YTO TaCb/ aBO-tpoPamMTop HaCTpoEII bI pyHIOI peKHM (OIIINI INIΦPOBOrO taHMePa).
- EeH np6Iema Hc pa3peIIaTeTcA, 6paTHTEcB K IIpoH3BOIIHTeJIHO, IocTaBIIHKy, cepBHCMy aReHTy HJIN dpyToMy KBaIHnHpOBAHHOMy cIeIHNAHCTy.
OINCAHNE IENI IAIHEJN YIPABJEHHN
PcYJHpOBKa 3ByKObOrO ChHaJa
C NOMONIOIIO 3TOIyIKINMOKHO 3aIporpAMNPOBaT, Ype3 KaKOC BPCM INP03ByHT CTHHAI.


1)IpeKIOHOHTBpeKIM 3BYKOBOFO CHHAJA.
2)3aainTeBpemn o6paTHoro orceta.
3) Hepe3 HeckoIbko CekyHn OkpaH BepHeTcBpeKHM YacOB.
IpHMeaHHe: Iocne IporpaMMnpoBaIIHIO octabIIeecr BpeM MoKIO yBnTeb, IaKaB KIOIky 4OHH pa3.
OrMeHa 3ByKOBOrO ChnHaJa


1) CnHaJI Ipo3ByHT NocJIe HCTeYehnHAaIporpaMMHPOBaHHOro BpeMcHN.
2)ДЯOTMнБиHAKMHTE KHOIIKy
IIporpmaABTOMaTHueckoI IPhroTOBJEHH
EcJIN BxOHTHe HaaytB IIpHrOToBJIeHHe HEmEJIeHHO, IpoCTo 3aaiTe BpeM.
PnHmep:MbIOCTABHIN6JIOO B DxyOBky HxOTHM,TO6bI OHO rTOBNIocb 2 aca 15 MHHyT

1) Tekyiue Bpem 18:30. 2) IpeekHHTB Bpekm 3) OtperyIHPoBaTb 4) Yepe3 HeckoiKo CekyH 3KpaH BpemEH IOTOBKN KHOIIKO+ HIN-. Bpem IOTOBKN IOKaKeT, YTO IOTOBKa Haayiaacb, H OTDa3HT Tekyiue Bpem.
Tenepb Bb 3aipporpamMnpobai nyxOBky Ha roTOBky B TeueHne 2 yacob 15 MHHyt. He 3abte nocTaBHT KHOHNK fHKnn H/IN TMnncpatpyb B HyKnocnoJokcHc.
IipHmueHaHe: ABtOMaTHueckn peKHM MoKHO OCTaHOBHTb B JIO6oe BpeMa, HaKaB KHOIIky
B IIpHMepe, IIpHBeIeIIOM BbIe, IIpHrOToBJIeIIHe IIaJIOc bcpa3y IocJIe BbCTaJIeIIHH BpeMeHH IIpHrTOBJIeIIHH. HaxkAB KHOK Ky MOJHO YBHDCbBpemr rOTOBHOCTH, T.C. BpcM, KOrJa 6JIIO MoJHO IOJaBaTb K cTOLy, H CCJH Bb XOTHTC, H3McHHTb cRO. B IIpHBeIeIIHom HJKc IIpHMepe BpcM rOTOBHOCTH H3McHCHO Ha 21:30.

1)ПоказAoBpemЯ roTOBIOCTH 2)YcTahOBHTe HJxHoe BpeM 3)Yepe3 HeckoJIbKO cckyH 18:30+2:15=20:45. KHOIIKAMN +IIN -. OkaPn IpeKeJIOHOTcB peKM YacOB.
TenepbMb3aipporpamMnpoBajn DxyOBky Ha roTOBHOCTb 6JIOa B 21:30.Tak KaK BPema IpiHrTOBJIeHHa 6bIIO yCTAHOBJIeHO 2 Yaca 15 MHyT, DxyOBka HauHer pa6oTaTB B 19:15, TTO6bI IIpHrTOBHTb 6JIOIO K 21:30.

1) 3KpaII npn NaaJIe npHrTOBJIeHH 2) 3KpaII B KOIue npHrTOBJIeHH
IO OKHuaHH INpoecca npHrTOBJIeHH INpO3ByuHT 3bYKOBoi cHraJI H6yTe 3bUaTb, ecJIH He OCTaHOBTb, B TeueHHe 7 MHHyt.
1)BbIKJIOHTeIyXOBKy.
2) IpeyectaHOBHTraMep.
IpHMeaHHe: IeH II 6yTe pa6oTaB, noka II nepeyeCTaHOBII TaHMeP.
B II pHBeHIOm Iprmepe cHaJa 6bIIO 3aIporpaMMHPOBaHO BpeM IIpiHrTOBJIeHH, BpeM rTOBHOCTH 6bIIO paccHTaHO
ABTomathueckn H 3MeHeHO HAMN. MoKHO cHaJa 3aIporpaMMHPOBaTb BpeM rTOBHOCTH, B 3TOM CJIyae BpeM IIpHrTOBJIeHH
6yET paccHTaHO ABTomathueckn H MOKeT 6bITb H3MeHeHO IOTOM.
Bo Bpem BblIOJIeHHI IporpaMMb ABTomaTHueCKoTo IIpHrTOBJIeHHI NOcBETKa 9KpaHa 6yJeT 3eJHo I nepe I naJOM H KpaHoi BO Bpem IIpHrTOBJeHHI.
Ipc60B 3JekTPOHHTAHNN BHKIOHT IyXOBky. B OTOM cnyac HKOHa pyKn HaHcT MnTaB H OTO6pa3HTcB PcMg 12:00. IIporpaMaIIpHToOTOBIEHH TAKKe 6yET OTMeHeHa. HAcKMte KHOIKy ,YTO6bl IyXOBka 3apa6oRaJa, eue pa3 HaKmHTe H otpeyIInpyiTE Bpem (CM. PEYJIINPOBKA BPEMEHN).
PpHmueaHHe: EcnIyXOBKa B daHHb MomeHT He HcNoJIb3yeTcB, BbIKIOHHTe ee, IocTabN b pyKb NIOJoxHe OFF.
MIGAIOIIARyKA YKA3bIBAET,HTO JIVXOBKA HE PABOTAET. IJIIEPE3APY3KN HAO HAJKATB KHOIIKY
PeryJHpOBKa IpOMKocTH 3BOIHka

1)HaKMHTe HydepKNBaIte KHOIIky 2 B TeueHHe 5 cekyH, Bby ycIbHInTe 3aIaHHn CHHaJI.
2)KJIABHnAMn+HJH-MoKHO eOTpeYHnPOBaTb rPOMKOCTb (IOCTyINBb3BapHaHTa).
3) CoxpaHHTe BbIbOp, HaaKaB KHOJIky.
IporpamMHPyemble OIIHH PcYJHPOBka TOHa 3BOHka
HaKMHTe KIOKHy HA 5cekyH(IOKA He yBnHTe Ha KpaHe'pr1)
HaKMHTe KHOHky Jy yMcHbIeHHr POMKoCTH 3BOHka
HaKMHTe KHOIky + yBeyHHeHHr pOMKoTH 3BOHka (IO yMOJIaHHO BbICOKa)
HaKMITE KHOIIKY 3aHNCn HocJeIHeRo ycBuaHHoro ToHa
ABTomathueckoe H3meHne H0Ha
HaKMMTe KHOIIky → Ha 5 cekyH (IOKA dncIe He IOKaKeT ON HIN OFF). IBet fOHa IIpeKIOuaTcM MeKdy BKJI n BbIKJI n HAO6OpOT. Ecln 3Ta OINB BKIOUeHa, IBet IONCBETKN KpacH b BO BpMa II pNIRTOBIEHH N 3EJIb b BO BpMa OKHdAHH B ABTomathueckOM peKHMc. Ecln OINB bIKIOUeHa, IBet fOHa B ABTOMATueckOM peKHMe HE H3MeHITcR.
Bk/ByK:I IIOCBETKN
Haekmte Khoiky ha 5 ckyH (noka nncnne He nokaet ON nH OFF). IocCBetKa nepeKIOaetc Mekny BKJI n BblKJI n HAObOpot. Ecln 3ta OIIIN BkIOHoeHa, IOCBETKa BcERda pa6oTaET. Ecln OIIIN BbIKIOHoeHa, IOCBETKa He pa6oTaET B pyHOM peKHM. IocCBetKa BkIOHHTc Ha 15 ckyH II np H aKATIN AKTHBOH KOIIKN.
Bk/BbIKI Ie.iKa
HaKMMrE KHOHky + Ha 5 ckyHn (IOka IncIe Hc NOKaKeT ON HIN OFF). OIIHHIeIHKa IpeKJIIOaCTeM MeKJy BKJI IN BbIKJI. EcIn 3a OIIIN BcIOHueHa, IIp HauKaTHN KHOIIKN 6yET CJIbIIaH IeJIIOK. Ecln OIIIN BbIKIOHueHa, IeJIYKA He 6yDet.
Bo3bpar K Hacpoikam Iyo MyoJuaHHIO
HaKmTe Ha 10cekyHn (IOKa Ha dncJIe ee HnoBHTcra prd).
HacpoiKnI NO yMOJIaHHIO: 3BOHOK: BbICOKn TOH IIcJyK: BKJI
HcIOJb3OBAHHe IJIAHKn 3AHTbI PYUEK
- ⅢIITOK 6e3oNaocn HpeJHaaHaeHa JIA 3aIHTb HaneH ynpabHeHH NIOK, KOrDa IyXOBKa HxOHTcB B peKmE rpn (pncyHok 1)
- IIOKJIyIcTa, HIOJIb3yIe Tc IIHTOK 6c3oIacHocTH, YTO6bI KAp Ic IOBpcIIT IaHcJIb yIpaBcHnR N KHOIIKN, KOrJa IyXOBKa IaxOJNTcBpeKHMc rPHJ.
- IocTaBbTe 6e3oHaChOcTH IOI IaHeJIb yIpaJIbHHeH, OTKpbIB IpeHHIO CTKJIHHyO KpbIIHKy IyXOBKn (pHyCnK 2)
- 3aTeM 3aKpeHrTe uHTOK MEXKdy dYxOBKO H IpeDHeN KpbIuKO, octopoJXHO 3aKpbIb KpbIuKy (pncyHok 3)
- Bo Bpem IprHrOToBJIeHHa IrpHJIe BaKHO epKaTH KpbIHT OIKpbITOn Ha OIIpeJeIHHOe pacCToHHne.
- IITOK 6e30IaHocTH O6ecIeHT HHeaJIbHbIe ycIOBnA II pHIrTOBJIeHHN, OIOHOpeMeHHO 3aIIHua HaHEJIb yIpaBJIeHHN KHOIIKN.
PcHyHOK 1 PcyHOK 2 PcyHOK 3
OBCJYKBAHNEIOHCTKA
- OTKIOHHTe HHTaHHe, NOIaBaemoe Ha IIeYb.
2.Bo Bpempa6oBtI Hekotopoe nocle BbIKIOueHH ney oueh ropaay.He npKacaiTecb KHarpeBaTeJbHbIM 3JeMeHTAM. - HNKOrJa He YHCTHTe IyXOBky, NaHcIb, KpbHKy, IpOTHBHH NpyTHe IcTaH NcH TaKHMn HHeTpyMcHTaMn KaK JccTKa IIcTKa, cETKa HIIIOK. He HcnoJb3yIte a6pa3HBIIbe H npapaaioHne MaTePnaJIb.
- TocJe OunCTK BHTpeHHX DeTaeIe MblbHIO TpRnKOI ONOLOHTE HN IaTeJIbHO BHTPteMRAKOI TKaIIbIO,
- OHHaTe cTeKJIHHbIe NOBcPxHOCTn CteIIHaJIbHbIM OHcHTcJIaM
- He HnCTHTe IINTy Iapom.
- IepHOINueckn MOITE FOIOBKN RopeIOK MblbHO BDOI, a Ra3OIOPOBOI bIeTKOI.
- IpeKHe Cm BepxHIO KpbHKy neHN, OHeTHTe KpbHky ot pa3JIHTOJ KnIKocTH. IpeKHe Cem 3aKpbITb KpbHky ybeIInTeCb, TTO KaOpHbI CT0JI OCTBII.
- HNKoRJa He HcHIOJIb3yIte IINI YNCTKN IIeHN ITOPOUHe MaTePHaJIbI, TaKHe KAc KNCJIoTA, pa36aBHTe.Ib H 6eH3HH.
10.He MoIte DeTaNIN NENBIOOCyDOMOeHIOI MaIIHIIIE. - TTO6bI ONUCTHTb NpeEHHIO CTKJIHHYIO DBepu NeH, cHMMITE OTBepTKoI hKcHpyIOUne BnHTb, KOTOpBIE KpeIaT pyKy, H CHMHTe DBePuy dYxOBKn. 3aTeM ONUCTHte I TuaTeJIbHO OIOIOCHNTE. IocJIe TORO KA K OHa BBICOXHe, IocTaBBTe DBePuy n pyKy IIa MecTo.
C
aall jnnnne 1
Aislll waiiell wii i j j 2
3
4
-5
64
alj 1i jll aai i jll jll jll jll jll jll jll jll jll jll jll jll jll jll jll jll jll jll jll jll jll jll jll jll jll jll jll jll jll jll jll jll jll jll jll jll jll jll jll jll jll jll jll jll jll jll jll jll jll jll jill
aay jy jy 1 y 1 y 1 y 1 y 1 y 1 y 1 y 1 y 1 y 1 y 1 y 1 y 1 y 1 y 1 y 1 y 1 y 1 y 1 y 1 y 1 y 1 y 1 y 1 y 1 y 1 y 1 y 1 y 1 y 1 y 1 y 1 y
a ≤ b ≤ 1
-9
1111111111111111111111111111111111
11
aalall aalily gai jayi jai jgai jai jai jai jai jai
iLalol Clda o
(1) (2)
aagaa aaii 2
(2.1)
(3.1) 1501 1501 1501 1501 1501 1501 1501 1501 1501 1501 1501 1501 1501 1501 1501 1501 1501 1501 1501 1501
alal aal al! 1ie 2a dlae 5 3 6 8 9 10 11 12
J 6

iill 1ie aill i
jlll jlll 1
7 7
Aaai 2


J 10000000000000000000000000000000000000000000000000000
(OFF) 100000000000000000000000000000000000000000000000000000
ayial igua jyue bua


5 1 jbcal (1)
gall s jjilai 2 -+jj Jaauiy
J 3
a aaii aiai ai jaiyai
("Pr1"aaai 5 aal 4 jbciai -jie biaiaa aai Cg sinaa Jilll
Gall . +jie biaia aai all Gsinaa Djgl
. 4 jie biaia jiaiaall gssinaa Jj
aill jy baa aai 1
aclll jie bainj 2 -j+jjJuauiy
aaii 3
S ACD = S COD + S_ DCE
4.1.11
Saaee


2
Jaa 3
Aealll
4jge biaally gaiil aeg jay jay jay paiy:
15 15


30 1 (1
2012 2
Jaeiily 120
4
.
-+
1 1
15, 15, 15, 15, 15, 15, 15, 15, 15, 15, 15, 15, 15, 15, 15, 15, 15, 15,
21:30 1


aill 1
aallll 2
20:45 = 2:15 + 18:30
- 2j + 2j _i = 1^njixi
aclll 1
jll jll jll jll jll jll jll jll jll
aalee
aagaae aee eae aee ae aee aee aee aee aee aee
jieslglie 1
.11
- n j 12
J 1
.13
a a a a a a a a a a a a a a a a a a a a a a a a a a a a a
Lg g y 1y
J 1
Jooa yj 100000000000000000000000000000000000000000000000
j( 1) Si = 12 · j_i - 1 + ·s + 1j + 1j - 1
jiaiiaiall al jaiy jil yll 11
| N | I | V | O | |||
| 140 mm | 130 W 20 | 6 W 350 W 5 | 00 W 850 W | 1200 W | ||
| 180 mm 180 W | 470 W 790 W | 850 W 1230 W | 1700 W |
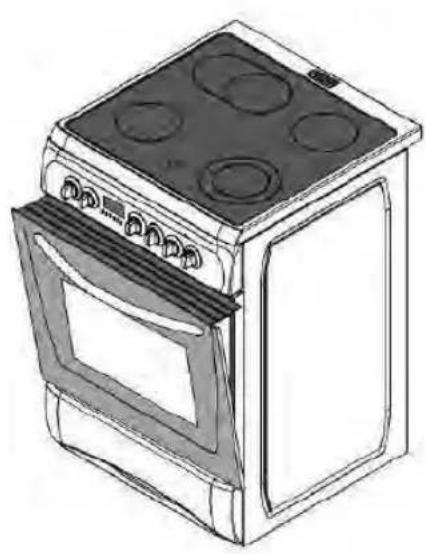
Figure 1 Figure 2 Figure 3
Održavanje i cisćenje
-
Iskličite urežaj iz struje.
-
Tokom rada pećnice dijelovi su vrlo vruci, Izbajgavaje diranie zagrijanih elemenata.
-
Nikada ne Čistite ununtrašnje dijelove, keramčku ploču ili ladice uz pomoc metalne Četke, kuhinjske strugalice ili nožem. Ne koristite abrazivna sredstva ili agresivne deterdžente za Čišćenie.
-
Nakon cisćenja unutrašnjih dijelova vlažnom krpom natopljenom u blagu sapunicu obrišite je i osušite suhom krpom.
-
Očistite staklene dijelove i platu elektricnog štednjaka uz pomoć sredstava za Čišcenje staklenih povrsina.
-
Ne cistitie uredai parnim cistacima.
-
Ponead operite staklenu gorniu povrsinu i greina kola u blagoi sapunici.
-
Nikada ne koristite zapalijiye tekuciine i kiseline za chişecnie pećnice.
-
Ne perite niti jegan dio uredaia u perilici za posude.
-
Kako biste očistili prednje staklo na vratima pećnice skinite držač stakla uz pomoć odvijača te skinite staklo. Očistite staklo i obrišite ga. Nakon sušenja vratite ga na svoje mjesto.