KDR671E - Car stereo JVC - Free user manual and instructions
Find the device manual for free KDR671E JVC in PDF.

Frequently Asked Questions - KDR671E JVC
User questions about KDR671E JVC
0 question about this device. Answer the ones you know or ask your own.
Ask a new question about this device
Download the instructions for your Car stereo in PDF format for free! Find your manual KDR671E - JVC and take your electronic device back in hand. On this page are published all the documents necessary for the use of your device. KDR671E by JVC.
USER MANUAL KDR671E JVC
MANUEL D'INSTRUCTIONS
CD-RECEIVER
Information on Disposal of Old Electrical and Electronic Equipment and Batteries (applicable for countries that have adopted separate waste collection systems)
Products and batteries with the symbol (crossed-out wheeled bin) cannot be disposed as household waste.
Old electrical and electronic equipment and batteries should be recycled at a facility capable of handling these items and their waste byproducts.
Contact your local authority for details in locating a recycle facility nearest to you. Proper recycling and waste disposal will help conserve resources whilst preventing detrimental effects on our health and the environment.
Notice: The sign "Pb" below the symbol for batteries indicates that this battery contains lead.
Declaration of Conformity with regard to the EMC Directive
Declaration of Conformity with regard to the RoHS Directive 2011/65/EU
Manufacturer:
JVC KENWOOD Corporation
3-12, Moriya-cho, Kanagawa-ku, Yokohama-shi, Kanagawa, 221-0022, Japan
EU Representative:
JVC Technical Services Europe GmbH
Konrad-Adenauer-Allee 1-11, D-61118 Bad Vilbel, Germany
1 Cancel the demonstration
2 Set the clock
3 Set the basic settings
CD/USB/iPod/Android 5
RADIO 7
AUX 8
AUDIO SETTINGS 9
DISPLAY SETTINGS 11
REFERENCES 12
Maintenance
More information
TROUBLESHOOTING 14
SPECIFICATIONS 15
INSTALLATION /
CONNECTION 16
IMPORTANT
To ensure proper use, please read through this manual before using this product. It is especially important that you read and observe Warning and Caution in this manual.
- Please keep the manual in a safe and accessible place for future reference.
Warning
Do not operate any function that takes your attention away from safe driving.
Caution
Volume setting:
- Adjust the volume so that you can hear sounds outside the car to prevent accidents.
- Lower the volume before playing digital sources to avoid damaging the speakers by the sudden increase of the output level.
General:
- Avoid using the external device if it might hinder safe driving.
- Make sure all important data has been backed up. We shall bear no responsibility for any loss of recorded data.
- Never put or leave any metallic objects (such as coins or metal tools) inside the unit, to prevent a short circuit.
- If a disc error occurs due to condensation on the laser lens, eject the disc and wait for the moisture to evaporate.
How to read this manual
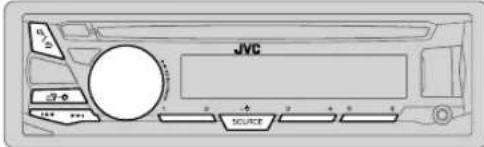
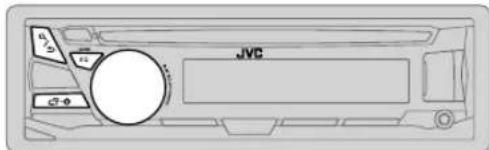
- Operations are explained mainly using buttons on the faceplate of KD-R571.
- English indications are used for the purpose of explanation. You can select the display language from the menu. (→4)
- [XX] indicates the selected items.
- ( XX) indicates references are available on the stated page.
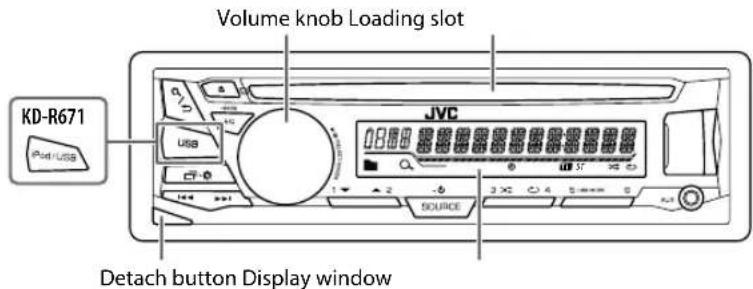
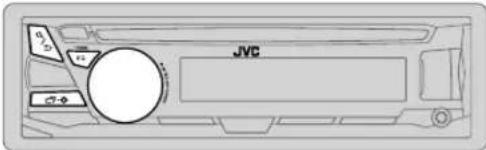
BASICS
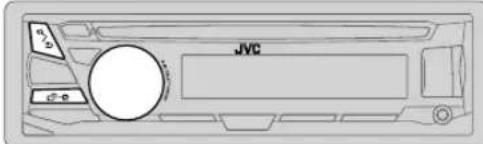
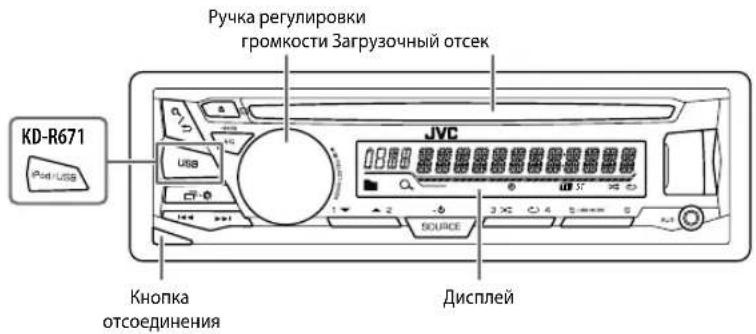
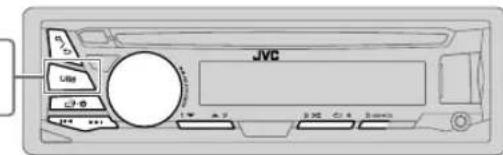
Faceplate
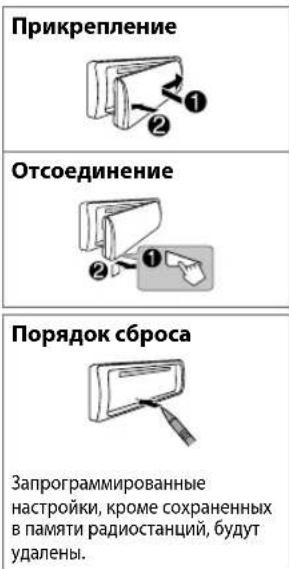
| Attach |
| Detach |
| How to reset |
| Your preset adjustments will be erased except stored radio stations. |
To On the faceplate
Turn on the power
Press SOURCE-
- Press and hold to turn off the power.
Adjust the volume Turn the volume knob.
Press the volume knob to mute the sound or pause playback.
- Press again to cancel.
Select a source
- Press SOURCE- repeatedly.
- Press SOURCE- , then turn the volume knob within 2 seconds.
Change the display information
Press repeatedly. (一 13)
GETTING STARTED

Cancel the demonstration
When you turn on the power (or after you reset the unit), the display shows: "CANCEL DEMO" "PRESS" "VOLUME KNOB"
1 Press the volume knob. [YES] is selected for the initial setup.
2 Press the volume knob again. "DEMO OFF" appears.

Set the clock
1 Press and hold
2 Turn the volume knob to select [ CLOCK], then press the knob.
3 Turn the volume knob to select [ CLOCK SET], then press the knob.
4 Turn the volume knob to make the settings, then press the knob. Day Hour Minute
5 Turn the volume knob to select [24H/12H], then press the knob.
6 Turn the volume knob to select [12 HOUR] or [24 HOUR], then press the knob.
7 Press to exit.
To return to the previous setting item, press Q/

Set the basic settings
1 Press and hold
2 Turn the volume knob to select an item (see the following table), then press the knob.
3 Repeat step 2 until the desired item is selected or activated.
4 Press to exit.
To return to the previous setting item, press Q/
Default: XX
| SETTINS | |
| BEEP | ON: Activates the keypress tone. ; OFF: Deactivates. |
| SRC SELECT | |
| AM* | ON: Enables AM in source selection. ; OFF: Disables. |
| AUX* | BT ADAPTER: Selects when the KS-BTA100 Bluetooth adapter is connected to the AUX jack. (→ 8) ; ON: Enables AUX in source selection. ; OFF: Disables. |
| F/W UPDATE | |
| SYSTEM | |
| F/W xxxx | YES: Starts upgrading the firmware. ; NO: Cancels (upgrading is not activated). For details on how to update the firmware, see: <http://www.jvc.net/cs/car/>. |
| CLOCK | |
| CLOCK SYNC | AUTO: The clock time is automatically set using the Clock Time (CT) data in FM Radio Data System signal. ; OFF: Cancels. |
| CLOCK DISP ON | ; The clock time is shown on the display even when the unit is turned off. ; OFF: Cancels. |
| ENGLISH | |
| PUSCKM | Select the display language for menu and music information if applicable. By default, ENGLISH is selected. |
| ESPANOL | |
- Not displayed when the corresponding source is selected.
CD / USB / iPod /Android
Start playback
The source changes automatically and playback starts.
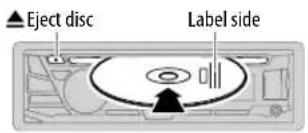
CD
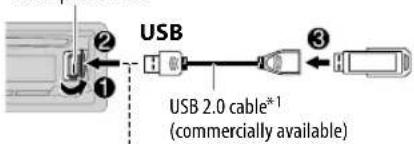
USB input terminal
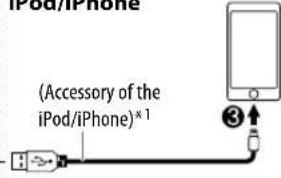
iPod/iPhone
ANDROID*2
Micro USB 2.0 cable*1 (commercially available)


Selectable source: KD-R671
1 Do not leave the cable inside the car when not using.
2 When connecting an Android device, "Press [VIEW] to install JVC MUSIC PLAY APP" is shown. Follow the instructions to install the application. You can also install the latest version of JVC MUSIC PLAY application on your Android device before connecting. (12)
3 For ANDROID: Applicable only when [AUTO MODE] is selected. (→ 6)
4 For CD: Only for MP3/WMA files. This does not work for iPod/Android.
*5 For iPod/ ANDROID: Applicable only when [HEAD MODE]/[AUTO MODE] is selected. (→ 6)
CD/USB/iPod/Android
Select control mode
While in USB-IPOD source, press sRscnolde
HEAD MODE: Control iPod from this unit.
IPHONE MODE Control iPod using the iPod itself. However, you can still play/ pause or file skip from this unit.
While inAndroid source,press srtseamode
AUTO MODE: Control Android device from this unit via JVC MUSIC PLAY application installed in the Android device.
AUDIO MODE: Control Android device using the Android device itself via other media player applications installed in the Android device. However, you can still play/pause or file skip from this unit.
Select music drive
Press SrySbMaDE
Stored songs in the following drive will be played back.
- Selected internal or external memory of a smartphone (Mass Storage Class).
- Selected drive of a multiple drives device.
Change the playback speed of the Audiobook
(For KD-R671)
While listening to the iPod and [HEAD MODE] is selected....
1 Press and hold
2 Turn the volume knob to select [IPOD], then press the knob.
3 Press the volume knob to select [AUDIOBOOKS].
4 Turn the volume knob to select an item, then press the knob. 0.5 × SPEED / 1 × SPEED / 2 × SPEED: Select the desired playback speed of the Audiobooks sound file in your iPod/iPhone. (Default: Depends on your iPod/iPhone setting.)
5 Press to exit.
To return to the previous setting item, press Q/
Select a file from a folder/list
1 Press Q/
2 Turn the volume knob to select a folder/list, then press the knob.
3 Turn the volume knob to select a file, then press the knob.
Quick Search
If you have many files, you can search through them quickly.
Turn the volume knob quickly to browse through the list quickly.
Not applicable for iPod.
Alphabet search (applicable only for iPod):
You can search for a file according to the first character.
Press 2 the volume knob quickly to select the desired character (A to Z/0 to 9/Others).
- Select "OTHERS" if the first character is other than A to Z, 0 to 9.
To return to the previous setting item, press /
To cancel, press and hold / .
- For iPod, applicable only when [HEAD MODE] is selected.
- ForAndroid,applicable only when [AUTO MODE] is selected.
RADIO
"ST" lights up when receiving an FM stereo broadcast with sufficient signal strength.
Search for a station
1 Press to select FM or AM.
2 Press to search for a station automatically.
(or)
Press and hold unifn flashes, then press repeatedly to search for a station manually.
Settings in memory
You can store up to 18 stations for FM and 6 stations for AM.
Store a station
While listening to a station....
Press and hold one of the number buttons (1 to 6).
(or)
1 Press and hold the volume knob until "PRESET MODE" flashes.
2 Turn the volume knob to select a preset number, then press the knob.
The preset number flashes and "MEMORY" appears.
Select a stored station
Press one of the number buttons (1 to 6).
(or)
1 Press.
2 Turn the volume knob to select a preset number, then press the knob to confirm.
Other settings
1 Press and hold
2 Turn the volume knob to select [ TUNER], then press the knob.
3 Turn the volume knob to select an item (see the following table), then press the knob.
4 Repeat step 3 until the desired item is selected/ activated or follow the instructions stated on the selected item.
5 Press to exit.
To return to the previous setting item, press a/
Default: XX
| RADIO TIMER | Turns on the radio at a specific time regardless of the current source.1 ONCE/DAILY/ WEEKLY/ OFF: Select how often the timer will be turned on.2 FM' AM: Select the band.3 01 to 18(for FM)/ 01 to06 (for AM): Select the preset station.4 Set the activation day * 1 and time."②" lights up when complete. Radio Timer will not activate for the following cases. The unit is turned off. [OFF] is selected for [AM] in [SRC SELECT] after Radio Timer for AM is selected. (→) |
| SSM | SSM 01 - 06 / SSM 07 - 12 / SSM 13 - 18 : Automatically resets up to 18 stations for FM. "SSM" stops flashing when the first 6 stations are stored. Select SSM 07 - 12 / SSM 13 - 18 to store the following 12 stations. |
*1 Selectable only when ONCE] or [WEEKLY] is selected in step 1.
RADIO
Default: XX
| LOCAL SEEK_ON | : Searches only FM stations with good reception. ; OFF: Cancels. • Settings made are applicable only to the selected source/station. Once you change the source/station, you need to make the settings again. |
| IF BAND AUTO | : Increases the tuner selectivity to reduce interference noises from adjacent FM stations. (Stereo effect may be lost.) ; WIDE: Subjects to interference noises from adjacent FM stations, but sound quality will not be degraded and the stereo effect will remain. |
| MONO ON | : Improves the FM reception, but the stereo effect will be lost. ; OFF: Cancels. |
| NEWS-STBY*2 | ON: The unit will temporarily switch to News Programme if available. ; OFF: Cancels. |
| REGIONAL*2 | ON: Switches to another station only in the specific region using the "AF" control. ; OFF: Cancels. |
| AF SET*2 | ON: Automatically searches for another station broadcasting the same program in the same Radio Data System network with better reception when the current reception is poor. ; OFF: Cancels. |
| TI SET*2 | ON: Allows the unit to temporarily switch to Traffic Information if available ("TI" lights up). ; OFF: Cancels. |
| PTY SEARCH*2 | Select a PTY code (see below). If there is a station broadcasting a program of the same PTY code as you have selected, that station is tuned in. |
PTY code: NEWS, AFFAIRS, INFO, SPORT, EDUCATE, DRAMA, CULTURE, SCIENCE, VARIORED, POP M (music), ROCK M (music), EASY M (music), LIGHT M (music), CLASSICS, OTHER M (music), WEATHER FINANCE, CHILDREN, SOCIAL, RELIGION, PHONE IN, TRAVEL, LEISURE, JAZZ, COUNTRY, NATION M (music), OLDIES, FOLK M (music), DOCUMENT
*2 Only for FM source.
AUX
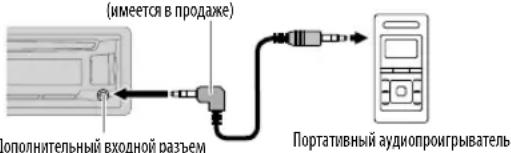
Use a portable audio player
1 Connect a portable audio player (commercially available).
3.5 mm stereo mini plug with "L" shaped connector (commercially available)
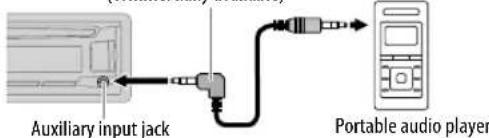
2 Select [ON] for [AUX] in [SRC SELECT]. ( 4)
3 Press to select AUX.
4 Turn on the portable audio player and start playback.

Use a 3-core plug head stereo mini plug for optimum audio output.
Use a Bluetooth device
1 Connect the Bluetooth adapter, KS-BTA100 (separately purchased).
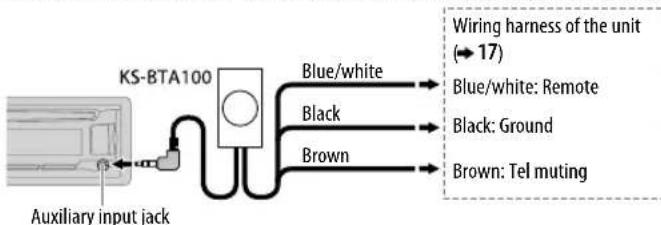
2 Register (pair) the Bluetooth device with KS-BTA100.
3 Select [BT ADAPTER] for [AUX] in [SRC SELECT]. ( 4)
4 Press to select BT AUDIO.
5 Start using the Bluetooth device.
For details, refer to the instruction manual of KS-BTA100.
AUDIO SETTINGS
Select a preset equalizer
Press Eppssdly.
(or)
PressEQ-BASS, then turn the volume knob within 5 seconds.
Preset equalizer. FLAT(default), HARD ROCK, HIP HOP, JAZZ, POP, R&B, TALK, USER,
VOCAL BOOST, BASS BOOST, CLASSICAL, DANCE
Store your own sound settings
1 Press and hold EQ-BasEASY EQ setting.
2 Turn the volume knob to select an item, then press the knob.
Refer to [EASY EQ] for setting and the result is stored to [USER].
To return to the previous setting item, press /
To exit, press EQ-BASS.
Other settings
1 Press and hold
2 Turn the volume knob to select an item (see the following table), then press the knob.
3 Repeat step 2 until the desired item is selected/activated or follow the instructions stated on the selected item.
4 Press to Enter.
To return to the previous setting item, press R/
Default: XX
| EQ SETTING | |
| EQ PRESET | Select a preset equalizer suitable to the music genre. (Select [USER] to use the settings made in [EASY EQ].)FLAT (default) / HARD ROCK / HIP HOP / JAZZ / POP / R&B / TALK / USER/VOCAL BOOST / BASS BOOST / CLASSICAL / DANCE |
| EASY EQ | Adjust your own sound settings. The settings are stored to [USER].SUB.W SP *1*2 00 to +06 Default: 03SUB.W *1*3 -08 to +08 00BASS LVL: -06 to +06 00MID LVL: -06 to +06 00TRE LVL: -06 to +06 00 |
| PRO EQ | 1 BASS/ MIDDLE / TREBLE Select a sound tone.2 Adjust the sound elements of the selected sound tone.BASS Frequency: 60/80/100/200 HZ (Default: 80 HZLevel: -06to +06 00Q: Q1.0/Q1.25/Q1.5/Q2.0MIDDLE Frequency: 0.5/1.0/1.5/2.5 KHZ (Default: 1.0 KHZLevel: -06to +06 00Q: Q0.75/Q1.0/Q1.25TREBLE Frequency: 10.0/12.5/15.0/17.5 KHZ (Default: 10.0 KHZLevel: -06to +06 00Q: Q FIX Q FIX) |
| AUDIO | |
| BASS BOOST +01- +05 (+01): Selects your preferred bass boost level.; OFF: Cancels. | |
| LOUD 01 | /02: Boosts low or high frequencies to produce a well-balanced sound at low volume.; OFF: Cancels. |
1 Displayed only when [SUB.W] is set to [ON. (→10)
2 Displayed only when [SPK/PRE OUT] is set to [SUB.W/SUB.W]. (→ 10)
*3 Displayed only when [SPK/PRE OUT] is set to [REAR/SUB.W] or [SUB.W/SUB.W]. (→ 10)
AUDIO SETTINGS
| SUB.W LEVEL*4 | SPK-OUT*5 | 00 to +06 (+03): Adjusts the output level of the subwoofer connected via speaker lead. (→ 17) |
| PRE-OUT*6 | -08 to +08 (00): Adjusts the output level of the subwoofer connected to the lineout terminals (REAR/SW) through an external amplifier. (→ 17) | |
| SUB.W*6 | ON / OFF: Turns on or off the subwoofer output. | |
| SUB.W LPF*4 | THROUGH: All signals are sent to the subwoofer. LOW 55HZ / MID 85HZ /HIGH 120HZ: Audio signals with frequencies lower than 55 Hz/ 85 Hz/ 120 Hz are sent to the subwoofer. | |
| SUB.W PHASE*4 | REVERSE (180°)/ NORMAL (0°): Selects the phase of the subwoofer output to be in line with the speaker output for optimum performance. (Selectable only if a setting other than [THROUGH] is selected for [SUB.W LPF]. | |
| FADER R06 | — F06 (00): Adjusts the front and rear speaker output balance. | |
| BALANCE*7 | L06 — R06 (00): Adjusts the left and right speaker output balance. | |
| VOL ADJUST -15 | — +06 (00): Preset the initial volume level of each source (compared to the FM volume level). Before adjustment, select the source you want to adjust. ("VOL ADJ FIX" appears if FM is selected.) | |
| AMP GAIN LOW | POWER: Limits the maximum volume level to 25. (Select if the maximum power of each speaker is less than 50 W to prevent damaging the speakers.) ; HIGH POWER: The maximum volume level is 35. | |
| D.T.exp(Digital Track Expander) | ON: Creates realistic sound by compensating the high-frequency components and restoring the rise-time of the waveform that are lost in audio data compression. ; OFF: Cancels. | |
| TEL MUTING*8 | ON: Mutes the sounds while using the cellular phone (not connected through KS-BTA100). ; OFF: Cancels. | |
| SPK/PRE OUT | Depending on the speaker connection method, select the appropriate setting to get the desired output. (→ Speaker output settings) | |
4 Displayed only when [SUB.W] is set to [ON].
5 Displayed only when [SPK/PRE OUT] is set to [SUB.W/SUB.W].
6 Displayed only when [SPK/PRE OUT] is set to [REAR/SUB.W] or [SUB.W/SUB.W].
*7 This adjustment will not affect the subwoofer output.
8 Does not work if [BT ADAPTER] is selected for [AUX] in [SRC SELECT]. (→ 4)
Speaker output settings
Select the output setting for the speakers [SPK/PRE OUT], base on the speaker connection method.
Connection via lineup terminals
For connections through an external amplifier. ( 17)
(For KD-R671)
| Setting on [SPK/PRE OUT] | Audio signal through lineup terminal | |
| FRONT REAR/SW | ||
| REAR/REAR | Front speakers output Rear speakers output | |
| REAR/SUB.W | Front speakers output Subwoofer output | |
| SUB.W/SUB.W | Front speakers output Subwoofer output | |
(For KD-R571 / KD-R474 / KD-R472 / KD-R471)
| Setting on [SPK/PRE OUT] | Audio signal through lineageout terminal |
| REAR/SW | |
| REAR/REAR | Rear speakers output |
| REAR/SUB.W | Subwoofer output |
| SUB.W/SUB.W | Subwoofer output |
Connection via speaker leads
For connections without using an external amplifier. However, with this settings you can also enjoy the subwoofer output. (一 17)
| Setting on [SPK/PRE OUT] | Audio signal through rear speaker lead | |
| L (left) R (right) | ||
| REAR/REAR | Rear speakers output Rear speakers output | |
| REAR/SUB.W | Rear speakers output Rear speakers output | |
| SUB.W/SUB.W | Subwoofer output (Mute) | |
If [SUB.W/SUB.W] is selected:
- [HIGH 120HZ] is selected in [SUB.WLPF] and [THROUGH] is not available.
- [R01] is selected in [FADER] and selectable range is [R06] to [00]
DISPLAY SETTINGS

1 Press and hold
2 Turn the volume knob to select an item (see the following table), then press the knob.
3 Repeat step 2 until the desired item is selected/activated or follow the instructions stated on the selected item.
4 Press to exit.
To return to the previous setting item, press Q/
Default: XX
| DISPLAY | |
| DIMMER | Dim the display and buttons illumination. OFF: Dimmer is turned off. ON: Dimmer is turned on. Brightness changes to [NIGHT] setting. (↔ BRIGHTNESS]) DIMMER TIME: Set the dimmer on and off time. 1 Turn the volume knob to adjust the [ ON] time, then press the knob. 2 Turn the volume knob to adjust the [ OFF] time, then press the knob. (Default: [ ON]: 18:00 or 6:00 PM [OFF]: 6:00 or 6:00 AM) AUTO: Dimmer turns on and off automatically when you turn off or on the car headlights.*1 |
*1 The illumination control wire connection is required. (47)
| BRIGHTNESS | Set the button, display and USB input terminal brightness for day and night separately. 1 DAY/NIGHT: Select day or night. 2 Select a zone. 3 Set the brightness level (00 to 31). (Default: BUTTON ZONE: DAY: 25; NIGHT: 09 DISP ZONE: DAY: 31; NIGHT: 12) |
| SCROLL*2 | ONCE: Scrolls the display information once.; AUTO: Repeats scrolling at 5-second intervals.; OFF: Cancels. |
| COLOR (for KD-R571) | |
| PRESET | Select a color for the buttons illumination. • COLOR 01 to COLOR 49 [COLOR 08] • USER: The color you have created for [DAY COLOR] or [NIGHT COLOR] is shown. • COLOR FLOW01 to COLOR FLOW03: Color changes at different speeds. |
| DAY COLOR | Make your own day and night colors for the buttons illumination. 1 RED /GREEN / BLUE: Select a primary color. 2 00 to 31: Select the level. |
| NIGHT COLOR | Repeat steps1 and 2 for all primary colors. • Your setting is stored to [USER] in[PRESET]. |
| MENU COLOR | ON: Changes the button illumination in menu mode or when selecting a music file from a folder/list. ; OFF: Cancels. |
NIGHT COLOR] or [DAY COLOR] is changed by turning on or off your car's headlight.
*2 Some characters or symbols will not be shown correctly (or will be blanked).
REFERENCES
■ Maintenance
Cleaning the unit
Wipe off dirt on the faceplate with a dry silicone or soft cloth.
Cleaning the connector
Detach the faceplate and clean the connector gently with a cotton swab, being careful not to damage the connector.

Connector (on the reverse side of the faceplate)
Handling discs:
- Do not touch the recording surface of the disc.
- Do not stick tape etc. on the disc, or use a disc with tape stuck on it.
- Do not use any accessories for the disc.
Clean from the center of the disc and move outward. - Clean the disc with a dry silicone or soft cloth. Do not use any solvents.
- When removing discs from this unit, pull them out horizontally.
- Remove burrs from the center hole and disc edge before inserting a disc.
■ More information
Visit also the following website http://www.jvc.net/cs/car/ for:
- Latest firmware updates and latest compatible item list
AndroidTM application JVC MUSIC PLAY
Any other latest information
About discs and audio files
- This unit can only play the following CDs:


- This unit can play back multi-session discs; however, unclosed sessions will be skipped during playback.
- Unplayable discs:
- Discs that are not round.
- Discs with coloring on the recording surface or discs that are dirty.
- Recordable/ReWritable discs that have not been finalized.
-
8 cm CD. Attempting to insert using an adapter may cause malfunction.
-
DualDisc playback: The Non-DVD side of a "DualDisc" does not comply with the "Compact Disc Digital Audio" standard. Therefore, the use of Non-DVD side of a DualDisc on this product cannot be recommended.
- Playable files:
- File extensions: MP3 (.mp3), WMA (.wma)
- Bit rate: MP3: 8 kbps — 320 kbps
WMA: 32 kbps — 192 kbps - Sampling frequency
MP3:48 kHz, 44.1 kHz, 32 kHz, 24 kHz, 22.05 kHz, 16 kHz, 12 kHz, 11.025 kHz, 8 kHz
WMA:8 kHz — 48 kHz
- Variable bit rate (VBR) files.
Maximum number of characters for file/folder name:
It depends on the disc format used (includes 4 extension characters- < .mp3> or < .wma>
- ISO 9660 Level 1 and 2: 32 characters
- Romeo: 32 characters
Joliet: 32 characters - Windows long file name: 32 characters
About USB devices
- This unit can play MP3/WMA/WAV/FLAC files stored on a USB mass storage class device.
- You cannot connect a USB device via a USB hub.
-
Connecting a cable whose total length is longer than 5m may result in abnormal playback.
The maximum number of characters for: -
Folder names: 64 characters
- File names: 64 characters
- MP3 Tag: 64 characters
WMA Tag: 64 characters
WAV Tag: 64 characters
-FLAC Tag:64 characters
REFERENCES
- This unit can recognize a total of 15 000 files, 500 folders (999 files per folder including folder without unsupported files), and of 8 hierarchies.
- This unit cannot recognize a USB device whose rating is other than 5 V and exceeds 1 A.
About iPod/iPhone
Made for
- iPod touch (2nd, 3rd, 4th, and 5th generation)
- iPod classic
- iPod nano (3rd, 4th, 5th, 6th, and 7th generation)
iPhone 3G, 3GS, 4, 4S, 5, 5S, 5C, 6, 6 Plus - It is not possible to browse video files on the "Videos" menu in [HEAD MODE].
- The song order displayed on the selection menu of this unit may differ from that of the iPod/ iPhone.
About Android device
- This unit supports Android OS 4.1 and above.
- Some Android devices (with OS 4.1 and above) may not fully support Android Open Accessory (AOA) 2.0.
- If the Android device supports both mass storage class device and AOA 2.0, this unit always playback via AOA 2.0 as priority.
Change the display information
Each time you press the display information changes.
- If the information is unavailable or not recorded, "NO TEXT", "NO NAME", or other information (eg. station name) appears.
| FM or AM | Frequency Day/Clock |
| (For FM Radio Data System stations only) Station name (PS) Frequency Program type (PTY) Radio text+Day/Clock (back to the beginning) | |
| CD or USB (For CD-DA)Playing time Day/Clock Disc name Track title (back to the beginning) | |
| (For MP3/WMA/WAV/FLAC files)Playing time Day/Clock Album title/Artist Track title Folder/file name (back to the beginning) | |
| USB-IPOD or ANDROID Playing time Day/Clock Album title/Artist Track title (back to the beginning) | |
| AUX AUX Day/Clock | |
| BT AUDIO BT AUDIO Day/Clock | |
TROUBLESHOOTING
| Symptom Remedy | |
| General | Sound cannot be heard. · Adjust the volume to the optimum level. · Check the cords and connections. |
| "MISWIRING CHECK WIRING THEN PWR ON" appears. Turn the power off, then check to be sure the terminals of the speaker wires are insulated properly. Turn the power on again. | |
| "PROTECTING SEND SERVICE" appears. Send the unit to the nearest service center. | |
| Source cannot be selected. Check the [ SRC SELECT] setting. (▲) | |
| Radio | · Radio reception is poor. · Static noise while listening to the radio. Connect the antenna firmly. |
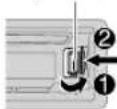
| CD/USB /IPod | Disc cannot be ejected. Press and hold ▲to forcibly eject the disc. Be careful not to drop the disc when it is ejected. |
| "IN DISC" appears. Make sure nothing is blocking the loading slot when you eject the disc. | |
| "PLEASE" and "EJECT" appear alternately. Press ▲, then insert the disc correctly. | |
| Playback order is not as intended. The playback order is determined by the file name (USB) or the order in which files were recorded (disc). | |
| Elapsed playing time is not correct. This depends on the recording process earlier. | |
| "Not SUPPORT" appears and track skips. Check whether the track is a playable format. (▲2) | |
| "READING" keeps flashing. Do not use too many hierarchical levels and folders. · Reload the disc or reattach the USB device. | |
| "CANNOT PLAY" flashes and/or connected device cannot be detected. Check whether the connected device is compatible with this unit and ensure the files are in supported formats. (▲12) · Reattach the device. | |
| Symptom | Remedy | |
| CD/USB/iPod | The iPod/iPhone does not turn on or does not work. | Check the connection between this unit and iPod/iPhone. Detach and reset the iPod/iPhone using hard reset. |
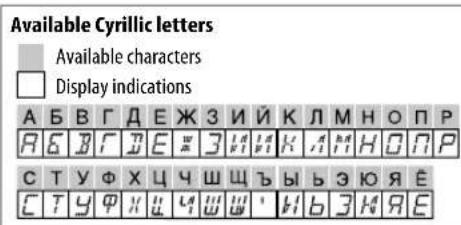
| Correct characters are not displayed. | This unit can only display uppercase letters, numbers, and a limited number of symbols. (→4) | |
| Android | ·Sound cannot be heard during playback. ·Sound output only from the Android device. | Reconnect the Android device. If in [AUDIO MODE], launch any media player application on the Android device and start playback. If in [AUDIO MODE], relaunch the current media player application or use another media player application. Restart the Android device. If this does not solve the problem, the connected Android device is unable to route the audio signal to unit. (→13) |
| Cannot playback at [AUTO MODE]. | Make sure JVC MUSIC PLAY APP is installed on the Android device. (→5) Reconnect the Android device and select the appropriate control mode. (→6) If this does not solve the problem, the connected Android device does not support [AUTO MODE]. (→13) | |
| “NO DEVICE” or “READING” keeps flashing. | Switch off the developer options on the Android device. Reconnect the Android device. If this does not solve the problem, the connected Android device does not support [AUTO MODE]. (→13) | |
| Playback is intermittent or sound skips. | Turn off the power saving mode on the Android device. | |
| “CANNOT PLAY” · Make sure Android device contains playable audio files. ·Reconnect the Android device. ·Restart the Android device. | ||
| If you still have troubles, reset the unit. (→8) | ||
SPECIFICATIONS
Subject to change without notice.
Tuner
FM Frequency Range 87.5 MHz — 108.0 MHz (50 kHz step)
Usable Sensitivity (S / N = 26dB) 0.71 V / 75
Quieting Sensitivity
(DIN S/N = 46 dB)
Frequency Response (± 3dB) 30Hz -15 kHz
Signal-to-Noise Ratio (MONO) 64 dB
Stereo Separation (1 kHz) 40 dB
MW Frequency Range 531 kHz — 1611 kHz (9 kHz step)
Usable Sensitivity (S / N = 20dB) 28.2 V
LW Frequency Range 153 kHz — 279 kHz (9 kHz step)
Usable Sensitivity (S / N = 20dB) 50~ V
Laser Diode GaAlAs
Digital Filter (D/A) 8 times over sampling
Spindle Speed 500 rpm — 200 rpm (CLV)
Wow & Flutter Below measurable limit
Frequency Response (± 1dB)20Hz - 20kHz
Total Harmonic Distortion (1 kHz) 0.01%
Signal-to-Noise Ratio (1 kHz) 105 dB
Dynamic Range 90 dB
Channel Separation 85 dB
MP3 Decode Compliant with MPEG-1/2 Audio Layer-3
WMA Decode
Compliant with Windows Media Audio
5
USB Standard USB 1.1, USB 2.0 (Full speed)
Compatible Devices Mass storage class
File System FAT12/ 16/32
Maximum Supply Current DC 5 V-1 A
MP3 Decode Compliant with MPEG-1/2 Audio Layer-3
WMA Decode Compliant with Windows Media Audio
WAV Decode Linear-PCM
FLAC Decode FLAC_files
Aannnnnne
Frequency Response (± 3dB) 20Hz - 20kHz
Input Maximum Voltage 1000 mV
Input Impedance 30k
A aae
Maximum Output Power 50W× 4 or 50W× 2 + 50W× 1 (Subwoofer = 4
Full Bandwidth Power 22W× 4 (at less than 1 % THD)
Speaker Impedance 4Ω-8Ω
Preout Level/Load (CD/USB) 2500 mV/10 kΩ load
Preout Impedance ≤ 600
Operating Voltage 14.4 V
(10.5V—16Vallowable)
rernnne
Maximum Current Consumption 10 A
Operating Temperature Range -10^ - +60^ Installation Size (× × ) 182mm× 53mm× 158mm
Weight 1.1 kg
Warning
- The unit can only be used with a 12VDC power supply, negative ground.
- Disconnect the battery's negative terminal before wiring and mounting.
- Do not connect Battery wire (yellow) and Ignition wire (red) to the car chassis or Ground wire (black) to prevent a short circuit.
- Insulate unconnected wires with vinyl tape to prevent a short circuit.
- Be sure to ground this unit to the car's chassis again after installation.
Caution
- For safety's sake, leave wiring and mounting to professionals. Consult the car audio dealer.
- Install this unit in the console of your vehicle. Do not touch the metal parts of this unit during and shortly after use of the unit. Metal parts such as the heat sink and enclosure become hot.
- Do not connect the wires of speakers to the car chassis or Ground wire (black), or connect them in parallel.
- Connect speakers with a maximum power of more than 50W . If the maximum power of the speakers is lower than 50W , change the [AMP GAIN] setting to avoid damaging the speakers. ( 10)
- Mount the unit at an angle of less than 30^ .
- If your vehicle wiring harness does not have the ignition terminal, connect Ignition wire (red) to the terminal on the vehicle's fuse box which provides 12 V DC power supply and is turned on and off by the ignition key.
- Keep all cables away from heat dissipate metal parts.
- After the unit is installed, check whether the brake lamps, blinkers, wipers, etc. on the car are working properly.
- If the fuse blows, first make sure the wires are not touching car's chassis, then replace the old fuse with one that has the same rating.
Basic procedure
1 Remove the key from the ignition switch, then disconnect the terminal of the car battery.
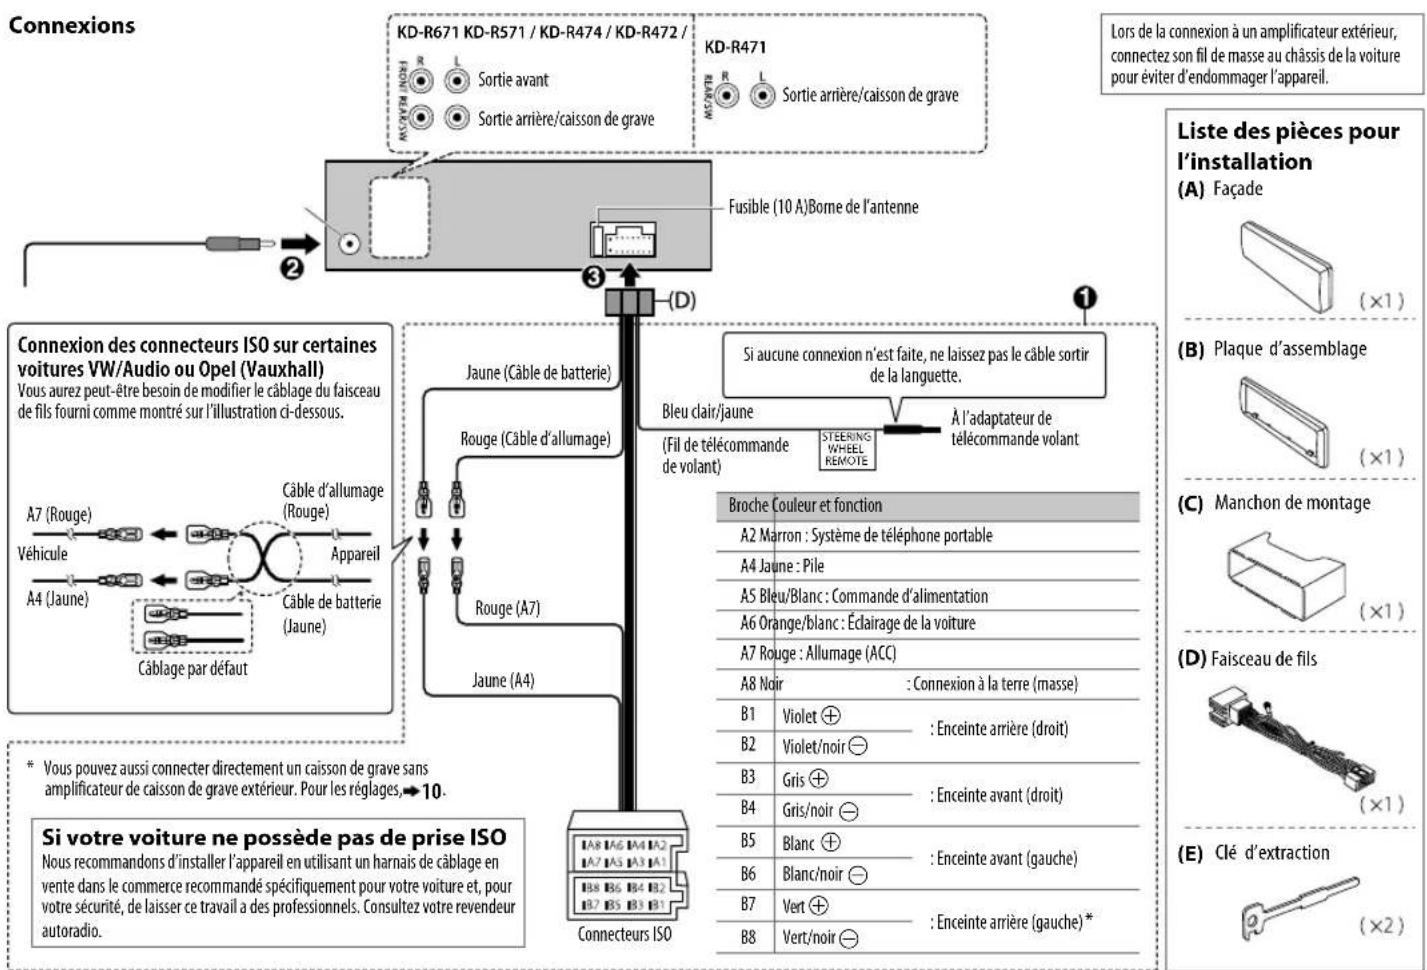
2 Connect the wires properly. See Wiring connection 17
3 Install the unit to your car. See Installing the unit (in-dash mounting).
4 Connect the terminal of the car battery.
5 Reset the unit. ( 3)
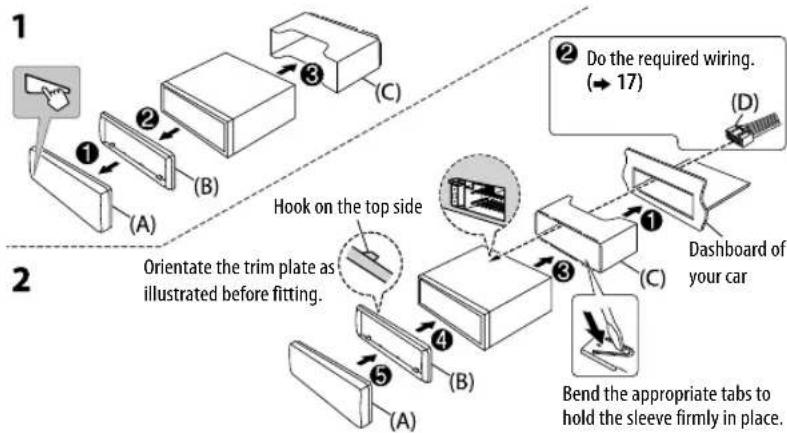
Installing the unit (in-dash mounting)
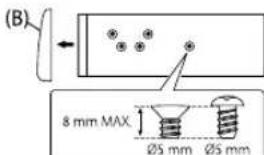
When installing without the mounting sleeve
1 Remove the mounting sleeve and trim plate from the unit.
2 Align the holes in the unit (on both sides) with the vehicle mounting bracket and secure the unit with screws (commercially available).
Use only the specified screws. Using wrong screws might damage the unit.
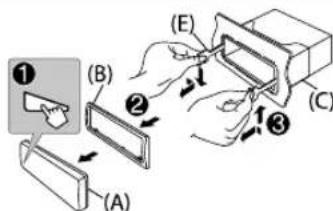
How to remove the unit

TABLE DES MATIERES
AVANT L'UTILISATION
CD/USB/iPod/Android 5
RADIO 7
AUX 8
RÉGLAGES AUDIO 9
RéGLAGES D'AFFICHAGE 11
REFERENCES 12
Entretien
Plus d'informations
GUIDE DE DÉPANNAGE 14
SPECIFICATIONS 15
INSTALLATION /
RACCORDEMENT 16
IMPORTANT
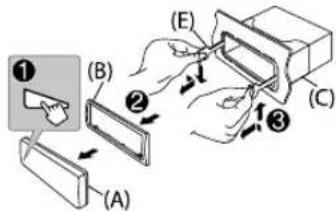
Comment retiree I'appareil
CD/USB/iPod/Android 5
RADIO 7
AUX 8
Sampling frequency: MP3: 48 kHz, 44.1 kHz, 32 kHz, 24 kHz, 22.05 kHz, 16 kHz, 12 kHz, 11,025 kHz, 8 kHz
WMA:8kHz—48kHz
CD/USB/iPod/Android5
PAIINOPINEMHUK 7
AUX 8
3BYKOBbIE HACTPOIKN 9
HACTPOIKNIINCPIJIER11
CIPABOCHbIE MATEPNAJIbI 12 O6cnykmbaHne
DOnonHnTeNbHa HhOpMaun
YCTPAHEHNE IPO6JIEM 14
TEXHNUCHECKNE
XAPAKTEPNCNTKNI 15
YCTAHOBKA NIOJKIQUEHNE 16
BAXHO
B cIeJIbX oEbcneHHe HApIeJeaUe 3KcNpyatauIN, POxAnyCTa, nepeTem KaK npCtynTb K KcNpyatauIN daHnHO rMaDeHH, BHIMATEbHO pOHTNeHractOnuee pykoBOdCTBO. OoCeHNO BaxHo, YTObblpOIOHN Co6IoJaIN Bce yka3AHN B daHOM pykoBOCTBe, OTMeHHe bocAmII PepdynpExdHeHIn B NHIMAHNE.
- PtoKanyIcTA, depXHTE daHHoe pYKOBOCTBO B HAdEHXOM I DOCTYNHOM MeCTe 6paueHn K Hemy 3a CnpaBkamn B 6yduem.
IpeDynpexKeHne
He nCnoB3yIte fynkun, KOToPbIe OTBnEkaT BnHMaHne I MeaKaT 6e3onacHomy BoKdHIO.
BHHMaHne
HactpoKa rPOMKocTn:
OtperynnpyTe rpmkocTb taKIM o6pa3OM, yTO6blcIbIaTb 3ByKu 3a npedeJAMn ABTOMO6HnI nI npedOTBpaueHnA bApN.
YMeHbIInTe rPOMKocTb Ipeep BOCpOn3BeDeHHeM, YTO6bl IpeDoTbPaTb NOBpeXeHne DMHaMMKOB 3-3a BHe3aHOro NOBbIeHnA yPOBnA rPOMKocTn Ha BBIXOe.
06une xapaKTepeNCTnK:
He nnonb3yTe BHeWnHye yCTpoiCTBa,ecnTo MoKeT OTPOMaTeNbHO NOBmAraTb Ha 6eONaCHocTb DBXKeHna.
- y6eIntecb b TOM, yTO CO3daHbI pe3epBhble KOINBCEX BaXhIx daHHbx. Mbl He Hecem OTBeTCTBeHHOCTb 3a IOTepIO 3aIMCaHHbx DaHHbx.
HnKOrda He octabIe MeTaJIInueCeNne npEIMeTbI (HaNPmep, MoHeTb IIN MTeaJIInueCeNne INCTpyMeHTbI) BHyTpIyCTpoCTBa BO N36exKaHHe KOPOTKnx 3AmbKaHn.
- Ecnn Oun6ka YTeHnA NcKa Bo3Nkna H3-3a Obpa3OBaHn KaOHdeHcata Ha Na3epHbIX IINH3ax, INBLeKNTe INCK N DOxJNTecb, noka Bnara NcnapITcR.
KaK NoJIb3OBAtbcAaHHbIM pyKOBOdCTBOM
-ОпациоьбсгдявocBOHbOMcNOnBJ3OBaHMeKHOJOKHaNepeDHe NaHeHIMOdei KD-R571.
B06bRCHNTeJIbHbIX cIeIAX NcIIOJIb3yOTcR HnIINKaUIM Ha aHrIMNCKOM Ra3bIke. Bbl MoXeTe Bbl6paTb Ra3bIK OTO6paKeHHa N3 MeHO.(4)
- [XX] 0603Haayae T bbl6paHHbIe 3JIeMeHTbl.
- (→ XX) O3HaayaeT, YTO MaTePmaIbI DoCTyINbI Ha yKa3aHHoN CTpaHIne.
OCHOBHbIE CBeDEHnA
Ipeedna naheb
Hauano Bocnpon3BedeHH
PpOxCQoMT ABOTMaTueckar CMeHa NCTouHnKa, HauHaTaC BOCpOu3BeDeHne.
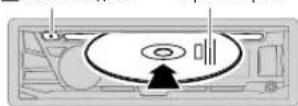
CD
M3BnueHneDnCKa
BexxHgCTOpOHa
BxOHHO USP-pa3bEm
DocTyTHbIe IJIy BbI6opa
MCTOUYHKU:
KD-R671
CD/USB/USB-IPOD/Android
KD-R571/KD-R474/KD-R472/
KD-R471
CD/USB/Android

Yto6bHaHnPamyBb6paBntOToHnK USB/USB-IPOD/ANDROID,Haxmnte
iPod/USB nnn USB
3aapaHa npepeHnnaHn
| ПелермOTka назад有很大 Влеред*3 | Нажmentе уdeckимьгд Нажатой кноку/▼/▼ | |
| Быбор дорожки有很大файа | Нажmente кноку /▼/▼. | |
| Быбор пankи*4 | Нажmente кноку 2▲/1▼ | |
| Восprонзve徳hoe в рекшке посторa*5 | Нажmente кноку 4ссвовko pa3. TRACK RPT/ ALL RPT : 3bykoob TRACK RPT/ FOLDER RPT/ALL RPT : Φай MP3/WMA/WAV/FLAC ONE RPT/ALL RPT/RPT OFF : iPod ули ANDROID | |
| Восprонзve徳hoe в случим посторa*5 | Нажmente кноку 7ссвовko pa3. ALL RND/RND OFF : 3bykoob FOLDER RND/ALL RND/RND OFF : Φай MP3/WMA/WAV/FLAC SONG RND/ ALL RND/ RND OFF : iPod ули ANDROID | |
1 He octabnnte Ka6enb B ABTOMOBnne, KOrna OH He HcNOnb3yETC.
^2 PnnpoknoeHmYyctpoiCTBaAndroidotobpa3aTc"Press[VIEW]to install JVC MUSIC PLAY APP".CneJeIte HnCTpyKuHaMaHaKpAe,HTo6bIyCTaONBtB pInloKeHHe.BaTakke moKeTe yCTaONBtB noCteHIOB eepCuio npNkOeHMeJYMCUSICPLAYHbAbaueyctpoiCTBOAndroiddoeroNOKNoeHHe.(→12)
3ДЯ ANDROID:ПиMuHEmHMo,ТоьКо ecmBыБбраHo [AUTO MODE. (→6)
*4 Dn CD:ToIbKO JnA faino MP3/WMA.3a yHKJHHe pa60anT dn yCTPOiCTBa IPod/ ANDROID.
5ДЯI Pod/ ANDROID: ПпнмсEHMO, товko ecn BblbpahO [HEAD MODE/ [AUTO MODE]. (→ 6)
Bb60pexkmaynpaBneHn
Korda nctouhikom rBnIeTc8 USB-IPOD, noCneobatebHO haxmaiTe 5 USB MODE.
HEAD MODE: YnpaBneHne yCtpoNCTBOM iPod c daHHoro ycTpoNCTBa.
IPHONE MODE: YnpaBHeHneY cTpoICTbOM iPod c Camoro iPod. OHaKo Bbl no- npexHemy MoXeTe 3anyckTaB BocPOnBBeHneY/CTabNt Ha Na3y Hnn npOnyckaTb AaiNb C daHnro YcTpoICTBa.
Korda nToHnKOM RBLIeTcA Android, noCneObaTeNbHO hXmaiTe 5 USB MODE.
AUTO MODE: YnpabneHne yctpoCTBom Android c daHHoro yctpoCTBa uepe3 npinoxeHne JVC MUSIC PLAY, yctahOBnEHoe Ha yctpoCTBe Android. AUDIO MODE: YnpabneHne yctpoCTBom Android c noMoouc CamoRO yctpoCTBa Android yepe3 pyrIe nporpAMMbHe MEnaJIeepb, yctAOHnEHHe Ha yctpoCTBe Android. OHaKo Bbl No-PrpexHemy MoKeTe 3aNcyKaTb BocPONB3BeDHe/ CTABITb Ha na3y mnn pOpyCKaTb faaiNb C daHHoro yctpoCTBa.
Bb60 my3bikalhoro ncka
HaxMnte KhoNkY 545Bmoda3.
ByyT Bocnpn23B0DnTbc necHn, coxpaHeHHbHe Ha cneJeUoem dncke.
Bb6paHHa BHTpeHHra NIN BHeuHnPaMBy CMapToHa (3anOMHaOooe yCTpoCTBO 60nbwoemKOCTN).
BbI6paHHbI npHbOyCTpoIcTBA C HeCKoJIbKIMM DnCKaM.
U3MeHeHne cKOpocTu BocPon3BeDeHnayDnokHn (Audiobook)
(JRAKD-R671)
Pnp npocnyuBaHnn iPod, kOrDa Bb6paHo [HEAD MODE].
1 Haxmte n ydepXnBaTHe HaxaToH KhoNky
2 NOBEPHNTe pyky perynipOBKn rpoMkoCTn Iy Bb6opa 3neMeHTa [ IPOD], a 3aTEM HAXMUTe ee.
3 HaxMMTE pykny perynnpOBKn rpmKocTN, qTo6bl Bbl6paTb 3neMeHT [AUDIOBOOKS].
4 Nobeprte pyky perynipobkn rpoMKoCTn IaBb6opa 3neMeHa, a 3aTe Haxmnte pyky. 0.5× SPEED / 1 × SPEED / 2 × SPEED: Bb6epnte keenaemyo CKopoctb Bocnpon3BeHn 3BykoBOrO faina n3 kateropnn "Audiobooks" Ha iPod/iPhone. (Iyo ymonuHnIO: 3ABNCIT OT hactpOnKn iPod/iPhone.)
5 HaKMnTe 1000bIXOa.
ДЯ BO3BpATA KпрдыДушему ДамentMuнхКннMTe KONky
Bb6op faIa n3 nanKn/cnncka
1 HaxMMTE KONky /
2 Nobeprhne pyky perynnpobkn rpoMkoTn Ira Bb6opa nanKn/ cnNcKa, a 3aTeM HaxMnTe pyky.
3ПовернitepykyperynipOBKNrpoMKoCTnДЯBb6opaФаиа,a 3aTeMaHxMITEpyky.
BbIcTpy Nocck
ECIN y Bac IMeTeC6 BoKoNHeCTBO aHIOB, Bbl MoKeTe BBInOJIHNHTb
6BcIcTpyn NOCK No HIM.
ДЯбьICTPOrO INPOCMOTpa CnNcKa 6bICTPO NOBOPaUMBaItepyKyperyIpOBKNrPOMKoCTN.
- HenpMMeHHMo pIgPod.
POnck No aIaBaty (nphmehmo TOnbko dI iPod):
BbMOKeTe BbINOHHTb NOcK faiJa No NepBOMy CmBOny BImeHn.
Haxmnte 2 /1 nnn 6bictpo NOBepnhtpe pyky peynpobkn rpmkocn, yto6b bbl6paht jekaembl cmbon (A-Z/0-9/OTHERS).
-Bb6epHTe"OTHERS",ecnnepeBbCUMBONOTMuaeTcRorA-7,0-9.
-ДЯ BO3Bpata Knpedbyuemy JneMeHTy HactpoKN HaKMTE KHONky 0/3.
-ДЯOTMeHbI HaxMnTe N yDepKnBaIe HaKaToi KHOnKy a/3.
-ДяI Pod npHMHeMTo,ToJIbKO KOrJa BbIbpaHO[HEAD MODE].
ANDROIDnpmmeHMO,ToIbKO KOrDa Bb6pHo [AUTO MODE]
PAДИОПРИЕМнИК

Hndkatop"ST"3aropaetc npnpneMe ctepeocnHaJFaM-tpaHcIzIM doctatoHoro ypOBHr.
Ponck paadnoctaHm
1 HaxmTe KhoNky SOURGEpa3nBb6opa FM nnn AM.
2 Haxmte KhoNky/ /DnA bToMaTneckoro noncKa paNoctaHm. (nn)
HaxMNTe u yedeKbAte HaxaToK hONky /▶, nOKa CmBOn"M" He hauhet MrrTa, 3aTe HaxMNTe HeckOkb Ko paI IINcKa paAnocTahU IN bpuyHyO.
HactpoKuB namTn
Moxho coxpaHbT do 18 paNocTaHcN FM n 6 paNocTaHcN AM.

CoxpaHHe npAnocTaHcHn
PnpnpocnyuBaHH npaoctaH..
HaxMnte u ydePKNBaTe HxKaTbIMN HymepoBaHHbIe KHONK (1-6).
(unn)
1 HaxMMte u yepKuBaIte HaxaToI pykU peryIupOBKn rpoMkoCTn, noKa He 3amraet TeKT "PRESET MODE".
2 IIOBepHnTe pyky perynnpOBKn rpomKoCTn dny Bb6opa 3anporpaMMnpOBAHHoro HOMepa, a 3aTeM HAXMnTe pyky.
3anporpammmpoabHHbHomep mraet, n oTo6paKaTaTcH aHnncb "MEMORY".

Bb6op coxpanenno paanoctaun
Haxmte u yepknaBte HaxkaTbIMn HymepoBaHHbIe KhoNkn (1-6). (nn)
1 HaKMnte KONky.
2 NobeprHte pyky perynnpOBKn rpoMkOtn IaBb6opa 3anporpaMMNPOBaHHoro Homepa, a 3aTeM Haxmnte pyky nnoTBepeKdEHN.
Дугнaitpoик
1 HaxmTe uydepKuBaIte HaKaToH KOnKy
2 NObepHnTe pyky perynnpOBKn rpoMkOCTn dny BbI6opa 3neMeHTa [TUNER], a 3aTeM hXmITE ee.
3 Yto6bI Bb6paTb 3IeMeHt, NOBepHnTe pyKy peryNnPOBKn rPOMKOCT (CM. cIeNyOuYIO TaBnUy), 3aTeM HAXMnTE ee.
4 NobtoprJte JeCTBHe 3do Tex nop, noka He 6ydet Bb6paH/akTNbPBOBaH JenaembI 3JIeMHT, mN CnEpyTe HCHPTyKuINM, PnBBeDEHbIM IaBbPaHHRo 3JIeMNTHa.
5 HaXMMTe 108 bIXoJa.
IINBaBpata Knpedbinyuemy 3nEmeHTy HAcTPOHn HAKMITE KHOKNY
IyMOnuHaHHIO: XX
IcnoB3OBAHHe npTaTnBHO aynonponrpbBaTea
1 PoiKluHHTe nopTaunBbH ayuOnpOurpbBaTeB (UMeTcB npOdaKe).
MHH-CTepeopaa3bem 3,5 MM Cpa3aBemOM BΦoPme 6yKbbi"
2Bb6epnte[ON]AUXB[SRCSELECT].(4)
3 HaKMTe 014kpa3 nBb6opaAUX.
4 BkIouHte npTaTHBbI ayuOnpOurpBbATEnb I HaHHTe BOCnpon3BeDeHne.

IcnoB3yIte MmH-ctepeop3bem C 3 KOHTAKTAMn Dn o6ecneeyn ONTMAmhBOrO KaueCTBa BixoDHO rayuocurHa.
IcnoJb3ObaHne yctpoCTBa Bluetooth
1 PoiKIOUHTe aanTep Bluetooth KS-BTA100 (npno6peTaetc oTdienbHO).
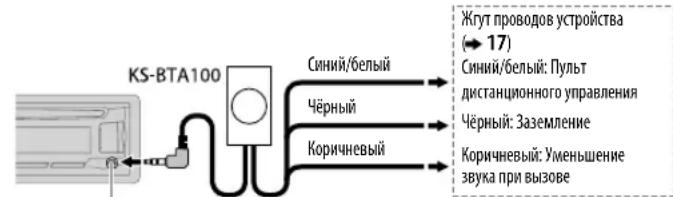
IIOIOHNHTeNbHbBxOJHOpa3bem
2 3aperntpuyte yctpoictBO Bluetooth c yctpoictBOM KS-BTA100 (BblonHnte conpiaeHne).
3 Bb6epuTe I BT ADAPTERI dnaI [AUX] B [SRC SELECT]. ( 4)
4 Haxmte faa3 nra Bb6opa BT AUDIO.
5 Haayano nCnoB3OBAHn yctpoiCTBa Bluetooth.
IINI NOJUyHnI DOnOJIHNITeINbHOINHΦOpMaUN Cm. INHCTpyKuIO NO 3KcNlYaTaun KKS-BTA100.
3BYKOBBIE HACTPOIKN
Bb6op 3anporpammmuropaHHoro kBaana3epa
Haxmte KhoNkyEo pa3. (nnn)
HaxMMTe KhoNkyEQ-BASS, 3aTEM NOBepHnTe pyuKy perynnpOBKn rpOMKoCTn B TeueHne 5 cekyHd.
3anporpammmpoBaHHn bKbana3ep. FLAT (no ymOnuaHnO), HARD ROCK, HIP HOP, JAZZ, POP, R&B, TALK, USER, VOCAL BOOST, BASS BOOST, CLASSICAL, DANCE
CoxpaHeHne co6CTbeHHbIX HacTpoeK 3Byka
1 HaKMITE n ydepxnBaIteEQBASHepeTn K HactpoiKe EASY EQ.
2 Повернite руку ретулповки رромковддд Вьбoga щемenteа, a 3aTeMнхмite ручky. Ддгостори Кбрашайтсь к раду EASYE), Habстpoika BydET coхpaheha B paazene [USER].
JaBo3BpTaK npEbyDyMeMy 3JeMeHTy HAcTPOkHn HAcMNTe KOnKy a/
YTO6bI BBIITN, HAXMNTeEQ-BASS.
Дугней Habсторки
1 HaxMnTe n ydeepxmbaTe haxTaOn KhONky
2 706bI bbl6paTb 3nEMeHT, NOBepHmTe pyky perynipOBKn rPOMKoCTN (cm. cneIyUOyIO TaInu) 3aTe m HxMnTe ee.
3 Nobtoprnte deTBE 2do tex nop, noka he 6ydet Bb6paH/ AKTNIBPOBAH KenaembIe IeMeHTN, INI cIeynIte HnCTpyKuINM, npBbeDEHHbIM dR b6paHORO 3eMeHTA.
4 HaxmTe 7. TaBbIXOa.
INB03Bpata KnpdeIduyemmy 3nEMHTy HAcTPOKn HAKMITE KHONKY/
IyoymonuHaHHo:XX
| EQ SETTING | |
| EQ PRESET | Быбөрөгүпөдөдөдөдөдөдөдөдөдөдөдөдөдөдөдөдөдөдөдөдөдөдөдөдөдөдөдөдөдөдөдөдөдөдөдөдөдөдөдөдөдөдөдөдөдөдөдөдөдөдө�. |
| Мызькалову канчу. (Чтобл мспльь зовын 查стрик, заданные в [ EASY EQ), Быбөрөгүе [USER].) | |
| FLAT (no ymолчанн): HARD ROCK / HIP HOP / JAZZ / POP / R&B / TALK / USER/VOCAL BOOST / BASS BOOST/ CLASSICAL/DANCE | |
| EASY EQ | Настоге сбстевны памаметы 3вуka. 查стрик coхраяотя в раздени [USER]. |
| SUB.WSP*1*2:ОТ00do+06 (По умолчанн): | |
| SUB.W*1*3:ОТ-08do+08 -00 | |
| BASS LVL:ОТ-06do+06 -00 | |
| MID LVL:ОТ-06do+06 -00 | |
| TRE LVL:ОТ-06do+06 -00 | |
| PRO EQ | 1 BASS/MIDDLE/TREBLE:Выбөрөгү тон 3вуka. |
| 2Настоге лимен'tь 3вуашид дь вьбранногю тона 3вуka. | |
| BASS Chactota:60/80/100/200 HZ (По умолчанн):80 HZ00Q1.0) | |
| MIDDLE Chactota:0.5/1.0/1.5/2.5 KHZ (По умолчанн):80 Q01.25) | |
| Yprobenb:OТ-06do+06 Q00Q1.25) | |
| TREBLE Chactota:10.0/12.5/15.0/17.5 KHZ (По умолчанн):80 KHZ00Q1.25) | |
| Yprobenb:OТ-06do+06 QFIX) | |
| AUDIO | |
| BASS BOOST | +01 +05 (+01): Выбор п徳очиаму уровь подема hyжши частот.;OFF:Оtmehа. |
| LOUD 01 | _,02:_,02:_,02:_,02:_,02:_,02:_,02:_,02:_,02:_,02:_,02:_,02:_,02:_,02:_,02:_,02:_,02:_,02:_,02:_,02:_,02:_,02:_,02:_,02:_,02:_,02:_,02:_,02:_,02:_,02:_,02:_,02:_,02:_,02:_,02:_,02:_,02:_,02:_,02:_,02:_,02:_,02:_,02:_,02:_,02:_,02:_,02:_,02:_,02:_,02:_,02: 3вуаши рinn Изкову уровь гомковостли; OFF:Оtmehа. |
1 OTo6paXaETcT OTo6Kb B ToM cIpyae, eCNI napaMeTp [SUB.W] HMeet 3HaueHne [ON. (→10)
^2 OTo6paKaTeTc TOnbKO B Tom CToyae,ecn NapaMeTp [SPK/PREOUT]MMeet3HaueHMe SUB.W/SUB.W.
*03 06paXaTcT TONbKO B TOM CNYae,ecnN npaMeTp [SPK/PREOUT]MMeet 3HaueHHe [REAR/SUB.W] mM [SUB.W/SUB.W. ( 10)
3BYKOBbie HACTPOIKN
| SUB.W LEVEL *4 | SPK-OUT *5 | 0r 00do+06 (+03): Perylmpobka ypoBnBa BbIXoHOrO CmHana H3K2OAcTcTcHOrO DmHAMKa, noCoeDmHeHOrO cepe3 akyCTneckHe npOBda. (+17) |
| PRE-OUT *6 | 0r -08do+08 (00): Perylmpobka ypoBnBa BbIXoHOrO CmHana H3K2OAcTcTcHOrO DmHAMKa, noCoeDmHeHOrO K pa3beMaM LmHEnHOrO BbXoDa (REAR/SW) cepe3 BWeHmY uCmHTeB. (+17) | |
| SUB.W *6 | ON/OFF: BkIIOUeHHe HmN BbIXIOUeHHe BbIXoHOrO CmHAnA H3K2OAcTcTcHOrO DmHAMKa. | |
| SUB.W LPF*4 | THROUGH: Bce cmHAnbIy nepeJaTOcB H3K2OAcTcTcHb DmHAMK. LOW 55HZ/MID 85Hz /HIGH 120HZ: H3K2OAcTcTcHb DmHAMK BOCpOHNBOdHT ayDIOcHnHb C quCTotAmH NmHke 55 Γu/85 Γu/120 Γu. | |
| SUB.W PHASE*4 | REVERSE (180°)/NORMAL(0°): Bb6Op Φa3b BbIXoHOrO CmHAnA H3K2OAcTcTcHOrO DmHAMKa B COOTBeTcTBH C BxOJHbM CmHAnOM DmHAMKa B CEJIAX oEcbneueHnA OITMAMbH IOPOINBDOKeTbHcHtN. {OCTyHnTObKbB TOM cIyAE, eCIN dIpaPametra [SUB.W LPH Bb6pHaNO 3HAeHHe, OTMNHOEOT [THROUGH].} | |
| FADER R06 | -F06 (00): HAcTpoHKA BbIXoHOrO 6bAanHc NapeDHNH MzadHnDmHAMKnOB. | |
| BALANCE*7 | L06 -R06 (00): HAcTpoHKA BbIXoHOrO 6bAanHc NapeBx N npabBx DmHAMKnOB. | |
| VOL ADJUST -15 | +06 (00): IPrpGpAMMPOBAHme npeBHOaHbHOrO yPoBnRA gPOMKocTn DnI KaxdOro NcTOHNIKA (B cPABHEMN C yPoBnHE pOMKocTn FM). IPrp ENaCTpOIKo Bb6epHTe NcToHnik, KOTOpB bHeO6bXDoMo HAcTpoHb. (TekCT "VOL ADJ FIX" ot6bpaKaTaC, eCIN Bb6pHaNo "FM".) | |
| AMP GAIN LOW POWER | : OprAHueHMe MAKCMMAHbO rpoBnH rpoMKOcT h3auHHeMe 25. (Ecln MakCMMAHbA MOnHOCbT DmHAMKa MeHbue 50 Bt, Bb6epHTe 3Tu HAcTpoHk, YcTbB IpeDToBparHb TObpeJedHe DmHAMKnOB.) ; HIGH POWER MAKCMMAHbY uPoBHeB rpoMKOcTn 35. | |
| D.T.EXP (Digital Track Expander) | ON: Co3DAHnPe aalNtCHNuHrO 3Byk ApyTeM KMOnECAuHM BbIXoHcTcTbH X KOMIoHENTOB N BocSTaHOBeHnH BpeMeH N DoCTiKHeHn MAKCMMAHbO 3ΦΦeKa T BoHb, KOTopB bSbIh noTeBpaHb pNayAOKOMPpeCSn DaHbX. ; OFF: OTmehA. | |
| TEL MUTING*8 | ON: OTKIOUeHHe 3Byk pNir NcPbIbZOBaHm COTOBOr TEleΦOHa (He noDknIOaETcR Hepe3 KS-BTA100). .OFF: OTmehA. | |
| SPK/PRE OUT | B 3aBbMnMOCTn OT cIoo6a BnOKnIOuHnE DmHAMKnOB, Bb6epHTe NpOxoDAUYu HAcTpoHk dIraDANH JIeMaEMO rboXoHa. (→ HAcTpoKn BbIXoHa Na DmHAMKnI) | |
| *4 OTo6paKaTeC TOnbKo B Tom ClyuAe, eCIn napaMetr SUB.W ] IMeET 3aueHHe [ON. *5 OTo6paKaTeC TOnbKo B Tom ClyuAe, eCIn napaMetr SPK/Pre OUT ] IMeET 3aueHHe [SUB.W/SUB.W. *6 OTo6paKaTeC TOnbKo B Tom ClyuAe, eCIn napaMetr SPK/Pre OUT ] IMeET 3aueHHe [REAR/SUB.W] IMeI [SUB.W/SUB.W.] *7 ErHa cTApOIIKA He BmIAeH Na BbIXoHDo CmHAn CabeByφepa. *8 He paBoTaE, eCIn 3aueHHe [BTADAPTER ] Bb6pHaNo IMy [AUX ] B [SRC SELECT]. (+4) | ||
HactpoKn BbIXOda Ha dHaMaNKn
Bb6epnte HactpoKy BbIXOJa Ha dHnHaMnKn [SPK/PRE OUT]B COOTBeTcBn C MeTOJOM POKIIOUeHnI DnHaMnKOB.
IpoCoeHHeHneYepe3 pa3bEmbl NHeHOrO BbxOda
Дяпадклоченучесьнсьшиycnntenb.(→17)
[JaR-KR671]
WMA:32K6MT/C-192K6MT/C
- Yactota DnckpTeMaaz
MP3:48KfU,44.1KfU,32KfU,24KfU,22.05KfU,16KfU,12KfU,11.025KfU,8KfU
WMA:8KΓμ—48KΓμ
-ФаиьспесримнсКорpoctьб6HTax(VBR).
MaKcMmAbHoe KOJIueCTBO CnMbOIOB B IMeHN faIa/naKN:
3aBnCHOT hCnnonb3yEmofo fOpMaTAnCKA (BKNHouaET 4 CMMBona pa3peWenHr--<.mp3>nn<.wma}).
-ISO9660Level1n2:32CMMBONA
- Romeo: 32 cumbonna
Joliet:32cMbDpa
-IMMHOE MMFAaHnA Windows:32 CMBona
06 yctpoctrbax USB
JaHHOE yCTPOIcTBO MOKET BOCnPOH3BOJNTb faaHbI MP3/WMA/WAV/FLAC, coXpaHeHHbIe Ha 3aONMHaIOeM yCTPOIcTBE USB 60bnoi EMKOCTH.
3anpeaaetcnoKIOHIOUaTb USB-HocuTeB uepe3 USB-KOHueHTpaTOp.
IIOKIIKUeyHHe Ka6eJIa, o6uaA dINHa KOTOPo InpBbIaet 5 M, MoKeT IpMBeCTN K HeKOppeKTHOMy BOCpOHI3BeDEHHIO.
MakmmabHoe KOINueCTBO CMBONOB DnCneDyUOUXN 3NeMeHTOB OrpaHueHO:
-Imeha nanok:64 CMMBona
-Imeha daimob:64 CMBONA
-TerMP3:64cmmbona
-TerWMA:64CHMBONA
-Term WAV:64 CMBONA
-TerFLAC:64CMBONA
CNPABOCHbIE MATEPNAJIbl
JaHHOe yCTPOIcTBO MOKET pAcNO3HabTa 10 15 000 fainOB, 500 nanok (999 fainOB Bnanke, BkIOUaH nanky 6e3 HenoDpeXnBAembix faainOB) n8 HepapxN.
3To yCTPOIACTBO He pacoN03HaET yCTPOIACTBA USB C HOMMHNbHbIM HANpJKeHHEM,OTNIHbIM OT 5B,N HOMMHNbHbIM TOKOM CBHBE 1A.
06 iPod/iPhone
Made for
- iPod touch (2nd, 3rd, 4th w 5th generation)
- iPod classic
- iPod nano (3rd, 4th, 5th, 6th, 7th generation)
- iPhone 3G, 3GS, 4, 4S, 5, SS, SC, 6, 6 Plus
-ПлбСМТВьдофайовВм�нo"Videos"Вржиме[HEAD MODE]HEB03MOKeH. - Nopadok otobapkeHnneCenB MeHo BbOpa DaHHoro yCTpOKCTBa MOKeT OTMnUaTBcOr NTnpAka neCenB npomprbatae iPod/iPhone.
06 yctpoictbax Android
JaHHOe yCTPOIcTBO NOIDepKnBaER Android OS 4.1 H BbIe.
- HeKOTOpBie yCtpoiCTBa Android (c OS 4.1 u BbIe) Moryr HnOaepXmbatb nonHocTbAndroid Open Accessory (AOA)2.0.
Ecna yctpoiCTBO Android oHOBPemHeNo noepKbMaer 3aONMnHaouHe yctpoiCTBa 6oJIbwoE mKocTn H AOA 2.0, daHnoe yctpoiCTBO BcERda BocpOn3BDoHTupe3 A0A 2.0 bKaueCTBe npHopRTeta.
H3mehenhe oTo6paKaemn HhOpMaun
KaKdoe HaxaThe KhoNkHpeHoayet OTo6paKaemyo HOpMaunio.
EcnHnHOpmaaHHeNoCTyHaHnHe3aHcHAno,OTbpaKaTaCOo6eHMe“NO TEXT”,“NO NAME"nnHpyra HnHOpMaua(HanpHmep,Ha3BaHmPe padmoctaHm).
DonyctMMbIe CHMBOJIbIe
0tobpaqchenHe mHnkaTopoB
A B B F D E X K M N K J M H O N P
AECED
CTYΦXU4UWbblb0R
C7yFxH H W Hb3N8E
YCTPAHEHNE IPOBJEM
| Симпомы | ||||
| Одney кра�кгейнам | Зук не сныши. - установite оtmальни уровень ГROMKOCTN. -iprobercrete Кабеля и coедиени. Оторазрааэр садпсь "MSWIRING CHECK WIRING THEN PWR ON". | БыклioчITE пптатиme, Затем ВыллонITE ріорobерку,Чтося убел'tьс, Что koхтakсы піорobod димамков Должkyн IMOBIM образим ИзOLIMBOВАЛ. Сюba вklioчITE пптати. Оторазрааэр садпсь "PROTECTING SEND SERVICE". | Доступы устайные вдимам сегвский цент. Источник нехтурику [SRC SELECT]. (▲) | |
| Источник неья вдбуразь. | Пristоры нехтурику [SRC SELECT]. (▲) | |||
| Радонгейнам | • Спбий радонлгий. • Статчески поедуни по ріорocушевим радим. | Плотоны вставы оhardtу. | ||
| Одney USB/ Pod | Небальною ИстBLEчесibles дис. | НармITE и уdeckатье коньу —дд ринуддөногу ИстBLEчени Диска. Oсторожин, He урочITE дись BO врreamи ИстBLEчени. | ||
| Оторазрааэр садпсь "IN DISC". | Убетдитсь в оztугстBNи Бokларовая заузочаго остеса рпс Вставке диска. | |||
| Почередно піordьліотсь надимс "PLEASE" и "EJECT". | НармITE —н вставы дись піordьнho. | |||
| Неравильный поаддOK вocрочьевени. | ПораддOK вocрочьевени по поимени Фаль (USB) кли B пораддк заимс Фаль (dksk). | |||
| Верma о т havалу вocрочьевени неравильhoe. | Зто завскот о пожени поочьда заимс. | |||
| Оторазрааэр с Coaste "Not SUPPORT", и дорожka порочьcaета. | Убетдитсь в тOM, Утdoуорожka Имeelфόрмат, подөржьа届毕业生 вдд вocрочьевени. (▲ 12) | |||
| Пробд�gesТ мигатьTekst "READING". | •Енmiclonьшүtte Многуровпсьу Ирархишеньу STPyктуру И много nanok. •перацрүүдүдүдүлүлүлүлүлүлүлүлүлүлүлүлүлүлүлүлүлүлүлүлүлүлүлүлүлүлүлүлүлүлүлүлүлүлүлүлүлүлүлүлүлүлүлүлүлүлүлүлүлүлүlүлүлүлүлүлүлүлүлүлүлүлүлүлүлүлүлүлүлүлүлүлүлүлүлүлүлүлүлүлүлүлүлүлүлүлүлүлүлүлүлүлүлүлүлүлүлүлүлүлү�. •перацрүүдүдүдүлүлүлүлүлүлүлүлүлүлүлүлүлүлүлүлүлүлүлүлүлүлүлүлүлүлүлүлүлүлүлүлүлүлүлүлүлүлүлүлүлүлүлэ. Tekt "CANNOT PLAY" мигать u/ mлл подкючehнoe устов нельь ор dedelntb. Кendун ор dedelntb. | Yedetseв в тOM, Ут doуорожka Имeelфόрмат, подөржьа届毕业生 вдд bocрочьевени. (▲ 12) | ||
TEXHnueCKNE XAPAKTEPNUKNI
AaHbIe MoYr 6bITb N3MeHbI 6e3yBcDmJIeHn.
The marking of products using lasers
The label is attached to the chassis/case and says that the component uses laser beams that have been classified as Class 1. It means that the unit is utilizing laser beams that are of a weaker class. There is no danger of hazardous radiation outside the unit.
- Microsoft and Windows Media are either registered trademarks or trademarks of Microsoft Corporation in the United States and/or other countries.
- "Made for iPod," and "Made for iPhone" mean that an electronic accessory has been designed to connect specifically to iPod, or iPhone, respectively, and has been certified by the developer to meet Apple performance standards. Apple is not responsible for the operation of this device or its compliance with safety and regulatory standards. Please note that the use of this accessory with iPod or iPhone may affect wireless performance.
- iPhone, iPod, iPod classic, iPod nano, and iPod touch are trademarks of Apple Inc., registered in the U.S. and other countries.
Lightning is a trademark of Apple Inc.
Android is trademark of Google Inc.
libFLAC
Copyright (C) 2000,2001,2002,2003,2004,2005,2006,2007,2008,2009 Josh Coalson
Redistribution and use in source and binary forms, with or without modification, are permitted provided that the following conditions are met:
- Redistributions of source code must retain the above copyright notice, this list of conditions and the following disclaimer.
- Redistributions in binary form must reproduce the above copyright notice, this list of conditions and the following disclaimer in the documentation and/or other materials provided with the distribution.
- Neither the name of the Xiph.org Foundation nor the names of its contributors may be used to endorse or promote products derived from this software without specific prior written permission. THIS SOFTWARE IS PROVIDED BY THE COPYRIGHT HOLDERS AND ONBUTRutors "AS IS" AND ANY EXPRESS OR IMPLIED WARRANTY, INCLUDING, BUT NOT LIMITED TO, THE IMPLIED WARRANTY OF MERCHANTABILITY AND FITNESS FOR A PARTICULAR PURPOSE ARE DISCLAIMED. IN NO EVENT SHALL THE FOUNDATION OR CONTRIBUTORS BE LIABLE FOR ANY DIRECT, INDIRECT, INCIDENTAL, SPECIAL, EXEMPLARY, OR CONSEQUENTIAL DAMAGES (INCLUDING, BUT NOT LIMITED TO, PROCUREMENT OF SUBSTITUTE GOODS OR SERVICES; LOSS OF USE, DATA, OR PROFITS; OR BUSINESS INTERMUsION) HOWEVER CAUSED AND ON ANY THEORY OF LIABILITY, WHETHER IN CONTRACT, STRICT LIABILITY, OR TORT (INCLUDING NEGLIGENCE OR OTHERWISE) ASING IN ANY WAY OUT OF THE USE OF THIS SOFTWARE, EVEN IF ADVISED OF THE POSSIBILITY OF SUCH DAMAGE.