
DXLCD3209 - Television Dynex - Free user manual and instructions
Find the device manual for free DXLCD3209 Dynex in PDF.
| Product Type | LCD TV |
| Brand | Dynex |
| Model | DXLCD3209 |
| Screen Size | 32 inches (81.1 cm) |
| Panel Type | TFT LCD |
| Dimensions (W × H × D) | 81.1 × 58.3 × 25.5 cm |
| Weight | 14 kg |
| Power Supply | 120 V AC, 60 Hz |
| Power Consumption | 150 W |
| TV System | NTSC-M, ATSC |
| Channel Reception | VHF 2-13, UHF 14-69, Cable TV 1-125, CADTV 1-135, TVN 2-69 |
| Audio Output | 6 W × 2 |
| Audio System | BTSC |
| Video/Audio Inputs | Composite (1), S-Video (1), Component (2), HDMI (2), VGA (1), Antenna (1) |
| Outputs | Composite (1), Headphone (1), Optical S/PDIF (1) |
| Control Port | RS-232 |
| Operating Temperature | 5 °C to 40 °C |
| Storage Temperature | 0 °C to 50 °C |
| Warranty | 1 year limited |
| Main Features | Parental control, closed captions, sleep timer, program guide, favorites list, image optimization |
| Maintenance | Soft dry cloth; for stubborn dirt, mild soap solution or eyeglass cleaner |
| Safety | Auto shutoff in case of overheating; unplug before cleaning; do not block ventilation openings |
Frequently Asked Questions - DXLCD3209 Dynex
User questions about DXLCD3209 Dynex
0 question about this device. Answer the ones you know or ask your own.
Ask a new question about this device
Download the instructions for your Television in PDF format for free! Find your manual DXLCD3209 - Dynex and take your electronic device back in hand. On this page are published all the documents necessary for the use of your device. DXLCD3209 by Dynex.
USER MANUAL DXLCD3209 Dynex
Dynex DX-LCD32-09 32" LCD TV
Contents
Important safety instructions. 2
TV components 4
Front. 4
Side 4
Back. 5
Remote control. 5
Setting up your TV. 6
Installing the remote control batteries 6
Using the remote control. 6
Connecting an antenna or direct cable. 7
Connecting a VCR. 7
Connecting a VCR for recording. 7
Connecting a camcorder or game console. 7
Connecting an HDMI device. 8
Connecting a component video device 8
Connecting a computer 8
Connecting a digital optical audio device 9
Connecting headphones 9
Using your TV 9
Turning your TV on or off 9
Selecting the video input source. 9
Selecting the TV signal source 9
Using the on-screen menu. 9
Memorizing for channels. 10
Deleting memorized channels. 11
Changing channels 12
Adjusting the picture. 12
Adjusting the VGA (PC) image 12
Reducing video noise. 13
Optimizing the image. 13
Selecting the aspect ratio 13
Adjusting the volume 13
Adjusting the audio. 13
Selecting the audio signal type. 14
Setting the clock. 14
Displaying the information banner. 14
Displaying the program guide 14
Monitoring the DTV signal strength. 14
Setting up the favorite channel list. 14
Labeling a channel 15
Using closed captions 15
Using the sleep timer. 16
Selecting the on-screen menu language 16
Setting the password. 17
Turning the parental lock on or off. 17
Setting parental controls 17
Downloading rating information. 18
Restoring factory defaults. 19
Maintaining. 19
Troubleshooting 19
Remote control. 19
Video and audio. 19
General. 20
Specifications 20
Legal notices. 20
One-year limited warranty. 21
Francais 23
Espanol 49
Important safety instructions

CAUTION RISK OF ELECTRIC SHOCK DO NOT OPEN


The lightning flash with arrowhead symbol within an equilateral triangle is intended to alert you to the presence of uninsulated dangerous voltage within your TV's enclosure that may be of sufficient magnitude to constitute a risk of electric shock to persons.

The exclamation point within an equilateral triangle is intended to alert you to the presence of important operating and maintenance (servicing) instructions in the literature accompanying your TV.
Warning: To reduce the risk of fire or electric shock, do not expose your TV to rain or moisture.
Warning: Your TV utilizes tin-lead solder and fluorescent lamps containing a small amount of mercury. Disposal of these materials may be regulated due to environmental considerations. For disposal or recycling information, contact your local authorities or the Electronic Industries Alliance at www.eia.org.
Warning: For continued safety, your TV should be connected to a power outlet that is correctly grounded.
1 Read these instructions—All operating instructions must be read and understood before you use your TV.
2 Keep these instructions—These safety and operating instructions must be kept in a safe place for future reference.
3 Heed all warnings—All warnings on the product and in the instructions must be observed closely.
4 Follow all instructions—All operating instructions must be followed.
5 Do not use your TV near water—For example, do not use near a bathtub, washbowl, kitchen sink, or laundry tub, in a wet basement, or near a swimming pool.
Do not use immediately after moving from a low temperature to a high temperature environment, because this causes condensation, which may result in fire, electric shock, or other hazards.
6 Cleaning — Unplug your TV from the wall outlet before cleaning. Do not use liquid cleaners or aerosol cleaners. Use a damp cloth for cleaning.
7 Ventilation—Do not block any ventilation openings. Install in accordance with the these instructions. The vents and other openings in the cabinet are designed for ventilation. Do not cover or block these vents and openings because insufficient ventilation can cause overheating and shorten the life of your TV. Do not place your TV on a bed, sofa, rug, or other similar surface because they can block ventilation openings. Your TV is not designed for built-in installation. Do not place your TV in an enclosed place such as a bookcase or rack unless correct ventilation is provided or the manufacturer's instructions are followed.
8 Heat sources Do not install near radiators, heat registers, stoves, or other devices (including amplifiers) that produce heat.
9 Ground or polarization—Do not defeat the safety purpose of the polarized or grounding-type plug. A polarized plug has two blades with one wider than the other. A grounding type plug has two blades and a third grounding prong. The wide blade or third prong are provided for your safety. If the plug does not fit into your outlet, consult an electrician for replacement of the obsolete outlet.
10 Power cord protection—Protect the power cord from being walked on or pinched particularly at plugs, convenience receptacles, and the point where they exit from your TV.
Note: The power plug is the disconnect device for your TV. Make sure that the plug is easy to access.
11 Attachments—Only use attachments or accessories specified by the manufacturer. Do not use attachments not recommended by the manufacturer. Use of incorrect attachments can result in accidents.
12 Stand—Use only the cart, stand, tripod, bracket, or table specified by the manufacturer or sold with your TV. Do not place your TV on an unstable cart, stand, tripod, or table. Placing your TV on an unstable base can cause your TV to fall, resulting in serious personal injuries, as well as damage to your TV. When mounting your TV on a wall, be sure to follow the manufacturer's instructions. Use only the mounting hardware recommended by the manufacturer.
13 Move carefully—When a cart is used, use caution when moving the cart and TV combination to avoid injury from a tip-over. Sudden stops, excessive force, and uneven floor surfaces can cause your TV to fall from the stand. Never attempt to move your TV unless the power cord has been disconnected.

14 Lightning—Unplug your TV and disconnect the antenna during lightning storms or when unused for long periods of time. This will prevent damage to your TV from lightning and power-line surges.
15 Servicing—Refer all servicing to qualified service personnel. Servicing is required when your TV has been damaged in any way, such as when the power cord or plug is damaged, liquid has been spilled or objects have fallen into your TV, your TV has been exposed to rain or moisture, your TV does not operate normally, or your TV has been dropped.
16 Replacement parts—In case your TV needs replacement parts, make sure that the service person uses replacement parts specified by the manufacturer or parts with the same characteristics and performance as the original parts. Use of unauthorized parts can result in fire, electric shock, or other danger.
17 Overloading—Do not overload power outlets, extension cords, or convenience receptacles on other equipment because overloading can result in a risk of fire or electric shock.
18 Entering of objects and liquids—Never insert an object into the product through vents or openings. High voltage flows into the product, and inserting an object can cause electric shock or short internal parts. For the same reason, do not spill water or liquid on your TV.
19 Damage requiring service—If any of the following conditions occurs, unplug the power cord from the power outlet and have a qualified service person perform repairs. Examples of damages requiring repairs are:
- When the power cord or plug is damaged.
- When a liquid is spilled on your TV or when objects have fallen into your TV.
- When your TV has been exposed to rain or water.
- When your TV does not operate correctly as described in the operating instructions. Do not adjust controls other than those described in the operating instructions. Incorrect adjustment of controls not described in the instructions can cause damage, which often requires extensive adjustment work by a qualified technician.
- If your TV has been dropped or the cabinet has been damaged in any way.
- When your TV displays an abnormal condition or exhibits a distinct change in performance. Any noticeable abnormality in your TV indicates that it needs servicing.
20 Safety checks—Upon completion of service or repair work, ask the service technician to perform safety checks to ensure that the product is in correct operating condition.
21 Wall or ceiling mounting—When mounting your TV on a wall or ceiling, be sure to install your TV according to the method recommended by the manufacturer. This is a safety issue.
22 Power source—Your TV is intended to be supplied by a listed power supply indicated on the marking label. If you are not sure of the type of power supply to your home, consult your TV dealer or local power company. For added protection for your TV during a lightning storm or when your TV is left unattended and unused for long periods of time, unplug it from the power outlet and disconnect the cable system. This will prevent damage to your TV from lightning and power line surges. When your TV has to be used with another power supply voltage, the power cable must be changed. Consult your TV dealer. The power outlet should be installed near your TV and easily accessible. Use only the power cord designated by your dealer to ensure safety and EMC. When connecting other products, such as VCRs and computers, you should turn off the TV to protect against electric shock.
23 Panel protection—The display panel used in your TV is made of glass. Therefore, it can break when your TV is dropped or hit by other objects. Be careful to avoid being injured by broken glass pieces in case the display panel breaks.
24 Pixel defect—The display panel is a high-technology product that gives you finely detailed pictures. Occasionally, a few non-active pixels may appear on the screen as fixed points of blue, green, or red. This is not a defect and does not affect the performance of your TV.
25 Temperature—Do not use in hot and cold rooms or locations.
- Do not leave your TV in a hot or cold location. Also, do not leave your TV in a location exposed to direct sunlight or near a heater. This may cause the cabinet to warp and the screen to malfunction.
Storage temperature: 32^ to 122^ (0^ to 50^) - Working temperature: 41^ to 104^ ( 5^ to 40^ )
26 After image—Do not allow a still picture to be displayed for an extended period, because this can cause a permanent after-image to remain on the screen. Examples of still pictures include logos, video games, computer images, teletext, and images displayed in 4:3 mode. This background image is viewable on normal programs in the form of a stationary fixed image. This type of irreversible screen deterioration can be limited by observing the following:
- Reduce the brightness and contrast settings to a minimum viewing level.
- Do not display the fixed image for extended periods of time.
- Turn off the power when not in actual use.
Cautions: The permanent after-image on the screen resulting from fixed image use is not an operating defect and is not covered by the warranty. Your TV is not designed to display fixed images for extended periods of time.
TV components
Front
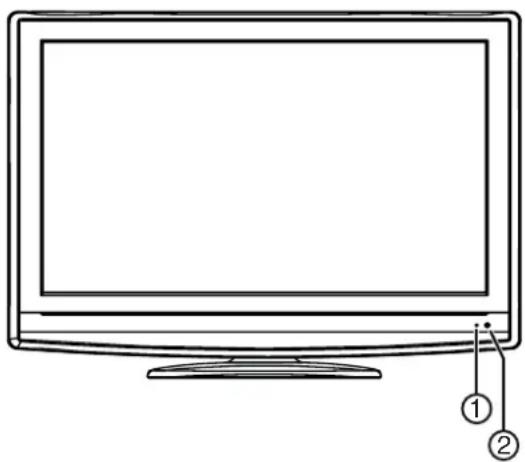
| # Component Description | ||
| 1 Power indicator Lights when your TV is plugged into a power outlet. This indicator is green when your TV is on and red when your TV is in Standby mode. | ||
| 2 | R e m sensor | Receives signals from the e remote control. Do not block. |
Side
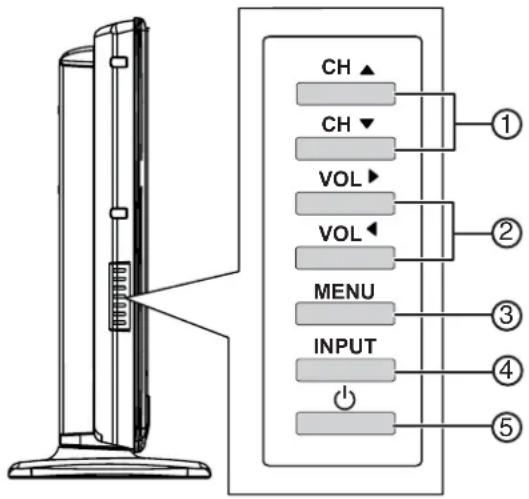
| # Component Description | ||
| 1 | CH▲CH▼ | Press to go to the next or previous channel. |
| 2 | VOL▼VOL▲ | Press to increase or decrease the volume. |
| 3 | MENU Press to open the on-screen menu. | |
| 4 | INPUT Press to open the Input | Source menu, press CH▲ or CH▼ to select the source, then press VOL▲to confirm. You can select TV, AV, S-Video, Component1, Component2, HDMI1, HDMI2, or VGA. |
| 5 | ( power) | Press to turn on your TV. Press again to enter standby mode. |
C
Back Remote control
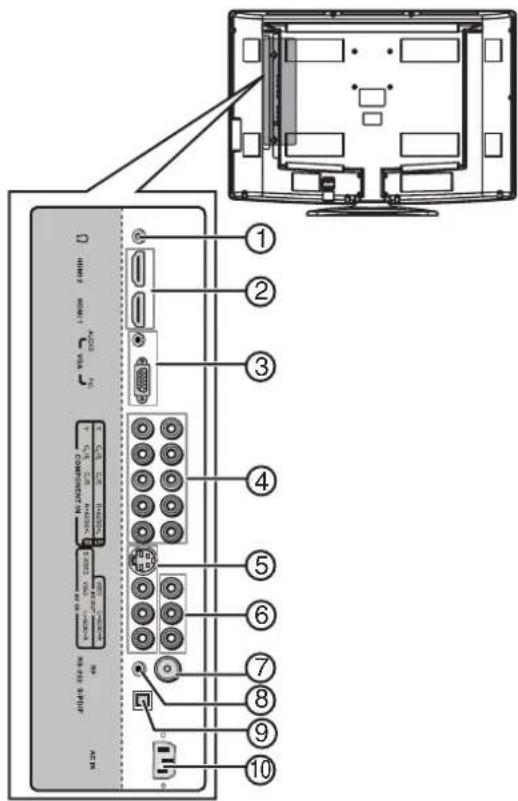
| # Component Description | ||
| 1 Connect headphones to this | jack. | |
| 2 HDMI 2 and HDMI 1 Connect HDMI devices to these jacks. You can connect two HDMI devices. | ||
| 3 VGA AUDIO/PIC Connect the audio from a computer to these jacks. | ||
| 4 COMPONENT IN 1 and COMPONENT IN 2 | Connect component video devices to these jacks. You can connect two component video devices. | |
| 5 S-VIDEO/AV IN Connect an S-Video device to the S-VIDEO jack or connect a standard A/V device to the AVIN jacks. | ||
| 6 | A V O | U T C you can record from your TV. |
| 7 RF | Connect the antenna, cable TV, or satellite TV to this jack. | |
| 8 RS-232 | For service only. Do not connect anything to this jack. | |
| 9 S/PDIF | Connect a digital optical audio device to this jack. | |
| 10 | AC POWER | Connect the power cord to this jack, then plug the other end into a power outlet. |
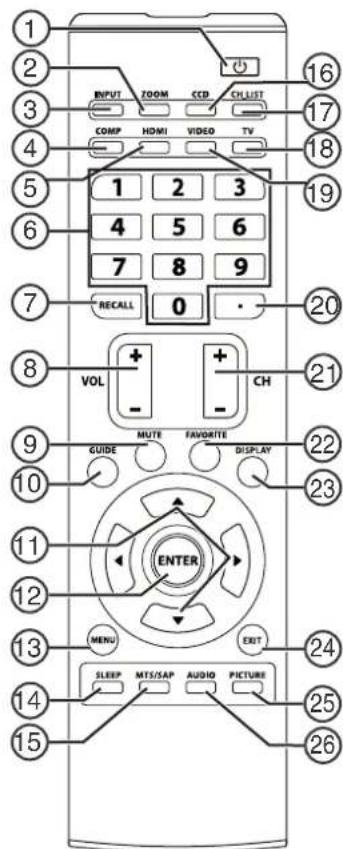
| # Button | Description | |
| 1 | ( power ) | Press to turn on your TV. Press again to enter standby mode. |
| 2 ZOOM | Press to | select the aspect ratio. You can select Normal, Wide, Zoom, or Cinema. |
| 3 INPUT | Press to | open the video input source menu, press▲ or▼ to select the video input source, then press ENTER to confirm. You can select TV, AV, S-Video, Component1, Component2, HDMI1, HDMI2, or VGA. |
| 4 COMP n | Press once | Once to select the device connected to the COMPONENT IN 1 Jacks! Press twice to select the device connected to the COMPONENT IN 2 Jacks. |
| 5 HDMI | Press once | Once to select the device connected to the HDMI 1 jack. Press twice to select the device connected to the HDMI 2 jack. |
| 6 | Number buttons | Press to enter a channel number or the password. |
| 7 RECALL | Press to view the previous channel. | |
| 8 | VOL+VOL- | Press to increase or decrease the volume. |
| 9 | MUTE | Press to turn off the sound. Press again to restore the sound. |
| 10 | GUIDE | Press to open the program guide (if available) for digital TV (DTV) programs. |
| # | Button | Description |
| 11 | ▲▼▲ | Press or move up or down in an on-screen menu. Press or adjust an on-screen option. |
| 12 ENTER | Press to confirm a selection or open a sub-menu in the on-screen menu. | |
| 13 MENU | Press to open the on-screen menu. | |
| 14 SLEEP | Press to set the sleep timer. | |
| 15 MTS/SAP In analog TV mode, | press to select the sound mode. You can select STEREO, SAP (second audio program), or MONO. In digital TV mode, press to select the audio track, if available. | |
| 16 CCD | Press to turn closed captions on or off. | |
| 17 CH.LIST | Press to open the memorized channel list. | |
| 18 TV Press to watch TV. | ||
| 19 VIDEO | Press once to select the device connected to AV IN jacks. Press twice to select the device connected to the S-VIDEO jack. | |
| 20 Press to select a digital | sub-channel. For example, to select sub-channel 2 of the main channel 5, press 5, press this button, then press 2. | |
| 21 CH+/CH- Press to go to the next higher or lower TV channel. | ||
| 22 | FAVORITE Press to display the favorite channel list. | |
| 23 DISPLAY | Press to display the information banner. | |
| 24 EXIT Press to close the on-screen menu. | ||
| 25 PICTURE | Press to select the picture mode. You can select Standard, Dynamic, Soft, or Personal. | |
| 26 AUDIO | Press to select the sound mode. You can select Standard, Music, Movie, or Personal. | |
Setting up your TV Installing the remote control batteries
To install the remote control batteries:
1 Remove the battery compartment cover.
2 Insert two AAA batteries into the battery compartment. Make sure that the + and - symbols on the batteries align with the + and - symbols inside the battery compartment.
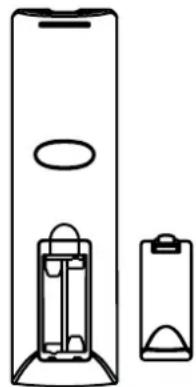
3 Replace the battery compartment cover.
Cautions:
Do not mix different types of batteries.
Do not mix old and new batteries. Mixing old and new batteries can shorten battery life or cause old batteries to leak.
Remove batteries as soon as they no longer have a charge. Old batteries may leak, and the chemicals that leak can cause a rash. If batteries leak inside the battery compartment, use a cloth to wipe the inside of the battery compartment.
If you do not intend to use the remote control for an extended time, remove the batteries.
Do not expose batteries to excessive heat such as direct sunlight or heaters. Do not dispose of used batteries in a fire.
Using the remote control
To use the remote control:
1 Make sure that there are no obstructions between the remote control and the remote control sensor on the front of your TV.
2 Point the remote control toward the remote control sensor, then press the button you want.
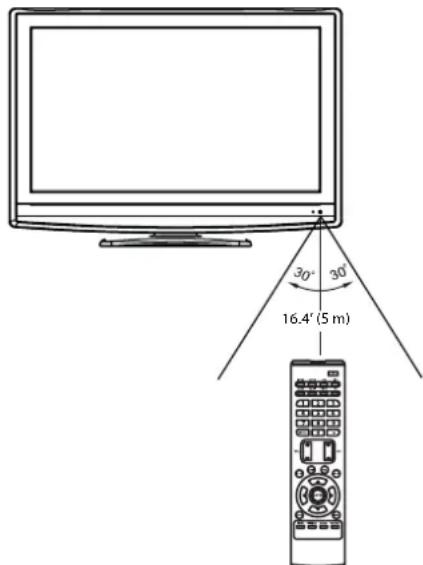
Cautions:
Do not drop the remote control or expose it to shock.
Do not expose the remote control to liquids and do not use in an area with high humidity.
Do not leave the remote control in direct sunlight or near a heat source. The heat may warp or damage the plastic.
Note: The remote control may not work if sunlight or strong light shines on the remote control sensor on the front of your TV. If this occurs, operate the remote control closer to the remote control sensor, change the angle of the lighting, or change the angle or location of your TV.
Connecting an antenna or direct cable
Optimum color reception requires good signal, which generally means that you should use an outdoor antenna. The type and position of the antenna you need depends on your location.
To connect an antenna or direct cable:
- Connect a 75 Ohm coaxial cable to the RF jack on the back of your TV and to the antenna or cable wall jack.
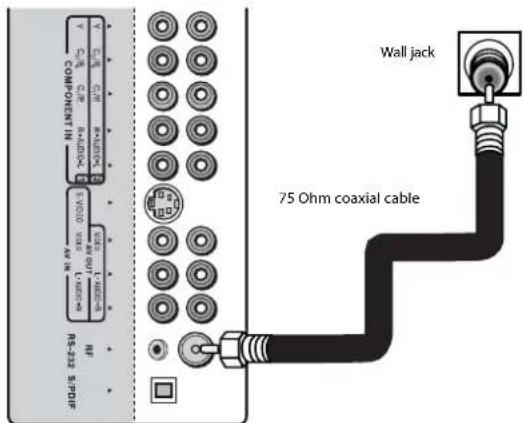
Note: Do not bundle the antenna cable with the power cord or other cables.
Connecting a VCR
To connect a VCR:
- Connect an A/V cable to the AV IN jacks on the back of your TV and to the AV OUT jacks on the VCR. Or
Connect an S-Video cable to the S-VIDEO jack on the back of your TV and to the S-Video Out jack on the VCR. Then connect an audio cable to the L AUDIO and R AUDIO jacks on the back of your TV and to the Audio Out jacks on the VCR.
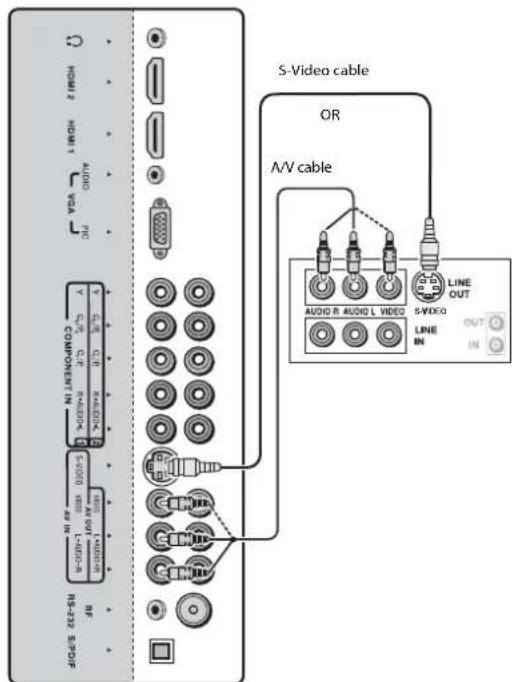
To play a videotape:
1 Turn on your TV, then press INPUT. The INPUT SOURCE menu opens.
2 Press or to select AV or S-Video, then press ENTER.
Note: You can press Video once to select AV or twice to select S-Video.
3 Turn on your VCR, insert a videotape, then press PLAY on the VCR.
Note: AV and S-Video connections share the same audio jacks.
Connecting a VCR for recording
To connect a VCR for recording:
- Connect an A/V cable to the AV OUT jacks on the back of your TV and to the AV IN jacks on the back of the VCR.
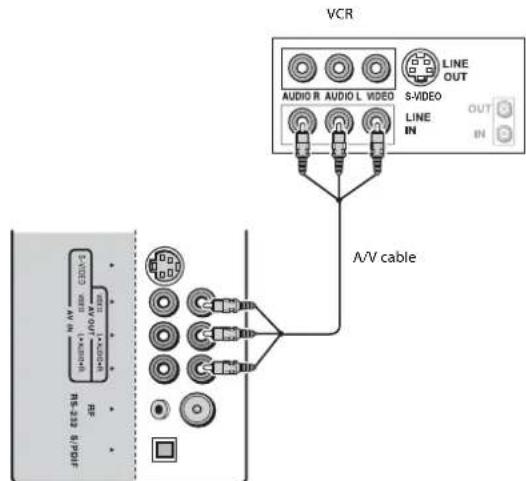
To record a program:
1 Turn on your TV, then select the program you want to record.
2 Turn on your VCR, then insert a videotape.
3 Press RECORD on your VCR to start the recording. Note: You can only record analog TV programs and input from the AV and S-VIDEO jacks on your TV.
Connecting a camcorder or game console
To connect a camcorder or game console:
- Connect an A/V cable to the AV IN jackets on the back of your TV and to the AV OUT jackets on your camcorder or game console.
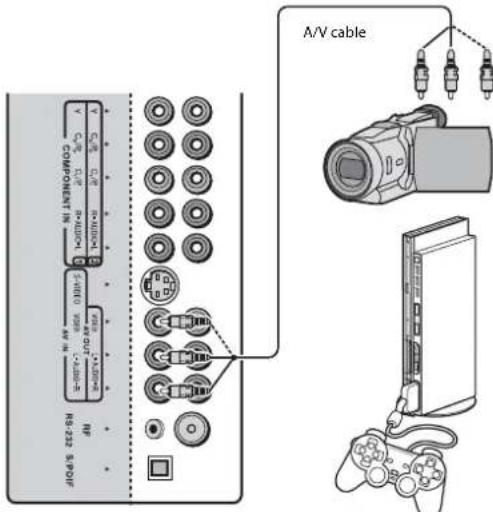
To play from a camcorder or play a game:
1 Turn on your TV, then press INPUT. The INPUT SOURCE menu opens.
2 Press or to select AV, then press ENTER. Note: You can press Video once to select AV.
3 Insert a tape in the camcorder or a game disc in the game console, then press PLAY on the camcorder or game console. Note: If you are connecting a camcorder, you need to set it to output mode. See the documentation than came with the camcorder for specific instructions.
Connecting an HDMI device
You can connect two HDMI devices.
To connect an HDMI device:
- Connect an HDMI cable to the HDMI 1 or HDMI 2 jack on the back of your TV and to the HDMI Out jack on the HDMI device.
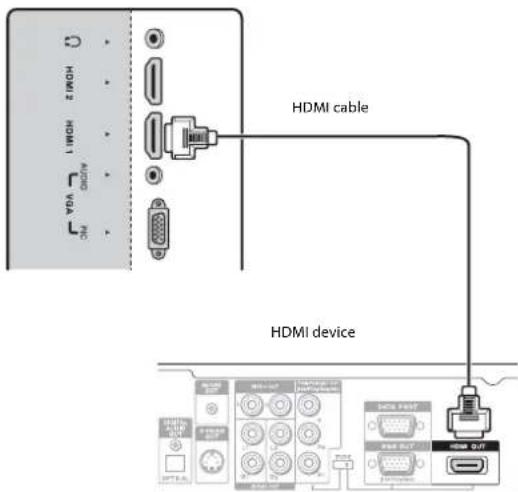
Note: If you want to connect a DVI device, use a DVI-to-HDMI adapter cable to connect the device to the HDMI 1 or HDMI 2 jack, then connect an audio cable to the VGA AUDIO IN jack.
To play from an HDMI device:
1 Turn on your TV, then press INPUT. The INPUT SOURCE menu opens.
2 Press or to select HDMI1 or HDMI2, then press ENTER. Note: You can press HDMI once to select HDMI1 or twice to select HDMI2.
3 Turn on the HDMI device, then set it to the correct mode. See the documentation that came with the device for instructions.
Connecting a component video device
You can connect two component video devices.
To connect a component video device:
- Connect a component video cable to the COMPONENT IN 1 or COMPONENT IN 2 jacks on the back of your TV and to the Component Out jacks on the component video device.

To play from the component video device:
1 Turn on your TV, then press INPUT. The INPUT SOURCE menu opens.
2 Press or to select COMPONENT1 or COMPONENT2, then press ENTER. Note: You can press COMP once to select COMPONENT1 or twice to select COMPONENT2.
3 Turn on the component video device, then set it to the correct mode. See the documentation that came with the device for instructions.
Connecting a computer
You can use your TV as a computer monitor.
Note: When the computer goes into standby mode, your TV turns off. If your TV does not turn on when you "wake" your computer, press the POWER button on your TV or remote control.
To connect a computer:
1 Connect a VGA cable to the VGA PIC jack on the back of your TV and to the VGA jack on the computer.
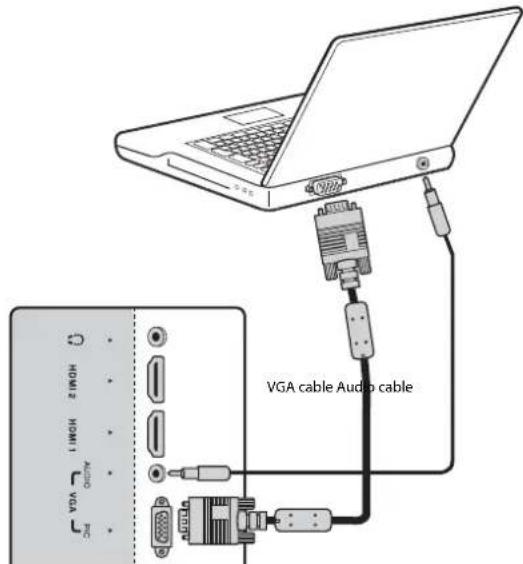
2 Connect an audio cable to the VGA AUDIO jack on the back of your TV and to the Audio Out jack on the computer.
To use your TV as a computer monitor:
1 Turn on your TV, then press INPUT. The INPUT SOURCE menu opens.
2 Press or to select VGA, then press ENTER.
3 Turn on the computer, then adjust the display properties, if necessary.
Connecting a digital optical audio device
To connect a digital optical audio device:
- Connect an optical audio cable to the S/PDIF jack on the back of your TV and to the S/PDIF In jack on the S/PDIF device.
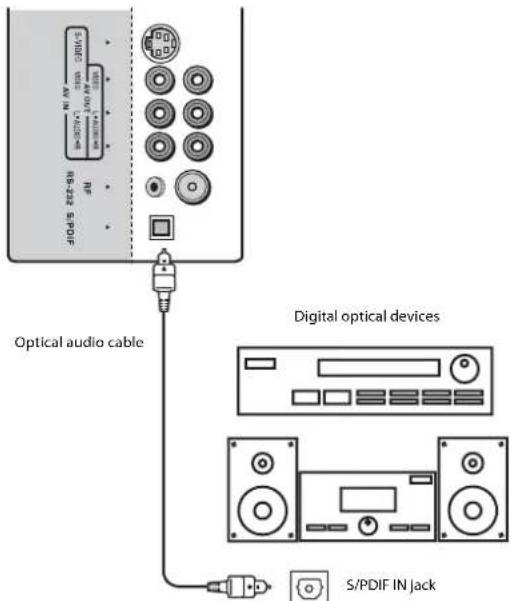
Note: The S/PDIF jack on your TV sends audio for DTV channels only.
Connecting headphones
To connect headphones:
- Connect the headphone cable to the (headphone) jack on the back of your TV.
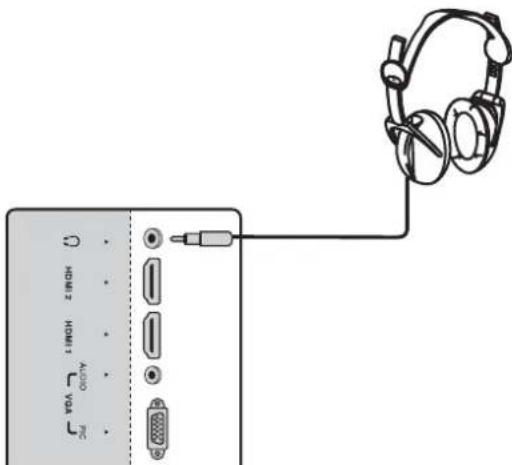
Warning: If the headphone volume is too loud, you may damage your hearing. Adjust the volume to a comfortable level.
Using your TV
Turning your TV on or off
Note: The first time you turn on your TV, you need to select the TV signal source and your TV needs to memorize channels. For more information, see "Selecting the TV signal source" on page 9 and "Memorizing for channels" on page 10.
To turn your TV on or off:
1 Plug the power cord into a power outlet.
2 Press the remote control or the side of your TV. Your TV turns on.
3 Press again to put your TV in standby mode.
Note: When your TV is in standby mode, power is still flowing into it. To completely disconnect power, unplug the power cord.
Selecting the video input source
To select the video input source:
1 Turn on your TV, then press INPUT. The INPUT SOURCE menu opens.
2 Press or to select an video input source, then press ENTER. You can select TV, AV, S-Video, Component1, Component2, HDMI1, HDMI2, or VGA.
The remote control also has four direct video input buttons that you can press to go directly to the corresponding video input source.
To use a direct video input button:
- Press COMP once to select Component1 or twice to select Component2.
- Press HDMI once to select HDMI1 or twice to select HDMI2.
- PressVIDEO once to select AV or twice to select S-Video.
- Press TV to select TV.
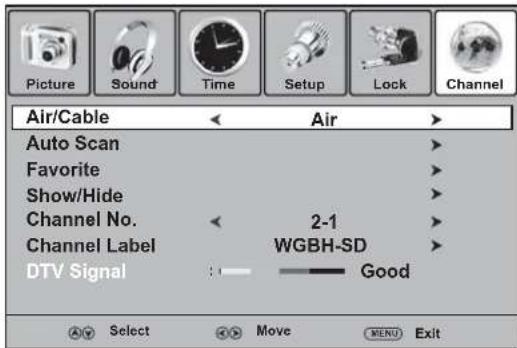
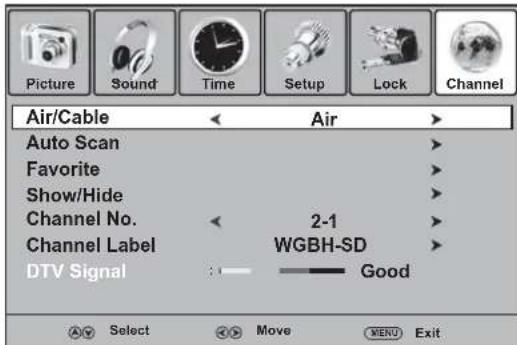
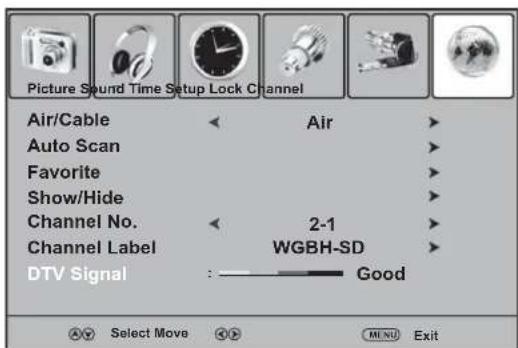
Selecting the TV signal source
To select the TV signal source:
1 Press MENU. The on-screen menu opens.
2 Press or to select Channel, then press to open the Channel menu.
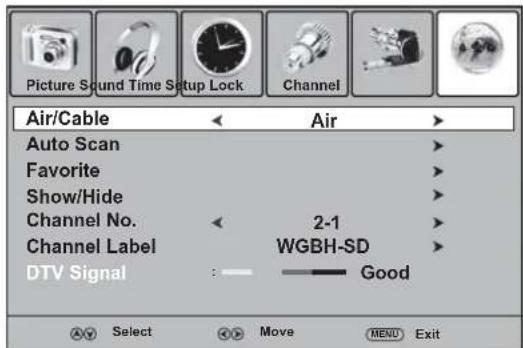
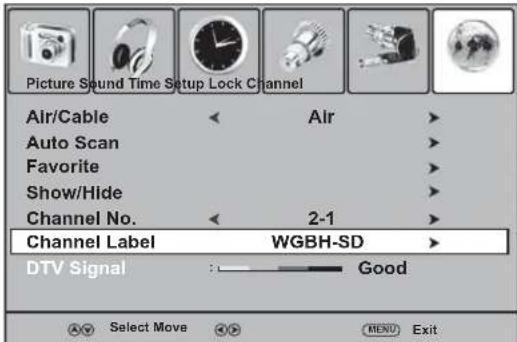
3 Press or to select Air/Cable, then press or to select Air (for an antenna) or Cable (for cable or satellite TV).
Using the on-screen menu
Your TV has an on-screen menu that lets you adjust options and settings for your TV.
Notes:
Menu options that are grayed out are not available for the current video input source.
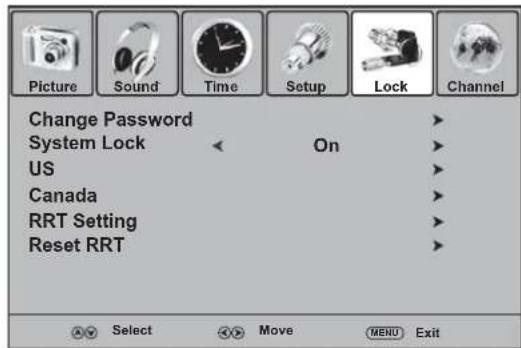
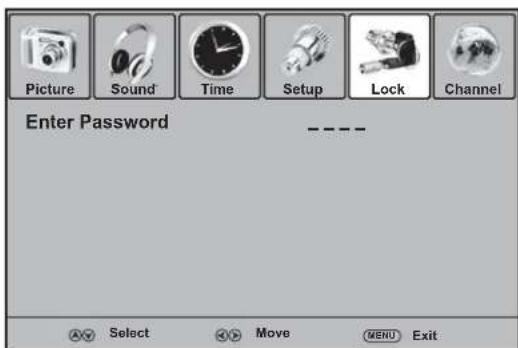
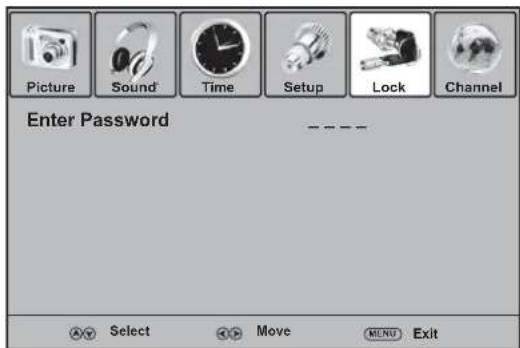
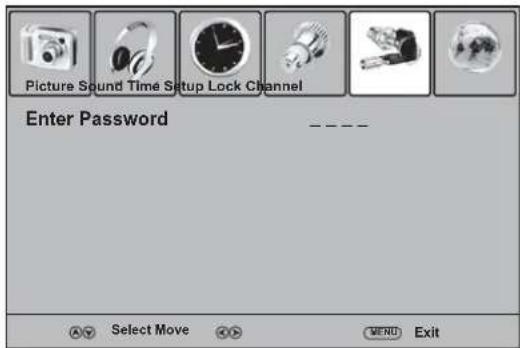
To access the Lock menu, you must enter the password.
The on-screen menus in this guide are for explanation purposes only. Some are cropped or enlarged and may vary slightly from the actual menus.
The menus shown are for the DTV video input mode.
The following illustrations show the main on-screen menus.
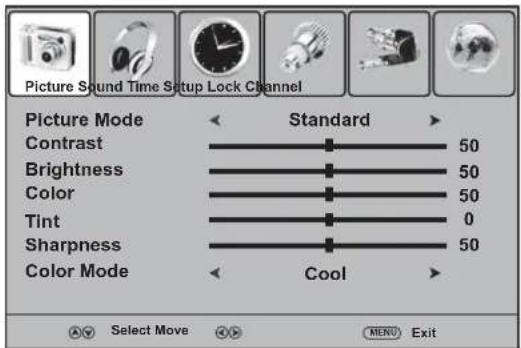
Picture menu
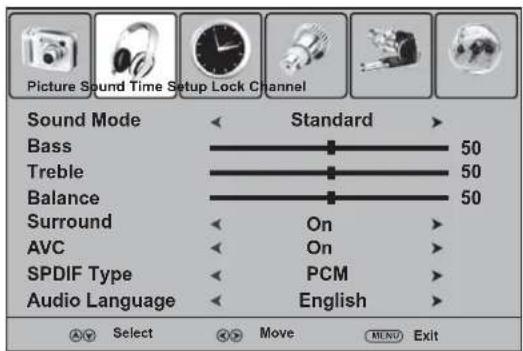
Sound menu
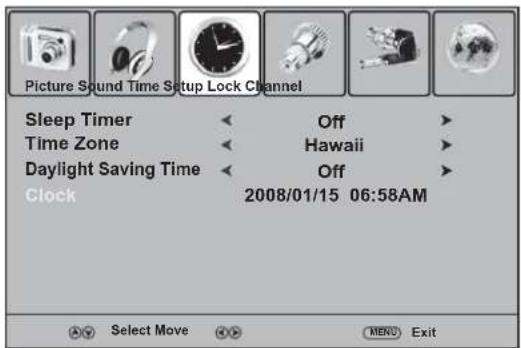
Time menu
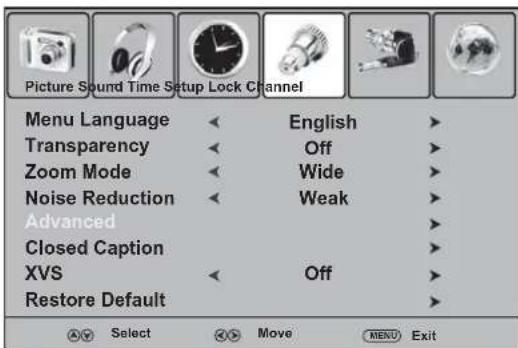
Setup menu
Lock menu
Channel menu

To use the on-screen menu:
1 Make sure that your TV is turned on.
2 Press MENU. The on-screen menu opens.
3 Press on to select a menu, then press to open the menu.
4 Press to select an option.
5 Press on to adjust the option.
Or
If the option has sub-options, press or ENTER to access the sub-options, press or select an option, then press or to adjust the option.
6 Press MENU to return to a previous menu, or press EXIT to close the menu system.
Memorizing for channels
The first time you turn on your TV, you need to scan for channels. Your TV uses the scanned information to create a memorized channel list. When you press CH+ or CH- your TV skips any channels that were not memorized.
To memorize channels if the TV signal source is Air (antenna):
1 Press MENU. The on-screen menu opens.
2 Press or to select Channel, then press to open the Channel menu.
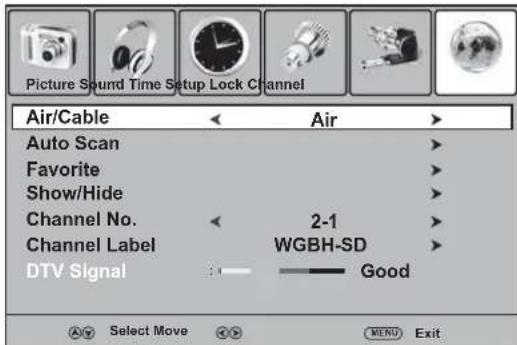
3 Press or to select Auto Scan.
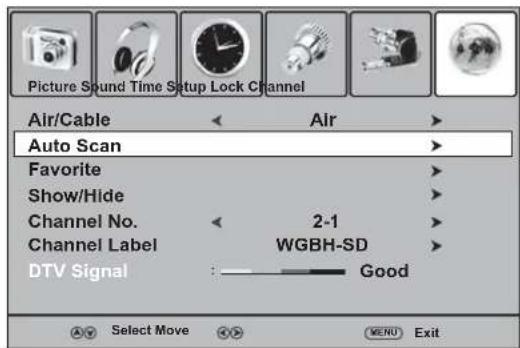
4 Press or ENTER. Start to Scan is highlighted.
5 Press or ENTER to start scanning. Your TV memorizes all analog and digital TV channels in your viewing area.
To memorize channels if the TV signal source is Cable (cable or satellite TV):
1 Press MENU. The on-screen menu opens.
2 Press or to select Channel, then press to open the Channel menu.

3 Press or to select Auto Scan.
4 Press or ENTER.
5 Press or to select Cable System, then press or to select your type of cable or satellite system. You can select STD, IRC, HRC, or AUTO. If you are not sure what type of system you have, select AUTO.
6 Press or to select Start to Scan, then press or ENTER to start scanning. Your TV memorizes all cable or satellite channels you receive.
Note: If you want to stop the scan, press MENU.
Deleting memorized channels
When you press CH+ or CH- , your TV goes to the next or previous channel in the memorized channel list. You can delete a channel from the channel list. If you delete a channel, your TV skips the channel when you press CH+ or CH- . You can still tune to the channel by pressing the number buttons.
To delete a memorized channel:
1 Press MENU. The on-screen menu opens.
2 Press or to select Channel, then press to open the Channel menu.
3 Press or to select Show/Hide.
4 Press or ENTER. The channel list opens. Channels that are in the channel list have a check mark in the Show column. Channels that are not in the channel list do not have a check mark.
5 Press or to select a channel, then press ENTER to hide the channel (remove the check mark).
Note: If the channel list has more than one page, press to scroll to the next page.
6 Press EXIT to save your changes and close the menu system.
Changing channels
Digital sub-channels
A digital TV signal transmits more data than an analog signal. This increase in data provides a better picture and sound with less static and interference.
The increased data capacity of a digital signal also lets broadcasters fit several channels into the same bandwidth as an analog signal. Broadcasters may use these sub-channels to transmit a variety of information, such as weather forecasts, foreign languages, commercials.
A digital sub-channel is indicated by the main channel number followed by a dot and the sub-channel number. For example, 5.1 indicates sub channel 1 of the main channel 5.
To change channels:
- Press CH+ or CH- to go to the next or previous channel in the memorized channel list.
- To select an analog channel, press the number buttons for the channel you want, then wait for the channel to change or press ENTER to immediately change the channel.
- To select a main digital channel, press the number buttons for the main channel, press then wait for the channel to change or press ENTER to immediately change the channel.
To select a digital sub-channel, press the number buttons for the main channel, press then press the number button for the sub channel. Wait for the channel to change, or press ENTER to immediately change the channel.
Note: Button presses must be within three seconds of each other.
- To go to the last channel viewed, press RECALL.
To select a channel from the memorized channel list, press CH.LIST, press or to select the channel, then press ENTER. Note: If the memorized channel list has more than one page, press to scroll to the previous page or next page.
To select a channel from the favorite channel list, press FAVORITE, press or to select the channel, then press ENTER.
Note: If the favorite channel list has more than one page, press or to scroll to the previous page or next page.
Adjusting the picture
To adjust the picture:
1 Press MENU. The on-screen menu opens.
2 Press or to select Picture, then press to open the Picture menu.
3 Press on to select an option, then press or adjust the option. You can adjust:
Picture Mode-Selects Standard, Dynamic, Soft, or Personal.
- Contrast—Adjusts the amount of white between the lightest and darkest parts of the image.
- Brightness—Adjusts the overall lightness or darkness of the image.
Color-Adjusts the color intensity (saturation).
- Tint—Adjusts the tint of the image.
- Sharpness—Adjusts the clarity of the image.
Color Mode-Selects Warm (intense colors), Cool (softer colors), or Normal (standard colors).
4 Press MENU to return to the previous menu, or press EXIT to close the menu system. Note: You can also press PICTURE to select the Picture Mode.
Adjusting the VGA (PC) image
To adjust the VGA (PC) image:
1 Make sure that your TV is in VGA mode, then press MENU. The on-screen menu opens.
2 Press or to select Picture, then press to open the Picture menu.
3 Press to select an option, then press or adjust the option. You can adjust:
Picture Mode-Selects Standard, Dynamic, Soft, or Personal.
- Contrast—Adjusts the amount of white between the lightest and darkest parts of the image.
- Brightness—Adjusts the overall lightness or darkness of the image.
- Sharpness—Adjusts the clarity of the image.
Color Mode-Selects Warm (intense colors), Cool (softer colors), or Normal (standard colors).
4 Press MENU to return to the previous menu, or press EXIT to close the menu system.
Note: You can also press PICTURE to select the Picture Mode.
You can also adjust advanced VGA picture settings.
To adjust advanced VGA picture settings:
1 Press MENU. The on-screen menu opens.
2 Press or to select Setup, then press to open the Setup menu.
3 Press or to select Advanced, then press or ENTER to open the Advanced menu.
4 Press or to select an option, then press or to adjust the option. You can adjust:
- H-Pos—Moves the image left or right.
- V-Pos—Moves the image up or down.
- Clock—Adjusts the sample frequency.
- Phase—Improves image stability.
- Auto—Automatically adjusts image settings.
5 If you selected Auto, press ENTER to confirm the adjustment.
6 Press MENU to return to the previous menu, or press EXIT to close the menu system.
Reducing video noise
If you experience video noise, commonly called snow, you may be able to reduce or eliminate it.
To reduce video noise:
1 Press MENU. The on-screen menu opens.
2 Press or to select Setup, then press to open the Setup menu.
3 Press or to select Noise Reduction, then press or to select Weak, Middle, Strong, or Off.
4 Press MENU to return to a previous menu, or press EXIT to close the menu system.
Optimizing the image
To optimize the image:
1 Press MENU. The on-screen menu opens.
2 Press or to select Setup, then press to open the Setup menu.
3 Press or to select XVS, then press or to select On or Off.
4 Press MENU to return to a previous menu, or press EXIT to close the menu system.
Selecting the aspect ratio
To select the aspect ratio:
- Press ZOOM one or more time. You can select:
Normal Selects the aspect ratio that matches to source's aspect ratio (4:3 or 16:9). - Wide—Displays a full-screen image.
- Zoom—Enlarges the picture. The top and bottom may be cropped.
- Cinema—Stretches the image at the edges while maintaining a clear image in the center of the screen.
Adjusting the volume
To adjust the volume:
- Press VOL+ or VOL- to increase or decrease the volume.
- Press MUTE to turn off the sound. Press this button again to restore the sound.
Adjusting the audio
To adjust the audio:
1 Press MENU. The on-screen menu opens.
2 Press or to select Sound, then press to open the Sound menu.
3 Press to select an option, then press or adjust the option. You can adjust:
Sound Mode-Selects Standard, Music, Movie, or Personal.
- Bass—Adjusts the low sounds.
- Treble—Adjusts the high sounds.
Balance-Adjusts the balance between the left and right audio.
- Surround—Turns the surround sound effect on or off.
- AVC—Turns auto volume control on or off. When AVC is on, the overall volume levels are equalized across all channels.
SPDIF Type—(Digital programs only) Selects the audio output mode. RAW outputs the audio in its original format. PCM outputs the audio in PCM format (if available).
- Audio Language—(Digital programs only) Selects an alternate audio language if the program has more than one language.
4 Press MENU to return to the previous menu, or press EXIT to close the menu system.
Note: You can also press AUDIO to select the Sound Mode.
Selecting the audio signal type
For analog programs, your TV can receive MTS stereo programs and any SAP (secondary audio program) that comes with a stereo program.
To select the audio signal type:
-
Press MTS/SAP one or more times. You can select:
-
MONO—Sends the same signal to the left and right audio. If you are having trouble hearing a stereo broadcast, select this option.
- STEREO—Sends different signals to the left and right audio.
- SAP—Plays a secondary audio program, if available.
Note: If you are watching a digital program, pressing MTS/SAP selects an audio track, if available.
Setting the clock
The time is set automatically from a digital channel signal. You can select a time zone and turn daylight saving on or off.
To set the clock:
1 Press MENU. The on-screen menu opens.
2 Press or to select Time, then press to open the Time menu.
3 Press or to select Time Zone, then press or to select a time zone. You can select Pacific, Alaska, Hawaii, Eastern, Central, or Mountain.
4 If your viewing area observes daylight saving time, press to select Daylight Saving Time, then press or to select On.
The current date and time appear at the bottom of the option list.
Displaying the information banner
The information banner displays current status information, such as the channel number or signal source. In DTV mode, you may also see additional information.
To display the information banner:
- Press DISPLAY. The information banner opens.
Displaying the program guide
If available, the program guide displays program information, such as the viewing time, program name, and program description.
To display the program guide:
- Press GUIDE. The program guide opens.
Monitoring the DTV signal strength
You can check the DTV signal strength. The stronger the signal, the less likely you are to experience picture degradation. If the signal is weak, you may need to adjust your antenna or digital cable input.
To monitor the DTV signal strength:
1 Press MENU. The on-screen menu opens.
2 Press or to select Channel, then press to open the Channel menu. The DTV Signal bar appears at the bottom of the menu.
Setting up the favorite channel list
To set up the favorite channel list:
1 Press MENU. The on-screen menu opens.
2 Press or to select Channel, then press to open the Channel menu.
3 Press or to select Favorite.
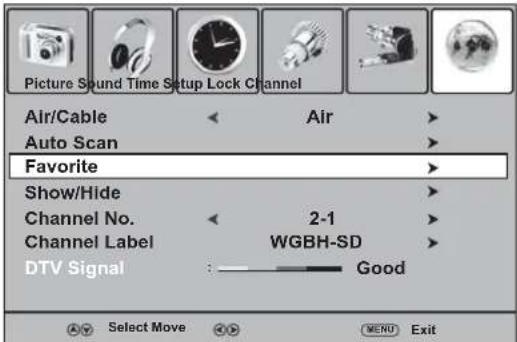
4 Press or ENTER. The favorite channel list opens. Channels that are in the favorite channel list have a check mark in the Favorite column. Channels that are not in the favorite channel list do not have a check mark.
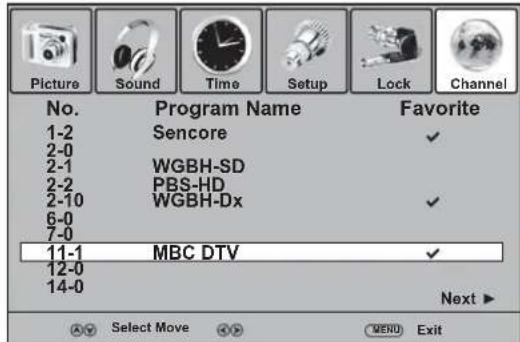
5 Press or to select a channel, then press ENTER to add the channel to the favorite channel list.
Note: If the favorite channel list has more than one page, press or to scroll to the previous page or next page.
6 Repeat Step 5 to add more channels.
7 Press EXIT to save your changes and close the menu system.
Labeling a channel
You can add a label to a channel to make it easier to identify.
To label a channel:
1 Press MENU. The on-screen menu opens.
2 Press or to select Channel, then press to open the Channel menu.
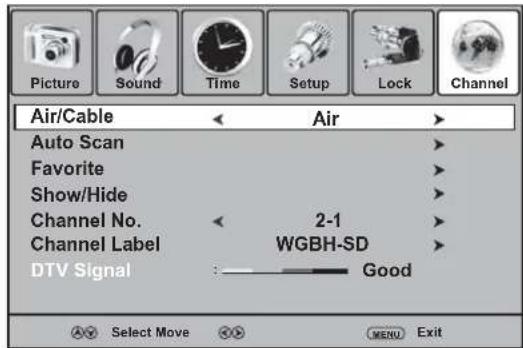
3 Press or to select Channel Label.
4 Press or ENTER. The channel label editing screen opens.
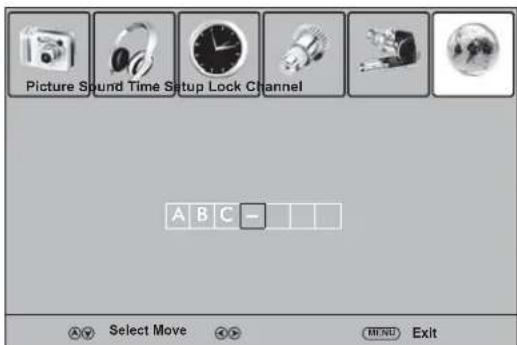
5 Press to select a character, then press or move to a different character.
6 Press ENTER to save the label, or press MENU to save the label and return to the Channel menu.
Note: If a DTV channel broadcaster provides a channel label, the broadcaster's label appears even if you do not label the channel.
Using closed captions
You can turn closed captions on or off, select the closed caption type, and customize DTV closed caption styles.
Notes: The closed caption feature does not work in the component, VGA, or HDMI mode.
Not all programs have closed captions.
To use closed captions:
1 Press MENU. The on-screen menu opens.
2 Press or to select Setup, then press to open the Setup menu.
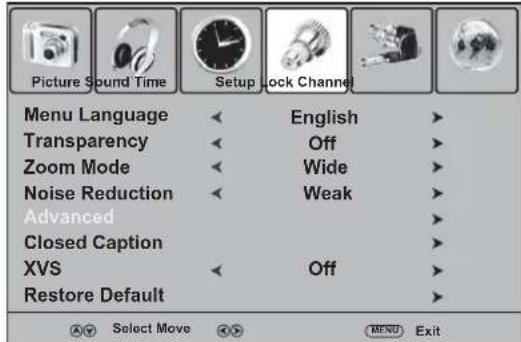
3 Press or to select Closed Caption, then press or ENTER. The closed caption option screen opens.
4 Press on to select an option, then press or adjust the option. You can adjust:
- CC Mode—Selects the closed caption mode. You can select On, CC on Mute, or Off.
- Basic Selection—Selects the closed caption type. You can select CC1 through CC4 or Text1 through Text4. A CC type displays the caption in a banner at the bottom of the screen. CC1 usually displays the text of the audio. CC2 through CC4 usually display other information supplied by the broadcaster. A Text type displays information in a large box that covers a large portion of the screen. Text1 through Text4 display information supplied by the broadcaster.
- Advanced Selection—(DTV only) Selects advanced digital closed caption options.
- Option—(DTV only) Lets you customize closed caption styles. For instructions for customizing closed caption styles, see "Customizing closed caption styles" on page 16.
Customizing closed caption styles
To customize closed caption styles:
1 Select Option on the closed caption option screen, then press ENTER. The closed caption style screen opens.
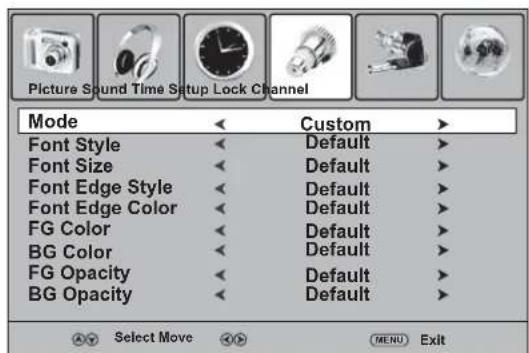
2 Press or to change the Mode option to Custom.
3 Press or to select an option, then press or adjust the option. You can adjust:
- Font Style—Selects a font style for the words.
- Font Size—Selects the size of the words.
- Font Edge Style—Selects an edge style.
- Font Edge Color-Selects an edge color.
FG Color-Selects a text color. - BG Color-Selects a background color.
-FG Opacity-Selects the text opacity. - BG Opacity-Selects the background opacity.
4 Press MENU to go to the previous menu, or press EXIT to close the menu system.
Using the sleep timer
You can select an amount of time you want your TV to wait before it automatically turns off. If you turn off your TV before the timer runs out, the timer is cleared.
To set the sleep timer:
1 Press MENU. The on-screen menu opens.
2 Press or to select Time, then press to open the Time menu.
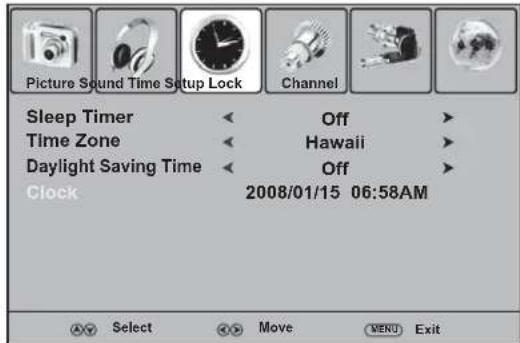
3 Press or to select Sleep Timer, then press or to select the amount of time you want your TV to wait before it automatically turns off.
Note: You can also press SLEEP to set the sleep timer.
Selecting the on-screen menu language
To select the on-screen menu language:
1 Press MENU. The on-screen menu opens.
2 Press or to select Setup, then press to open the Setup menu.
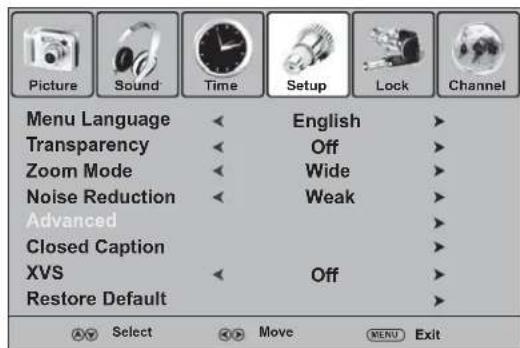
3 Press or to select Menu Language.

4 Press to select the language you want. You can select English, French, or Spanish.
5 Press EXIT to save your selection and close the menu system.
Setting the password
Before you block channels, you need to set a password. The password controls access to the parental lock system.
To set the password:
1 Press MENU. The on-screen menu opens.
2 Press or to select Lock, then press . The password entry screen opens.
3 Press the number buttons to enter 0000 (default password). The Lock menu opens.
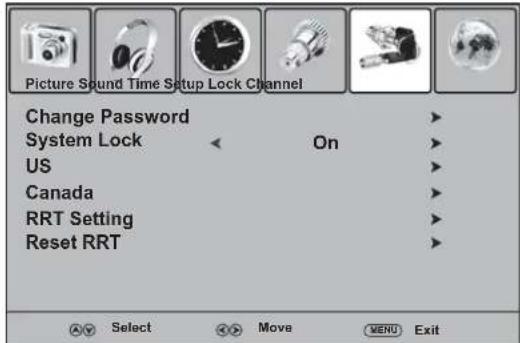
4 Press or to select Change Password, then press or ENTER. The change password screen opens.
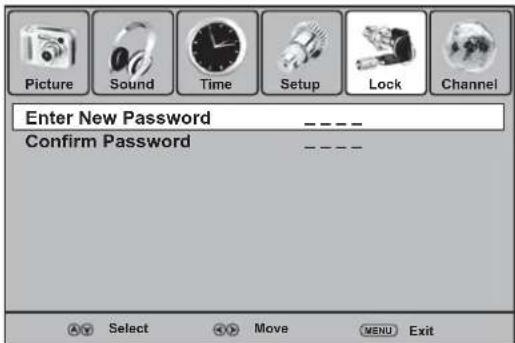
5 Press the number buttons to enter the new password, then enter the new password again. The Lock menu reopens and you can change the lock options.
Note: If you forget the password, enter 1397.
Turning the parental lock on or off
To turn the parental lock on or off:
1 Press MENU. The on-screen menu opens.
2 Press or to select Lock, then press . The password entry screen opens.
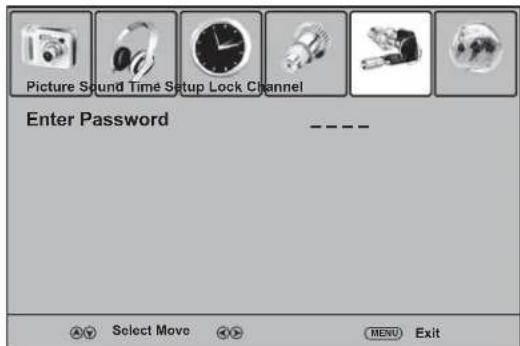
3 Press the number buttons to enter the password. The default password is 0000. The Lock menu opens.
4 Press or to select System Lock, then press or to select On or Off.
5 Press MENU to return to the previous menu, or press EXIT to close the menu system.
Setting parental controls
You can block TV programs and movies based on their ratings.
| U.S. TV age ratings | |
| Y All children | |
| Y7 Children age 7 and older | |
| G | General audiences |
| PG | Parental guidance suggested |
| 14 Parents strongly cautioned | |
| MA | Mature audiences only |
| U.S. TV content ratings | |
| FV Fantasy violence | |
| V | Violence |
| S | Sexual situations |
| L | Strong language |
| D | Suggestive dialog |
| Canadian English ratings |
| E Exempt programming |
| C All children |
| C8+ Children age 8 and over |
| G General programming |
| PG Parental guidance |
| 14+ Children age 14 and over |
| 18+ Adult programming |
| Canadian French ratings | |
| E Exempt programming | |
| G General programming | |
| 8ans+ Children age 8 and over | |
| 13ans+ | Children age 13 and over |
| 16ans+ | Children age 16 and over |
| 18ans+ | Adult programming |
| Movie ratings | |
| G All audiences | |
| PG Parental guidance suggested | |
| PG-13 Parental guidance for children under age 13 | |
| R | Parental guidance for children under age 17 |
| NC-17 Not recommended for children under age 17 | |
| X Adults only | |
| N/A Not rated | |
To set parental controls:
1 Press MENU. The on-screen menu opens.
2 Press or to select Lock, then press . The password entry screen opens.
3 Press the number buttons to enter the password. The default password is 0000. The Lock menu opens.
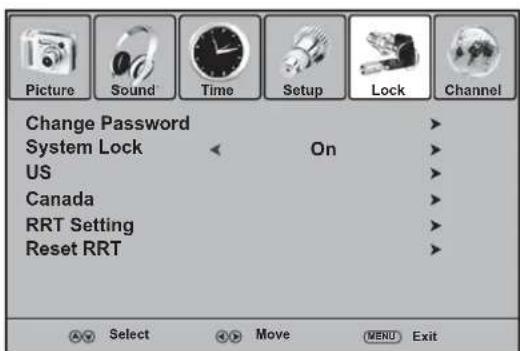
4 If necessary, press or to select System Lock, then press or to select On.
5 Press or to select US or Canada, then press ENTER.
6 If you selected Canada, press or to select Canada English or Canada French, then press or to select the rating.
7 If you selected US, press or to select MPAA or TV.
8 If you selected MPAA, press or to set the rating.
9 If you selected TV, press ENTER, then press 1 to select a rating type and to set the rating. When you lock a rating, a lock symbol appears. When you lock a rating, that rating and all other higher ratings are locked.
10 Press MENU to return to the previous menu, or press EXIT to close the menu system.
Downloading rating information
If a program includes RRT5 (Rating Region Table-Region 5) rating information, your TV automatically downloads the rating information. You can use this information to set parental controls.
To use the RRT information to set parental controls:
1 Press MENU. The on-screen menu opens.
2 Press or to select Lock, then press. The password entry screen opens.
3 Press the number buttons to enter the password. The default password is 0000. The Lock menu opens.
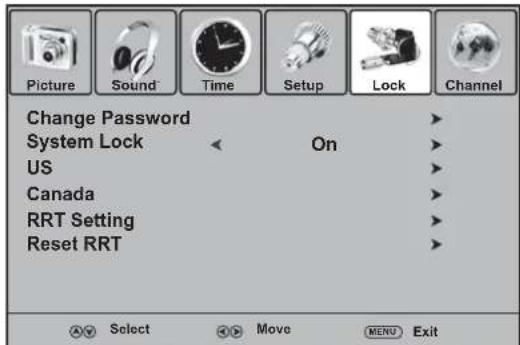
4 If necessary, press or to select System Lock, then press or to select On.
5 Press or to select RRT Setting, then press ENTER.
6 Press or to select a rating type, then press ENTER.
7 Press or to select a rating, then press or to select On or Off.
Note: The actual option for the RRT rating vary depending on the broadcaster.
To delete the RRT information:
1 Press MENU. The on-screen menu opens.
2 Press or to select Lock, then press . The password entry screen opens.
3 Press the number buttons to enter the password. The default password is 0000. The Lock menu opens.
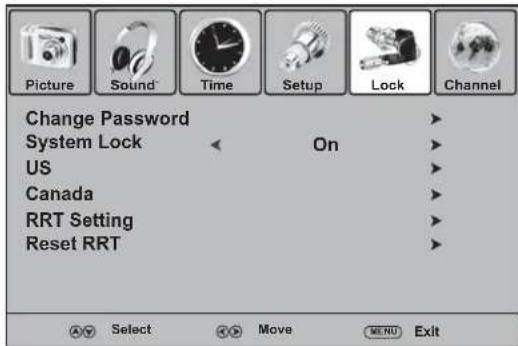
4 If necessary, press or to select System Lock, then press or to select On.
5 Press or to select Reset RRT, then press ENTER.
6 When a message asks if you want to clear the RRT Setting, select Yes to delete the RRT rating information, or select No to exit without deleting the information.
Restoring factory defaults
You can restore all settings to the factory defaults. When you restore settings, all customized settings are cleared, except the parental control password and the parental lock settings. After you restore settings, your TV needs to memorize channels again.
To restore factory defaults:
1 Press MENU. The on-screen menu opens.
2 Press or to select Setup, then press to open the Setup menu.
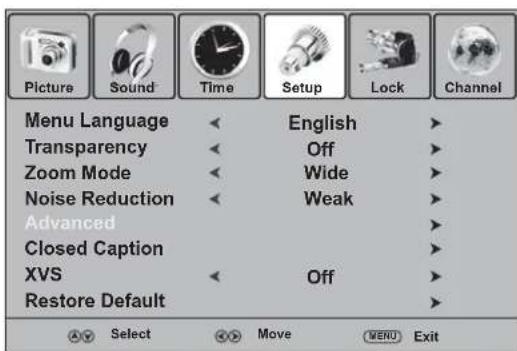
3 Press or to select Restore Default, then press or ENTER.
4 When a message asks if you want to restore factory settings, select Yes to restore the settings, or select No to exit without restoring settings.
Maintaining
To dean your TV:
1 Turn off and unplug your TV.
2 Wipe it with a soft, dry cloth.
If the surfaces are extremely dirty, dampen a soft cloth with a soap and water solution or a weak detergent solution.
Use eyeglass cleaner to remove stubborn dirt from the screen.
Cautions: Never use alcohol, paint thinner, or benzine to clean your TV. Before using a chemically treated cloth, read the instructions that came with the cloth.
Troubleshooting
Caution: Never try to repair your TV yourself. Refer all servicing to qualified service personnel.
Note: If the problem is not solved after you try the solutions in this section, turn off your TV, then turn it back on again.
Remote control
| Problem | Solution |
| Remote control does not work. | ·Make sure that the power cord is plugged into a power outlet. ·Make sure that the batteries are installed correctly. Align the + and - symbols on the batteries with the + and - symbols in the battery compartment. ·Replace the batteries. |
Video and audio
| Problem | Solution |
| No picture (screen not lit) and no sound. | Make sure that the power cord is plugged into a power outlet. Press on the remote control or the side of your TV. Try another channel. |
| Dark, poor, or no picture (screen lit) but good sound. | Adjust the brightness. Select a different picture mode. Make sure that the antenna or cable TV cables are connected securely. |
| No color, incorrect color, or dark picture. | Adjust the Color (color saturation) on the Picture menu. |
| Only snow and noise appear on the screen. | Try another channel. Make sure that the antenna or cable TV cables are connected securely. |
| Dotted lines or stripes. | Adjust the antenna. Move your TV away from sources of interference such as cars, neon signs, or hair dryers. |
| Double images. | Adjust the antenna. You may need a high-directional outdoor antenna. |
| Good picture but no sound. | Press MUTE to make sure that the sound is not muted. Make sure that the sound mode is set to Stereo or Mono. |
| Audio noise. | Move devices that use IR (infrared) away from your TV. |
General
| Problem Solution | |
| One or more channels cannot be displayed. | ·Make sure that your TV has memorized channels. ·Make sure that the channel has not been deleted from the memorized channel list. If the channel was deleted, you can press the number buttons on the remote control to tune to the channel. ·Make sure that the channel is not blocked through the parental controls. |
| Password lost. ·If you have forgotten the password, enter 1397 to open the Lock menu and set a new password. | |
| Some menu options cannot be accessed. | ·If an option is grayed, the option is not available for the current video input mode. |
| TV cabinet creaks or makes noises. | ·This is not a malfunction. When you use your TV, the temperature inside the cabinet increases. This causes the cabinet to expand or contract, which makes a creaking noise. |
| Control buttons on the TV do not work. | ·Unplug the power cord, wait a few seconds, plug the cord back in again, then turn on your TV. |
Specifications
Product design and specifications are subject to change without notice.
| Type | LCD TV |
| Panel | 32" TFT LCD |
| TV system | NTSC-M, ATSC |
| Receiving channels | VHF: 2-13 UHF: 14-69 CATV: 1-125 CADTV: 1-135 DTV: 2-69 |
| Audio multiplex | BTSC system |
| Audio out | 6 W × 2 |
| Power requirement | AC 120 V, 60 Hz |
| Power consumption | 150 W |
| Dimensions (W × H × D) | 31.9 × 23 × 10 inches (81.1 × 58.3 × 25.5 cm) |
| Weight | 30.9 lbs (14 kg) |
| Temperature | Storage: 32° to 122°F (0° to 50°C) Working: 41° to 104°F (5° to 40°C) |
| Input ports | Composite video/audio (L/R) (1) S-Video (1) Component video/audio (L/R) (2) HDMI (2) VGA/audio (1) Antenna (1) |
| Output ports | Composite video/audio (L/R) (1) Headphone (1) S/PDIF (optical) (1) |
| Control port | RS-232 |
Legal notices
FCC Part 15
This equipment has been tested and found to comply within the limits for a class B digital device, pursuant to Part 15 of the FCC Rules. These limits are designed to provide reasonable protection against harmful interference in a residential installation. This equipment generates, uses, and can radiate radio frequency energy and, if not installed and used in accordance with the instructions, may cause harmful interference to radio communications. However, there is no guarantee that interference will not occur in a particular installation. If this equipment does cause harmful interference to radio or television reception, which can be determined by turning the equipment off and on, the user is encouraged to try to correct the interference by one or more of the following measures:
- Reorient or relocate the receiving antenna.
- Increase the separation between the equipment and receiver.
- Connect the equipment into an outlet on a circuit different from that to which the receiver is connected.
- Consult the dealer or an experienced technician for help.
FCC warning
Changes or modifications not expressly approved by the party responsible for compliance with the FCC Rules could void the user's authority to operate this equipment.
FCC warning
This is a CLASS B product. In a domestic environment this product may cause radio interference in which case the user may be required to take adequate measures to counter interference.
Notices
Specifications and features are subject to change without notice or obligation.
For service and support call (800) 305-2204.
One-year limited warranty
Dynex Products ("Dynex") warrants to you, the original purchaser of this new DX-LCD32-09 ("Product"), that the Product shall be free of defects in the original manufacture of the material or workmanship for a period of one (1) year from the date of your purchase of the Product ("Warranty Period"). This Product must be purchased from an authorized dealer of Dynex brand Products and packaged with this warranty statement. This warranty does not cover refurbished product. If you notify Dynex during the Warranty Period of a defect covered by this warranty that requires service, terms of this warranty apply.
How long does the coverage last?
The Warranty Period lasts for one year (365 days) from the date you purchased the Product. The purchase date is printed on the receipt you received with the Product.
What does this warranty cover?
During the Warranty Period, if the original manufacture of the material or workmanship of the Product is determined to be defective by an authorized Dynex repair center or store personnel, Dynex will (at its sole option): (1) repair the Product with new or rebuilt parts; or (2) replace the Product at no charge with new or rebuilt comparable products or parts. Products and parts replaced under this warranty become the property of Dynex and are not returned to you. If service of products and parts are required after the Warranty Period expires, you must pay all labor and parts charges. This warranty lasts as long as you own your Dynex Product during the Warranty Period. Warranty coverage terminates if you sell or otherwise transfer the Product.
How to obtain warranty service?
If you purchased the Product at a retail store location, take your original receipt and the Product to the store you purchased it from. Make sure that you place the Product in its original packaging or packaging that provides the same amount of protection as the original packaging. If you purchased the Product from an online web site, mail your original receipt and the Product to the address listed on the web site. Make sure that you put the Product in its original packaging or packaging that provides the same amount of protection as the original packaging.
To obtain in-home warranty service for a television with a screen 25 inches or larger, call 1-888-BESTBUY. Call agents will diagnose and correct the issue over the phone or will have an Dynex-approved repair person dispatched to your home.
Where is the warranty valid?
This warranty is valid only to the original purchaser of the Product in the United States and Canada.
What does the warranty not cover?
This warranty does not cover:
- Customer instruction
- Installation
- Set up adjustments
Cosmetic damage
- Damage due to acts of God, such as lightning strikes
- Accident
- Misuse
Abuse
Negligence
Commercial use
- Modification of any part of the Product
- Plasma display panel damaged by static (non-moving) images applied for lengthy periods (burn-in).
This warranty also does not cover:
- Damage due to incorrect operation or maintenance
- Connection to an incorrect voltage supply
- Attempted repair by anyone other than a facility authorized by Dynex to service the Product
- Products sold as is or with all faults
- Consumables, such as fuses or batteries
- Products where the factory applied serial number has been altered or removed
REPAIR REPLACEMENT AS PROVIDED UNDER THIS WARRANTY IS YOUR EXCLUSIVE REMEDY. DYNEX SHALL NOT BE LIABLE FOR ANY INCIDENTAL OR CONSEQUENTIAL DAMAGES FOR THE BREACH OF ANY EXPRESS OR IMPLIED WARRANTY ON THIS PRODUCT, INCLUDING, BUT NOT LIMITED TO, LOST DATA, LOSS OF USE OF YOUR PRODUCT, LOST BUSINESS OR LOST PROFITS. DYNEX PRODUCTS MAKES NO OTHER EXPRESS WARRANTY WITH RESPECT TO THE PRODUCT, ALL EXPRESS AND IMPLIED WARRANTYES FOR THE PRODUCT, INCLUDING, BUT NOT LIMITED TO, ANY IMPLIED WARRANTYES OF AND CONDITIONS OF MERCHANTABILITY AND FITNESS FOR A PARTICULAR PURPOSE, ARE LIMITED IN DURATION TO THE WARRANTY PERIOD SET FORTH ABOVE AND NO WARRANTYES, WHETHER EXPRESS OR IMPLIED, WILL APPLY AFTER THE WARRANTY PERIOD. SOME STATES, PROVINCES AND JURISDICTIONS DO NOT ALLOW LIMITATIONS ON HOW LONG AN IMPLIED WARRANTY LASTS, SO THE ABOVE LIMITATION MAY NOT APPLY TO YOU. THIS WARRANTY GIVES YOU SPECIFIC LEGAL RIGHTS, AND YOU MAY ALSO HAVE OTHER RIGHTS, WHICH VARY FROM STATE TO STATE OR PROVINCE TO PROVINCE.
Contact Dynex:
For customer service please call 1-800-305-2204
www.dynexproducts.com
DYNEX is a registered trademark of Best Buy Enterprise Services, Inc. Distributed by Best Buy Purchasing, LLC.
Dynex, 7601 Penn Avenue South, Richfield, Minnesota, U.S.A.
Channel menu (Menu canal)
Pourutiliserelemdudecran:
Dynex, 7601 Penn Avenue South, Richfield, Minnesota, E.-U.
Dynex DX-LCD32-09 Televisor con PDT de 32"
Contidente
Dynex, 7601 Penn Avenue South, Richfield, Minnesota, E.U.A.
DYNEX
07-622
www.dynexproducts.com (800) 305-2204
Distributed by Best Buy Purchasing, LLC
7601 Penn Ave. South, Richfield, MN 55423 U.S.A.
© 2008 Best Buy Enterprise Services, Inc. All rights reserved.
DYNEX is a trademark of Best Buy Enterprise Services, Inc. Registered in some countries. All other products and brand names are trademarks of their respective owners.
7601 Penn Ave. South, Richfield, MN 55423 E.-U.
7601 Penn Ave. South, Richfield, MN 55423 U.S.A.
© 2008 Best Buy Enterprise Services, Inc. Todos los derechos reservados.
- Dynex DX-LCD32-09 32" LCD TV
- Contents
- Important safety instructions
- CAUTION RISK OF ELECTRIC SHOCK DO NOT OPEN
- TV components
- Front
- Side
- Back Remote control
- Setting up your TV Installing the remote control batteries
- To install the remote control batteries:
- Replace the battery compartment cover.
- Cautions:
- Using the remote control
- To use the remote control:
- Connecting an antenna or direct cable
- To connect an antenna or direct cable:
- Connecting a VCR
- To connect a VCR:
- To play a videotape:
- Connecting a VCR for recording
- To connect a VCR for recording:
- To record a program:
- Connecting a camcorder or game console
- To connect a camcorder or game console:
- To play from a camcorder or play a game:
- Connecting an HDMI device
- To connect an HDMI device:
- To play from an HDMI device:
- Connecting a component video device
- To connect a component video device:
- To play from the component video device:
- Connecting a computer
- To connect a computer:
- To use your TV as a computer monitor:
- Connecting a digital optical audio device
- To connect a digital optical audio device:
- Connecting headphones
- To connect headphones:
- Using your TV
- Turning your TV on or off
- To turn your TV on or off:
- Selecting the video input source
- To select the video input source:
- To use a direct video input button:
- Selecting the TV signal source
- To select the TV signal source:
- Using the on-screen menu
- Notes:
- Picture menu
- Sound menu
- Time menu
- Setup menu
- Lock menu
- Channel menu
- Memorizing for channels
- Deleting memorized channels
- Changing channels
- Digital sub-channels
- To change channels:
- Adjusting the picture
- To adjust the picture:
- Adjusting the VGA (PC) image
- To adjust the VGA (PC) image:
- You can also adjust advanced VGA picture settings.
- To adjust advanced VGA picture settings:
- Reducing video noise
- To reduce video noise:
- Optimizing the image
- To optimize the image:
- Selecting the aspect ratio
- To select the aspect ratio:
- Adjusting the volume
- To adjust the volume:
- Adjusting the audio
- To adjust the audio:
- Selecting the audio signal type
- To select the audio signal type:
- Setting the clock
- To set the clock:
- Displaying the information banner
- Displaying the program guide
- Monitoring the DTV signal strength
- Setting up the favorite channel list
- Press or to select Favorite.
- Labeling a channel
- To label a channel:
- Press or to select Channel Label.
- Using closed captions
- To use closed captions:
- Customizing closed caption styles
- To customize closed caption styles:
- Using the sleep timer
- To set the sleep timer:
- Selecting the on-screen menu language
- To select the on-screen menu language:
- Setting the password
- To set the password:
- Turning the parental lock on or off
- To turn the parental lock on or off:
- Setting parental controls
- To set parental controls:
- Downloading rating information
- To use the RRT information to set parental controls:
- To delete the RRT information:
- Restoring factory defaults
- To restore factory defaults:
- Maintaining
- To dean your TV:
- Troubleshooting
- Remote control
- Video and audio
- General
- Specifications
- Legal notices
- FCC Part 15
- FCC warning
- Notices
- One-year limited warranty
- How long does the coverage last?
- What does this warranty cover?
- How to obtain warranty service?
- Where is the warranty valid?
- What does the warranty not cover?
- Channel menu (Menu canal)
- Pourutiliserelemdudecran:
- Dynex DX-LCD32-09 Televisor con PDT de 32"
- Contidente
- DYNEX
Brand : Dynex
Model : DXLCD3209
Category : Television