
LEF65V200S - TV HAIER - Free user manual and instructions
Find the device manual for free LEF65V200S HAIER in PDF.
| Product Type | LED TV |
| Brand | Haier |
| Model | LEF65V200S |
| Dimensions with stand (W x H x D) | 1460 x 905 x 344 mm |
| Dimensions without stand (W x H x D) | 1460 x 838 x 38 mm |
| Screen Size | 65 inches |
| Power Supply | 220-240 V AC, 50 Hz |
| Power Consumption | 200 W |
| Audio Power | 2 x 12 W (10% THD) |
| Reception System | DVB-T / DVB-C (PAL B/G, D/K, I, L/L') |
| Number of Preset Channels | 1,000 |
| Main Functions | Digital/cable TV, HDMI (x3), USB, PVR recording, time shift, Wi-Fi 802.11n, Bluetooth, DLNA, web browser, Internet portal |
| Connectors | HDMI, USB, SCART, VGA, YPbPr, Optical S/PDIF, headphone output, CI, Ethernet (LAN) |
| Supported USB File Formats | Video: MPEG, H.264, VC1, etc.; Audio: MP3, AAC, WMA; Photo: JPEG, PNG, BMP |
| Safety | Ventilation: free space of at least 10 cm; do not expose to moisture; unplug before cleaning; use qualified personnel for cord replacement |
| Maintenance and Cleaning | Unplug the TV, use a soft dry cloth. Do not use liquid or abrasive products |
| Operating Temperature | 0°C to 40°C, humidity max. 85% |
| Included Accessories | Remote control, AAA batteries (x2), instruction manual, side AV connection cable, mini SCART adapter |
| Wall Mount Compatibility | Yes (kit not included) |
Frequently Asked Questions - LEF65V200S HAIER
User questions about LEF65V200S HAIER
0 question about this device. Answer the ones you know or ask your own.
Ask a new question about this device
Download the instructions for your TV in PDF format for free! Find your manual LEF65V200S - HAIER and take your electronic device back in hand. On this page are published all the documents necessary for the use of your device. LEF65V200S by HAIER.
USER MANUAL LEF65V200S HAIER
Connectivite Bluetooth. 19
RISQUE D'ÉLECTROCUTION NE PAS OUVRIR

ATTENTION:POUR EVITER TOUT RISQUE D' ELECTROCUTION, NE RETIREZ PAS LE COUVERCLE (OU L'ARRIÈRE). L'ENTRETIEN DES PIECES INTERNES EST INTERDIT AUX UTILISATEURS. VEUILLEZ CONFIER L'ENTRETIEN A UN PERSONNEL QUALIFIE.
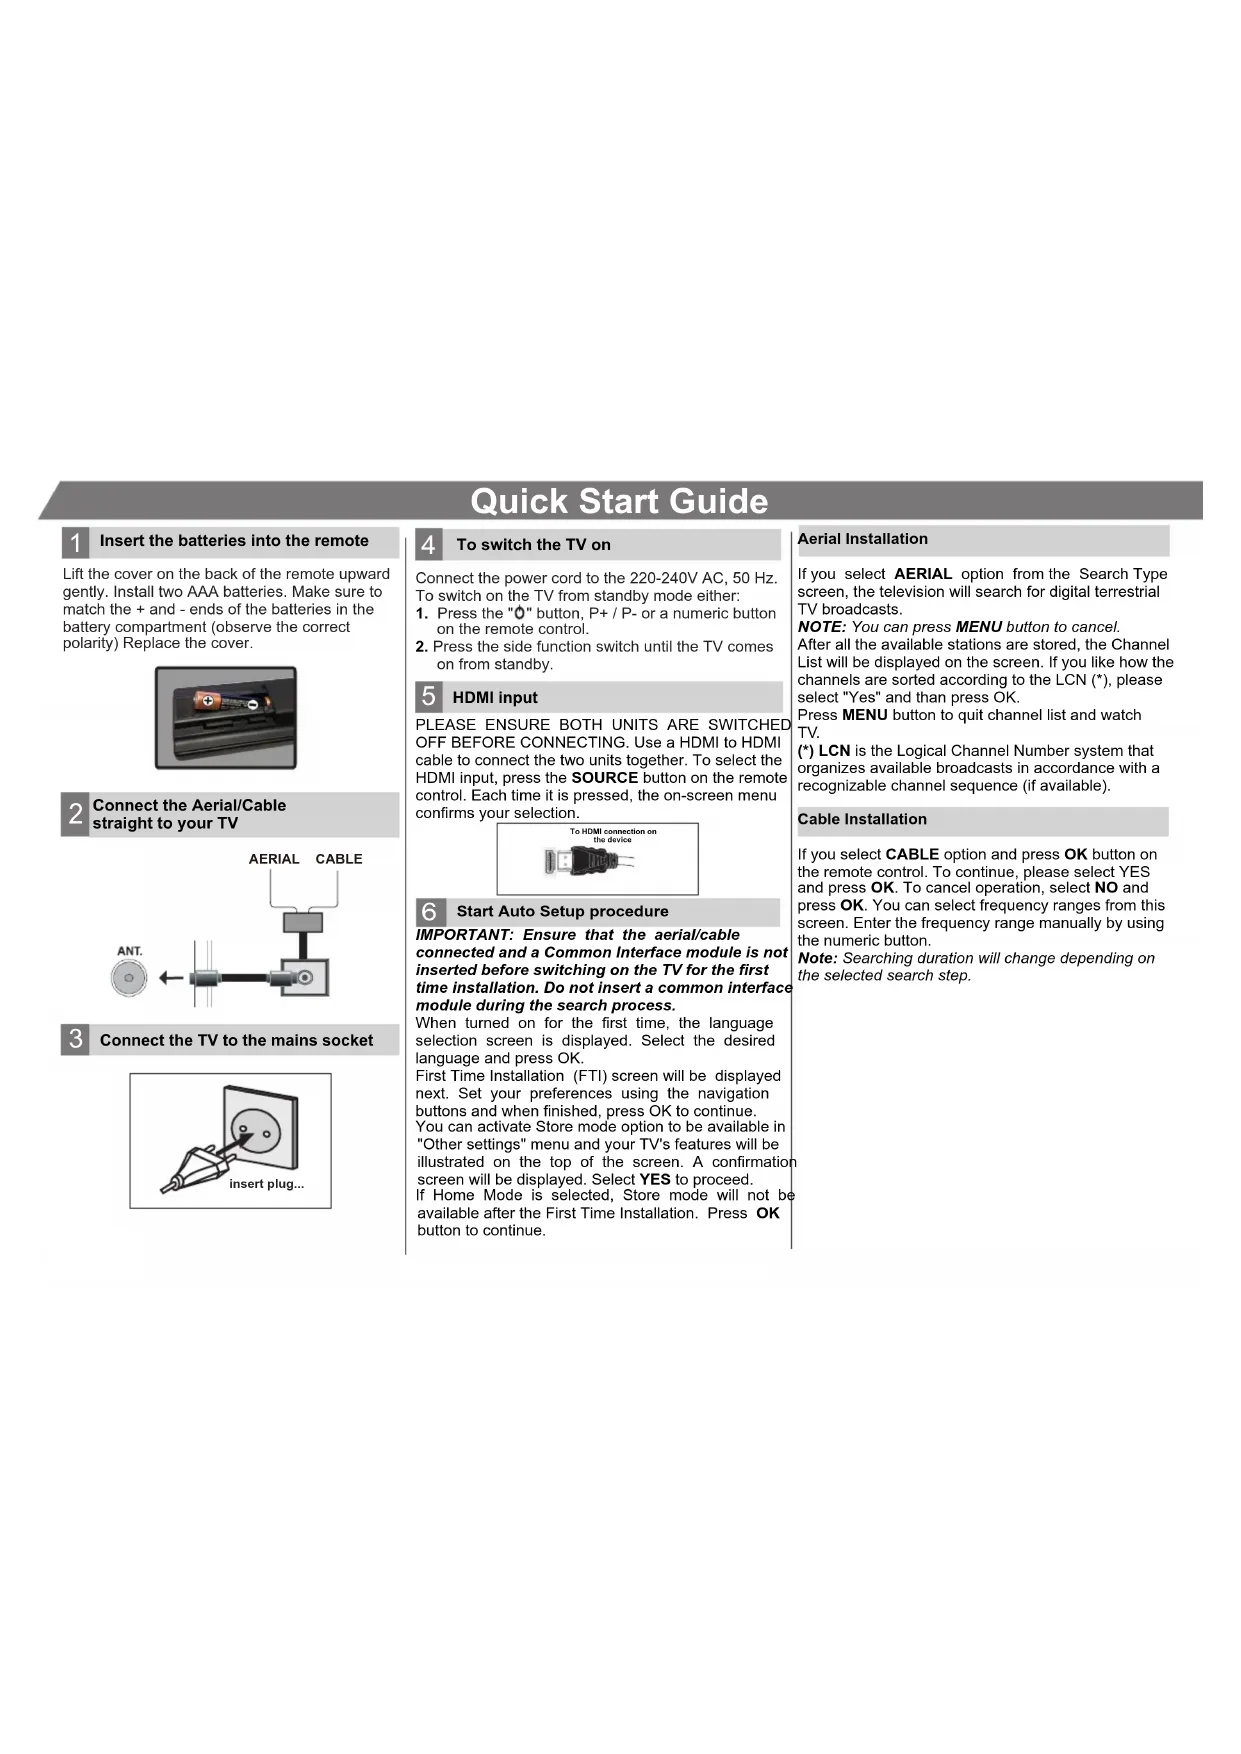
1 Insert the batteries into the remote
Lift the cover on the back of the remote upward gently. Install two AAA batteries. Make sure to match the + and - ends of the batteries in the battery compartment (observe the correct polarity) Replace the cover.
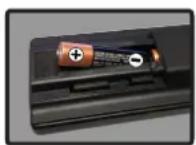
2 Connect the Aerial/Cable straight to your TV
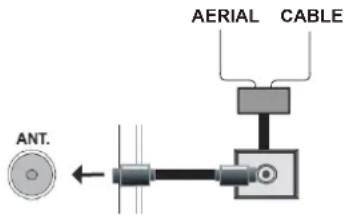
3 Connect the TV to the mains socket
4 To switch the TV on
Connect the power cord to the 220-240V AC, 50Hz . To switch on the TV from standby mode either:
- Press the "O" button, P + / P - or a numeric button on the remote control.
- Press the side function switch until the TV comes on from standby.
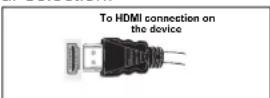
5 HDMI input
PLEASE ENSURE BOTH UNITS ARE SWITCHED OFF BEFORE CONNECTING. Use a HDMI to HDMI cable to connect the two units together. To select the HDMI input, press the SOURCE button on the remote control. Each time it is pressed, the on-screen menu confirms your selection.
6 Start Auto Setup procedure
IMPORTANT: Ensure that the aerial/cable connected and a Common Interface module is not inserted before switching on the TV for the first time installation. Do not insert a common interface module during the search process.
When turned on for the first time, the language selection screen is displayed. Select the desired language and press OK.
First Time Installation (FTI) screen will be displayed next. Set your preferences using the navigation buttons and when finished, press OK to continue. You can activate Store mode option to be available in "Other settings" menu and your TV's features will be illustrated on the top of the screen. A confirmation screen will be displayed. Select YES to proceed. If Home Mode is selected, Store mode will not be available after the First Time Installation. Press OK button to continue.
Aerial Installation
If you select AERIAL option from the Search Type screen, the television will search for digital terrestrial TV broadcasts.
NOTE: You can press MENU button to cancel.
After all the available stations are stored, the Channel List will be displayed on the screen. If you like how the channels are sorted according to the LCN () , please select "Yes" and then press OK.
Press MENU button to quit channel list and watch TV.
(*) LCN is the Logical Channel Number system that organizes available broadcasts in accordance with a recognizable channel sequence (if available).
Cable Installation
If you select CABLE option and press OK button on the remote control. To continue, please select YES and press OK. To cancel operation, select NO and press OK. You can select frequency ranges from this screen. Enter the frequency range manually by using the numeric button.
Note: Searching duration will change depending on the selected search step.
Contents
Safety Information 26
Getting Started 28
Notifications & Features & Accessories. 28
Remote Control 31
Connections 32
First Time Installation - USB Connections 33
TV Menu Features and Functions 37
General TV Operation 40
WIRELESS DISPLAY 42

Safety Information

CAUTION
RISK OF ELECTRIC SHOCK DO NOT OPEN

CAUTION: TO REDUCE THE RISK OF ELECTRIC SHOCK DO NOT REMOVE COVER (OR BACK). NO USER-SERVICEABLE PARTS INSIDE. REFER SERVICING TO QUALIFIED SERVICE PERSONNEL.
To operate your TV in extreme ambient conditions may cause damage of the device.
Bluetooth Connectivity 42
Internet Browser 45
PC Input Typical Display Modes 46
AV and HDMI Signal Compatibility 46
Supported File Formats for USB Mode 47

If there is lightning or storms, or if the TV is not going to be used for a while (e.g. if going away on holiday), disconnect the TV set from the mains. The mains plug is used to disconnect TV set from the mains and therefore it must remain readily operable.

The exclamation point within an equilateral triangle is intended to alert the user to the presence of important operating and maintenance (servicing) instructions in the literature accompanying the appliance.
Note : Follow the on screen instructions for operating the related features.

IMPORTANT - Please read these instructions fully before installing or operating
WARNING: Never let people (including children) with reduced physical, sensory or mental capabilities or lack of experience and / or knowledge use electrical devices unsupervised.
- For ventilation purposes, leave a free space of at least 10cm all around the set.
- Do not block ventilation holes.
- Do not place the TV on sloping or unstable surfaces, the TV may tip over.
- Use this device in moderate climates.
- The power cord plug should be easily accessible. Do not place the TV, furniture, etc. on the power cord. A damaged power cord/plug can cause fire or give you an electric shock. Handle the power cord by the plug, do not unplug the TV by pulling the power cord. Never touch the power cord/ plug with wet hands as this could cause a short
circuit or electric shock. Never make a knot in the power cord or tie it with other cords. When damaged it must be replaced, this should only be done by qualified personnel.

- Do not use this TV in a humid or damp place. Do not expose the TV to liquids. If any liquid falls into the cabinet unplug the TV and have
it checked by qualified personnel before operating it any further.

- Do not expose the TV to direct sunlight or other heat sources.
- The TV should not be placed near to open flames or sources of intense heat such as an electric heater.
- Excessive sound pressure from earphones and headphones can cause hearing loss.
- Ensure that no open flame sources, such as lit candles, are placed on top of the TV.
- To prevent injury, this TV must be securely attached to the wall in accordance with the installation instructions (if the option is available).
- Occasionally, a few non-active pixels may appear on the screen as a fixed blue, green or red point. Please note that this does not affect the performance of your product. Take care not to scratch the screen with fingernails or other hard objects.
- Before cleaning, unplug the TV from the wall socket. Only use a soft, dry cloth while cleaning.
| Warning | Serious injury or death risk |
| Risk of electric shock | Dangerous voltage risk |
| Caution | Injury or property damage risk |
| Important | Operating the system correctly |
| Notice | Additional notes marked |
Markings on the Product
The following symbols are used on the product as a marker for restrictions and precautions and safety instructions. Each explanation shall be considered where the product bears related marking only. Note such information for security reasons.

Class II Equipment: This appliance is designed in such a way that it does not require a safety connection to electrical earth.

Class II Equipment With Functional Earthing: This appliance is designed in such a way that it does not require a safety
connection to electrical earth, the earth connection is used for functional purposes.

Protective Earth Connection: The marked terminal is intended for connection of the protective earthing conductor associated with pply wiring.

Hazardous Live Terminal: The marked terminal(s) is/are hazardous live under normal operating conditions.

Caution, See Operating Instructions: The marked area(s) contain(s) user replaceable coin or button cell batteries.

Class 1 Laser Product: This product contains Class 1 laser source that is safe under reasonably foreseeable conditions of
operation.
WARNING
Do not ingest the battery, Chemical Burn Hazard
(The accessories supplied with or) This product may contain a coin/button cell battery. If the coin/button cell battery is swallowed, it can cause severe internal burns in just 2 hours and can lead to death.
Keep new and used batteries away from children.
If the battery compartment does not close securely, stop using the product and keep it away from children.
If you think batteries might have been swallowed or placed inside any part of the body, seek immediate medical attention.
WARNING
Never place a television set in an unstable location. A television set may fall, causing serious personal injury or death. Many injuries, particularly to children, can be avoided by taking simple precautions such as;
- Using cabinets or stands recommended by the manufacturer of the television set.
- Only using furniture that can safely support the television set.
- Ensuring the television set is not overhanging the edge of the supporting furniture.
- Not placing the television set on all furniture (for example, cupboards or bookcases) without acnoring both the furniture and the television set to a suitable support.
Educating children about the dangers of climbing on furniture to reach the television set or its controls.
If your existing television set is being retained and relocated, the same considerations as above should be applied.
Getting Started
Notifications & Features & Accessories
Environmental Information
This television is designed to be environment friendly. To reduce energy consumption, you can follow these steps:
If you set the Power Save Mode to Eco, the TV will switch to energy-saving mode. The Power Save Mode settings can be found in the 'Picture' section of the System Menu. Note that some picture settings will be unavailable to be changed.
If pressed Right button, "Screen will be off in 15 seconds." message will be displayed on the screen. Select PROCEED and press OK to turn the screen off immediately. If you don't press any button, the screen will be off in 15 seconds. Press any button on the remote or on the TV to turn the screen on again. If you disable Power Save Mode, picture mode will be automatically set to Dynamic.
When the TV is not in use, please switch off or disconnect the TV from the mains plug. This will also reduce energy consumption.
Standby Notifications
If the TV does not receive any input signal (e.g. from an aerial or HDMI source) for 5 minutes, it will go into standby. When you next switch-on, the following message will be displayed: "TV switched to stand-by mode automatically because there was no signal for a long time." Press OK to continue.
The Auto TV OFF option (in Settings>Other Settings menu) is set to Off by default. If this setting is changed and the TV has been left on and not been operated during the set time, it will switch into standby mode after the set time has expired. When you next switch-on, the following message will be displayed. "TV switched to stand-by mode automatically because no operation was made for a long time." Press OK to continue.
Features
- Remote controlled colour LED TV.
Fully integrated digital/cable TV (DVB-T/C) - HDMI inputs are for connecting a device that has a HDMI socket.
- USB input.
Programme recording.
Programme timeshifting. - OSD menu system.
- Scart socket for external devices (such as DVD Players, PVR, video games, etc.)
-
Stereo sound system.
-
Teletext.
- Headphone connection.
Automatic programming system. - Manual tuning.
Automatic power down after up to six hours. - Sleep timer.
Child lock.
Automatic sound mute when no transmission. - NTSC playback.
AVL (Automatic Volume Limiting). - PLL (Frequency Search).
- PC input.
- Plug&Play for Windows 98, ME, 2000, XP, Vista, Windows 7.
Game Mode (Optional). - Ethernet (LAN) for Internet connectivity and service
802.11n built in WIFI Support
DLNA. - Bluetooth support
Accessories Included
Remote Control
Batteries 2 x AAA
Instruction Book
Side AV Connection Cable
Mini scart adapter cable
TV Control Buttons & Operation
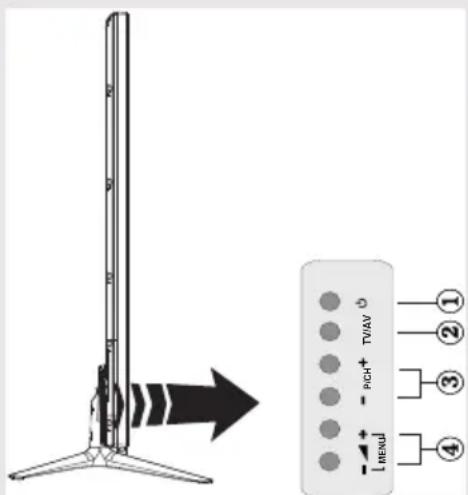
- Standby On/Off button
- TV/AV button
- Programme Up/Down buttons
- Volume Up/Down buttons
Operation with the Buttons on the TV
Press button to decrease the volume or + button to increase the volume, so a volume level scale (slider) will be displayed on the screen. Press P/CH +
button to select the next programme or P/CH - button to select the previous programme.
Press the button at the
same time to view the main menu. In the Main menu select a sub-menu using TV/AV button and set the sub-menu using or buttons. To see what options are available via the menu, refer to the menu system section of this manual. Press the TV/ AV button in the control panel on the TV to switch between AV modes.
Note: Function indications of the buttons will be displayed on the screen when pressed.
Operation with the Remote Control
Press the MENU button on your remote control to display the main menu screen. Use the “<or“ ” buttons to select a menu tab and press the OK button to select option. Use the “<or“ ” or “ ” buttons to select or set an item. Press BACK or EXIT or MENU button to quit a menu screen.
Input Selection
Once you have connected external systems to your TV, you can switch to different input sources. Press the "source) button on your remote control consecutively to select the different inputs.
Changing Channels and Volume
You can change the channel and adjust the volume by using the V + / - and + / - buttons on the remote. You can also change the channels by pressing the buttons on the front panel of your TV.
Inserting the Batteries into the Remote
Lift the cover on the back of the remote upward gently. Install two AAA batteries. Make sure to match the + and - ends of the batteries in the battery compartment (observe the correct polarity) Replace the cover.

Connect Power
IMPORTANT: The TV set is designed to operate on 220-240V AC, 50Hz socket. After unpacking, allow the TV set to reach the ambient room temperature before you connect the set to the mains. Plug the power cable to the mains socket outlet.
Antenna/Cable Connection
Connect the aerial or cable TV plug to AERIAL INPUT (ANT-TV) socket located on the rear bottom side of the TV.
Notification
Manufactured under license from Dolby Laboratories. TRADEMARK ACKNOWLEDGMENT
"Dolby" and the double-D symbol are trademarks of Dolby Laboratories.

"HDMI, the HDMI logo and High-Definition Multimedia Interface are trademarks or registered trademarks of HDMI Licensing LLC."

"DLNA, the DLNA Logo and DLNA CERTIFIED are trademarks, service marks, or certification marks of the Digital Living Network Alliance."

"YouTube and the YouTube logo are trademarks of Google Inc."
For DTS patents, see http://patents.dts.com. Manufactured under license from DTS Licensing Limited. DTS, the Symbol, & DTS and the Symbol together are registered trademarks, and DTS TruSurround is a trademark of DTS, Inc. © DTS, Inc. All Rights Reserved.

Information for Users on Disposal of Old Equipment and Batteries
[European Union only]
These symbols indicate that equipment with these symbols should not be disposed of as general household waste. If you want to dispose of the product or battery, please consider the collection systems or facilities for appropriate recycling.
Notice: The sign Pb below the symbol for batteries indicates that this battery contains lead.
![HAIER LEF65V200S - [European Union only] - 1](/content/2026/02/398891/images/ab900a40d8afbc943ba8273424e223598e0223c05a0c55a3060c03d60177d933.jpg)
![HAIER LEF65V200S - [European Union only] - 2](/content/2026/02/398891/images/34adf4cd5398b3b97ef5b4e9421dc3a4068a82c25b15dd108e72114502d2bc3a.jpg)
Products
| Specification | |
| TV Broadcasting PAL | B/G D/K K |
| Receiving Channels | VHF (BAND I/III) - UHF (BAND U) - HYPERBAND |
| Number of Preset Channels | 1.000 |
| Channel Indicator On | Screen Display |
| RF Aerial Input 75 Ohm (unbalanced) | |
| Operating Voltage 220-240V AC, 50Hz. | |
| Audio DTS TruSurround HD | |
| Audio Output Power (WRMS.) (10% THD) | 2x12W |
| Power Consumption | 200 W |
| TV Dimensions DxLxH (with foot) | 344 x 1460 x 905 |
| TV Dimensions DxLxH (without foot) | 38/48 x 1460 x 838 |
| Display 65" | |
| Operation temperature and operation humidity: | 0°C up to 40°C, 85% humidity max |
Teletext
Press button to enter. Press again to activate mix mode. Press once more to exit. Follow the instructions displayed on digital teletext screen.
Digital Teletext (for UK only)
Press button to view digital teletext information. Operate it with the coloured buttons, cursor buttons and the OK button. The operation method may differ depending on the contents of the digital teletext. Follow the instructions displayed on the digital teletext screen. When the button is pressed again, the TV returns to television broadcast.
Remote Control
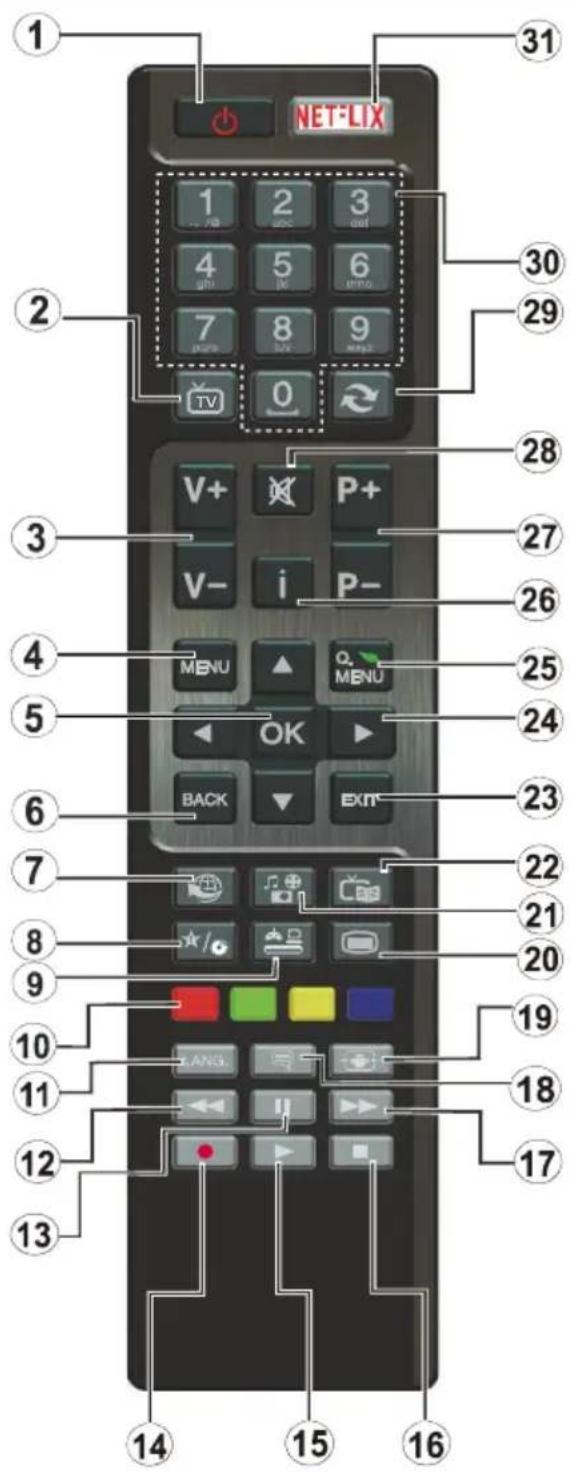
NOTE: The Remote Control range is approximately 7m

/23ft.
(*) MY BUTTON:
This button may have a default function depending on the model. However you can set a special function to this button by pressing on it for five seconds when on a desired source, channel or link. A confirmation message will be displayed on the screen. Now the MY BUTTON is associated with the selected function. Note that if you perform First Time Installation, MY BUTTON will return to its default function.
- Standby: Switches On / Off the TV
- TV: Displays channel list / Switches among broadcast types / Switches to TV Source
- Volume +/-
- Menu: Displays TV menu
- OK: Confirms user selections, holds the page (in TXT mode), views channel list (DTV mode)
- Back/Return: Returns to previous screen, opens index page (in TXT mode)
- Internet: Opens the portal page, where you can reach many web based applications
- My button 1 (*)
- Source: Shows all available broadcast and content sources
- Coloured Buttons: Follow the on-screen instructions for coloured button functions
- Language: Switches between sound modes (analogue TV), displays and changes audio/subtitle language (digital TV, where available)
- Rapid reverse: Moves frames backwards in media such as movies
- Pause: Pauses the media being played, starts timeshift recording
- Record: Records programmes
- Play: Starts to play selected media
- Stop: Stops the media being played
- Rapid advance: Moves frames forward in media such as movies
- Subtitles: Turns subtitles on and off (where available)
- Screen: Changes the aspect ratio of the screen
- Text: Displays teletext (where available), press again to superimpose the teletext over a normal broadcast picture (mix)
- Media browser: Opens the media browsing screen
- EPG (Electronic programme guide): Displays the electronic programme guide
- Exit: Closes and exits from displayed menus or returns to previous screen
- Navigation buttons: Helps navigate menus, content etc. and displays the subpages in TXT mode when pressed Right or Left
- Quick Menu: Displays a list of menus for quick access
- Info: Displays information about on-screen content, shows hidden information (reveal - in TXT mode)
- Programme +/-
- Mute: Completely turns off the volume of the TV
- Swap: Quickly cycles between previous and current channels or sources
- Numeric buttons: Switches the channel, enters a number or a letter in the text box on the screen.
- Netflix: Launches the Netflix application.
Getting Started
Connections
| Connector Type | Cables Device | ||
| Scart Connection (back) | |||
| Mini Scart Connection (rear bottom) | Mini Scart adapter cable (supplied) | ||
| VGA Connection (back) | |||
| AUDIENCE | PC/YPbPr Audio Connection (back) | Side Audio YPbPr or PC Connection Cable (not supplied) | |
| HDMI Connection (bottom&side) | |||
| S/PDIF (Optical Out) Connection (bottom) | |||
| Side AV (Audio/Video) Connection (side) | Side AV Connection Cable (supplied) | ||
| Headphone Connection (side) | |||
| YPbPr Video Connection (side) | YPbPr Connection Cable(not supplied) | ||
| USB | USB Connection (side) | ||
| CI Connection (side) | |||
| Subwoofer Connection (back)(*) | |||
Switching On/Off
To Switch the TV On
Connect the power cord to the 220-240V AC, 50Hz
To switch on the TV from standby mode either:
Press the " button, P + / P - or a numeric button on the remote control.
To Switch the TV Off
Press the " button on the remote control or press the touch button on the TV. The TV will now switch to standby mode.
To power down the TV completely, unplug the power cord from the mains socket.
Note: When the TV is switched to standby mode, the standby LED can blink to indicate that features such as Standby Search, Over Air Download or Timer is active. The LED can also blink when you switch on the TV from standby mode.
First Time Installation
When turned on for the first time, the language selection screen is displayed. Select the desired language and press OK.
On the next screen, set your preferences using the navigation buttons and when finished, press OK to continue.
Notes
Depending on the Country selection you may be asked to set and confirm a PIN at this point. The selected PIN cannot be 0000. You have to enter it if you are asked to enter a PIN for any menu operation later.
You can activate Store Mode option at this point. This option will configure your TV's settings for best display quality and the supported features of the TV will be displayed on the top of the screen as a info banner. This option is intended only for store use. It is recommended to select Home Mode for home use. If Store Mode is selected, a confirmation screen will be displayed. Select YES to proceed. This option will be available in More menu and can be turned off/on later.
Press OK button on the remote control to continue and a message will be displayed next, asking whether you want to do network settings. Select Yes and the Network Settings menu will be displayed. Please refer to Connectivity section to configure a wired or a wireless connection. After the settings are completed press OK button to continue.
Aerial Installation
If you select Aerial option from the search type selection screen, the television will search for digital terrestrial TV broadcasts. After all the available stations are stored, the Edit Channel List will be displayed on the screen.
Press Menu button to quit Edit Channel List and watch TV.
Cable Installation
If you select Cable option and press OK button on the remote control, a confirmation screen will be displayed. Select YES and press OK to proceed. To cancel operation, select NO and press OK. You can select frequency ranges from next screen. Enter the frequency range manually by using the numeric buttons. When finished, press OK button to start automatic search.
Note: Searching duration will change depending on the selected search step.
MediaPlayback viaUSB Input
You can connect a 2.5" and 3.5" inch (hdd with external power supply) external hard disk drives or USB memory stick to your TV by using the USB inputs of the TV.
IMPORTANT! Back up your files before making any connections to the TV. The Manufacturer will not be responsible for any file damage or data loss. Certain types of USB devices (e.g. MP3 Players) or USB hard disk drives/memory sticks may not be compatible with this TV. The TV supports FAT32 and NTFS disk formatting but recording will not be available with NTFS formatted disks.
While formatting a USB hard disk that has 1TB (Tera Byte) or more file capacity, you can experience problems with the formatting process. Quickly plugging and unplugging USB devices, is a very hazardous operation. This may cause physical damage to the USB player and the USB device itself. Do not pull out the USB module while playing a file.
You can use USB hubs with your TV's USB inputs. External power supplied USB hubs are recommended in such a case.
It is recommended to use the TV's USB input(s) directly, if you are going to connect a USB hard disk.
Recording a Programme
IMPORTANT: When using a new USB hard disk drive, it is recommended that you first format the disk using your TV's "Format Disk" option.
Note: To record a programme, you should first connect a USB disk to your TV while the TV is switched off. You should then switch on the TV to enable the recording feature.
To use the recording function, you need to connect a USB disk or an external hard disk drive to the TV and the connected USB disk should have at least 1 GB capacity and should have 2.0 speed compatibility. If the connected USB device does not support 2.0 speed, an error message will be displayed.
Note: Recorded programmes are saved into the connected USB disk. If desired, you can store/copy recordings onto a computer; however, these files will not be available to be played on a computer. You can play the recordings only via your TV.
Note: Lip Sync delay may occur during the timeshifting. Radio record is supported. The TV can record programmes up to ten hours.
Recorded programmes are split into 4GB partitions.
If the writing speed of the connected USB disk is not sufficient, the recording may fail and the timeshifting feature may not be available.
It is recommended to use USB hard disk drive to recording HD programmes.
Do not plug out the USB/HDD during a recording. This may harm the connected USB/HDD.
Multiparition support is available. A maximum of two different partitions are supported. The first partition of the USB disk is used for PVR ready features. It also must be formatted as the primary partition to be used for the PVR ready features.
Some stream packets may not be recorded because of signal problems, so sometimes the video may freeze during playback.
Record, Play, Pause, Display (for PlayDialog) keys can not be used when teletext is ON. If a recording starts from the timer when teletext is ON, teletext is automatically turned off. Also teletext usage is disabled when there is an ongoing recording or playback.
Timeshift Recording
Press PAUSE) button while watching a broadcast to activate timeshifting mode. In timeshifting mode, the programme is paused and simultaneously recorded to the connected USB disk. Press PLAY) button again to resume the paused programme from where you stopped. Press the STOP button to stop timeshift recording and return to the live broadcast.
Note: Timeshift cannot be used while in radio mode.
Note: You cannot use the timeshift fast reverse feature before advancing the playback with the fast forward option.
Instant Recording
Press (RECORD) button to start recording an event instantly while watching a programme. You can press (RECORD) button on the remote control again to record the next event on the EPG. In this case, an OSD will be displayed, indicating the programmed events for recording. Press STOP) button to cancel instant recording.
Note: You can not switch broadcasts or view the Media Browser during the recording mode. While recording a programme or during the timeshifting, a warning message appears on the screen if your USB device speed is not sufficient.
Watching Recorded Programmes
Select the Recordings Library from the Media Browser menu. Select a recorded item from the list (if previously recorded). Press the OK button to view the Play Options. Select an option then press OK button.
Note: Viewing main menu and menu items will not be available during the playback.
Press the STOP) button to stop a playback and return to the Recordings Library.
Slow Forward
If you press the PAUSE) button while watching recorded programmes, the slow forward feature will be available. You can use the button to slow forward. Pressing the button consecutively will change slow forwarding speed.
Recording Configuration
Select the Recording Configuration item in the System>Settings menu to configure the recording settings.
Format Disk: You can use the Format Disk feature for formatting the connected USB disk. Your pin is required to use the Format Disk feature.
Note: Default PIN can be set to 0000 or 1234. If you have defined the PIN(is requested depending on the country selection) during the First Time Installation use the PIN that you have defined.
IMPORTANT: Formatting your USB drive will erase ALL the data on it and it's file system will be converted to FAT32. In most cases operation errors will be fixed after a format but you will lose ALL your data.
If "USB disk writing speed too slow to record" message is displayed on the screen while starting a recording, try restarting the recording. If you still get the same error, it is possible that your USB disk does not meet the speed requirements. Try connecting another USB disk.
Media Browser Menu
You can play photo, music, and movie files stored on a USB disk by connecting it to your TV. Connect a USB disk to one of the USB inputs located on the side of the TV. Pressing the MENU button while in the Media Browser mode will access the Picture, Sound and Settings menu options. Pressing the
MENUbution again will exit from this screen.You can set your Media Browser preferences by using the Settings Menu.
| Loop/Shuffle Mode Operation | |
| Start playback with ▷and activate | TV plays next file and loop the list. |
| Start playback with OK and activate | The same file will be played in a loop (repeat). |
| Start playback with OK/ ▷and activate | The file will be played in a shuffle. |
Custom Boot Up Logo
You can personalize your TV and see your favorite image or photo on screen each time your TV boots up. To do this, place your favorite image files in a USB stick and open them from the media browser menu. When you have chosen the desired image, highlight it and press OK to view it in full screen. Press OK again to choose the image as custom logo. A confirmation message will be displayed. Select Yes and press OK again. If the image is suitable(*) you will see it on the screen during the TV's next boot up.
Note: If you perform an FTI (first time installation) the TV will return to using the default logo.
(*) Images must have an aspect ratio between 4:3 to 16:9 and they must be in.jpeg, jpg or formats. The image cannot be set as boot logo, which's resolution doesn't appear on the info banner.
Quick Menu
The Quick Settings menu allows you to access some options quickly. This menu includes Power Save Mode, Picture Mode, Favourites, Sleep Timer, FollowMe TV, FollowMe TV to DMR, CEC RC Passthrough and Information booklet options. Press Quick Menu button on the remote control to view the quick menu. See the following chapters for details of the listed features.
FollowMe TV
With your mobile device you can stream the current broadcast from your smart TV using the FollowMe TV feature. Install the appropriate Smart Center application to your mobile device. Start the application. For further information on using this feature refer to the instructions of the application you use.
Note: This application is not compatible with all mobile device.
FollowMe TV to DMR
This feature allows video streaming from your TV to mobile devices using proper applications (e.g. UPnP - Universal Plug and Play - applications like BubbleUPnP) or to another TV. Activate FollowMe TV to DMR from the System>Settings>More menu and timeshifting starts. Start the application on your device and select your TV. To stream to another TV press the Red button on the remote after starting a timeshift recording by pressing the Pause button on the remote. Device selection menu will be displayed. Choose the receiver TV and press OK.
Note: FollowMeTV and FollowMe TV to DMR features require a connected USB storage device with FAT32 format and enough space in it. Media Renderer option in the More menu should be set as Enabled. HD channels are not supported and both of the devices must be connected to the same network.
E-Manual
You can find instructions for your TV's features in the E-Manual.
To use E-Manual, press to the Info button while main menu is displayed on the screen.
By using the navigation buttons select a desired category. Every category includes different topics. Select a topic and press OK to read instructions.
To close the E-Manual screen press the Exit button.
Note: The contents of the E-Manual may vary according to the model.
CEC and CEC RC Passthrough
This function allows to control the CEC-enabled devices, that are connected through HDMI ports by using the remote control of the TV.
The CEC option in the System>Settings>More menu should be set as Enabled at first. Press the Source button and select the HDMI input of the connected CEC device from the Source List menu. When new file CEC source device is connected, it will be listed in source menu with its own name instead of the connected HDMI ports name(such as DVD Player, Recorder 1 etc.).
The TV remote is automatically able to perform the main functions after the connected HDMI source has been selected.
To terminate this operation and control the TV via the remote again, press and hold the "0-Zero" button on the remote control for 3 seconds. Or press Quick Menu button on the remote, highlight the CEC RC Passthrough and set as Off by pressing Left or Right button. This feature can also be enabled or disabled under the System>Settings>More menu.
The TV supports also ARC(Audio Return Channel) feature. This feature is an audio link meant to replace other cables between the TV and the audio system (A/V receiver or speaker system).
When ARC is active, TV does not mute its other audio outputs automatically. So you need to decrease TV volume to zero manually, if you want to hear audio from connected audio device only (same as other optical or co-axial digital audio outputs). If you want to change connected device's volume level, you should select that device from the source list. In that case volume control keys are directed to connected audio device.
System Audio Control
Allows an Audio Amplifier/Receiver to be used with the TV. The volume can be controlled using the remote control of the TV. To activate this feature set the Speakers option in the System>Settings>More menu as Amplifier. The TV speakers will be muted and the sound of the watched source will be provided from the connected sound system.
Note: The audio device should support System Audio Control feature and CEC option should be set as Enabled.
TV Menu Features and Functions
| System - Picture Menu Contents | |
| Mode | You can change the picture mode to suit your preference or requirements. The Picture mode can be set to one of these options: Cinema, Game, Sports, Dynamic and Natural. |
| Contrast Sets the brightness values of the screen. | The brightness value for the screen. |
| Sharpness Sets the sharpness value for the objects displayed on the screen. | The sharpness value for the objects displayed on the screen. |
| Colour Sets the colour value, adjusting the colors. | The power Save Mode is dynamic, Power Save mode is automatically set as disabled. |
| Backlight (Optional) | This setting controls the backlight level. The backlight function will be inactive if the Power Save Mode is set to Eco. The backlight cannot be activated in VGA, Media Browser mode or while the picture mode is set to Game. |
| Noise Reduction | If the broadcast signal is weak and the picture is noisy, use the Noise Reduction setting to reduce the amount of noise. |
| Advanced Settings | |
| Dynamic Contrast | You can change the Dynamic Contrast ratio to desired value. |
| Colour Temp Sets the desired colour tone. | |
| Picture Zoom | Sets the desired picture size from picture zoom menu. Note: Auto option is only available in Scart mode with SCART PIN8 high voltage/low voltage switching. |
| Movie Sense | Movie Sense: Press "Left" / "Right" to set Movie Sense Low, Med, High or Off. While Movie Sense is active, it will optimize the TV's video settings for motional images to acquire a better quality and readability. When Movie Sense option is set to Low, Med or High, Movie Sense demo option will be available. If one of these options is selected and if you press OK button, then the demo mode starts. While demo mode is active, the screen will be divided into two sections, one displaying the movie sense activity, the other displaying the normal settings for TV screen. |
| HDMI True Black | While watching from a HDMI source, this feature will be visible in the Picture Settings menu. You can use this feature to enhance blackness in the picture. |
| Film Mode | Films are recorded at a different number of frames per second to normal television programmes. Turn this feature on when you are watching films to see the fast motion scenes clearly. |
| Skin Tone Skin tone can be changed between -5 and 5. | |
| Colour Shift Adjust the desired colour tone. | |
| RGB Gain | You can configure the colour temperature values using the RGB Gain feature. |
| Reset Resets the picture settings to factory default settings.(Except Game Mode) | |
| Autoposition (in PC mode) | Automatically optimizes the display. Press OK to optimize. |
| H Position (in PC mode) | This item shifts the image horizontally to the right hand side or left hand side of the screen. |
| V Position (in PC mode) | This item shifts the image vertically towards the top or bottom of the screen. |
| Dot Clock (in PC mode) | Dot Clock adjustments correct the interference that appear as vertical banding in dot intensive presentations like spreadsheets or paragraphs or text in smaller fonts |
| Phase (in PC mode) | Depending on the resolution and scan frequency that you input to the TV set, you may see a hazy or noisy picture on the screen. In such a case you can use this item to get a clear picture by trial and error method. |
| While in VGA (PC) mode, some items in Picture menu will be unavailable. Instead, VGA mode settings will be added to the Picture Settings while in PC mode. | |
| Sound Menu Contents | |
| Volume Adjusts the volume level. | |
| Equalizer | Selects the equalizer mode. Custom settings can be made only when in user mode. |
| Balance This setting is used for emphasizing left or right speaker balance. | |
| Headphone Sets headphone volume. | |
| Sound Mode You can select a sound mode (if the selected channel supports). | |
| AVL (Automatic Volume Limiting) | This function sets the sound to obtain fixed output level between programmes. |
| Audio Link | Press OK to open the Audio Link menu screen. Using this screen you can discover and connect the sound devices to your TV wirelessly via Bluetooth. |
| Headphone/Lineout (optional) | When you connect an external amplifier to your TV using the headphone jack, you can select this option as Lineout. If you have connected headphones to the TV, set this option as Headphone. |
| Bass Gain Controls the bass gain level. Use Left or Right button to set. | |
| DTS TruSurround HD DTS TruSurround HD mode can be changed as On or Off. | |
| Digital Out Sets digital output audio type. | |
| Settings Menu Contents | |
| Conditional Access Controls conditional access modules when available. | |
| Language | Configs language settings (may change depending on the country selected) Preferred and current settings will be available. Current settings can be changed only if the broadcaster supports. |
| Parental | Enter correct password to change parental settings. You can easily adjust menu lock, maturity lock (depending on the country selected) and child lock in this menu. You can also set a new pin number. |
| Timers | Sets sleep timer to turn off the TV after a certain time. Sets timers for selected programmes (USB Record). |
| Recording Configuration | Displays the recording configuration menu (USB connection required). |
| Date/Time Sets date and time. | |
| Sources Enables or disables selected source options. | |
| Network Settings Displays network settings. | |
| More...: Displays other setting options of the TV set | |
| Menu Timeout Changes timeout duration for menu screens. | |
| Scan Encrypted Channels | When this setting is on, the search process will locate the encrypted channels as well. |
| Blue Background | Activates or deactivates the blue background system when the signal is weak or absent. |
| Software Upgrade | ensure that your TV always has the most up to date firmware. |
| Application Version | Displays application version. |
| Hard of Hearing | Enables any special feature sent from the broadcaster. |
| Audio Description | Audio description refers to an additional narration track for blind and visually impaired viewers of visual media, including television and movies. You can use this feature, only if the broadcaster supports that additional narration track. Note: Audio description sound feature cannot be available in recording or time shifting mode. |
| Auto TV Off | You can set the timeout value of the auto off feature. When the timeout value is reached and the TV has not been operated for a selected time, the TV will go into standby mode. |
| Standby Search (Optional) | If the Standby Search is set to On, when the TV is in standby mode, available broadcasts will be searched. If the TV locates any new or missing broadcasts, a menu screen will be displayed, asking you whether or not to execute these changes. The Channel list will be updated and changed after this process. |
| Store Mode (Optional) | If you are displaying the TV in a store, you can activate this mode. Whilst Store Mode is enabled, some items in the TV menu may not be available. |
| DLNA renderer | DLNA renderer feature allows you to share files stored on your smartphone or tablet pc. If you have a DLNA compatible smartphone or tablet pc and the appropriate software is installed, you can share/play photos on your TV. See instructions of your sharing software for more information. DLNA renderer mode will not be available with internet portal feature. |
| Power Up Mode Enables | or disables the virtual remote feature. |
| Virtual Remote (optional) | Enable or disable the virtual remote feature. |
| CEC | With this setting you can enable and disable CEC functionality completely. Press Left or Right button to enable or disable the feature. |
| Netflix | You can view your ESN(*) number and deactivate Netflix.(*) ESN number is an unique ID number for Netflix, created especially to identify your TV. |
| Smart Remote | Press OK to open the Smart Remote menu screen. Using this screen you can discover and connect the remote controller devices to your TV wirelessly via Bluetooth. |
| Installation Menu Contents | |
| Automatic Channel Scan (Retune) (If available) | Displays automatic tuning options. Digital Aerial: Searches and stores aerial DVB stations. Digital Cable: Searches and stores cable DVB stations. Analogue: Searches and stores analogue stations. Digital Aerial & Analogue: Searches and stores aerial DVB and analogue stations. Digital Cable & Analogue: Searches and stores cable DVB and analogue stations. |
| Manual Channel Scan This | feature can be used for direct broadcast entry. |
| Network Channel Scan Searches | for the linked channels in the broadcast system. |
| Analogue Fine Tune | You can use this setting for fine tuning analogue channels. This feature is not available if no analogue channels are stored. |
| First Time Installation | Deletes all stored channels and settings, resets TV to factory settings. |
| Clear Service List | (*) This setting is visible only when the Country option is set to Denmark, Sweden, Norway or Finland. Use this setting to clear channels stored. |
General TV Operation
Using the Channel List
The TV sorts all stored stations in the Channel List. You can edit this channel list, set favourites or set active stations to be listed by using the Channel List options.
Configuring Parental Settings
To prohibit viewing of certain programmes, channels and menus can be locked by using the parental control system.
To display parental lock menu options, the PIN number should be entered. The factory default PIN number is 0000. After coding the correct PIN number, parental settings menu will be displayed.
Menu Lock: Menu lock setting enables or disables the menu access.
Maturity Lock: When set, this option gets the maturity information from the broadcast and if this maturity level is disabled, disables access to the broadcast.
Child Lock: When Child Lock is set, the TV can only be controlled by the remote control. In this case the control panel buttons will not work.
Set PIN: Defines a new PIN number.
Note: If the Country option is set to France, you can use 4725 as the default code.
Electronic Programme Guide (EPG)
Some, but not all channels send information about the current and next programmes. Press the button to view the EPG menu.
Up/Down/Left/Right: Navigate EPG.
OK: Displays programme options.
I(INFO): Displays, in detailed, information on the programme selected.
GREEN: Switches to List Schedule EPG.
YELLOW: Switches to Timeline Schedule EPG.
BLUE: Displays filtering options.
(RECORD): The TV will start to record the selected programme. You can press again to stop the recording.
IMPORTANT: Connect a USB disk to your TV while the TV is switched off. You should then switch on the TV to enable the recording feature.
Note: Switching to a different broadcast or source is not available during a recording.
Programme Options
In EPG menu, press the OK button to enter the Event Options menu.
Select Channel
In EPG menu, using this option, you can switch to the selected channel.
Record/Delete Record Timer
After you have selected a programme in the EPG menu, press the OK button. Select the Record option and press the OK button. After this operation, a recording will be scheduled for the selected programme.
To cancel an already set recording, highlight that programme and press the OK button and select the option Delete Rec. Timer. The recording will be cancelled.
Set Timer/DeleteTimer
After you have selected a programme in the EPG menu, press the OK button. Select the Set Timer on Event option and press the OK button. You can set a timer for future programmes. To cancel an already set timer, highlight that programme and press the OK button. Then select "Delete Timer" option. The timer will be cancelled.
Note: It is not possible to record two channels at the same time.
CONNECTIVITY
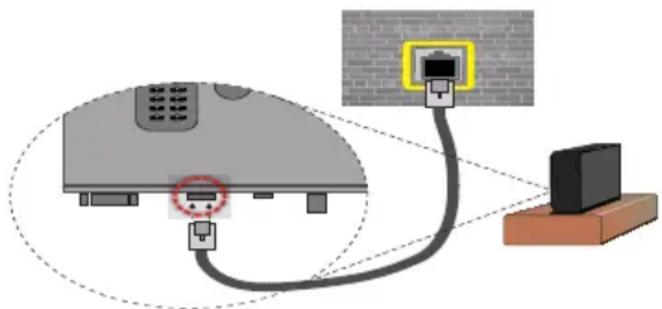
Wired Connectivity
To Connect to a Wired Network
- You must have a modem/router connected to an active broadband connection.
- Ensure that Nero Media Home software is installed to your PC (for DLNA function). See "Nero Media Home Installation" section.
- Connect your PC to your modem/rodter. This can be a wired or wireless connection.
- Connect your TV to your modem/rodter via an ethernet cable. There is a LAN port at the rear (back) of your TV.
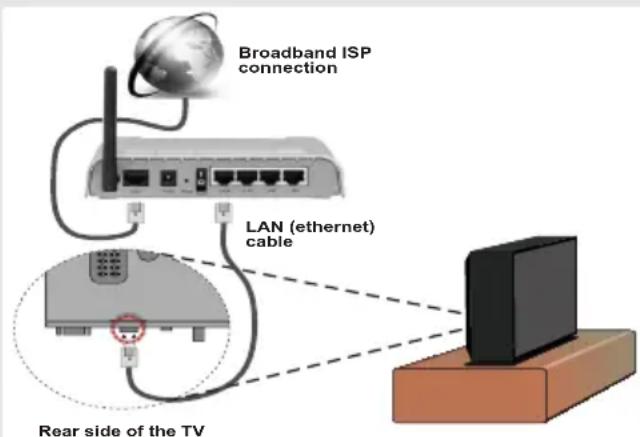
- To access and play shared files, you must select the Media Browser. Press the Menu button and select Media Browser. Press OK to continue. Select the desired file type and press OK. You must always
use the Media Browser screen to access and play shared network files.
- PC/HDD/Media Player or any other devices that are DLNA 1.5 compatible should be used with a wired connection for higher playback quality.
To configure wired settings please refer Network Settings section in the Settings menu.
- You might be able to connect your TV to your LAN depending on your network's configuration. In such a case, use an ethernet cable to connect your TV directly to the network wall outlet.
Configuring Wired Device Settings Network Type
The Network type can be selected as Wired or Wireless Device, in accordance with the active connection to the TV set. Select this as Wired Device if you are connecting via an ethernet.
Configuration Status
This section displays the status of the connection.
IP Address
If an active connection is available, the IP address will be displayed on this section. If you want to configure an IP address preferences, press the Green button and switch to the advanced mode.
Configuring Wired Network Settings in Advanced Mode
After pressing the Green button, the advanced mode will be available. While in advanced mode, press the Red button to edit settings. When finished, press OK to save, Press Return/Back to exit.
Wireless Connectivity
To Connect to a Wireless Network
The TV cannot connect to the networks with a hidden SSID. To make your modem's SSID visible, you should change your SSID settings via the modem's software.
To Connect to a wireless LAN, you should perform the following steps:
- Ensure that Nero Media Home software is installed to your PC (for DLNA function).
- To configure your wireless settings please refer to the Network settings section in this manual.
to the
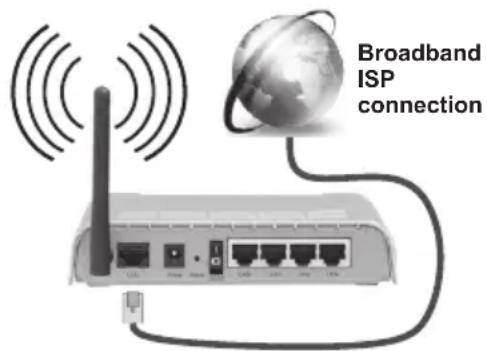
A Wireless-N router (IEEE 802.11a/b/g/n) with simultaneous 2.4 and 5 GHz bands is designed to increase bandwidth. These are optimized for smoother and faster HD video streaming, file transfers and wireless gaming.
- Use a LAN connection for quicker file sharing between other devices like computers.
- The frequency and channel differ depending on the area.
- The transmission speed differs depending on the distance and number of obstructions between the transmission products, the configuration of these products, the radio wave conditions, the line traffic and the products that you use. The transmission may also be cut off or may get disconnected depending on the radio wave conditions, DECT phones or any other WiFi 11b appliances. The standard values of the transmission speed are the theoretical maximum values for the wireless standards. They are not the actual speeds of data transmission.
- The location where the transmission is most effective differs depending on the usage environment.
- The Wireless feature of the TV supports 802.11 a,b,g & n type modems. It is highly recommended that you should use the IEEE 802.11n communication protocol in order to avoid any possible problems while watching videos.
- You must change your modem's SSID when there are any other modems around with the same SSID. You can encounter connection problems otherwise. Use a wired connection if you experience problems with a wireless connection.
Configuring Wireless Device Settings
Open the Network Settings menu and select Network Type as Wireless Device to start connection process.
Press the Yellow button to scan the wireless networks. A list of available networks will be displayed. Please select your desired network from the list.
Note: If the modem supports N mode, you should set N mode settings.
If the selected network is protected with a password, please enter the correct key by using the virtual keyboard. You can use this keyboard via the navigation buttons and the OK button on the remote control.
Wait until the IP address is shown on the screen.
This means that the connection is now established. To disconnect from a wireless network, highlight Network Type and press OK.
You can navigate between menu tabs by pressing left/right buttons. The help bar on the bottom of the dialog shows features that you may use. Press the Blue button to check your internet connection speed. Press the Green button to switch to advanced mode and then press the OK button to edit settings.
Other Information
Configuration Status: Displays Wi-Fi status as Connected or Not Connected.
IP Address: Displays the current IP address.
Network Name: Connected networks' name will be displayed.
Delete Saved Wi-Fi Profiles
Saved profiles will be deleted if you press the Red button while the wireless device selection OSD is on the screen.
Connecting to your mobile device via WiFi
- If your mobile device has WiFi feature, you can connect it to your TV via a router, in order to access the content in your device. For this, your mobile device must have an appropriate sharing software.
- Connect to your router following the steps stated above in the Wireless Connectivity section.
- Afterwards, engage your mobile device with the router and then activate the sharing software on your mobile device. Then, select files that you want to share with your TV.
- If the connection is established correctly, you will be able to access the shared files from your mobile device via the Media Browser of your TV.
- Enter the Media Browser menu and the playback device selection OSD will be displayed. Select your mobile device and press the OK button to continue.
- If available, you can download a virtual remote controller application from the server of your mobile device application provider.
Note: This feature may not be supported on all mobile devices.
WIRELESS DISPLAY
Wireless Display is a standard for streaming video and sound content by Wi-Fi Alliance. This feature provides the ability to use your TV as wireless display device.
Using with mobile devices
There are different standards which enable sharing of screens including graphical, video and audio content between your mobile device and TV.
Plug the wireless USB dongle to TV first, if the TV doesn't have internal WiFi feature.
Then press the Source button on the remote and switch to Wireless Display source.
A screen appears stating that the TV is ready for connection.
Open the sharing application on your mobile device. These applications are named differently for each brand, please refer to the instruction manual of your mobile device for detailed information.
Scan for devices. After you select your TV and connect, the screen of your device will be displayed on your TV.
Note: This feature can be used only if the mobile device supports this feature. Scanning and connecting processes differ according to the programme you use. Android based mobile devices should have the software version V4.1.2 and above.
Bluetooth Connectivity
Your TV supports Bluetooth technology. A pairing is required before using the Bluetooth devices with the TV set. You should do the followings to pair your device with the TV:
*Set the device to pairing mode
*Start device discovery on the TV
Note: Refer to the user manual of the Bluetooth device to learn how to set the device to pairing mode.
You can connect audio devices or remote controllers via Bluetooth to your TV. For audio devices you should use the Audio Link option in the System>Sound menu, for remote controllers the Smart Remote option in the System>Settings>More menu. Select the menu option and press the OK button to open the related menu. Using this menu you can discover and connect the devices that use Bluetooth wireless technology and start to use them. Follow the on-screen instructions. Start the device discovery. A list of available bluetooth devices will be displayed. Select the device you want to connect from the list and press the OK button to connect. If "Device connected" message is displayed, the connection is successfully established. If the connection fails try it again.
Note: Bluetooth and Wireless LAN devices operate within the same radio frequency range and may interfere with one another. To improve the performance of your Bluetooth device place it at least 1 meter away from any other Bluetooth or Wireless LAN devices.
Connectivity Troubleshooting
Wireless Network Not Available
- Ensure that any firewalls of your network allow the TV wireless connection.
- Try searching for wireless networks again, using the Network Settings menu screen.
If the wireless network does not function properly, try using the wired network in your home. Refer to the "Wired Connectivity" section for more information on the process.
If the TV does not function using the wired connection, check the modem (router). If the router does not have a problem, check the internet connection of your modem.
Connection is Slow
See the instruction book of your wireless modem to get information on the internal service area, connection speed, signal quality and other settings. You need to have a high speed connection for your modem.
Distruption during playback or slow reactions
You could try the following in such a case:
Keep at least three meters distance from microwave ovens, mobile telephones, bluetooth devices or any other Wi-Fi compatible devices. Try changing the active channel on the WLAN router.
Using DLNA Network Service
DLNA (Digital Living Network Alliance) is a standard that eases the viewing process of digital electronics and makes them more convenient to use on a home network. For further information, visit www.dlna.org. The DLNA standard allows you to view and play photos, music and videos stored in the DLNA media server connected to your home network.
1. Nero Media Home Installation
The DLNA function cannot be used if the server programme is not installed onto your PC. Please prepare your PC with the Nero Media Home programme. For more information about the installation, please refer to the "Nero Media Home Installation" section.
2. Connect to a Wired or Wireless Network
See the chapter Network Settings for detailed configuration information.
3. Play Shared Files via Media Browser
Select Media Browser by using the Left or Right buttons from the main menu and press OK. The Media browser will then be displayed.
DLNA
DLNA support is only available in the Media Browser folder mode. To enable folder mode, go to the Settings tab in the main media browser screen and press OK. In the settings options, highlight View Style and change to Folder using the Left or Right buttons. Select the desired media type and press OK.
If sharing configurations are set properly, Device Selection screen will be displayed after selecting the desired media type. Select the desired one and press OK to display the content of the selected network or USB memory. If you want to refresh the device list, press the Green button. You can press Menu to exit. If available networks are found, they will be listed on this screen. Select media server or network that you want to connect to using the Up or Down buttons and press OK.
If you select the media type as Videos and choose a device from the selection menu, a new menu screen will appear on the screen.
Select Videos from this screen again to list all the available video files from the selected network.
To play other media types from this screen, you must go back to main Media Browser screen and select the media type as desired and then perform the network selection again. Refer to the Media Browser Menu section for further information on file playback.
Subtitle files do not work if you watch videos from your network through DLNA.
You can connect only one television with DLNA to the same network. If a problem occurs with the DLNA network, please switch your television off at the wall socket and back on again. Trick mode and jump are not supported with the DLNA function.
Note: There may be some PC's which may not be able to utilize the DLNA function due to administrator and security settings (such as business PC's).
For best home network streaming with this TV, the Nero software should be installed.
Nero MediaHome Installation
To install Nero MediaHome, please proceed as follows:
Note: To use DLNA function, this software should be installed to your PC.
- Enter the link below completely in the adressbar of your web browser.
http://www.nero.com/mediahome-tv - Click the Download button on the opening page. The installation file will be downloaded onto your PC.
- After the download is completed, double click on the installation file to start the installation. The installation wizard will guide you through the installation process.
- The prerequisites screen will be displayed first. The installation wizard checks the availability of required third-party software on your PC. If applications are missing they are listed and must be installed before continuing installation.
- Click the Install button. The integrated serial will be displayed. Please do not change the displayed serial.
- Click the Next button. The License Conditions (EULA) screen will be displayed. Please read the license agreement carefully and select the appropriate check box if you agree to the terms of the agreement. Installation is not possible without this agreement.
- Click the Next button. On the next screen you can set your installation preferences.
- Click the Install button. The installation begins and finishes automatically. A progress bar will indicate the state of the installation process.
- Click the Finish button. The installation is completed. You will be directed to the web site of the nero software.
- A shortcut is now placed on your desktop.
Congratulations! You successfully installed Nero MediaHome on your PC.
Run Nero MediaHome by double clicking on the shortcut icon.
Internet Browser
To use the internet browser, please select the internet browser logo from the portal section.

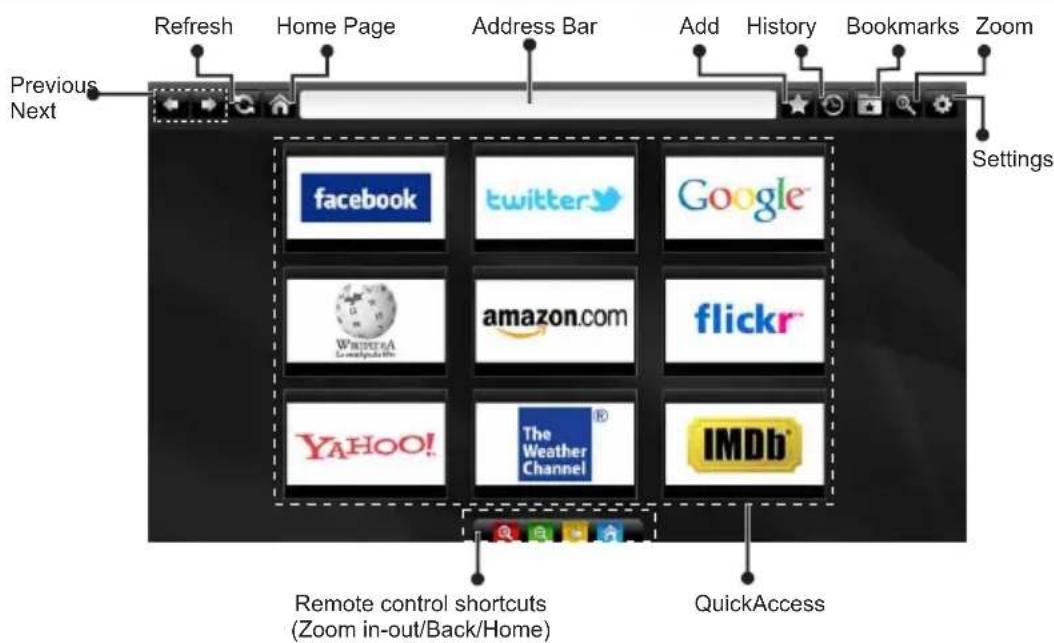
- To navigate the web browser, use the arrow buttons on the remote control. Press OK to continue.
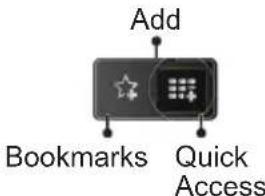
- After First time installation, predefined web sites and logos will be displayed on the browser's access page (see image above). To add a desired web page to the quick access page, whilst on the website you wish to add, select the "Add" menu and select "Quick Access" button.
- If you want to add bookmarks, select this item while the desired web page is on the screen.
- You can navigate the web browser in three ways. First, enter any URL in the address bar.
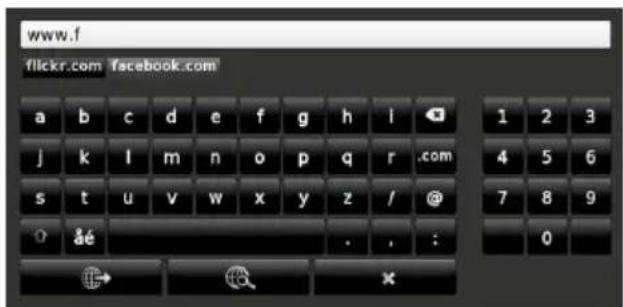
- You can search keywords by clicking the search button in the address dialog box or another way to navigate to pages is by clicking on links on web
pages and these will take you to the appropriate pages.
- When you scroll the pointer down to the middle of the screen, the remote control's shortcuts will be shown.
- Use the zoom shortcut buttons or the zoom menu to zoom in or zoom out.
- You can clear cookies or clear all browser data from the settings menu.
- Your TV is compatible with USB mice. Plug your mouse or wireless mouse adaptor to the USB input of your TV.
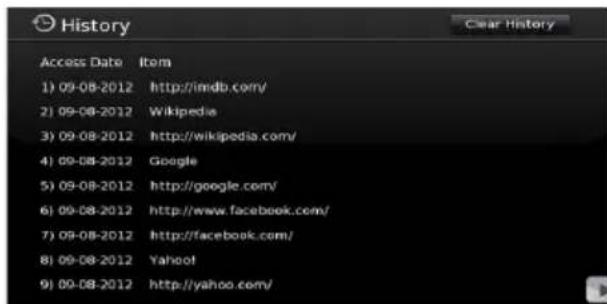
- To view your browsing history, click the history button. You can also clear your browsing history from here.
- The browser does not support multiple tabs.
- Some internet pages include flash content. These are not supported by the browser.
- Your TV does not support any download processes from the web browser.
PC Input Typical Display Modes
The following table is an illustration of some of the typical video display modes. Your TV may not support all resolutions. Your TV supports up to 1920x1200.
| Index | Resolution | Frequency |
| 1 | 640x400 | 70Hz |
| 2 | 640x350 | 85Hz |
| 3 | 640x400 | 85Hz |
| 4 | 640x480 | 60Hz |
| 5 | 640x480 | 66Hz |
| 6 | 640x480 | 72Hz |
| 7 | 640x480 | 75Hz |
| 8 | 640x480 | 85Hz |
| 9 | 800x600 | 56Hz |
| 10 | 800x600 | 60Hz |
| 11 | 800x600 | 70Hz |
| 12 | 800x600 | 72Hz |
| 13 | 800x600 | 75Hz |
| 14 | 800x600 | 85Hz |
| 15 | 832x624 | 75Hz |
| 16 | 1024x768 | 60Hz |
| 17 | 1024x768 | 66Hz |
| 18 | 1024x768 | 70Hz |
| 19 | 1024x768 | 72Hz |
| 20 | 1024x768 | 75Hz |
| 21 | 1024x768 | 85Hz |
| 22 | 1152x864 | 60Hz |
| 23 | 1152x864 | 70Hz |
| 24 | 1152x864 | 75Hz |
| 25 | 1152x864 | 85Hz |
| 26 | 1152x870 | 75Hz |
| 27 | 1280x768 | 60Hz |
| 28 | 1360x768 | 60Hz |
| 29 | 1280x768 | 75Hz |
| 30 | 1280x768 | 85Hz |
| 31 | 1280x960 | 60Hz |
| 32 | 1280x960 | 75Hz |
| 33 | 1280x960 | 85Hz |
| 34 | 1280x1024 | 60Hz |
| 35 | 1280x1024 | 75Hz |
| 36 | 1280x1024 | 85Hz |
| 37 | 1400x1050 | 60Hz |
| 38 | 1400x1050 | 75Hz |
| 39 | 1400x1050 | 85Hz |
| 40 | 1440x900 | 60Hz |
| 41 | 1440x900 | 75Hz |
| 42 | 1600x1200 | 60Hz |
| 43 | 1680x1050 | 60Hz |
| 44 | 1920x1080 | 60Hz |
| 45 | 1920x1200 | 60Hz |
AV and HDMI Signal Compatibility
| Source Supported Signals Available | ||
| EXT(SCART1) | PAL O | |
| NTSC 60 O | ||
| RGB 50/60 O | ||
| SECAM O | ||
| EXT(SCART2) | PAL O | |
| NTSC 60 O | ||
| RGB 50/60 O | ||
| SECAM O | ||
| Side AV | PAL 50/60 O | |
| NTSC 60 O | ||
| SECAM | ||
| YPbPr | 480I, 480P 60Hz O | |
| 576I, 576P 50Hz O | ||
| 720P 50Hz,60Hz O | ||
| 1080I 50Hz,60Hz O | ||
| 480I 60Hz O | ||
| HDMI1 | 480P | 60Hz O |
| 576I, 576P 50Hz O | ||
| 720P 50Hz,60Hz O | ||
| 1080I 50Hz,60Hz O | ||
| HDMI2 | 1080P | 24Hz,25Hz |
| 30Hz,50Hz,60Hz | O | |
| HDMI3 | ||
| HDMI4 | ||
(X: Not Available, O: Available)
In some cases a signal on the LED TV may not be displayed properly. The problem may be an inconsistency with standards from the source equipment (DVD, Set-top box, etc.). If you do experience such a problem please contact your dealer and also the manufacturer of the source equipment.
Supported File Formats for USB Mode
| Media Extension Format Notes | ||||
| Video Audio | ||||
| Movie | mpg, MPEG | Mpeg1,2 MPEG1/2 Layer 1/2/3, AAC/HEAAC, AC3/EAC3, LPCM/ADPCM | 1080P@ 30fps 50Mbit/sec | |
| dat, mpg, MPEG | MPEG2 ,H.264, VC1, AVS, MVC | MPEG1/2 Layer 1/2/3, AAC/HEAAC, AC3/EAC3, LPCM/ADPCM | H.264:1080Px2@25fps 1080P@ 50fps MVC: 1080P@ 24fps Other: 1080P@ 30fps" 50Mbit/sec | |
| .vob MPEG2 | MPEG1/2 Layer 1/2/3, AC3, | LPCM 1080P@ 30fps 50Mbit/sec | ||
| .mkv MPEG | 1,2,4, XviD, H.264, VC1,WMV3, Motion JPEG | MPEG1/2 Layer 1/2/3, AAC/HEAAC, AC3/EAC3, LPCM | H.264:1080Px2@25fps 1080P@ 50fps Other:1080P@ 30fps 50Mbit/sec | |
| .mp4 .mov M | MPEG1/2 Layer 3, AAC/HEAAC | AC3/EAC3, LPCM/ADPCM | H.264: 1080Px2@25fps 1080P@ 50fps Other: 1080P@ 30fps 50Mbit/sec | |
| .avi MPEG1 | 2,4 Xvid H.264, VC1,WMV3, Sorenson H.263 Motion JPEG | MPEG1/2 Layer 1/2/3, AAC/HEAAC, AC3/EAC3, LPCM/ADPCM, WMA | H.264: 1080Px2@25fps 1080P@ 50fps Other: 1080P@ 30fps" 50Mbit/sec | |
| flv H.264, | Sorenson H.263 | MPEG1/2 Layer 3, AAC/HEAAC, LPCM/ADPCM | H.264: 1080Px2@25fps 1080P@ 50fps Other: 1080P@ 30fps" 50Mbit/sec | |
| 3gp,3g2 MPEG | MPEG4, H.264 1920x1080 @ 30P | 20Mbit/sec | ||
| asf, wmv | MPEG2,4, XviD, H.264, VC1,WMV3 | MPEG1/2 Layer 1/2/3, AAC/HEAAC, AC3/EAC3, LPCM, WMA | 1080P@ 30fps 50Mbit/sec | |
| Music | 3 | WMA, WMA Pro AC, HEAAC | MPEG1 Layer 1/2/3 (MP3) | |
| .wav | LPCM | |||
| WMA/ASF V | ||||
| .m4a/.aac A | ||||
| Photo | .jpg.jpeg | Baseline JPEG | MAX WxH = 14592x12288 Up to 8 MegaByte | |
| .png | Progressive JPEG | |||
| .bmp | non-interlace | |||
| .png | interlace | |||
| Subtitle | sub | - | - | |
| srt | - | - | ||
UWAGA: Do podlaczania urzadzen poprzej YPbPr lub boczne wejscie AV nalezy uzyc kabli dołaczonych do zestawu. Spojrz na powyzsza ilustracja. | Aby podlączy dzwiek z PC, bedziesz potrzebowac BIALEGO i CZERWONEGO wejscia kabla do BOCZNEGPODŁACZENIA AV. | Ješli urzadzenia zewétrzne jest podlączone poprzej gniażdko SCART, TV automatycznie przyłączny sie na tryb AV. | Podczas ogladania kanław DTV (Mpeg4 H.264) lub w trybie przyegrądarki medów, wyjscie poprzej gniażdko scart nie bedzie dostepne. | Przy korzystaniu z montazu nasciennego (opcja), zalecamy podlączenie wszymstkich kabli do tylnych wejsć w TV przy zamontowaniem urzadzenia na scianie. | Modul CIromaticity of the two-dimensional system of two-dimensional systems of two-dimensional systems of two-dimensional systems of two-dimensional systems of two-dimensional systems of two-dimensional systems of two-dimensional systems of two-dimensional systems of two-dimensional systems of two-dimensional systems of two-dimensional systems of two-dimensional systems of two-dimensional systems of two-dimensional systems of two-dimensional systems of two-dimensional systems of two-dimensional systems of two-dimensional systems of two-dimensional systems of two-dimensional systems of two-dimensional systems of two-dimensional systems of two-dimensional systems of two-dimensional systems of two-dimensional systems of two-dimensional system of two-dimensional system of two-dimensional system of two-dimensional system of two-dimensional system of two-dimensional system of two-dimensional system of two-dimensional system of two-dimensional system of two-dimensional system of two-dimensional system of two-dimensional system of two-dimensional system of two-dimensional system of two-dimensional system of two-dimensional system of two-dimensional system of two-dimensional system of two-dimensional system of two-dimensional system of two-dimensional system of two-dimensional system of two-dimensional system of two-dimensional system of two-dimensional system of two-dimensional
CEC i CEC RC Passthrough
| A | Product Fiche | ||
| B | Commercial Brand:HAIER | ||
| C | Product No. | 10099270 | |
| D | Model No. | LEF65V200S | |
| E | Energy efficiency class | A | |
| F | Visible screen size (diagonal,approx.) (inch/cm) | 65 inches | 165 cm |
| G | On mode average power consumption (Watt) | 154 | |
| H | Annual energy consumption (kWh/annum) | 224 | |
| I | Standby power consumption (Watt) | 0,5 | |
| J | Off mode power consumption (Watt) | 0 | |
| K | Display resolution (px) | 1920x1080 | |
| ABCDEF | Visible screen size (diagonal, approx.) (inch/cm) | ||||||
| English | Product Fiche Commencial Brand Product No. Model No. Energy efficiency class | ||||||
| Deutsch | Produkt-Datenblatt Markenzeichen Produkt-Nr. Modell-Ne Energieeffizienzklasse | Sichtbare Bildschirmgroße (diagonal,ca.) (Zoll/cm) | |||||
| Bilanz | Punjab | Jahore | Jahore | Jahore | Jahore | Jahore | (,) (,) (,) (,) (,) (,) (,) (,) (,) (,) (,) (,) (,) (,) (,) (,) (,) (,) (,) (,) (,) (,) (,) (,) (,) (,) (,) (,) (,) (,) (,) (,) (,) (,) (,) (,) (,) (,) (,) (,) (,) (,) (,) (,) (,) (,) (,) (,) (,) (,) (,) |
| Белларски | Справочen лintс с тхинеске данни | Тьровская марka | Проблем № | Мonden № | Клас на[eнгеляе[eфektivноct] | Вividим разерся на[eхраза] (дialogал.>[пriб.] (инда./см) | |
| Česstina | Informačni list | Značka vyrobce | Čislo produktu | Model Č. | Energetická tflda | Videtilne na velikost obrazovky (uhloptěka, pbrl.) (palc./cm) | |
| Dansk | Produktoplysningsskema | Varemaerkle | Produktnr. | Model nr. | Energietektivetsklasse | Synig skerstmstørrelse (diagonal,ca.) (HK/cm) | |
| Suomi | Tuote fiche | Kaufallen fin merkki | Tuote nro. | Malln rno. | Viran tehokkuusluokka | Nakyvan kuvarudun koko (diagonal,linen.n.) (tuumaa/cm) | |
| Françals | Fiche du produit | Marque commerciale | Produit N° | Modèle N° | Classe d'efficacité énergétique | Taille d'écran visible (diagonale,approx (pouces/cm) | |
| Hrvatski | SAŽETAK PROIZVODA | Trgovačka marka | Br. proizvoda | Br. modela | Klasa energetske učinkovitosti | Vidjiva velicina ekrana (diagonal,priblino) (inca./cm) | |
| Nederlands | Productfiche | Commercieel merk. | Productnr. | Modelnr. | Energie efficientre klasse | Zichtbare schermgrotte (diagonal,ca.) (inches/cm) | |
| Espanol | Ficha del Producto | Marca Comercial | N° de Producto | N° de Modelo | Clasificación Energética | Tamafo de pantalla visible (diagonal,aprc.) (pulgadas/cm) | |
| Svenska | Produktspecification | Varumärke | Produktnr. | Modelnr. | Energiklass | Synig skarmstolek (diagonal,ungefärig) (tum/cm) | |
| Itallano | Scheda prodotto | Marchio commerciale | Numero prodotto | Numero modello | Classe di efficienza energetica | Dimensioni visibili dello schermo (diagonale,cirpi/cim) | |
| Polski | KARTA PRODUKTU | Marka produktu Nr Produktu Nr | Prductu Nr | Nr modelu | Klasa efektywnósci energetycznej | Widocznny obraz ekrana (przekatna okolo) (cali/cm) | |
| Magyar | Termékismertő adatlap | Kereskedelmi marka | Termékszám | Modellszám | Energiahalékonysúsagi osztály | Lathato képlartomány (diagonális,kb.) (inches/cm) | |
| Norsk | Produktinformasjon | Kommersiell merkevare | Produkt nr. | Modell nr. | Energieffektivitet klasse | Synig skjermstørrelse (diagonal,ca.) (tommer/cm) | |
| Portugues | Ficha do produits | Marca Comercial | Produkt N° | Modelo N° | Classificação eficiência enerética | Tamanho ecra visivel (diagonal,aprox. (polegadas/cm) | |
| România | Fișă produs | Marcă commerciale | Nr. Proclus | Nr. Model | Clasa de eficientă energetica | Dimensiunea ecranuliu vizibil (diagonal,apex. ) (inch/cm) | |
| Русckий | Справочьй писток тхинеске даньх Издения | Торовая марka | Homer nizdenia | Homer moedeni | Клacks зэрегонтөблия | Вividим的服务лары (п�догонл), Okono) (дюмов/cm) | |
| Берапская | Справочьий писток тхинеске даньх Издения | Торовая марka | Homer nizdenia | Homer moedeni | Клacks зэрегонтөблия | Вividим的服务лары (подогонл), Okono) (дюмов/cm) | |
| MAKEDONCKI | Тхинчкій podatoцii | Корец岡лама марka | Посиевord 6р. | Model n6р. | Клacks на[eнергеташдзшост | Толемпна на вiderл� похан (д��агогонл), ДИнн/cm) | |
| украимьский | Тхинчidi дani | Корец岡лама марka | Артыкел | Мodelь | Клacksenergosх�оваяня | Вividим的服务лары (падогонл), ДИнн/cm) | |
| Srpski | Тehnicke odike | Komercijnalma marka | Proizvod br. | Model br. | Klasa energetske efikasnosti | Veilcina vdirljovog erkana (diagonal, tokom) (inca./cm) | |
| Slovencina | Informačni list | Značka výrobcu | Čislo produktu | Model Č. | Energetická trieda | Videtifna velkost obrazovky (uhlopterečka, zhruba) (palcov/cm) | |
| Slovenscina | Opis izdelka | Komercialna znamka | Śt. Izdelka | Śt. Modela | Razred energetske učinkovitosti | Vidna velkost zaslona (diagonal, prbj.) (palcev/cm) | |
| Ельунik | Дέλtrio国际贸易 | ЕмTORÍ KÓ JúO | Ap. Поитóvтό | Ap. Моту�о | Катуlorия[evepyiaiaikɔs amdooboiŋs | Оразу mužьогьо:[davuyioic,pεp.] (IVtoεc/cm) | |
| Bosanski | Тehnicke podaci | Komercijnalma marka | Produktbr. | Model br. | Klasa energetske efikasnosti | Vidjiva veilecina ekrana (diagonal, prilbino.) (inca./cm) | |
| Туке | Ürün fişi | Ticari Marka | Ürün No. | Model No. | Enerji verimiliigi sinfi | Görülen ekran boylut (çapraz, yakişk.) (ingc./cm) | |
| Shqip | Té chēnat e produktit | Marka treglare | Nr. i produktit. | Nr. i modelit. | Klasa e eficiencës se energjisë | Madhesia e ekrani tê dukshēm (diagonal,afersitsht) (inc/.cm) | |
| Lietuvič | Gamino etikétè | Gamintojas | Gamino Nr. | Modello Nr. | Energetinia efektyvumo klase | Matomas ekran dycis (stržainé,approx.) (colu./cm) | |
| Latviešu | Produkta apraksts | Marka | Produktur nr. | Modelja nr. | Energoefektivitätes klase | Ekrána izmírs (pa diognäli, apmçram) (collas/cm) | |
| Eesti | TOOTEKIRJELDUS | Tootja fima | Toote nr. | Mudeil nr. | Energiaklass | Vadadatava ekraani suurus (diagonal, umbes) (tolli/cm) | |
| G H I J | K | Standby power consumption(Watt) | Off mode power consumption(Watt) | Display resolution(px) | |||
| English | On mode averagepower consumption (Watt) | Annual energy consumption(kWh/annum) | |||||
| Deutsch | Durchschnittlicher Stromverbrauch imeingeschalttem Zustand (Watt) | Jährlicher Energieverbrauch(kWh/Jahr) Standby-Stromverbrauch | Watt) | Stromverbrauch im ausgeschattemZustand (Watt) Display-Auflösung (px) | |||
| Бъларский | Среда koюмаша на elektropeонявь въларовь състен�(mWatt) | Тудша Кочушиа на elektropeонявь noTovmna | (кг.)Ф.Ф.Ф.Ф.Ф.Ф.Ф.Ф.Ф.Ф.Ф.Ф.Ф.Ф.Ф.Ф.Ф.Ф.Ф.Ф.Ф.Ф.Ф.Ф.Ф.Ф.Ф.Ф.Ф.Ф.Ф.Ф.Ф.Ф.Ф.Ф.Ф.Ф.Ф.Ф.Ф.Ф.Ф.Ф.Ф.Ф.Ф.Ф.Ф.Ф.Ф.F.Ф.Ф.Ф.Ф.Ф.Ф.Ф.Ф.Ф.Ф.Ф.Ф.Ф.Ф.Ф.Ф.Ф.Ф.Ф.Ф.Ф.Ф.Ф.Ф.Ф.Ф.Ф.Ф.Ф.Ф.Ф.Ф.Ф.Ф.Ф.Ф.Ф.Ф.Ф.Ф.Ф.Ф.Ф.Ф.Ф.Ф.Ф.Ф.Ф.Φ.Ф.Ф.Ф.Ф.Ф.Ф.Ф.Ф.Ф.Ф.Ф.Ф.Ф.Ф.Ф.Ф.Ф.Ф.Ф.Ф.Ф.Ф.Ф.Ф.Ф.Ф.Ф.Ф.Ф.Ф.Ф.Ф.Ф.Ф.Ф.Ф.Ф.Ф.Ф.Ф.Ф.Ф.Ф.Ф.Ф.Ф.Ф.Ф.Ф.φ.Ф.Ф.Ф.Ф.Ф.Ф.Ф.Ф.Ф.Ф.Ф.Ф.Ф.Ф.Ф.Ф.Ф.Ф.Ф.Ф.Ф.Ф.Ф.Ф.Ф.Ф.Ф.Ф.Ф.Ф.Ф.Ф.Ф.Ф.Ф.Ф.Ф.Ф.Ф.Ф.Ф.Ф.Ф.Ф.Ф.Ф.Ф.Ф.Ф. Μхларовь noTovmna | (кг.)Ф.Ф.Ф.Ф.Ф.Ф.Ф.Ф.Ф.Ф.Ф.Ф.Ф.Ф.Ф.Ф.Ф.Ф.Ф.Ф.Ф.Ф.Ф.Ф.Ф.Ф.Ф.Ф.Ф.Ф.Ф.Ф.Ф.Ф.Ф.Ф.Ф.Ф.Ф.Ф.Ф.Ф.Ф.Ф.Φ.Ф.Ф.Ф.Ф.Ф. (кг.)Ф.Ф.Ф.Ф.Ф.Ф.Ф.Ф.Ф.Ф.Ф.Ф.Ф.Ф.Ф.Ф.Ф.Ф.Ф.Ф.Ф.Ф.Ф.Ф.Ф.Ф.Ф.Ф.Ф.Ф.Ф.Ф.Ф.Ф.Ф.Ф.Ф.Ф.Ф.Ф.Ф.Ф.Ф.Ф.Ф.Ф.Ф.Ф. (кг.)Ф.Ф.Ф.Ф.Ф.Ф.Ф.Ф.Ф.Ф.Ф.Ф.Ф.Ф.Ф.Ф.Ф.Ф.Ф.Ф.Ф.Ф.Ф.Ф.Ф.Ф.Ф.Ф.Ф.Ф.Ф.Ф.Ф.Ф.Ф.Ф.Ф.Ф.Ф.Ф.Ф.Ф.Φ.Ф.Ф.Ф.Ф.Ф.Ф.Ф. (кг.)Ф.Ф.Ф.Ф.Ф.Ф.Ф.Ф.Ф.Ф.Ф.Ф.Ф.Ф.Ф.Ф.Ф.Ф.Ф.Ф.Ф.Ф.Ф.Ф.Ф.Ф.Ф.Ф.Ф.Ф.Ф.Ф.Ф.Ф.Ф.Ф.Ф.Ф.Ф.Ф.Φ.Ф.Ф.Ф.Ф.Ф.Ф.Ф.Ф.Ф. (кг.)Ф.Ф.Ф.Ф.Ф.Ф.Ф.Ф.Ф.Ф.Ф.Ф.Ф.Ф.Ф.Ф.Ф.Ф.Ф.Ф.Ф.Ф.Ф.Ф.Ф.Ф.Ф. (кг.)Ф.Ф.Ф.Ф.Ф.Ф.Ф.Ф.Ф.Ф.Ф.Ф.Ф.Ф.Ф.Ф.Ф.Ф.Ф. (кг.)Ф.Ф.Ф.Ф.Ф.Ф.Ф.Ф.Ф.Ф.Ф.Ф.Ф. (кг.)Ф.Ф.Ф.Ф.Ф.Ф.Ф.Ф.Ф.Ф. (кг.)Ф.Ф.Ф.Ф.Ф.Ф.Ф. (кг.)Ф.Ф.Ф.Ф.Ф.Ф. (кг.)Ф.Ф.Ф.Ф.Ф. (кг.)Ф.Ф.Ф.Ф. (кг.)Ф.Ф.Ф. (кг.)Ф.Ф.Ф. (кг.)Ф.Ф.Ф. (кг.)Ф.Ф.Ф. (кг.)Ф.Ф.Ф. (кг.)Ф.Ф.Ф. (кг.)Ф.Ф.Ф. (кг.)Ф.Ф.Ф. (кг.)Ф.Ф.Ф. (кг.)Ф.Ф.Ф. (кг)Φ. (кг)Φ. (кг)Φ. (кг)Φ. (кг)Φ. (кг)Φ. (кг)Φ. (кг)Φ. (кг)Φ. (кг)Φ. (кг)Φ. (кг)Φ. (кг)Φ. (кг)Φ. (кг)Φ. (кг)Φ. (кг)Φ. (кg)Φ. (кg)Φ. (кg)Φ. (кg)Φ. (кg)Φ. (кg)Φ. (кg)Φ. (кg)Φ. (кg)Φ. (кg)Φ. (кg)Φ. (кg)Φ. (кg)Φ. (кg)Φ. (кg)Φ. (кg)Φ. (кg)Φ. -10000000000000000000000000000000000000000000000000000000000000000000000000000000000000000000000000000 Espanol | Arligt energforbrug (kWh/Arligt) Jeurolles energforbrug (kWh/Arligt) Energiakonsumption per ar (KWh/Arlig) Consumo annuale di energia (kWh/annuo) Rocze nuzyce energii w trybie wlaçzonym (кг./Rocze) Energiokonsument per ar (KWh/Arlig) Consumo corrente in modalità standby (Watt) Consumo du corente in modality standby (Watt) Consumo du corente in modality standby (Watt) Consumo du corente in modality standby (Watt) Consumo du corente in modality standby (Watt) Consumo du corente in modality standby (Watt) Consumo du corente in modality standby (Watt) Consumo du corente in modality standby (Watt) Consumo del stromforbrug (Watt) Hilemodus stromforbrug (kWh/Arlig) Consumo annual energy (kWh/annual) Consumo annual de energia (kWh/annual) Consumo anual de energia (kWh/annual) Consumo anual de energia (kWh/annual) Consumo anual de energia (kWh/annual) Consumo anual de energia (kWh/annual) Consumo anual de energia (kWh/annual) Consumo anual de energia (kWh/annual) Consumo anual de energia (kWh/annual) Consumo anual de energia (kWh/annual) Consumo anual de energia (KWh/annual) Consumo anual de energia (KWh/annual) Consumo anual de energia (KWh/annual) Consumo anual de energia (KWh/annual) Consumo anual de energia (KWh/annual) Consumo anual de energia (KWh/annual) Consumo anual de energia (KWh/annual) Consumo anual de energia (KWh/annual) Consumo anual de energia (KWh/annual) | Ult-modus stroomvorbruik (Watt) | Schemresolutie (px) |
| Nordien | Aan-modus gemiddeld stroomverbruk (Watt) | Jaurigt energforbrug (kWh/Aarilks) | Stand-by stroombruk (Watt) | Ult-modus stroomvorbruik (Watt) | Schemresolutie (px) | ||
| Espanol | Consumo eletrico medio, en funacionamento (Vatio) | Consumo eletrico anual (KWh/annual) | Consumo en mode en espaa (Vatio) | Consumo eletrico medio apagado(Vatio) | Resoluccion de pantalla (px) | ||
| Svenska | Strömkonsumption i PÅ-låge (Watt) | Energiakonsumption per ar (KWh/Arlig) Consumo annuale di energia (kWh/annuo) Consumo annuale di energia (kWh/annuo) Consumo du corente in modality standby (Watt) | Strömkonsumption i vilolåge (Watt) | Strömkonsumption i AV-låge (Watt) | Skärnupplösning (polar) | ||
| Italienano | Consumo di corrente medie do modalità(Watt) | Consumo di corrente in modality standby (Watt) | Consumo di corrente in modality standby (Watt) | Consumo di corrente in modality standby (Watt) | Risolutione del display (px) | ||
| Polski | Sredne zuzycie energii w trybie wlaçzonym (Watów) | Rocze zuzycie energii w trybie wlaçzonym (кг./Rocze) Energiodnyi zuzycie energii w trybie wlaçzonym (кг./Rocze) Energiogasovia zuzycie energii w trybie wlaçzonym (кг./Rocze) Energiogasovia zuzycie energii w trybie wlaçzonym (кг./Rocze) Energiogasovia zuzycie energii w trybie wlaçzonym (кг./Rocze) Energiogasovia zuzycie energii w trybie wlaçzonym (кг./Rocze) Energiogasovia zuzycie energii w trybie wlaçzonym (кг./Rocze) Energiogasovia zuzycie energii w trybie wlaçzonym (кг./Rocze) Energiogasovia zuzycie energii w trybie wlaçzonym (кг./Rocze) Energiogasovia zuzycie energii w trybie wlaçzonym (кг./Rocze) Energiogasovia zuzycie energii w trybie wlaçzonym (Кг./Rocze) Energiogasovia zuzycie energii w trybie wlaçzonym (Кг./Rocze) Energiogasovia zuzycie energii w trybie wlaçzonym (Кг./Rocze) Energiogasovia zuzycie energii w trybie wlaçzonym (Кг./Rocze) Bavel (Вот) (Вот) (Вот) (Вот) (Вот) (Вот) (Вот) (Вот) (Вот) (Вот) (Вот) (Вот) (Вот) (Вот) (Вот) (Вот) (Вот) (Вот) (Вот) (Вот) (Вот) (Вот) (Вот) (Вот) (Вот) (Вот) | (кг.)Ф. (кг.)Ф. (кг.)Ф. (кг.)Ф. (кг.)Ф. (кг.)Ф. (кг.)Ф. (кг.)Ф. (кг.)Ф. (кг.)Ф. (кг.)Ф. (кг.)Ф. (кг.)Ф. (кг.)Ф. (кг.)Ф. (кг.)Ф. (кг.)Ф. (кг)Φ (кг)Φ (кг)Φ (кг)Φ (кг)Φ (кг)Φ (кг)Φ (кг)Φ (кг)Φ (кг)Φ (кг)Φ (кг)Φ (кг)Φ (кг)Φ (кг)Φ (кг)Φ (кг)Φ (кг) (кг)Φ (кг)Φ (кг)Φ (кг)Φ (кг)Φ (кг)Φ (кг)Φ (кг)Φ (кг)Φ (кг)Φ (кг)Φ (кг)Φ (кг)Φ (кг)Φ (кг)Φ (кг)Φ (кг (Мын) (Мын) (Мын) (Мын) (Мын) (Мын) (Мын) (Мын) (Мын) (Мын) (Мын) (Мын) (Мын) (Мын) (Мын) (Мын) (Мын) (Мын) (Мын) (Мын) (Мын) | (кг.)Ф. (кг.)Ф. (кг.)Ф. (кг.)Ф. (кг.)Ф. (кг.)Φ (кг.)Φ (кг.)Φ (кг.)Φ (кг.)Φ (кг.)Φ (кг.)Φ (кг.)Φ (кг.)Φ (кг.)Φ (кг.)Φ (кг.)Φ (кг.)Φ (кг.)Φ (кг.)Φ (кг.)Φ (кг.)Φ (кг)Φ (кг)Φ (кг)Φ (кг)Φ (кг)Φ (кг)Φ (кг)Φ (кг)Φ (кг)Φ (кг)Φ (кг)Φ (кг)Φ (кг)Φ (кг)Φ (кг)Φ (кг)Φ (Кг)Φ (Кг)Φ (Кг)Φ (Кг)Φ (Кг)Φ (Кг)Φ (Кг)Φ (Кг)Φ (Кг)Φ (Кг)Φ (Кг)Φ (Кг)Φ (Кг)Φ (Кг)Φ (Кг)Φ (Кг)Φ (Кг)Φ | |||
| Slovenskina | Pröse nera spotrba elektrokce energija v zapnutom reizime (Watt) | Rocze nuzyce energija w trybie wlaçzonym (кг./Rocze) Energiodnyi zuzyce energija w trybie wlaçzonym (кг./Rocze) Energiogasovia zuzyce energija w trybie wlaçzonym (кг./Rocze) Energiogasovia zuzyce energija w trybie wlaçzonym (кг./Rocze) Energiogasovia zuzyce energija w trybie wlaçzonym (кг./Rocze) Energiogasovia zuzyce energija w trybie wlaçzonym (Кг./Rocze) Energiogasovia zuzyce energija w trybie wlaçzonym (Кг./Rocze) Energiogasovia zuzyce energija w trybie wlaçzonym (Кг./Rocze) Energiogasovia zuzyce energija w trybie wlaçzonym (Кг./Rocze) Eschinen (Мын) (Мын) (Мын) (Мын) (Мын) (Мын) (Мын) (Мын) (Мын) (Мын) (Мын) (Мын) (Мын) (Мын) (Мын) (Мын) (Мын) (Мын) (Мын) (Мы网) (Мы网) (Мы网) (Мы网) (Мы网) (Мы网) (Мы网) (Мы网) (Мы网) (Мы网) (Мы网) (Мы网) (Мы网) (Мы网) (Мы网) (Мы网) (Мы网) (Мы网) (Мы网) (Мы网) (Мы net) (Мы net) (Мы net) (Мы net) (Мы net) (Мы net) (Мы net) (Мы net) (Мы net) (Мы net) (Мы net) (Мы net) (Мы net) (Мы net) (Мы net) (Мы net) (Мы net) (Мы net) (Мы net) (Мы net) (Мы网) (Мы网) (Мы网) (Мы网) (Мы网) (Мы网) (Мы网) (Мы网) (Мы网) (Мы网) (Мы网) (Мы网) (Мы网) (Мы网) (Мы网) (Мы网) (Мы网) (Мы网) (Мы网) (Мыnet) (Мыnet) (Мыnet) (Мыnet) (Мыnet) (Мыnet) (Мыnet) (Мыnet) (Мыnet) (Мыnet) (Мыnet) (Мыnet) (Мыnet) (Мыnet) (Мыnet) (Мыnet) (Мыnet) (Мыnet) (Мыnet) (Мыnet) (Мы网) (Мы网) (Мы网) (Мы网) (Мы网) (Мы网) (Мы网) (Мы网) (Мы网) (Мы网) (Мы网) (Мы网) (Мы网) (Мы网) (Мы网) (Мы网) (Мы网) (Мы网) (Мы网) (Мы 网) (Мы网) (Мы网) (Мы网) (Мы网) (Мы网) (Мы网) (Мы网) (Мы网) (Мы网) (Мы网) (Мы网) (Мы网) (Мы网) (Мы网) (Мы网) (Мы网) (Мы网) (Мы网) (Мы网) (Мп) (Мп) (Мп) (Мп) (Мп) (Мп) (Мп) (Мп) (Мп) (Мп) (Мп) (Мп) (Мп) (Мп) (Мп) (Мп) (Мп) (Мп) (Мп) (Мп) (Мп) (Мп) (Мп) (Мп) (Мп) (Мы网) (Мы网) (Мы网) (Мы网) (Мы网) (Мы网) (Мы网) (Мы网) (Мы网) (Мы网) (Мы网) (Мы网) (Мы网) (Мы网) (Мы网) (Мы网) (Мы网) (Мы网) (Мы网) (Мы阀) (Мы网) (Мы网) (Мы网) (Мы网) (Мы网) (Мы网) (Мы网) (Мы网) (Мы网) (Мы网) (Мы网) (Мы网) (Мы网) (Мы网) (Мы网) (Мы网) (Мы网) (Мы网) (Мы网) (Мы网点) (Мы网) (Мы网) (Мы网) (Мы网) (Мы网) (Мы网) (Мы网) (Мы网) (Мы网) (Мы网) (Мы网) (Мы网) (Мы网) (Мы网) (Мы网) (Мы网) (Мы网) (Мы网) (Мы网) (Мы区) (Мы网) (Мы网) (Мы网) (Мы网) (Мы网) (Мы网) (Мы网) (Мы网) (Мы网) (Мы网) (Мы网) (Мы网) (Мы网) (Мы网) (Мы网) (Мы网) (Мы网) (Мы网) (Мы网) (МыNet) (Мы网) (Мы网) (Мы网) (Мы网) (Мы网) (Мы网) (Мы网) (Мы网) (Мы网) (Мы网) (Мы网) (Мы网) (Мы网) (Мы网) (Мы网) (Мы网) (Мы网) (Мы网) (Мы网) (Мы Net) (Мы网) (Мы网) (Мы网) (Мы网) (Мы网) (Мы网) (Мы网) (Мы网) (Мы网) (Мы网) (Мы网) (Мы网) (Мы网) (Мы网) (Мы网) (Мы网) (Мы网) (Мы网) (Мы网) (Мы.net) (Мы网) (Мы网) (Мы网) (Мы网) (Мы网) (Мы网) (Мы网) (Мы网) (Мы网) (Мы网) (Мы网) (Мы网) (Мы网) (Мы网) (Мы网) (Мы网) (Мы网) (Мы网) (Мы网) (Мы nets) (Мы网) (Мы网) (Мы网) (Мы网) (Мы网) (Мы网) (Мы网) (Мы网) (Мы网) (Мы网) (Мы网) (Мы网) (Мы网) (Мы网) (Мы网) (Мы网) (Мы网) (Мы网) (Мы网) (Мы网球) (Мы网球) (Мы网球) (Мы网球) (Мы网球) (Мы网球) (Мы网球) (Мы网球) (Мы网球) (Мы网球) (Мы网球) (Мы网球) (Мы网球) (Мы网球) (Мы网球) (Мы网球) (Мы网球) (Мы网球) (Мы网球) (Мы网球) (Мы网) (Мы网) (Мы网) (Мы网) (Мы网) (Мы网) (Мы网) (Мы网) (Мы网) (Мы网) (Мы网) (Мы网) (Мы网) (Мы网) (Мы网) (Мы网) (Мы网) (Мы网) (Мы网) (Мы网通) (Мы网通) (Мы网通) (Мы网通) (Мы网通) (Мы网通) (Мы网通) (Мы网通) (Мы网通) (Мы网通) (Мы网通) (Мы网通) (Мы网通) (Мы网通) (Мы网通) (Мы网通) (Мы网通) (Мы网通) (Мы网通) (Мы网通) (Мы网) (Мы网) (Мы网) (Мы网) (Мы网) (Мы网) (Мы网) (Мы网) (Мы网) (Мы网) (Мы网) (Мы网) (Мы网) (Мы网) (Мы网) (Мы网) (Мы网) (Мы网) (Мы网) (Мы网络) (Мы网) (Мы网) (Мы网) (Мы网) (Мы网) (Мы网) (Мы网) (Мы网) (Мы网) (Мы网) (Мы网) (Мы网) (Мы网) (Мы网) (Мы网) (Мы网) (Мы网) (Мы网) (Мы网) (Мы网红) (Мы网) (Мы网) (Мы网) (Мы网) (Мы网) (Мы网) (Мы网) (Мы网) (Мы网) (Мы网) (Мы网) (Мы网) (Мы网) (Мы网) (Мы网) (Мы网) (Мы网) (Мы网) (Мы网) (Мы网吧) (Мы网吧) (Мы网吧) (Мы网吧) (Мы网吧) (Мы网吧) (Мы网吧) (Мы网吧) (Мы网吧) (Мы网吧) (Мы网吧) (Мы网吧) (Мы网吧) (Мы网吧) (Мы网吧) (Мы网吧) (Мы网吧) (Мы网吧) (Мы网吧) (Мы网吧) (Мы net) (Мы net) (Мы net) (Мы net) (Мы net) (Мы net) (Мы net) (Мы net) (Мы net) (Мы net) (Мы net) (Мы net) (Мы net) (Мы net) (Мы net) (Мы net) (Мы net) (Мы net) (Мы net) (Мы web) (Мы web) (Мы web) (Мы web) (Мы web) (Мы web) (Мы web) (Мы web) (Мы web) (Мы web) (Мы web) (Мы web) (Мы web) (Мы web) (Мы web) (Мы web) (Мы web) (Мы web) (Мы web) (Мы web) (Мы net) (Мы net) (Мы net) (Мы net) (Мы net) (Мы net) (Мы net) (Мы net) (Мы net) (Мы net) (Мы net) (Мы net) (Мы net) (Мы net) (Мы net) (Мы net) (Мы net) (Мы net) (Мы net) (Мы nets) (Мы net) (Мы net) (Мы net) (Мы net) (Мы net) (Мы net) (Мы net) (Мы net) (Мы net) (Мы net) (Мы net) (Мы net) (Мы net) (Мы net) (Мы net) (Мы net) (Мы net) (Мы net) (Мы net) (Мыnet) (Мы net) (Мы net) (Мы net) (Мы net) (Мы net) (Мы net) (Мы net) (Мы net) (Мы net) (Мы net) (Мы net) (Мы net) (Мы net) (Мы net) (Мы net) (Мы net) (Мы net) (Мы net) (Мы net) (Мы NZ) (Мы NZ) (Мы NZ) (Мы NZ) (Мы NZ) (Мы NZ) (Мы NZ) (Мы NZ) (Мы NZ) (Мы NZ) (Мы NZ) (Мы NZ) (Мы NZ) (Мы NZ) (Мы NZ) (Мы NZ) (Мы NZ) (Мы NZ) (Мы NZ) (Мы NZ) (МыNZ) (Мы NZ) (Мы NZ) (Мы NZ) (Мы NZ) (Мы NZ) (Мы NZ) (Мы NZ) (Мы NZ) (Мы NZ) (Мы NZ) (Мы NZ) (Мы NZ) (Мы NZ) (Мы NZ) (Мы NZ) (Мы NZ) (Мы NZ) (Мы NZ) (Мы NZ) (Мы nz) (Мы NZ) (Мы NZ) (Мы NZ) (Мы NZ) (Мы NZ) (Мы NZ) (Мы NZ) (Мы NZ) (Мы NZ) (Мы NZ) (Мы NZ) (Мы NZ) (Мы NZ) (Мы NZ) (Мы NZ) (Мы NZ) (Мы NZ) (Мы NZ) (Мы NZ) (Мы Nz) (Мы NZ) (Мы NZ) (Мы NZ) (Мы NZ) (Мы NZ) (Мы NZ) (Мы NZ) (Мы NZ) (Мы NZ) (Мы NZ) (Мы NZ) (Мы NZ) (Мы NZ) (Мы NZ) (Мы NZ) (Мы NZ) (Мы NZ) (Мы NZ) (Мы NZ) (Мы AZ) (Мы NZ) (Мы NZ) (Мы NZ) (Мы NZ) (Мы NZ) (Мы NZ) (Мы NZ) (Мы NZ) (Мы NZ) (Мы NZ) (Мы NZ) (Мы NZ) (Мы NZ) (Мы NZ) (Мы NZ) (Мы NZ) (Мы NZ) (Мы NZ) (Мы NZ) (Мы Niz) (Мы NZ) (Мы NZ) (Мы NZ) (Мы NZ) (Мы NZ) (Мы NZ) (Мы NZ) (Мы NZ) (Мы NZ) (Мы NZ) (Мы NZ) (Мы NZ) (Мы NZ) (Мы NZ) (Мы NZ) (Мы NZ) (Мы NZ) (Мы NZ) (Мы NZ) (Мы Zul) | Mazdun (Maždun) | Mazdun (Maždun) | |||
| Slovenskina | Pröse nera spotrba elektrokce energija v zufassamet (Zurückstufe) | Rocze nuzyce energija w trybie wlaçzonym (KWh/Arlig) | Consumo d'énergie in modality consumo en mode en modality consumo en modality consumo en modality consumo en modality consumo en modality consumo en modality consumo en modality consumo en modality consumo en modality consumo en modality consumo en modality consumo en modality consumo en modality consumo en modality consumo en modality consumo en modality consumo en modality consumo en modality | Consumo d'énergie in modality consumo en mode en modality consumo en modality consumo en modality consumo en modality consumo en modality consumo en modality consumo en modality consumo en modality consumo en modality consumo en modality consumo en modality consumo en modality consumo en modality consumo en modality consumo in modality consumo in modality consumo in modality consumo in modality consumo in modality consumo in modality consumo in modality consumo in modality consumo in modality consumo in modality consumo in modality consumo in modality consumo in modality consumo in modality consumo in modality consumo in modality consumo in modality consumco in modality consumco in modality consumco in modality consumco in modality consumco in modality consumco in modality consumco in modality consumco in modality consumco in modality consumco in modality consumco in modality consumco in modality consumco in modality consumco in modality consumco in modality consumco in modality consumco in modality | |||
IMPORTANT
ENREGISTREZ VOTRE APPAREIL

N°Vert
0805370239
APPEL GRATUIT DEPUIS UN POSTE FIXE
ENREGISTREMENT POUR LA FRANCE UNIQUEMENT. NOS SERVICES SONT DISPONIBLES DE 9HÀ 18H, DULUNDI AU VENDredi (HORS JOURS FERIES)

COMMUNAUTÉ D'ENTRAIDE DES CLIENTS HAIER

- RISQUE D'ÉLECTROCUTION NE PAS OUVRIR
- Insert the batteries into the remote
- Connect the Aerial/Cable straight to your TV
- Connect the TV to the mains socket
- To switch the TV on
- HDMI input
- Start Auto Setup procedure
- Aerial Installation
- Cable Installation
- Contents
- Safety Information
- CAUTION
- RISK OF ELECTRIC SHOCK DO NOT OPEN
- IMPORTANT - Please read these instructions fully before installing or operating
- Markings on the Product
- WARNING
- Getting Started
- Notifications & Features & Accessories
- Environmental Information
- Standby Notifications
- Features
- Accessories Included
- TV Control Buttons & Operation
- Operation with the Buttons on the TV
- Operation with the Remote Control
- Input Selection
- Changing Channels and Volume
- Inserting the Batteries into the Remote
- Connect Power
- Antenna/Cable Connection
- Notification
- Information for Users on Disposal of Old Equipment and Batteries
- [European Union only]
- Teletext
- Digital Teletext (for UK only)
- Remote Control
- (*) MY BUTTON:
- Switching On/Off
- To Switch the TV On
- To Switch the TV Off
- To power down the TV completely, unplug the power cord from the mains socket.
- First Time Installation
- Notes
- MediaPlayback viaUSB Input
- Recording a Programme
- Timeshift Recording
- Instant Recording
- Watching Recorded Programmes
- Slow Forward
- Recording Configuration
- Media Browser Menu
- Custom Boot Up Logo
- Quick Menu
- FollowMe TV
- E-Manual
- CEC and CEC RC Passthrough
- System Audio Control
- General TV Operation
- Using the Channel List
- Configuring Parental Settings
- Electronic Programme Guide (EPG)
- Programme Options
- Select Channel
- Record/Delete Record Timer
- Set Timer/DeleteTimer
- CONNECTIVITY
- Wired Connectivity
- To Connect to a Wired Network
- To configure wired settings please refer Network Settings section in the Settings menu.
- Configuring Wired Device Settings Network Type
- Configuration Status
- IP Address
- Configuring Wired Network Settings in Advanced Mode
- Wireless Connectivity
- To Connect to a Wireless Network
- To Connect to a wireless LAN, you should perform the following steps:
- to the
- Configuring Wireless Device Settings
- Other Information
- Delete Saved Wi-Fi Profiles
- Connecting to your mobile device via WiFi
- WIRELESS DISPLAY
- Using with mobile devices
- Bluetooth Connectivity
- Connectivity Troubleshooting
- Wireless Network Not Available
- Connection is Slow
- Distruption during playback or slow reactions
- Using DLNA Network Service
- Nero Media Home Installation
- Connect to a Wired or Wireless Network
- Play Shared Files via Media Browser
- DLNA
- Nero MediaHome Installation
- To install Nero MediaHome, please proceed as follows:
- Internet Browser
- PC Input Typical Display Modes
- AV and HDMI Signal Compatibility
- (X: Not Available, O: Available)
- CEC i CEC RC Passthrough
- IMPORTANT
- ENREGISTREZ VOTRE APPAREIL
Brand : HAIER
Model : LEF65V200S
Category : TV