
KDN64VL20N - Fridge BOSCH - Free user manual and instructions
Find the device manual for free KDN64VL20N BOSCH in PDF.

| Technical specifications | Combined refrigerator, energy class A++, total capacity 340 L, refrigerator capacity 240 L, freezer capacity 100 L. |
|---|---|
| Dimensions | Height 186 cm, width 60 cm, depth 65 cm. |
| Weight | Net weight 70 kg. |
| Cooling system | Ventilated cooling in the refrigerator, static cooling in the freezer. |
| Features | LED lighting, vegetable drawer with humidity control, egg compartment, glass shelves. |
| Usage | Temperature adjustment by thermostat, holiday mode, door open alarm. |
| Maintenance | Automatic defrosting of the refrigerator, cleaning surfaces with a damp cloth. |
| Safety | Child safety lock, overload protection. |
| General information | 2-year warranty, noise level 39 dB, stainless steel color. |
Frequently Asked Questions - KDN64VL20N BOSCH
User questions about KDN64VL20N BOSCH
0 question about this device. Answer the ones you know or ask your own.
Ask a new question about this device
Download the instructions for your Fridge in PDF format for free! Find your manual KDN64VL20N - BOSCH and take your electronic device back in hand. On this page are published all the documents necessary for the use of your device. KDN64VL20N by BOSCH.
USER MANUAL KDN64VL20N BOSCH
en Operating and installation instructions
Safety and warning information 5
Directions for disposal 7
Scope of delivery 7
Installing the appliance 8
Connecting the appliance 9
Attaching handles 9
Getting to know the appliance 10
Switching on the appliance 11
Setting the temperature 11
Super cooling function 12
Button lock 12
Alarm function 12
Cooling compartment 13
Freezer compartment 13
Max. freezing capacity 13
Freezing and storing 14
Freezing fresh food 14
Defrosting frozen food 15
Features 15
Switching the appliance off and
placing it out of operation 16
Cleaning the appliance 16
Lighting (LED) 17
Saving energy 17
Operating noises 18
Rectifying minor faults yourself 18
After-sales service 20
Safety and warning information
Before you put the appliance into operation
Carefully read through the instructions for use and assembly instructions. They contain important information on setting up, using and maintaining the appliance.
The manufacturer is not liable for any damage caused by users ignoring the information and warnings contained in the instructions for use. Retain all documents for later use or for subsequent owners.
Technical safety
The appliance contains a small quantity of the environmentally-friendly, though flammable, refrigerant R600a. Make sure that the pipes of the refrigerant circuit are not damaged during transport or installation. If refrigerant shoots out, it may ignite or cause eye injuries.
In the event of damage:
- Keep open flames or sources of ignition away from the appliance,
- Ventilate the room well for a few minutes,
- Switch off the appliance and unplug it from the mains,
Inform the after-sales service.
The more refrigerant an appliance contains, the larger the room must be in which it stands. If there is a leak and the room is too small, a flammable gas-air mixture may form.
The room must be at least 1m^3 in size for each 8 g of refrigerant. The volume of refrigerant in your appliance is listed on the rating plate inside the appliance.
If the mains connection cable for this appliance is damaged, it must be replaced by the manufacturer, the after-sales department or a similarly qualified person. Incorrect installations and repairs may put the user at considerable risk.
Repairs must only be carried out by the manufacturer, after-sales service, or a similarly qualified person.
Only original parts from the manufacturer must be used. The manufacturer can only guarantee that the safety requirements are met if these parts are used.
A mains cable extension lead must only be procured from the after-sales service.
During use
- Never use electrical appliances inside the appliance (e.g. heaters, electric ice makers, etc.). Risk of explosion!
- Never defrost or clean the appliance with a steam-cleaning device. The steam may reach electrical parts and trigger a short circuit. Risk of electric shock!
- Do not use pointed or sharp objects to remove layers of ice and frost! You could damage the refrigerant pipes. If refrigerant shoots out, it may ignite or cause eye injuries.
en
- Do not store products with flammable propellant gases (e.g. spray cans) or explosive substances inside the appliance. Risk of explosion!
- Do not misuse the base, rails, doors, etc. as a step or support.
For defrosting and cleaning, unplug the appliance from the mains or switch off the fuse. Pull on the mains plug, not on the connecting cable.
Only store high-proof alcohol tightly sealed and in an upright position. - Do not contaminate plastic parts or door seals with oil or grease. Otherwise, the plastic parts and door seals will become porous.
- Never cover or block ventilation openings for the appliance.
Children and people with impaired physical, sensory, or mental abilities or who lack knowledge of the appliance must only use it if they are supervised by a person who will take responsibility for their safety or who have learned how to use the appliance by reading this manual. - Do not store liquids in bottles or tins in the freezer compartment (in particular carbonated drinks). Bottles and tins may burst.
- Never eat frozen foods immediately after they have been taken out of the freezer compartment. Risk of freezer burn!
- Avoid prolonged hand contact with frozen foods, ice, and the evaporator tubes, etc.
Risk of freezer burn!
Children in the household
- Do not give packaging or packaging parts to children.
Risk of suffocation from cardboard boxes and films!
The appliance is not a toy.
For appliances with a door lock: Keep the key out of the reach of children!
General requirements
The appliance is suitable for the following tasks:
Chilling and freezing food,
Making ice cubes
This appliance is intended for domestic use in private households and for a domestic environment.
The appliance is fitted with interference suppression in accordance with EU Directive 2004/108/EC.
The refrigeration circuit has been checked for leak tightness.
This appliance corresponds to the relevant safety requirements for electrical appliances (EN 60335-2-24).
Directions for disposal
Disposing of packaging
The packaging protects your appliance from damage during transport. All the materials used are environmentally friendly and can be recycled. Please help by Disposing of the packaging in an environmentally-responsible manner.
You can obtain information about current disposal methods from your specialist dealer or local council.
Disposing of your old appliance
Old appliances are not useless waste. Valuable raw materials can be recovered through environmentally responsible disposal.
This appliance is marked in accordance with European directive 2002/96/EC regarding old electric and electronic appliances (waste electrical and electronic equipment - WEEE). The directive provides a framework for the collection and recycling of old appliances, which is valid across the EU.
Warning
For worn-out appliances:
- Unplug the mains plug.
-
Cut the power cord and remove it along with the mains plug.
-
Do not remove the shelves and containers. Leaving them intact makes it more difficult for children to climb in.
- Never let children play with a disused appliance. Risk of asphyxiation!
Refrigerators contain refrigerant as well as gases in the insulation material.
Refrigerant and gases must be disposed of properly. Do not damage the
refrigerant circuit pipes before disposing of them properly.
Scope of delivery
After unpacking the appliance, check all parts for transport damage.
If you wish to make a complaint, please contact the dealer from whom you purchased the appliance or our after-sales service.
The scope of delivery includes the following parts:
Free-standing appliance
Features (vary depending on the model)
Instructions for use and assembly instructions
After-sales service booklet
Guarantee slip
Information on energy consumption and noises
Bag of assembly materials
Installing the appliance
Location
The ideal installation location is a dry, well-ventilated room. The installation location should not be subject to direct sunlight or near a heat source, such as a cooker, heating element, etc. If setting up the appliance next to a heat source is unavoidable, use a suitable insulating plate or observe the following minimum distances from the heat source:
3 cm from an electric or gas cooker.
30 cm from oil or solid fuel cookers.
Appliances with fixed handles require a distance of at least 55mm from the wall on the hinged side so that the door can be opened by 90^ .
Note the room temperature and ventilation
Ambient temperature
The appliance is designed for a certain climate class. Depending on the climate class, the appliance can be operated at the following ambient temperatures.
The climate class is specified on the rating plate. Figure 10
| Climate class Permissible ambient temperature |
| SN +10 °C to 32 °C |
| N +16 °C to 32 °C |
| ST +16 °C to 38 °C |
| T +16 °C to 43 °C |
Note
The appliance can function within the ambient temperature limits of the specified climate class. If an appliance in the SN climate class is operated at lower ambient temperatures, damage to the appliance can be excluded up to a temperature of +5^ .
Ventilation
Figure 4
The air on the appliance's back panel and side panels heats up. The heated air must be able to escape unimpeded.
Otherwise, the refrigerating unit has to work harder, which increases the appliance's power consumption.
Therefore: You must never cover or block the ventilation openings!
The minimum distance to all sides must be at least 5cm
Fitting spacers
Figure 5
Use the screws to attach the spacers provided to the relevant openings at the rear of the appliance. This will maintain the minimum distance from the wall, thus providing adequate ventilation.
If the appliance is standing at an angle, this may mean that the doors do not close correctly.
Levelling the appliance
Figure 6
To ensure that it functions properly, the appliance must be set level using a spirit level.
If the appliance is standing at an angle, this may mean that the doors do not close correctly.
- Position the appliance in the intended installation area.
- Unscrew the two screws on the base panel and inspect the base panel.
- Screw the front feet out until they stand firmly on the ground and align the appliance at the front.
- Use a spirit level to check that the appliance is horizontal.
- Position the base panel and secure it in place using the screws.
Note
The front feet must stand firmly on the ground so that the appliance does not roll away.
Connecting the appliance
After setting up the appliance, wait for at least one hour before starting the appliance up. The oil contained in the compressor may have been displaced into the refrigeration system during transport.
Before starting the appliance up for the first time, clean its interior (see section "Cleaning the appliance").
Electrical connection
The socket must be near to the appliance and easily accessible after the appliance has been installed.
The appliance conforms to protection class I. Connect the appliance to a 220-240 V/50 Hz alternating current supply using a socket with protective earthing conductor which has been correctly installed. The socket must be protected by a fuse with a rating of 10 A to 16 A.
In the case of appliances operated outside of Europe, check whether the voltage and type of current specified conform to the values of your electricity grid. You will find this information on the rating plate. Figure 10
Warning
The appliance must never be connected up to an electronic energy-saving socket. Sinusoidal-commutated and linecommutated inverters can be used with our appliances. Line-commutated inverters are used with photovoltaic systems that are connected directly to the national grid. Sinusoidal-communicated inverters must be used with standalone applications (e.g. on ships or mountain huts) that do not have a direct connection to the national grid.
Attaching handles
Figure 7
Only attach the handles once the appliance has been positioned in its installation location and has been aligned so that it is level.
- Push the holders into the guides.
- Position and tighten the screws.
- Push the handles onto the holders and slide them downwards. The "Top" sticker must be facing upwards.
- Position and tighten the screw.
Getting to know the appliance
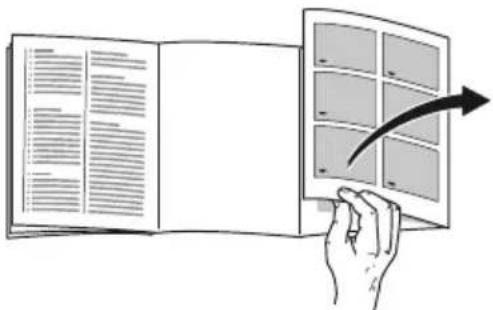
Fold out the last page that contains the figures. These instructions for use apply for several models.
The features of the models may vary.
Deviations between the figures are possible.
Figure 1
1 Lighting
2 Shelf in the freezer compartment
3 Ice twister
4 Temperature controller
5 Light switch
6 Door shelf (2 star compartment) for short-term storage of food and ice cream
7 Door shelf
8 Control element
9 Light switch
10 Shelves in the cooling compartment
11 Stay-fresh compartment
12 Fruit and vegetable container with deodoriser
13 Door shelf for eggs, tubes and small tins
14 Door shelf for large bottles
Control element
Figure 2
1 "super" button
For switching the super cooling function on and off.
2 "lock" button
For switching the button lock on and off.
3 "alarm" button
For switching off the warning tone
4 "fridge" button
For adjusting the temperature in the fridge compartment.
5 Display panel
Displays the set temperature for the fridge compartment.
"lock"
The button lock is switched on. "super"
Super cooling function is switched on.
"alarm"
The alarm function is active.
Switching on the appliance
The appliance starts to cool after it is connected to the power supply. The lighting is switched on when the door is opened.
An acoustic warning tone sounds. The "alarm" button can be used to switch off the audible warning signal.
The factory has recommended and set the following temperatures:
Fridge compartment: +4^
Freezer compartment: -18 °C.
Notes on using the appliance
After switching on the appliance, it may be several hours before the set temperatures are reached.
Thanks to the fully automatic no-frost system, the freezer compartment remains ice-free. There is no longer any need to defrost it.
The front side of the housing is slightly heated. This prevents condensation from forming around the door seal.
If the freezer compartment drawer cannot be opened again soon after being closed, wait for a moment until the negative pressure has cleared.
Setting the temperature
Cooling compartment
Figure 2/4
The temperature can be set from +2^ up to +8^ .
Press the "fridge" button repeatedly until the display panel shows that the required fridge compartment temperature is set.
Do not store perishable foods at temperatures higher than +4^ .
Notes
Do not store perishable foods at temperatures higher than +4^ .
For short-term storage of food, a higher temperature can be set (energy-saving operation).
- When frequently opening the door and placing large quantities of food in the cooling compartment, a lower temperature should be set.
Freezer compartment
Figure 3
Turn the temperature controller to the required setting.
At the medium setting, the temperature reaches approx. -18^
Min: higher temperature.
Max: lower temperature.
Once the ambient temperature has fallen below +10^ , turn the temperature controller to "Max".
Super cooling function
With the super cooling function, the cooling compartment is cooled to the coldest temperature. Once the coldest temperature is reached, it automatically changes to the present temperature.
The super cooling function is recommended in the following cases:
Before putting a large amount of food in the cooling compartment.
To cool drinks quickly.
Switching on and off
Figure 2/1
Press the 1 button.
If the super cooling function is switched on, "super" is shown on the display panel.
After approx. 40 minutes, or once the temperature in the cooling compartment is 2^ lower than the set temperature, the super cooling function automatically switches off.
Button lock
When the button lock is switched on, all of the buttons on the control element are locked.
Exception: When the button lock is switched on, the "alarm" button can be used to switch off the audible warning signal.
Switching on and off
Figure 2/2
Press the 2 button.
If the button lock is switched on, "lock" is shown on the display panel.
To switch the button lock off, press and hold button 2 for approx. 3 seconds.
Alarm function
If an alarm is triggered, an audible warning signal sounds and "alarm" is shown on the display panel.
Press the "alarm" button to switch off the audible warning signal. Figure 2/3
Door alarm
The door alarm switches on if one of the appliance doors remains open for longer than 1 minute.
The alarm stops when the door is closed again.
Temperature alarm
The temperature alarm switches on if it becomes too warm in the cooling compartment.
Note
If it has become too warm in the cooling compartment, properly heat up any chilled goods that have been warmed before consumption.
In cases of doubt, do not use raw food.
Utilisable volume
You will find information regarding the utilisable volume on the rating plate (see section "After-sales service").
Cooling compartment
The cooling compartment is the ideal place to keep prepared dishes, baked goods, canned goods, condensed milk, hard cheese, fruit and vegetables that are sensitive to cold, and tropical fruits.
When arranging the food, note the following
When arranging the food, bear in mind the following:
- Arrange your food so that it is well-packaged or covered. This ensures that the aroma, colour and freshness are not lost. This also prevents flavours from mixing and the plastic parts from becoming discoloured.
- Allow warm food and beverages to cool before putting them into the appliance.
- Do not block the cooling compartment's air outlets with food. Doing so impedes the air circulation. Food that is stored directly in front of the air outlets may become frozen by the cold air that is discharged.
Freezer compartment
Use the freezer compartment for the following
Storing deep frozen food.
Making ice cubes.
Freezing food.
Note
Make sure that the freezer compartment door is always closed. When the door is open, the frozen foods defrost and the freezer compartment ices up heavily. Furthermore: Energy is wasted due to the power consumption.
When you close the freezer compartment door, there is negative pressure in the freezer compartment. This causes a sucking noise. Wait for two to three minutes until the negative pressure has cleared.
Max. freezing capacity
You will find information on the maximum freezing capacity in 24 hours on the rating plate (see section "After-sales service").
Freezing and storing
Purchasing frozen foods
- Packaging must not be damaged.
Observe the best before date.
The temperature in the commercial chest freezer must be -18^ or colder.
As far as possible, frozen food must be transported in an insulated container and quickly placed in the freezer compartment.
Storing frozen food
If lots of food is to be stored, you can remove the ice twister and the shelf.
To ensure that there is no impact on the air circulation in the appliance, do not stack the food beyond the stacking limit.
Freezing fresh food
Only use fresh, undamaged food for freezing.
In order to retain the nutritional value, aroma and colour of the food as much as possible, blanch vegetables before they are frozen. Blanching is not required for aubergines, peppers, courgettes and asparagus.
You can find literature about freezing and blanching in bookshops.
Note
Do not allow food that is to be frozen to sit right next to food that has already been frozen.
The following are suitable for freezing: Baked goods, fish and seafood, meat, game, poultry, vegetables, fruit, herbs, eggs without their shells, dairy products such as cheese, butter and curd cheese, prepared dishes and leftovers such as soups, stews, cooked meat and fish, potato dishes, baked casseroles and sweet foods.
The following are not suitable for freezing: Types of vegetables that are usually eaten raw - such as green salad or radishes, eggs in their shells, grapes, whole apples, pears and peaches, hard-boiled eggs, yoghurt, soured milk, sour cream, crème fraîche and mayonnaise.
Packaging frozen food
Pack food so that it is airtight to prevent it from losing its flavour or drying out.
- Store food in its packaging.
- Press out any air.
- Close the packaging tightly.
- Label packaging with its contents and date of freezing.
The following are suitable as packaging:
Plastic film, polyethylene hose film, aluminium foil, freezer bags.
You will find these products at your specialist dealer.
The following are not suitable as packaging:
Wrapping paper, greaseproof paper, cellophane, rubbish bags and used shopping bags.
The following are suitable for sealing packaging:
Rubber bands, plastic clips, pack-twines, cold-resistant scotch tape, or similar.
Polyethylene bags and hose film can be fused closed using a bag sealer.
Storage life of frozen foods
Depending on the type of food.
At a temperature of -18^
Fish, sausages, prepared dishes, baked goods: Up to 6 months
Cheese, poultry, meat Up to 8 months:
Vegetables, fruit Up to 12 months:
Defrosting frozen food
You can decide between the following options, depending on the type of food and its intended use:
at ambient temperature
in the fridge
in an electric oven, with/without hot air convection
In the microwave oven.

Caution
Do not refreeze defrosted food. It can only be refrozen after it has been made into a ready-to-eat meal (cooked or roasted).
Do not continue to use the complete max. storage time for the frozen food.
Features
You can vary positioning of the interior shelves and the door shelves depending on your requirements:
- Lift the shelf and move it towards the front.
Lift the door shelf and remove it.
Stay-fresh compartment
The temperatures in the stay-fresh compartment are lower than in the cooling compartment. There may also be temperatures lower than 0^ .
Ideal for storing fish, meat and sausages. Not suitable for salads, vegetables or food that is sensitive to cold.
To ensure that the stay-fresh compartment functions correctly, it must be completely closed and the shelf must rest on it correctly.
Odour filter
Unpleasant odours in the refrigerator compartment are prevented by the odour filter.
Tip: Despite this, strong-smelling foods should still be stored in securely sealed containers.
If the effect of the odour filter decreases, it can easily be revitalised:
- Remove the odour filter.
- Dry the filter with a hair dryer.
- Lay the odour filter in the sun in order to eliminate any remaining unpleasant odours (decomposition of the odour compounds by ultraviolet light).
- Place the odour filter back in the appliance.
en
Vegetable container with humidity controller
Figure 8
To create the perfect storage climate for vegetables, salad and fruit, depending on the quantity of food in storage, the humidity can be controlled in the vegetable container.
Small quantities of food -
Move the controller to the left.
Large quantities of food -
Move the controller to the right.
Ice twister
Figure 9
- Remove the ice cube drawers, fill these up with water until they are 3/4 full and reinsert the drawers.
- Once the ice cubes are frozen, turn the turning handles on the ice cube drawers to the right. The ice cubes become loose and far into the container.
- Pull out the container and remove the ice cubes.
Switching the appliance off and placing it out of operation
Switch off the appliance
Unplug the appliance from the mains or switch off the childproof lock. The temperature display goes blank and the refrigerating unit switches off.
Putting the appliance out of service
If you do not use the appliance for long periods:
- Unplug the appliance from the mains or switch off the childproof lock.
- Clean the appliance.
- Leave the appliance door open.
Cleaning the appliance
Caution
- Do not use gritty, acidic or chlorine-based cleaning agents or solvents.
- Do not use any abrasive materials or materials that may scratch surfaces. This may lead to corrosion of the metallic surfaces.
- Never clean the shelves or containers in the dishwasher. The parts may warp.
The cleaning water must not get into
- Opening slots in the front bottom area of the freezer compartment,
Operating controls
Or any lighting.
Proceed as follows:
- Before cleaning the appliance, unplug the mains plug or disconnect the fuse.
- Take out the frozen food and store it in a cool place. Place an ice block (if you have one) on the food.
- Clean the appliance with a soft cloth, lukewarm water, and a little pH-neutral detergent. The water used for rinsing must not get into the lighting.
- Only wipe the door seal with clean water and then rub it until it is dry.
- After cleaning, reconnect the appliance to the mains and switch it on.
- Put the frozen food back in.
Features
To clean the appliance, all of the variable elements can be removed.
Removing shelves
Lift the shelf and move it towards the front.
Removing the door shelves
Lift the door shelf and remove it.
Lighting (LED)
Your device is equipped with a maintenance-free LED light.
Any repair work on the lighting must only be carried out by the after-sales service or authorised experts.
Saving energy
Install the appliance in a dry, ventilated room. The appliance must be installed out of direct sunlight and away from heat sources (e.g. heating elements, cooker). Use an insulating plate if necessary.
- Allow hot food and drinks to cool before placing them in the appliance.
- Place frozen food that is to be defrosted in your cooling compartment. Use the low temperature of the frozen food to cool down food.
- Open the appliance door for as little time as possible.
Clean the rear side of the appliance occasionally with a vacuum cleaner or brush in order to avoid increased power consumption.
Operating noises
Completely normal noises
Humming
Motors running (e.g. refrigeration units, ventilator).
Bubbling, whirring or gurgling noises
Refrigerant is flowing through the pipes.
Clicking
Motors, switches or solenoid valves are switching on/off.
Crackling
Automatic defrosting is taking place.
Preventing noises
If the appliance is positioned unevenly
Align the appliance using a spirit level. Use the threaded feet for this, or place something underneath the feet.
If the appliance is touching adjacent units or appliances
Move the appliance away from adjacent furniture or appliances.
Containers or shelves are wobbling or sticking
Check the removable parts and reinsert them if necessary.
If bottles or containers are touching
Move the bottles or containers apart slightly.
Rectifying minor faults yourself
Before you call the after-sales service:
Check whether you can rectify the fault yourself by using the notes below.
You must bear the costs for consultation with the after-sales services yourself - even during the warranty period.
Problem Possible cause Remedy
| It is too cold in the cooling compartment. | Colder freezer compartment temperatures may also cause colder cooling compartment temperatures. This is due to its cooling properties. | Set the temperature in the cooling compartment so that it is slightly warmer. If this is not sufficient, e.g. if the room temperatures are too cold, you can also set the temperature in the freezer compartment temperature so that it is warmer. |
| Problem Possible cause Remedy | ||
| The temperature in the freezer compartment is too high. | The appliance door is being opened frequently. | Do not open the appliance door unnecessarily. |
| The ventilation openings are covered. | Remove any obstructions. | |
| Freezing larger quantities of fresh food. | Do not exceed the max. freezing capacity. | |
| The temperature deviates considerably from the setting. | In some cases, it is sufficient to switch off the appliance for 5 minutes. If the temperature is too high, wait a few hours and check whether the temperature has aligned with the setting. If the temperature is too low, wait until the next day and check the temperature again. | |
| The lighting is not working. | The LED lighting is faulty. | See section "Lighting (LED)". |
| The appliance door was opened for too long. The lighting switches off after approx. 10 minutes. | After closing and opening the appliance door, the lighting is switched on again. | |
| The light switch is jammed. | Check whether you can move the light switch. Figure 1/5 | |
| No display lights up. If the appliance is not operated for some time, the control panel display switches to energy-saving mode. | As soon as the appliance is used again (e.g. the door is opened), the display switches back to its normal lighting. | |
| Connect the mains plug. Check whether there is power, check the fuses. | ||
| Power failure; the fuse has been tripped; the mains plug is not firmly inserted. | ||
| An audible warning signal sounds and "alarm" is shown on the display panel. | Problem; It is too warm in the cooling compartment. | Press the "alarm" button to switch off the audible warning signal. Figure 2/3 |
| Note If it has become too warm in the cooling compartment, properly heat up any chilled goods that have been warmed before consumption. In cases of doubt, do not use raw food. | ||
| The appliance door is open. | Close the appliance door. | |
| The ventilation openings are covered. | Remove any obstructions. | |
| Too much food has been inserted for freezing at the same time. | Do not exceed the max. freezing capacity. | |
After-sales service
You can find an after-sales service point near to you in the telephone directory or in the list of after-sales service points. When you call the after-sales service, quote your product number (E no.) and the production number (FD no.) of your appliance.
You will find this information on the rating plate. Figure 10
Please help us to avoid unnecessary journeys by quoting the appliance and production number. This will save you the additional associated costs.
Repair order and consultation if faults occur
The attached after-sales service directory contains the contact data for all countries.
GB 0844 8928979 Calls from a BT
landline will be charged at up to 3 pence per minute. A call set-up fee of up to 6 pence may apply.
IE014502655
US 800 944 2904 toll-free
Compartment congélateur
Figure 3
Compartment congélateur
Utilisez le compartmentingóngélateur
Compartment fraîcheur
AtoeKeuon kATEUuymuEvwv TpoipuW
OTav npEeI vToTOnoTeNToUv TpOphi, mTOpEITE v a oAipEoETe To avatpeTIOeVO kavaki TAYOKuWv KaT a pia.
Tia va unv eunoiEeai n KukAoopia Tou aepa otn ouokcun, mnt oioaTe Ta TpOiMaPiaw ano To opio oioiaEnc.
Meyaaes nooTnTec Tpophiomega