
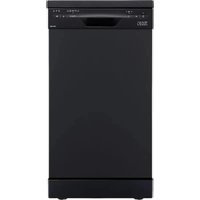
DW126FI - Dishwasher PKM - Free user manual and instructions
Find the device manual for free DW126FI PKM in PDF.

| Product type | Dishwasher |
| Brand | PKM |
| Model | DW126FI |
| Capacity | 12 place settings |
| Energy class | E (EU 2019/2017) |
| Annual energy consumption | 92.00 kWh (per 100 cycles) |
| Energy consumption per standard cycle | 0.92 kWh |
| Annual water consumption | 1100 L (per 100 cycles) |
| Water consumption per standard cycle | 11 L |
| Duration of standard cycle (Eco program) | 237 minutes |
| Noise level | 49 dB(A) |
| Noise emission class | C |
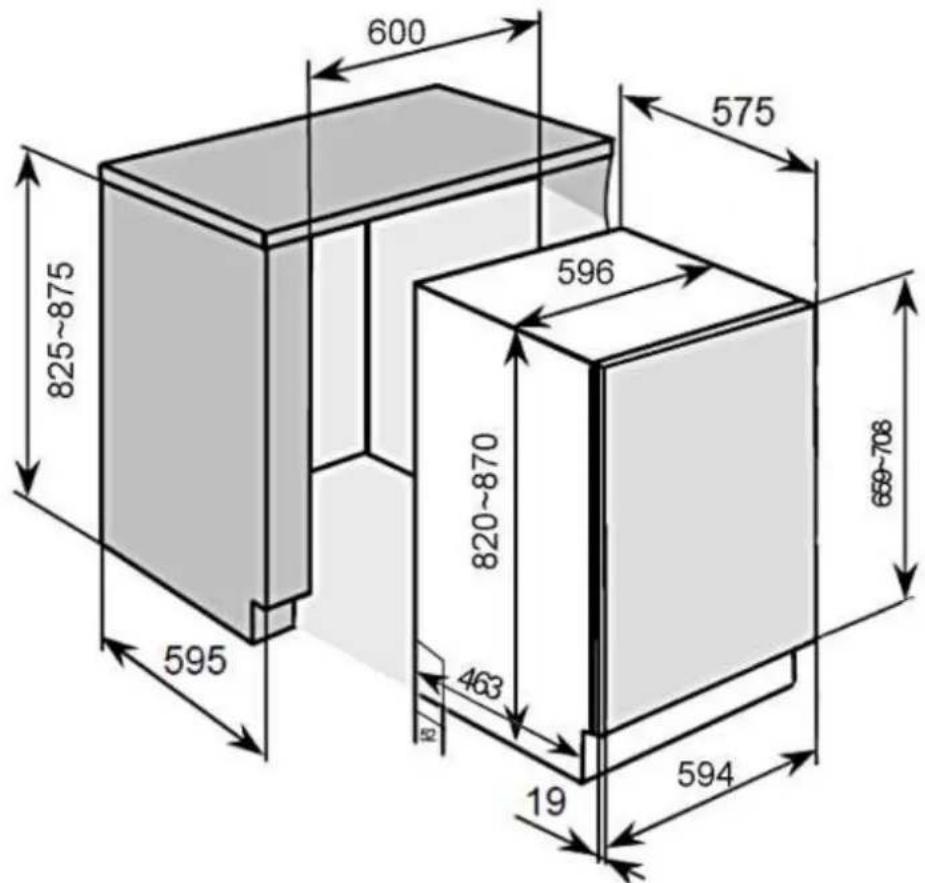
| Dimensions (H x W x D) | 82.0 - 87.0 cm (adjustable height) x 59.6 cm x 55.5 cm |
| Voltage/Frequency | 220-240 V ~ 50 Hz |
| Total power | 1850 W |
| Water pressure | 0.4 - 10 bar (0.04 - 1.0 MPa) |
| Maximum water temperature | 63 °C |
| Installation type | Built-in |
| Wash programs | Intensive, Eco, Economy, Crystal, Quick, Pre-wash |
| Water softener (salt container) | Yes, capacity approx. 2 kg |
| Rinse aid reservoir | Yes, capacity approx. 140 ml |
| Filtration system | Coarse filter, flat filter, micro-filter |
| Frost protection | Yes (procedure described in the manual) |
| Spare parts and repairability | Original parts available, after-sales service |
Frequently Asked Questions - DW126FI PKM
User questions about DW126FI PKM
0 question about this device. Answer the ones you know or ask your own.
Ask a new question about this device
Download the instructions for your Dishwasher in PDF format for free! Find your manual DW126FI - PKM and take your electronic device back in hand. On this page are published all the documents necessary for the use of your device. DW126FI by PKM.
USER MANUAL DW126FI PKM
KONDENSWASSER-SCHUTZSTREIFEN
Dear customer! We would like to thank you for purchasing a product from our wide range of domestic appliances. Read the complete instruction manual before you operate the appliance for the first time. Retain this instruction manual in a safe place for future reference. If you transfer the appliance to a third party, also hand over this instruction manual.
Index
- Safety information 51
1.1 Signal words 52
1.2 Safety instructions 52
- Installation 56
2.1 Unpacking and Positioning 57
2.2 Before installation 57
2.3 Minimum required space 59
2.4 Dimensions and fixing of the front decoration panel 59
2.5 Adjusting of the door-spring tension 60
2.6 Installation of the water inlet hose 61
2.7 Installation of the waste water hose 62
2.8 Raised level installation 62
2.9 Electrical connection 63
2.10 Proper levelling 63
2.11 Installation of the skirting board 64
2.12 Fixing of the appliance 65
2.13 Fixing of the top spacer 66
3.Appliance and control panel. 66
4.Before the first use 67
4.1 Water softener 68
4.1.1 Filling of the water softener container 68
4.2 Filling of the rinse aid container 69
4.3 Dishwasher detergent 71
5.Use of the dish racks. 72
5.1 Before/after use 73
5.2 Upper dish rack 73
5.3 Lower dish rack 74
5.4 Cutlery basket 75
5.5 Unsuitable dishes / cutlery 76
5.6 Instructions for loading the dish racks 76
5.7 Damage to glasses and dishes 77
- The washing programmes 77
6.1 Starting of a programme 78
6.2 How to change a running programme 78
6.3 Subsequent addition of dishes 79
6.4 End of a programme 79
- Cleaning and maintenance. 79
7.1 Filter system 80
7.2 Control panel and appliance 81
7.3 Spray arms 81
7.4 Door 82
7.5 Frost protection 82
7.6Decommissioning. 82
8.Troubleshooting. 83
8.1 Error codes 86
9. Technical data.. 87
10.Waste management. 88
11. Guarantee conditions 89

Do not dispose of this appliance together with your domestic waste. The appliance must be disposed of at a collecting centre for recyclable electric and electronic appliances. Do not remove the symbol from the appliance.
The figures in this instruction manual may differ in some details from the current design of your appliance. Nevertheless, follow the instructions in such a case. Delivery without content.
Any modifications, which do not influence the functions of the appliance, shall remain reserved by the manufacturer.
Please dispose of the packing with respect to your current local and municipal regulations.
The appliance you have purchased may be an enhanced version of the unit this manual was printed for. Nevertheless, the functions and operating conditions are identical. This manual is therefore still valid.
Technical modifications as well as misprints shall remain reserved.
EU - DECLARATION OF CONFORMITY
The products, which are described in this instruction manual, comply with the harmonised regulations.
The relevant documents can be requested from the final retailer by the competent authorities.
MAKE SURE THAT THIS MANUAL IS AVAILABLE TO ANYONE USING THE APPLIANCE AND MAKE SURE THAT IT HAS BEEN READ AND UNDERSTOOD PRIOR TO USING THE DEVICE.
1. Safety information
READ THE SAFETY INFORMATION AND SAFETY INSTRUCTIONS CAREFULLY BEFORE YOU OPERATE THE APPLIANCE FOR THE FIRST TIME.
All information included in those pages serve for the protection of the operator. If you ignore the safety instructions, you will endanger your health and life.
Store this manual in a safe place so you can use it whenever it is needed. Strictly observe the instructions to avoid damage to persons and property.
Check the technical periphery of the appliance! Do all wires and connections to the appliance work properly? Or are they time-worn and do not match the technical requirements of the appliance? A check-up of existing and newly made connections must be done by an authorised professional. All connections and energy-leading components (incl. wires inside a wall) must be checked by a qualified professional. All modifications to the electrical mains to enable the installation of the appliance must be performed by a qualified professional.
The appliance is intended for private use only as well as to be used (1) in staff kitchen areas of shops, offices and other working environments; (2) by clients in hotels, motels, B&B and other residential type environments; (3) for catering and similar non-retail applications.
The appliance is intended for cleaning tableware and cookware in a private household only.
The appliance is intended for indoor-use only.
The appliance is not intended to be operated for commercial purposes, during camping and in public transport.
Operate the appliance in accordance with its intended use only.
Do not allow anybody who is not familiar with this instruction manual to operate the appliance.
This appliance may be operated by children aged from 8 years and above as well as by persons with reduced physical, sensory and mental capabilities or lack of experience and knowledge if they are supervised or have been instructed concerning the safe use of the appliance and do comprehend the hazard involved. Children must not play with the appliance. Cleaning and user-maintenance must not be carried out by children unless they are supervised.
1.1 Signal words
DANGER! indicates a hazardous situation which, if ignored, will result in death or serious injury.
CAUTION! indicates a hazardous situation which, if not avoided, may result in minor or moderate injury.
WARNING! indicates a hazardous situation which, if ignored, could result in death or serious injury.
NOTICE! indicates possible damage to the appliance.
1.2 Safety instructions
DANGER!
To reduce the risk of electrocution.
- Non-observation of the instructions of this instruction manual will endanger the life of the user and can cause damage to the appliance.
- All electrical work to connect the appliance to the mains must be carried out by a qualified professional. Do not modify the energy supply. The connection must be carried out in accordance with the current local and legal regulations. RISK OF ELECTRIC SHOCK!
- Do not connect the appliance to the mains if the appliance itself or the power cord or the plug are visibly damaged. RISK OF ELECTRIC SHOCK!
- The technical data of your energy supplier must meet the data on the rating plate of the appliance.
-
Do not modify the plug provided with the appliance, if it will not fit the outlet, have a proper outlet installed by a qualified electrician (not covered by the guarantee).
-
Never try to repair the appliance yourself. If the appliance does not operate properly, please contact the aftersales service. Original spare parts should be used only.
- Always check that the power cord is not placed under the appliance or damaged by moving the appliance.
- When the power cord is damaged, it must be replaced by the manufacturer or an authorised aftersales service or a qualified professional only.
- Never pull the power supply cable to unplug the appliance. Always use the power plug itself to unplug the appliance. RISK OF ELECTRIC SHOCK!
- Never touch the power plug, the power switch or other electrical components with wet or damp hands. RISK OF ELECTRIC SHOCK!
WARNING!
To reduce the risk of burns, electrocution, fire or injury to persons.
- Under certain conditions hydrogen is generated in a hot-water system, which has not been used within a fortnight or longer. Hydrogen is explosive. If you have not operated the hot-water system within such a period of time, open all hot-water taps and let the water flow for several minutes to release the hydrogen. During this period do not smoke and do not use any open flames or naked light, because hydrogen is flammable.
- While unpacking, the packaging materials (polythene bags, polystyrene pieces, etc.) should be kept away from children and pets. CHOKING HAZARD.
- Do not connect the appliance to the electric supply unless all packaging and transit protectors have been removed.
- Operate the appliance with 220 240V / 50Hz AC only. All connections and energy-leading components must be replaced by an authorised professional. Any repairs should be carried out by an authorised aftersales service.
- Do not use a socket board or a multi socket when connecting the appliance to the mains.
- Never cut or remove the earth connection of the power cable.
- A dedicated and properly grounded socket (250V/10A) meeting the data of the plug is required to minimise any kind of hazard.
- The technical data of your energy supplier must meet the data on the model plate of the appliance.
- Your domestic circuit must be equipped with an automatic circuit breaker.
-
Do not modify the appliance.
-
Turn off the power before you install the appliance and before you connect it to the mains. RISK OF FATAL ELECTRIC SHOCK!
- Disconnect the appliance from the mains before you clean or maintain it. RISK OF ELECTRIC SHOCK!
- Never immerse the appliance, the power cord or the plug into water or any other liquid. RISK OF ELECTRIC SHOCK!
- Dishwasher-detergents are very alkaline and so they are extremely dangerous when swallowed. Skin and eyes should not come in contact with dishwasher-detergents. Always keep such detergents out of reach of children. RISK OF CHEMICAL BURN!
- Keep dishwasher-detergents and additives away from children. Keep children away from the appliance when its door is open as some detergent may be still in the appliance.
- When all indicators on the control panel flicker, the appliance malfunctions. Disconnect the appliance from the mains and the water-supply immediately in such a case.
- Do not operate the appliance without the filters installed.
- Children must never play with the appliance.
- Never operate the appliance unattended.
- Strictly observe the instructions in chapter INSTALLATION.
CAUTION!
- While the appliance is operating it is dangerous to open its door as hot water may spurt out. RISK OF SCALDING!
- When a rinse cycle has been completed, wait a few minutes before opening the door as hot vapour may escape.
- When a rinse cycle has been completed, wait at least 20 minutes before cleaning the interior of the appliance so the heating elements can cool down.
- Do not touch the heating elements during operation or immediately after operation. RISK OF BURNS!
- Do not sit or stand on the dish rack or the door of the appliance. RISK OF INJURY! RISK OF BREAKAGE!
- Do not place any heavy items on the open door as the appliance can tilt forwards.
- When you load the dishwasher: a. check that sharp-edged items will not damage the door seals. b. check that items do not project through the bases of the racks. c. place sharp knives with the handle at the top or horizontally to avoid injuries.
- Do not leave the door open so that no one can trip on it.
NOTICE
- The spray arms may be equipped with a transport protection. Remove the transport protection before installing the appliance.
- After the installation of the water supply and wastewater disposal as well as before the first operation, all water hose connections - even on the appliance itself - must be checked for leakage. The manufacturer is not liable for any damage caused by improper installation.
- Dishwasher salt causes corrosion unless you activate a washing programme immediately after the filling of the dedicated container. Corrosion can damage the appliance beyond repair! The manufacturer is not liable for any damage caused by corrosion due to improper operation. RISK OF CORROSION!
- Whenever you fill salt into the dedicated container, water will escape which contains dissolved salt. This water as well as not dissolved salt particles will cause corrosion. When refilling salt, you always must initiate a complete washing programme immediately after. RISK OF CORROSION! Any damage caused by corrosion is not covered by the guarantee.
- Never operate the appliance without the filter inserted properly.
- Only use a water softener (= dishwasher salt) which is suitable for dishwashers. The water hardness depends on your place of residence. Hard water in a dishwasher generates deposits of minerals and salts on your dishes and in the appliance. The water softener removes minerals and salts from the water.
- Use a rinse aid which is suitable for a dishwasher only. Never use other chemical substances, e.g., dishwasher cleaners or liquid cleaners; otherwise, you will damage the appliance.
- Only use a detergent and additives which are suitable for dishwashers. Do not use soap, washing agents, hand wash detergents etc.
- When you move the appliance, hold it at its base and lift it carefully. Keep the appliance in an upright position.
- Never use the door for moving the appliance as you will damage the hinges.
- The appliance must be transported and installed by at least two persons.
- When you unpack the appliance, you should take note of the position of every part of the interior accessories in case you have to repack and transport it at a later point of time.
-
The connection to the water supply should be carried out by a qualified professional.
-
Do not operate the appliance unless all components are installed properly.
- Do not stand or lean on the racks or the door.
- Plastic-made items must not touch the heating elements.
- Only wash dishwasher-proof plastic-made items in the appliance. Such items are labelled by their manufacturer.
- After each rinse cycle check that the water-softener container is empty.
- Never use cleaning sprays to clean the door as they can damage the lock and electric components.
- The appliance is intended for washing max. 12 place settings.
- Clean the appliance regularly (s. chapter CLEANING AND MAINTENANCE).
- The rating plate must not be removed or made illegible, otherwise all terms of the warranty become invalid!
SAVE THESE INSTRUCTIONS.
The manufacturer and distributor are not responsible for any damage or injury in the event of failure to comply with these instructions.
2. Installation
The water inlet and drainage installation must be carried out by a qualified professional.
Use brand-new hoses and connector kids only.
We recommend securing the water supply with a back-pressure valve.
NOTICE! After the installation of the water supply and wastewater disposal as well as before the first operation, all water hose connections - even on the appliance itself - must be checked for leakage. The manufacturer is not liable for any damage caused by improper installation.
2.1 Unpacking and Positioning
- Unpack the appliance carefully. Completely remove the transport-protection. Be very careful and do not use any aggressive or abrasive detergents to remove residuals of the transport-protection.
- The spray arms may be equipped with a transport protection. Remove the transport protection before installing the appliance.
- Install the appliance in a dry and well-ventilated place.
- Install the appliance on a level, dry and solid floor. Check the correct installation with a bubble level.
- Connect the appliance to the mains properly.
- The nameplate is inside the appliance or at the back.
2.2 Before installation
INSTALLATION OF THE CONDENSATION STRIP. (DEPENDING ON MODEL)
- You must install the condensation strip on the bottom side of the worktop to protect it from the water vapour released by the appliance. The condensation strip deflects the water vapour from the worktop.
- You will find the condensation strip inside your appliance.
- Clean the bottom side of the worktop properly before you install the condensation strip.
- Remove the protective foil from the adhesive surface of the condensation strip.
- Stick the condensation strip on the bottom side of the worktop.
CONDENSATION STRIP
NOTICE! Improper installation of the condensation strip may cause damage to the worktop.
Required space for the appliance: look at the following figures. The back of the appliance must face the wall. The appliance must be equipped with an inlet and outlet hose, which can be installed on the left or right.
INSTALL THE APPLIANCE.
| 1 | 825-875 mm |
| 2 | min. 598 mm |
| 3 | 100 mm |
| 4 | CONNECTIONS FOR POWER CABLE, WATER INLET, WATER OUTLET |
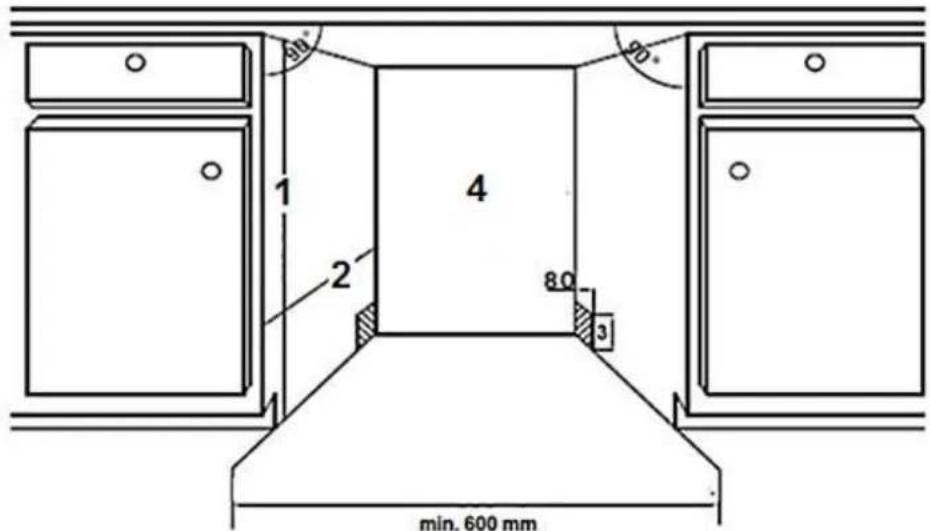
2.3 Minimum required space
| 1 | DISHWASHER | 2 | DOOR OF THE DISHWASHER |
| 3 | CABINET | 4 | MINIMUM DISTANCE FOR OPENING THE DOOR IS 50 mm |
2.4 Dimensions and fixing of the front decoration panel
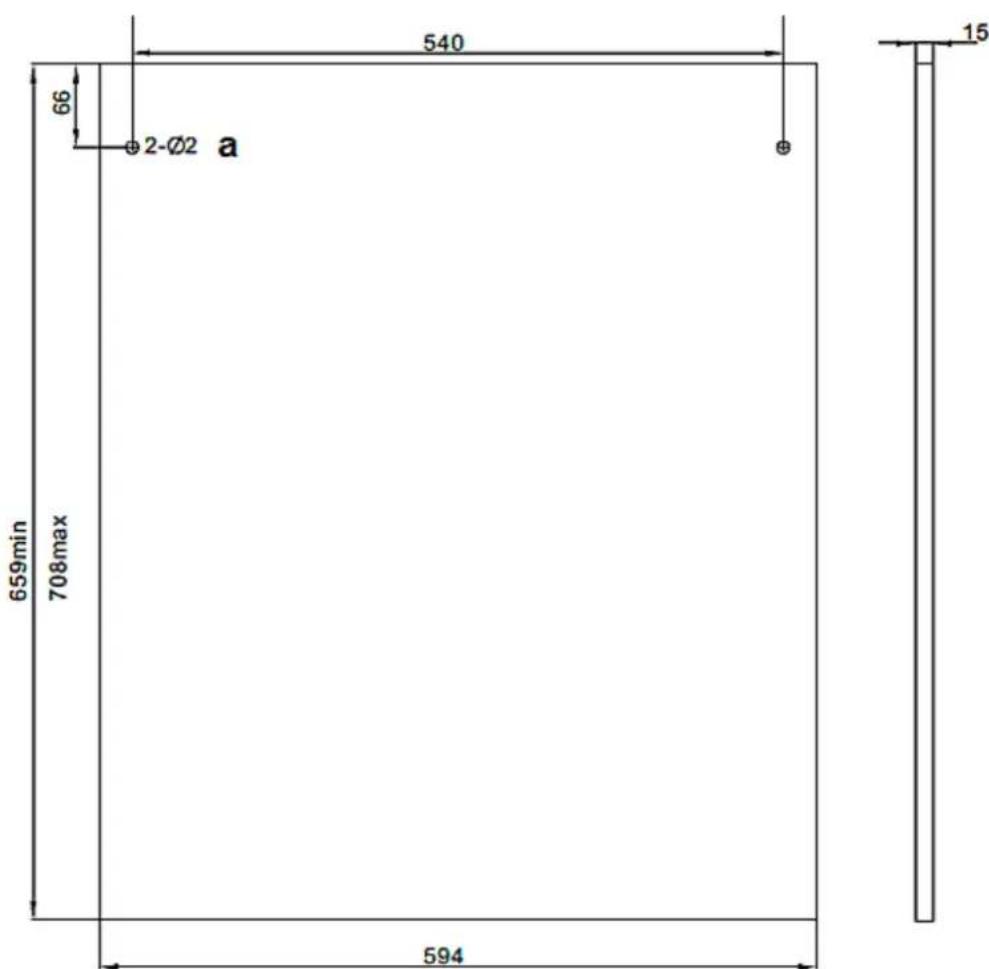
A: holo/10 mm depth.
| 1 | 4 pcs. 4*42 mm WOODSCREWS |
| 2 | 1.) REMOVE 2 pcs. 4*10 2.) 4 pcs. 4*42 WOODSCREWS |
| 3 | DOOR OF THE APPLIANCE |
| 4 | T-SHAPE PLUG |
| 5 | 2 pcs. 4*26 mm WOODSCREWS |
| 6 | DECORATION PANEL |
| 7 | 4 pcs. 4*42 mm WOODSCREWS |
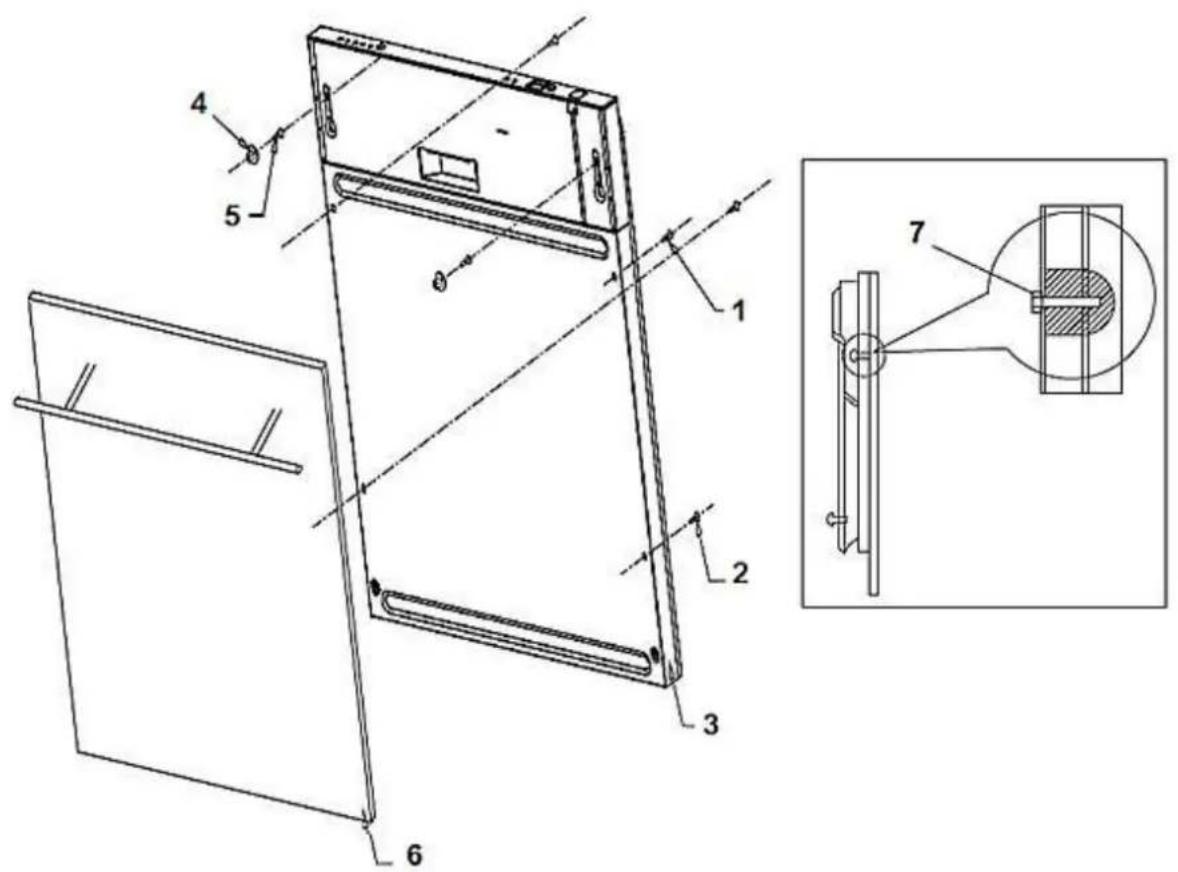
2.5 Adjusting of the door-spring tension
After having installed the decoration-panel, try to open and close the door to check its balance and to decide if it can remain in its installation-condition. When the door is balanced improperly, turn the screws in clockwise and anti-clockwise direction for proper adjustment (or let the balance adjust by an experienced person).
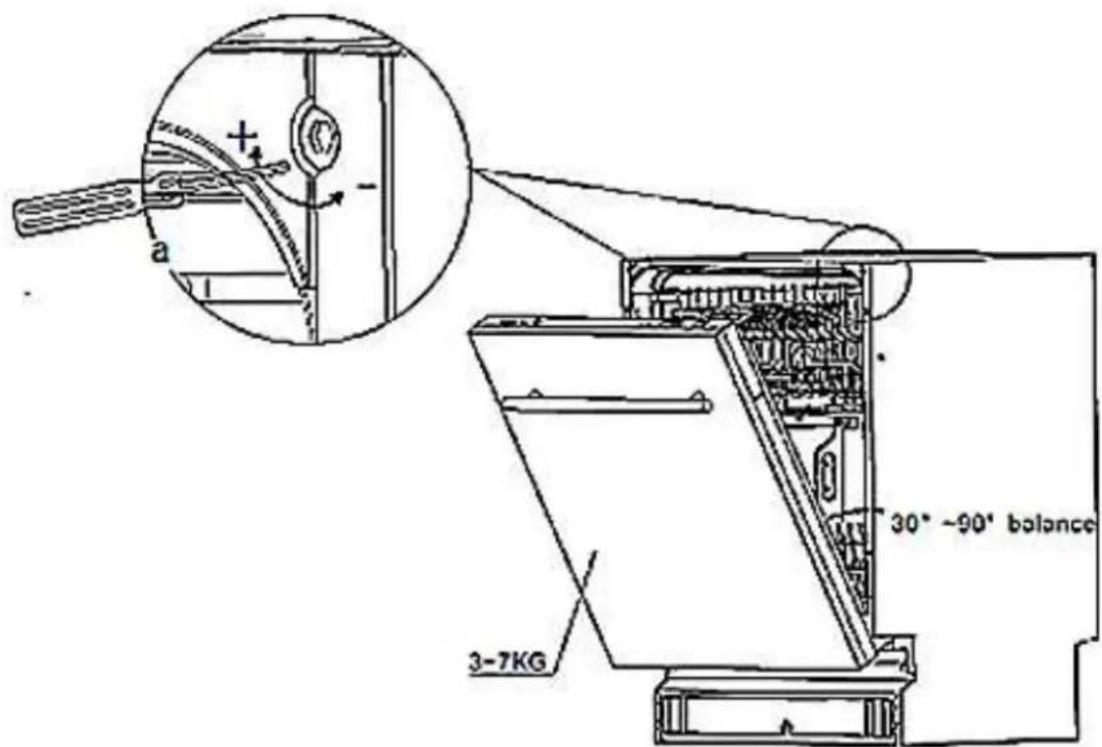
a: hexagon screwdriver /CR-V 4 mm
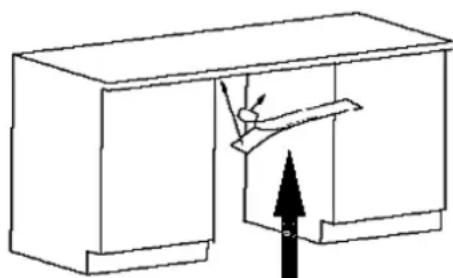
2.6 Installation of the water inlet hose
Connect the inlet hose to a connector with a 3/4-inch thread firmly and securely. When the hoses are new or were not used for an extended period of time, let the water flow until the hose is clear of any contamination.
NOTICE! Otherwise, the water inlet may be blocked and the appliance will be damaged.
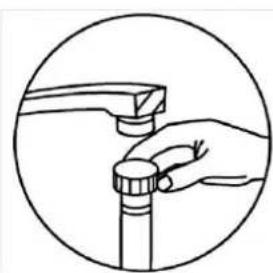
NOTICE! After the installation of the water supply and wastewater disposal as well as before the first operation, all water hose connections - even on the appliance itself - must be checked for leakage. The manufacturer is not liable for any damage caused by improper installation.
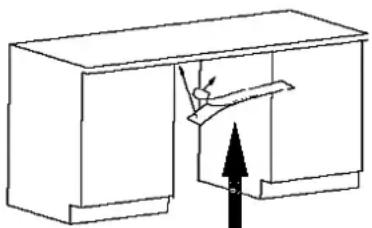
2.7 Installation of the waste water hose
Fit the drainage hose of your appliance to the drainage pipe without bending.
If the length of the hose is not sufficient, apply to your authorised service for an extension made from the same material as the original hose.
Remember that the length of the hose (including extension) should not exceed 4 meters.
If the drainage hose is longer the 4m the dishes will not be cleaned properly. Check that the connection does not leak. Fix the outlet hose with a hose-holder
NOTICE! After the installation of the water supply and wastewater disposal as well as before the first operation, all water hose connections – even on the appliance itself – must be checked for leakage. The manufacturer is not liable for any damage caused by improper installation.
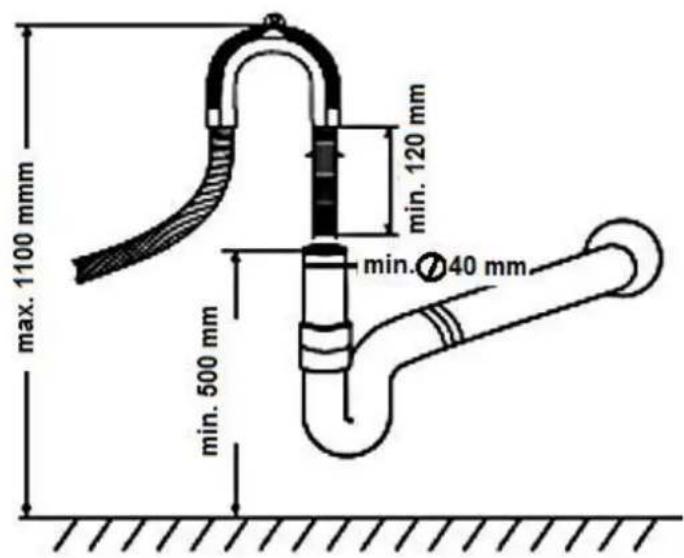
2.8 Raised level installation
Partially and fully integrated appliances can be installed at a raised level when connected properly.
A collar enables the bending of the drain hose. There is a holding device on the collar to fix the collar. The drain hose must have a height of min. 40~cm at the top of the collar. Look at the drawing below for the connection options A, B and C.
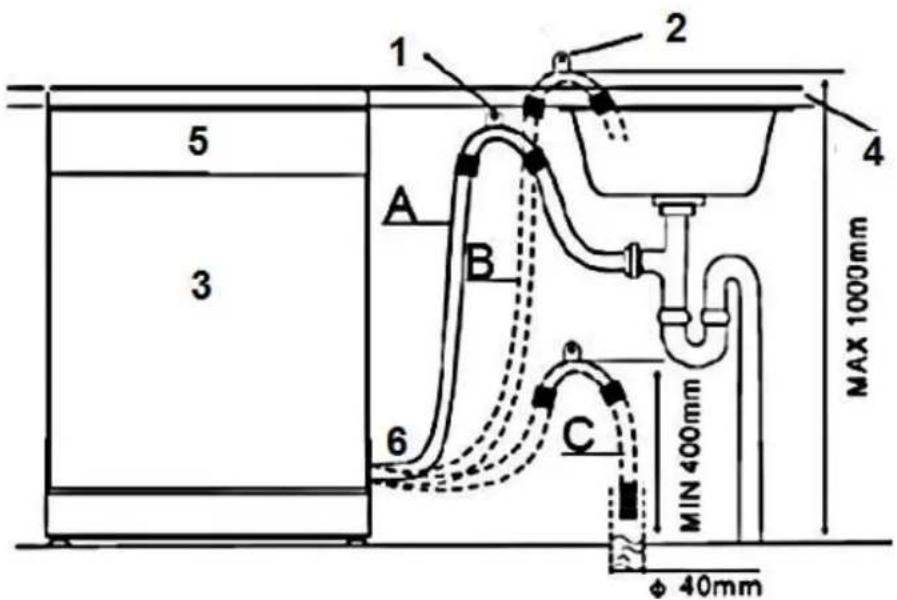
| 1 | Hang the hook of the DRAIN HOSE on the worktop. |
| 2 | HOOK OF THE DRAIN HOSE. |
| 3 | The TOP OF THE HOSE must be at a height between 40 and 100 cm. The free end of the hose must not be immersed in liquids (water, etc.). |
| 4 | WORKTOP. |
| 5 | FRONT. |
| 6 | DRAIN HOSE. |
2.9 Electrical connection
You need a properly grounded and dedicated safety socket relevant to the plug (250V/10A).
WARNING! Otherwise, serious accidents may occur or your appliance may be damaged.
2.10 Proper levelling
The maximum permissible inclination angle under the entire appliance is 2^ . Adjust the appliance with its feet horizontally. Check with a water level.

| 1 | ADJUST FRONT FEET |
| 2 | ADJUST BACK FEET |
2.11 Installation of the skirting board
| 1 | DECORATION PANEL |
| 2 | SKIRTING BOARD |
| REFERENCE DIMENSIONS | ||
| SERIAL NUMBER | DECORATION PANEL | SKirting BOARD |
| 1 | 708 mm | 75 mm |
| 2 | 698 mm | 85 mm |
| 3 | 688 mm | 95 mm |
| 4 | 678 mm | 105 mm |
| 5 | 668 mm | 115 mm |
| 6 | 658 mm | 125 mm |
The required height of the skirting board should meet your standard of aesthetics as well as it should enable the door to open/close properly. You find the relevant benchmarks on the schedule above.
2.12 Fixing of the appliance
a. Fix the appliance on the built-in unit by turning the screws.
b. Press the 4 plugs into the holes (look at figure).
c. Use woodscrews ST 426 (self-tapping screws) for the left and right as well as for the 4 top holes.
1: plug
2.13 Fixing of the top spacer
Equipment depending on model.
The top spacer has got several layers.
Customise the height of the spacer by removing the relevant number of layers from the bottom side of the spacer.
Use the click-mechanism for selecting the proper number of layers.
1: spacer
3. Appliance and control panel
- Upper dish rack
- Spray arms
- Lower dish rack
- Water softener (= dishwasher salt)
- Filters
- Detergent dispenser
- Rinse aid dispenser
- Cutlery basket
- Cup holder
- Adjusting facility
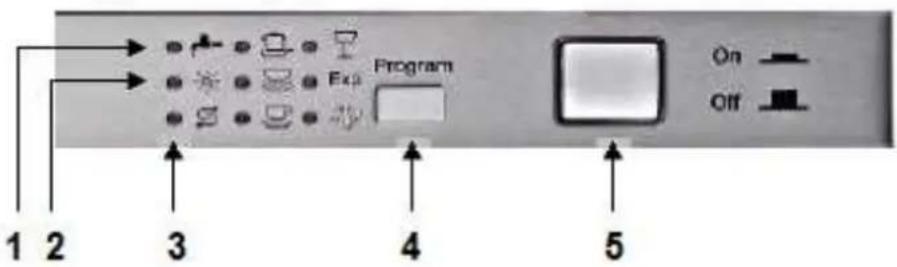
| 1 | WATER SUPPLY INDICATOR | Lights when the water tap is closed or interrupted or the hose is kinked. |
| 2 | RINSE AID INDICATOR | Lights when container has to be refilled. |
| 3 | SALT AID INDICATOR | Lights when container has to be refilled. |
| 4 | PROGRAM CHOICE BUTTON | Press the button and scroll through the programs. The relevant control light indicates the current program. |
| 5 | ON/OFF | Press the button to switch the appliance on or off. |
4. Before the first use
BEFORE YOU START OPERATING THE APPLIANCE, CHECK THAT
- the appliance is positioned and levelled properly.
- the inlet valve is opened.
- the connections of the hoses do not leak.
- the appliance is plugged in properly.
- the power is switched on.
- the hoses are not knotted.
- you have removed the complete packaging material.
BEFORE YOU OPERATE THE APPLIANCE FOR THE FIRST TIME:
a) pour 500ml water into the container of the water softener and pour in the water softener (= dishwasher salt); s. chapter 4.1 WATER SOFTENER et seq.
b) pour in the rinse aid.
c) select a washing programme.
4.1 Water softener
NOTICE! Use a water softener (= dishwasher salt) which is suitable for dishwashers only. Other water softeners and salts, especially table salt, will damage the water softener container.
NOTICE! Dishwasher salt causes corrosion unless you activate a washing programme immediately after the filling of the dedicated container. Corrosion can damage the appliance beyond repair! The manufacturer is not liable for any damage caused by corrosion due to improper operation. RISK OF CORROSION!
NOTICE! Whenever you fill salt into the dedicated container, water will escape which contains dissolved salt. This water as well as not dissolved salt particles will cause corrosion. When refilling salt, you always must initiate a complete washing programme immediately after. RISK OF CORROSION! Any damage caused by corrosion is not covered by the guarantee.
You must fill in the water-softener manually; please use the water-softener filler hole. Open the lid and pour approx. 2kg of water-softener into the container; then close the lid properly.
4.1.1 Filling of the water softener container
THE WATER SOFTENER CONTAINER IS BENEATH THE LOWER DISH RACK. FILL THE CONTAINER AS FOLLOWS.
- Only use a water softener (= dishwasher salt) which is suitable for dishwashers. Other water softeners and salts, especially table salt, will damage the water softener container.
The manufacturer shall not guarantee against and is not liable for any damage caused by an unsuitable water softener.
Fill the container only shortly before you start a programme, otherwise spilled residuals of the water softener may remain in the appliance and cause corrosion.
The control light on the control panel goes off after the first programme.
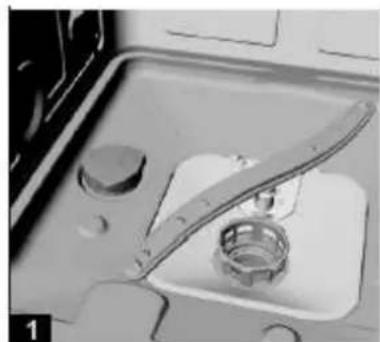
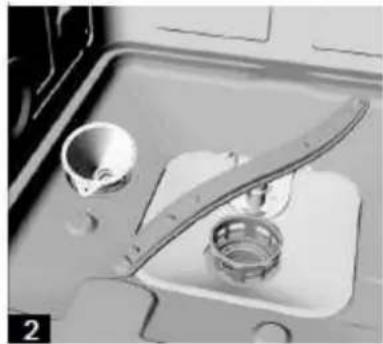
- Remove the lower dish-rack and the lid of the water softener container.
- When you fill the container for the first time, pour approx. 500ml water into the container.
- Put the equipped funnel in the opening and pour approx. 2kg water softener (=dishwasher salt) in the container.
- Close the lid carefully.
- The control light for the hardness of water usually goes off after 2-6 days.
4.2 Filling of the rinse aid container
- When the rinse aid indicator is not on, the colour of the display device "D" indicates the needed quantity of rinse aid.
Dark spot = container filled to capacity.
The smaller the spot the emptier the container. The container should be filled not less than 25% .
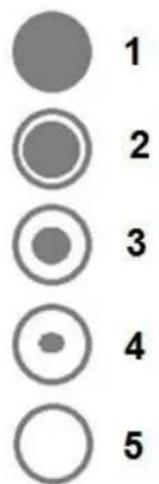
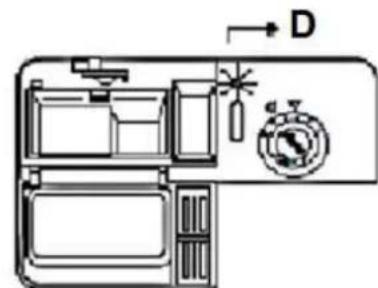
| 1 | FULL | 2 | 75 % |
| 3 | 50 % | 4 | 25%; REFILL! |
| 5 | EMPTY | D | DISPLAY DEVICE |
RINSE AID CONTAINER
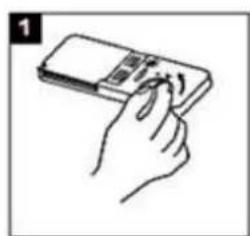
- Turn the lid towards the open-arrow (left) and take it off.
- Pour the rinse aid in the container. Do not overfill.
- Put the lid back adjusted to the open-arrow and turn it towards the closed-arrow (right).
The rinse aid is added automatically during operation and supports the spot-free and perfect drying of the dishes. Your appliance is designed for using rinse aid.
The rinse aid container is inside the appliance near the dishwasher detergent container.
Max. capacity of the container: approx. 140ml
Do not overfill the container; otherwise, severe foam formation may occur.
Do not forget to close the lid after refilling.
1: ROTARY KNOB
SETTING OF THE RINSE AID DISPENSER
Start with position 4.
Select position 5 when stains have occurred or the drying is not satisfying.
Select position 6 if these problems occur again.
The factory adjustment is position 5.
- If water drops or scale marks are on your dishes after washing, increase the amount of rinse aid.
- If whitish stripes are on glasses or bluish film is on the cutlery after washing, decrease the amount of rinse aid.
4.3 Dishwasher detergent
DISHWASHER DETERGENTS ARE DIVIDED INTO 2 GROUPS DUE TO THEIR CHEMICAL COMPOSITION:
conventional, alkaline detergents with caustic components.
low-alkaline concentrated detergents with natural enzymes.
"Normal" programmes combined with concentrated detergents prevent pollution and are also good for your dishes. Such programmes support the washing effect of the enzymes. Therefore, "normal" programmes combined with concentrated detergents are as effective as "intensive" programmes.
THERE ARE 3 KINDS OF DISHWASHER DETERGENTS:
- with phosphate and chlorine.
- with phosphate / without chlorine
- without phosphate / without chlorine
Most recent powdered dishwasher detergents usually do not contain any phosphate, so they do not soften the water. In such a case add a water softener (= dishwasher salt) even if the hardness of water is e.g., 6 dH. Otherwise, white spots may occur on your dishes and glasses.
Dishwasher detergents without chlorine only bleach slightly, so they do not remove tough stains. In such a case select a programme with a higher temperature.
DISHWASHER TABS
Dishwasher tabs of different manufacturers may need different periods of time for washing your dishes. So, some kinds of tabs cannot be used when operating a short programme. Always select long lasting programmes to clean your dishes completely.
THE DETERGENT CONTAINER
You must fill the container matching the information of the programme schedule.
Use detergents which are suitable for dishwashers only.
Always keep your detergent dry.
Fill the container just before starting a programme.
The detergent and rinse aid consumption of your appliance is lower than the consumption of conventional appliances. In general, you need 1 tablespoon of detergent for a normal programme.
You must increase the amount of detergent if your dishes are heavily soiled.
FILLING OF THE CONTAINER


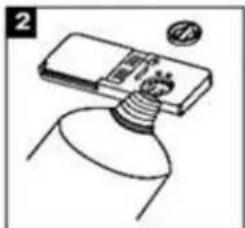
- When the lid is closed, press the open-button.
- Fill the container just before starting a programme. Use detergents which are suitable for dishwashers only.
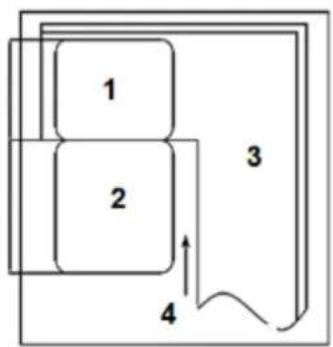
Pour the detergent in the container. The marks indicate the dose levels (look at figure below). If your dishes are heavily soiled, pour an additive dose of detergent in the pre-wash section.
- Detergent main wash. MIN equal to approx. 20g
- Detergent pre-wash; equal to approx. 5 g.
NOTE THE MANUFACTURER'S DOSAGE INSTRUCTIONS ON THE PACKAGING OF YOUR DISHWASHER DETERGENT.
Close the lid and press until it locks.
5. Use of the dish racks
Observe the instructions given in this chapter to reach the best performance of your appliance. The features and design of the racks depend on model.
5.1 Before/after use
- Remove residuals of food from the dishes.
- You do not need to rinse the dishes under flowing water.
- Fill the racks as follows:
a. Objects such as cups, glasses, pots and pans upside down.
b. Curved objects and objects with recesses in a slanted position, so the water can drain off.
c. Arrange the dishes safely and tightly in the rack so they cannot tip over.
d. The dishes must not block the rotating spray arms.
e. Do not put small objects in the appliance as they may easily drop out of the racks.
- After washing, empty the lower rack first; so remaining water cannot drop from the upper rack into the lower one.
5.2 Upper dish rack
The upper dish rack is intended for delicate and light dishes such as glasses, cups, saucers, small platters and bowls and small, flat pans. When you have filled the rack, the dishes must not be moved by the sprayed water (spray arms).
| TYPE | DISHES |
| A | CUP |
| B | GLASS |
| C | SAUCER |
| D | BOWL |
| E | BOWL |
| F | BOWL |
You can adjust the position of the upper dish rack to provide more room for large objects either in the lower or the upper rack. You adjust the upper rack by placing the relevant wheel-set in the rail. Put long items on the shelf so they will not impede the rotating spray arms. You can fold back the shelf if need be.
5.3 Lower dish rack
The lower dish rack is intended for objects which are hard to clean such as pots, pans, lids, platters and bowls. Place platters and lids at the sides of the rack and do not block the rotating spray arms. Place pots and bowls upside down.
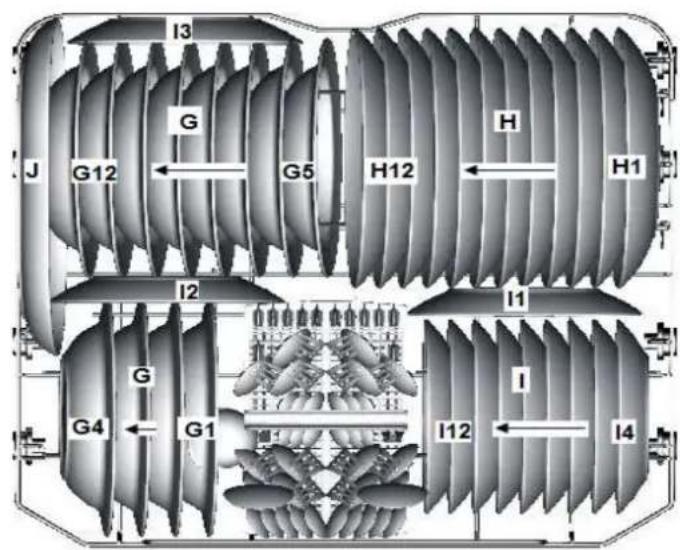
| TYPE | DISHES |
| G | SOUP PLATE |
| H | SERVING DISH |
| I | DESSERT PLATE |
| J | OVAL PLATTER |
5.4 Cutlery basket
Place the cutlery (except sharp knives) with the handles at the bottom. Place long objects vertically and safely in the appliance so they do not block the spray arms.
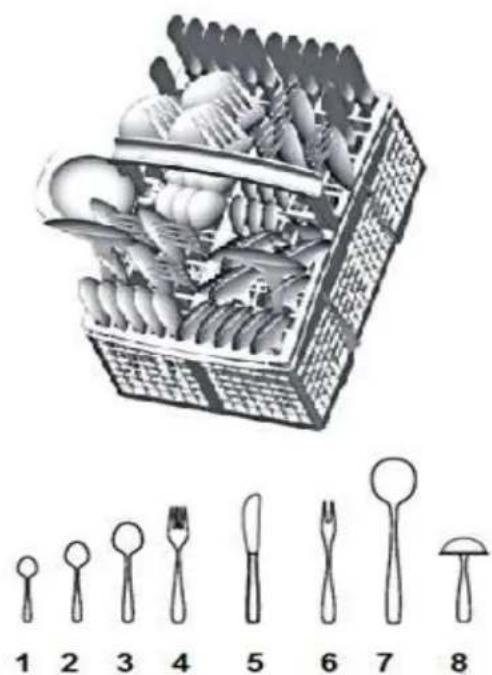
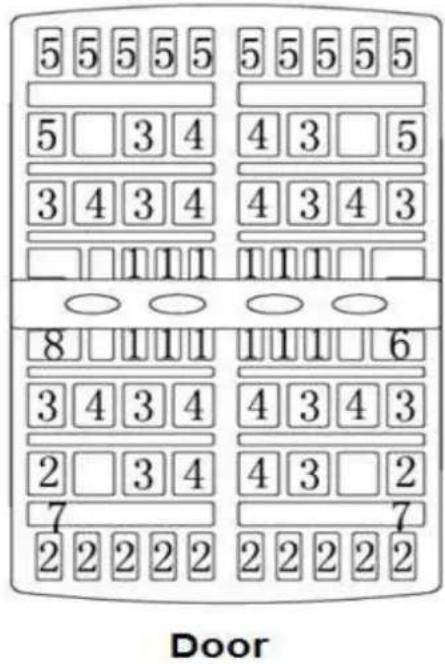
| TYPE | CUTLERY | TYPE | CUTLERY |
| 1 | TEA/COFFEE SPOONS | 5 | KNIVES |
| 2 | DESSERT SPOONS | 6 | SERVING FORKS |
| 3 | SOUP SPOONS | 7 | SERVING SPOONS |
| 4 | FORKS | 8 | GRAVY SPOONS |
CAUTION!
- Do not let any items extend through the bottom.
- Always load sharp items with the sharp side down.
5.5 Unsuitable dishes / cutlery
THE FOLLOWING OBJECTS ARE NOT SUITABLE TO BE WASHED IN A DISHWASHER
- Cutlery with handles made of wood, horn, china, or mother-of-pearl.
- Not heat-resistant objects.
- Cutlery with glued components, which are not heat-resistant.
- Objects with components of synthetic resin.
- Objects made of copper and/or tin.
- Objects made of leaded crystal.
- Objects made of steel which show signs of rust or are lightly corrosive.
- Any object made of wood.
- Objects made of synthetic fibres.
- Objects soiled by cigarette ashes, wax, lacquers and paints.
THE FOLLOWING OBJECTS ARE PARTIALLY SUITABLE TO BE WASHED IN A DISHWASHER
- Some glass types may become dead or cloudy after a large number of programmes.
- Objects made of silver or aluminium may decolourisc.
- Glazed motifs may dull when often washed in a dishwasher.
5.6 Instructions for loading the dish racks
Remove any remnants of food from the dishes.
Soak burnt food on pots and pans.
Cutlery and dishes must never block the rotating spray arms.
Place cups, glasses and pots upside down.
The dishes must not touch or cover each other.
Glasses must not touch each other.
Place big dishes and dishes which are difficult to clean in the lower rack.
Place small and delicate dishes such as glasses or cups in the upper rack.
5.7 Damage to glasses and dishes
| POSSIBLE CAUSES | MEASURES |
| Type of the glasses/dishes or their production method. | Use dishwasher-proof glasses and dishes only. |
| The chemical composition of your detergent. | Use a mild dishwasher detergent. The manufacturer of the detergent provides information about its chemical properties. |
| Temperature of the water and duration of the programme. | Select a programme with a lower temperature and duration. |
6. The washing programmes
| Programme | Information | Description | Detergent PW/MW | Duration consumption Min.-kW/h-L |
| Intensive | Extremely dirty dishes. | Pre-wash Main wash (630) Rinse Hot rinse Drying | 5/25 g | 168-1,30-14 |
| Eco | Standard programme for daily use. | Pre-wash Main wash (500) Rinse Hot rinse Drying | 5/25 g | 237-0,92-11 |
| Save | For lightly soiled dishes. | Pre-wash Main wash (450) Hot rinse Drying | 5/25 g | 123-0,85-11 |
| Crystal | Economic and fast washing. For delicate dishes. Start washing after having used the dishes. | Pre-wash Main wash (400) Hot rinse Drying | 5/25 g | 126-0,80-11 |
| Rapid | Short programme for lightly soiled dishes without drying. | Main wash (40') Hot rinse | 25 g | 37-0,50-7 |
| Pre-wash | For rinsing dishes to wash them at a later point of time. | Pre-wash | - | 8-0,01-4 |
6.1 Starting of a programme
- Fill the lower rack first.
- Pour the dishwasher detergent and the water softener (=dishwasher salt) in the relevant containers.
- During operation, the appliance must be supplied with water (full water pressure).
- Close the door properly while pressing gently. When the door closes properly you will hear a light KLICK.
- Press the PROGRAM button to select a programmc.
- Press the OFF button when the programme has ended. Open the door.
6.2 How to change a running programme
CAUTION! While the appliance is operating it is dangerous to open its door as hot water may spurt out. RISK OF SCALDING!

You can only change a programme when it has run a short period of time. Otherwise, the detergent has dissolved and the dishwater has been drained. In such a case you must refill the detergent container.
- Open the door and press the current programme selection for at least 3 seconds.
- Set the new programme.
- Close the door.
When you open the door while the appliance is operating, the appliance will stop operating. The display indicates the code E1. When you close the door again, the appliance will start operating after 10 seconds.
The 6 control lights indicate the status of the appliance.
a) All lights are off = stand-by mode.
b) One light is on = the relevant programme is running.
c) One light flashes = Pause - modc.
6.3 Subsequent addition of dishes
You can put dishes later in the appliance unless the detergent container has opened.
- Open the door slightly to stop operation.
- You can open the door completely after the rotating spray arms stopped operation.
- Now you can add dishes.
- When you close the door, the appliance starts operating after 10 seconds.
6.4 End of a programme
-
When the display indicates "-" and the acoustic signal sounds 6 times, the programme has ended.
-
Switch off the appliance (ON/OFF button).
- Turn off the water.
- CAUTION! Wait a few minutes before you open the door as hot damp may escape.
- Wait approx. 15 minutes before you take out the dishes. The dishes are still hot and will break easily.
- It is normal that the appliance is wet inside.
7. Cleaning and maintenance
WARNING! Disconnect the appliance from the mains before you clean or maintain it. RISK OF ELECTRIC SHOCK!
CAUTION! When a rinse cycle has been completed, wait at least 20 minutes before cleaning the interior of the appliance so the heating elements can cool down.
NOTICE! Never operate the appliance without the filter inserted properly.
- Always keep the appliance clean so that unpleasant odours do not occur.
- Take off all rings and bracelets before cleaning or maintaining the appliance; otherwise, you will damage the surface of the appliance.
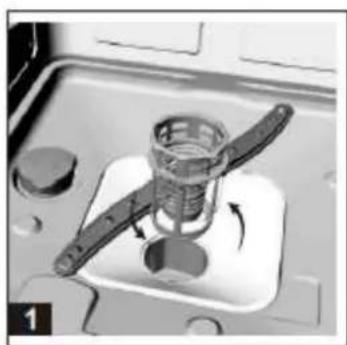
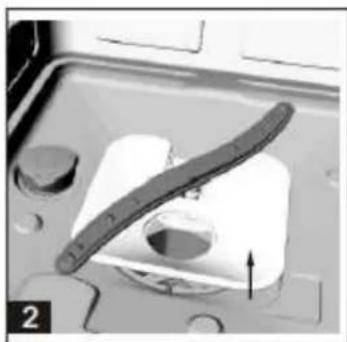
7.1 Filter system
The filter system protects the pump against remnants of food and other objects. These remnants can clog the filters after a while. The filter system comprises a coarse filter, a flat filter and a micro filter.
Check the status of the filters after each programme.
i When you remove the coarse filter, you can remove all filters of the system. Remove any remnants and clean the filters with flowing water.
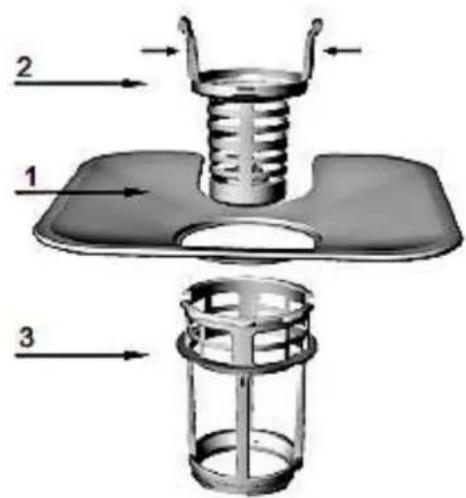
- The flat filter catches remnants by a special nozzle on the bottom of the spray arm.
- The coarse filter catches remnants such as bones and glass which may clog the drain. To remove the remnants, press the upper pins and take out the coarse filter.
- The micro filter catches remnants in the drain so they cannot soil the dishes again.
CLEANING OF THE FILTER SYSTEM
- Turn the micro filter anticlockwise and remove it.
- Take out the flat filter.
- To install the filters, proceed in reverse order.
We recommend cleaning the entire filter system once a week.
Remove bigger remnants after each programme.
Clean the coarse and micro filter with a washing-up brush.
Do not knock against the filters as you will damage them. Your appliance will not work properly if the filters are damaged.
Always install the filters properly.
Improperly installed filters may damage the appliance and dishes.
7.2 Control panel and appliance
Clean the control panel with a soft damp cloth and dry it carefully.
Clean the exterior of the appliance with a suitable polish.
Never use sharp-edged items, scouring pads, scouring agents, paper towels or other abrasive and aggressive detergents to clean any component of the appliance.
7.3 Spray arms
Clean the spray arms regularly as chemicals and minerals may clog the nozzles and bearings.
HOW TO REMOVE / INSTALL THE SPRAY ARMS
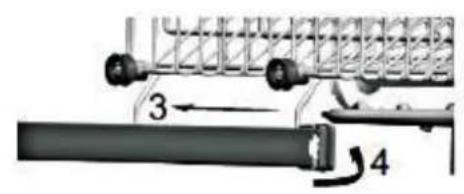
- To remove the spray arms, screw off the nut (anticlockwise). Take off the washer at the top of the spray arm. Now remove the spray arm.
- Remove the lower spray arm.5
- Clean the spray arm with warm soapy water and the nozzles with a soft brush.
- Rinse the spray arm with flowing water.
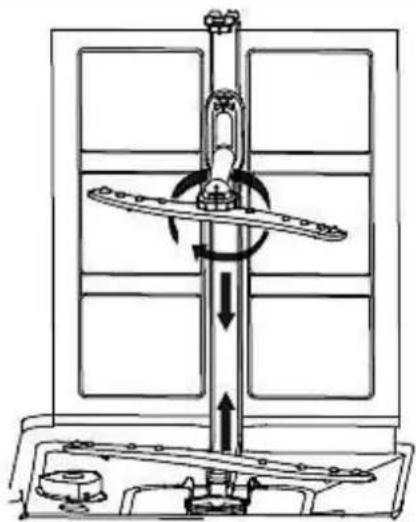
- Proceed in reverse order to install the spray arms properly.
- Ensure that the spray arms can rotate freely.
7.4 Door
NOTICE! Never use sharp-edged items, scouring pads, scouring agents, paper towels or other abrasive and aggressive detergents to clean the door of the appliance.
NOTICE! Never clean the door or the door seals with a cleaner spray as you may damage the lock and the electrical components.
Clean the sides of the door with a warm damp cloth.
Clean the exterior surface with a suitable polish.
Clean the door seals with a damp sponge; otherwise, remnants of food may generate unpleasant odours.
Never use sharp-edged items, scouring pads, scouring agents, paper towels or other abrasive and aggressive detergents to clean the door of the appliance.
7.5 Frost protection
If your appliance is situated in an unheated place during winter, consult a qualified technician to carry out the following measures6.
- Disconnect the appliance from the mains.
- Turn off the water supply and disconnect the water inlet pipe from the water valve.
- Remove any water from the water inlet pipe and the valve.
- Connect the water inlet pipe with the valve again.
- Remove the filters. Remove any water from the drain.
7.6 Decommissioning
- When you do not operate the appliance for a certain period of time, c.g., during holidays/vacancies, let a programme run (empty appliance) before.
- Disconnect the plug und turn off the water supply of the appliance.
- Leave the door slightly ajar to protect the seals and to avoid the generation of unpleasant odours.
WARNING! Disconnect the appliance from the mains before you clean or maintain it.
| ERROR | |
| POSSIBLE CAUSE (S) | MEASURES |
| APPLIANCE DOES NOT WORK AT ALL. | |
| 1. The fuse in the fuse box is tripped. | 1. Check the fuse box. |
| 2. The appliance is not supplied with energy. | 2. Check that the appliance is supplied with energy / the door is closed properly / the plug is in the socket. |
| 3. Low water pressure. | 3. Check the water supply and the water pressure. |
| 4. The door is not closed properly. | 4. Ensure that the door of the dishwasher is closed properly. |
| DRAIN PUMP DOES NOT WORK. | |
| 1. Kink in drain hose. | 1. Check the drain hose. |
| 2. Filter is clogged. | 2. Check the coarse filter. |
| 3. Kitchen sink is clogged. | 3. Check the kitchen sink. |
| NOISE. | |
| 1. Some noise is normal. | 1. The detergent container has opened. |
| 2. Dishes are placed improperly. Small objects dropped out of the racks. | 2. Check the position of the dishes. |
| 3. Knocking sound inside the appliance: The spray arms touch items during operation. | 3. Interrupt the programme and realign the items touched by the spray arms. |
| 4. Motor hums. | 4. Appliance was not used regularly. Even if you do not use the appliance regularly, let it operate once a week. |
| 5. Knocking sound in the water lines can be caused by the kind of installation or the diameter of the water lines. | 5. The proper function of the appliance is not affected. If you are in doubt, contact a qualified professional (not covered by the guarantee). |
| STAINED INTERIOR. | |
| 1. Detergent contains colorants. | 1. Use colorant-free detergents only. |
| FOAM IN THE APPLIANCE. | |
| 1. Unsuitable detergent. 2. Spilled rinse aid. | 1. Use dishwasher detergent only. 2. Remove any spilled rinse aid immediately. Open the door and wait until the foam has evaporated. |
| DISHES ARE NOT CLEAN. | |
| 1. Unsuitable programme. 2. Dishes are placed improperly. | 1. Select a stronger programme. 2. Check the position of the dishes. The dishes must not block the spray arms. |
| CLOUDINESS ON GLASSWARE. | |
| 1. Soft water in combination with too much detergent. | 1. If you have soft water, use less detergent. Select a short programme for glassware. |
| WHITE FILM ON INNER SURFACES. | |
| 1. Minerals in hard water. | 1. Clean the interior with a soft sponge and dishwasher detergent. Wear rubber gloves! Use dishwasher detergent only to avoid formation of foam. |
| TABLEWARE IS NOT DRIED PROPERLY. | |
| 1. Improper use of the dish rack. 2. Not enough rinse aid. 3. Tableware has been removed from the appliance too early. 4. Cutlery and tableware are made of low-quality materials. | 1. Load the dish rack properly. 2. Check the quantity of the rinse aid. Refill if needed. 3. Wait at least 15 min., before you remove the tableware. 4. Do not clean such items using the appliance. |
| SOME DETERGENT IS LEFT IN THE CONTAINER. | |
| 1. Dishes block the container of the detergent | 1. Place the dishes properly. |
| STEAM. | |
| 1. Normal. | 1. There is some steam coming through the vent near the door latch during drying and water draining. |
| BLACK OR GREY SPOTS OR RUST SPOTS ARE ON THE TABLEWARE. | |
| 1. Aluminium-made objects touched the dishes. | 1. Clean the marks with a mild abrasive cleaner by hand. |
| 2. The items are not corrosion resistant. | 2. Do not clean such items using the appliance. |
| 3. The lid of the water softener container is not close properly. | 3. Close the lid properly. |
| 4. You have not started a programme after you added the water softener. The remaining salt is now affecting the running programme. | 4. Always start the rapid programme without adding any tableware when you have added some water softener. |
| WATER REMAINS ON THE BOTTOM OF THE APPLIANCE. | |
| 1. Normal. | 1. A small amount of clean water around the outlet keeps the water seal functioning. |
| SPOTS AND FILM ON GLASSES AND CUTLERY. | |
| 1. Extremely hard water. | 1. Check the water hardness. |
| 2. Very low temperature of the water supply. | 2. Check the temperature of the water supply. |
| 3. The appliance is overfilled. | 3. Do not overfill the appliance. |
| 4. The dishes are placed improperly. | 4. Always place the dishes properly. |
| 5. Old or wet detergent. | 5. Always use proper detergent. |
| 6. The rinse aid container is empty. | 6. Refill the rinse aid container. |
| 7. Improper detergent dosage. | 7. Dose the detergent properly. |
| HOW TO REMOVE SPOTS FROM GLASSWARE | |
| a) Remove all metal-made objects. | |
| b) Do not use a detergent. | |
| c) Select the longest programmec. | |
| d) Start the programmec. After 18-22 minutes the main-wash cycle bçgins. | |
| e) Open the door pour 2 cups of white vinegar in the appliance (bottom). | |
| f) Close the door and let the complete programme run. If these measures fail, repeat the procedure but use 1/4 cup (60 ml) of citric acid crystals instead of the vinegar. | |
If the appliance shows a malfunction not noted on the schedule above or if you have checked all items on the above schedule but the problem still exists, please contact the aftersales service.
8.1 Error codes
| CODE | MEANING | POSSIBLE CAUSES |
| LED 1, LED 2 flashes. | Door opened. | Door is opened during operation. |
| LED 7 flashes. | Water inlet. | Water inlet malfunction. |
| LED 1, LED 4 flashes. | Water drainage. | Water drainage malfunction. |
| LED 1, LED 5 flashes. | Temperature sensor. | Temperature sensor malfunction. |
| LED 2, LED 6 flashes. | Overflow/leakage | Overflow/leakage has occurred. |
| LED 2, LED 3 flashes. | Water leakage. | Water leakage has occurred. |
| LED 2, LED 4 flashes. | Heating element. | Heating element malfunction. |
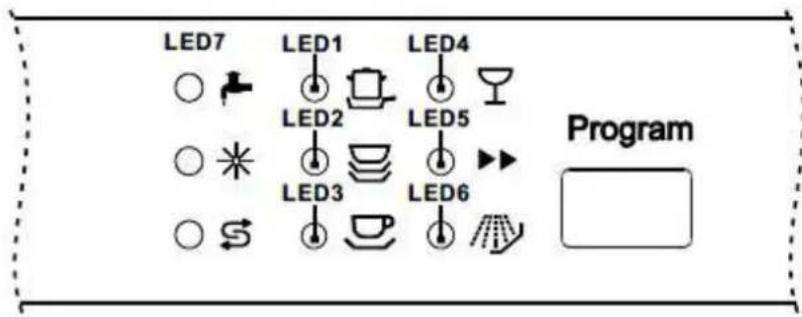
If overflow occurs, turn off the main water supply before calling a service. If there is water in the base pan because of an overfill or small leak, remove the water before restarting the dishwasher.
9. Technical data
| TECHNICAL DATA* | |
| Model | Dishwasher |
| Control | Electronic |
| Cleaning capacity | 12 standard place settings |
| Energy efficiency class1 | E |
| Annual energy consumption2 | 92.00 kWh |
| Energy consumption / 1 standard cycle3 | 0.92 kWh |
| Energy consumption / off-mode | 0.49 W |
| Energy consumption / left-on mode (standby) | 0.60 W |
| Annual water consumption2 | 1100 l |
| Water consumption / 1 standard cycle3 | 11 l |
| Drying performance index | 1.09 |
| Standard cleaning cycle / duration4 | Eco / 237 minutes |
| Noise emission | 49 dB(A) |
| Noise emission class5 | C |
| Mounting | Built-in |
| Could be built-in | yes |
| Dimensions H*W*D in cm | 82.00-87.00*59.60*55.50 |
| Power consumption | 1850 W |
| Voltage/frequency | AC 220 - 240 V / 50 Hz |
| Water pressure (flow pressure) | 0.4-10 bar = 0.04-1.0 MPa |
| Water temperature | Max. 63 °C |
Technical modifications reserved.
| * | According to Regulation (EU) No. 2019/2017 |
| 1 | On a scale from A (highest efficiency) to G (lowest efficiency) according to the new EU standard. |
| 2 | Based on 100 standard cleaning cycles using cold water fill and low power modes. The actual energy and water consumption values depend on the type of usc. |
| 3 | Based on the standard cleaning cycle using cold water fill and low power modes. The actual energy and water consumption values depend on the type of use. |
| 4 | This programme is suitable for cleaning normally soiled dishes and the most efficient programme in terms of its combined energy and water consumption for that kind of dishes. |
| 5 | On a scale from A (highest efficiency) to D (lowest efficiency. |
- While unpacking, the packaging materials (polythene bags, polystyrene pieces, etc.) should be kept away from children, CHOKING HAZARD!
- Old and unused appliances must be sent for disposal to the responsible recycling centre. Never expose to open flames.
- Before you dispose of an old appliance, render it inoperative. Unplug the appliance and cut off the entire power cord. Dispose of the power cord and the plug immediately. Remove the door completely so children are not able to get into the appliance as this endangers their lives!
- Dispos of any paper and cardboard into the corresponding containers.
- Dispose of any plastics into the corresponding containers.
- If suitable containers are not available at your residential area, dispose of these materials at a suitable municipal collection point for waste-recycling.
- Receive more detailed information from your retailer or your municipal facilities.

Materials marked with this symbol are recyclable.
Please contact your local authorities to receive further information.
for large electric appliances. PKM GmbH & Co. KG, Neuer Wall 2, 47441 Moers.
This appliance includes a 24-month guarantee for the consumer given by the manufacturer, dated from the day of purchase, referring to its flawless material-components and its faultless fabrication. The consumer is accredited with both the ducs of the guarantee given by the manufacturer and the vendor's guarantees. These are not restricted to the manufacturer's guarantee. Any guarantee claim has to be made immediately after the detection and within 24 months after the delivery to the first ultimate vendee. The guarantee claim has to be verified by the vendee by submitting a proof of purchase including the date of purchase and/or the date of delivery.
The guarantee does not establish any entitlement to withdraw from the purchase contract or for a price reduction. Replaced components or exchanged appliances demise to us as our property.
The guarantee claim does not cover:
- fragile components as plastic, glass or bulbs;
- minor modifications of the PKM-products concerning their authorised condition if they do not influence the utility value of the product;
- damage caused by handling errors or false operation;
- damage caused by aggressive environmental conditions, chemicals, detergents;
- damage caused by non-professional installation and haulage;
- damage caused by non common household use;
- damages which have been caused outside the appliance by a PKM-product unless a liability is forced by legal regulations.
The validity of the guarantee will be terminated if:
- the prescriptions of the installation and operation of the appliance are not observed.
- the appliance is repaired by a non-professional.
- the appliance is damaged by the vendor, the installer or a third party.
- the installation or the start-up is performed inappropriately.
- the maintenance is inadequately or incorrectly performed.
- the appliance is not used for its intended purpose.
- the appliance is damaged by force majeure or natural disasters, including, but with not being limited to fires or explosions.
The guarantee claims neither extend the guarantee period nor initiate a new guarantee period. The geographical scope of the guarantee is limited with respect to appliances, which are purchased and used in Germany, Austria, Belgium, Luxembourg and the Netherlands.
MISE EN GARDE! attire
Aftersales service information on the leaflet inside this instruction manual.

- Index
- EU - DECLARATION OF CONFORMITY
- Safety information
- READ THE SAFETY INFORMATION AND SAFETY INSTRUCTIONS CAREFULLY BEFORE YOU OPERATE THE APPLIANCE FOR THE FIRST TIME.
- Signal words
- Safety instructions
- DANGER!
- To reduce the risk of electrocution.
- WARNING!
- To reduce the risk of burns, electrocution, fire or injury to persons.
- CAUTION!
- NOTICE
- SAVE THESE INSTRUCTIONS.
- Installation
- Unpacking and Positioning
- Before installation
- INSTALLATION OF THE CONDENSATION STRIP. (DEPENDING ON MODEL)
- Minimum required space
- Dimensions and fixing of the front decoration panel
- Adjusting of the door-spring tension
- Installation of the water inlet hose
- Installation of the waste water hose
- Raised level installation
- Electrical connection
- Proper levelling
- Installation of the skirting board
- Fixing of the appliance
- Fixing of the top spacer
- Appliance and control panel
- Before the first use
- BEFORE YOU START OPERATING THE APPLIANCE, CHECK THAT
- BEFORE YOU OPERATE THE APPLIANCE FOR THE FIRST TIME:
- Water softener
- Filling of the water softener container
- THE WATER SOFTENER CONTAINER IS BENEATH THE LOWER DISH RACK. FILL THE CONTAINER AS FOLLOWS.
- Filling of the rinse aid container
- RINSE AID CONTAINER
- SETTING OF THE RINSE AID DISPENSER
- Dishwasher detergent
- DISHWASHER DETERGENTS ARE DIVIDED INTO 2 GROUPS DUE TO THEIR CHEMICAL COMPOSITION:
- THERE ARE 3 KINDS OF DISHWASHER DETERGENTS:
- DISHWASHER TABS
- THE DETERGENT CONTAINER
- FILLING OF THE CONTAINER
- Use of the dish racks
- Before/after use
- Upper dish rack
- Lower dish rack
- Cutlery basket
- Unsuitable dishes / cutlery
- THE FOLLOWING OBJECTS ARE NOT SUITABLE TO BE WASHED IN A DISHWASHER
- THE FOLLOWING OBJECTS ARE PARTIALLY SUITABLE TO BE WASHED IN A DISHWASHER
- Instructions for loading the dish racks
- Damage to glasses and dishes
- The washing programmes
- Starting of a programme
- How to change a running programme
- Subsequent addition of dishes
- End of a programme
- Cleaning and maintenance
- Filter system
- CLEANING OF THE FILTER SYSTEM
- Control panel and appliance
- Spray arms
- HOW TO REMOVE / INSTALL THE SPRAY ARMS
- Door
- Frost protection
- Decommissioning
- Error codes
- Technical data
- The guarantee claim does not cover:
- The validity of the guarantee will be terminated if:
Brand : PKM
Model : DW126FI
Category : Dishwasher