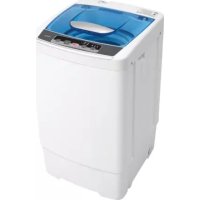
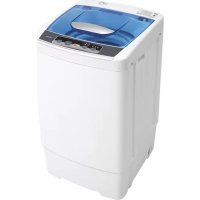
DWM5500W - Washing machine DANBY - Free user manual and instructions
Find the device manual for free DWM5500W DANBY in PDF.

User questions about DWM5500W DANBY
0 question about this device. Answer the ones you know or ask your own.
Ask a new question about this device
Download the instructions for your Washing machine in PDF format for free! Find your manual DWM5500W - DANBY and take your electronic device back in hand. On this page are published all the documents necessary for the use of your device. DWM5500W by DANBY.
USER MANUAL DWM5500W DANBY
Read complete installation and operating instructions before installing and/or using the washer.
KEEP THESE INSTRUCTIONS FOR FUTURE REFERENCE.
If the washer changes ownership, be sure this manual accompanies the unit.
PRECAUTION:
- Safety Instructions
- Installation
Care and Maintenance
Operation - Trouble Shooting
LAVEUSE A CHARGEMENT FRONTAL
FRONTLOAD AUTOMATIC WASHER Limited Product Warranty (In-Home Service)
This quality product is warranted to be free from manufacturer's defects in material and workmanship, provided that the unit is used under the normal operating conditions intended by the manufacturer.
This warranty is available only to the person to whom the unit was originally sold by Danby or by an authorized distributor of Danby, and is non-transferable.
TERMS OF WARRANTY
The limited warranty period listed below is based upon the selection of brand name of product purchased.
Any electrical parts of this product found to be defective will be repaired or replaced, including labour, at warrantor's option for the ORIGINAL purchaser, covering service listed below per product selection. Consumable parts (i.e. light bulbs) are not warranted or guaranteed for any length of time.
The product warranty coverage is as follows:
Parts and Labour Coverage One (1) Year
Corrosion on Cabinet (No labour after 2nd year) Five (5) Years
Stainless Steel Drum (Parts Only) Lifetime
TO OBTAIN SERVICE
Contact your dealer from whom your unit was purchased, or contact your nearest authorized Danby service depot, where service must be performed by a qualified service technician. If service is performed on the unit by anyone other than an authorized service depot, or the unit is used for commercial application, all obligations of Danby under this warranty shall be at an end.
EXCLUSIONS
Save as herein provided, there are no other warranties, conditions, representations or guarantees, express or implied, made or intended by Danby Products Limited (Canada) or Danby Products Inc. (U.S.A) or its authorized distributors and all other warranties, conditions, representations or guarantees, including any warranties, conditions, representations or guarantees under any Sale of Goods Act or like legislation or statute is hereby expressly excluded.
Save as herein provided, Danby Products Limited (Canada) or Danby Products Inc. (U.S.A), shall not be responsible for any damages to persons or property, including the unit itself, howsoever caused or any consequential damages arising from the malfunction of the unit and by the purchase of the unit, the purchaser does hereby agree to indemnify and save harmless Danby Products Limited from any claim for damages to persons or property caused by the unit.
GENERAL PROVISIONS
No warranty or insurance herein contained or set out shall apply when damage or repair is caused by any of the following:
1) Power Failure.
2) Damage in transit or when moving the appliance.
3) Improper power supply such as low voltage, defective house wiring or inadequate fuses.
4) Accident, alteration, abuse or misuse of the appliance such as inadequate air circulation in the room or abnormal operating conditions, (extremely high or low room temperature).
5) Use for commercial or industrial purposes.
6) Fire, water damage, theft, war, riot, hostility, acts of God such as hurricanes, floods etc.
7) Service calls resulting in customer education.
8) Damage to porcelain tubs due to foreign objects.
Proof of purchase date will be required for warranty claims; so, please retain bill of sale. In the event warranty service is required, present this document to our AUTHORIZED SERVICE DEPOT. or contact:
Danby Products Limited
PO Box 1778, Guelph, Ontario, Canada N1H 6Z9
Telephone: (519) 837-0920 FAX: (519) 837-0449
Danby Products Inc.
PO Box 669, Findlay, Ohio, U.S.A. 45839-0669
Telephone: (419) 425-8627 FAX: (419) 425-8629
IMPORTANT: Please complete and return the enclosed registration card within thirty days for warranty coverage.
Danby Designer
CP 1778, Guelph, Ontario, Canada N1H 6Z9
Telephone: (519) 837-0920 Télécopieur: (519) 837-0449
Danby Products Inc.
PO Box 669, Findlay, Ohio, U.S.A. 45839-0669
Telephone: (419) 425-8627 FAX: (419) 425-8629
Thank you for your trust and for buying this appliance. We hope it will successfully serve its purpose for many years.
This washing machine was designed for home use.
It meets all the requirements of modern washing: it is economical; it uses less water, less energy and washing agent.
Before Use 4
Important. 5
Important safety instructions. 6
Removing the Transport Brackets 7
Placing and Installation 8
The Door 9
Preparing the Laundry. 10
Washing Agents and How Much to Use.... 11
Washing 12
Cleaning and Maintenance. 15
Trouble-Shooting Guide. 17
This instruction manual was prepared for the user of the washing machine. Read the manual carefully and get to know your washing machine so that you will know how to use it safely and correctly.
This instruction manual was prepared for various models of washing machines, and they vary in function and design. Make sure to consider only those switches and knobs your machine is equipped with.
- When you find your appliance is out of use and no longer needed, try not to burden the environment with it. Call you're nearest authorized "collecting service for used appliances".
Tips for Energy Savings
Through correct use and considering our recommendations, you can make substantial energy savings.
- For economical washing, always refer to the table of programs with recommended wash loads.
- Skip the pre-wash whenever possible (if laundry is lightly soiled).
- Use an adequate washing agent, and always consider the recommended amount, and pay attention to water hardness and degree of soiling.
- In the course of time (depending on water hardness) lime deposits will occur on the heater and inside the appliance. This increases the consumption of energy for heating water. Occasionally remove the lime deposit with a special agent.

Important
Before putting the machine into use, don't forget to remove the transport brackets. Switching on a blocked machine may damage the machine. Our guarantee does not cover such damage.
- Before switching the machine on, check that the transport brackets have been removed.
- Don't place the appliance in a room where the temperature may fall below 32^ , causing individual parts of the machine to freeze and become damaged (hose may crack).
- The appliance should stand firmly and horizontally on a solid base (a machine standing on an uneven floor is very likely to vibrate during the spinning cycle).
Always consider the instructions for correct placing and installation of the machine to the mains and water supply. This will help you avoid accidents and protect your machine against damage. - The end of the outlet hose should not be immersed in the discharge water (the machine may pump the discharge water back).
- During the washing cycle, the door of the machine cannot be opened. It can only be opened 2 minutes after washing is finished.
- The glass door gets very hot during washing, so take care of children.
- Use only washing powder and other agents specially designed for machine washing. We do not take any responsibility for damage caused by the improper use of bleaching or coloring agents (colored gasket and other plastic parts).
- Lime dissolving agents contain acid, so only use those containing rust-protection agents. Always consider the manufacturer's instructions. When you have finished removing lime deposit, run a few rinse cycles to make sure that the acid is thoroughly rinsed. Even traces of acid can cause substantial damage to component parts.
- Never use washing agents containing solvents - individual component parts may be damaged or toxic gases may be produced. There is also a risk of ignition or explosion.
- When washing is finished, remember to close the tap.
-
Your washing machine can only be transported with transport brackets. It is usually enough to use only one of the rods, that is the upper one. It is much easier to insert the rod if you remove the top cover. Before doing anything, however, don't forget to disconnect the machine from the power supply.
-
Data plate with essential information on the appliance is fitted above the opening for laundry insertion under the door frame.
(UKS)-Unbalance Control System
This washing machine is equipped with the UKS -unbalanced control system. This means that the spinning starts smoothly, even in case of smaller wash loads or inadequate loads.
In case of unfavorable distribution of laundry in the drum, this is sensed by the UKS system and the automatic re-distribution of the laundry follows immediately, then only spinning starts. In case the re-distribution of the laundry is not successful (only one large piece in the drum), the UKS system reduces the spinning speed (r.p.m.), to prevent damages to the washing machine.
Important safety instructions
WARNING - To reduce the risk of fire, electric shock, or injury to persons when using your appliance follows basic precautions, including the following:
- Read all instructions before using the appliance.
- Do not wash articles that have been previously cleaned in, washed in soaked in or spotted with gasoline, dry-cleaning solvents, and other flammable or explosive substances as they give off vapors that could ignite or explode.
- Do not add gasoline, dry-cleaning solvents, or other flammable or explosive substances to the wash water. These substances give off vapors that could ignite or explode.
- Under certain conditions, hydrogen gas may be produced in a hot water system that has not been used for 2 weeks or more. HYDROGEN GAS IS EXPLOSIVE, if the hot water system has not been used for such a period, before using a washing machine, turn on all hot water faucets and let the water flow from each for several minutes. This will release any accumulated hydrogen gas. As the gas is flammable do not smoke or use an open flame during this time.
- Do not allow children to play on or in the appliance. Close supervision of children is necessary when the appliance is used near children.
- Before the appliance is removed from service or discarded, remove the door.
- Do not reach into the appliance if the tub or agitator is moving.
- Do not install or store this appliance where it will be exposed to the weather.
- Do not tamper with controls.
- Do not repair or replace any part of the appliance or attempt any servicing unless specifically recommended in the user-maintenance instructions or in published user-repair instructions that you understand and have the skills to carry out.
Save these instructions
GROUNDING INSTRUCTIONS
This appliance must be grounded. In the event of malfunction or breakdown, grounding will reduce the risk of electric shock by providing a path of least resistance for electric current. This appliance is equipped with a cord having an equipment-grounding conductor and a grounding plug. The plug must be plugged into an appropriate outlet that is properly installed and grounded in accordance with all local codes and ordinances.
WARNING-Improper connection of the equipment-grounding conductor can result in a risk of electric shock. Check with a qualified electrician or serviceman if you are in doubt as to whether the appliance is properly grounded.
Do not modify the plug provided with the appliance-if it will not fit the outlet; have a proper outlet installed by a qualified electrician.
Removing the Transport Brackets
The washing assembly is blocked with two metal rods which protects the machine during transport (fig.1).
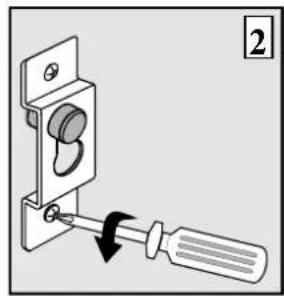
- Undo the screws on the rear wall (fig. 2).
- Remove the squares, rotate them 180^ and use them to pull out the rods (fig. 3).
- Disengaged parts may remain at the bottom since they do not obstruct the operation of the machine (4 rubber hoses and 4 paper spools).
- Use the enclosed plastic caps to plug the holes (fig. 4).
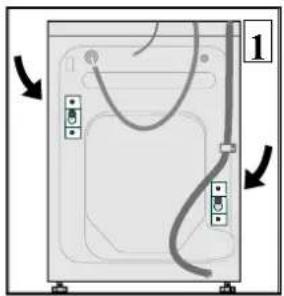

Save the brackets: you may need them later.
Placing and Installation
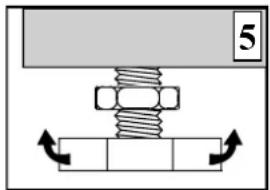
If the floor is uneven, use the adjustable feet to level the machine.
- Undo the nuts. Rotate the feet to level the machine (fig. 5).
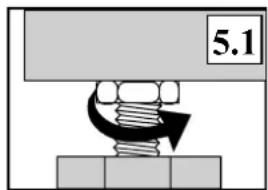
Fix the nuts (fig. 5.1).
Maximum height of the washing machine is 33.5 in.
IMPORTANT
The floor on which the machine stands should be dry, otherwise the machine may slide during the spinning cycle.
Connection to the Water Supply
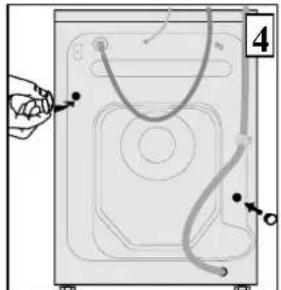
The hose connections inclusive of the 90^ elbow and coupling must be connected to the water inlet valves located on the rear wall of the appliance. The hose connections inclusive of the straight line coupling must be connected to the water (facet) supply (See Fig. 6)
To ensure efficient operation, the water pressure of the water supply should be between 7 and 116 psi.
If the pressure exceeds the maximum allowed limit, fit a pressure regulator. (Open the tap fully - in 15 seconds, 0.8 gal. of water should pour out; and this is the minimum pressure of the water supply).
Connection to hot/cold water
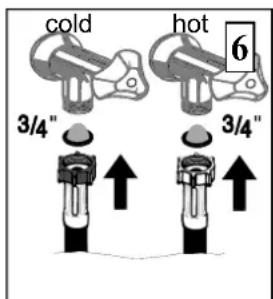
Washing machines designed for connections to hot/cold water are equipped with two inlet hoses. Each hose is identified with a "red" or "blue" stripe running the entire length of the hose.
Red Stripe = Hot Water Hose Connection
Blue Stripe = Cold Water Hose Connection. Insert rubber washer with screen (filter) inside (straight line) coupling and connect to the faucet/tap. (Fig. 6) Insert regular rubber washer inside (90^) coupling and connect to water inlet valve.
IMPORTANT
The highest allowed temperature of hot water is 140^
Water Outlet
Hook the outlet hose securely over the edge of the washbasin or bath tub. The outlet hose can also be connected directly to the plumbing outlet, the diameter of which should be not less than 1.6 in. (fig. 7).
Wall siphon drain must be correctly fitted in such manner to enable cleaning.
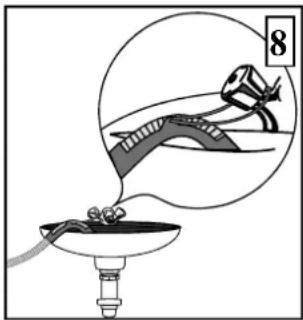
If water is drained through a washbasin, always check it is drained quickly enough, otherwise an overflow may occur or the machine may pump the water back. Pull a string through the hole on the plastic elbow, and secure the outlet hose to prevent it from falling off (fig. 8).
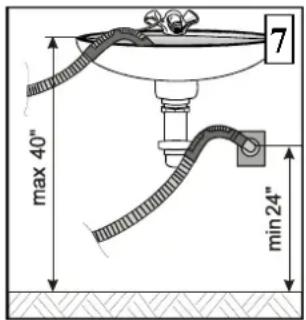
The end of the outlet hose should be raised from the floor by not more than 40 in. and not less than 24 in. If the hose is positioned higher than recommended, the machine will not pump out the water.
Connection to Power Supply
Connect the appliance to the power supply using the power cord. The electrical outlet should be equipped with a properly grounded contact (safety socket).
Rated voltage, frequency and other data are listed on the rating plate of the machine.
Your washing machine should be grounded and connected to the power supply according to local electricity board regulations and standards.
Connect to individual branch circuit.
WARNING!
If the supply cord is damaged, it must be replaced by the manufacturer or his service agent or a qualified person in order to avoid hazard.
- The appliance must be installed so that power cord plug is within reach of the appliance.
DO NOT USE AN EXTENSION CORD
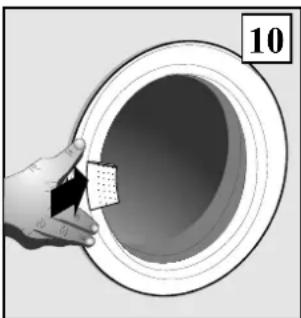
The Door
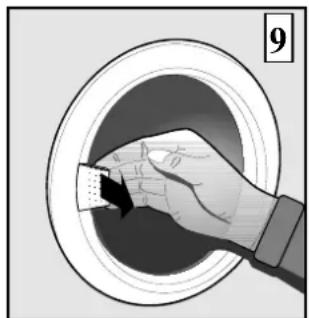
The door can only be opened two minutes after the washing program has finished.
Open the door by pulling the door handle (fig. 9).
When closing the door, push it towards the machine until it locks (fig. 10).
If the door is not correctly closed, the machine will not operate.
IMPORTANT
- When closing the door, be careful not to trap fabric between the door glass and the rubber gasket.
- If you need to open the door after the machine has been switched on, first switch it off and wait for about two minutes.
When opening the door, be careful, as the water level may be high and water may pour out when you open the door.
- Do not attempt to open the door while the machine is operating.
- If the machine won't start after switching on, push the door once again towards the machine (at handle).
- An inadequately closed door is the most common cause of malfunctions.
Preparing the Laundry
Sort the laundry before washing according to the type, quality, and color and soil degree of the laundry.
Type of Fabrics
Most clothes nowadays have labels describing the type of fabric they are made of, the kind of recommended wash, and the recommended washing temperature.
These labels will help you choose the most suitable washing program for your clothes.
Put delicate laundry (stockings, fine underwear...) into a sack or into a pillow case if washed together with other laundry.
Color Fastness
Pay special attention to color fastness, and always choose the correct washing temperature.
When washing new clothes, always check color fastness first - wash separately the first time.
Degree of Soil
Stained and heavily soiled laundry should be washed in small loads or with a larger amount of washing powder.
Heavily stained or soiled areas on the fabric can be treated before washing using special agents.
Use the energy-saving program for lightly soiled laundry (no pre-wash, economic program, lower washing temperature).
Loading
The maximum load of dry laundry is stated in the Table of Washing Programs (Page 14).
Overloading the machine will cause clothing to crease and minimize washing efficiency.
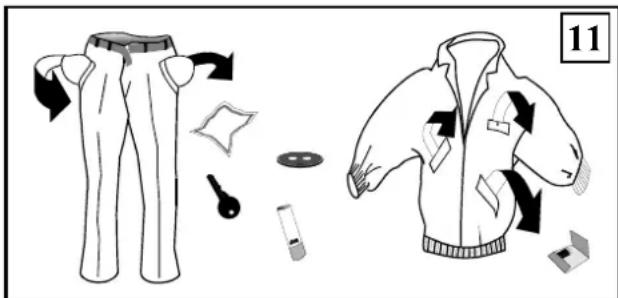
Always check the pockets before loading the laundry. Remove keys, coins, hair-pins and similar objects that may clog the water outlet hose.
Zip the zippers and remove metal pins that may damage the laundry or even the drum (fig. 11).
Folded clothes should be loosened before loading.
The best washing effect is obtained by mixing larger and smaller items of laundry in one load.
Washing Agents and How Much to Use
Use only washing powder for machine washing.
Use special washing agents for delicate and woolen fabrics.
This washing machine was designed for washing powder as well as for liquid detergent. As to the quantity of the washing agent, refer to the manufacturer's recommendation. The quantity of washing agent recommended on the packaging is usually sufficient for normally soiled laundry, depending on the hardness of the water.
If your water is hard, we recommend using water softener. This means that you can then use the same quantity of washing powder as if the water was soft (hardness degree 1). Follow manufacturer's instruction.
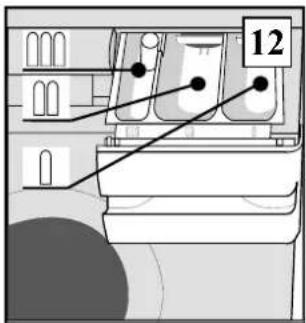
Dispenser
The detergent dispenser is divided into three sections (fig. 12). The table of the program shows which section to use.
| These sections are used for washing powder |
| This section is used for liquid softener and starching agent. |
Always add washing agents before switching on the machine and keep the dispenser clean and dry. This allows washing agent to be thoroughly rinsed from the dispenser.
Programs without a pre-wash cycle, the detergent can be put directly into the drum. This is especially convenient if:
you use larger amounts of detergent (very hard water),
you use detergent which is hard to rinse from the dispenser,
water pressure is low,
you use a concentrated detergent special dosing sack which should be inserted directly in the drum.
Using not enough detergent causes
the laundry to turn grey,
- greasy clots,
-lime deposit in the machine and on the laundry.
Using too much detergent causes
- bubbling,
- reduced agitation and washing effect,
- inadequate rinsing.
We recommend that you gradually decrease or increase the quantity of washing agent depending upon the soil level condition of the linen.
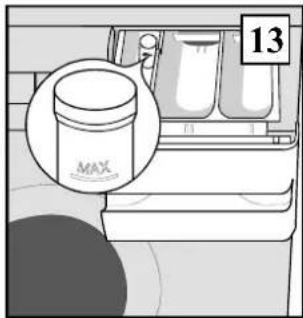
Fabric Conditioner and Starching Agent
When using fabric conditioner or starching agent, always follow the manufacturer's instructions, but never fill higher than the level marked on the dispenser. The excess is immediately poured out before the program begins washing and is therefore lost (waste).
When using the high density liquid agent we recommend mixing it with water before filling, as otherwise the dispenser outlet may clog.
In case the dispenser is clogged and the liquid is not flushed, the dispenser should be washed. Remove level indicator and wash with brush and lukewarm water or rinse under the tap (fig. 13).
Never use both fabric conditioner and starching agent together as this combination may cause the dispenser opening to clog.
Liquid Washing Agents
(for some models only)
If the washing machine is equipped with partition plate, the middle section may also be used for liquid washing agents.
Lift the partition plate when using washing powders and push it in when using liquid detergent.
We recommend using liquid detergent with washing program without pre-wash.

- Washing powder
- Liquid detergent
Washing
Before washing, select a wash program that best suits your washload.
The control panel incorporates various switches and pushbuttons for selecting washing programs, a control light, and a dispenser.
This instruction manual was prepared for various models of washing machine. Note: some functions may not be applicable to your specific model.
Control Light
A control light illuminates when the machine is switched on.
Program Selection Knob
To select a program, make sure the machine is switched off. Turn the knob clockwise to the required program.
Washing programs are divided into three groups and are marked with letters A ~ M (Fig. A).
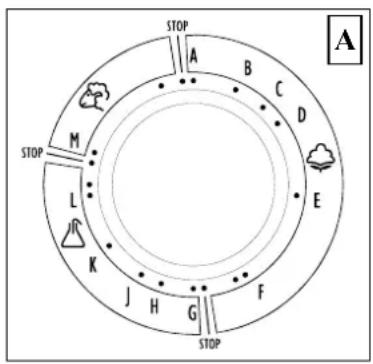
Regular cycle
Programs for non-delicates (A-F)
Intensive programs concluded with a prolonged spin cycle of highest number of revolutions.
Permanent press cycle
Programs for delicates (G-L)
Gentle tumbling programs concluded with short stage spinning.
Woolens, delicate cycle
Program for Woolens (M)
Gentle tumbling programs concluded with short stage spinning. Program uses high water level and gentle tumbling and concludes with a short stage spinning.
Temperature Selection Knob
Turn the knob clockwise (Fig. B).
Washing temperature may be optionally selected up to 200^ .
Programs from A to B may be used as economic program, if the selected temperature is lower than 200^ . This feature will help you save energy up to 40% .
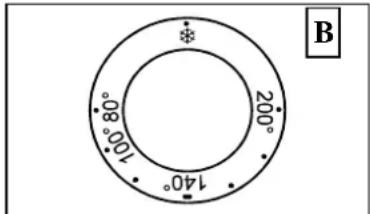
On the position marked with a snow flake, the heaters are switched off and you can select cold wash on all programs. The duration of the program is the same as if the heaters are on.
Spinning Speed Selection Knob
Spinning speed is selected by turning the knob clockwise up to the highest position and backwards (Fig. C). Available settings 500, 700, 900, 1000rpm
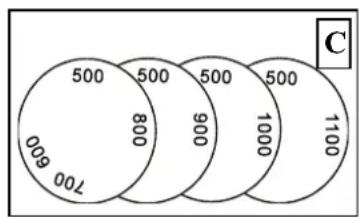
A lower number of revolutions are recommended for washing delicate laundry. A higher number of revolutions are recommended for woolens, cottons and linens.
ON/OFF switch

Select suitable washing program, prepare the laundry for washing and press the ON/OFF switch to switch the machine on.
Spinning-OFF Knob

Using this switch the intermediary and final spinning of all programs are switched-OFF.
Water plus Switch

Washing under programs for regular laundry (programs A and B) is carried out with a low water level; the quantity of water
is automatically adjusted to the amount of laundry. This guarantees successful and economic washing, regardless of the amount of laundry.
When washing heavily soiled laundry the water level can be increased by pressing this switch.
It is impossible to change the water level in programs for delicate linens and woolens.
Extra Rinse Switch

All washing programs are designed for optimum water usage, during both washing and rinsing cycles.
If you are allergic to washing agents, use the extra rinsing cycle. This switch is operating only with the programs for regular laundry (A-F) and can be switched on at the beginning of the wash program or prior to rinsing.
Prepare your machine for washing
- Select laundry and load a suitable amount.
- Close the door (push it towards the machine).
- Fill the dispenser (in the correct sections).
- Check water inlet and outlet.
- Choose the right program.
If your machine is equipped with switches, use them, as appropriate. - Select the washing temperature and spinning speed, if your washing machine is equipped with this option.
- Switch the machine on.
After Washing
- Switch off the machine (the control lamp turns off).
- Check that the washing is finished and that water is pumped out of the machine to avoid unnecessary flooding. If there is still water in the machine, select one of the programs for pumping or spinning.
- Some two minutes after the washing is finished you can open the door.
Take the laundry out of the machine and turn the drum once or twice by hand to make sure no articles remain inside. - Check the rubber gasket on the door and remove objects that might have deposited (buttons, pins.) (fig. 14).
- Leave the door open and allow the interior to dry.
- Disengage any pushbuttons you used.
- Close the water taps.
- Check the dispenser and clean if necessary and dry it well.
- Check and clean the lint filter regularly.

Table of Washing Programs - Hot/cold Water
| Program | Washing temperature | Dispenser- washing agents | Dry laundry (Ibs) | |||||
| A M | Type of fabric, laundry | °F | °C | |||||
| REGULAR (cotton, linen) | ||||||||
| A B | Cottons | 140-200 | 60 - 95 | 10 | ||||
| Whites | 140-200 | 60 - 95 | ||||||
| C D | Cottons | 100-140 | 40 - 60 | |||||
| Coloreds | * - 80 | * - 300 | ||||||
| E | Rinses | |||||||
| F | Softening, spining | |||||||
| PERMANENT PRESS (surface finished cotton, mixture of cotton with synthetics) | ||||||||
| G H J | Whites, Coloreds | 100-140 | 40 - 60 | 4,4 | ||||
| 100-140 | 40 - 60 | |||||||
| * - 100 | * - 400 | 2,2 | ||||||
| K | Rinses | 4,4 | ||||||
| L | Softening, short spining | |||||||
| WOOLEN, DELICATES (non-shrinkable, mixtures of wool with synthetics, silk) | ||||||||
| M | Woolen | * - 100 | * - 40 | 2,2 | ||||
Water:
Cold Hot Hot/cold
Cleaning and Maintenance
Warning:
- Before cleaning, always disconnect the machine from electrical supply.
- There is a danger of burning when hot water is in the machine. Wait until it cools.
Cabinet
Clean the washing machine (exterior) cabinet with a soft cloth and mild detergent. Do not use coarse cleaning agents which could damage the surface.
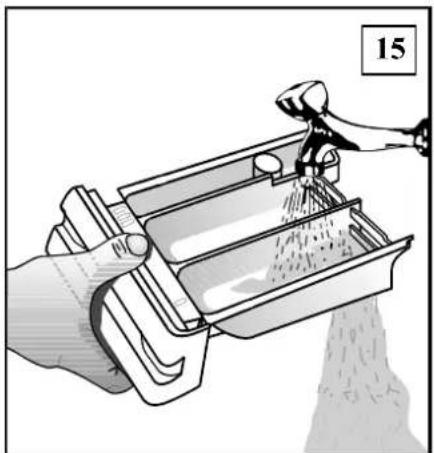
Dispenser
Check the detergent dispenser after each washing. If detergent residue remains visible, remove detergent drawer and rinse thoroughly. (Fig. 15).
Door Gasket
Clean the door gasket after each washing; the gasket will last longer.
Inlet Hose Screened Washers
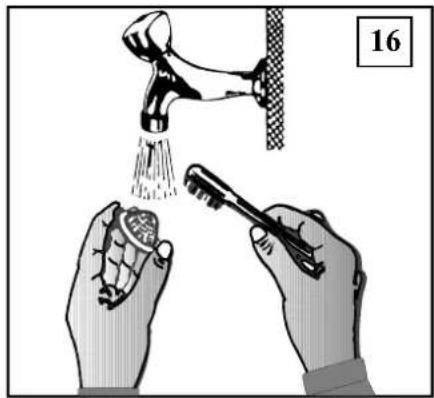
The inlet hose screened washers should be cleaned frequently.
Shut off the water supply and remove the inlet hose. Clean screened washers under a tap, (with small brush) replace and re-install inlet hoses (Fig. 16).
Filter
The lint filter is located under the cap at the bottom of the machine.
If you use the machine correctly, there is no need to clean the filter.
However, we suggest you check (clean) the filter periodically to make sure foreign objects have not become trapped inside. (Fig. 17 & 18)
A partially blocked filter will restrict pumping out of the wash water.
Before attempting to clean the filter, make sure the wash/rinse water has been completely drained from the machine. The best method to do that is to place the drain hose as low as possible (to the floor) next to a floor drain.
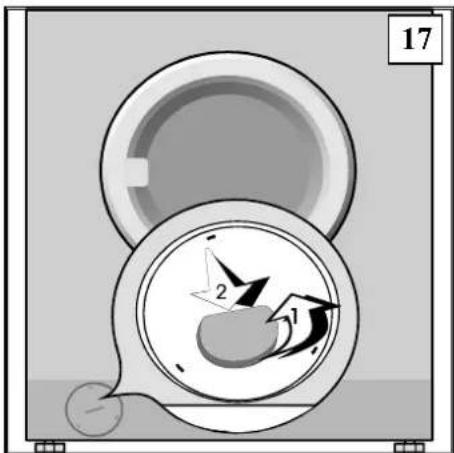
- Remove the cover (with coin inserted into the notch (fig. 17).
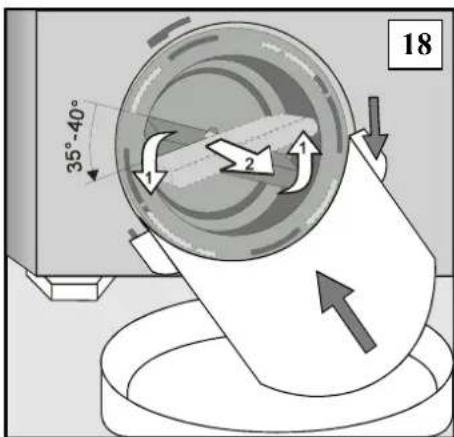
- Insert the funnel attached to the machine into the bottom cut-outs between the filter cover and cabinet and fix it by turning clockwise.
- Place a shallow pan underneath to allow the excess water to pour out. Remove the filter, by turning it counter-clockwise (35 - 40^) (fig. 18).
- Replace the filter in the reverse order and screw it down firmly. Check it for sealing prior to washing.

Trouble-Shooting Guide
Some problems are minor in nature and can be easily resolved without having to call for service. The following guide list some of the problems you should check before calling for service. If
you are unable to resolve the problem after checking this guide, call our Toll Free Number (1 800 26 DANBY) and ask for customer assistance.
| Problem: Check the following: | |
| The machine doesn't operate (the control lamp is off). | - Check the power supply and fuses. - Is the plug correctly plugged in the socket? |
| Water is not entering into the machine. | - Is the machine switched on? - Is the water faucet open? - Are the screened rubber washer filters on the inlet hoses clean? - Is the door properly closed? |
| The machine moves during operation. | - Are the transport brackets removed? - Is the machine correctly leveled? (if not, use the adjustable legs) - Check the load (perhaps you are washing only one large item). |
| The machine is leaking. | - Is the lint filter properly fixed? - Are the inlet hoses properly secured to the faucets and water inlet valves on the machine? |
| The laundry is too wet at the end of the program. | - Is the lint filter clean (free of solid particles)? - Check whether the wall siphon drain is clogged (clean it). |
| Too much soap suds accumulation during washing. | - Check the water hardness and/reduce the quantity of washing detergent. |
| Unsatisfactory washing results (stains, greasy clots). | - Have you chosen the correct wash program? Use larger quantities of washing detergent for heavily soiled laundry, or wash smaller loads. |
| Laundry not well rinsed (detergent residue remains). | - Is the lint filter clean (free of solid particles)? - Perhaps you overloaded the machine (especially delicate fabrics) and used too much washing detergent. - Check whether the wall siphon drain is clogged (clean it). |
After you have considered all the above stated instructions and the problem still cannot be eliminated. Please call the nearest Danby authorized service agent or call our Toll Free Number (1 800 26 DANBY) and ask for customer assistance.
Any claim or malfunction caused by improper installation or misuse is not covered by the
manufacturers warranty. All repair costs shall be covered by the user.
WE RESERVE THE RIGHT TO ALTER THE SPECIFICATIONS WITH NO INFLUENCE ON THE OPERATION OF THE APPLIANCE.
THIS INSTRUCTION MANUAL CAN NOT BE A REASON FOR CLAIM.
Lave-linge
Installation et raccordement
For service, contact your nearest service depot or call: 1-800-26-Danby to recommend a depot in your area.
The model number of your front load washer is found on the serial plate located on the back of the unit.
To request service and/or the location of the service depot nearest you, call the toll free number listed to the left in Canada and the U.S.
When requesting service, always provide the following information:
- Appliance
Model Number
LAVEUSE A CHARGEMENT FRONTAL
Danby Products Limited PO Box 1778, 5070 Whitelaw Road, Guelph, Ontario, Canada N1H 6Z9
Danby Products Inc. PO Box 669, 101 Bentley Court, Findlay, Ohio, USA 45839-0669