
MAG525ONY - Microwave Oven Pelgrim - Free user manual and instructions
Find the device manual for free MAG525ONY Pelgrim in PDF.

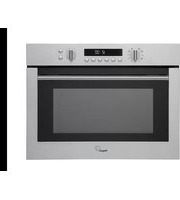
| Product Type | Microwave Oven |
| Brand | Pelgrim |
| Model | MAG525ONY |
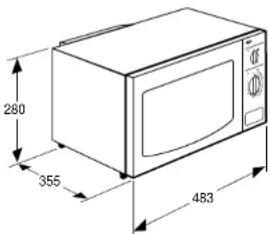
| Dimensions (W x H x D) | 483 x 280 x 355 mm |
| Power Supply | 230 V, 50 Hz |
| Connected Load | 1200 W |
| Microwave Frequency | 2450 MHz |
| Microwave Output Power | 800 W |
| Power Levels | 5 |
| Maximum Programmable Time | 60 minutes |
| Main Functions | Cooking, Defrosting, Reheating |
| Control Type | Rotary Selectors |
| Safety | Automatic stop when door opens, safety lock |
| Maintenance and Cleaning | Wipe with a damp cloth and mild detergent; deodorize with vinegar or lemon |
| Included Accessories | Roller support, glass turntable |
| Parts Warranty | 5 years |
| Labor Warranty | 1 year |
| After-Sales Service | Pelgrim S.A. Belgium, Industrial Zone, Keerstraat 1, B-9420 Erpe-Mere, Tel.: (053) 80 62 08 |
| Installation | Solid, flat surface; 10 cm free space at the rear and sides |
| Grounding | Mandatory |
Frequently Asked Questions - MAG525ONY Pelgrim
User questions about MAG525ONY Pelgrim
0 question about this device. Answer the ones you know or ask your own.
Ask a new question about this device
Download the instructions for your Microwave Oven in PDF format for free! Find your manual MAG525ONY - Pelgrim and take your electronic device back in hand. On this page are published all the documents necessary for the use of your device. MAG525ONY by Pelgrim.
USER MANUAL MAG525ONY Pelgrim
natural_image
Line drawing of a microwave oven with control panel (no text or symbols)Nederlands 1 - 7
English 8-15
Français 16 - 23
Deutsch 24 - 31
Pelgrim
Toestelbeschrijving
Bedieningspaneel
1 vermogensinstelknop
2 timer/gewicht-instelknop
3 deurontgrendeling
Toebehoren
1 power knob
2 control knob cooking time / weight
3 button for opening the door
Accessories
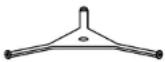
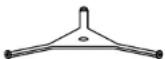
Turntable support
This accessory supports the turntable
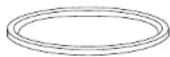
Turntable
The turntable fits onto the turntable support and is made of heat-resistant glass.
Do not place any food directly onto the turntable.
Please note:
Ensure that the turntable support and turntable are correctly in place before using the microwave.
Introduction
Reading through these instructions for use will rapidly inform you of all of the possibilities that this appliance has to offer you. You will find information regarding your safety, the maintenance of the appliance and tips regarding the environment with advice on how to save energy.
Keep these instructions for use in a safe place, together with the installation instructions. A possible future owner of this appliance will be glad you did.
Happy cooking!
Table of contents
Safety 10
Things to watch for 10
Before you begin....10
One more thing....11
■ Use 12
Cooking 12
Defrosting 12
■ Maintenance .... 13
■ Faults 13
■ Installation 14
■ Technical specifications ..... 15
Things to watch for
- Disconnect the appliance before starting with cleaning or repairs. Preferably by taking the plug out of the socket or by turning off the mains switch.
This appliance may only be used for the purpose for which it was designed, namely preparing food. Any other use must be deemed unsuitable and hazardous. We cannot accept any liability in the event of damage due to incorrect, wrongful or improper use of the appliance.
■ Children are not aware of the dangers that can arise when operating electrical equipment. For this reason do not allow children to use the microwave oven. - Your microwave oven is only safe if the door shuts properly! Never place any object between the door and the oven, and always ensure that the door and the seal are clean.
- Do not use the oven if there is any damage to the door (warped), lock, hinges (broken or loose) or seal.
■ Use the oven only for defrosting and preparing food, and never for drying clothes or paper, for example, as these may burst into flame.
■ If something catches fire in the oven, keep the oven door closed, switch the microwave off and remove the plug from the socket.
Before you begin
- Open the door and remove the packaging material.
■ Clean the inside of the oven and the accessories with a damp cloth. Do not use an abrasive cleaner or any strongly-smelling detergents. - Place the turntable support in the middle of the oven. Place the turntable on top of the turntable support.
- Do not use the oven when empty, this could damage the oven.
- Do not operate the oven without the glass tray in place. Be sure it is properly fitted on the turntable support.
- The microwave oven is not suitable for:
- Preserving food.
- Boiling eggs in their shells - these explode due to the increased pressure.
- Heating oil for deep-fat frying.
■ Remove any metal sealing strips from plastic bags and use bowls and dishes which are microwave proof.
■ Certain materials may not be placed in the microwave oven. The list below shows which materials may or may not be used.
Material Permitted
paper yes aluminium foil yes
cling film yes
aluminium trays no
freezer / microwave dishes yes
heat-resistant plastic yes
unglazed earthenware no
glazed earthenware yes
metal cooking utensils no normal glass yes
Pyrex and other ovenproof glass and ceramics yes dishes with metallic decoration no metallic twists no
mercury thermometer no
sealed pots no bottle with narrow neck no roasting bags yes
■ Never heat for longer than necessary. Food continues to cook after heating has finished, so always let it stand a while before eating.
- Use as little water as possible when cooking, and use salt sparingly.
■ Stir or turn over food half-way through preparation time.
■ Use a fork or other sharp object to puncture the skin of meat or fish. This prevents juices spattering inside the oven.
■ Covering the food prevents spattering, shortens the preparation time and helps maintain the moisture level.
- The door may be opened while the microwave oven is switched on – the microwave oven will then switch off automatically, and the timer will pause.
One more thing...
* By covering thinner pieces of food (such as chicken legs) you prevent them cooking too quickly.
- If you wish to boil a liquid (such as water) put a plastic spoon in the cup. The liquid could boil without you seeing any movement. Once the cup is removed from the oven, the liquid can start to boil rapidly and spatter out of the cup.
- On account of the increased pressure during heating: liquids in airtight packaging can only be heated if a couple of openings have first been made in the package.
If you wish to check how cooking is proceeding:
- Open the door. The microwave stops.
■ To continue cooking close the door.
- If you wish to stop cooking remove the dish from the oven and turn the timer dial to the "0"-setting.
Operation
Cooking
Depending on the type of dish, select a higher or lower power setting (see power setting table).
-
Open the door. Place the food on the turntable. Close the door.
-
Set the power required using the power adjustment knob.
This microwave oven has 5 power settings. The maximum power is 800 W. The table below shows the various power settings.
Power
| setting | Use for |
| 90 | warming up |
| defrost | defrosting |
| 360 | medium |
| 600 | medium/high |
| max | high |
- Set the cooking time required using the timer/weight adjustment knob. The microwave oven switches on. At the end of the cooking time you will hear a sound signal and the oven light will go out. The microwave oven switches off.
Tip:
Turn the timer/weight adjustment knob slightly past the required cooking time to start with and then turn it back to the correct cooking time, so as to set it accurately.
Check the food during the cooking time. Press the release knob to open the door. The microwave oven switches off. The settings and the remaining cooking time are preserved. When you close the door, the microwave oven switches on again.
Defrosting
Food can be defrosted quickly and safely in the microwave oven. Defrosting in the microwave oven does take longer than cooking, however.
Check the food during the defrosting process. Turn it at least once and (if possible) remove any food that has already defrosted.
-
Set the power adjustment knob to defrost.
-
Set the timer/weight adjustment knob to the correct weight. At the end of the defrost time, you will hear a sound signal and the oven light will go out.
Attention:
The appliance switches on as soon as you turn the timer/weight adjustment knob from the 0-position.
Looking after your appliance
Take the plug out of the socket or set the switch in the meter cupboard to zero before you start cleaning the microwave oven.
Clean the inside and the outside of the oven on a regular basis using washing up liquid and dry the oven thoroughly with a soft cloth.
Clean the accessories regularly: use soapy water and a brush and dry the accessories thoroughly with a dry cloth. The accessories may also be washed in a dishwasher.
Odours will disappear if you put a glass of vinegar or water - with lemon juice added - in the oven space. Switch the microwave on for two minutes on full power. Then wipe with a damp cloth.
Check the seal of the door regularly for damage.
If there is any damage the oven may not be used until the damage has been repaired.
Troubleshooting
When the cooking results are not as you expected, sparking occurs in the oven, the oven does not start etc; try to locate the problem yourself before calling a service technician. Use the checklist below to see if you did something wrong.
– Is the appliance plugged in?
– Is the door closed properly?
- Are the power level, cooking time and cooking temperature set right?
– Is there anything in the oven that does not belong there?
- Did you use the right kitchen equipment/containers?
- Are the turntable support and the turntable placed in the oven?
- Are the ventilation outlets blocked?
– Was the food defrosted sufficiently?
- Has the food been turned or stirred during cooking?
Installation instructions
General
National regulations must always be observed.
Electrical connections
This appliance should be connected to a three-pin plug with a 13 amp fuse in accordance with UK safety standards.
Earthing instructions
This appliance should be connected to an AC 230 V 50 Hz household mains supply. The unit should be earthed at all times and under no circumstances should it be connected to a DC power supply.
■ Remove all the packaging material and check the microwave oven for any damage. Do not install the microwave oven if it is damaged, but contact your supplier immediately.
■ Remove the protective foil from the casing.
- Place the microwave oven on a firm, flat surface.
■ Make sure that there is sufficient ventilation around the microwave oven. At the rear and sides keep at least 10 cm free.
■ Do not cover the air vents.
■ The adjustable feet should not be removed.
- Do not place the microwave in the immediate vicinity of a radio, t.v., aerial or signal-bearing cables to prevent picture or sound interference. Do not place the appliance near radiators or taps.
Technical specifications
Power 230 V 50 Hz
Connecting value 1200 W
Microwave frequency 2450 MHz
Microwave output (IEC 705) 800 W
Power settings 5
Maximum timer setting 60 min.
Dimensions (w x h x d) 483 x 280 x 355 mm
Pelgrim gives a 5 year guarantee on the appliance, provided it is professionally installed by a qualified fitter in accordance with the installation instructions.
Pelgrim is obliged for the period of 5 year from purchase date to replace parts free of charge.
For the period of 1 year from purchase date no charges will be made for housecalls or labour.
This guarantee covers all defects caused by manufacturing faults or defective parts.
When service is required, purchase receipt and guarantee certificate must be presented.
Defects caused by incorrect installation are not covered by this guarantee.
Name and adress of fitter:
Purchase date:


- Pelgrim
- Toestelbeschrijving
- Bedieningspaneel
- Toebehoren
- Accessories
- Turntable support
- Turntable
- Please note:
- Introduction
- Table of contents
- Things to watch for
- Before you begin
- Material Permitted
- One more thing...
- Operation
- Cooking
- Tip:
- Defrosting
- Attention:
- Looking after your appliance
- Troubleshooting
- Installation instructions
- General
- Electrical connections
- Earthing instructions
- Technical specifications
Brand : Pelgrim
Model : MAG525ONY
Category : Microwave Oven