MAG535ONY - Microwave Oven Pelgrim - Free user manual and instructions
Find the device manual for free MAG535ONY Pelgrim in PDF.

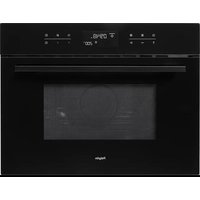
| Product type | Microwave oven |
| Brand | Pelgrim |
| Model | MAG535ONY |
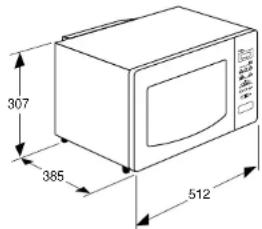
| Dimensions (W x H x D) | 512 x 307 x 385 mm |
| Power supply | 230 V ~ 50 Hz |
| Rated power input | 1300 W |
| Microwave power | 900 W |
| Microwave frequency | 2450 MHz |
| Number of power levels | 5 |
| Control type | Buttons and keys |
| Auto programs | Defrost (meat, poultry, fish, bread), Cook (potatoes, vegetables) |
| Special functions | 2-phase cooking, Quick start, Timer, Child safety |
| Display | Digital display |
| Door opening | Button release |
| Included accessories | Glass plate, Conductor ring |
| Care and cleaning | Clean with a damp cloth, do not use abrasives |
| Safety | Automatic stop when door opens, Child lock |
| Warranty | 5 years parts, 1 year labor and travel |
Frequently Asked Questions - MAG535ONY Pelgrim
User questions about MAG535ONY Pelgrim
0 question about this device. Answer the ones you know or ask your own.
Ask a new question about this device
Download the instructions for your Microwave Oven in PDF format for free! Find your manual MAG535ONY - Pelgrim and take your electronic device back in hand. On this page are published all the documents necessary for the use of your device. MAG535ONY by Pelgrim.
USER MANUAL MAG535ONY Pelgrim
natural_image
Simple diagram of a rounded rectangle with control panel on the right (no text or symbols)Hoog (100%) 900 W 1x
Midden-hoog (80%) 720 W 2x
Midden (60%) 540 W 3x
Ontdoolen (40%) 360 W 4x
Hoog (100%) 900 W Ex
≈
flowchart
graph TD
    A["Input"] --> B["Process Step 1"]
    B --> C["Output"]
    subgraph Stage 1
        D["Input: 10 min"]
        E["Time: 1 min"]
        F["Time: 10 min"]
    end
    subgraph Stage 2
        G["Input: 10 min"]
        H["Time: 1 min"]
        I["Time: 10 min"]
    end
    subgraph Stage 3
        J["Input: -"]
        K["Time: 1"]
        L["Output"]
    end
    subgraph Stage 4
        M["Input: +"]
        N["Time: +"]
        O["Output"]
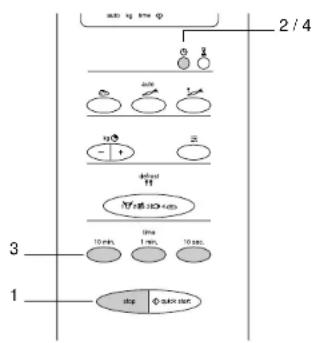
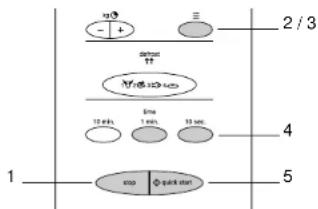
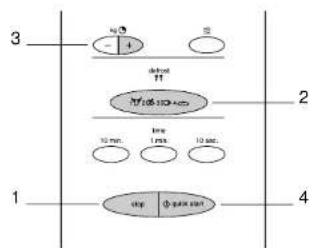
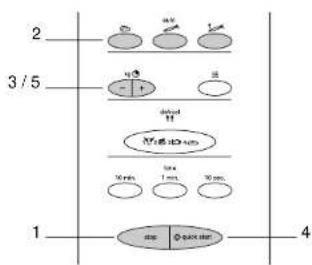
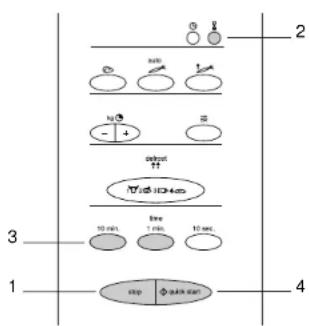
Opmerkingen
- stop / clear
- time setting (10 sec.)
- time setting (1 min.)
- time setting (10 min.)
- automatic defrost programs
- weight setting / time added/subtracted
- automatic cooking program for frozen vegetables
- automatic cooking program for vegetables
- automatic cooking program for jacket potatoes
- display
- clock
- timer
- microwave power level
- quick start
- door release
Accessories
- roller stay
- glass turntable
The microwave oven may not be used without the roller stay or turntable.
Preface
You will find information about the installation, safety, operation and maintenance of your appliance in this instruction booklet.
By reading this information, you will quickly learn all about the facilities the appliance offers.
Keep this booklet safely. Anyone using the appliance after you, will find it very useful.
We wish you much pleasure using your microwave oven.
Introduction
Cooking with your new microwave oven is safe and relaxing. You can have the tastiest dishes on the table in no time at all.
The appliance is extremely easy to use, partly thanks to the automatic cooking and defrost programs.
The microwave oven is also very easy to clean.
Table of contents
■ Safety 2
Points for your attention 2
■ Positioning 2
Positioning 2
■ Connection .... 3
Electrical connection....3
■ General 3
How the microwave works 3
■ Before use .... 4
Before first use 4
Points for your attention 4
Operation 5
Clock 5
Cooking 6
Quick start 7
Cooking in 2 stages 8
Automatic cooking 9
Automatic defrost 11
"-" and "+" buttons 13
Timer 14
Childproof lock 15
■ Cooking tips .... 16
Heating and cooking 16
Defrosting 17
Factors that can affect the
cooking process 17
Basic techniques 18
■ Cooking tables ..... 19
Microwave power levels 19
Reheating 19
Cooking vegetables 20
Cooking rice and pasta 21
■ Maintenance 22
Keep your appliance looking good ..... 22
■ Faults 22
Faults 22
Packaging 23
Disposal of packaging and appliance .... 23
■ Technical information ..... 23
Technical information 23
Points for your attention
■ Turn the power supply off before cleaning or repairing the appliance, preferably by removing the plug from the socket.
■ This appliance may only be used for the purpose for which it was designed, namely cooking food.
All other uses should be considered improper and dangerous. We do not accept responsibility in the event of damage due to improper, incorrect or irrational use of the appliance.
■ Children are not aware of the dangers that can arise when operating electrical equipment. For this reason do not allow children to use the microwave oven.
- Your microwave oven is only safe if the door closes properly! Never place an object in the door opening of the oven and make sure that the seal is always clean.
- Do not use the microwave oven if there is any damage to the door (bent), the hinges and catch (defective or loose) or the seal.
■ Only use the microwave oven for defrosting and cooking food and not, for example, for drying clothes or paper. These can catch fire.
■ Switch the microwave oven off and remove the plug from the socket if something in the oven catches fire. Keep the oven door closed.
Positioning
- Place the microwave oven on a firm, flat surface.
■ Make sure that there is sufficient ventilation around the microwave oven. Keep a 30 cm space free at the top. At the rear and sides keep at least 10 cm free.
■ Do not cover the air vents.
■ The adjustable feet should not be removed. - Do not place the microwave oven near a heat source.
■ Transmitting and receiving equipment such as radios and televisions can affect the operation of the microwave oven.
■ The appliance can also be built in.
text_image
307 385 512Electrical connection
This appliance requires a mains power supply of 230 V, 50 Hz alternating current.
The appliance must be grounded and under no circumstances should it be connected to a direct current supply.
Place the appliance near to a grounded wall socket.
How the microwave works
A microwave oven is a cooking appliance that uses microwaves to heat food. Microwaves are electromagnetic waves, just like radio and television waves. A radio converts these waves into sound, whereas a microwave oven converts them into heat.
The heat arises because the microwaves cause water and fat molecules, which are always present in food, to move quickly. The molecules slide past each other quickly and friction occurs. And friction causes heat (just try rubbing your hands together quickly).
The microwave oven heats food very intensively, because the waves penetrate the food directly. The waves do not just heat the outside of the food, as in traditional methods of cooking, but get right inside the food. Compared to conventional methods of cooking, with small quantities cooking time is much shorter.
Before first use
- Open the door and remove the packaging material.
■ Clean the inside of the oven and the accessories with a damp cloth. Do not use an abrasive cleaner or any strongly-smelling detergents. - Place the roller stay in the middle of the oven. Place the turntable on top of the roller stay.
■ The microwave oven may not be used without the roller stay or turntable.
■ Do not operate the oven when empty. - Check that the microwave oven is working correctly. Put a glass of water inside it. Switch the microwave oven on for one minute on its highest setting (see page 7, cooking). At the end of this time, the water should be hot.
NB:
If you want to boil a liquid (e.g. water), put a plastic spoon in the cup. It is possible that the liquid will boil without you seeing any bubbles. When you remove the cup from the oven, the liquid may start to boil violently and splash out of the cup, with the risk of scalding.
Points for your attention
The door may be opened if the microwave oven is switched on: the microwave oven then switches itself off automatically and the cooking time is stopped.
The microwave oven always heats with the same intensity, irrespective of the quantity of food you are cooking in the oven. The more you put in the microwave oven, the longer the cooking time.
Not all materials are suitable for use in the combi-microwave oven. The table below shows which materials you can use and which you cannot.
Material Permitted
paper yes
aluminium foil* yes
cling film yes
aluminium trays no
freezer / microwave dishes yes
heat-resistant plastic yes
unglazed earthenware no
glazed earthenware yes
metal cooking utensils no
normal glass yes
Pyrex and other ovenproof
glass and ceramics yes
dishes with metallic decoration no
metallic twists no
mercury thermometer no
sealed pots no
bottle with narrow neck no
roasting bags yes
* By covering thinner pieces of food (such as chicken legs) you prevent them cooking too quickly.
Clock
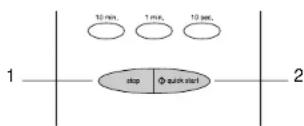
flowchart
graph TD
    A["1"] --> B["2/4"]
    B --> C["3"]
    C --> D["10 min"]
    C --> E["1 min"]
    C --> F["10 min"]
    D --> G["↑"]
    E --> H["↓"]
    F --> I["↑"]
    G --> J["↑"]
    H --> K["↓"]
    I --> L["↑"]
Note
Pull the plug out of the wall socket if any strange signs appear in the display.
Once you have set the clock, if you want to switch from the 12-hour clock to the 24-hour clock you must first disconnect the appliance from the power supply. Then reconnect the appliance and set the time.
The clock will work as long as the oven is connected to the mains. If the time has not been set, the display will show '0'. You can choose a 12-hour or 24-hour display for the clock. While the clock is being set, a colon flashes. The colon stops flashing when the clock has been set.
For example:
You want to set the clock to 14:35.
Setting the clock
-
Press
-
Press
The display shows "24 H".
Press again if you want to set the clock to the 12-hour setting.
- Set the hour using the button. Press
the button 14 times or keep the
10 min. button depressed until "14" appears in the display.
Set the minutes using the and.
10 sec, buttons.
Press the button 3 times or keep the
1 min. button depressed until "3" appears in the display.
Press the button 5 times or keep the
10 sec. button depressed until '5' appears in the display.
- Pres again
The clock begins working.
Cooking
Power level Press
High (100%) 900 W 1x
Medium-high (80%) 720 W 2x
Medium (60%) 540 W 3x
Defrost (40%) 360 W 4x
Defrost delicate (20%) 180 W 5x
High (100%) 900 W 6x
≈
flowchart
graph TD
    A["2/3"] --> B["detected"]
    B --> C["10 sec"]
    C --> D["1 sec"]
    D --> E["10 sec"]
    E --> F["4"]
    F --> G["5"]
    H["1"] --> I["exp 1 sec"]
    I --> J["exp 2 sec"]
You can choose from five power levels. You activate the power function by pressing ≈. This automatically sets the power level to maximum. You can then select the power level you require by pressing several times.
For example:
You want to cook fish on the medium power level (60%) for 5 minutes 30 seconds.
- Press
- Press to select the microwave function.
- Press twice to set the power level to medium (60%).
- Press 5 times and 3 times to, set the cooking time to 5 minutes 30 seconds.
5.

The microwave oven is switched on.
Quick start
With just one press on the start button you can cook for 30 seconds on maximum power. By pressing the button repeatedly you can increase the cooking time in steps of 30 seconds.
You can set the cooking time to a maximum of 10 minutes.
For example:
You want to cook a dish for 2 minutes on high power.
-
Press
-
Press 4 times to set the cooking time to 2 minutes on high power.
- You can increase the cooking time in the interim by pressing one or more times.
The microwave oven is switched on.
Note
See pages 16 to 21 for cooking tips and tables. The tables provide information about foods, microwave power levels and cooking times.
Note
See pages 16 to 21 for cooking tips and tables. The tables provide information about foods, microwave power levels and cooking times.
Cooking in 2 stages
flowchart
graph TD
    A["Start"] --> B["Step 1: Time 2"]
    B --> C["Step 2: Time 3"]
    C --> D["Step 3: Time 4"]
    D --> E["Step 4: Time 5"]
    E --> F["End"]
    style A fill:#f9f,stroke:#333
    style B fill:#ccf,stroke:#333
    style C fill:#cfc,stroke:#333
    style D fill:#fcc,stroke:#333
    style E fill:#cff,stroke:#333
    style F fill:#ffc,stroke:#333
The oven door may be opened during the 2-stage cooking program to check the food. After you have closed the door again and pressed start, the appliance will continue with the cooking program.
For example:
You want to cook on high power for 5 minutes (1st stage) and then on medium-low power (40%) for 13 minutes (2nd stage).
1st stage:
- Pressp
- Press once to select the microwave function.
- Press 5 times to set the cooking time to 5 minutes.
2nd stage:
- Press 4 times to set the microwave power level to 40%.
- Press once, and 3 times to set the cooking time to 13 minutes.
6.

Notes
You can interrupt the cooking program by pressing stop once.
Close the door and press 📋 quick start continue.
Press twice to cancel the program.
See pages 16 to 21 for cooking tips and tables. The tables provide information about foods, microwave power levels and cooking times.
Automatic cooking
flowchart
graph TD
    A["Stage 1: ATPase"] --> B["Stage 2: ATPase + H2O"]
    B --> C["Stage 3: ATPase + H2O"]
    C --> D["Stage 4: ATPase + H2O"]
    D --> E["Time Points: 10 min, 1 min, 10 sec"]
Automatic cooking (auto cook) enables you to cook your favourite foods very easily. You can choose from two cooking programs: jacket potatoes and vegetables. All you have to do is select the type of food and the weight. The microwave oven does the rest.
For example:
You want to cook 0.6 kg of jacket potatoes.
- Press
- Press to select the cooking program for jacket potatoes.
- Enter the weight using kg
Press 5 times to enter a weight of 600 grams.
- ♦ quickness
The microwave is switched on.
In the table on the following page you can see which cooking programs you can select. You can also read how to select the programs and for which dishes.
Notes
When you press the first time, the weight display for potatoes is already on 0.1 (by then pressing the button another 5 times you enter a weight of 600 grams). When you press the first time, the weight display for vegetables is already on 0.2.
Automatic cooking programs
In the table below, you can see which cooking programs you can use and for which foods the programs are suitable.
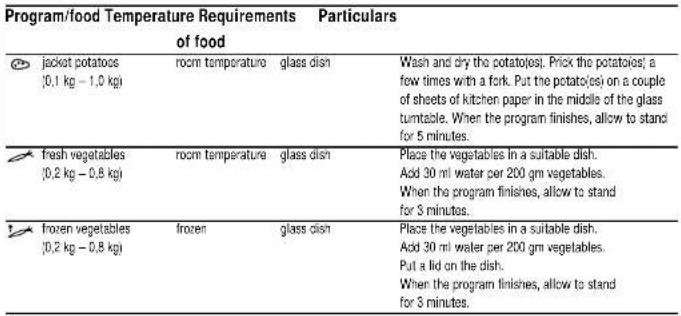 |
Automatic defrost
Type of food Symbol No. of times to press defrost butto
| meat 1x | |
| poultry 2x | 200 |
| fish 3x | 100 |
| bread 4x |
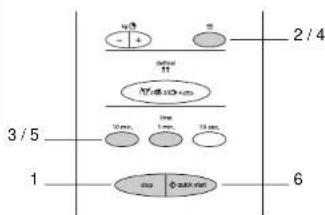
flowchart
graph TD
    A["Stage 3"] --> B["Arrow to -"]
    B --> C["Stage 2: dashed"]
    C --> D["Stage 1: w/100-100"]
    D --> E["Stage 1: 10 min."]
    D --> F["Stage 2: 1 min."]
    D --> G["Stage 3: 10 min."]
    H["Stage 1"] --> I["Arrow to +"]
    I --> J["Stage 4: +/−"]
    style A fill:#f9f,stroke:#333
    style H fill:#f9f,stroke:#333
There are 4 defrost programs (auto defrost) you can use to defrost frozen food; all you have to do is enter the weight of the food to be defrosted.
For example:
You want to defrost 1.4 kg of chicken.
Weigh the food. Remove all metallic objects such as metal twists and ties with metallic ends.
1. Pressp
-
Press twice to select the defrost program for poultry. The display shows dEF2.
-
Enter the weight using kg
Press 14 times to enter a weight of 1400 grams.
4. ♦ qR50888t
The microwave is now switched on.
Notes
An audio signal will sound during the defrosting time. The food can now be turned.
If possible, remove food that has already
defrosted. Press to continue.
If you do not react to the beep, it will automatically stop after a while. The program continues to run.
If you keep or depressed, the display will quickly run through the weights.
See pages 16 to 21 for cooking tips.
In the table on the following page you can see which defrost programs you can select. You can also read how to select the programs and for which dishes.
Automatic defrost programs
You can see from the table below which defrost programs you can use and for which foods the programs are suitable
| Program Type of No. of times to Min./max.food press button weight | |||||
| 1. | meat beef: mince, cubes of meat, steaks, rolled meat 1x | 0,1/4,0 kg | |||
| 2. | poultry | chicken: | whole chicken (< 2 kg), chicken breast, chicken legs | 205 2x | 0,1/4,0 kg |
| turkey: | turkey breast (< 2 kg), turkey legs | ||||
| 3. | fish | fish: | fillats, steaks, whole fish | 3x | 0,1/4,0 kg |
| shellfish: | crao, lobster, prawns, mussels | ||||
| 4. | bread | cut brown/white, rolls, French stick, croissants | 4x | 0,1/0,5 kg | |
Although the program defrosts automatically, you should still check the food frequently, just as for manual defrosting.
- For best results, first remove the packaging around meat and fish. Packaging can adversely affect the defrosting process. The presence of liquid from the fish or meat can lead to the formation of steam, which then cooks the outside of the food.
- If the packaging is difficult to remove, it is best to allow the food to defrost for one quarter of the defrosting time, which is shown in the display at the start of the defrost program. Take the food out of the microwave, remove the packaging and put the food back.
- Put the food in a shallow glass oven dish, to catch any liquid that comes out of it.
- The centre of the food should still feel slightly frozen when you take it out of the microwave.
- Place slices of bread between sheets of kitchen paper. Cut rolls in half first.
- For other foods, select a power level of 40% (defrost) or 20% (defrost delicate).
"-" and "+" buttons
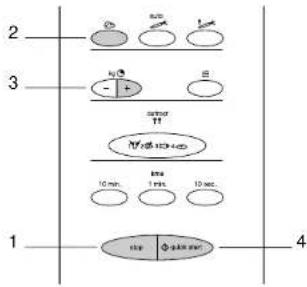
flowchart
graph TD
    A["2"] --> B["Cell"]
    C["3/5"] --> D["Cell"]
    E["1"] --> F["Cell"]
    G["4"] --> H["Cell"]
    I["2"] --> J["Cell"]
    K["3/5"] --> L["Cell"]
    M["1"] --> N["Cell"]
    O["4"] --> P["Cell"]
The automatic cooking programs operate on a fixed set time. You can shorten or increase this time during the program using the '-' or '-' buttons. You can use these buttons to adjust the cooking time for manually operated cooking as well (see page 6).
A shorter defrosting time:
-
Press
-
Select an automatic program with

-
Enter the weight using kg
-
♦ qRdessat
-
Press
Each time the button is pressed, the defrosting time is decreased by 10 seconds.
A longer defrosting time:
-
Pressp
-
Select an automatic program with ,or !
-
Enter the weight using kg
-
♦quReresst
-
Press
Each time the button is pressed, the defrosting time is increased by 10 seconds.
Note
If the dish needs to be in the oven for a longer or shorter time in combined cooking or when using the automatic cooking programs, adjust the cooking and buttons.
Timer
flowchart
graph TD
    A["Step 1: step"] --> B["Step 2: molecular components"]
    B --> C["Step 3: molecular structure with 10 min, 1 min, 10 sec"]
    C --> D["Step 4: molecular process with 'quit' start"]
    D --> E["End"]
appliance. The microwave does not have to be switched on. This is very useful when, for example, you want to boil an egg on the hob.
For example:
You want to set the timer to 15 minutes.
Setting the timer
- Press
- Press ☒
- Press once, and five times to set the timer to 15 minutes.
- Press ◆ quick start
The timer is switched on. The time in the display counts down. At the end of the time set, an audio signal can be heard and the word 'End' can be seen in the display.
Childproof lockThe timer works independently of the an 'lock' your microwave, so that it is no longer possible to start it.
Activating the childproof lock
- Pressp .
- Press and keep it depressed until L appears in the left of the display and an audio signal is heard.
- L remains visible in the display. The time is no longer shown.
All of the controls have been made inoperative.
Turning the childproof lock off
- Press and keep it depressed until L disappears from the display and an audio signal is heard.
The microwave can be used normally again.
Heating and cooking
■ Place the food on a suitable dish.
- The food should preferably be covered with, for example, microwave cling film or a suitable lid. Remove the cling film or lid carefully afterwards. The steam that comes off can be very hot!
■ If necessary, moisten foods that quickly become dry.
Before placing them in the microwave, first put potatoes and vegetables into cold water for a moment. This prevents a skin forming on them.
- Wide, flat foods become hot more quickly than narrow, tall foods.
■ For uniform results, it is best to stir or turn food once or twice.
- When reheating foods that are already cooked, always select the highest microwave power level.
■ The food should preferably be divided into small pieces.
- When cooking in the microwave, you only need small quantities of water, salt and seasoning.
It is best to add salt after cooking. This prevents moisture being drawn out of the food.
■ The food continues to cook for some time after the microwave has been switched off. Allow for this by not heating the food for too long.
Important
When heating small quantities of powdery products (such as when drying herbs), always place a glass of water in the microwave. Otherwise, due to the small quantity, there is a chance of spontaneous combustion.
Fish
Fish should be cooked gradually. With thin fish, fatty fish or small portions, therefore, set the power level to 40% (360 watt). In other cases, you can safely set the power level a bit higher. Allow, however, for the food continuing to cook after the microwave has been switched off.
Fish is done when the flesh has become opaque.
Defrosting
■ Always defrost large dense pieces using the defrost program. Thanks to the food defrosting gradually and evenly, you will not run the risk of the outside drying out while the centre is still frozen.
- To speed up the defrosting process, it is recommended that after a while the food be divided up into smaller pieces.
■ For large pieces of meat and dense food, introduce a couple of breaks into the defrosting process.
- When defrosting irregularly shaped food, halfway through the defrosting time you can cover or wrap the thin parts with aluminium foil.
- When freezing foods, you can already allow for them being defrosted in the microwave by not using aluminium foil or trays and by freezing flatter portions.
Factors that can affect the cooking process
The cooking times given in this booklet are only indications. The temperature of the ingredients affects the cooking times. A cold meal will require a longer cooking time than a meal that is already at room temperature.
Light, porous foods cook more quickly than heavy, solid foods, such as stews and rolled meats. Take care when cooking light, porous foods. The edges quickly become dry and tough.
■ Bones and fat conduct heat better than meat. Cover chicken legs and wings, for example, with aluminium foil.
■ Microwaves penetrate food to a depth of about 3 cm. The centre of thick foods is heated as a result of heat from the heated part (the outside) spreading to the inside. Thin and ring-shaped foods are heated the quickest and are therefore also done the quickest.
■ Meat and poultry that is cooked in the microwave for more than about 15 minutes becomes lightly browned. Any food cooked for a shorter time can be rubbed beforehand with a "browning" sauce, such as Worcestershire sauce, soya bean oil or barbecue sauce.
■ Greaseproof paper prevents splashing. Food also retains heat better.
■ Small pieces of food are heated more evenly if you place them separately in the microwave, preferably in a circle.
Basic techniques
Arranging food
- Place thicker pieces at the outside on the glass turntable. Foods placed at the outside on the glass turntable receive the most microwaves.
Stirring
- By stirring dishes regularly you distribute the heat stored in them. Always stir from outside to inside, since the outside of the dish always becomes hot first.
Turning
■ Turn large, thick foods frequently. They then cook more regularly and quickly.
Aluminium foil
- Aluminium foil blocks the microwaves. By covering thinner parts of foods (such as chicken legs) you prevent them from becoming done too quickly.
Pricking
- Foods with a skin or shell, such as egg yolks, shellfish and fruit, burst in the microwave. You can prevent this by pricking them a few times with a fork or skewer beforehand.
Checking
- Foods cook quickly. You should therefore check them frequently. Take food out of the microwave just before it is done.
Standing
- Once you have taken it out of the microwave, let the food stand covered for, in general, 3 to 10 minutes. The food continues to cook. Foods that have a dry crust, such as cake, should not be covered.
Microwave power levels
You can see from the table below from which five power levels you can choose and for which foods the power levels are suitable.
| Power level Wattage No. of times to Foodpress ≈ button | |
| high (100%) 900 W 1x – boiling water, reheating | – cooking chicken, fish, vegetables |
| medium-high (80%) 720 W 2x – reheating | – cooking mushrooms, shellfish– cooking dishes containing egg and cheese |
| medium (60%) 540 W 3x – cooking eggs [take care!] | – cooking rice, soup |
| defrost (40%) 360 W 4x – defrosting | – malting chocolate and butter |
| defrost 180 W 5x – defrosting sensitive/delicate foodsdelicate (20%) – defrosting irregularly-shaped foods | – softening ice cream– allowing dough to prove |
Reheating
| Food Quantity Power level Time (min.) Remarks | ||||
| milk drinking chocolate stock | 200 ml (1 cup) | 900 W | 1 1/2 - 2 1/2 | Do not cover. |
| soup | 250 ml (1 bowl) | 900 W | 2 - 3 | Do not cover; stir once. |
| rice, fried rice, chow mein | 1 person | 900 W | 2 - 3 | Stir once to twice. |
| 4 persons | 900 W 10 - 12 | Stir once to twice. | ||
| vegetables | 1 person | 900 W | 1 1/2 - 2 | Stir vegetables once. |
| 500 g | 900 W | 7 - 8 | Stir vegetables once. | |
| prepared meal | 1 person | 900 W | 3 - 4 | The time is dependent, among other things on the starting temperature (for example, whether the food food was from the fridge or not). |
| large piece of meat (clons) | 500 g | defrost (360 W) | 7 - 9 | Do not cover and brush with melted butter or oil if necessary. |
| fried meat in gravy | 4 slices | 900 W | 5 - 7 | Cover. |
| smoked sausage | 250 g | 720 W | 1 1/2 - 2 | Fierce vacuum pack with fork. |
| half chicken | 400 g | 900 W | 3 - 5 | Cover chicken until halfway through cooking time. Then place in dish without lid. |
| fried fish | 150 g | 900 W | 1 - 3 | Do not cover. |
Cooking vegetables
- Use fresh vegetables if possible. If the vegetables have become limp because they have been kept for too long, you can refresh them by placing them in cold water for a little while.
- Use a large dish to cook vegetables, so that the bottom of the dish is not covered by too thick a layer.
- Cook vegetables with the water that adheres to them, unless otherwise stated in the table.
■ Always cover the dish with a lid or microwave cling film.
- Do not add salt. The salts naturally present in the vegetables usually provide enough flavour. If you must add salt, do so after cooking.
- Cook vegetables for as short a time as possible. Allow for them continuing to cook after the microwave has been switched off.
- Check whether the vegetables are done or not with a fork or skewer.
Food Quantity Power level Time (min.) Remarks
| potatoes | 500 g | 900 W | 6 - 7 | Use potatoes of the same size. |
| endive 500 g | 900 W 6 - 7 | |||
| blanched celery | 500 g | 900 W | 7 - 8 | If necessary, peel the lower part of the stalks.Cut into 2.5 cm pieces. |
| cauliflower | 500 g | 900 W | 7 - 9 | Cut into equal-sized florets. |
| broccoli | 500 g | 900 W | 7 - 8 | Cut into equal-sized florets. |
| Chinese cabbage 500 g | 900 W 6 - 8 | Shred the cabbage. | ||
| kohlrabi | 500 g | 900 W | 7 - 9 | Cube the kohlrabi. |
| leeks 500 g | 900 W 7 - 8 | Cut the leek into 2 cm pieces. | ||
| red cabbage | 500 g | 900 W | 8 - 10 | Remove the stalk and the ribs. Shred the cabbage.Add 2 – 4 tablespoonfuls of water. |
| French beans | 500 g | 900 W | 7 - 8 | Acid 2 tablespoonfuls of water. |
| spinach | 500 g | 900 W | 5 - 7 | More than 500 g is too bulky.Cock it in a pan. |
| sprouts | 500 g | 900 W | 7 - 8 | Acid 75 ml water. |
| chicory | 500 g | 900 W | 7 - 9 | Place the heads with the thick part to the outside. |
| white cabbage | 500 g | 900 W | 8 - 9 | Only use fresh cabbage. Remove the ribs. Shred the cabbage and add 2 – 4 tablespoonfuls of water. |
| carrots | 500 g | 900 W | 7 - 9 | Only use young carrots. Add 2 tablespoonfuls of water and, if desired, a knob of butter. |
| poached apples | 500 g | 900 W | 4 - 5 | Peel the apples, cut them in half and remove the |
| cores(6 halves) | Place them in a circle in the dish. If desired,add syrup, cinnamon and raisins. | |||
| mushrooms | 250 g | 900 W | 2 - 3 | Clean the mushrooms with a damp cloth.Braise the mushrooms with perhaps some butter anda finely-cut onion, if desired. Slice large mushrooms. |
Cooking rice and pasta
Food Quantity Power level Time (min.) Remarks
| rice 250 g 900 W 5 Wash the rice. Put the rice in a dish and add 300 ml+ of water. Cover the dish and bring it to the boil. When360 W 10 the rice boils, stir it once and let it finish cookingon a lower power level. Allow the rice to stand for 10 minutes. |
| brown rice 250 g 900 W 6 Wash the rice. Put the rice in a dish and add 300 ml+ of water. Cover the dish and bring it to the boil. When360 W 15 the rice boils, stir it once and let it finish cookingon a lower power level. Allow the rice to stand for 10 minutes. |
| pasta 250 g 900 W 7 Fill a large dish with 1.3 litres of hot water. Bring the- water to the boil and add the pasta. Cook the pasta360 W 7 gently on the lower power level until it is done. |
Keep your appliance looking good
Before starting to clean the microwave oven, remove the plug from the socket or turn the switch in the meter cupboard to zero.
Clean the inside immediately after use. Use a damp cloth to remove any condensation, liquid that has boiled over and food remains. Crumbs and liquid that remain behind absorb microwave energy and lengthen cooking times.
Clean the inside and outside of the oven regularly using soapy water and dry it thoroughly with a dry cloth.
Make sure that the microwave distributor cover (inside the oven on the right) is clean. A cover which is not clean may cause sparking.
Clean the accessories regularly; use soapy water and a brush and dry the accessories thoroughly with a dry cloth. The accessories may also be washed in a dishwasher.
Check the door closure and the door seal regularly for damage.
Odours will disappear if you put a glass of vinegar or water - with lemon juice added - in the oven space. Switch the microwave on for two minutes on full power. Then wipe with a damp cloth.
Do not use the oven if the door or the door closure is damaged.
Faults
If the microwave oven does not cook as well as it should do, if there is sparking inside it, or if it does not start, etc., first try to find the reason for the problem yourself before phoning the service department. You can do this by referring to the points listed below.
– Is the plug in the socket?
– Is the door closed properly?
- Have the power level and the cooking time been set properly?
- Are there any objects in the microwave oven which shouldn't be there?
- Are you using the correct cooking utensils?
- Are both the roller stay and the turntable in the microwave oven?
- Are the ventilation openings blocked?
- Has the food been defrosted sufficiently?
– Did you stir or turn the food during cooking?
– Is the childproof lock turned on?
Disposal of packaging and appliance
Render discarded appliances unusable immediately by removing the plug from the socket and cutting the cable.
It is important that an old microwave oven is disposed of in a responsible manner and in accordance with the regulations.
The packaging materials used for your new microwave oven should also be disposed of in a responsible way.
You can obtain information about the responsible disposal of discarded household appliances from the relevant authorities.
Technical information
Power supply 230 V - 50 Hz
Connected load 1300 W
Frequency of microwaves 2450 MHz
Microwave output (IEC 705) 900 W
Dimensions (wxhxd) 512 x 307 x 385 mm
Forte (100%) 900 W 1x
Moyennement forte (80%) 720 W 2x
Moyenne (60%) 540 W 3x
Forte (100%) 900 W 6x
Appuyez ≡
Hoch (100%) 900 W 1x
Mittelhoch (80%) 720 W 2x
Mittel (60%) 540 W 3x
Auhtauen (40%) 360 W 4x
Hoch (100%) 900 W 6x
≈
Pelgrim gives a 5 year guarantee on the appliance, provided it is professionally installed by a qualified fitter in accordance with the installation instructions.
Pelgrim is obliged for the period of 5 year from purchase date to replace parts free of charge.
For the period of 1 year from purchase date no charges will be made for housecalls or labour. This guarantee covers all defects caused by manufacturing faults or defective parts.
When service is required, purchase receipt and guarantee certificate must be presented.
Defects caused by incorrect installation are not covered by this guarantee.
Name and adress of fitter: ____
Purchase date: ____