
Leopard G5 - Slicer BEEM - Free user manual and instructions
Find the device manual for free Leopard G5 BEEM in PDF.
| Product type | Multifunction meat grinder |
| Brand | BEEM |
| Model | Leopard G5 |
| Dimensions (W x H x D) | 160 x 390 x 285 mm |
| Net weight | 3.9 kg |
| Power supply | 220 – 240 V~, 50 Hz |
| Power consumption | 500 W |
| Protection class | II |
| Protection type | IPX0 |
| Materials | Motor housing in plastic, grinder head in aluminum, accessories in plastic and metal |
| Main functions | Meat grinding, sausage making, kibbeh making, small cake making |
| Included accessories | 3 perforated grates (∅ 3, 5, 7 mm), cross knife, screw auger, filling tray, pusher, locking ring, centering ring and sausage tubes, kibbeh attachment with sleeve, small cake accessory, instruction manual |
| Maximum operating time | 10 minutes, followed by a 30-minute cooling period |
| Overload protection | Integrated thermal cutoff, automatic shutdown in case of overload |
| Cleaning | Motor housing: wipe with a damp cloth. Other parts: wash in warm soapy water (do not put aluminum parts in dishwasher, plastic parts are dishwasher safe) |
| Spare parts | Available, e.g. drive gear ref. 900 760 001, contact customer service |
| Warranty | Statutory warranty + extended manufacturer warranty on some products (see beem.de) |
Frequently Asked Questions - Leopard G5 BEEM
User questions about Leopard G5 BEEM
0 question about this device. Answer the ones you know or ask your own.
Ask a new question about this device
Download the instructions for your Slicer in PDF format for free! Find your manual Leopard G5 - BEEM and take your electronic device back in hand. On this page are published all the documents necessary for the use of your device. Leopard G5 by BEEM.
USER MANUAL Leopard G5 BEEM
Elements of Lifestyle
Bedienungsanleitung
User Manual
Mode d'emploi
Gebruiksaanwijzing
Leopard G5
Fleischwolf
Meat grinder
Hachoir à viande
Gehaktmolen
Open the fold-out page at the beginning and end of the user manual in order to view the illustrations during reading.
Safety instructions ..... 17
Startup 19
Appliance description ..... 2 0
Preparations....20
Operation and use 21
Recipe suggestions....23
After using 24
Cleaning and care 25
Storage 25
Spare parts and other accessories .. 25
Technical data 25
Troubleshooting 26
Dear Customer,
before using the appliance, please read the instructions contained in this user manual on startup, safety, intended use as well as cleaning and care.
Open the fold-out page at the beginning and end of the user manual in order to view the illustrations during reading.
Keep this user manual in a safe place and pass it on to any future owners together with the appliance.
General notes
Copyright
This document is copyrighted. Any duplication or reprinting, in whole or in part, and the reproduction of the illustrations, even in modified form, is only permitted with the written approval of the manufacturer.
Notes on environmental protection

The packaging materials used can be recycled. When no longer re-d, dispose of the packaging materials rding to local environmental regula-

This product may not be disposed of in the domestic refuse within the European Union. Dispose of the appli-via communal collection points.
Guarantee
In addition to the statutory warranty obligation, BEEM also grants an extended manufacturer's guarantee for some products.
Provided this is granted, the corresponding details for each product can be found either on the product-specific packaging, advertising material or on the BEEM website.
Please visit our website to obtain more information on comprehensive guarantee conditions, available accessories and spare parts as well as user manuals in various languages.
Symbols used
DANGER
This indicates an imminent hazardous situation, which could lead to severe physical injury or death.
Follow these instructions to avoid danger.
WARNING
This indicates a possible hazardous situation, which could lead to severe physical injury or death.
Follow these instructions to avoid danger.
CAUTION
This indicates a potentially hazardous situation, which could lead to minor injuries or material damage.
Follow these instructions to avoid danger.
NOTE!
A note contains additional information to simplify the use of the appliance.
Intended use
This appliance is intended primarily for non-commercial use in closed rooms for mincing meat and making sausages and shortbread biscuits in normal household quantities. Any use other than previously stated is considered as improper use.
WARNING
If not used for its intended purpose and/or used in any other way, the appliance may be or become a source of danger.
Use the appliance only for its intended purpose.
Observe the procedures described in this user manual.
No claims of any kind will be accepted for damage resulting from use of the appliance for other than its intended purpose. The risk must be borne solely by the user.
Limitation of liability
We assume no liability for damage or follow-up damage in the case of:
failure to observe the instructions in ■ the user manual,
use for other than the intended purpose,
improper or unsuitable handling, ■
incorrectly performed repairs, ■
unauthorised modifications, ■
use of non-approved parts or spare ■ parts,
use of unsuitable supplementary or accessory parts.
Declaration of Conformity
BEEM hereby declares that this appliance complies with the fundamental requirements and other relevant provisions of 2006/95/EC and 2004/108/EC directives.
Safety instructions
Inspect the appliance for visible signs of damage before use. Do not use a damaged appliance.
This appliance is not intended for use by persons (including children) with restricted physical, sensory or mental capabilities or with insufficient experience and/or knowledge unless they are supervised by a person responsible for their safety or have received instructions on the use of the appliance from such a person.
Children must be supervised to ensure that they do not play with the appli- ance.
Store the appliance and accessory ■ parts out of the reach of children.
Do not leave the appliance unattended during operation.
Only allow repairs to the appliance ■ to be carried out by an authorised specialist or by the works customer service; this particularly applies to replacing a damaged connecting cable. Unqualified repairs can lead to considerable danger for the user. They will also invalidate the guarantee.
Repairs to the appliance during the ■ guarantee period may only be carried out by service centres authorised by the manufacturer as the guarantee will otherwise be invalidated in the event of damage or subsequent damage.
Defective parts may only be replaced with original spare parts. Only original spare parts guarantee that the safety requirements are met.
Only use spare parts from the manufacturer or spare parts that are specifically recommended by the manufacturer. The guarantee will otherwise be invalidated.
Do not use this appliance together with an external timer or a separate remote control system.

DANGER
Danger from electric current!
Do not use the appliance if the mains cable or mains plug is damaged.
Do not open the housing of the appliance. Danger from electric current if live connections are touched and/or the electrical and mechanical configuration is changed.
Never immerse the appliance or the mains plug in water or other liquids.
Pull the plug out of the mains socket, before assembling/disassembling-the attachment,
- if you are not using the appliance,
- if a malfunction occurs during operation,
– before you clean the appliance.
Risk of suffocation!
▶Never play with packaging material.
Risk of suffocation.

WARNING
Danger from sharp blades!
Do not touch the blades of the mincing knives.
Danger from moving parts!
Always disconnect the mains plug ▶ before assembling, disassembling, cleaning or storing the appliance.
Never insert your fingers or objects into the feed shaft or the feed shaft.
Always push food in with the pusher. Never use your fingers or other objects.
Only operate the appliance when the attachment is fitted.
CAUTION
Do not pull the connecting cable ▶ to remove the plug from the mains socket.
Do not use sharp objects or abrasive cleaning agents to clean the surfaces.
When using for prolonged periods ▶ of time, allow the appliance to cool down occasionally to avoid overheating.
Never lift or move the appliance with the mains cable.
Move switch A position "R" and hold for max. 10 seconds (see section
Eliminating blockages; page 22), otherwise the motor could be damaged.
Only push the reverse button after the drive motor has come to a complete stop.
Requirements for the place of use
For safe and trouble-free operation of the appliance, the place of operation must satisfy the following requirements:
Place the appliance on a firm, dry, flat and waterproof surface.
Do not install the appliance in a hot, ■ wet or very humid environment.
■The mains socket must be easily accessible and allow fast disconnection in the event of an emergency.
■The surface finishes on furniture may contain substances that can be detrimental to the feet of the appliance. If necessary, place a mat under the feet of the appliance.
Electrical connection
For safe and trouble-free operation of the appliance, the following instructions must be observed for the electrical connection:
Before connecting the appliance, ■ compare the connection data (voltage and frequency) on the rating plate with those of your mains power supply. The data must correspond in order to avoid damage to the appliance. If in doubt, ask your electrical appliance retailer.
The mains socket must be protected by at least a 10 A automatic circuit breaker.
Ensure that the mains lead is undamaged and is not laid over sharp edges.
The mains cable must not be pulled ■ tightly, bent or come into contact with hot surfaces.
Route the cable to prevent risk of tripping.
The electrical safety of the appliance is only assured when it is connected to a properly installed protective earth (PE) conductor system. Connection to a mains socket without PE conductor is forbidden. If in doubt, the electrical system must be checked by a qualified electrician. The manufacturer assumes no liability for injury or damage caused by a missing or interrupted protective earth conductor.
Startup
Unpacking
Remove the appliance, all accessory parts, also out of the pusher, and the user manual from the box
Remove all packaging materials and protective foils from the product and the accessories before using it for the first time.
NOTE!
Do not remove the rating plate or any warning signs on the appliance. If possible, keep the original packaging during the guarantee period in order to be able to pack the appliance properly in the event of a guarantee claim. Transport damage will invalidate the guarantee.
Check the delivery contents
Check for visible signs of damage or missing items.
Report incomplete or damaged contents to your supplier immediately.
Before using for the first time
Clean the appliance and the accessories, as described in the section Cleaning and care (page 25).
Appliance description
(See illustration on the left fold-out page)
Lid, pusher1
Pusher2
Tray3
Release button4
Handle5
Motor unit6
Switch A7
Switch B8
Fixture9
feed shaft10
Attachment11
Drive pinion12
Screw conveyor13
Mincing knives14
Perforated disc15
15a Small perforated disc ( 3 mm)
15b Medium perforated disc (∅ 5 mm)
15c Large perforated disc (∅ 7 mm)
16 Locking ring
17 Pusher for shortbread biscuits
18 Shortbread biscuit attachment
19 Sausage filling disc
20 Kebbe attachment
21 Kebbe shaper
22 Sausage filling shaft 1
23 Sausage filling shaft 2
24 User manual (not illustrated)
Switch positions
■ Switch A (7) and switch B (8) at "ON" position: normal operation
■ Switch A (7) at "0" position: appliance switched off
■ Switch A (7) and switch B (8) at "R" position: reverse operation
Overload protections
The motor is protected against overloading by a thermal circuit breaker. It stops automatically in the event of overloading. In this case, switch off the appliance and allow it to cool for approx. 60 minutes.
CAUTION
▶ Observe the maximum operating time of 10 minutes.
▶ Allow the appliance to cool down afterwards for 30 minutes before it is switched on again.
Preparations
Preassembly
Using as mincer (image A)
◆ Insert the screw conveyor (13) into the attachment (11).
◆ Insert the mincing knife (14) with the blades facing outwards into the square of the conveyor screw.
Put the desired perforated disc (15a, 15b, 15c) onto the screw. The notch in the perforated disc must lie over the keyway of the attachment (image E).
♦ Screw on the locking ring (16).
Making sausages (image B)
◆ Insert the screw conveyor (13) into the attachment (11).
Put the sausage filling disc (19) onto the screw. The notch in the sausage filling disc must lie over the keyway of the attachment.
◆ Insert the desired sausage filling shaft (21, 22) through the locking ring (16).
◆ Screw on the locking ring (16).
Using the Kebbe attachment (image C)
Insert the screw conveyor (13) into the attachment (11).
Put the Kebbe shaper (21) onto the screw. The notch in the Kebbe shaper must lie over the keyway of the attachment.
Put the Kebbe attachment (20) onto the Kebbe shaper (21).
Screw on the locking ring (16).
Making shortbread biscuits (image D)
Insert the screw conveyor (13) into the attachment (11).
Put the large perforated disc (15c) onto the screw. The notch in the perforated disc must lie over the keyway of the attachment (image E).
NOTE!
The perforated disc must be ▶ mounted so that the screw conveyor is held in position.
If you select a perforated disk with small holes, the appliance will become too hot during operation. The fat in the batter will melt and drip out of the shortbread biscuit mould.
Put the shortbread attachment (18) ◆ without pusher onto the perforated disc.
Screw on the locking ring (16).
Insert the pusher into the shortbread attachment.
NOTE!
You can choose the shape of the ▶ biscuit by pushing the pusher of the attachment into the desired shape. If you turn the locking ring too tightly, the appliance will also become too hot during operation. Turn the locking ring back about half a turn.
Assembling the attachment (image F)
Assemble the attachment for the desired application as described in the section Preassembly (page 20).
Insert the preassembled attachment ◆ into the fixture (8).
Turn the attachment clockwise until it ◆ audibly snaps in.
◆ Put the tray (3) onto the feed shaft (10).
Removing the attachment (images G1 and G2)
Remove the tray.
◆press and hold down the release button (4), turn the attachment (11) clockwise an pull off the attachment.
◆Inscrew on the locking ring (16).
◆Remove all parts from the attachment.
Operation and use
Notes
Using as mincer
If you wish to make very fine mince, ■ you can feed the meat through several times (initially use a perforated disc with large holes and then one with smaller holes).
You can chop the ingredients (e. g., ■ onions) together with the mince.
Inedible parts such as bones, gristle or tendons must be removed before mincing.
Dice the meat first so that it fits into the feed shaft.
Making sausages
Soak the sausage skin in lukewarm ■ water for 10 minutes. Push the wet sausage skin over the sausage filling shaft. Sausage skins can be obtained at the butchers.
Season the mince and put it into the ■ funnel.
If the sausage skin is sticky, dampen it again with a little lukewarm water.
Numerous recipes are available in the Internet. For example, it is possible to individually season each one with different spices until the desired flavour has been found.
Using the Kebbe attachment
Kebbe (Kibbeh Mischwiye) is filled meat rolls. A hollow roll is made with the Kebbe attachment that can be cut to the desired length and filled with various different ingredients (e.g., meat, vegetables). The Kebbe portions are subsequently fried.
Switching the appliance on/off
Move switch B (8) followed by switch A (7) to the "ON" position to switch on the appliance.
Move switch A (7) to position "0" (middle position) to switch off the appliance.
Using the appliance
Assemble the attachment as de- described in the section Assembling the attachment (page 20).
Insert the plug into the mains socket.
Switch on the appliance as described in the section Switching the appliance on/off (page 22).
Put a suitable container under the outlet.
Cut the ingredients into pieces to fit ◆ into the feed shaft.
◆ Add the ingredients into the feed shaft
◆Press the ingredients downwards using the pusher (2) until the feed shaft is empty.
Eliminating blockages
Switch off the appliance as described in the section Switching the appliance on/off (page 22).
◆ Move switch B (8) to position "R".
◆ Move switch A (7) to position "R" and hold down for max. 10 seconds. When you release the button, it springs back to position "0".
◆pull the plug out of the mains socket.
Remove the attachment as described in the section Removing the attachment (page 21).
Clean the appliance and the accessories used as described in the Cleaning and care section (page 25).
Recipe suggestions
Grilled sausage
Ingredients
- 1.5 kg pork
- 500 g raw bacon
- 2 eggs from the refrigerator
- 100 ml cold milk
•1 large onion - clove of garlic
• Seasoning: salt, pepper, majoram
Chop the pork and bacon und in the mincer. Add the milk, eggs, finely chopped onions, crushed garlic clove and the seasoning. Mix well.
Pull the sausage skin over the sausage shaft and knot the end. Insert the sausage stuffing into the filling funnel and fill slowly. After approximately 20 cm, turn the sausage and continue filling evenly.
The sausages taste best when they are grilled immediately. However, it is possible to freeze them for approximately 3 weeks.
Meet wrap for the Kebbe
Ingredients (for approx. 20 pieces)
- 250 g bulgur wheat
- 500 g lean beef, mutton or veal
•1 onion
Salt
Pepper
A smooth dough is made from the ingredients. The bulgur wheat must be soaked in water first. Pour out surplus water after approximately 20 minutes. Mince the meat several times in the mincer and season the bulgur wheat and the finely chopped onions with salt and pepper. Mix well until a smooth dough is formed.
Tips:
You can also use flour (approximately 200-250 g) instead of bulgur wheat.
Cool down the finished meat wraps ■ first to ease filling.
Classical Kebbe filling
Ingredients (for approx. 20 pieces)
•1 onion
●A little olive oil
●2 teaspoons of pine nuts
- 500 g mutton (or beef for example)
Salt
•Pepper
•Fryer fat
Mince the meat in the mincer three times. Steam the onions in the olive oil. Add the pine nuts and fry to a golden brown. Add meat, season with salt and pepper and fry until the meat has a crispy colour.
Now fill the meat wrap with mince and push the ends together with wet hands in order to close them. The ends of the egg-shaped dumplings are pushed together to a point to achieve the typical shape. Fry the Kebbe pieces to a golden brown in frying fat heated to approx 160-170 °C. Take the finished pieces out of the fat, put them onto kitchen paper to allow the fat to drip off and serve them hot. They taste best together with salads, dips and pitta bread.
Shortbread biscuits
Ingredients
- 200 g butter
- 200 g of sugar
-1 packet of vanilla sugar
•200 g ground almonds
2 eggs - 400 g of flour
- 100 g starch
Whip the butter, sugar, vanilla sugar to a froth and add eggs little by little. Then add the almonds, flour and starch to the butter mass and mix well. Wrap the dough in cling film and allow it to rest for 30 minutes before continuing.
First mount the shortbread attachment. Fill the filling shaft with the dough and allow it to run through the shortbread attachment. Cut the shortbread to the desired length and put the pieces onto the baking tray covered with baking paper. Bake the biscuits at medium heat (approx. 175 °C) for approx. 10 minutes.
After using
Switch off the appliance as described in the section Switching the appliance on/off (page 22).
Pull the plug out of the mains socket.
Remove the attachment as described in the section Removing the attachment (page 21).
Clean the appliance and the accessories used as described in the section Cleaning and care (page 25).
Cleaning and care
Before beginning work, pay attention to the safety instructions in the Safety section (page 17)!
Cleaning the appliance
Wipe the motor unit (10) with a slightly damp cloth.
All other parts can be cleaned in a warm washing-up liquid solution. They are not suitable for the dishwasher. It is possible that strongly acidic cleaning agents will react with the aluminium parts. The plastic accessories can be cleaned in the dishwasher.
Dry all parts of the appliance thor- ◆ oughly after cleaning.
NOTE!
Dried and caked food residues can be removed more easily if you allow them to soak in warm washing-up liquid solution for 10 minutes before cleaning.
Storage
If you do not intend to use the appliance for a longer period of time, clean it as described in the section Cleaning and care (page 25).
Store the appliance and all accessory parts at a dry, clean and frost-free location, which is protected against direct sunlight.
Mount the shortbread attachment.
Remove the lid from the pusher, insert the other accessory parts in to the pusher and then replace the lid.
Spare parts and other accessories
Item* Article No. Designation
| 12 900 760 001 | Drive pinion, complete |
* numbering according to the description of the appliance
Contact our customer service department for other spare parts (see last page).
Technical data
| Model | Leopard G5 mincer |
| Type number | M26.001 |
| Dimensions (W x H x D) | 160 X 390 x 285 mm |
| Approx net weight. | 3.9 kg |
| Operating voltage | 220 – 240V~ |
| Mains frequency | 50 Hz |
| Power consumption | 500 W |
| Protection class II | |
| Type of protection | IPX0 |
Troubleshooting
The following table will help you locate and eliminate minor faults:
| Fault Possible cause Remedy | ||
| Plug not inserted into socket. Insert plug. | ||
| The appliance does not function after switching on. | Automatic circuit breaker in electrical distribution board tripped. | Switch on the automatic circuit breaker again. |
| The internal safety switch has switched off the appliance as a result of overheating. | Allow the appliance to cool down. | |
| Both switches A (7) and B (8) have not been moved to the "ON" position. | Move both switches to the "ON" position. | |
| The automatic circuit breaker in the electrical distribution board trips. | Too many appliances connected to the same power circuit. | Reduce the number of appliances on the power circuit. |
| No fault detected. | Contact customer service. | |
| Pressure too strong. Exert less pressure. | ||
| Motor runs extremely slowly or stops. | The mincer attachment is blocked. | Eliminate blockage as described in the section Eliminating blockages (page 22). |
NOTE!
If you cannot resolve the problem with the steps described above, please contact customer service.
Table des matières
natural_image
Close-up of a circular perforated drain with a white circle highlighting a small feature, labeled 'E' in the top-left corner (no other text or symbols)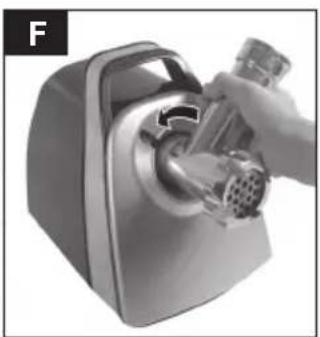
natural_image
Close-up of a hand holding a metal grater with a handle, no visible text or symbols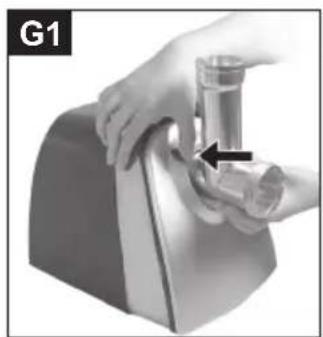
natural_image
Close-up of hands holding a small glass bottle over a device (no visible text or symbols)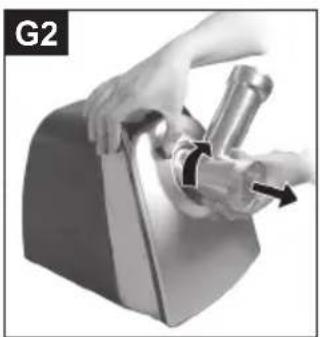
natural_image
Close-up of hands operating a mechanical device with a metallic handle and arrow indicator (no text or symbols)Kundendienststelle:
Customer service:
Bureaux de service après-vente:
Klantenservice:

Elements of Lifestyle
BEEM
Subject to printing error.
For service in other countries contact your local dealer.


- Bedienungsanleitung
- Leopard G5
- General notes
- Copyright
- Notes on environmental protection
- Guarantee
- Symbols used
- DANGER
- WARNING
- CAUTION
- NOTE!
- Intended use
- Limitation of liability
- Declaration of Conformity
- Safety instructions
- Requirements for the place of use
- Electrical connection
- Startup
- Unpacking
- Check the delivery contents
- Before using for the first time
- Appliance description
- Switch positions
- Overload protections
- Preparations
- Preassembly
- Using as mincer (image A)
- Making sausages (image B)
- Using the Kebbe attachment (image C)
- Making shortbread biscuits (image D)
- Assembling the attachment (image F)
- Removing the attachment (images G1 and G2)
- Operation and use
- Notes
- Using as mincer
- Making sausages
- Using the Kebbe attachment
- Switching the appliance on/off
- Using the appliance
- Eliminating blockages
- Recipe suggestions
- Grilled sausage
- Ingredients
- Meet wrap for the Kebbe
- Ingredients (for approx. 20 pieces)
- Tips:
- Classical Kebbe filling
- Shortbread biscuits
- After using
- Cleaning and care
- Cleaning the appliance
- Storage
- Spare parts and other accessories
- Troubleshooting
- Table des matières
- BEEM
Brand : BEEM
Model : Leopard G5
Category : Slicer