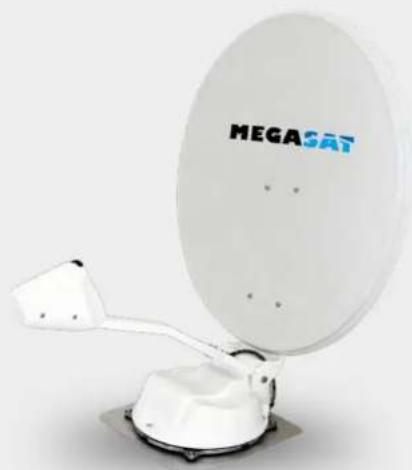
Caravanman 85 Premium - Satellite receiver MEGASAT - Free user manual and instructions
Find the device manual for free Caravanman 85 Premium MEGASAT in PDF.
| Brand | Megasat |
| Model | Caravanman 85 Premium |
| Product type | Satellite receiver with motorized antenna |
| Dimensions of the mirror | 850 x 910 mm (W/L) |
| Dimensions of the control unit | 295 x 46 x 130 mm (W/H/D) |
| Antenna weight | approx. 5 kg |
| Power supply | 12 VDC, 5 A |
| Consumption during search | 12 V / 20-30 W |
| Consumption during standby | 12 V / 0.01 W |
| Tilt angle | 0° - 70° |
| Search angle | 360° |
| Tilt speed | 6°/second |
| Rotation speed | 14°/second |
| Orientation time | 1-2 minutes |
| Temperature range | -20°C to +50°C |
| Polarization | Vertical / Horizontal |
| Frequency band | Ku band |
| Frequency range | 10.7 - 12.75 GHz |
| LNB gain | 37 dB |
| Reception power | 44 dBiW |
| Number of participants | 1 |
| LNB type | Universal Single I/II B |
| GPS receiver | No |
| Auto skew | No |
| Main functions | Automatic satellite search, motorized alignment, wired control, firmware update via SD card |
| Maintenance and cleaning | Clean the surface with a lint-free cloth and a suitable cleaner. Avoid abrasive products. |
| Safety | Install on a stable roof, observe safety distances (30 cm minimum from air conditioners). Use a 7 A fuse on the power supply. |
| Spare parts and repairability | The mirror is removable for transport. Connection cables can be replaced. Contact a dealer or technician for repairs. |
| General information | Manual available in several languages upon request. Compliant with European directives 2014/30/EU, 2014/35/EU, 2014/53/EU. |
Frequently Asked Questions - Caravanman 85 Premium MEGASAT
User questions about Caravanman 85 Premium MEGASAT
0 question about this device. Answer the ones you know or ask your own.
Ask a new question about this device
Download the instructions for your Satellite receiver in PDF format for free! Find your manual Caravanman 85 Premium - MEGASAT and take your electronic device back in hand. On this page are published all the documents necessary for the use of your device. Caravanman 85 Premium by MEGASAT.
USER MANUAL Caravanman 85 Premium MEGASAT
SD CARD DETECTED WRITING SOFTWARE
2.1 Installation on the roof 05
2.2 Gluing instructions 06
2.3 Installing the roof outlet 07
2.4 Installation indoors.. 08
2.5 Installation of the dish 08
2.6 Connection diagram 09
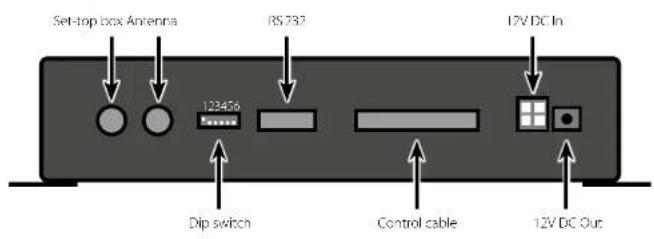
3. The Control Unit
3.1 Front view 10
3.2 Rear view 10
3.3 Default setting for the dip switch 10
- Satellite transmission 11
- Startup and operation 12
- Skew Setting values 14
7.Troubleshooting 15 - Footprint 1/
- Mounting Dimensions 18
- Firmware Update 19
- Specifications 20
1. Introduction
1.1 Safety Information

Caution - Improper handling by unqualified personnel can cause serious damage to this equipment. Unqualified personnel who tamper with this equipment may be held liable for any resultant damage to the equipment.
Note - Before you begin, carefully read each of the procedures in this manual. If you have not performed similar operations on comparable equipment, do not attempt to perform these procedures.
1.2 Short description
The satellite antenna system is the innovative and a technologically advanced satellite Positioner system. The antenna has a unique combination of cutting-edge components. Fast satellite search and compatibility with all digital, HD-ready set-top boxes and TV sets are guaranteed.
1.3 Delivery
- Motor unit
·Dish
Control unit (IDU) incl. powercable (ca. 1,50 m) - Antenna cable (10 m)
Antenna cable (1 m)
Control cable (7 m) (water resistant)
Roof outlet - Weather protection for cable connector
- mounting glue (optional)
Power supply 230 V (12 V, 5 A) (optional) - User manual
1. Introduction
1.4 System components 2.1 Installation on the roof
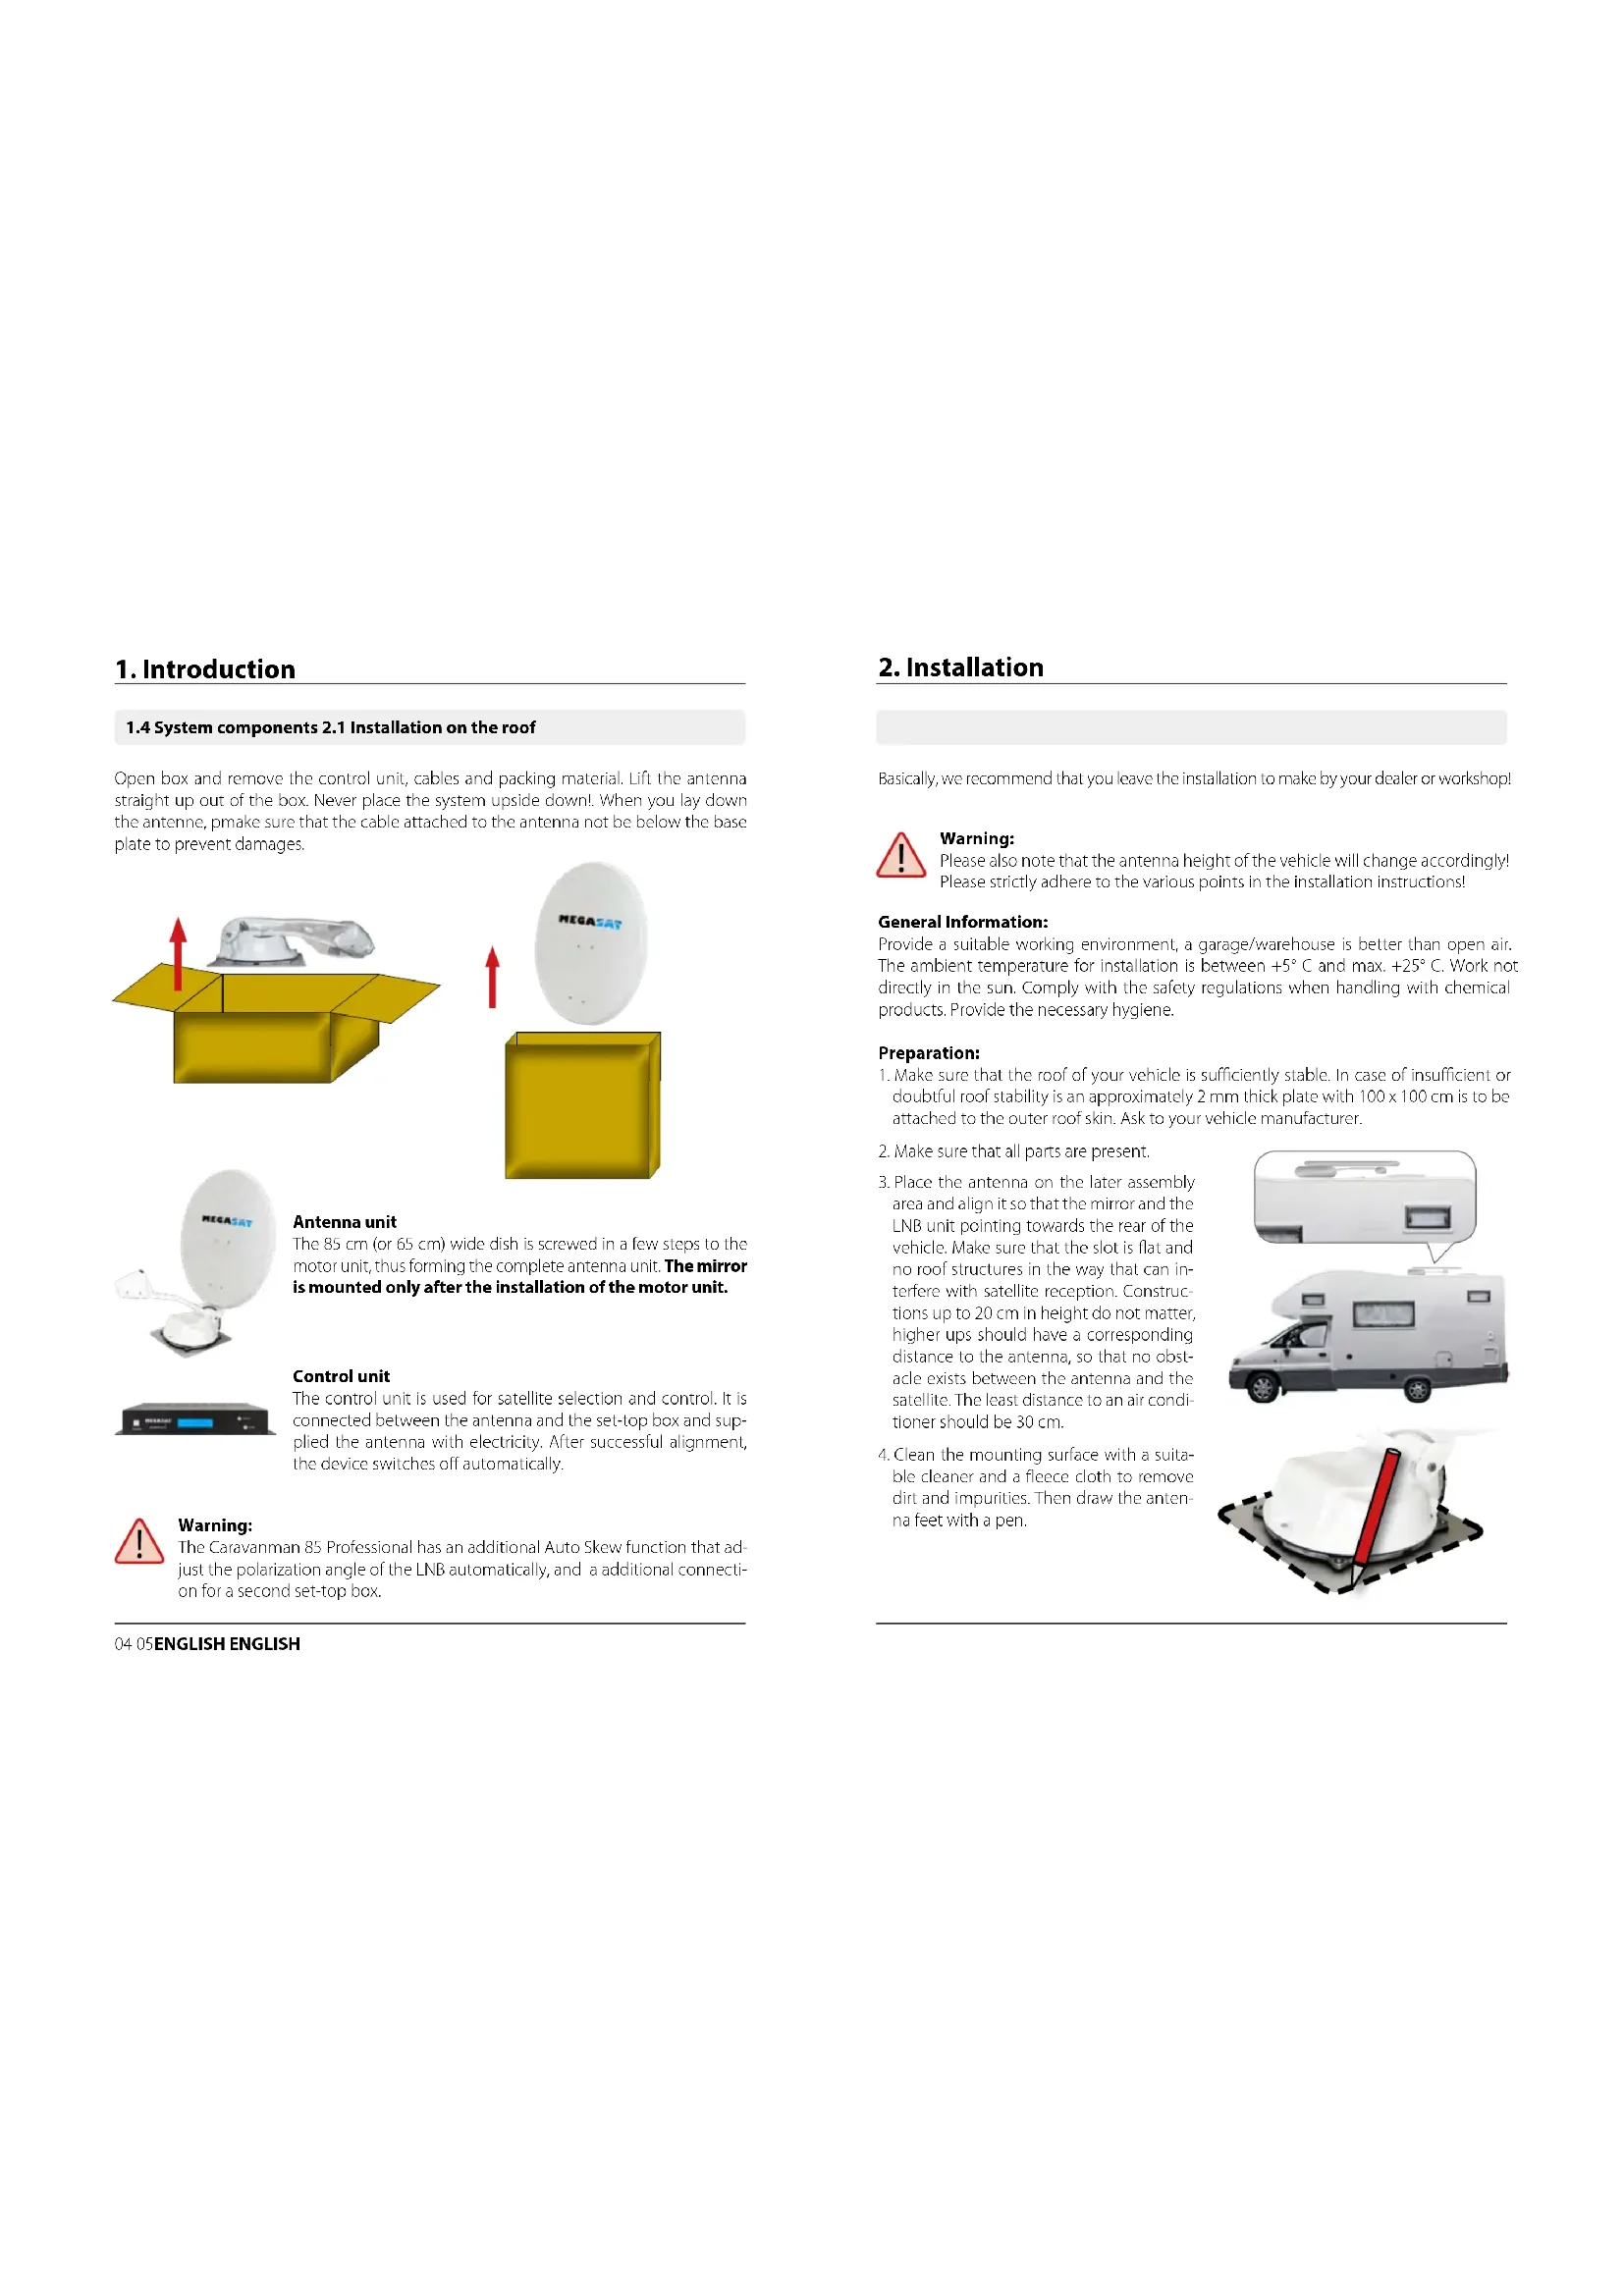
Open box and remove the control unit, cables and packing material. Lift the antenna straight up out of the box. Never place the system upside down! When you lay down the antenna, pmake sure that the cable attached to the antenna not be below the base plate to prevent damages.
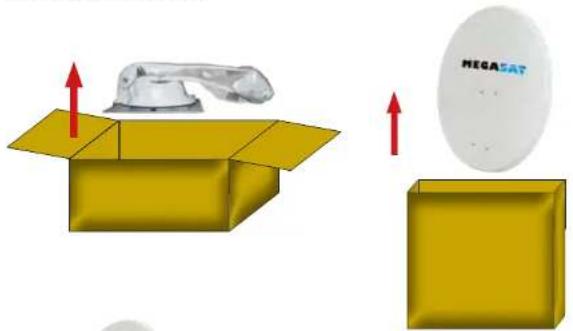
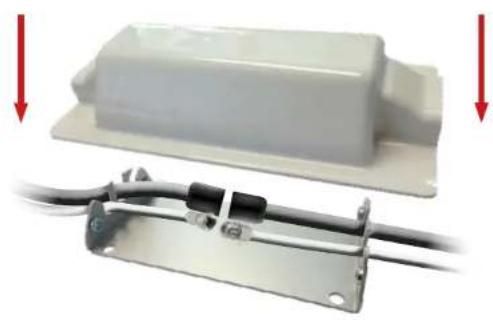
Antenna unit
The 85~cm (or 65~cm ) wide dish is screwed in a few steps to the motor unit, thus forming the complete antenna unit. The mirror is mounted only after the installation of the motor unit.
Control unit
The control unit is used for satellite selection and control. It is connected between the antenna and the set-top box and supplied the antenna with electricity. After successful alignment, the device switches off automatically.

Warning:
The Caravanman 85 Professional has an additional Auto Skew function that adjust the polarization angle of the LNB automatically, and a additional connection for a second set-top box.
2. Installation
Basically, we recommend that you leave the installation to make by your dealer or workshop!

Warning:
Please also note that the antenna height of the vehicle will change accordingly! Please strictly adhere to the various points in the installation instructions!
General Information:
Provide a suitable working environment, a garage/warehouse is better than open air. The ambient temperature for installation is between +5^ and max. +25^ . Work not directly in the sun. Comply with the safety regulations when handling with chemical products. Provide the necessary hygiene.
Preparation:
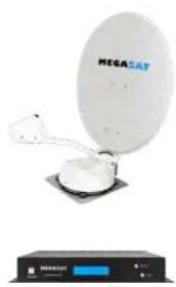
- Make sure that the roof of your vehicle is sufficiently stable. In case of insufficient or doubtful roof stability is an approximately 2 mm thick plate with 100 × 100 cm is to be attached to the outer roof skin. Ask to your vehicle manufacturer.
- Make sure that all parts are present.
- Place the antenna on the later assembly area and align it so that the mirror and the LNB unit pointing towards the rear of the vehicle. Make sure that the slot is flat and no roof structures in the way that can interfere with satellite reception. Construction up to 20cm in height do not matter, higher ups should have a corresponding distance to the antenna, so that no obstacle exists between the antenna and the satellite. The least distance to an air conditioner should be 30cm .
- Clean the mounting surface with a suitable cleaner and a fleece cloth to remove dirt and impurities. Then draw the antenna feet with a pen.

2. Installation
- Roughen the drawn areas and foot with sandpaper (120 grit) to easily and thoroughly clean the surface again with cleaner (WARNING: then no longer touch areas) and let the clean dry for about 10 minutes.
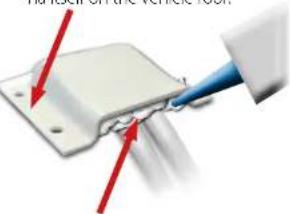
2.2 Gluing instructions
1.Prepare the glue for mounting.
2. Now take the glue on the underside of the antenna base in serpentine lines, so that the glue can harden well to the inside.
3. Now place immediately (within 5 minutes after adhesive application), the antenna on the marked fields. Press your feet slightly and evenly and fix the antenna so that it stays in place, eq by an adhesive tape. It must be after pressing for at least 2mm glue between antenna and surface. The adhesive is cured max. in 48 hours at +18^ and a relative humidity of 50% . Should prevail low humidity during the assembly time, spray after bonding in the vicinity of the antenna always some water in the air.
4. Remove any spilled adhesive immediately with a putty knife or similar and clean the soiled surfaces with the cleaner and a fleece cloth.
5. For safety, you can attach the antenna base additionally. Given by drill through the existing hole in the respective antenna to the roof of your car and fix it with a screw with locking nut. In order for the freshly bonded feet can not slip, wait with this work until the adhesive has cured.
6. After the complete assembly and curing of the adhesive, a silicone can be drawn around the antenna bases.
2. Installation
2.3 Installation of the roof outlet
- If you have no way to feed the cable through an existing Roof outlet, seek a suitable piece (best in the slipstream behind the antenna) on the roof for the installation of the Roof outlet to prevent ingress of moisture (eg rain or splashing) in to avoid borehole. Make sure that the cable is not bent too much signal loss and to avoid damaging the cable (bending radius max. 5-7 cm).
- To install the weatherproof housing for the cable connector, glue as described above, the base plate to a suitable location of your vehicle. Connect the connecting cable and insert it into the slot provided. Now put the cover on the base plate and fix it with the screws. Seal openings here both with the weather-resistant silicone material.
The Roof outlet taped as the antenna itself on the vehicle roof.
After installation the roof outlet, the opening must be sealed with weather-resistant silicone.
2. Installation
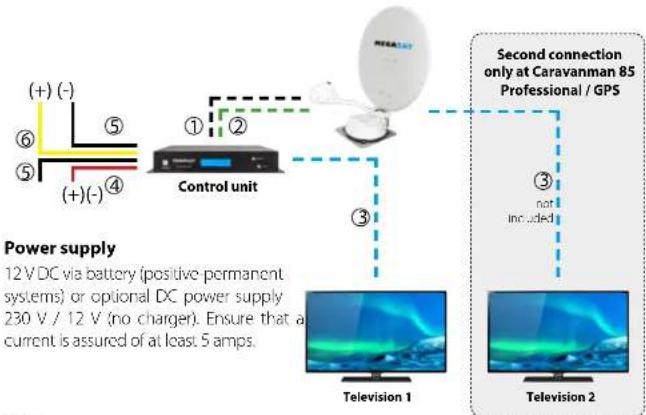
2.4 Installation indoors 2.6 Connection diagram
- The control cable and coaxial cable is routed inside the vehicle.
IMPORTANT: The control cable must not be shortened. - Make sure when you choosing a location for the control unit and the set-top box that both devices are in a dry and a protected place.
- Do not place the control unit and the set top box close to heat sources and ensure sufficient ventilation.
-
Below are the basic connections for the antenna system are shown:
-
Connect the power supply (red and black thick cable) for the control unit to your car battery via a fuse (7 amps) to avoid a cable fire at short circuit. The yellow cable is connected to the ignition plus of the vehicle (12 volts line only when the ignition leads), and also protected with a fuse of 7 amps. The remaining black wire is connected to the corresponding negative (ground).
- Connect the cables coming from the antenna to the control unit:
- 7 m Control cable with green connector into „CONTROL CONNECTOR“
- 10 m Coaxial cable with F-connector in „ANTENNA“
- Connect the control unit to the set-top box: -1,5 m Kcoaxial cable with F-connector from "RECEIVER" to set-top box.
2.5 Installation of the dish
- Turn on the control unit.
- Press the SEARCH button and wait until the back part of the antenna is erected.
- Remove the power supply to the control unit - the search is interrupted and you can now assembly the dish.
- After assembly the dish you can connect the power supply back on and start a normal scan.
2. Installation
Ignition positive
The Caravanman automatically moves to the folded state when the ignition key is turned. This function is only available when the controller is turned off and cables 5 and 6 are connected. The control unit displayed "IGNITION".
Note
The control cable (7 m) can not be reduced, because that can cause interference.
1 Control cable 7 m
Coaxial cable 10m
③ Coaxial cable 1 m
④ Positive pole
5 Minus pol
6 Plus ignition
Information:
The antenna does not have to necessarily be operated with two receivers!
3. The Control unit
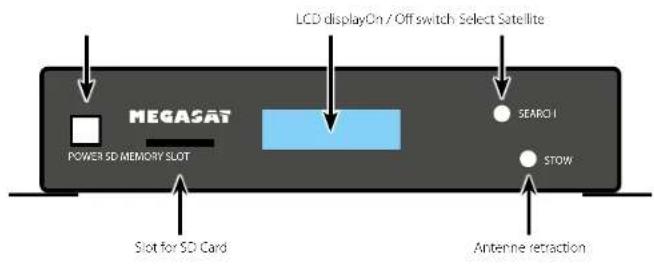
3.1 Front view
3.2 Rear view

3.3 Default setting for the dip switch

Should not be the DIP switches in this position, the antenna unit can not search automatically for a satellite.
4. Satellite transmission
Choice of location
Direct Broadcast Service (DBS) satellites broadcast audio, video and data information from satellites located 22,000 miles in space. A receiving station, such as the antenna, should include a dish and satellite receiver to receive the signals and process them for use by the consumer audio and video equipment. The system requires a clear view of the satellite to maximize the signal reception.
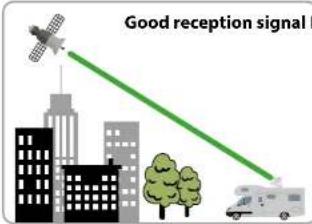
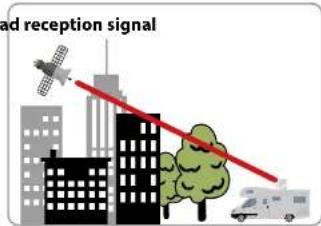
Objects such as tall lighthouse, bridges and big ship that block this view will cause a loss of signal. The signal will be quickly restored once the antenna has a clear line of sight again. Heavy rain, cloud, snow or ice may also interfere with the signal reception quality. If the satellite signal is lost due to blockage or severe weather condition, services from the receiver will be lost (picture will freeze frame and may disappear). When the satellite signal strength is again high enough, then the receiver will resume providing desired programming services.
Note to Caravanman 85 Professional GPS:
The integrated GPS receiver ensured a fast and accurate alignment of the antenna. With GPS, the location will be determined and directed the tilt angle and the skew of the LNB exactly. Especially in peripheral areas of the footprints, the search time can be shortened.
5. Startup and operation
Operation from firmware version: 2.2A / 3.2A
- Turn on the controller using the POWER button. The display then shows the current firmware version of the control unit.
- As soon as you press the SEARCH button on the control unit, the antenna unit starts searching and the display shows the last set satellite (default - Astra 19.2° East) and the display starts flashing quickly. During this time (about 5 seconds) you can change the satellite using the SEARCH and STOW buttons.
- The Start Elevation indicator starts flashing quickly.
Note (optional): In order for the antenna to find a satellite signal faster, you can now set the start elevation (see table). Use the SEARCH and STOW keys to change the values. In the future, the antenna always starts the search with the last used elevation setting, in which a signal was found. This feature is not mandatory and is useful only if you frequently switch between the northern and southern locations of the satellite footprint (more than 300 km away).
With the Caravanman 85 Professional GPS the elevation adjustment is not necessary as the antenna determines the values via the GPS signal itself.
- After a successful search, the control unit will remain operational for approx. 30 seconds and then switch off automatically. If necessary, you can start a satellite change during this time. If the control unit is switched off, you must start with point 1 to change the satellite.
Note: If you want to change a satellite, the antenna no longer moves to the basic position, but remembers the current position and automatically calculates the position of the new satellite. This significantly shortens the search for the new satellite!
- If you want to retract the antenna, switch on the control unit and press the STOW button.
Note: Changing the satellite is only possible as described, but not during the search process!
12 13 ENGLISH ENGLISH
5. Startup and operation
Programmed satellites:
Astra 1 (19,2° East)
Astra 2 (28,2° East)
Astra 3 (23.5° East)
Astra 4(4,8° East)
Astra 5 (5,0° Last)
Eutelsat 9A (9,0° East)
Holbird (13,0° East)
- Irispatat (30,0° West)
Eutelsat 5 West A (5,0° West)
Thor (0,8° West)
Turksat (42,0 East)
Hellas Sat 2 (39,0° East)

During the search, the display shows the message FAILURE appears. This is not a defect of the antenna unit. The message only appears while the antenna compares the detected signal with the IDs of stored satellites. Recognizes the signal and the antenna can assign it one of the stored satellites, LOCKED appears on the display. This process is repeated until the area you choose satellite is found.

To turn off the controller, you must press the STOW and SEARCH button at the same time. To turn it back on, press the power button on the front of the control unit.
Elevation setting values for European capitals
The following settings are only for the Caravanman 65/85 Premium (without AutoSker).
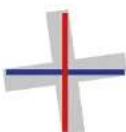
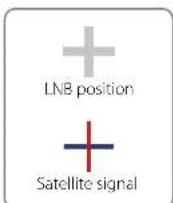
Signals in the vertical (red) and horizontal (blue) line have an offset of exactly 90^ to each other. Due to the different position of the satellites, depending on your location, it is possible that the signals do not meet exactly vertically and horizontally on the LNB. To adjust this, turn the LNB into the correct position to the transmitted signal. This adjustment to the LNB is called, skew adjustment. The following figure shows the optimal setting of the LNB. More accurate the match, the better of reception.
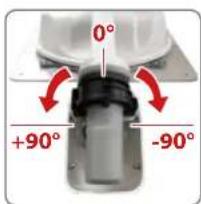

bad reception
good reception

best reception
| Country City | Astra 2 | Astra 3 | Astra 4 | Thar | Hispani | Futelsat S | ||||
| Bulgaria | Sofia | +1.7 | -6.8 | +11.4 | +11.0 | -19.0 | +24.0 | +41.0 | +27.2 | |
| Denmark | Copenhagen | 3.4 | 0.4 | 12.5 | 0.3 | 15.3 | 8.1 | 124.8 | 111.8 | |
| Finland | Helsinki | +5.2 | -7.9 | +10.3 | +6.2 | -11.2 | +14.2 | +25.2 | +16.0 | |
| France | Paris | 13.9 | 10.5 | 7.2 | 9.2 | 2.2 | 12.9 | 125.0 | 6.3 | |
| Germany | Berlin | -4.1 | -0.7 | +2.8 | +0.3 | +6.6 | +10.8 | +27.8 | +13.5 | |
| England | London | -13.7 | -10.7 | -7.8 | -10.3 | -4.0 | -0.6 | +21.6 | +3.9 | |
| Greece | Athens | 11.3 | 7.3 | 112.7 | 113.4 | 22.5 | 128.1 | 145.9 | 131.6 | |
| Hungary | Budapest | -1.3 | -3.0 | +6.0 | +5.6 | -12.8 | +17.5 | 134.7 | 120.5 | |
| Italy | Rome | 9.8 | 5.0 | 0.4 | 0.6 | 18.5 | 114.6 | 137.0 | 118.5 | |
| Poland | Warsaw | +1.5 | +5.1 | -8.4 | -6.1 | +12.2 | +16.2 | +31.0 | +18.8 | |
| Portugal | Lisbon | 30.2 | 27.0 | 23.7 | 25.3 | 15.8 | 16.1 | 123.9 | 5.1 | |
| Spain | Madrid | -24.8 | -21.2 | -17.6 | -18.7 | -9.9 | -3.2 | +27.5 | +1.5 | |
| Belgium | Brussels | 11.2 | 7.0 | 4.8 | 7.0 | 0.3 | 14.4 | 124.7 | 19.3 | |
| Sweden | Stockholm | +1.1 | +3.8 | -6.4 | +3.0 | +7.8 | -11.0 | +21.8 | +13.0 | |
| Switzerland | Bern | -11.3 | -7.5 | -3.8 | -5.2 | +2.4 | +7.8 | +29.5 | +11.4 | |
| Austria | Vienna | 3.4 | 0.7 | 14.5 | 13.0 | 10.2 | 115.0 | 132.9 | 118.0 |
7. Troubleshooting
No Signal
Objects such as trees, bridges, and large buildings, which are located in the angle of the satellite will lead to a loss of the signal.
If the satellite signal is lost through severe weather conditions, the current program of the receiver is stopped (the image freeze, or disappear). If the weather conditions allow a good reception again, the TV screen will be restored.
Satellite can't be found (only for 65/85 Premium without Auto Skew)
If the antenna has not found satellites, check the Skew settings for the satellite at your location. Please check the table of Skew settings. The basic setting of the LNB is 0^ . Should they deviate more than 5^ , adjust the degrees accordingly.
There is dirt on the antenna?
Excessive dirt on the dish may cause reception problems.
Everything is properly connected and turned on?
Your satellite TV receiver might be set up incorrectly or defective. First check the receiver's configuration to ensure it is set up for the desired programming. In the case of a faulty receiver, refer to your selected receiver's user manual for service and warranty information.
Satellite footprint
Satellites are positioned in fixed positions in orbit above the equator. To receive TV signals, the receiving location must be within the coverage area. Check reference to the graphic, if you are located in the footprint of the satellite. In the fringes of the footprint may lead to reception interference.
Satellite frequency data changed
If some channels work, while one or more other channels do not, or if the antenna cannot find the selected satellite, the satellite's frequency data might have changed.
7. Troubleshooting
Emergency operation: A failure in the antenna, you can change the DIP switch on the back of the unit, control the Antenna manually.

up down


Cycle Test
The antenna simulates the search.

Manueller Modus (Elevation)
The antenna can be controlled via the SEARCH and STOW button.

Manueller Modus (Azimuth)
The antenna can be controlled via the SEARCH and STOW button.
Note: The default settings of the DIP switch, see page 10.
Error messages of the control unit
EL Motor STALL
Elevation motor blocked, the antenna can not straighten up.
AZ Motor STALL Azimuth motor blocked, the antenna can not turn.
EL Motor NO POWER Elevation motor receiving sufficient power.
AZ Motor NO POWER Azimuth motor receiving sufficient power.
SOLUTION: Please check the connecting of the control cable and/or whether an adequate power supply for the antenna is present (12 V, 5 A)
SK Motor NO POWER Skew errors of the Auto Skew unit
SK Count Skew errors of the Auto Skew unit
SOLUTION: Please contact a technician of your local dealer.
Note:
After an error message, the control unit must be turned off by simultaneously pressing the STOW and SEARCH button. To switch on, press the Power button again.
8. Footprint
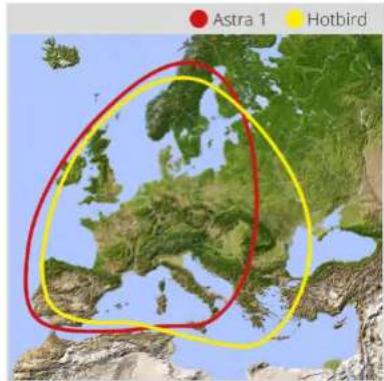
Caravanman 65
Caravanman 85
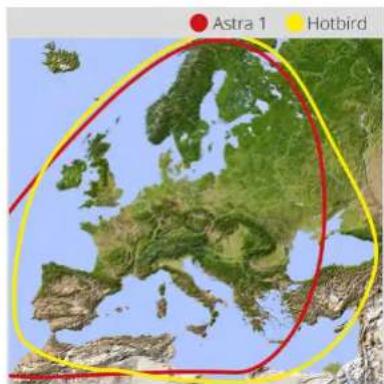
Note: In the bullying areas of the footprint there may be interference.
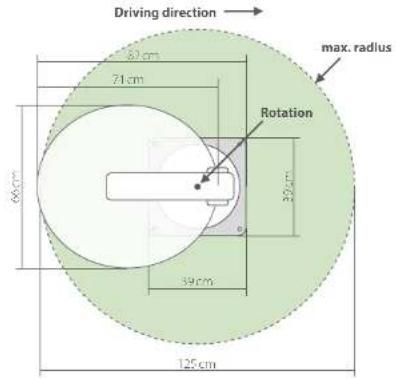
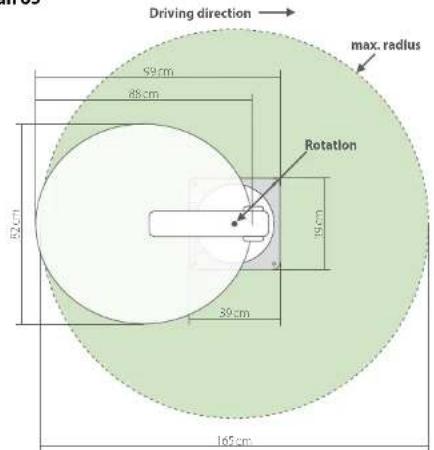
9. Mounting Dimensions
Caravanman 65
Caravanman 85
18 19 ENGLISH ENGLISH
10. Firmware update
When the frequency is switched off, on which the antenna idendiliziert the satellite, you must update the firmware of the control unit.
The current firmware version of the control unit, you can read on the bottom of the screen in the first 3 seconds after switching on.
Please check our website for the latest firmware version.
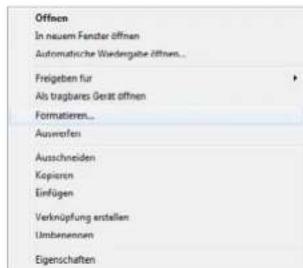
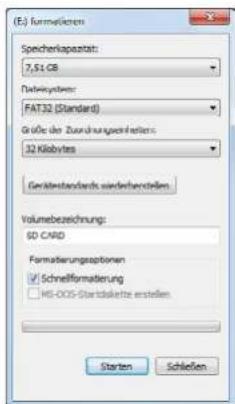
Preparing the SD card:
Before you use the SD card, format it to ,FAT32
After you format the SD card, copy the new firmware on it.

Update process:
- Insert the SD card into the slot on the front side of the control unit.
- Turn on the controller.
- The following will appear in the display:
SD CARD DETECTED
WRITING SOFTWARE
- After the software is copied, the following message appears:
LOAD COMPLETE
- Now remove the SD card.
- The firmware is updated now.
11. Specifications
| 65 Premium 85 Premium 85 Professional GPS | ||
| Antenna type Off Set dish | ||
| User 1.2 | ||
| Habit type | Universal Single INI Universal win INI | |
| Frequency band Ku Band | ||
| Frequency range TC/6dB alt 1.7A/sb | ||
| INR gain | 37 dBi.9 dBi | |
| Received power 40 dBW | 44 dBiW | |
| Polarization | Vertical / Horizontal | |
| Motor | 2-Axis DC Motor | |
| GPS Receiver | no | yes |
| Auto Skew | no | yes |
| Elevation | 0° to 70° | |
| Azimuth | 360° | |
| Prevalence speed | 6° per second | |
| Azimuth speed | 13° per second | |
| Search time | 1-2 min. | |
| Temperature range | -70°C to +50°C | |
| Power supply | 12VDC @ 5 Ampere | |
| Power in use | 12V/20-30W | |
| Power in stancyc | 12 V/0.01 W | |
| Dimensions dish | 860 x 710mm (W/H) | 850 x 910mm (W/H) |
| Dimensions (class) | 820 x 860 x 100mm | 1020 x 850 x 100mm (L/W/-) |
| Weight antenna | ca. 14 kg | ca. 15 kg |
| Dimensions control unit | 295 x 46 x 130 mm (M/F/T) | |
Note:
Weight and dimensions are not absolutely exact values.
Technical details can be changed at any time without prior notice.
Important note for a complaint

In case of complaint please note the following:
- Remove the dish from the motor unit.
In the event of a complaint, the mirror is usually not required. - Send the antenna in original packaging
(alternatively use a comparable, sturdy packaging) - Ensure adequate padding in the package to prevent transport damage
Always send the control unit including accessories
Please use our service form for a complaint. You can download this on our website
www.megasat.tv.
Conformity information
Hereby declare the company Megasat Worke GmbH that the following devices is in compliance with the essential requirements and other relevant provisions of Directive 2014/30/EU (EMV), 2014/35/EU (LVD) and 2014/53/EU (RED):
Megasat Caravanman 65 Premium (Article-No.1500119)
Megasat Caravanman 65 Premium Twin (Article-No.1500163)
Megasat Caravanman 85 Premium (Article-No.150009/)
Megasat Caravanman 85 Professional GPS (Article-No.1500162)
The Declaration of Conformity for these products is located at the company:
The declaration of conformity can be downloaded from our homepage:
www.megasat tv/support/downloads
Version: 3.8 (February 2020) // Technical changes, misprint and errors reserved.
Megasat Werke GmbH Industriestraße 4a D-9768 Niederlauer www.megasattvinfo@megasattv
MEGASAT
Caravanman 65/85 Premium
Caravanman 85 Professional GPS
Mode d'emploi
Sommaire
1. Introduction
Mode manuel (Elevation)
Mode manuel (Azimuth)
SD CARD DETECTED WRITING SOFTWARE