XBike 700 - Exercise bike Klarfit - Free user manual and instructions
Find the device manual for free XBike 700 Klarfit in PDF.
User questions about XBike 700 Klarfit
0 question about this device. Answer the ones you know or ask your own.
Ask a new question about this device
Download the instructions for your Exercise bike in PDF format for free! Find your manual XBike 700 - Klarfit and take your electronic device back in hand. On this page are published all the documents necessary for the use of your device. XBike 700 by Klarfit.
USER MANUAL XBike 700 Klarfit
natural_image
Exterior view of a KLAB FIT exercise bike with orange and black body (no text or symbols on the device itself)X-Bike 700
10009111 10022294 10022295
KLAR

FIT
text_image
Technical diagram of a stationary exercise machine with numbered components and exploded viewtext_image
Technical diagram of a mechanical device with numbered components and labeled partsAufbau - Schritt 2
text_image
Technical diagram of a mechanical device with labeled parts and an inset showing component detailsAufbau - Schritt 4
text_image
Technical diagram of a stationary exercise machine with labeled components and numbered partsAufbau - Schritt 5
text_image
Technical diagram of a stationary exercise machine with labeled components and partsDer Trainingscomputer
natural_image
Symbol of a trash bin crossed with a diagonal line, no text or numbers presentCongratulations on purchasing this product. Please read and follow these instructions, in order to avoid damaging the item. We do not cover any damages that may arise from improper use of the item or the disregard of the safety instructions.
Important Safety Instructions
- Read all instructions before using.
- Do not place on or near a hot gas or electric burner or in a heated oven.
- Do not expose the appliance to extreme temperatures. The appliance shall be used in moderate climates.
- The use of attachments that are not recommended by the appliance manufacturer may result in fire, electric shock or personal injury.
- The appliance is not a toy. Do not let the children play with it. Never let children insert foreign objects into the appliance.
- Do not use the appliance for other than intended use. This appliance has been designed solely for domestic use; the manufacturer's liability shall not be engaged in the event of any professional use, by any misuse or by any use not complying with the operating instructions.
- This weight station is made for training in private environment. Only use the appliance for the intended use.
- Pregnant or physically injured people should never use the weight station without prior consultation with a doctor you trust.
- Stop the training immediately when you do not feel comfortable or notice motoric, sensory or mental changes or limitations.
- Adapt your training style always to your personal fitness level and your health.
- Before every training check the operability and safety.
• Make sure before installation that the item works properly and that all safety devices are in function! - Damages or alterations to the product in the course of the independent modification lead to the exclusion of warranty. For problems resulting from the modification or other restrictions, the seller is not responsible! Any damage must be reported to the seller immediately after delivery, and access before use / installation. Later complaints will not be considered.
- Use only suitable tools for assembly.
- The installation must always be made only by adults.
- In part, the package may consist of plastic bags - make this regard with particular care and attention that this is not out of the reach of children. There is a risk of suffocation!
- Make sure to mount that all connections are securely mounted before releasing the product for use.
- Check all connections at regular intervals for damage, loose elements and other factors that can lead to a lass of sufficient security.
- Let children or people with physical or mental limitations, or people who are not familiar with this device, do not use this weight bench!
- Please keep in mind that this manual and the safety can only draw your attention to eventual hazard.
- Keep this manual.Read all instructions before using.
- Do not place on or near a hot gas or electric burner or in a heated oven.
- To protect against a fire, electric shock or personal injury, do not immerse cord, electric plugs or device in water or other liquids.
- Do not expose the appliance to extreme temperatures. The appliance shall be used in moderate climates.
- Disconnect the appliance from the power source if it is not going to be used for a long time, if there is a thunderstorm or if it isn't working properly.
- The use of attachments that are not recommended by the appliance manufacturer may result in fire, electric shock or personal injury.
- The appliance is not a toy. Do not let the children play with it. Never let children insert foreign objects into the appliance.
- Do not use the appliance for other than intended use. This appliance has been designed solely for domestic use; the manufacturer's liability shall not be engaged in the event of any professional use, by any misuse or by any use not complying with the operating instructions.
- Save these instructions.
Assembly
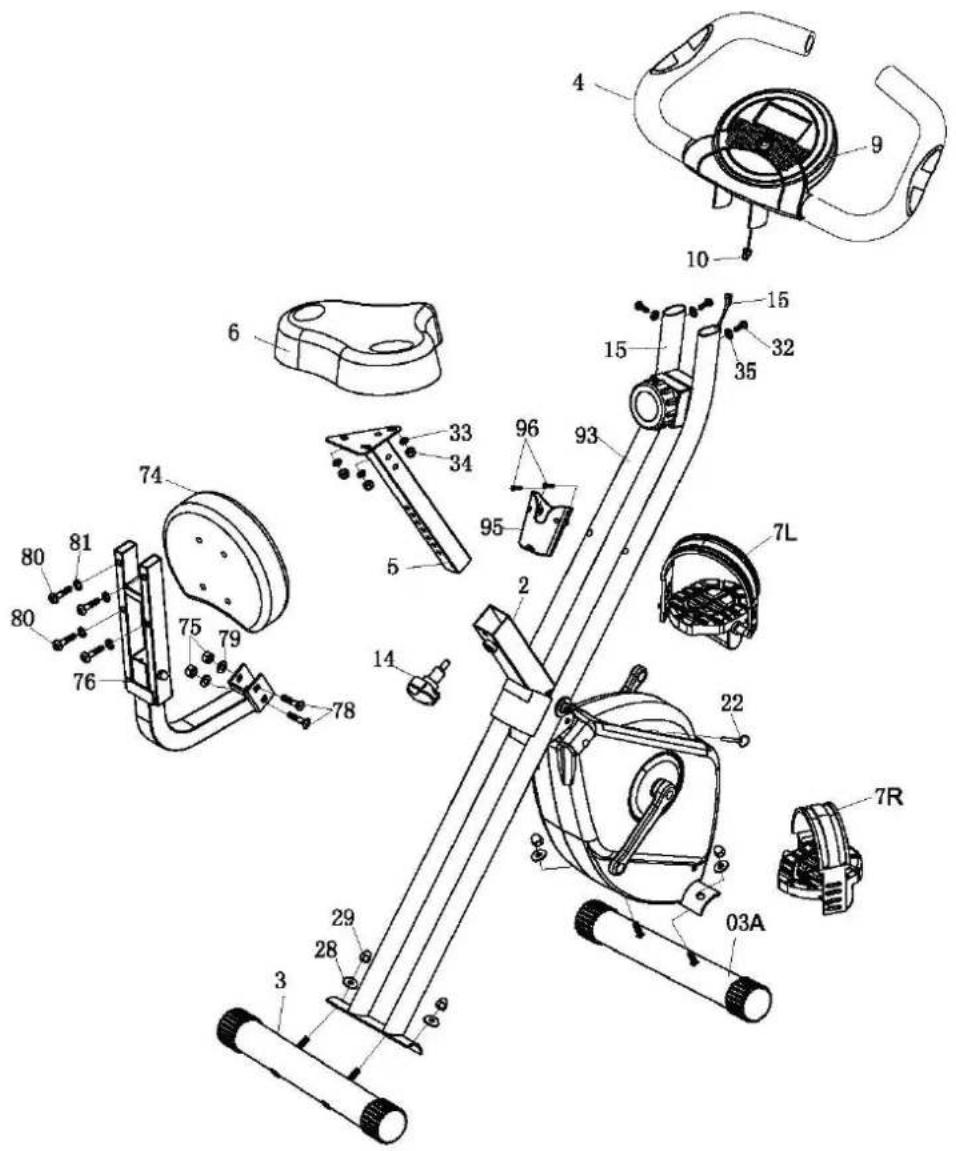
Exploded Diagram & Parts
text_image
Technical diagram of a stationary exercise machine with numbered components and exploded viewMain frame 2 33 Washer ID8.2
Rear Stabilize 3 34 Nylon nut M8 for seat
Front Stabilize w/ wheel 3a 35 Spring washer ID6.2
Handle bar w/ computer 4 74 Back cushion
Seat post 5 75 Nylon nut M8
Seat 6 76 Back cushion tube
Pedal L&R 7 78 Carriage bolt M8*50L
Adjustable knob M16 14 79 Washer I.D8.2
Sensor wire 15 80 Allen bolt M8*45
Safety pin 22 81 Spring washer
Curved washer ID8.2 28 93 Front post
Domed nut M8 29 95 Bracket for remote controller
Allen bolt M6 x 12 32 96 Screw M5 x 15
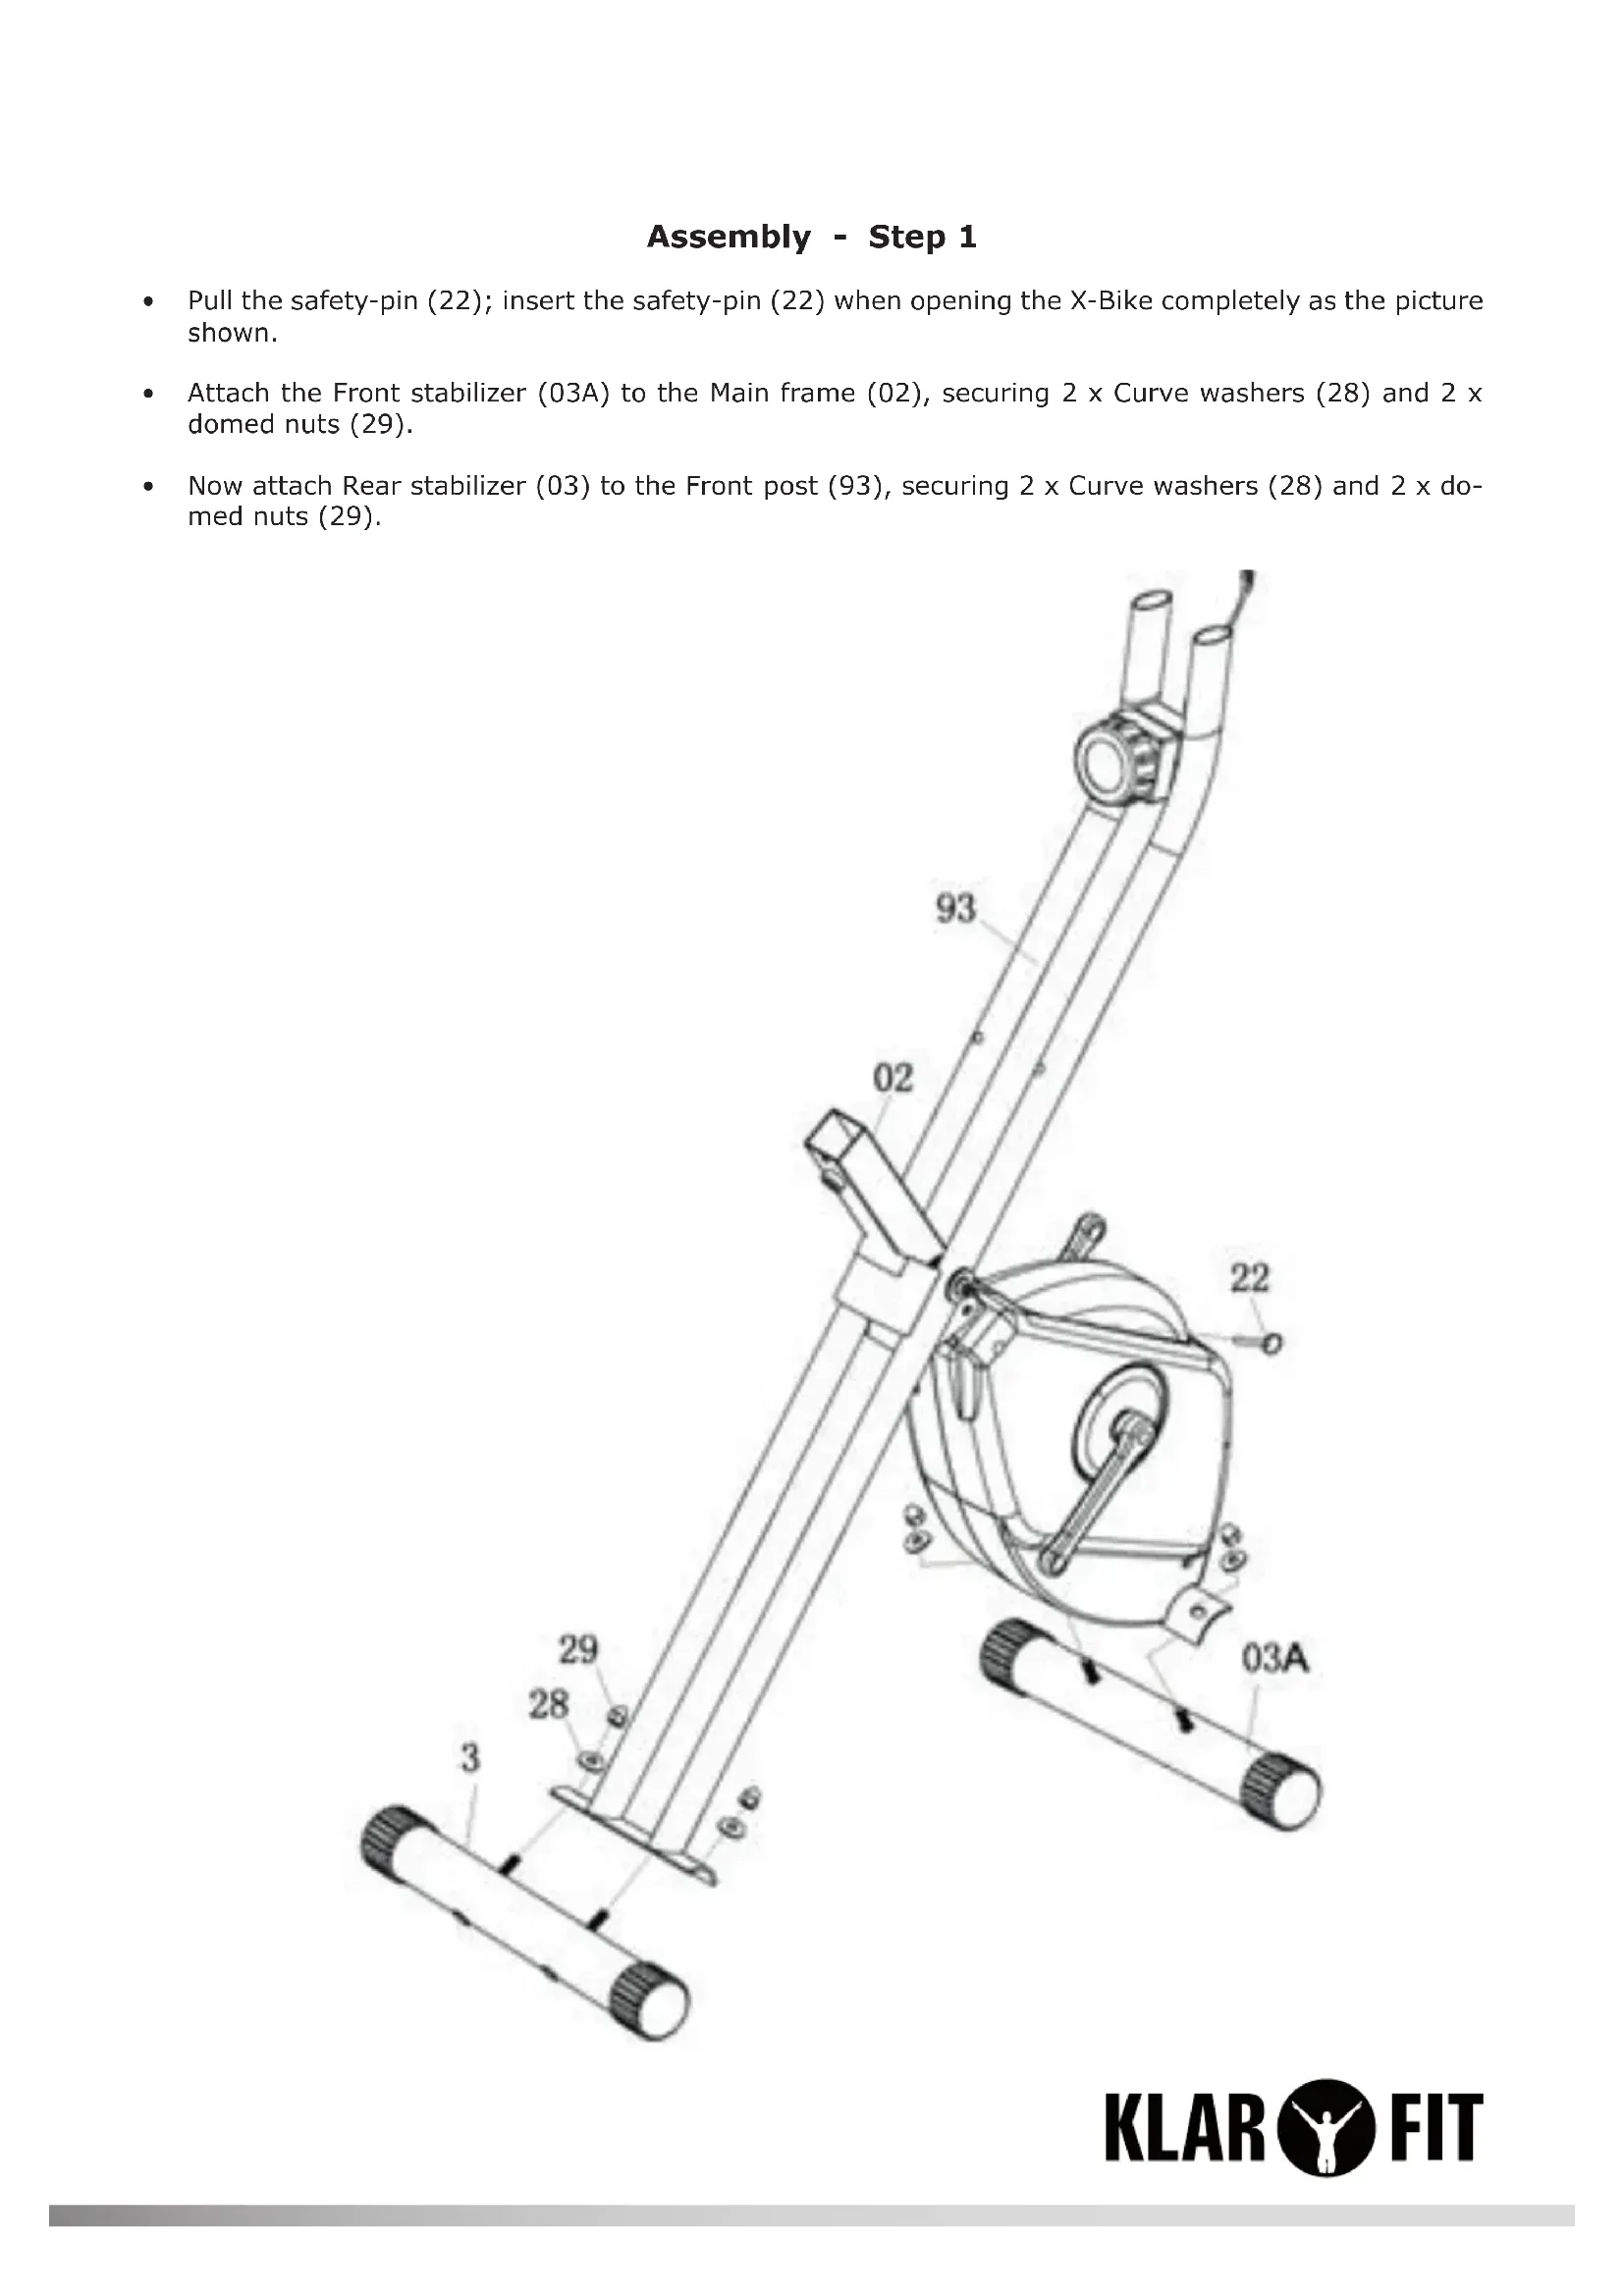
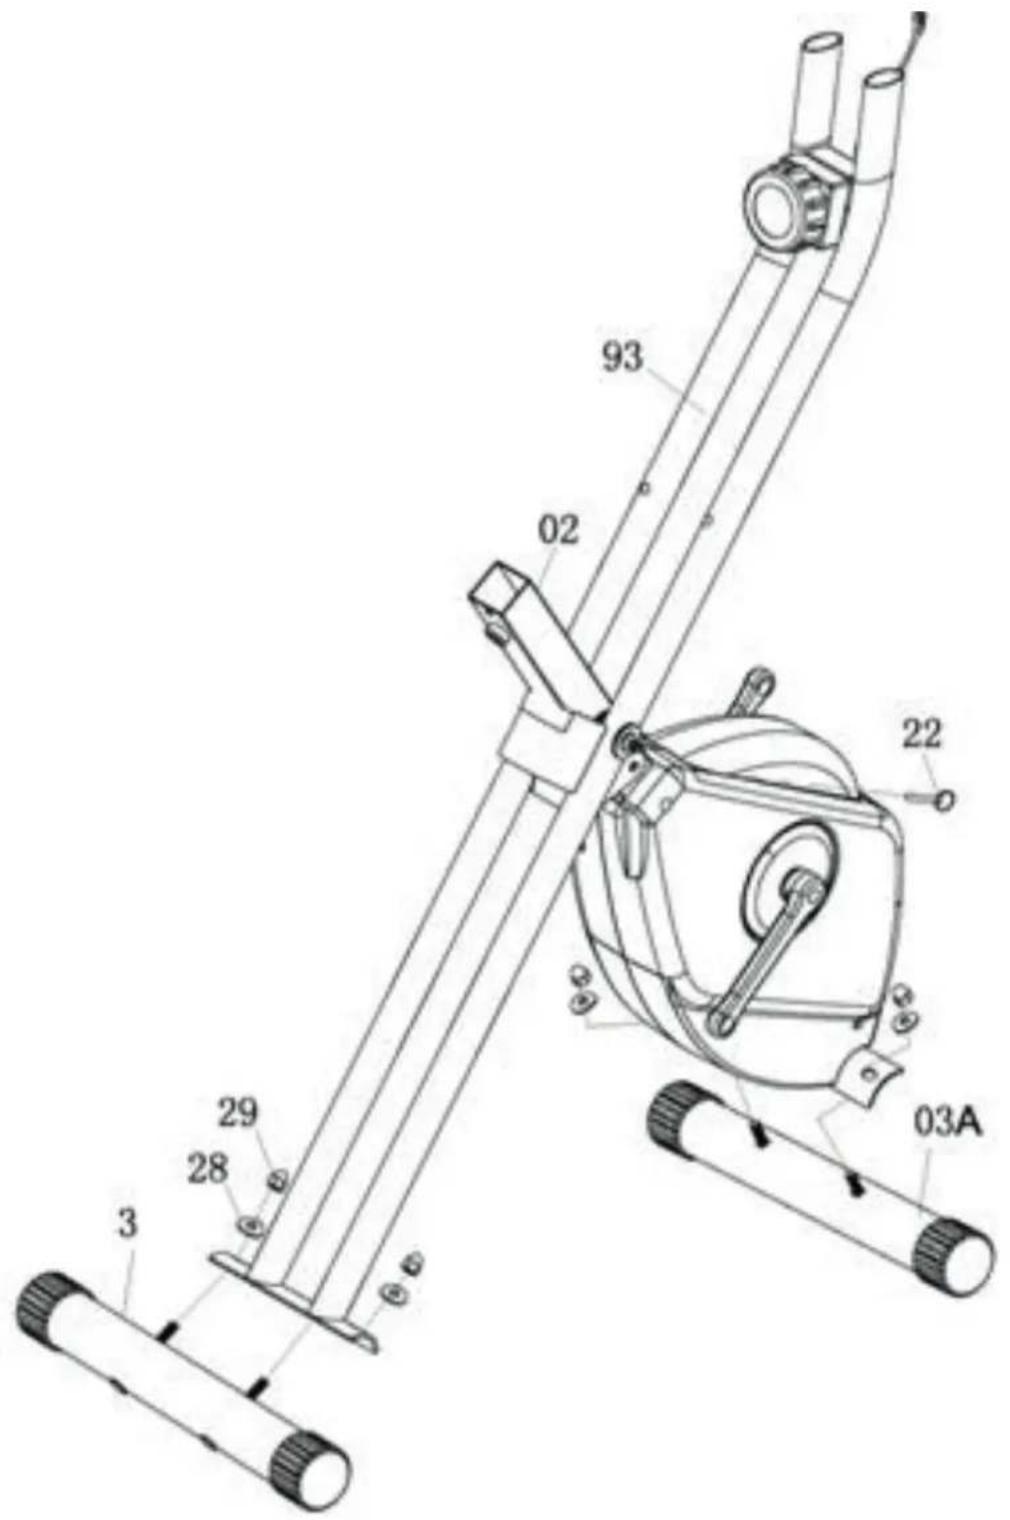
Assembly - Step 1
- Pull the safety-pin (22); insert the safety-pin (22) when opening the X-Bike completely as the picture shown.
- Attach the Front stabilizer (03A) to the Main frame (02), securing 2 x Curve washers (28) and 2 x domed nuts (29).
- Now attach Rear stabilizer (03) to the Front post (93), securing 2 x Curve washers (28) and 2 x domed nuts (29).
text_image
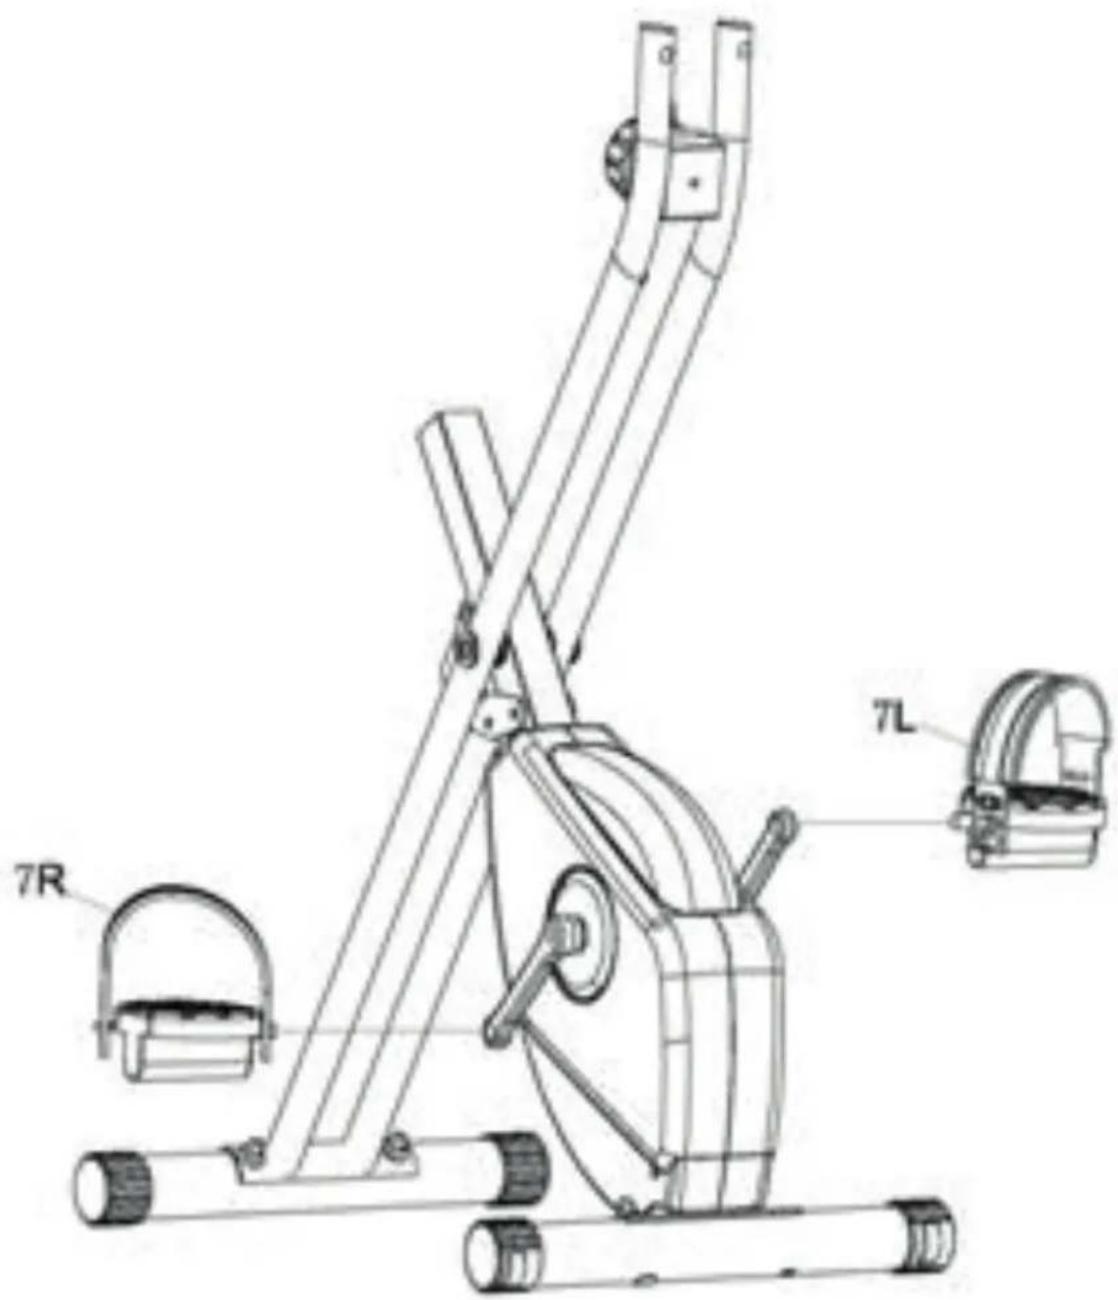
Technical diagram of a mechanical device with numbered components and labeled partsAssembly - Step 2
- The Left and Right Pedal (7L) and (7R) are marked "L" and "R".
- Connect them to their appropriate Crank Arm. The right pedal is on the right hand side of the cycle as you sit on it.
- Note that the right pedal should be threaded on clockwise and the left pedal anti-clockwise.
text_image
7R 7LAssembly - Step 3
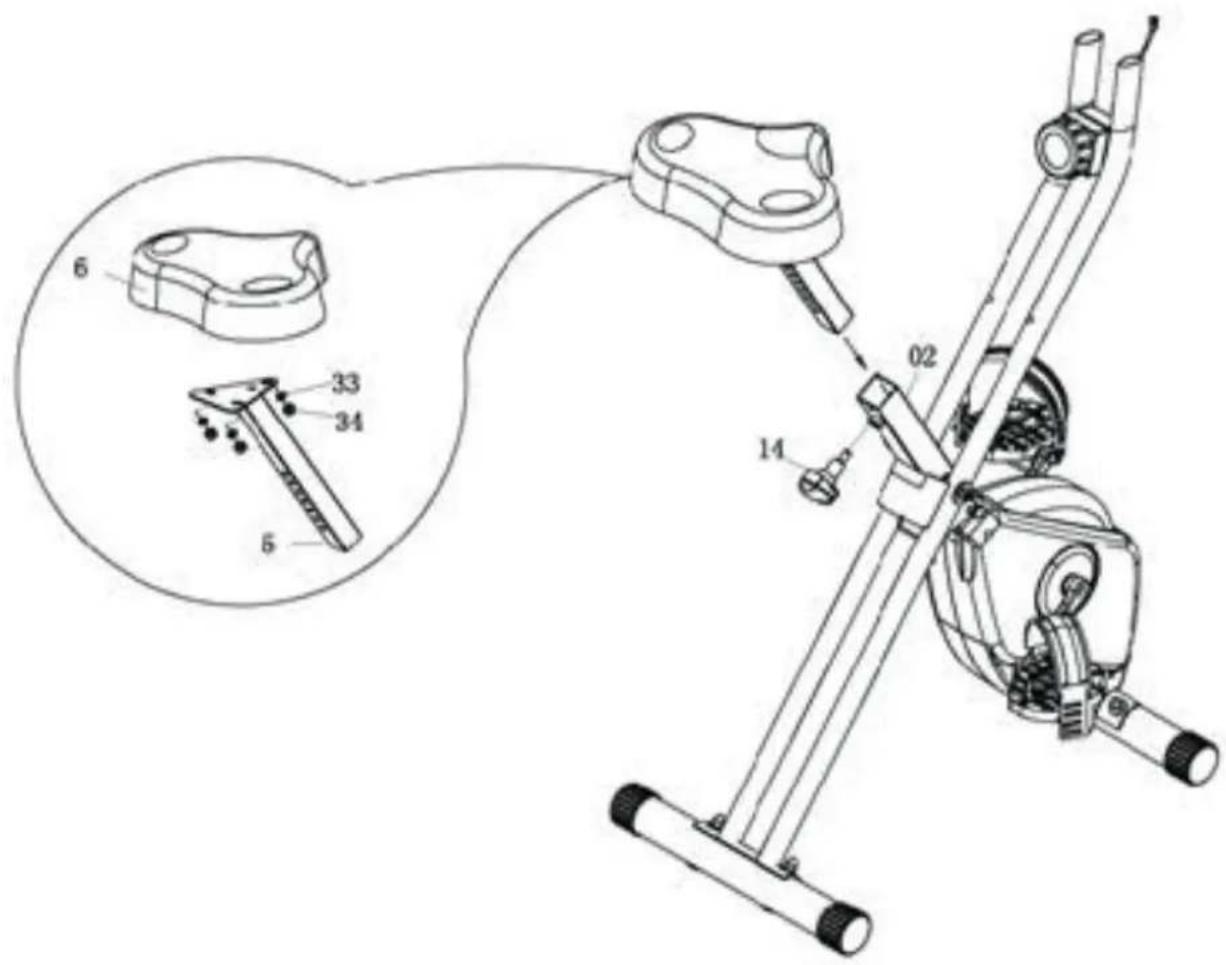
- Attach the Seat (6) to the Seat Post (5), securing with 3 x Washer (33) and 3 x Nylon nut (34).
- Insert the Seat post (6) into the Main frame (2). And then insert the Adjustable knob (14) into the hole of the seat post at your desired location.
text_image
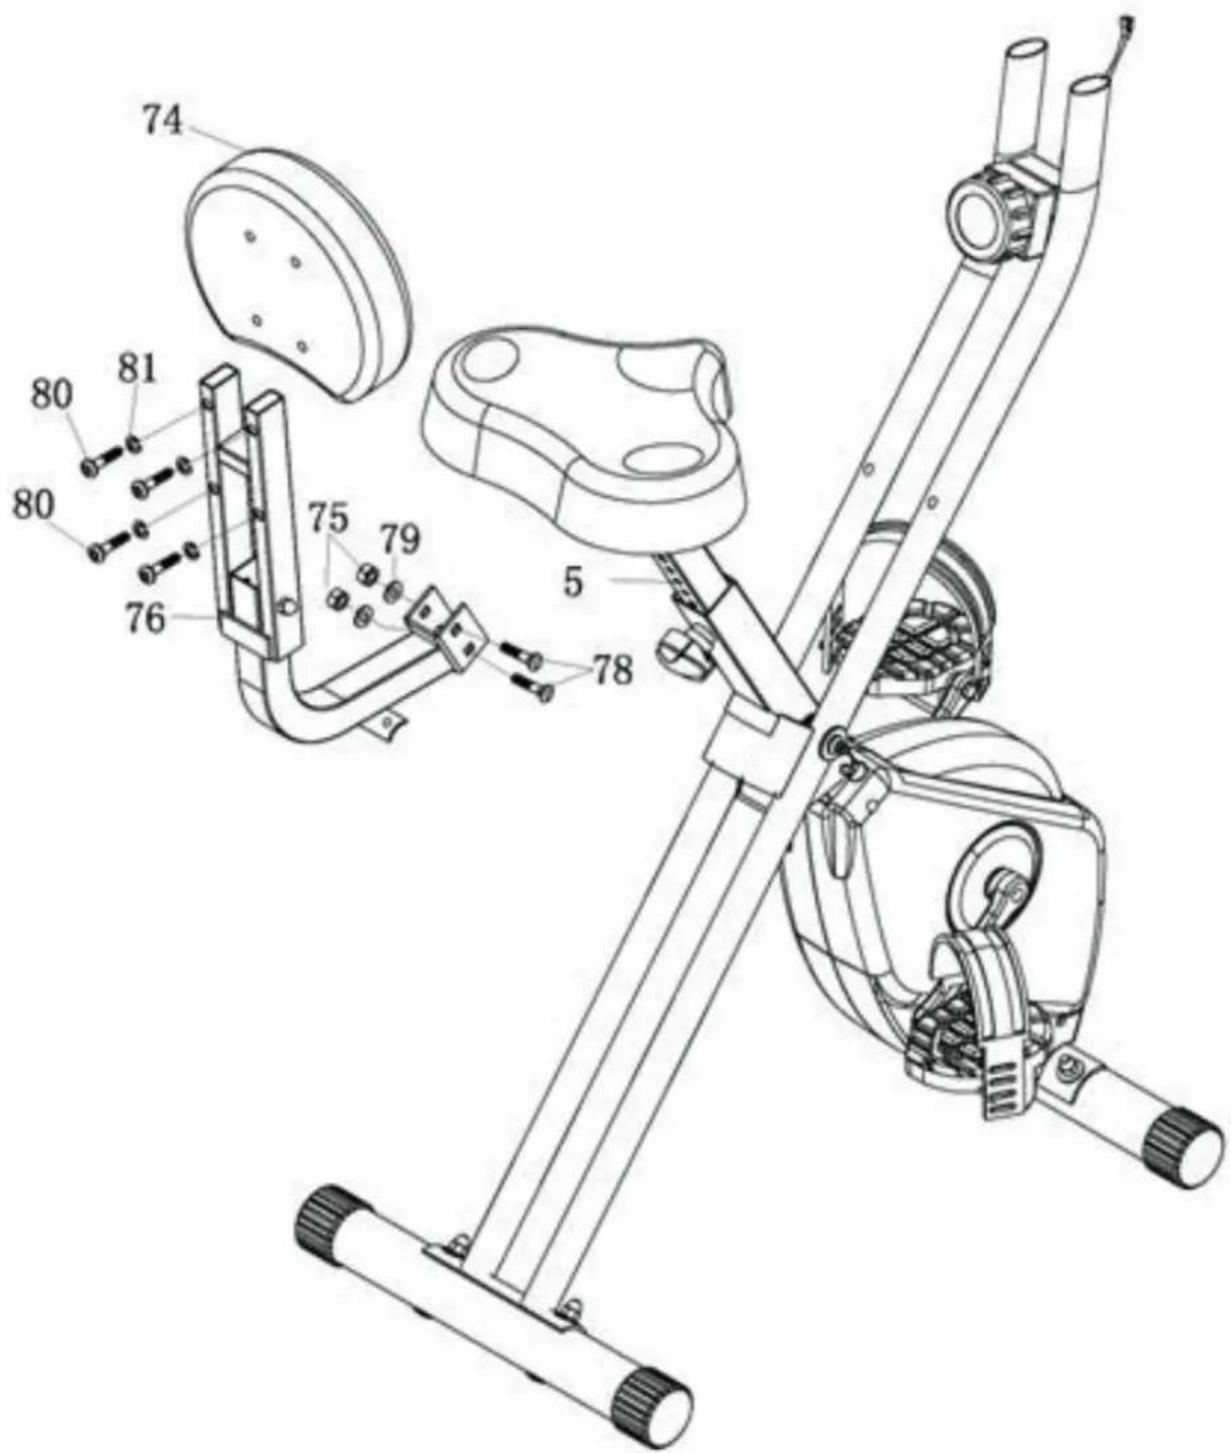
Technical diagram of a mechanical device with labeled parts and an inset showing component detailsAssembly - Step 4
- Attach Back cushion(74) into Back rest tube(76), tighten with 4 x Allen bolt(80), 4 x Spring washer(81)
- Attach back rest tube (76) into Seat post (5), tighten with 2 x Carriage bolt (78), 2 x Washer (79) and 2 x Nylon nut (75).
text_image
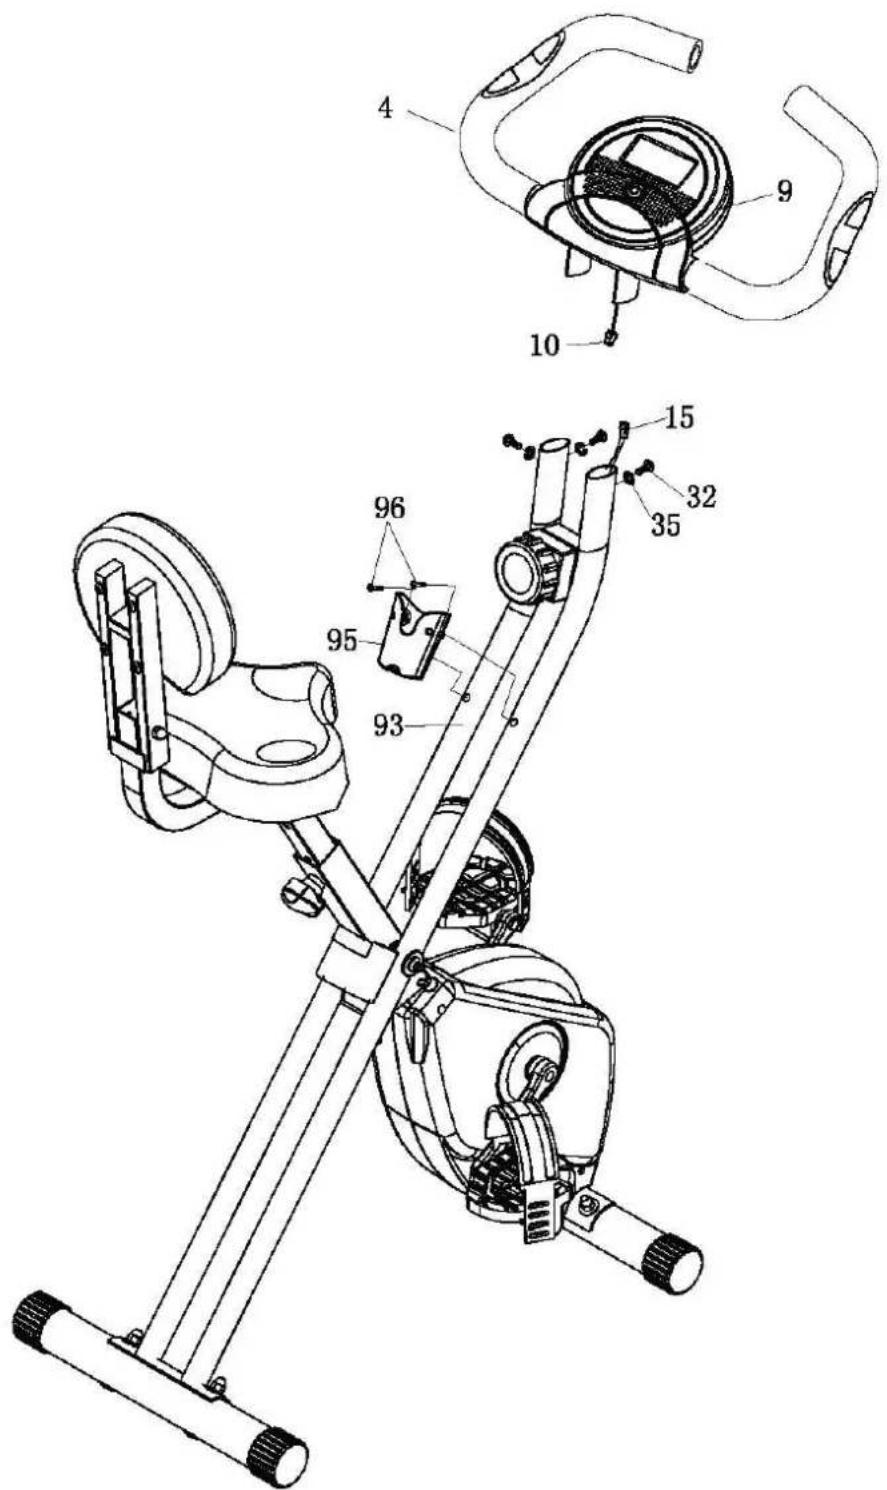
Technical diagram of a stationary exercise machine with labeled components and numbered partsAssembly - Step 5
- Fix the Handlebar (4) to the Front Post (93); tighten with 3 x Allen Bolt (32) and 3 x Spring Washer (35).
- Ensure the Sensor Wire (15) is protruding from the top of the Front post (93); then connect the Upper Computer Wire (10).
- Attach bracket of remote controller (95) into the Front post (93), tighten with 2 x Screw (96)
text_image
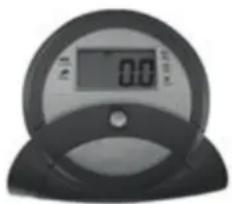
Technical diagram of a stationary exercise machine with labeled components and partsExercise Computer
FUNCTIONS AND OPERATION
text_image
0:00| MODE | Press repeatedly to choose functions. |
| Auto ON/OFF | The monitor will wake up automatically if the exercise machine is in motion. If you stop exercising over 4 minutes, monitor will turn off automatically. |
| SCAN | Press the button until the monitor display SCAN. Monitor will automatically rotate display SPEED, DIST, TIME, ODO & CAL every 30 seconds. Each display will be held for 6 seconds. |
| SPEED | Press the button until the arrow points to SPEED. Monitor will display the current speed. |
| DISTANCE | Press the button until the arrow points to DIST. Monitor will display the trip distance you are traveling. |
| TIME | Press the button until the arrow points to TIME. Monitor will count up your riding time. |
| ODOMETER: | Press the button until the arrow points to ODO. Monitor will display the total accumulated distance. |
| CALORIES | Press the button until the arrow points to CAL. Monitor will accumulate the calorie consumption. |
Technische Daten
| Item # | 10009111, 10022294, 10022295 |
| Power supply | 2 x battery type AAA |
| Sensor type | Non-contact magnetic type |
| Maximum weight (user) | 100kg max. |
| Dimensions | 44 x 113 x 90/45cm (WxHxD) |
| Weight | ca 16kg |
| Scope of delivery | Device, computer, batteries, tool, instruction manual |
Environment Concerns
natural_image
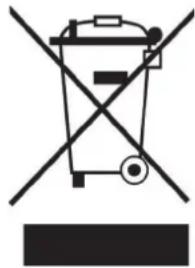
Symbol of a trash bin crossed with a diagonal line, no text or numbers presentAccording to the European waste regulation 2002/96/EG this symbol on the product or on its packaging indicates that this product may not be treated as household waste. Instead it should be taken to the appropriate collection point for the recycling of electrical and electronic equipment. By ensuring this product is disposed of correctly, you will help prevent potential negative consequences for the environment and human health, which could otherwise be caused by inappropriate waste handling of this product. For more detailed information about recycling of this product, please contact your local council or your household waste disposal service.
Declaration of Conformity
Manufacturer: CHAL-TEC GmbH, Wallstraße 16, 10179 Berlin, Germany
This product is conform to the following European Directives:
2011/65/EU (RoHS)
2014/30/EU (EMC)
CE
Chère cliente, cher client,
text_image
Technical diagram of a stationary exercise machine with numbered components and exploded viewCadre principal 2 33 Rondelle ID8.2