
U1 309.005 - Dishwasher CaterChef - Free user manual and instructions
Find the device manual for free U1 309.005 CaterChef in PDF.

| Product type | Semi-automatic professional dishwasher |
| Brand | CaterChef |
| Model | U-1 (U1 309.005) |
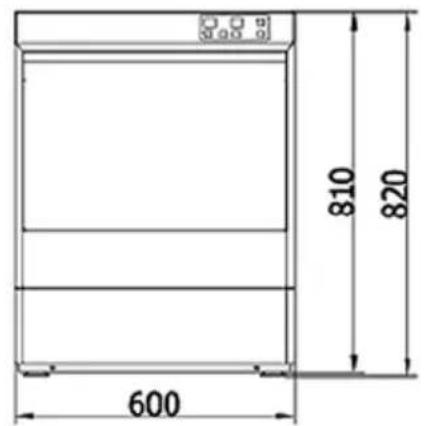
| Dimensions (W × D × H) | 600 × 600 × 820 mm |
| Capacity | 30 baskets/hour (120 s cycle) |
| Wash cycle | 90/120/180 s (standard 120 s) |
| Wash temperature | 60–65 °C |
| Rinse temperature | 82–90 °C |
| Tank capacity | 28 L |
| Water consumption | 2.8 L/cycle |
| Voltage / Frequency | 230 V / 50 Hz single-phase or 400 V / 50 Hz three-phase |
| Total connected power | 3.4 kW (230 V) or 6.4 kW (400 V) |
| Rated current | 16 A (230 V) or 3 × 16 A (400 V) |
| Required water pressure | 2–5 kg/cm² (dynamic) |
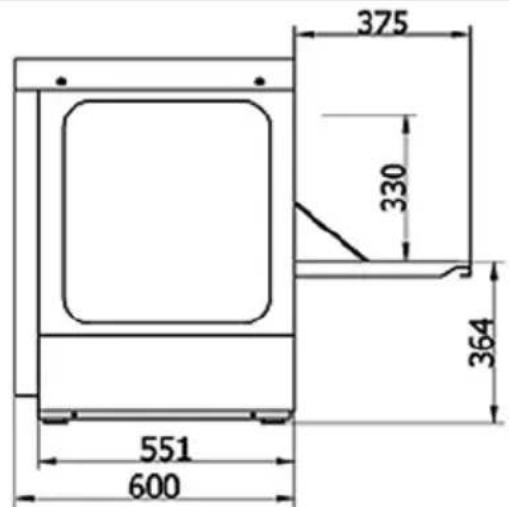
| Maximum washing height | 330 mm |
| Noise level | < 70 dB |
| Main functions | Automatic washing and rinsing, cycle and temperature settings, door safety |
| Maintenance and cleaning | Daily cleaning of filter basket and microfilter, regular descaling |
| Safety | Door safety device, grounding, automatic circuit breaker |
| Spare parts and repairability | Wash/rinse arms, filters, pump; repairs by authorized installer |
| General information | 12-month warranty, use for professional dishware |
Frequently Asked Questions - U1 309.005 CaterChef
User questions about U1 309.005 CaterChef
0 question about this device. Answer the ones you know or ask your own.
Ask a new question about this device
Download the instructions for your Dishwasher in PDF format for free! Find your manual U1 309.005 - CaterChef and take your electronic device back in hand. On this page are published all the documents necessary for the use of your device. U1 309.005 by CaterChef.
USER MANUAL U1 309.005 CaterChef
Vaatwasser
Model: U-1 (230/400 V)
Dishwasher
Model: U-1 (230/400 V)
Lave-vaisselle
natural_image
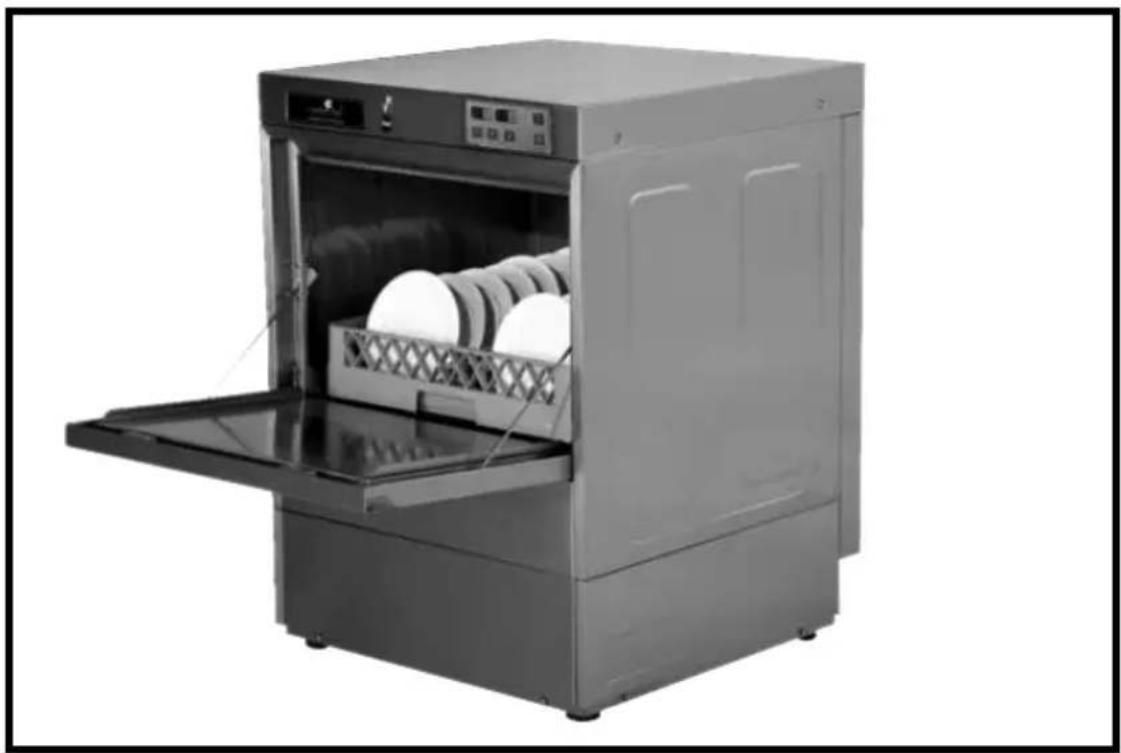
Exterior view of a stainless steel kitchen appliance with open door and side panel (no visible text or symbols)User instructions (p. 15-28)
natural_image
Line drawing of a 3D printer cabinet with open door and internal components (no text or symbols)1. Functietoetsen
natural_image
Technical line drawing of a mechanical component with multiple blades and a central frame (no text or symbols)
natural_image
Pure architectural line drawing of a symmetrical structure with no text or symbolsAfb 3
Reiniging
Dishwasher
Model: U-1 (230/400 V)
230 V. nr. *309.001 - *309.005 (with pump)
400 V. nr. *309.003
natural_image
Exterior view of a stainless steel kitchen appliance with open door and side panel (no visible text or symbols)Operation Manual (p. 15-28)
1. General foreword
1. General
Your new dishwasher, the CaterChef U-1, was manufactured using highly advanced production techniques.
Every CaterChef machine that leaves our factory is carefully inspected to ensure it is working correctly.
Please read this instruction manual carefully before you install and use the dishwasher. You must operate the dishwasher according to the instructions in this manual for your own safety and to extend its service life. In this way you will get the best results from your U-1.
This instruction manual tells you how to install, operate and maintain your dishwasher. Please keep it within reach until you are accustomed to using the machine and then keep it in a safe, dry place. Make sure that everyone who operates and maintains the machine knows where the manual is, so that it can be consulted quickly if necessary. If you lose the manual or can no longer read it, you can order a new copy from your dealer.
2. Technical support
Contact your service company or dealer if you need technical support.
3. Declarations
The importer/manufacturer retains the right to alter the instruction manual and all relevant materials as required to improve the quality of products and services.
The importer/manufacturer cannot be held liable for any accident or injury resulting from incorrect maintenance or repairs performed by a fitter or due to any activities not described in this manual, or from incorrect use or failure to follow the instructions in this manual. Please refer to the guarantee and to the safety sections which form part of these user instructions.
Do not use the dishwasher until you have read and understood each part of this instruction manual. If in any doubt, please contact your dealer.
Caution:
The machine only works, once the boiler is heated up and once the wash reservoir has been filled completely.
For model with built-in drain pomp (*309.005), the wash reservoir starts to refi II, once the boiler has reached temperature of 60 degrees.
2. Contents
Cover page 15
- General Foreword 16
- Contents 17
- Safety Instructions.... 18/19
- Short introduction....19
- Main technical specifications .... 20
- Installation 20
- Connecting electricity supply and water supply/discharge 21/22
- General Display 23
- Operating the Display Panel.. 23/24
- Preparation after installation and cleaning 24
- Dishwashing and Cleaning 25
- Maintenance 26
- Detecting malfunctions ...... 27
- Final comments & Guarantee, etc. 28
Appendices: Electrical diagram 43
3. Safety Instructions
Safety Instructions
To ensure that the dishwasher functions correctly, the user must pay particular attention to the following:
Safety
- This machine should only be installed and demonstrated by an expert fitter.
- All staff using the dishwasher must be fully trained in its correct and safe operation.
- Do not use or store infl ammable goods near the machine.
- Only connect the machine to an electrical wall socket that has been situated in accordance with regulations and which has sufficient power and an earth connection. After the machine has been installed in the desired location, the connecting plug must be connected directly to the wall socket, and not via an extension lead of any kind.
- Ensure that the CaterChef is correctly earthed to prevent any risk of electric shock. Only remove the connection from the wall socket by means of the plug; never by pulling the cable.
- The CaterChef must be connected to a circuit with adequate fuses and the power supply must comply with normal load requirements. If the connecting cable needs to be replaced, this must be done by a certified fitter.
- Never put your hands into the machine directly after use, and do not open the door while the machine is in use. To do so could result in scalding from the hot water or steam.
- To avoid accidents, the machine must not be placed too close to a wall or on any table not intended for the purpose. It should only be placed on its original support frame (optional).
- For your own safety, do not disassemble any parts of the machine not intended for disassembly.
- The safety precautions (door) and electrical installation must be inspected regularly.
- Turn off the power and water supply if there is any visible damage to the machine.
- Disconnect the power and water supply before undertaking any repairs or maintenance to the machine.
- Repairs must only be carried out by a properly qualified fi tter.
Using the machine
- The machine is only intended for the cleaning of cutlery, crockery and general kitchen utensils. The manufacturers cannot accept any liability for damage resulting from the improper use of the machine for purposes other than that for which it was intended.
- Only fi t original spare parts. The manufacturers cannot accept any liability for damage resulting from the use of non-original spare parts.
- The machine must only be installed and repaired by properly qualified and certified fi tters.
- Before you use the machine, check that the inlet hose and drain hose are connected correctly. The necessary remedial steps must be taken if there is any leakage of water or if any hoses are loose or damaged.
- Do not place any heavy objects, heating appliances or vessels containing liquids that might leak on top of the dishwasher.
- Do not use any infl ammable or corrosive solvents to clean the machine.
- Ensure that any damaged or worn connecting cables or switches and any other worn or damaged parts are replaced in good time by a qualified fi tter. The machine must not be used if any of the above is in poor condition.
- Do not operate the machine if there are any loose or damaged parts.
- Leave the door open (ajar) when the machine is not in use and always turn off the power and water supply after use.
- To ensure that the machine continues to function correctly, the reservoir and filter basket must be cleaned regularly; at least once a day and more often if the machine is being used intensively.
Economy and protection
Using water, electricity and cleaning agents correctly benefit the environment and will reduce costs.
Avoid half-empty baskets as much as possible and clean the fi Iter mesh in good time.
-
Remove large food remains from the dirty dishes and pre-rinse using a spray before loading into the dishwasher and distributing correctly.
-
Decide on the amount of detergent required, according to the amount of washing up and how heavily soiled it is, and following the detergent manufacturers' instructions.
-
Install a water softening appliance.
General safety Instructions:
- Using the machine incorrectly can be dangerous.
- The machine must only be operated by trained and qualified persons. They must receive professional training on the operation and safe handling of the dishwasher. They must also read and comply with the safety and operating instructions.
- The cleaning and rinsing water reach high temperatures during use. Do not touch the freshly cleaned items - they may be hot enough to cause injury. Remember your safety and that of your employees.
- When the machine is in use, the electrical components are live. Always make sure that the power is switched off before cleaning the machine. Do not clean the machine with a hose pipe or high pressure sprayer.
- The heating element in the tank will still be hot after the water reservoir has emptied (and after the power and water have been turned off). Take extra care when cleaning.
- Use only professional cleaning agents from a recognised manufacturer. Some professional cleaning and rinsing agents may be caustic and/or alkaline. Always take extra care when handling these products.
4. Short introduction to the Dishwasher
General

natural_image
Line drawing of a 3D printer cabinet with open door and internal components (no text or symbols)Your new CaterChef is a semi-automatic dishwasher which holds 50x50 cm baskets. Open the door to insert or remove the rack. After closing the door and pressing the start button, a wash and rinse cycle will start automatically (standard setting 120 sec). This can be altered using the display panel. If the water level is low, water will be added automatically once the door is closed. As soon as the normal water level has been reached, a wash and rinse cycle will follow automatically.
The machine is fitted with an electrical heating element for the boiler of either 3 KW (230 V) or 6 KW (400V), wash reservoir heater, water inlet valve, filter strainer basket, door security lock, cycle start button and setting display.
5. Main technical specifications
| Technical specifications Unit CaterChef U-1 | ||||
| Cleaning specifications | Max. capacity Basket/hour Max. 30 with 120 sec cycle | |||
| Cleaning cycle Sec. 90/120/180 (120 standard) | ||||
| Cleaning temperature °C 60 ~ 65 | ||||
| Rinsing temperature °C 82 ~ 90 | ||||
| Tank capacity litre 28 | ||||
| Water use litre/cycle | 2,8 | |||
| Water connection | Diameter of the water inlet hose | cm | 2,5 | |
| Pressure incoming water | kg/cm2 | 2 ~ 5 | ||
| Temp. incoming water | °C 40 ~ 60 | 10 ~ 60 | ||
| Diameter of drain hose cm | 2,4 | |||
| Power connection | Required voltage | V/Hz/F | 220/50/1 | 380/50/3 |
| Tank heating | Kw | 3 | 2,8 | |
| Boiler/rinse heating Kw | 3 | 6 | ||
| Pump | Kw 0,4 | |||
| Total connected power Kw | 3,4 | 6,4 | ||
| Total Amps used | Amps | 16 | 3 x 16 | |
| Diameter cable | mm2. | 3 x 2,5 | 5 x 2,5 | |
| Nominal current on fuse | A 16 | 3 x 16 | ||
| Other | Max usable washing level | mm | 330 | |
| Sound level | DB | < 70 | ||
| Measurements (L×B×H) | mm | 600×600×820 | ||
6. Installation
Unpacking
Check the machine for any damage which may have occurred during transit immediately after it is unpacked.
If you detect any damage to the machine, retain the packaging material and contact your supplier immediately.
After unpacking, remove the instruction manual and accompanying accessories.
Before installing the machine, check that the mains voltage matches the electrical specifications on the model plate of the dishwasher.
Positioning the dishwashing (to be performed by a qualified fitter)
Situate the machine where it will be used. Using the adjustable feet, adjust the dishwasher until it is level and at the required height.
Before final installation of the machine, check that the power supply, water inlet hose, drainage outlet and external soap pump (if present) are connected correctly. Also check that there is enough space to open the door and make sure that the machine is standing freely and can be accessed easily for everyday cleaning and maintenance.
7. Connecting the power supply and the water supply
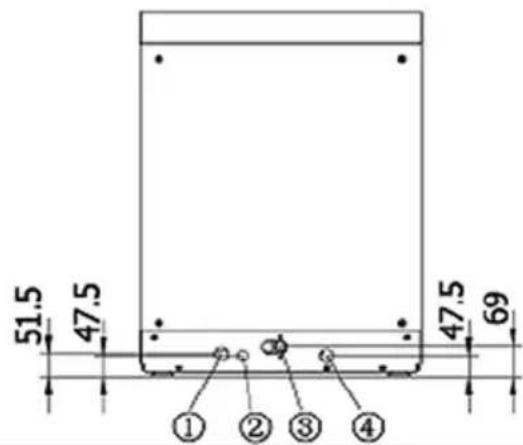
① Drainage connection
② Dose-measuring dispenser connection
③ Inlet hose connection
④ Power cable connection
(lmg. 1)
Connecting the power supply (this operation must be performed by a qualified fi tter)
Warning
- The connection to the power supply and earth must comply with local electrical safety regulations.
- Before connecting the machine, check that the voltage and fuses match the model plate on the machine.
- Turn off the supply at the mains (400V circuit fuse box) and place a card, clearly visible, near the fuse box, stating that you are carrying out electrical work.
Connect the colour-coded wires correctly (400V) to the mains according to the description and electrical diagram on the inside of the machine panel.
(Electrical diagram: see page 43)
Selecting the cable (400V)
Select the correct cables and contact-breaker switch for the power supply you are using.
Refer to the main technical specifications table to select the appropriate materials for connection.
Connecting the water supply
Warning
- The water connections must comply with local safety standards and regulations.
- The minimum water pressure required is 2 kg/cm ^2 . Cleaning performance will be adversely affected if water pressure is too low.
The temperature of incoming water must not exceed 65^ C, and water pressure must not exceed 5 kg/cm^2 .
Connect the inlet hose to the mains water supply (3/4" internal screw thread). Ensure that your hands are completely clean before you connect the tap or magnetic valve to the mains water supply. The manufacturers will not accept any responsibility for any damage or loss incurred as a result of foreign objects (e.g. dirt, iron or calcium) entering the tap or the magnetic valve. Pull carefully on the inlet pipe to ensure that it is firmly attached. Open the tap slowly and check that no water is leaking. It is necessary to first check that the inlet pipe is firmly attached and the supply line is open each time the dishwasher is used.
Water inlet (Requirements for water inlet)
| Temperature Pressure (dynamic) | ||||
| °C °F K Pa kg/cm | 2 | |||
| With 3 KW (230 V) electric boiler 40 ~ 60 | 04 ~ 140 196 ~ | 490 2 ~ 5 | ||
| With 6 KW (400 V) electric boiler 10 ~ 60 | 50 ~ 140 196 ~ | 490 2 ~ 5 | ||
Water discharge
Connect the water discharge hose to a suitable drainage point. This must be lower that the discharge outlet of the machine to ensure natural drainage. If necessary, to achieve this, the machine can be raised or placed on the stainless steel support frame (optional), or the fi tter can install a drain pump (optional).
If local regulations require a grease trap, it must be installed by a certifi ed company.
Note: After installation, test the pressure of the incoming water supply. If the hydrodynamic pressure is lower than 2 kg/cm^2 , it will be necessary to install a pressure raising pump (from an independent supplier). If the stagnation pressure is higher than 5 kg/cm^2 , it will be necessary to install a pressure reduction valve (from an independent supplier)
Tests
Water inlet hose
Clean the water inlet hose before connecting it. Clean all fi Iters after their first use.
Water connection and hydrodynamic pressure
Check that the inlet hose is firmly connected. The hose may come loose and start leaking if the dishwasher is moved. If the hydrodynamic pressure is too low, this may lead to malfunction of the machine.
Electrical connection
Connect up all the wires in the switch box (400V). Check that all wires are firmly connected. Check that the other electrical components, for example the switches and cable, appear to be in good order.
Inspect the inside of the dishwasher
Check that there is nothing inside the machine that does not belong there (for example: clothes, screws, nuts & bolts, tools, packaging materials, etc.).
8. General Display
Warning
- Always turn off the mains supply, voltage 230 V/400 V, before installation, servicing/maintenance or replacement.
- Installation, repairs and maintenance should only be carried out by a qualified fitter.
Always take care when working with electricity!
Minimum requirements:
a. Ambient operating temperature: 0° \~ 40°C
b. Atmospheric humidity: 40 \~ 93%
c. Suppression: IEC—801-norm
d. Voltage: AC 400V/230V (+10%, -15%) 50 Hz ± 1 Hz
e. Relay exit: 230V/2A
9. Operating the Display Panel
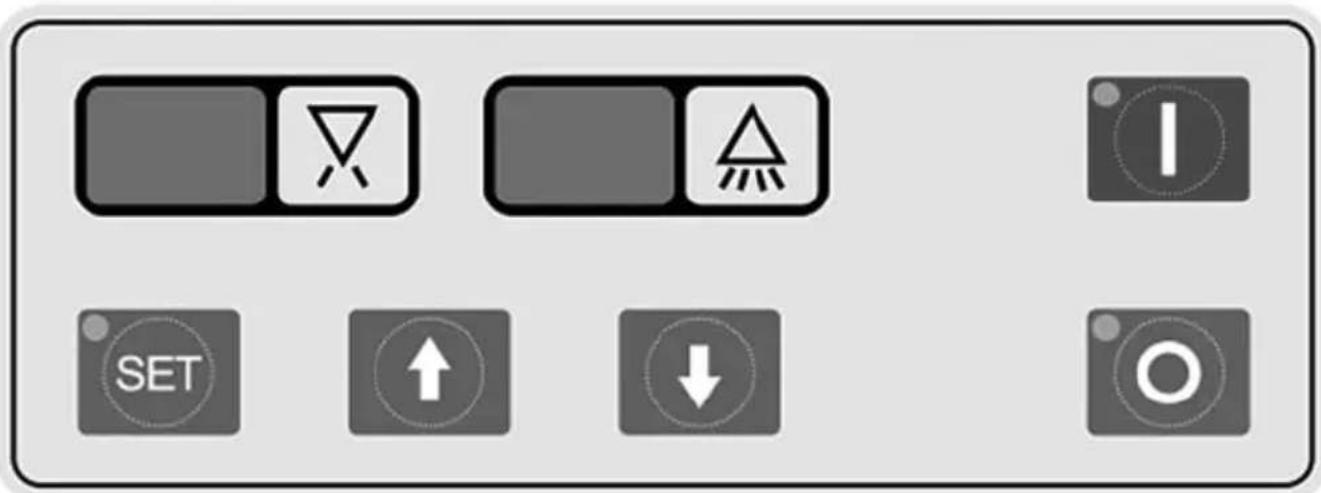
1. Function keys
- ON “I”: Press this key to start the machine.
- SET: Press SET in the "ON" mode to activate the parameter setting (original password is 00) see below.
- Up “↑”: Press to select a wash cycle (90 seconds/120 seconds (standard) /180 seconds) The indication will disappear 5 seconds after the cycle has been selected. Press this key in SET mode to increase the temperature. The temperature will continue to rise for as long as the key is kept pressed in.
- Down “↓”: Press this key in SET mode to reduce the temperature. The temperature will continue to fall as for as long as the key is kept pressed in.
- Stop "O": Press this key to stop the machine.
2. Display
There are 4 variable LCD displays on the operating panel. The 2 LCDs on the left indicate the rinse temperature, and the 2 LCDs on the right indicate the wash temperature.
Parameter setting
After turning the machine on, press SET and enter the password (see below) to alter the following settings:
- P1 Max. after rinse temperature (90°), shown in LCD for rinse temperature
- P2 Control rinse temperature (70-90°), shown in LCD for rinse temperature
- P3 Wash temperature (40-80°), shown in LCD for wash temperature
- P4 Limit rinse temperature (10-82°), shown in LCD for rinse temperature
- P5 Fill water (0-40s) shown in LCD for rinse temperature
- P6 Rinse time (8-15s) shown in LCD for rinse temperature
Press the Up "↑" or Down "↓" key to change the setting when the LCD is flashing.
Press the Up “↑” key to select a wash cycle of 90 seconds / 120 seconds (standard) / 180 seconds.
This is shown as C1, C2, C3 respectively in the LCD for the rinse temperature. After selecting a cycle, the indication will disappear after 5 seconds.
Setting a password:
- Pd Enter password (standard password is 00) - shown in LCD for the rinse temperature;
- PC Activate the setting mode, press for 2 seconds on SET, enter the password to set a new mode (00-99) and wait for a few seconds.
Warning Signals
| Type Display Malfunction | |||
| LCD rinse temperature | E1 Malfunction in boiler temperature sensor (T1) | ||
| E2 Malfunction in boiler temperature sensor (T2) | |||
| LCD wash temperature E | Malfunction in water reservoir temperature sensor (T3) | ||
| Signals | Door open/closed | No sign | Malfunction of door open detector sensor |
| Rinse pump | Keeps fl ashing | Rinse pump overload | |
10. Preparation after installation and cleaning
- Install the strainer basket and fi iter inset correctly. Connect the overflow pipe firmly. (img. 2)
- Close the door properly.
- Press the "ON" button once to start computer operation. Press the button again. The machine will then fill up automatically. Make sure that the water supply is on.
- Open the door and check that the wash tub is full of water once the fllling cycle is completed. If automatic chemical pumps are installed, follow the manufacturer's instructions.
- Then start the wash and rinse cycle with the START button, which will always start working after the door has been opened in order to remove and fill the rack, and then closed again.
- Start the wash after the tank has reached the correct temperature (see display).
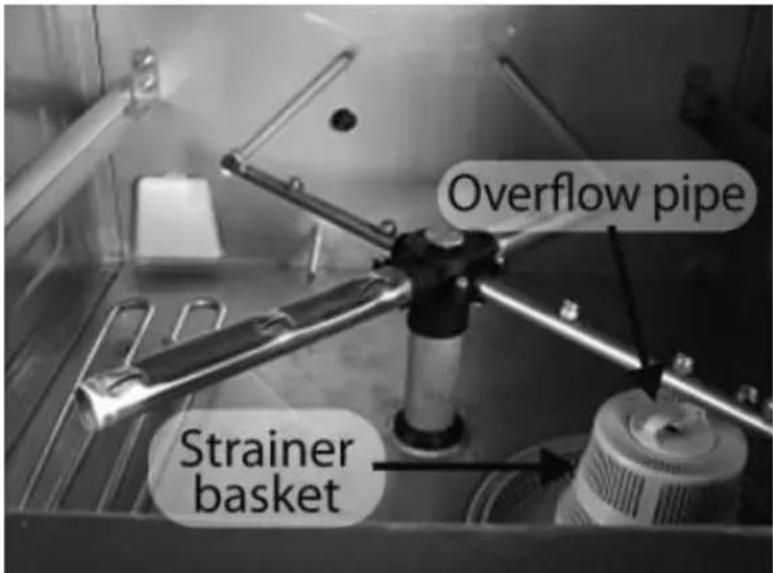
Img. 2
Recommended service temperature
| Washing 60 ~ 65°C (140 ~ 149°F) |
| Rinsing 82 ~ 90°C (180 ~ 194°F) |
11. Washing dishes and cleaning
Washing dishes
- First remove any left-over food from the plates and clean them with a pre-rinse spray.
- Select the required wash cycle, 90 sec., 120 sec. or 180 sec. (standard 120 sec.) depending on the size of the plates and how dirty they are.
- Place the plates in a plate rack. The plates should not touch each other. The water must be able to access both sides of a plate properly. Always place plates on their side in a rack with plate supports.
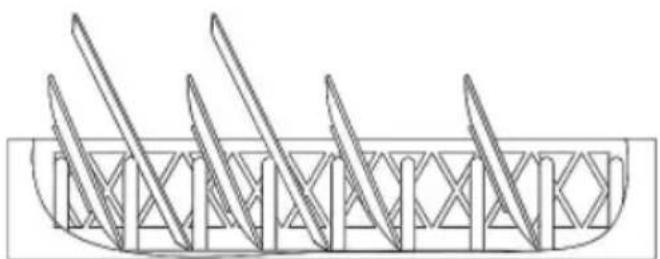
Cups, glasses and bowls must be placed upside down in an open basket or better still in a compartmentalised basket (img. 3). Cutlery and other small items can be spread loose on the bottom of a finely meshed cutlery basket or in special cutlery baskets.
- Fill the rack, open the door, slide the rack into the CaterChef machine and close the door again. The wash and rinse cycle will begin when the Start button is pressed, the after rinse cycle begins automatically when the wash cycle ends, after which the total cycle is finished (signal).
- Open the door when the wash and rinse cycles are finished and remove the rack of clean items. Slide the next rack of dirty dishes into the machine, close the door and press the Start button.
- If you need to add dishes after the wash cycle has started: turn off the power (0) or open the door 1 cm and wait for 10 seconds before opening the door completely. Allow the spray arms to stop by themselves to avoid being spattered by hot water. Then press Start.
natural_image
Technical line drawing of a mechanical component with multiple blades and a central frame (no text or symbols)
natural_image
Pure architectural line drawing of a symmetrical structure with no text or symbolsAfb 3
Cleaning
We recommend that the machine is cleaned at least once a day or more often if it is used intensively. It must be cleaned according to the following steps:
- Disconnect the power and water supply.
- Open the door and remove the basket and any large food remains left floating.
- Drain the wash reservoir by disconnecting the overflow pipe.
- Remove and empty the strainer basket, fi Iter inset and inlet strainer pump and clean them thoroughly.
- Clean the inside of the machine thoroughly.
- Replace the strainer basket, filter inset and inlet strainer pump precisely and correctly.
- Leave the door open to allow the inside to dry naturally (end of clean).
- Check that the wash and rinse arms can spin freely and are not obstructed.
- Check that the spray jets are not blocked by limescale or other residue.
- The power and water supplies must be switched back on before the machine is used again.
12. Maintenance
Warning!
Always disconnect power before any cleaning or maintenance operation!
Wash and rinse arms
The upper and lower wash and rinse arms must be able to spin freely and must continue to spin for several turns after they have been set off by hand. The power must be turned off while the arms are being checked. Spin the arms and remove any obstructive objects.
If the strainer basket, fi lter inset and inlet strainer pump are not placed correctly, the spray arms and jets may be obstructed by such items as food remains or bones.
The spray arms can be removed easily for cleaning.
To remove the wash and rinse arms, the serrated nuts must be unscrewed, after which the wash and rinse arms can be removed (img. 4).

Img.4
Comment:
It is necessary to have a firm grip on the upper wash and rinse arms before totally unscrewing the serrated nut that holds them in place. Be careful not to let them drop.
The upper and lower wash and rinse arms are interchangeable.
Maintaining the heating elements
Due to the high electrical load and lime-rich water found in many areas, it is common for limescale to form on the heating elements. This has a detrimental effect on heat conduction. This is why it is necessary to maintain and clean the dishwasher regularly and to use a water softener!
Remove any limescale residue on the bottom of the reservoir. If in doubt, contact your dealer.
Maintaining the water pipes
Impurities in the water inlet hose (strainer) must be removed regularly to ensure a constant flow of water.
Service
If repairs or other adjustments are necessary, please contact your dealer or service company.
13. Detecting malfunctions
This section could help prevent the need to call out a repair service. If a problem persists after all possible causes have been checked, contact your dealer or a qualified service company.
| Problem Possible causes & proposed solution | |
| The machine will not work | First check that the power and water supplies are switched on and working correctly!Open the door and close it again, then press the Start button, and if it doesn't work:1. There may be a blown fuse or activated circuit breaker in the meter cupboard.2. Check if the internal fuse has blown. Switch off the power!3. Check that the rinse arms can spin, remove dirt etc. regularly. |
| Long wash cycle | 1. The temperature in the boiler and/or reservoir is too low. (See the display)2. Check the fi Iter gauze in the water inlet pipe, and clean if necessary.3. If there is too much limescale residue (consult dealer), use a water softener! |
| Plates are not clean | 1. Remove left-over food thoroughly before washing up, use a pre-rinse spray2. The water pressure may be too low due to a blockage in the inlet strainer pump in the reservoir. Disconnect the power supply, empty the reservoir, inspect it and clean the strainer, etc, remove any food remains.3. The water temperatures may be too low. Not enough warming up time after it has been turned on: Check the temperatures in the display panel.4. Incorrect dose of detergent. Contact your detergent supplier or your dealer.5. Descaling may be necessary, use a water softener!6. The plate racks may not be loaded correctly. |
| Spots and stains on cutlery, glasses and plates | 1. The baskets are not loaded correctly.2. Incorrect rinse water temperature (See display).3. Low water pressure caused by an obstructed pump (clean regularly).4. Extremely hard water use a water softener!5. Incorrect detergent for the type of water. (detergent supplier)6. Incorrect rinsing agent for the type of water. (detergent supplier)7. Incorrect concentration of detergent and rinsing agent. (detergent supplier) |
| Water does not fi ll up or only does so slowly | Foreign objects prevent the water supply from working properly.Note: this must be checked after installation. Iron particles from the water pipe may get stuck in the hose. Disconnect the water supply. Remove the hose from the tap. Clean the fi Iter and put it back. This problem could also occur if the water pressure in the water inlet is too low. |
14. Final comments & Guarantee etc.
Dear customer:
Thank you for buying our product. We provide a 12 month guarantee, commencing from the date of purchase (you must submit a copy of your purchase invoice bearing the correct date). The guarantee applies only to defective materials or quality problems in parts, providing that they have been used correctly and are original.
The guarantee does not extend to:
- Damage resulting from transport, incorrect installation or incorrect use of the machine.
- Damage to components resulting from a mains voltage or water supply pressure which has deviated from the data in the technical specifications.
- Damage caused by improper disassembly of the machine, adjustments to or changing of original mechanical or electrical components.
- Damage caused by incompetent use, cleaning and maintenance.
- Damage resulting from fi re, f l ood, collapse, etc, all this in the broadest sense of the word.
- Failure to strictly follow the instructions in this instruction manual when using the machine.
- Normal consumable parts and parts subject to wear and tear.
- An incorrect invoice or failure to produce a purchase invoice bearing the correct date.
General safety precautions:
- Only use a suitable wall socket.
- If the power supply cable is damaged, it must be replaced by an expert service electrician to prevent the risk of electric shocks.
- The dishwasher is not intended for use by persons (including children) with reduced physical, sensory or mental abilities or a lack of knowledge and experience, unless they are acting under expert supervision or on the instructions of a person who is responsible for their safety.
- Make sure that children are not able to play with the machine.
- Always remove the plug from the wall socket (230 V) or turn the power off (400 V) before cleaning or servicing the machine.
- Do not touch any electrical components, especially if your hands are damp or wet.
- Only ever allow repairs to the machine to be carried out by a company or person qualified to do so.

Lave-vaisselle
natural_image
Exterior view of a stainless steel kitchen appliance with open door and side panel (no visible text or symbols)2. Assistance technique
natural_image
Line drawing of a 3D printer cabinet with open door and internal components (no text or symbols)natural_image
Technical line drawing of a mechanical component with multiple blades and a central grid structure (no text or symbols)
natural_image
Pure architectural line drawing of a symmetrical structure with no text or symbolsImg. 3
Nettoyage


- Vaatwasser
- Dishwasher
- Lave-vaisselle
- Functietoetsen
- Reiniging
- General foreword
- General
- Technical support
- Declarations
- Caution:
- Contents
- Safety Instructions
- Safety Instructions
- Safety
- Using the machine
- Economy and protection
- General safety Instructions:
- Short introduction to the Dishwasher
- General
- Main technical specifications
- Installation
- Unpacking
- Positioning the dishwashing (to be performed by a qualified fitter)
- Connecting the power supply and the water supply
- Connecting the power supply (this operation must be performed by a qualified fi tter)
- Warning
- Selecting the cable (400V)
- Connecting the water supply
- Water discharge
- Tests
- Water inlet hose
- Water connection and hydrodynamic pressure
- Electrical connection
- Inspect the inside of the dishwasher
- General Display
- Minimum requirements:
- Operating the Display Panel
- Function keys
- Display
- Parameter setting
- Setting a password:
- Preparation after installation and cleaning
- Recommended service temperature
- Washing dishes and cleaning
- Washing dishes
- Cleaning
- Maintenance
- Warning!
- Always disconnect power before any cleaning or maintenance operation!
- Wash and rinse arms
- Comment:
- Maintaining the heating elements
- Maintaining the water pipes
- Service
- Detecting malfunctions
- Final comments & Guarantee etc.
- The guarantee does not extend to:
- General safety precautions:
- Assistance technique
- Nettoyage
Brand : CaterChef
Model : U1 309.005
Category : Dishwasher