
OV 1 - Oven KALORIK - Free user manual and instructions
Find the device manual for free OV 1 KALORIK in PDF.
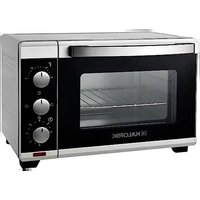
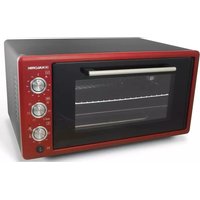
| Product type | Oven |
| Brand | Kalorik |
| Model | OV 1 |
| Material | Metal, refractory glass |
| Intended use | Cooking, reheating, grilling |
| Cooking functions | Grill (top heating element), bottom heat, convection (both heating elements simultaneously) |
| Thermostat | Temperature adjustment |
| Timer | Mechanical timer with bell, automatic shut-off |
| Door | Refractory glass door for cooking monitoring |
| Indicator light | Indicates that the oven is heating |
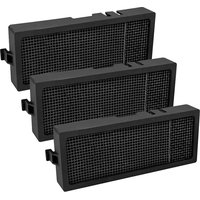
| Included accessories | Rack, baking tray, removable crumb tray |
| Plug type | Polarized plug (one blade wider) |
| Power cord | Short cord for safety |
| Interior cleaning | Wipe with paper towel, cooking oil for residue, avoid abrasive products |
| Exterior cleaning | Soft dry cloth, do not use metal sponge |
| Safety instructions | Do not immerse, do not touch hot surfaces, unplug before cleaning |
Frequently Asked Questions - OV 1 KALORIK
User questions about OV 1 KALORIK
0 question about this device. Answer the ones you know or ask your own.
Ask a new question about this device
Download the instructions for your Oven in PDF format for free! Find your manual OV 1 - KALORIK and take your electronic device back in hand. On this page are published all the documents necessary for the use of your device. OV 1 by KALORIK.
USER MANUAL OV 1 KALORIK
-
Check that your mains voltage corresponds to that stated on the appliance.
-
Do not touch hot surfaces. Use handles or knobs.
-
To protect against electrical shock do not immerse cord, plugs, or the appliance in water or other liquid.
-
Close supervision is necessary when any appliance is used by or near children.
-
Unplug from outlet when not in use and before cleaning. Allow to cool before putting on or taking off parts.
-
Do not operate any appliance with a damaged cord or plug or after the appliance malfunctions or has been damaged in any manner. Return the appliance to the nearest authorized service facility for examination, repair, or adjustment.
-
The use of accessory attachments not recommended by the appliance manufacturer may cause injuries.
-
Do not use outdoors.
-
Do not let the cord hang over the edge of a table or counter, or touch hot surfaces.
-
Do not place on or near a hot gas or electric burner, or in a heated oven.
-
Extreme caution must be used when moving an appliance containing hot oil or other hot liquids.
-
Always attach the plug to the appliance first, then the plug cord into the wall outlet. To disconnect, turn any control to "off" (or 0), then remove the plug from wall outlet.
-
Do not use the appliance for other than intended use.
-
Oversize foods or metal utensils must not be inserted in a toasteroven as they may create a fire or risk of electric shock.
-
A fire may occur if the toaster-oven is covered or touching flammable material, including curtains, draperies, walls, and the
like, when in operation. Do not store any item on top of the appliance when in operation.
- Do not clean with metal scouring pads. Pieces can break off the pad and touch electrical parts involving a risk of electric shock.
- Extreme caution should be exercised when using containers constructed of other than metal or glass.
- Do not store any materials, other than manufacturers recommended accessories, in this oven when not in use.
- Do not place any of the following materials in the oven: paper, cardboard, plastic, and the like.
- Do not cover crumb tray or any part of the oven with metal foil. This causes overheating of the oven.
- To disconnect the appliance, put all knobs in off (or 0) position and remove the plug from the wall outlet.
SAVE THESE INSTRUCTIONS
POLARIZED PLUG INSTRUCTIONS
This appliance has a polarized plug (one blade is wider than the other). To reduce the risk of electric shock, this plug will fit into the polarized outlet only one way. If the plug does not properly fit into the outlet at first, reverse it. If it still does not fit, contact a competent qualified electrician. Do not attempt to modify the plug in any way.
SHORT CORD INSTRUCTIONS
A short power supply cord is provided to reduce the hazards resulting from becoming entangled in, or tripping over a longer cord. Extension cords may be used if care is exercised in their use.
- The electrical rating of the extension cord should be at least that of the appliance. If the electrical rating of the extension cord is too low, it could overheat and burn.
- The resulting extended cord should be arranged so that it will not drape over the counter top or tabletop where it can be pulled on by children or tripped over.
PART DESCRIPTION
- Removable crumb tray
- Grill rack
- Baking tray
- Door handle
- Thermostat knob
- Function selector
- Power light
- Timer knob

BEFORE THE FIRST USE
- Unpack the appliance and accessories, then wash and wipe these accessories.
- It is normal if some smoke or smell emanates from the appliance when using it for the first time. This is not harmful. In order to eliminate any packing oil that may remain after production, we recommend to operate the appliance for 15 minutes, putting the thermostat on its maximum temperature setting.
OPERATING INSTRUCTIONS
- Before using the appliance, clean the surface of the tray with a damp cloth and wipe dry. Then grease the tray with butter, margarine or cooking oil.
-
Put the function selector in OFF position.
-
Plug the unit into the power supply socket.
- Turn the function selector to the desired position:

OFF

: only the upper heating element heats up in order to roast the preparation

: only the lower heating element heats up to bake or reheat a preparation without roasting it.

: both heating elements will heat up to bake and roast the preparation.
- Select the cooking temperature using the thermostat knob.
- Then, turn the timer knob to choose the required time, indicated in minutes on the appliance. If you wish to set the timer to less than 10 minutes, turn it to a position higher than 10 minutes first and then set it back to the desired time. The pilot light will come on, indicating that the oven is operating.
- Thanks to the heat resistant glass door, you can check the food during use, which means you can adjust the cooking setting and time if necessary according to your own appreciation.
- If you want to stop before the selected time is over, put the timer and the function selector in OFF position.
- A sound will be heard when the cooking time has elapsed. The appliance will switch off automatically. As soon as the food is ready, turn the thermostat and the function selector to OFF.
- Carefully open the door, preferably using an oven glove.
- Be very careful when removing the backing tray or the rack, as these might be very hot and you might get burned.
CLEANING AND MAINTENANCE
Switch off the appliance by putting the knobs of the control panel in OFF or "0" position. Before cleaning, unplug the appliance from outlet and allow it to cool down.
Inside cleaning
- Wipe trays with absorbent paper towelling or a soft cloth. To remove baked on food pour a little cooking oil on the food and allow to stand for five to ten minutes. This should soften the food and allow it to be removed with absorbent paper towelling or a soft cloth.
- If the above method fails to remove the food we suggest wiping the trays with a damp cloth and a little detergent.
- Never use abrasive products. Never immerse the appliance in water and make sure no water or damp penetrates into the appliance.
- Make sure no water comes on the oven door when the latter is still hot.
Outside cleaning
- Wipe clean with a soft dry cloth or paper towelling
- Do not use steel wool, scouring pads or abrasive cleaners.
DO NOT IMMERSE IN WATER OR ANY OTHER LIQUID.


Brand : KALORIK
Model : OV 1
Category : Oven