SIS 40516 - Iron KALORIK - Free user manual and instructions
Find the device manual for free SIS 40516 KALORIK in PDF.


| Brand | Kalorik |
| Model | SIS 40516 |
| Product Type | Steam iron with steam generator |
| Power Supply | 1700 W, 15 A, 120 V (polarized plug) |
| Tank Capacity | Not specified (fill without exceeding MAX level) |
| Temperature Settings | Adjustable thermostat: MIN (synthetic/silk), ●● (wool), ●●● (cotton/linen) |
| Steam Function | Continuous steam with regulator, steam jet with lock, vertical ironing |
| Safety | Auto shut-off not specified; must unplug after use; non-slip surface for iron rest |
| Maintenance and Cleaning | Clean the soleplate with a damp cloth; replace the anti-scale cartridge every 6 months or 120 hours |
| Anti-scale Cartridge | Included; never use without the cartridge; replacement by Kalorik after-sales service |
| Recommended Water Type | Tap water accepted, demineralized water recommended for longer lifespan |
| Warranty | 1 year on material and manufacturing defects |
| Included Accessories | Non-slip pad integrated into the base |
| Household Use | Yes |
Frequently Asked Questions - SIS 40516 KALORIK
User questions about SIS 40516 KALORIK
0 question about this device. Answer the ones you know or ask your own.
Ask a new question about this device
Download the instructions for your Iron in PDF format for free! Find your manual SIS 40516 - KALORIK and take your electronic device back in hand. On this page are published all the documents necessary for the use of your device. SIS 40516 by KALORIK.
USER MANUAL SIS 40516 KALORIK
When using your appliance, basic safety precautions should always be followed, including the following:
-
READ ALL INSTRUCTIONS BEFORE USING THE APPLIANCE!
-
•se the appliance only for its intended use.
- Check that your mains voltage corresponds to that stated on the appliance.
- To protect against electrical shock, fire or personal injury, do NOT immerse cord, plugs, base or iron in water or other liquid.
- The appliance shall be shut-off before plugging or unplugging from the outlet. Never yank the cord to disconnect form the outlet; instead, grasp the plug and pull to disconnect.
- Do not allow the cord to touch the hot surfaces. Let the iron cool down completely before putting away.
- Always disconnect the appliance from the electrical outlet when filling with water or emptying and when not in use.
- Do not operate the iron with a damaged cord or plug or after the appliance has been dropped or damaged in any manner.
- To avoid the risk of electric shock, do not disassemble the iron, take it to a qualified serviceman for examination and repair. Incorrect reassembly can cause a risk of electric shock when the iron is used.
- Close supervision is necessary when the appliance is used by or near children. Children should NOT play with this appliance. This appliance is not intended for use by persons (including children) with reduced physical, sensory or mental capabilities, or lack of experience and knowledge, unless they have been given supervision or instruction concerning use of the appliance by a person responsible for their safety.
- Do not leave appliance unattended while plugged in, on an ironing board, or while it is still hot.
-
Burns can occur from touching hot metal parts, hot water or steam. ●se caution when you turn a steam generator upside down – there may be hot water in the water tank.
-
Do not direct steam at people, animals or iron clothes while they are being worn.
- Deposit or Mineral in tap water will generate lime and eventually block the steam holes, therefore it is advisable to use distilled water.
- Always put the iron with the soleplate down on the iron rest, never resting on its heel.
- The use of accessory attachments is not recommended by manufacturer and may result in fire, electric shock or personal injury.
- The iron is not to be used if it has been dropped, if there are visible signs of damage or if it is leaking.
- If the supply cord is damaged, it must be replaced by the manufacturer, its service agency or similarly qualified persons in order to avoid a hazard.
- The iron must be used and rest on a stable surface.
- When placing the iron on its stand, ensure that the surface on which the stand is placed is stable.
SPECIAL INSTRUCTIONS
- This is a 1700W appliance. To avoid a circuit overload, do not operate another high wattage appliance on the same circuit.
- If an extension cord is absolutely necessary, a 15-ampere cord should be used. Cords rated for less amperage may overheat. Care should be taken to arrange the cord so that it cannot be pulled or tripped over.
SAVE THESE INSTRUCTIONS HOUSEHOLD USE ONLY
POLARIZED PLUG INSTRUCTIONS
This appliance is equipped with a polarized plug (one blade is wider than the other). To reduce the risk of electric shock, this plug will fit into the polarized outlet only one way. If the plug does not properly fit into the outlet at first, reverse it. If it still does not fit, contact a competent qualified electrician. Do not attempt to modify the plug in any way.
PART DESCRIPTION
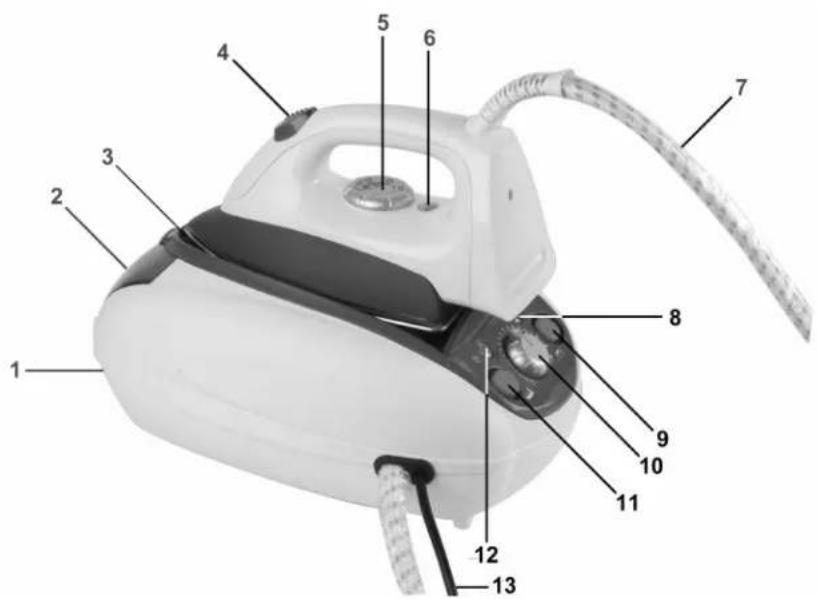
- Water tank
- Water tank cap
- Iron rest
- Steam button with lock
- Temperature dial
- Pilot light for the iron
-
Connection cord (for steam)
-
Water refill indicator
- Iron power switch
- Steam control knob
- Steam generation switch
- Steam pilot light
- Power cord
CAUTION BEFORE FIRST USE
- Please read all of the instructions for use and the "Important Safeguards" carefully.
- The iron has been greased, and as a result, the iron may slightly smoke when switched on for the first time. After a short while, this will cease.
- Before using for the first time, remove all packaging from the appliance.
- Before the first use, we recommend cleaning the iron as follows: fill the water tank and plug the appliance into an outlet. Press the boiler power switch and the iron power switch. Put the temperature dial on the "LINEN" position and the steam regulator on MAX. Let the iron heat for 10 minutes. When the iron is hot, lift it from its base, hold it vertically, and keep the steam button pressed for 30 seconds, then wait 30 seconds and repeat this cycle twice.
Switch the appliance OFF (set the boiler power switch and the iron power switch in the off-position), unplug it, and let it cool. You can then clean the soleplate with a damp cloth.
HINTS
- Before using the appliance for the first time, hold the iron away from your clothes and press the steam control trigger several times consecutively. This will remove any cold water from the steam connection cord. This should also be done if you have not used the steam function for a few minutes while the appliance is in use.
- For best results, use a mesh-type ironing board to allow excess steam to escape.
IRONING: PRECAUTION FOR USE AND TEMPERATURES
- Before ironing, always be sure to check the ironing instructions on all fabric labels. Follow these ironing instructions.
- If ironing instructions are missing, you may reference the following table for recommended ironing temperatures by fabric type:
| Kind of textile Temperature dial Steam Ironing | ||
| Synthetic (e.g. acetate, acrylic, viscose, polyamide, polyester...)Silk |  | NO |
 | ||
| Wool |  | YES |
| | | ||
| CottonLinen |  | YES |
| MAX | ||
- The table is valid for fiber materials only. If a finish has been applied (gloss, wrinkle relief etc.), the textile can best be ironed at a lower temperature.
- You should sort fabrics according to ironing temperature: wool with wool, cotton with cotton, etc.
- The iron heats up more rapidly than it cools down. Therefore, we recommend that you start ironing articles requiring lower temperatures first (such as those made of synthetic fibers), then progress to those requiring higher temperatures.
- If an article is made of a mixture of different fibers, you should always select the lowest ironing temperature of the composition of those fibers. For example an item consisting of “60% polyester and 40% cotton” should be ironed at the temperature indicated for polyester and without steam.
- If you will be ironing delicate fabrics or if you do not know what kind(s) of fabric(s) the article is made of, test the ironing temperature on a small, inconspicuous part of the fabric. Always start at a low temperature and increase as needed.
- Pure woolen fabrics (100% wool) may be pressed with the iron set to a steam position. It is recommended that you set the selector switch to the "Cotton" position, apply shot-of-steam, and use a dry pressing cloth.
- When steam-ironing woolen fabrics, shining of the fabrics may occur. This can be prevented by turning the articles inside out and ironing the inside or by placing a thin, damp cloth between the fabric and the iron.

- Velvet and other textures that rapidly acquire shiny spots should be ironed in one direction only (with the nap), applying only light pressure. Always keep the iron moving on these fabrics.
- Iron the reverse side of synthetic materials and silk. It is not advisable to use steam as this may cause stains.
- When you have been ironing fabrics at a high setting, do not switch to ironing articles that require a lower temperature immediately afterwards. Adjust the selector switch to a lower setting and wait until the iron has cooled to the desired temperature.
DRY PRESSING (WITHOUT STEAM)
- Plug the appliance into an outlet. Turn the variable steam dial (10) to position.
- Press on the iron switch (9).
- Set the temperature dial for the desired fabric. Always check the label of the garment before choosing the temperature setting.
- Leave the iron on its rest and wait until the temperature indicator light goes out before starting to iron.
- Leave the steam generation switch (11) in the OFF position.
FILLING THE WATER TANK
- Put the base on a stable, horizontal, and heat-resistant surface.
- Open the cap of the water tank and fill the water tank with clear water up to its "MAX" level. Do not fill beyond this maximum level! You can use tap water, but we advise you to use distilled water for the best long-term performance.
- Close the lid of the water tank.
- Never add vinegar, detergents, or other chemical products to the water as this could damage the appliance. See the "Cleaning" section of this guide for more details.
FILLING THE WATER TANK DURING USE
When the water tank (1) is empty, the water refill indicator (8) will light up. Since the water tank is not pressurized, you can refill it during use. To do so, proceed as described above in the "Filling with water" section. You can resume ironing immediately.
STEAM IRONING
Before plugging the unit into an outlet, always check that the steam control trigger (4) is not in locked position.
- Fill the water tank as described in the section above with water and insert the power plug into a wall socket.
- As indicated on the temperature dial and in the table on page 6, steam ironing is only possible at higher ironing temperatures. Set the dial to ●● or ●●●.
- Place the iron on the iron rest.
- Turn and adjust the temperature control dial until you reach the steam symbol.
- Completely unwind the cord and plug into an outlet.
• If you intend to iron with steam, press both switches (9) and (11). - The steam indicator light (12) will be off until the required temperature is reached. Wait for the light (12) to go on before steam ironing.
- The iron's temperature indicator light (6) will turn on. It will go off as soon as the desired temperature is reached. During ironing, this temperature indicator light will come on from time to time. When this happens, the soleplate is being re-heated to the required temperature. You can continue ironing while this happens.
- Press the steam button (4) to release a burst of steam from the soleplate of the iron. Release the button and the steam will stop. If you want a continuous jet of steam, you can hold the steam button down or slide its purple top part backwards so that the steam button locks. To stop the continuous jet of steam, push the purple part of the button forward again and release the steam button.
- You can adjust the steam control knob (10) to regulate the amount of steam generated by the base. Note: the maximum
steam rate ("MAX") can only be used when the ironing temperature is set on the highest position (●●●) or else water may drip from the soleplate.
- While ironing, the iron's pilot light (6) will go on and off from time to time. This means that the temperature of the iron is being regulated by the thermostat. You may continue ironing as it adjusts itself.
- When you use a lot of steam in a very short time, the steam output is slightly reduced until your appliance produces enough steam to maximize output. This phenomenon also happens when there is not enough water in the water tank.
- When the water tank is running empty, you will hear more noise when pressing the steam button. When the water tank is empty, the refill indicator (8) will light up. If you want to continue using the steam function, you must refill the water tank. The water refill indicator will go out once the water tank has been filled.
Note: when you start using the steam function, it is normal for the electrical pump to make vibrating sounds. This is due to the air inside the anti-lime scale cartridge and will lessen when the air has been pumped out. If the noise has not lessened after 60 seconds, check to see if the cartridge has been assembled correctly.
VERTICAL IRONING
The "burst of steam" button also allows you to iron delicate articles of clothing vertically. To use the "vertical burst of steam" feature, first hang your article of clothing on a hanger. Keep the steam button (4) pressed or locked with the sliding trigger lock and move the iron back and forth in front of the article of clothing. Make sure that the soleplate does not come into contact with the fabric! The amount of steam required and the distance between the soleplate and the article of clothing depends on the kind of fabric and the depth of the wrinkles.
WHEN YOU HAVE FINISHED IRONING
- Turn the temperature dial on the iron to "MIN", switch the iron (11) and the steam generator (9) off, and unplug the iron from the electrical outlet.
- Leave the iron on the iron rest. The non-slip iron rest is specially designed for this and will not damage the soleplate.
- Wait for the appliance to cool before storing it away.
ANTI-LIMESCALE FEATURE
There is a replaceable decalcification cartridge inside the unit's water tank that absorbs unsolvable calcium ions. It also emits solvable sodium ions that soften water, which greatly slows the process of mineral deposits.
- Your appliance features an anti-scale cartridge that is located in the water tank.
- You must replace the cartridge every six months or after every 120 hours of ironing, whichever comes first. This period can vary according to the iron's frequency of use and in your local area's water scale rate. If the water is hard, you will have to change the cartridge more frequently.
- You can delay the replacement of the cartridge by using distilled water or a mixture of 50% tap water and 50% distilled water.
- To take it out, open the water tank and lift the cartridge out of the water tank. When you put a new anti-scale cartridge in the water tank, immerse it in water for some time before using the appliance to obtain a better performance.
- To obtain a new cartridge, contact Kalorik's after-sales service.
- NEVER USE THE APPLIANCE WITHOUT ITS CARTRIDGE.
CARE AND CLEANING
- Clean the iron regularly according to water hardness and frequency of use.
- nplug the appliance and allow it to cool down.
• To clean the plastic parts of the iron, use a damp cloth. - To clean the soleplate, use a damp cloth or a product made specifically for this purpose. Never use abrasive products.
- Never immerse the appliance in water or any other liquid.
Any other servicing should be performed by an authorized service representative.
TROUBLESHOOTING
| Problem Possible | cause Solution | |
| A white powder comes out of the soleplate. | This is normal when the iron is new. | The powder is not harmful and will disappear after a few uses. |
| Water drips from the soleplate while steam ironing. | When you start steam ironing, the steam connection tube is still cold; the iron is not hot enough. | This is normal; after a few seconds, the steam jet will be OK. You can put the iron on an old cloth to start so that the water is absorbed; set the iron to a higher temperature. |
| No steam comes out. | The boiler power switch has not been turned on or there is not enough water in the water tank. | Press the boiler power switch or fill the water tank and wait until the indicator light turns off. |
| No visible steam comes out of the iron when the steam button is pressed. | When ironing at a very high temperature, steam may be faint and hard to see. | Put a mirror under the soleplate to check if steam comes out. |
| The soleplate is dirty. | Impurities in the water adhered to the soleplate or the temperature is set too high for the fabric. | Clean the soleplate with a soft, damp cloth; adjust the temperature to fit the article of clothing. |
WARRANTY
We suggest that you complete and return the enclosed Product Registration Card promptly to facilitate verification of the date of original purchase. However, return of the Product Registration Card is not a condition of these warranties. You can also fill out this warranty card online, at the following address: www.KALORIK.com
This KALORIK product is warranted in the ●.S.A. for 1 year from the date of purchase against defects in material and workmanship. This warranty is not transferable. Keep the original sales receipt. Proof of purchase is required to obtain warranty performance.
During this period, if the KALORIK product, upon inspection by KALORIK, is proven defective, it will be repaired or replaced, at Kalorik's option, without charge to the customer. If a replacement product is sent, it will carry the remaining warranty of the original product.
This warranty does not apply to any defect arising from a buyer's or user's misuse of the product, negligence, failure to follow KALORIK instructions noted in the user's manual, use on current or voltage other than that stamped on the product, wear and tear, alteration or repair not authorized by KALORIK, or use for commercial purposes. There is no warranty for glass parts, glass containers, filter basket, blades and agitators, and accessories in general. There is also no warranty for parts lost by the user.
ANY WARRANTY OF MERCHANTABILITY OR FITNESS WITH RESPECT TO THIS PRODUCT IS ALSO LIMITED TO THE ONE YEAR LIMITED WARRANTY PERIOD.
Some states do not allow limitation on how long an implied warranty lasts or do not allow the exclusion of incidental or consequential damages, so the above limitations may not apply to you. This warranty gives you specific legal rights, and you may also have other rights which vary from state to state.
If the appliance should become defective within the warranty period and more than 30 days after date of purchase, do not return
the appliance to the store: often, our Customer Service Representatives can help solve the problem without having the product serviced. If servicing is needed, a Representative can confirm whether the product is under warranty and direct you to the nearest service location.
If this is the case, bring the product, or send it, postage prepaid by the user (all Kalorik customers are responsible for the initial shipment back to the warranty center), along with proof of purchase and a return authorization number indicated on the outer package, given by our Customer Service Representatives. Send to the authorized KALORIK Service Center (please visit our website at www.KALORIK.com or call our Customer Service Department for the address of our authorized KALORIK Service Center). When sending the product, please include a letter explaining the nature of the claimed defect.
If you have additional questions, please call our Customer Service Department (please see below for complete contact information), Monday through Thursday from 9:00am - 5:00pm (EST) and Friday from 9:00am - 4:00pm (EST). Please note hours are subject to change.
If you would like to write, please send your letter to:
KALORIK Customer Service Department
Team International Group of America Inc.
1400 N.W 159th Street, Suite 102
Miami Gardens, FL 33169 •SA
Or call:
Toll Free: +1 888-521-TEAM / +1 888-KALORIK
Only letters can be accepted at this address above. Shipments and packages that do not have a return authorization number will be refused.
13 SIS 40716 - 120501
SP MANUAL DE INSTRUCCIONES
Team International Group of America Inc.
1400 N.W 159th Street, Suite 102
Miami Gardens, FL 33169 •SA
O llame gratuitamente (●.S.A.) al +1 888-521-TEAM / +1 888-KALORIK
REPASSAGE A SEC (SANS VAPEUR)
Team International Group of America Inc.
1400 N.W 159th Street, Suite 102
Miami Gardens, FL 33169 •SA
Ou appelez (Gratuitement des Etats-●nis): +1 888-521-TEAM ou +1 888-KALORIK.

- SPECIAL INSTRUCTIONS
- SAVE THESE INSTRUCTIONS HOUSEHOLD USE ONLY
- POLARIZED PLUG INSTRUCTIONS
- CAUTION BEFORE FIRST USE
- HINTS
- IRONING: PRECAUTION FOR USE AND TEMPERATURES
- DRY PRESSING (WITHOUT STEAM)
- FILLING THE WATER TANK
- FILLING THE WATER TANK DURING USE
- STEAM IRONING
- VERTICAL IRONING
- WHEN YOU HAVE FINISHED IRONING
- ANTI-LIMESCALE FEATURE
- CARE AND CLEANING
- WARRANTY
- KALORIK Customer Service Department
- SP MANUAL DE INSTRUCCIONES
- REPASSAGE A SEC (SANS VAPEUR)
Brand : KALORIK
Model : SIS 40516
Category : Iron