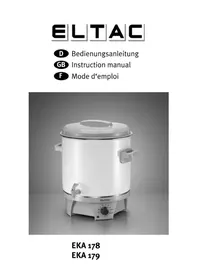
Eltac EKA 179 - Saucepan Rommelsbacher - Free user manual and instructions
Find the device manual for free Eltac EKA 179 Rommelsbacher in PDF.


| Brand | Rommelsbacher |
| Model | Eltac EKA 179 |
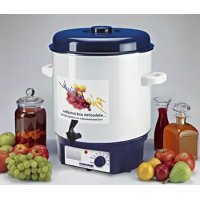
| Device type | Electric sterilizer / Multi-purpose pot |
| Capacity | 27 liters |
| Power | Approximately 2000 W |
| Supply voltage | 230 V ~ 50 Hz |
| Approximate dimensions (L x W x H) | 40 x 35 x 30 cm |
| Approximate weight | 5 kg |
| Material | Enameled steel, insulated handles |
| Temperature range | 30 °C to boiling (continuous adjustment) |
| Special juice setting | "Entsaften" position for juice extraction |
| Temperature control | Precision capillary tube thermostat |
| Main functions | Sterilization, cooking, juice extraction (with accessory), blanching, reheating |
| Safety | Overheating protection (dry-boil protection), insulated handles |
| Care and cleaning | Cleaning with damp cloth; descaling with vinegar or descaler |
| Included accessory | Grid, lid |
| Optional accessory | Juice extraction attachment (type EA 1803) |
| Drain | Drain tap (on some models) |
| Usage | Household use only |
| Operation indicator | Heating indicator light |
Frequently Asked Questions - Eltac EKA 179 Rommelsbacher
User questions about Eltac EKA 179 Rommelsbacher
0 question about this device. Answer the ones you know or ask your own.
Ask a new question about this device
Download the instructions for your Saucepan in PDF format for free! Find your manual Eltac EKA 179 - Rommelsbacher and take your electronic device back in hand. On this page are published all the documents necessary for the use of your device. Eltac EKA 179 by Rommelsbacher.
USER MANUAL Eltac EKA 179 Rommelsbacher
We are pleased that you decided for this Auto-Preserving Cooker and thank you for your confidence. To make sure you will have lots of pleasure using it, please observe the following notes carefully, save this instruction manual for future reference and pass it on to any user. Thank you very much.
For your safety
Make sure the mains voltage is identical with the details on the rating label.
Only connect to an AC outlet.
Use the appliance only for the use described herein; improper use will result in void of warranty.
In use the appliance becomes hot. Please take care not to touch any hot parts of the ap- appliance and to keep the power supply cord - like that of other neighbouring electrical appliances - away from these parts.
During operation the power supply cord has to be unwound completely.
Put the appliance on a solid, even and free surface, do not put it onto hot surfaces or into the proximity of open gas flames. Do not move the appliance when hot.
Unplug the appliance from the mains if there are problems during operation; also unplug it prior to every cleaning procedure and after each use.
Never immerse the appliance in water and make sure the power supply cord is protected against dampness.
The Auto-Preserving Cooker is designed for household use only and not for commercial use. In case of signs of damage to the appliance or the power supply cord, immediately unplug the appliance!
Our electrical appliances comply with the relevant safety regulations. They may be repaired by specialists only. Improper repairs may result in considerable danger for the user.
Children and persons with handicaps of physical, sensorial or mental nature must not operate this appliance without an adequate supervision and/or corresponding expert advice and safety instructions.
Children should be supervised in order to ensure that they do not play with this appliance.
- Do not at all operate this unit with an external timer or a separate telecontrol system.
General remarks
The Auto-Preserving Cooker offers a great variety of possible uses, not just for preserving, but food can also be cooked, heated up, heated up indirectly in water, to prepare hot drinks, to blanch vegetables etc.
Thick liquids, which tend to scorch, need to be heated slowly whilst stirring continuously.
In case your appliance happens to boil dry, there is an additional safety feature to prevent the appliance from overheating. In this case allow the appliance to cool well before fi lling it again with water, otherwise there is the risk of scalding by sudden development of steam. Moreover, the enamelled surface of the appliance may suffer damage.
During the initial operation it is possible for smell to develop, which, however, will disappear after a short period of operation.
Prior to first use, we recommend for hygienic reasons filling the appliance with approx. 5 litres of water - temperature selector should be set to ,Entsaften' (juice making) – and bringing it to a boil.
Capacity
The Auto-Preserving Cooker holds 27 litres. The level of liquid in the cooker must not exceed 4cm below the upper rim.
Important instructions for using the appliance
- Thoroughly clean the inside of the container prior to first use.
Always fill with water before switching on the appliance.
- Do not overfill container, leave at least 4cm space below the container rim. If overfilled, hot liquid may spurt out.
Risk of scalding from escaping steam.
Caution: The appliance will become hot when in use, so please only grab it on its insulated handles. Only carry it when it is cool.
Temperature control/Setting the thermostat
The appliance is equipped with a precision thermostat (capillary tube thermostat). The thermostat is infinitely variable from approx. 30^ up to the boiling point. An additional thermometer is not required.
For juice making the appliance is equipped with a special operation mode, which ensures continuous heating.
When the cooking process has been completed or needs to be interrupted, reset the temperature selector to off-position and disconnect the plug.
Notes for cooking
The boiling point of the water varies in accordance with the atmospheric pressure and the altitude of the location.
If the thermostat is set too high, this results in continuous heating and consequently strong development of steam, loss of water in the appliance and furthermore a waste of energy.
To find the correct setting for boiling on your appliance, simply take the following steps:
- Turn the temperature selector clockwise to the right to cooking setting („Kochen“).
- Wait for the water to boil.
- Slowly turn the temperature selector slightly to the left until the pilot lamp extinguishes.
After a short time the regulator will trigger the heating again.
Juice making
The Auto-Preserving Cooker is excellently qualified for juice making, too, when using the Juice-Extraction Top, which you may buy in the specialised trade under model numbers EA 1803.
Operational procedure in short
1) Preserving
a) Place grating insert
b) Put in prepared glass jars or bottles
c) Fill with water
d) Place lid
e) Connect plug to electrical outlet
f) Select temperature
g) Pilot lamp is on (heating process)
h) Pilot lamp goes out for the first time indicating that the selected temperature has been reached; now the actual cooking time begins. The temperature is maintained automatically.
i) Once the cooking procedure is finished, reset the temperature selector to off-position and pull the mains plug.
2) Juice making (Juice Extraction Top is available in the specialised trade)
a) Fill with at least 6 litres of water
b) Place adapter ring and Juice Extraction Top on the appliance according to the instructions
c) Place fruit prepared for juice extraction in the fruit basket
d) Place lid
e) Connect plug to the electrical outlet
f) Set temperature selector to 'Entsaften' (juice-making mode)
g) Pilot lamp is on (heating process)
h) Attention: Add water prior to every further juice-making procedure.
i) Once operation is ended reset the temperature selector to off-position and pull the mains plug.
Cleaning
Always disconnect the mains plug prior to cleaning, then clean the pot outside and inside with a damp cloth. Calcareous residues, which may have formed can be removed from time to time with some vinegar in water or with a standard descaling agent. Afterwards boil the appliance with clear water. This is necessary as a calcareous layer may influence the heating performance and the temperature control respectively. Never immerse the appliance into water and use no steam-jet appliances. Also make sure that no water or steam may inflate the underside of the appliance. Never use abrasives, steel wool or sharp, scratchy objects.
Outlet tap
The model with outlet tap is to be operated the same way, but there is the additional possibility to pour out liquids through the outlet tap. When cooking pasty food, we recommend sealing the tap terminal on the inside of the appliance with a stopper for example to prevent the outlet tap from blocking. From time to time the tap should be unscrewed underneath the knob and be cleaned with hot water, to which you may add a bit of dishwashing detergent. On reassembling, just tighten the screw by hand, as otherwise liquid might tail after.
Interesting points about preserving
First of all: grandma's good old rules for preserving have not been changed! Preserving means sterilising food without any chemical preserving agents. The even heat that is generated kills the germs in the items to be preserved; at the same time the resulting vacuum seals the jar hermetically and germ-free.
Only... the preserving cooker has come a long way since grandma's time! Auto-Preserving
Cookers make it a lot easier, and grandma would have been glad to have one!
But now to preserving itself
Cleanliness and thorough preparation are imperative for the sake of the shelf life. Fruit and vegetables should be of good quality, fresh and ripe.
Wash fruit and vegetables thoroughly and let them dry.
Green beans and peas keep longer if you blanch them briefly fi rst.
Glass jars, cans, bottles and their lids should be washed carefully in hot, soapy water. Then rinse with clear water and place them on a clean cloth till water has run off.
Check containers for stubborn residues and damaged pieces.
Leave seals in clear water till they are used.
Do not use any porous, damaged or over-stretched rubber rings or caps.
Fill the containers up to 2 cm below the rim; when preserving pulpy food (apple puree etc.) leave a space of 3 to 4 cm below the rim. The new glass jars for preserving can be filled higher; please take the instructions into account when buying glass jars.
When making sausage fi ll containers only to 3/4.
Close containers tightly with screw-on lids, spring clips or braces.
Close bottles immediately upon completion of the sterilisation process.
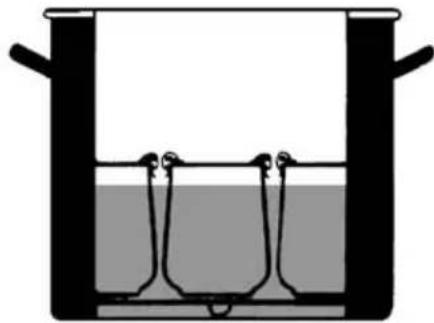
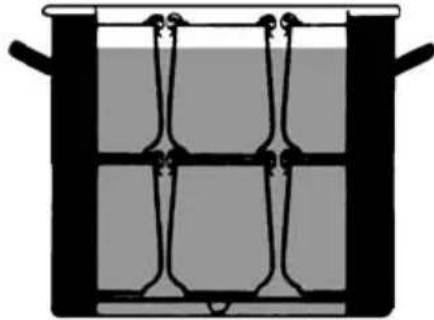
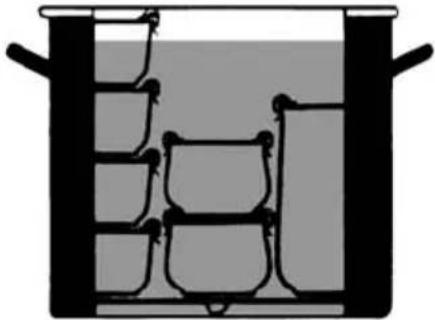
Always place glass jars on the insert grid, this ensures a good circulation of the boiling water underneath and amongst the glass jars, and they are heated more rapidly.
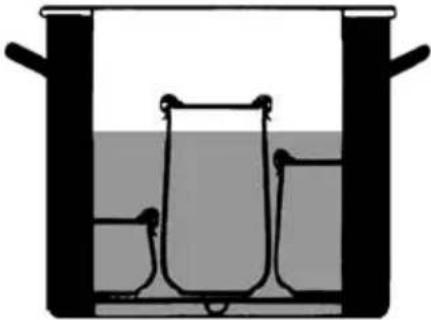
Glass jars of different sizes may be used.
The glass jars are to be 2/3 to 3/4 submerged; if you use the upper level as well, this applies to the upper level. Do not worry; the glass jars underneath which are then fully submerged are so well sealed by preserving ring and spring clips that no boiling water may infi ltrate them from outside.
The temperature of the water fllled into the pot should always be identical with the temperature of the food contained in the glass jars to ensure a uniform heating process.
Consequently, add cold water for glass jars with cold contents; for glass jars with hot contents (e.g. if the food to be preserved was precooked) add correspondingly hot water.
The lid made of food-safe, boil-proof synthetics is curved. The glass jars may rise up to the bow of the lid as long as it rests on well all around the pot, not allowing for steam to escape.
Please take care nonetheless that there is a suffcient amount of water in the pot and the upper glass jars are still 3/4 submerged in water.
As for preserving temperature and preserving time, please refer to the following table or standard cookbooks.
The heating up time is not included in the preserving time, which starts not until the selected temperature has been reached!
If the setting is adjusted below the boiling point, the pilot lamp will extinguish. The operating mode is indicated by the strong formation of steam.
After the cooking time is over, take out the glass jars. Braces and other lid fasteners should be left on the jars until these have cooled completely. Cans should be put into cold water immediately. It is advisable to mark the glass jars, cans etc. with date and content. Preserved food is stored best in a dry, cool and dark place.
Do not discard the cooking water until it has cooled, this will help to prevent the enamelled pots' surfaces from damage.
Special accessory Juice Extraction Top
With the Juice Extraction Top (model EA 1803) you can easily change your Auto-Preserving Cooker any time into a juice maker. If your retailer does not have a Juice Extraction Top in stock, please get in direct touch with us (see rear page for address details).
Table for cooking (details to be understood as reference values)
fruit
currants 85^ 20 min.
apple purée 90^ 30 min.
pears 90^ 30 min.
strawberries 75^ 25 min.
blueberries 85^ 25 min.
raspberries 80^ 30 min.
cherries 80^ 30 min.
yellow plums 90^ 30min
peaches 90^ 30 min.
apricots 90^ 30 min.
purple plums 90^ 30 min.
rhubarb
boil
30 min.
gooseberries 80^ 30 min.
plums 90^ 30 min.
vegetables
cauliflower boil 90 min.
beans
broad beans boil 90 min.
peas
dill pickles
carrots
turnips
pumpkin
Brusselsprouts
asparagus
savoy
tomatoes
boil
boil
90^ C
boil
boil
90^ C
boil
boil
boil
90^ C
30 min.
90 min.
30 min.
120 min.
120 min.
120 min.
30 min.
meat
pre-cooked roast
roasted goulash
roasted game, poultry
roasted cutlets, chops
sausage
boil 75 min.
boil 75 min.
boil 75 min.
boil 75 min.
boil
120 min.

Mode d'emploi
- For your safety
- General remarks
- Capacity
- Important instructions for using the appliance
- Temperature control/Setting the thermostat
- Notes for cooking
- Juice making
- Operational procedure in short
- Cleaning
- Outlet tap
- Interesting points about preserving
- But now to preserving itself
- Special accessory Juice Extraction Top
- Table for cooking (details to be understood as reference values)
- fruit
- vegetables
- meat
- Mode d'emploi
Brand : Rommelsbacher
Model : Eltac EKA 179
Category : Saucepan