
Muro SUB2010 - Subwoofer ELAC - Free user manual and instructions
Find the device manual for free Muro SUB2010 ELAC in PDF.
| Product Type | Powered Subwoofer |
| Brand | ELAC |
| Model | Muro SUB2010 |
| Speaker Type | 8" Polypropylene Cone with Steel Basket |
| Frequency Response | 32 Hz to 200 Hz |
| Crossover Frequency | 40 to 150 Hz |
| Amplifier Type | BASH (Class A/B and D hybrid) |
| Amplifier Power | 120 Watts RMS / 240 Watts Peak |
| App Control | Yes (iOS and Android via ELAC SUB CONTROL 2.0) |
| Digital Signal Processing (DSP) | Yes |
| Standby Power Consumption | 1.5 Watts |
| Maximum Power Consumption | 200 Watts |
| Inputs | 2x RCA (LFE and Line) |
| Wireless Connectivity | Integrated Bluetooth Receiver (optional transmitter) |
| Firmware Update | Via USB Port (service) |
| Finish | Black or White Vinyl |
| Dimensions (H x W x D) | 15.2" x 4.8" x 14.2" (386 x 122 x 361 mm) |
| Net Weight | 17.2 lb (7.8 kg) |
| Included Accessories | Power Cord, 2 Rectangular Feet, 4 Rubber Feet |
| Warranty (North America) | 3 years cabinet and speaker, 1 year amplifier |
| Maintenance and Cleaning | Clean with a soft, dry cloth. Do not use abrasive cleaners, alcohol, or benzene. |
| Safety | Do not open (risk of electric shock). Use on a stable surface. Do not block ventilation openings. |
| Spare Parts and Repairability | Repair by qualified personnel only. Replaceable fuse (type and rating on rear). |
Frequently Asked Questions - Muro SUB2010 ELAC
User questions about Muro SUB2010 ELAC
0 question about this device. Answer the ones you know or ask your own.
Ask a new question about this device
Download the instructions for your Subwoofer in PDF format for free! Find your manual Muro SUB2010 - ELAC and take your electronic device back in hand. On this page are published all the documents necessary for the use of your device. Muro SUB2010 by ELAC.
USER MANUAL Muro SUB2010 ELAC
natural_image
Line drawing of a rectangular electronic device with a circular vent and mounting base (no text or symbols)
natural_image
Line drawing of a rectangular electronic device with a flat top and side supports (no text or symbols)OPERATING INSTRUCTIONS
SUB2010 Powered Subwoofer SUB2020 Powered Subwoofer
Safety Instructions
1. General information
- Please read and follow these safety instructions.
- Keep them safe for future reference.
- Observe all warnings on the speaker and in the manual. Please check the speaker for damage before use. The speaker must be in perfect working condition. Damaged parts may lead to personal injury.
CAUTION! Subwoofers and active speakers are heavy. Be careful when lifting them to prevent personal injury.
2. Use only as directed
- Connect this speaker according to the instructions in the manual.
- Many ELAC speakers are equipped with spikes and / or anti-slip feet. They are explicitly provided for leveling the alignment. They must be screwed into the thread until thread end. For leveling on an uneven floor, it is possible to unscrew the spikes or anti-slip feet by 2-3 turns of thread. The speaker should always to be in perfect vertical alignment. The stability of the speaker must not be compromised by using spikes or anti-slip feet as the speaker may tip-over.
3. Location
• Install the speakers on a level surface only
- When choosing the location of these speakers do not place them in locations that are:
• In direct sunlight
- Very humid
- Prone to vibrations
• Exceptionally hot or cold
- Near CRT Televisions (The speakers are not magnetically shielded and may cause color issues with a CRT based TV)
- Close to magnetic cards (Since the speakers are not magnetically shielded placing magnetic cards such as credit cards or commuter cards may cause them to fail).
WARNING! Please ensure the product is perfectly stable to avoid severe injury from tip-over. Please note, that stability can be increased by using spikes for carpets (If available). However, the mounting of spikes must be carried out carefully because the spikes have very sharp ends which may cause injuries. The stability on slippery floors can be increased by using Velcro fastening tape or double-sided adhesive tape. Do not install the speaker near any heat sources such as radiators, heating valves, stoves, or other apparatus (including amplifiers) that produce heat, or in areas where there is a risk of explosion.
- Do not block any ventilation openings. Install in accordance with the manufacturer's instructions.
- Don't install the speaker in a closed rack or in a closed cupboard.
- Don't put burning candles on or near the speaker.
- Do not install the speaker near transformers because electromagnetic stray fields can cause the subwoofer(s) to produce humming noise.
- In combination with certain materials / lacquers / material surfaces, anti-slip feet or spike washers may cause colored imprints on the surfaces.
4. Overload
Extreme overload of the device due to very high volume may cause individual components to blow. Because of the possible danger, you should never leave loudspeakers under extreme overload conditions unattended.
5. Service
DANGER! Do not open the cabinet because the components and conductors may carry dangerous levels of electricity! Servicing to be carried out by qualified service personnel only.
Servicing is required when the loudspeaker has been damaged in any way, such as damage to the power supply cord or the plug, or when liquid has been spilled or objects have fallen into the loudspeaker, the speaker has been exposed to rain or moisture, does not operate normally, or has been dropped. To reduce the risk of electric shock, do not open the loudspeaker. Servicing to be carried out by qualified service personnel only.

6. Fuse links
Various faults in subwoofers or active speakers may cause the fuse to blow. If the fuse blows, only replace it with the correct fuse type and rating as shown on the rear of the loudspeaker on the fuse holder. A second fuse may be included with the device (in the fuse holder beneath the mains socket).
7. Cleaning
NOTE: Clean only with soft, smooth cloth or with a dust brush. Do not use scouring agents, alcohol, benzene, furniture polish or other agents for cleaning! Modern furniture is often coated with multiple varnishes and plastics which can be treated with chemical agents. Some of these agents contain substances which degrade or soften the rubber feet. Therefore we advise you to place an anti-slip mat underneath the loudspeaker.
8. Volume
CAUTION! Continuous high volume may cause severe damage to your hearing. Please listen responsibly.
9. Disposal
The packaging is made from recyclable materials. Dispose of this in an environmentally friendly manner. At end of product life do not dispose of the speaker(s) with standard household waste. The speaker must be recycled in accordance with local legislation. Ask your local government for further information on recycling as the device contains valuable raw materials. Disable the speaker before disposal.
10. Power
This subwoofer is only intended to be connected to voltages that are listed on the rear panel of the cabinet. Connection to any other voltage may cause irreversible damage to the subwoofer and will void the warranty. Use of plug adapters is not recommended because they may allow connection to voltages other than those printed on the back of this subwoofer.
Philosophy
Thank you for purchasing this ELAC product.
When we started in 1926, ELAC has always strived to achieve the very best. This holds true as much today as it did back then.
Your new ELAC speakers are built to the highest standards using high-quality components that are carefully constructed to deliver the best-in-class sound quality. They are developed by a passionate group of individuals whose sole purpose is to bring a new dimension of sound quality into your home. Enjoy!
Before Use
Avoid damage to the speakers and other components:
- Unbox the subwoofer carefully to avoid physical damage
- Keep your equipment turned off before connecting interconnects or speaker cables
- Check to ensure power cable is pushed in and secured to avoid electrical shock and injury.
BASH® Technology
The BASH® technology implemented in the amplifier module of the ELAC subwoofer features power reserves with much lower levels of distortion. This is achieved by using an audiophile class A/B power amplifier whose supply voltage is regulated by a class D amplifier circuit to prevent any unnecessary power losses and to obtain the efficiency close to that of a class D amplifier.
Since the audio signal is amplified in the analog domain, the high-frequency interference typical of digital amplifiers is eliminated. This design results in a low-noise amplifier with lower electromagnetic interference emissions. The absence of crossover distortion, which is a problem in traditional class D designs where the switching speed of the transistors is limited, yields further improvement in total harmonic distortion.
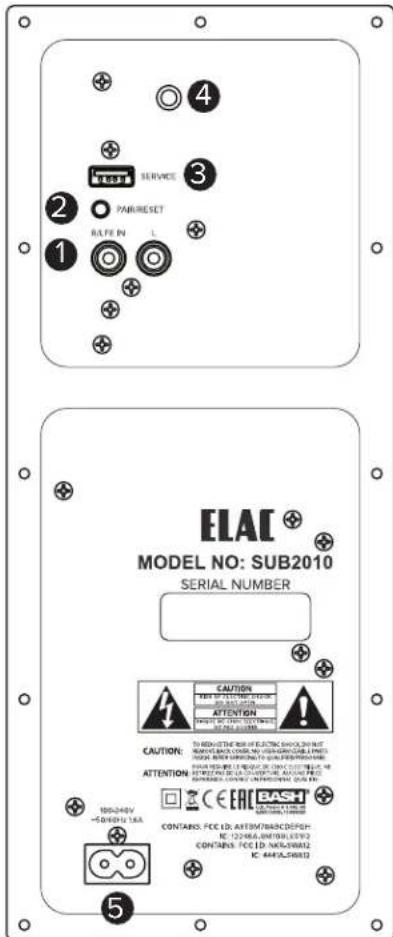
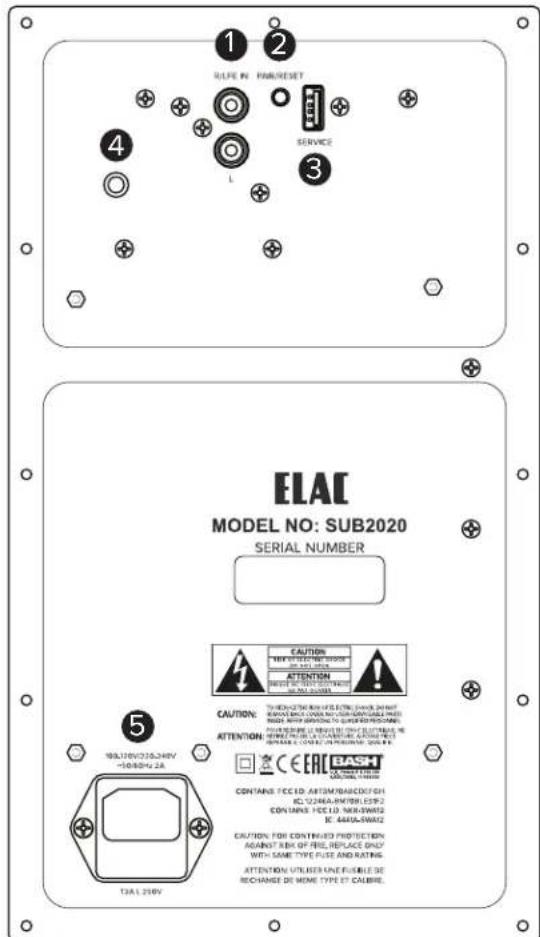
Controls and Indicators
- RCA Line In — The line level connection is used to connect the subwoofer to your pre-amp/AV receiver.
- PAIR/RESET button — Used for pairing of the internal wireless audio receiver and factory reset of the subwoofer:
- press more than 3 sec. for paring until the LED is blinking fast, than release the button. The subwoofer is ready to be paired with the wireless transmitter.
- press more than 10 sec., for factory reset of the subwoofer. The LED will blink very fast.
- Service — This connection is used for updating the subwoofer and not used for normal operation.
- Status LED — Shows the status of the subwoofer:
- dim LED on - indicates normal operation
- fast blinking LED - indicates wireless audio pairing mode
- slowly blinking LED - indicates the subwoofer is searching for a wireless transmitter
-
very fast blinking LED - indicates factory reset
-
AC Inlet — This inlet is a standard IEC power jack. Use the supplied power cord to connect the subwoofer to an available AC outlet.
Connecting your Subwoofer
The subwoofer can be connected to your home audio system using one of the two below options.
Option 1:
Connect the subwoofer to an AV Receiver or Pre-Amp with a dedicated subwoofer or LFE output using an RCA cable (not supplied) from the LFE/Subwoofer output on the AV Receiver/Pre-Amp to the LFE IN on the subwoofer (Fig 1).
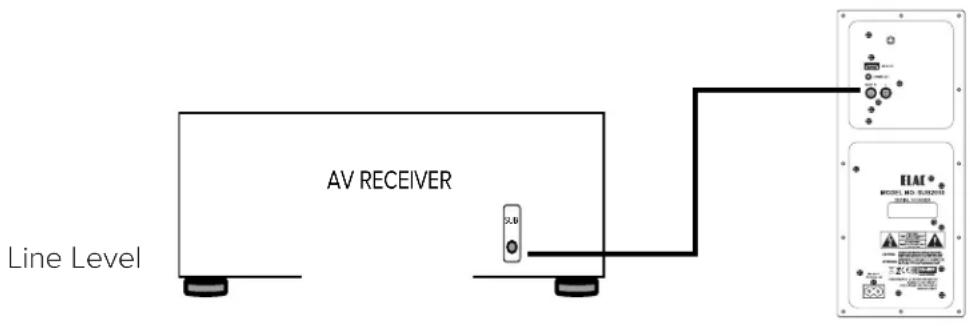
Fig. 1
Option 2:
Use the optional wireless transmitter (Sold Separately). Please follow the instructions included with the wireless transmitter.
Note: Out of the box, the default settings of the subwoofer are:
- crossover 80Hz
- volume 75%
The default settings work in most of the applications. Use the app for advance settings of the subwoofer.
Controlling Your Subwoofer—App Required
Your ELAC subwoofer incorporates an advanced, digital control system. Conventional analog rotary potentiometers and switches have been replaced by a digital signal processor (DSP), which enables you to adjust your subwoofer conveniently and accurately. All parameters, such as volume, cut-off frequency, phase, etc., as well as the automatic calibration functions, can be adjusted with the help of our free smartphone application.
The digital control system also eliminates the possibility of unwanted changes to controls and settings.
Note: A Bluetooth 4.0 low-energy Android or iOS device is required to set up and operate this subwoofer. You can download the "ELAC SUB Control 2.0" APP from the Apple® App Store® or Google® Play Store®.


Please note that your mobile device must support Bluetooth® Standard 4.0. This is the case for the majority of devices sold as of mid-2013. If necessary, check the accompanying documentation for your mobile device or contact the manufacturer's support hotline.
Note: In case your mobile device needs a 4 digit code during the subwoofer-pairing procedure, please use "0000"
Subwoofer Placement
Finding the proper placement for your subwoofer can take some trial and error, however, here are a few basic tips to get you started. In most cases the best position for the subwoofer is in the front corner (1) of the room. Placing a subwoofer in a corner excites most room modes and offers the best chance of avoiding a null area (a part of the room that experiences an acoustic reduction in bass).
If placing the subwoofer in the corner creates an abnormal amount of bass, you can try moving the subwoofer to one of the side walls (2) near the front of the room.
If possible, the best option is to move the subwoofer around the room and find the location that sounds the best from your normal listening position. There are many test discs you can purchase that provide the correct test signals for helping find this optimum location.

natural_image
Simple layout diagram with furniture and numbered boxes (no text or symbols)Note: The AutoEQ feature of this subwoofer (Available from the smartphone app) will optimize the subwoofers performance wherever you finally place the subwoofer.
There are also three ways this subwoofer can be mounted. Use one of the following mounting solutions to best suit your needs:
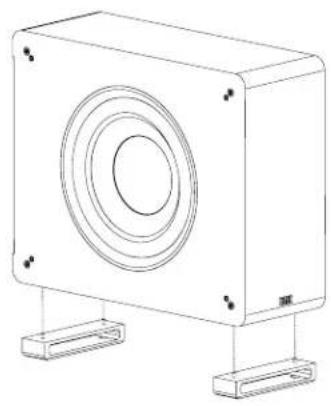
- Place the subwoofer on the floor in a vertical position on rectangular feet as show in Fig. A.
-
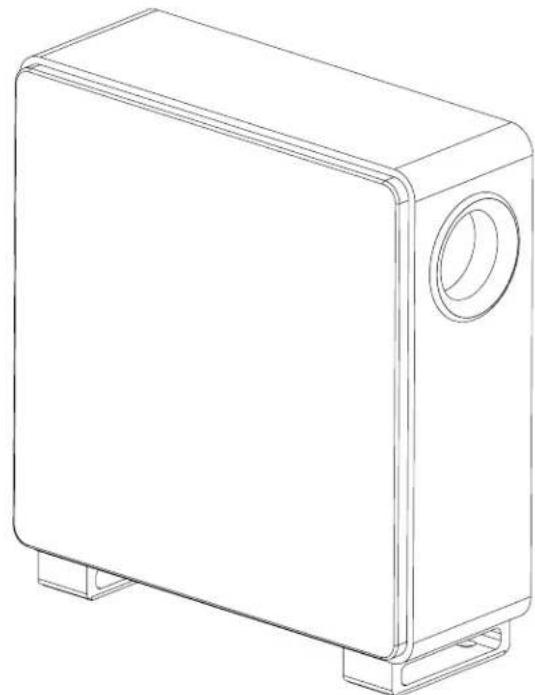
Place the subwoofer horizontally on the floor using the conical shaped rubber feet as show in Fig. B.
-
Mount the subwoofer on the wall using the provided brackets and two of the rubber feet as show in Fig. C.
L = 12" (304 mm) for SUB2010
L = 15.2" (385 mm) for SUB2020
natural_image
Technical line drawing of a rectangular electronic enclosure with circular vent and two base supports (no text or symbols)
natural_image
Simple line drawing of a rectangular electronic component with four small pins at the bottom (no text or symbols)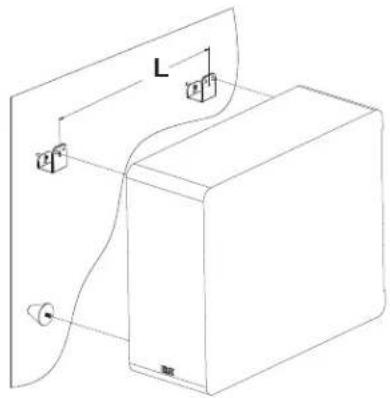
Fig. A Fig. B Fig. C
SUB2010 SPECIFICATIONS
| Speaker Type Powered Subwoofer | |
| Woofer 8" Polypropylene Cone with Steel Basket | |
| Frequency Response 32Hz to 200Hz | |
| Crossover Frequency 40Hz to 150Hz | |
| Amplifier Type BASH | |
| Amplifier Power 120 Watts RMS / 240 Watts Peak | |
| App Controlled Yes (iOS and Android) | |
| DSP Yes | |
| Standby Power Consumption 1.5 Watts | |
| Maximum Power Consumption 200 Watts | |
| Inputs 2 x line-channel (RCA) | |
| Data Connection | USB (Firmware Update) |
| Wireless | Receiver Built-in (Transmitter sold separately) |
| Cabinet Finish Black Vinyl, White Vinyl | |
| Accessories Included | AC Power Cord, 2 x Rectangular Feet, 4 x Rubber Feet |
| Height | 15.2in |
| Width | 4.8in |
| Depth | 14.2in |
| Net Weight | 17.2lbs |
SUB2020 SPECIFICATIONS
| Speaker Type Sealed Box; Powered Subwoofer | |
| Woofer 10" Woven Cellulose Fiber Cone with Steel Basket | |
| Frequency Response 28Hz to 200Hz | |
| Crossover Frequency 40Hz to 150Hz | |
| Amplifier Type BASH | |
| Amplifier Power 200 Watts RMS / 400 Watts Peak | |
| App Controlled Yes (iOS and Android) | |
| DSP Yes | |
| Standby Power Consumption 1.5 Watts | |
| Maximum Power Consumption 300 Watts | |
| Inputs 2 x line-channel (RCA) | |
| Data Connection | USB (Firmware Update) |
| Wireless | Receiver Built-in (Transmitter sold separately) |
| Cabinet Finish Black Vinyl, White Vinyl | |
| Accessories Included | AC Power Cord, 2 x Rectangular Feet, 4 x Rubber Feet |
| Height | 15.7in |
| Width | 6.6in |
| Depth | 18.2in |
| Net Weight | 28.0lbs |
ELAC Americas Inc.
North America Limited Liability Warranty Powered Subwoofers
ELAC Americas Inc. warrants to the original purchaser that this product be free from defects and or workmanship for a period of 3 (Three) years on the cabinet and speaker driver and 1 (One) year on the amplifier from the original date of purchase. During this time period, repair or replacement of parts will be free of charge to the original owner (See below limitations). Shipping to and return from the repair center will be the responsibility of the original purchaser.
Limitations
Warranty begins on the date of original purchase from an authorized ELAC Americas Inc. dealer.
- Product is warranted only if used in home applications. Commercial use of this product is not warranted.
- Product that has been modified or altered in anyway will not be warranted.
- Product that has been abused or subjected to faulty equipment will not be warranted.
- Products with defaced or removed serial numbers will not be warranted.
If service is required
In the event that service is required, please contact ELAC America at 714-252-8843 or at customerservice@elac.us to arrange for service or replacement. You will be responsible to provide proof of purchase (Copy or original sales receipt). Shipping to and from our repair center will be the responsibility of the original purchaser.
Warranty Outside of North America
This warranty applies to products purchased in the United States and Canada. For warranty claims outside of North America please contact the local dealer/distributor in the country of purchase.

The life of sound.
ELAC AMERICAS INC.
11145 KNOTT AVE. SUITES E & F
CYPRESS, CA 90630
ELAC ELECTROACUSTIC GMBH
FRAUNHOFERSTRAße 16
D-24118 KIEL, GERMANY
natural_image
Line drawing of a rectangular electronic device with a circular vent and mounting base (no text or symbols)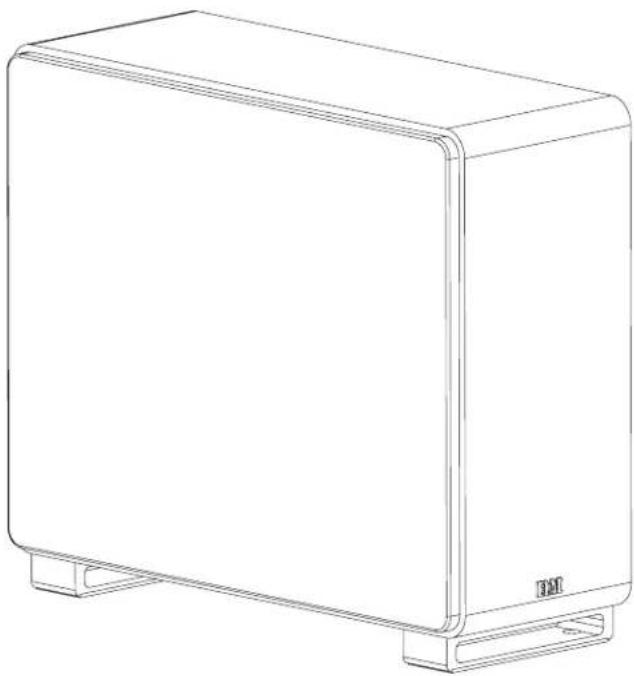
natural_image
Line drawing of a rectangular electronic device with a flat top and side supports (no text or symbols)CONSIGNES D'UTILISATION
natural_image
Simple line drawing of a sofa with four chairs and four windows, labeled 1 and 2 (no text or symbols on the diagram itself)natural_image
Technical line drawing of a rectangular electronic device with circular vent and two base supports (no text or symbols)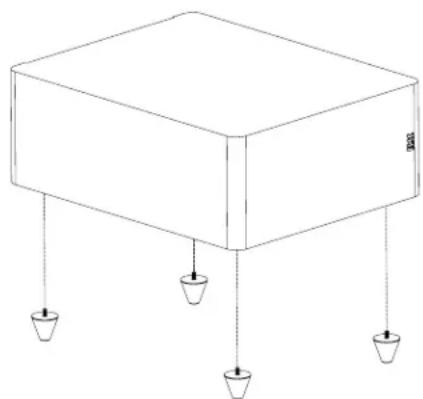
natural_image
Simple line drawing of a rectangular electronic component with four small circular pins at the bottom (no text or symbols)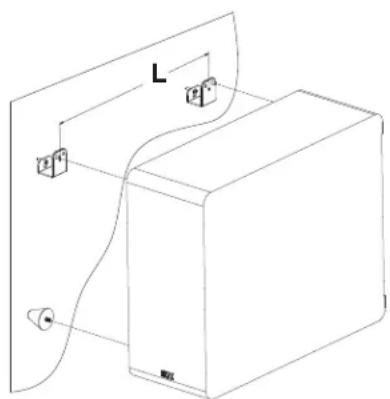
natural_image
Pure technical line drawing of a mechanical or electrical component with no text, numbers, or symbolsFig. A Fig. B Fig. C
CARACTÉRISTIQUES DU SUB2010
