ATOM Monitor - Subwoofer Paradigm - Free user manual and instructions
Find the device manual for free ATOM Monitor Paradigm in PDF.

| Product Type | 2-way bookshelf speaker, bass-reflex |
| Brand | Paradigm |
| Model | ATOM Monitor (Series 7) |
| Tweeter | 25 mm (1 in) pure aluminum S-PAL, ferrofluid cooled and damped |
| Woofer | 140 mm (5-1/2 in) satin-anodized aluminum S-PAL, 25 mm voice coil, ceramic/ferrite magnet |
| Frequency Response | ±2 dB from 86 Hz to 22 kHz (on-axis) / 86 Hz to 18 kHz (30° off-axis) |
| Low-frequency Extension | 50 Hz (DIN 45 500) |
| Nominal Impedance | 8 ohms |
| Sensitivity (room/anechoic) | 90 dB / 87 dB |
| Recommended Power | 15 to 80 watts |
| Maximum Power | 50 watts |
| Dimensions (H x W x D) | 28.2 cm x 16.8 cm x 22.5 cm |
| Weight (unpacked) | 4.8 kg per speaker |
| Finish | Black Ash, Heritage Cherry |
| Crossover Type | 2nd order electro-acoustic at 2.0 kHz |
| Connectors | Binding posts compatible with banana plugs, pins, spades or bare wire |
| Optional Stands | Paradigm S-30 or J-29 stands (sold separately) |
| Wall Mounting | Keyhole slots spaced 60 mm, Paradigm brackets (sold separately) |
| Application | Front, surround or rear speaker in stereo or home theater system |
| Care | Clean with a soft damp cloth, avoid strong detergents |
| Warranty | 5 years limited (parts and labor) |
Frequently Asked Questions - ATOM Monitor Paradigm
User questions about ATOM Monitor Paradigm
0 question about this device. Answer the ones you know or ask your own.
Ask a new question about this device
Download the instructions for your Subwoofer in PDF format for free! Find your manual ATOM Monitor - Paradigm and take your electronic device back in hand. On this page are published all the documents necessary for the use of your device. ATOM Monitor by Paradigm.
USER MANUAL ATOM Monitor Paradigm
natural_image
Abstract black ink brushstroke design on white background (no text or symbols)OWNERS MANUAL
text_image
CE RECOCONOMATION RECOCONOMATION RECOCONOMATION RECOCONOMATION RECOCONOMATION RECOCONOMATION RECOCONOMATION RECOCONOMATION RECOCONOMATION RECOCONOMATION RECOCONOMATION RECOCONOMATION RECOCONOMATION RECOCONOMATION RECOCONOMATION RECOCONOMATION RECOCONOMATION RECO CONSTRUCTION RECO CONSTRUCTION RECO CONSTRUCTION RECO CONSTRUCTION RECO CONSTRUCTION RECO CONSTRUCTION RECO CONSTRUCTION RECO CONSTRUCTION RECO CONSTRUCTION RECO CONSTRUCTION RECO CONSTRUCTION RECO CONSTRUCTION RECO CONSTRUCTION RECO CONSTRUCTION RECO CONSTRUCTION RECO CONSTRUCTION RECO CONSTRUCTION RECO CONSTRUCTION RECO CONSTRUCTION RECO CONSTRUCTION RECO CONSTRUCTIONSRECYCLING AND REUSE GUIDELINES (Europe)
In accordance with the European Union WEEE (Waste Electrical and Electronic Equipment) directive effective August 13, 2005, we would like to notify you that our speakers may contain regulated materials which, upon disposal, require special reuse and recycling processing. For this reason Paradigm Electronics Inc. (the manufacturer of Paradigm speakers and Anthem electronic products) has arranged with its distributors in European Union member nations to collect and recycle this product at no cost to you. To find your local distributor please contact the dealer from whom you purchased this product or go to our website at www.paradigm.com.
Please note that only the product falls under the WEEE directive. When disposing of packaging and other shipping material we encourage you to recycle through the normal channels.
www.paradigm.com
TABLE OF CONTENTS
Floorstanding Speakers:
Attaching Base & Optional Spikes (Pictorial) 4
Bookshelf Speakers:
Attaching Bumper Pads (Pictorial) 5
Your New Speakers 6
Preventing Speaker Damage 8
Room Acoustics 10
Placement: Front Left & Right Speakers (Pictorial) 11
Placement: The Center Speaker (Pictorial) 15
Placement: Surround / Rear Speakers (Pictorial) 16
Speaker Connection (Pictorial) 17
Fine Tuning 23
Troubleshooting Guide 24
Specifications 25
Limited Warranty 30
IMPORTANT: Read before wall mounting bookshelf speakers.

Wall mount speakers securely enough that they do not fall and cause personal injury or damage to property. Use safety straps (included with MB-60 Brackets, sold separately). Detailed information on attaching straps is included with the brackets.

Paradigm DOES NOT supply hardware for mounting speakers to the wall. Hardware shown in this manual is for example only and will vary depending on wall type. Use screws appropriate for wall type and weight of speakers.

If installing into drywall, install into 1/2" (13 mm) or 5/8" (16 mm) drywall only. Screws must be long enough to go through anchor bolts (not supplied).
IMPORTANT: Read before placing surround speakers on flat surface.

For stability, bumper pads (included) must be used when placing surround/rear speakers on a flat surface. Please see the section on "Placement: Surround / Rear Speakers" for more info.
Thank you
... for choosing award-winning Paradigm Monitor Series 7 speakers. You are about to hear the difference that sonically accurate speakers make in your audio/home theater system! They are the product of countless hours of comprehensive research and development and will reward you with truly exceptional sound for many years.
To ensure proper installation and enjoy all of the exceptional so – und these speakers are designed to provide, please read this manual and follow all instructions. If you have further questions contact your Dealer or visit the Q&A page on our website at www.paradigm.com.

Spikes and rubber feet are NOT to be used without the base.
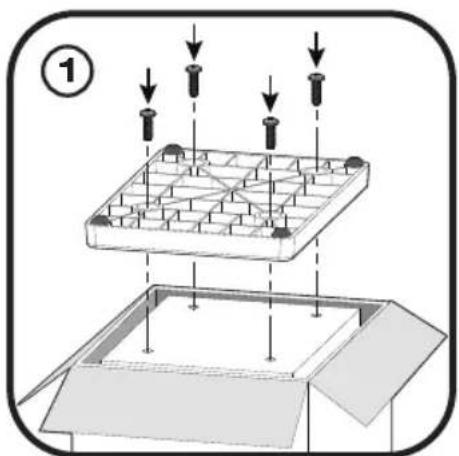
FLOORSTANDING SPEAKERS: ATTACHING BASE & OPTIONAL SPIKES
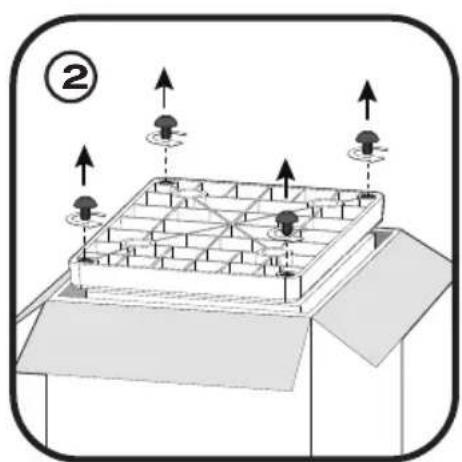
Attach base ☑ while speakers are still in carton, following the unpacking instructions provided. (Rubber feet come pre-installed on base).
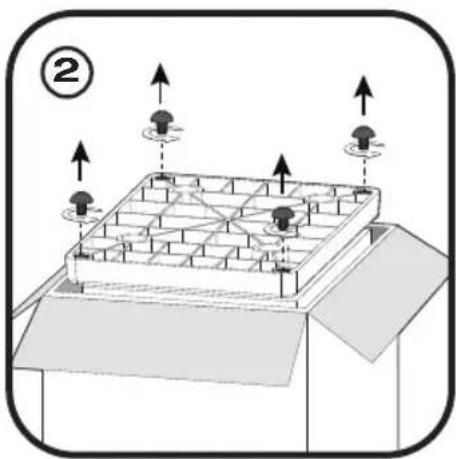
Optional: If you prefer to use the spikes provided, unscrew the rubber feet ② and carefully screw the spikes (with jam nuts) into the base ③.
text_image
Diagram showing installation of a grid-based structure with arrows indicating assembly or inspection, labeled with number 1.OPTIONAL:
natural_image
Diagram of a structural grid setup with directional arrows indicating movement or force (no text or symbols present)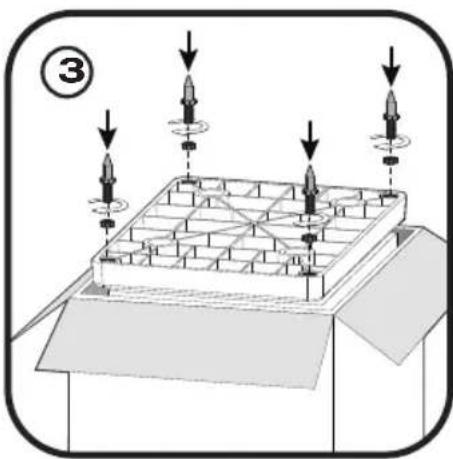
text_image
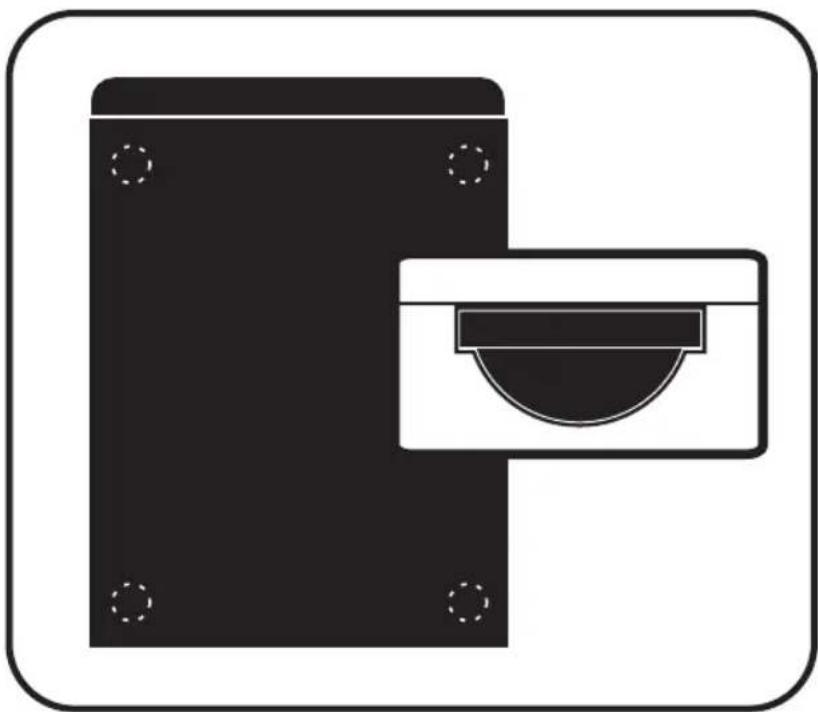
Diagram showing a grid-based structure with arrows indicating direction and numbered label ③BOOKSHELF SPEAKERS: ATTACHING BUMPER PADS
Self-adhesive bumper pads (included) may be applied to the bottom corners of bookshelf speakers (as shown) when placed on a shelf or other flat surface. This will isolate your speakers from the solid surface, improving overall sound quality.
natural_image
Pure diagram of a device with a black panel and a white container, no text or symbols present.Bottom View of Bookshelf Speaker
YOUR NEW SPEAKERS
Break-In
Although Paradigm Monitor Series 7 speakers sound great “out of the carton,” they will sound even better when broken in. Allow them to operate for several hours before you listen critically.
High-frequency drivers use ferro-fluid that can thicken at temperatures below 10^ C ( 50^ F). If your speakers have been transported or stored in the cold let them warm to room temperature before use.
Cleaning
Do not use a strong or abrasive cleaner on your speakers. Clean them with a damp soft cloth, but do not get them wet. Do not place wet objects, such as drinking glasses or potted plants, on top of the speakers. If allowed to soak in, even a small amount of water may permanently damage the speaker enclosure.
Rubber Feet and Optional Spikes
On floorstanding models, the speaker base comes with rubber feet pre-installed. If you intend to use isolation spikes (included with floorstanding speakers), rubber feet must be removed. We highly recommend installing these spikes if speakers are to be place on carpet as they will improve the sound of your speakers by isolating them from the floor. The most convenient time to install these spikes is during the unpacking process.
Optional Paradigm Speaker Stands
We highly recommend placing Monitor Series 7 bookshelf speakers on high-performance Paradigm speaker stands (sold separately), or bookshelves to raise the high-frequency drivers to approximately ear level, thereby ensuring the best performance possible.
Wall Mounting
Pilot holes spaced 60 mm apart are provided on the back of all Monitor Series 7 bookshelf models for use with Paradigm wall mounting brackets (sold separately). Monitor surround speakers also have pre-drilled pilot holes but are sold with wall-mounting brackets.

For Monitor surround speakers use the wall-mounting brackets included.
PREVENTING SPEAKER DAMAGE
Monitor Series 7 speakers are efficient and can be driven to loud listening levels with moderate amplifier power. They are also able to handle the output of very powerful amplifiers. To prevent damage to your speakers, please read the following guidelines before hooking them up.
Amplifier Distortion—The #1 Culprit!
Amplifier distortion is the principal cause of speaker damage. When listening at loud levels your amplifier may run out of clean power. It will then begin to produce distorted power several times greater than its rated output power. This will damage any brand of speaker very quickly! (See your Dealer for amplifier recommendations).
More Powerful Amplifiers are Safer
A 40 watts per channel amplifier will have substantial distortion above 40 watts. If driven to 50 watts, this amplifier will deliver distorted power—which will damage the speaker! A 100 watts per channel amplifier will have substantial distortion above 100 watts, but very low distortion below 100 watts. When the speaker requires 50 watts, this more powerful amplifier will deliver clean power and speaker damage is less likely.
Volume Control
Do not be fooled by the Volume Control of your receiver/preamplifier. It only adjusts listening level—it is not a “power-output” dial. The amount of amplifier power actually used at a given Volume Control setting depends solely on the nature of the music you are listening to. At a given Volume Control setting a quiet section of music will use less amplifier power than a loud section. With typical pop-rock, jazz or large scale classical music the rated output power of many receivers/amplifiers is often reached when the Volume Control is between the “11” and “1” o’clock settings (with bass/treble and loudness controls not used—otherwise rated power may be reached at even lower Volume Control settings).
Remember, all amplifiers produce distortion when operated beyond their rated output power. The resulting distortion will damage all speakers! Exercise caution! If you listen at loud levels, be careful to listen for the point of audible distortion—if the speakers begin to sound distressed, turn the Volume Control down or your speakers and/or amplifier(s) will be damaged! This type of damage constitutes abuse and is not covered by the warranty. If louder volumes are desired, obtain a more powerful amplifier.
There is a Limit!
Although more powerful amplifiers are safer, there is a point at which you could have more power than the speaker can handle. At that point you will overpower the speaker and damage it. Exercise caution! At loud levels do not increase bass/treble controls from zero and ensure that all loudness/contour/bass EQ buttons are off (otherwise rated output power will be reached at lower volume control settings). If you listen at loud levels, watch for excessive visible cone excursion (grille movement) from the woofer—then turn the Volume Control down.
The Right Amount of Power
A power-range rating is given as a guide to indicate the approximate minimum and maximum power input of your Monitor Series 7. Amplifiers that exceed your speaker's power-range rating are recommended. Their greater power reserves provide better sound. However, exercise caution! Use the speakers within their power-range rating to prevent damage (keep listening levels below the point of excessive woofer cone excursion).
ROOM ACOUSTICS
Paradigm Monitor Series 7 speakers are designed to provide exceptional sound in a wide variety of domestic settings. However, it is important to note that listening room construction, dimensions and furnishings all play a part in the quality of sound you will ultimately achieve. Your listening room will impose its own character on the performance capabilities of any speaker system. The extra care you take in correctly positioning the speakers will result in greater listening enjoyment. Keep the following guidelines in mind when deciding on the best speaker placement:
- Mid and high frequencies are affected by the amount of soft furnishings in your room—curtains, carpets, sofas, wall coverings, etc. An excess of such items can result in a somewhat dull sound. The same room without any soft furnishings can produce an overall bright sound. The typical quantity of soft furnishings found in most living environments provides the right acoustic characteristics to allow the speakers to sound balanced;
- Concrete floors and walls tend to aggravate low-frequency standing wave problems and are less preferred;
- Rooms where height, width and length are similar should be avoided as they can exhibit significant low-frequency standing wave problems. This may result in reduced clarity. If no other room is possible, experiment with speaker placement to minimize acoustic problems.
PLACEMENT: FRONT LEFT & RIGHT SPEAKERS

natural_image
Illustration of a person relaxing in bed with hands on head, watching TV and wall-mounted screens (no text or symbols)Ideal placement of left and right speakers
Monitor Series 7 front speakers are designed to allow flexible placement while providing a very large window of sound throughout your listening room. To ensure the best performance possible we strongly recommend that you observe the placement guidelines on the following pages ...

text_image
3/4 "X" "X"Accurate Timbre
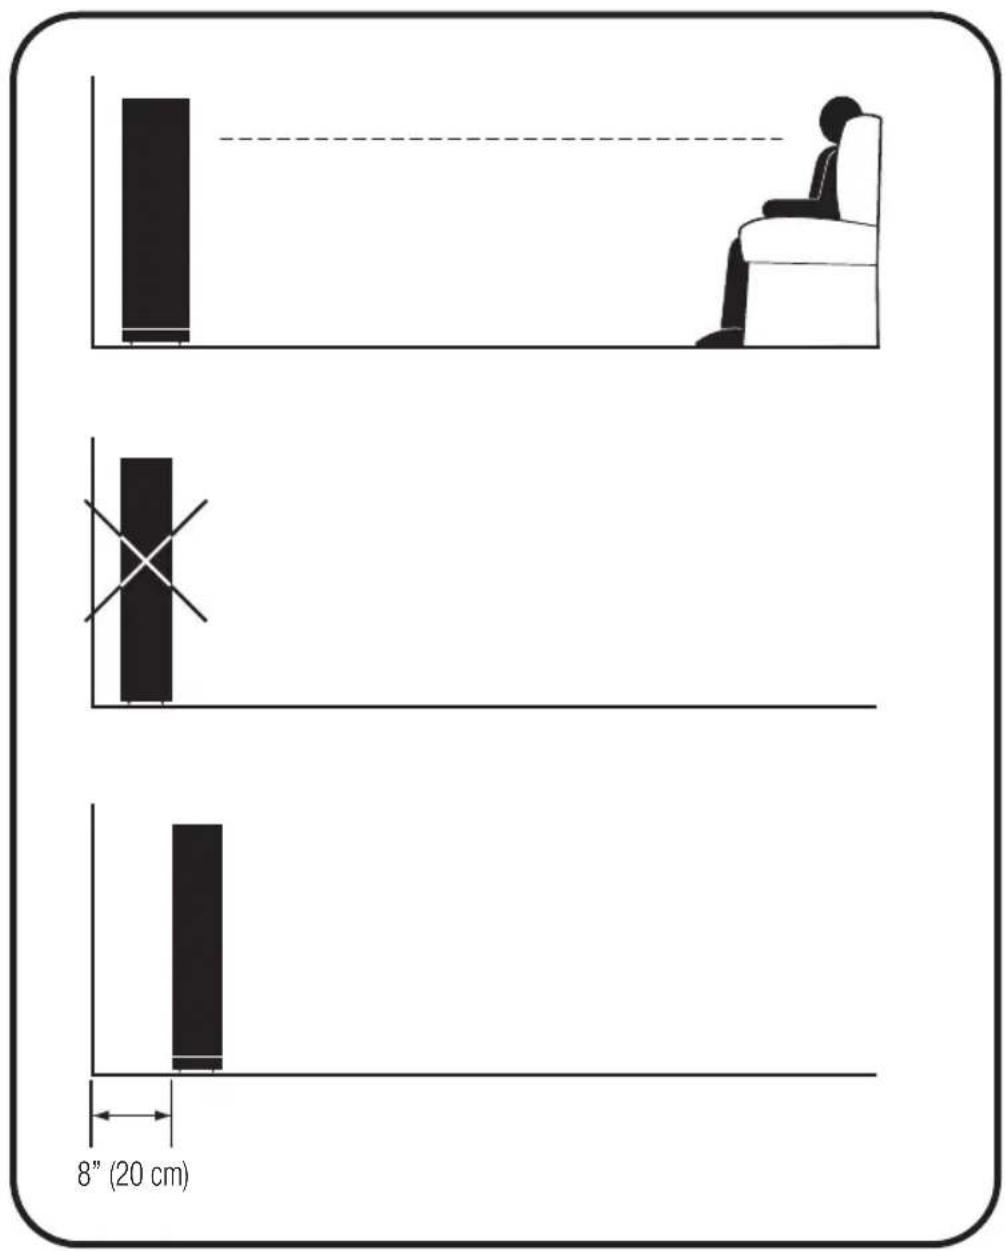
For the most accurate and natural timbre, place front speakers so that their high-frequency drivers are approximately at ear level, as shown.
Placing bookshelf models on Paradigm speaker stands (sold separately) or bookshelves raises their high-frequency drivers to approximately ear level, thereby ensuring the best performance possible.
text_image
8" (20 cm)Balanced Bass
Placing front speakers in corners will over-emphasize bass and reduce overall clarity. Avoid corner placement. Position front speakers 8 in (20 cm) or more from the wall behind the speaker and as much as possible from either side wall, as shown in. This will ensure better bass performance and optimal midrange clarity.
text_image
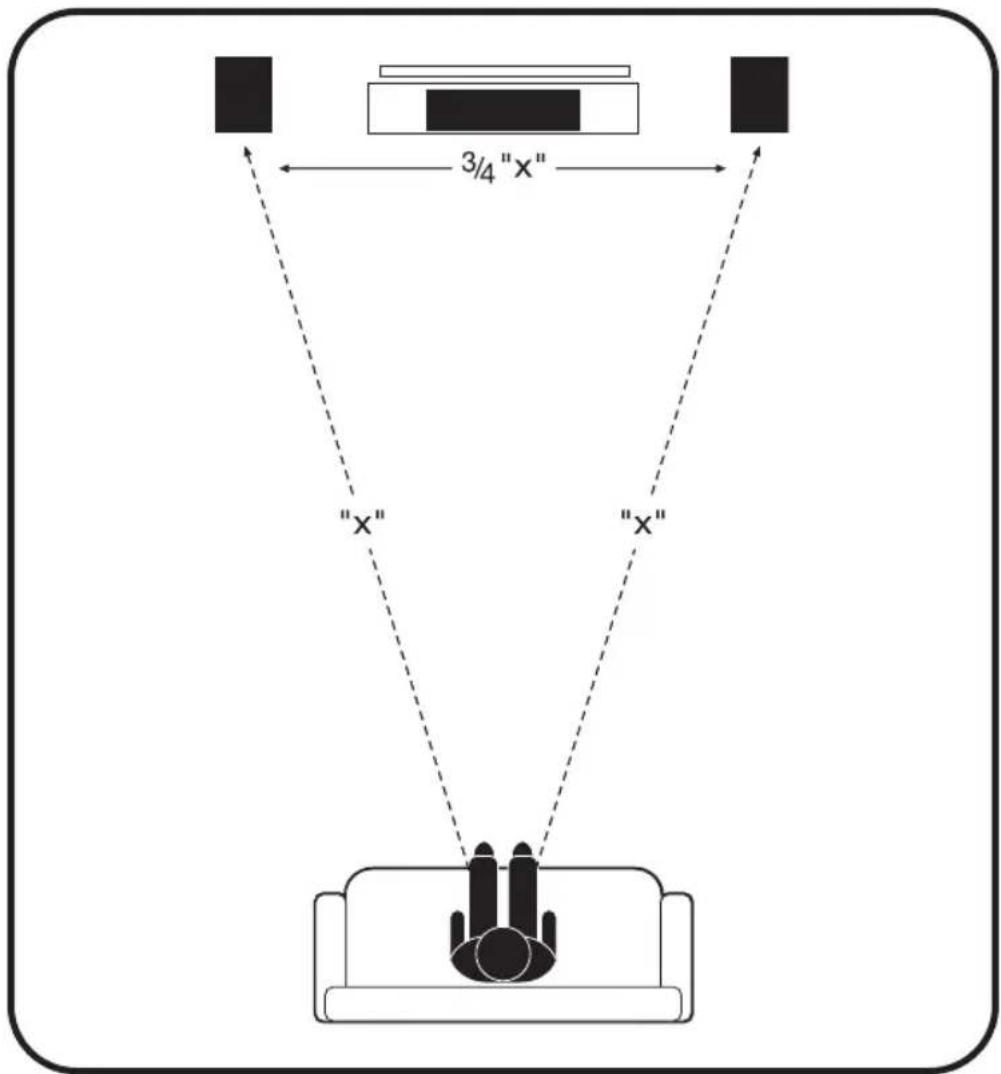
3/4"x" "x" "x"Optimal Imaging
Measure the distance from your main listening area to the front speakers ("X"). For best imaging, place speakers from three-quarters of that distance up to that same distance from each other (3/4 of "X" to "X"), as shown. To further optimize imaging, toe speakers slightly inward so they point toward the listening position with their axes crossing just behind it, as shown.
Optional On-Wall Mounting of Front Speakers
Follow the directions for placement given under “Optimal Imaging” above and use the mounting instructions provided with your mounting brackets (sold separately) to safely and securely mount your speakers on the wall.
PLACEMENT: CENTER SPEAKER

natural_image
Diagram showing a sensor emitting sound waves from a device, with no text or symbols present.Monitor Series 7 center speakers are designed to cover a large, wide listening area, allowing listeners throughout the room to hear center-channel information with unprecedented clarity and intelligibility.
Placing your center-channel speaker below (or above) the TV will ensure the best possible clarity and intelligibility. Position the speaker flush with the front of the TV or speaker shelf to minimize unwanted sound reflections. Make sure the center-channel is approximately the same distance away from the primary listening position as your front speakers. (Some A/V receivers/processors can electronically adjust for differences in distance.)
PLACEMENT: SURROUND / REAR SPEAKERS
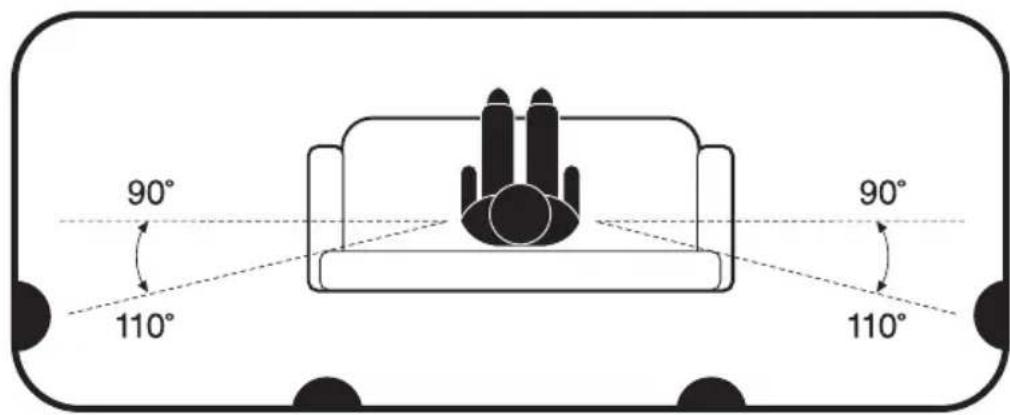
5.1 Surround Configuration
Position one speaker on each side of the listening area, as shown.
7.1 Surround Configuration (adds two rear speakers to a typical 5.1 surround configuration)
Position speakers behind the listening area—one speaker slightly right and the other slightly left, as shown.
text_image
90° 110° 90° 110°
CAUTION: WHEN PLACING SURROUND SPEAKERS ON A FLAT SURFACE

natural_image
Pure diagram of a curved mechanical or architectural component with no text, numbers, or symbols
natural_image
Pure technical line drawing of a mechanical component with no text or symbolsMonitor Surround 1 Monitor Surround 3
Bumper pads are included in hardware package with speaker.
SPEAKER CONNECTION

Turn your amplifier(s) OFF before connecting your speakers. This will avoid damage which could result from accidental shorting of speaker cables.
For optimum sound, the use of high quality speaker cable is essential. The chart below identifies the minimum gauge requirements for various lengths. (See your Dealer for recommendations)
| MINIMUM GAUGE REQUIREMENTS | ||
| LENGTH | DIAMETER GAUGE | |
| Under 4.5 m (15 ft) | 1.3 mm (0.05 in) | 16 awg |
| Under 9 m (30 ft) | 1.6 mm (0.06 in) | 14 awg |
| Over 9 m (30 ft) | 2.0 mm (0.08 in) | 12 awg |
natural_image
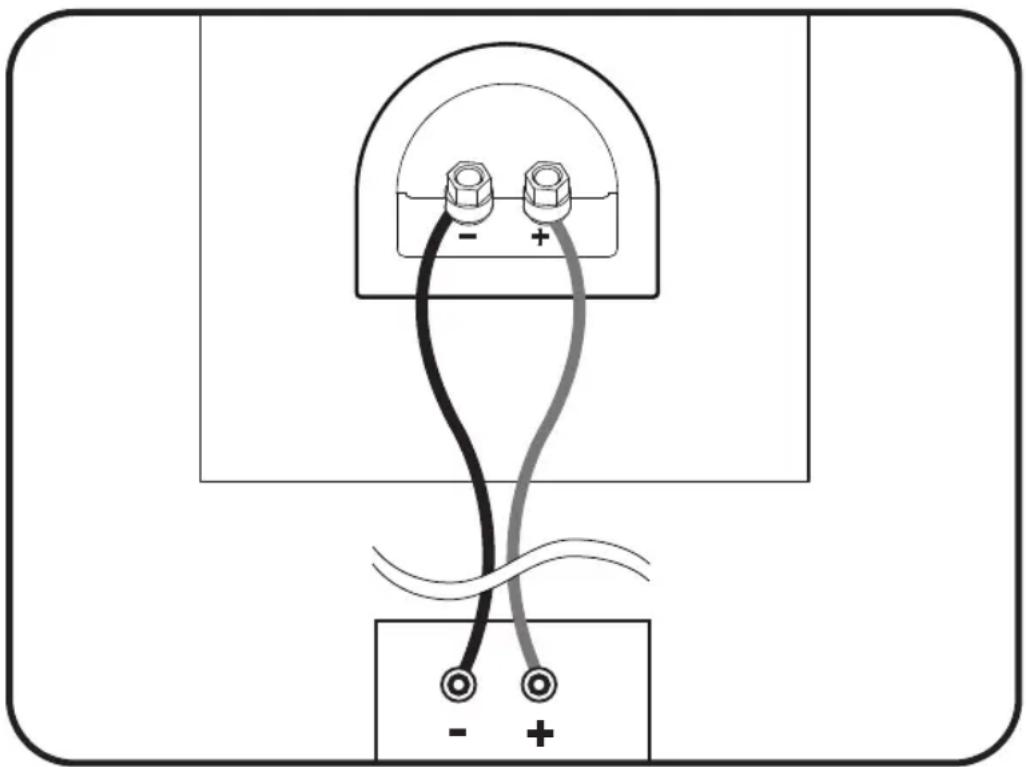
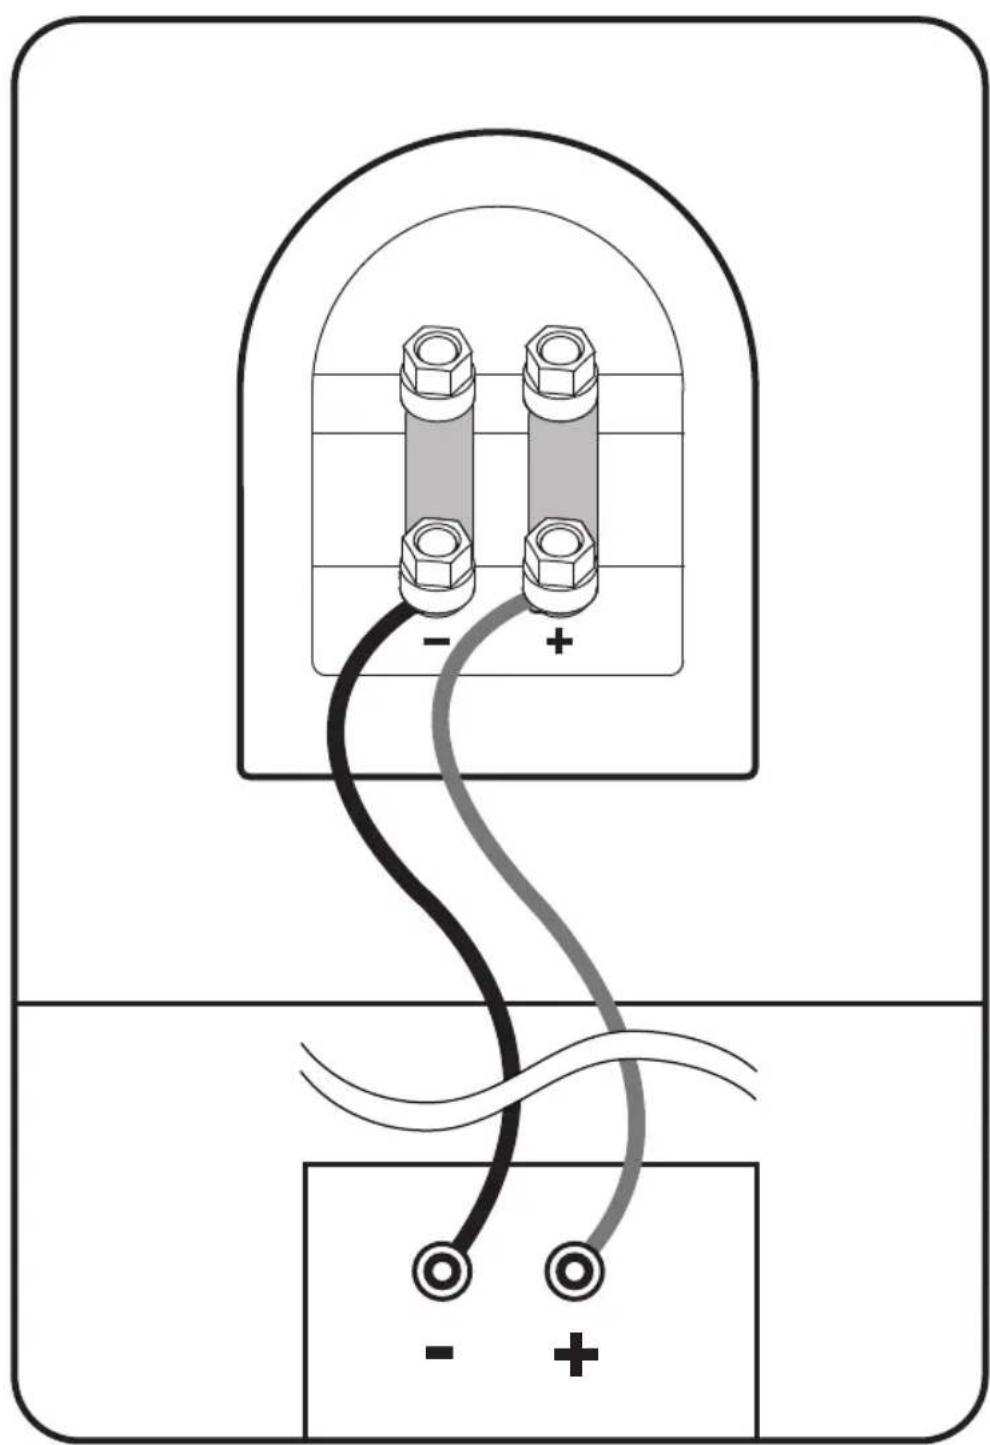
Pure electrical circuit lines without any symbolsStandard Connection
Standard Connection (See illustration on earlier page.)
Your speakers' binding posts can be used with banana, pin or spade connectors, as well as with bare wire. Tighten the posts firmly by hand but do not over tighten!
Correct polarity (or phase) is critical for proper soundstage imaging and bass performance. Connect one speaker at a time to ensure proper connection of every channel. The red (+) amplifier terminal must be connected to the red (+) speaker terminal. The same applies to the black (−) terminals.
Make sure all wires are firmly fastened. Repeat this connection procedure for each speaker in your system.
NOTE: If you hear a distinct lack of bass and a dislocated stereo image then one or more of your speakers may be connected out of phase (polarity is reversed). Re-check to ensure that each speaker's cable is connected with correct polarity: red (+) to red (+) and black (−) to black (−).
Other Connection Options
If your speakers do not have two sets of input terminals this section does not apply to you.

DO NOT attempt to bi-wire or bi-amplify speakers unless you have removed the jumper bars.
Some Monitor Series 7 speakers have two sets of input terminals connected externally with jumper bars. These speakers can be bi-wired or bi-amplified to achieve even better performance.
natural_image
Pure electrical wiring diagram showing two connectors with bolted pins and polarity indicators (no text or symbols)Standard Connection of Speakers with Two Input Terminals
For standard connection of speakers with two input terminals, leave the jumper bars attached and connect using either set of input terminals.
text_image
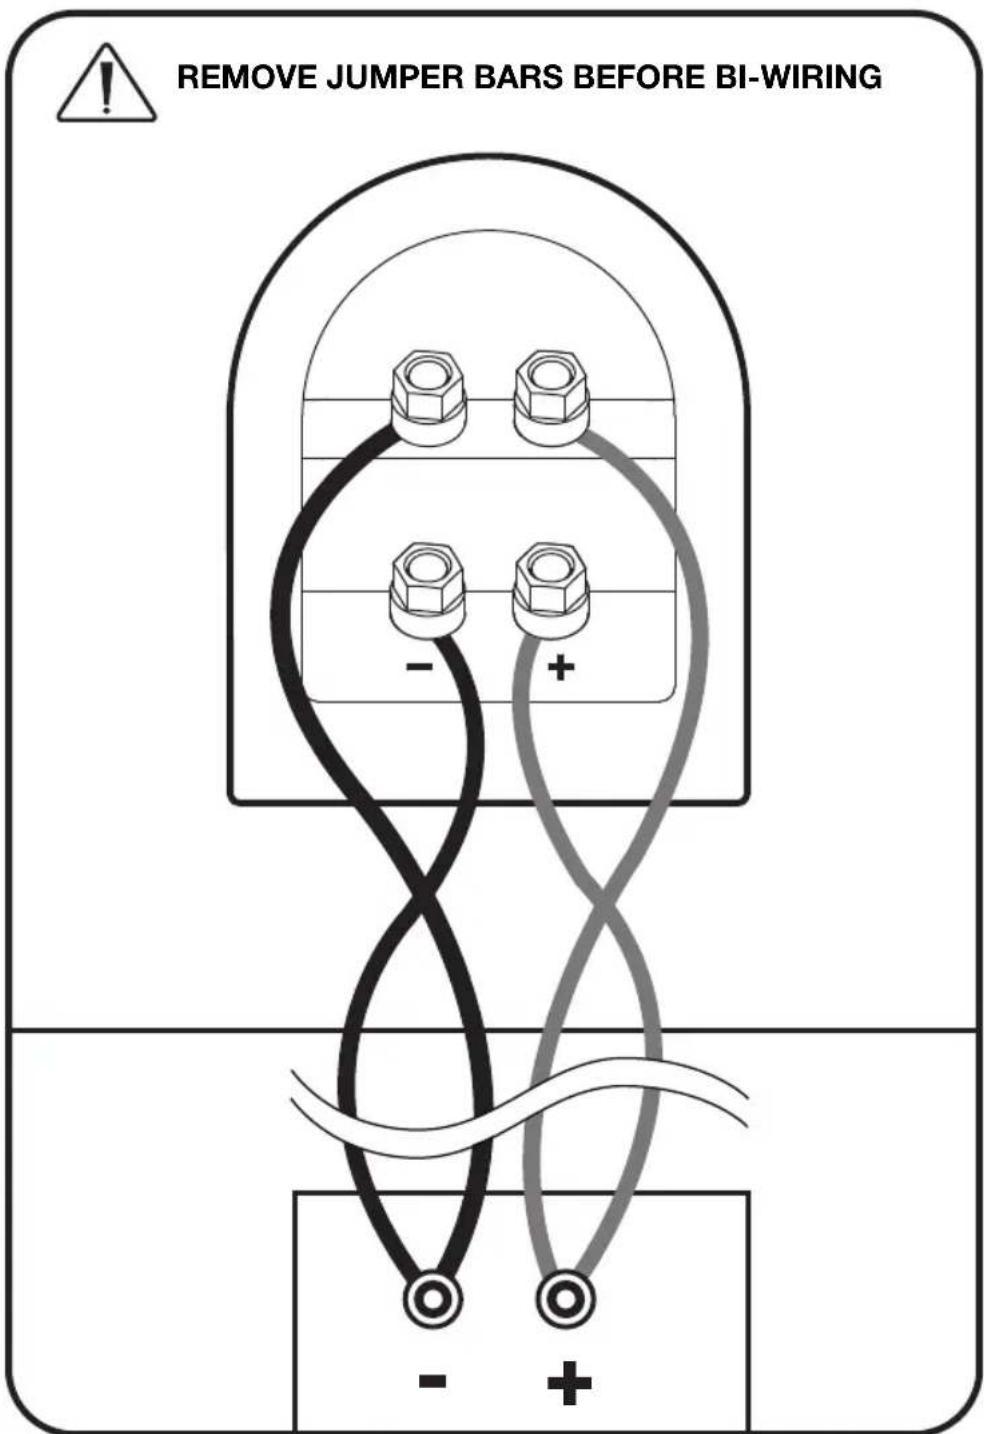
REMOVE JUMPER BARS BEFORE BI-WIRING - + -Bi-Wire Connection
Bi-wiring can improve clarity and openness with less grain and more solidity to the bass. Two speaker cables are required for each speaker that is bi-wired.
text_image
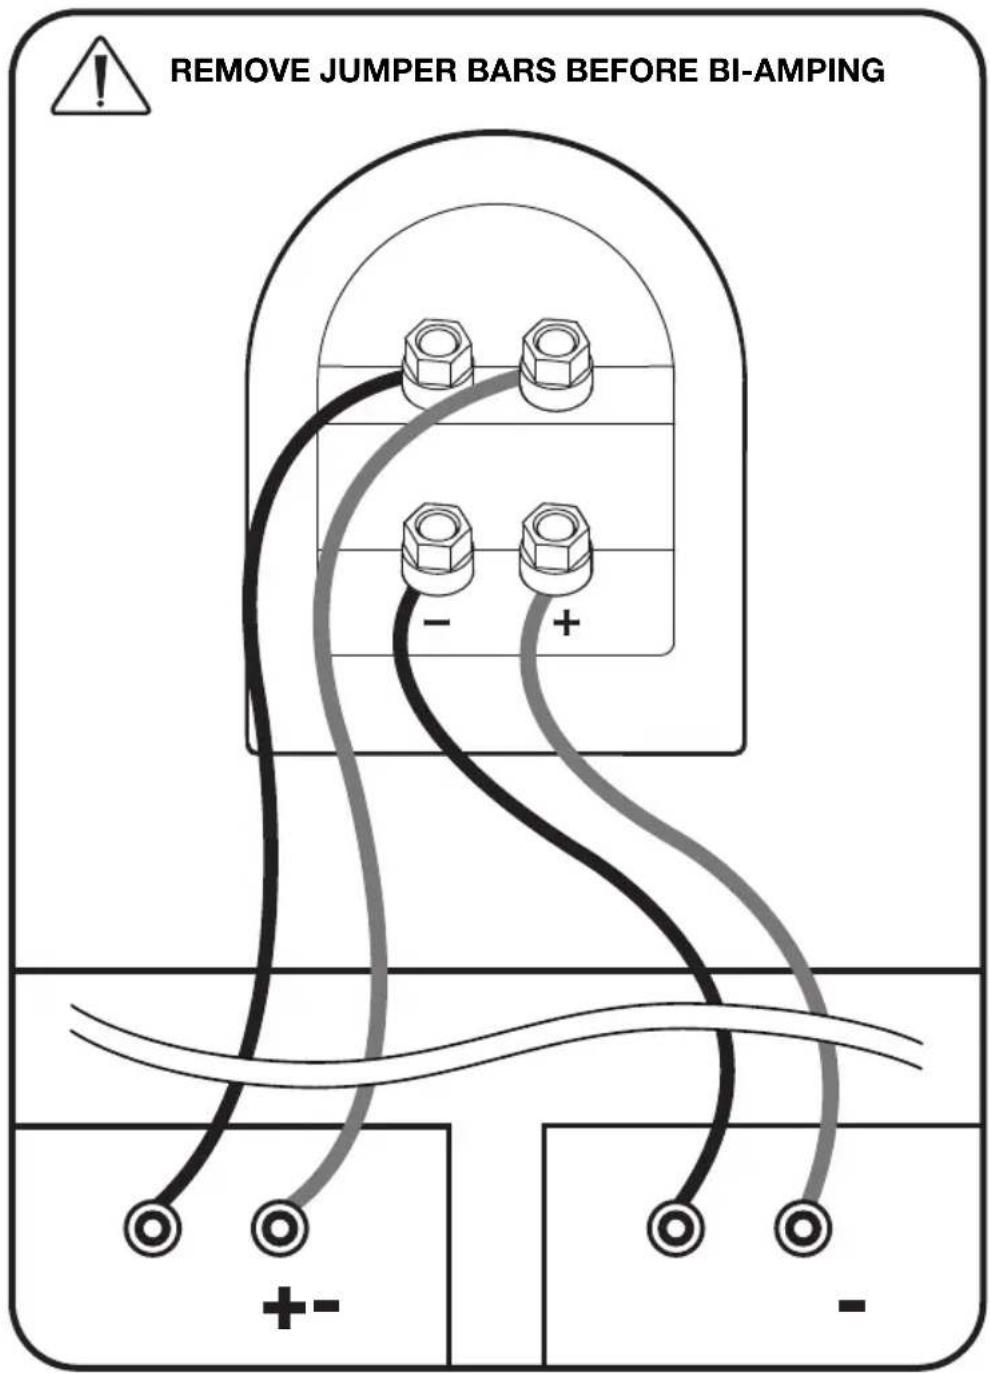
REMOVE JUMPER BARS BEFORE BI-AMPING + -Bi-Amp Connection
IMPORTANT! When bi-amping, always use amplifiers with identical gain. If uniform amplifier gain is not maintained the speaker-to-speaker balance will be incorrect when vertically bi-amped, or the speaker system's frequency balance will be incorrect when horizontally bi-amped. To prevent problems, use identical amplifiers (brand and model). Make sure they are operating in the same non-bridged or bridged mode.
Bi-Amp Connection (Cont'd)
Passive bi-amping offers a dramatic improvement in clarity, openness and detail, with much better bass solidity and definition. The presentation of music and movie soundtracks is simply more intelligible and transparent.
With passive bi-amping, the speaker's internal passive crossovers remain connected. An external electronic crossover is not required and cannot be used (there is no direct electrical access to individual drive units). This saves expense and setup difficulties. Passive bi-amping optimizes your speaker to achieve the best possible high-end performance.
To bi-amplify, two power amplifiers are required. Connection can be either vertical or horizontal.
Horizontal Bi-Amplification (shown on previous page) dedicates one amplifier to your speakers' mid/low-frequency inputs and another to their high-frequency inputs. This configuration can maintain better clarity when listening at loud levels—if low-frequency demands cause amplifier clipping, distortion will still be kept away from high-frequency drivers. Connect your speakers to one amplifier at a time.
Vertical Bi-Amplification (not shown) dedicates one amplifier to each speaker. This configuration provides complete channel separation, which optimizes your system's imaging ability. Connect your speakers to one amplifier at a time.
FINE TUNING
Once you have your speakers positioned in the room and have set speaker distances and calibrated speaker levels through your Audio/Video Processor or A/V Receiver it's time for a little fine tuning.
Since Monitor Series 7 provide exceptional performance in a variety of room settings, fine tuning is simply a matter of making slight adjustments (if necessary) to their placement in the room.
Start with the front speakers and listen to familiar music in stereo. The soundstage will be both wide and deep, but this can be tuned to your personal preference by adjusting the toe-in (the amount the speakers are turned toward the listening area). More toe-in will increase image depth and localization, less toe-in will increase image width. Adjust the toe-in in small increments, listening each time, until you achieve the soundstage balance you prefer. Toe-in is not applicable to the other speakers in your system since their position and sound distribution pattern is fixed.
Fine tuning for center speakers is a matter of making volume level adjustments that may be required for a particular multi-channel music or movie program. If necessary, adjust your Audio/Video Processor's or A/V Receiver's volume levels to ensure there is a cohesive overall soundstage.
To fine tune surround/rear speakers, please follow the illustrations in the earlier section.
To fine tune the subwoofer, please refer to the Owners Manual that was included with your subwoofer.
TROUBLESHOOTING GUIDE
No Sound
Make sure receiver, preamp or amplifier is plugged in and turned on. Check power outlet at the wall is working. Are headphones plugged in, or is system on Mute? Re-check all connections.
No Sound from One or More Speakers
Check your balance or Paradigm VC-150 Volume Control (if using). Check that all power cords are properly plugged in and functioning. Swap a non-working speaker with one that works to determine if the problem is with the speaker or something else (i.e. wiring, amplifier
Lack of Bass or Dislocated Image
One or more speakers may be connected out of phase (their polarity is reversed). Re-check to ensure that each speaker's cable is connected with correct polarity: red (+) to red (+) and black (-) to black (-).
SPECIFICATIONS
ATOM MONITOR
MINI MONITOR
| Design | 2-driver, 2-way bass reflex, quasi-3rd-order resistive port, bookshelf / stand-mounted | 2-driver, 2-way bass reflex, quasi-3rd-order resistive port bookshelf / stand-mounted |
| Crossover | 2nd-order electro-acoustic at 2.0 kHz | 2nd-order electro-acoustic at 2.0 kHz |
| High-Frequency Driver | 25-mm (1 in) S-PAL™ pure-aluminum dome tweeter, ferro-fluid cooled and damped | 25-mm (1 in) S-PAL™ pure-aluminum dome tweeter, ferro-fluid cooled and damped |
| Midrange Driver | N/A | N/A |
| Bass / Midrange Driver | 140-mm (5-1/2 in) S-PAL™ satin-anodized pure-aluminum cone, 25-mm (1 in) high-temperature voice-coil, oversize ceramic / ferrite magnets, GRIP™ glass-reinforced injection-molded polymer chassis | 165-mm (6-1/2 in) S-PAL™ satin-anodized pure-aluminum cone, 25-mm (1 in) high-temperature voice-coil, oversize ceramic / ferrite magnets, GRIP™ glass-reinforced injection-molded polymer chassis |
| Bass Driver(s) | N/A | N/A |
| Low-Frequency Extension* | 50 Hz | 42 Hz |
| Frequency Response: On-Axis 30° Off-Axis | ±2 dB from 86 Hz – 22 kHz ±2 dB from 86 Hz – 18 kHz | ±2 dB from 75 Hz – 22 kHz ±2 dB from 75 Hz – 18 kHz |
| Sensitivity – Room / Anechoic | 90 dB / 87 dB | 90 dB / 87 dB |
| Suitable Amplifier Power | 15 – 80 watts | 15 – 100 watts |
| Maximum Input Power | 50 watts | 80 watts |
| Impedance | Compatible with 8 ohms | Compatible with 8 ohms |
| Dimensions** (h x w x d) | 28.2 cm x 16.8 cm x 22.5 cm 11 in x 6-5/8 in x 8-7/8 in | 34.3 cm x 19.4 cm x 26.5 cm 13-1/2 in x 7-5/8 in x 10-1/2 in |
| Weight (unpacked) | 4.8 kg / 10.5 lb per speaker | 7.7 kg / 17 lb per speaker |
| Finishes | Black Ash, Heritage Cherry | Black Ash, Heritage Cherry |
| Paradigm Stands (sold sep.) | S-30, J-29 | S-26, J-29 |
| MONITOR 7 | MONITOR 9 | |
| Design | 3-driver, 2-1/2-way bass reflex, quasi-3rd-order resistive port, floorstanding model | 4-driver, 2-1/2-way bass reflex, quasi-3rd-order resistive port, floorstanding model |
| Crossover | 3rd-order electro-acoustic at 2.0 kHz; 3rd-order electro-acoustic at 700 Hz (lower bass driver) | 3rd-order electro-acoustic at 2.0 kHz; 2nd-order electro-acoustic at 700 Hz (lower bass drivers) |
| High-Frequency Driver | 25-mm (1 in) S-PAL ^TM pure-aluminum dome tweeter, ferro-fluid cooled and damped | 25-mm (1 in) S-PAL ^TM pure-aluminum dome tweeter, ferro-fluid cooled and damped |
| Midrange Driver | N/A | N/A |
| Bass / Midrange Driver | 140-mm (5-1/2 in) S-PAL ^TM satin-anodized pure-aluminum cone, 25-mm (1 in) high-temperature voice-coil, oversize ceramic / ferrite magnets, GRIP ^TM glass-reinforced injection-molded polymer chassis | 140-mm (5-1/2 in) S-PAL ^TM satin-anodized pure-aluminum cone, 25-mm (1 in) high-temperature voice-coil, oversize ceramic / ferrite magnets, GRIP ^TM glass-reinforced injection-molded polymer chassis |
| Bass Driver(s) | 140-mm (5-1/2 in) carbon-infused polypropylene cone, 25-mm (1 in) high-temperature voice-coils, oversize ceramic / ferrite magnets, GRIP ^TM glass-reinforced injection-molded polymer chassis | Two 140-mm (5-1/2 in) carbon-infused polypropylene cones, 25-mm (1 in) high-temperature voice-coils, oversize ceramic / ferrite magnets, GRIP ^TM glass-reinforced injection-molded polymer chassis |
| Low-Frequency Extension* | 34 Hz | 31 Hz |
| Frequency Response: On-Axis 30° Off-Axis | ±2 dB from 48 Hz – 22 kHz ±2 dB from 48 Hz – 18 kHz | ±2 dB from 46 Hz – 22 kHz ±2 dB from 46 Hz – 18 kHz |
| Sensitivity – Room / Anechoic | 91 dB / 88 dB | 91 dB / 88 dB |
| Suitable Amplifier Power | 15 – 180 watts | 15 – 200 watts |
| Maximum Input Power ^ | 130 watts | 150 watts |
| Impedance | Compatible with 8 ohms | Compatible with 8 ohms |
| Dimensions** (h x w x d) | 91.6 cm x 17.5 cm x 22.9 cm 36 in x 6-7/8 in x 9 in | 101.6 cm x 17.5 cm x 26.5 cm 40 in x 6-7/8 in x 10-1/2 in |
| Weight (unpacked) | 14.8 kg / 32.6 lb per speaker | 19.1 kg / 42 lb per speaker |
| Finishes | Black Ash, Heritage Cherry | Black Ash, Heritage Cherry |
| Paradigm Stands (sold sep.) | N/A | N/A |
MONITOR 11
| Design | 5-driver, 3-way bass reflex, quasi-3rd-order resistive port, floorstanding model |
| Crossover | 3rd-order electro-acoustic at 2.2 kHz; 2nd-order electro-acoustic at 700 Hz (lower bass drivers) |
| High-Frequency Driver | 25-mm (1 in) S-PAL™ pure-aluminum dome tweeter, ferro-fluid cooled and damped |
| Midrange Driver | 140-mm (5-1/2 in) S-PAL™ satin-anodized pure-aluminum cone, ferro-fluid cooled and damped, 25-mm (1 in) high-temperature voice-coil, oversize ceramic / ferrite magnets, GRIP™ glass-reinforced injection-molded polymer chassis, separate sealed driver chamber |
| Bass / Midrange Driver | N/A |
| Bass Drivers | Three 165-mm (6-1/2 in) carbon-infused polypropylene cones, 25-mm (1 in) high-temperature voice-coils,oversize ceramic / ferrite magnets, GRIP™ glass-reinforced injection-molded polymer chassis |
| Low-Frequency Extension* | 30 Hz |
| Frequency Response: On-Axis 30° Off-Axis | ±2 dB from 42 Hz – 22 kHz ±2 dB from 42 Hz – 18 kHz |
| Sensitivity – Room / Anechoic | 93 dB / 90 dB |
| Suitable Amplifier Power | 15 – 250 watts |
| Maximum Input Power† | 180 watts |
| Impedance | Compatible with 8 ohms |
| Dimensions** (h x w x d) | 105.2 cm x 20.0 cm x 34.3 cm 41-1/2 in x 7-7/8 in x 13-1/2 in |
| Weight (unpacked) | 25.1 kg / 55.3 lb per speaker |
| Finishes | Black Ash, Heritage Cherry |
| Paradigm Stands (sold sep.) | N/A |
| CENTER 1 | CENTER 3 | |
| Design | 4-driver, 3-way center channel. | 4-driver, 3-way center channel. |
| Crossover | 2nd-order electro-acoustic at 3.0 kHz; 2nd-order electro-acoustic at 550 Hz (bass drivers) | 2nd-order electro-acoustic at 2.2 kHz; 2nd-order electro-acoustic at 600 Hz (bass drivers) |
| High-Frequency Driver | 25-mm (1 in) S-PAL ^TM pure-aluminum dome tweeter, ferro-fluid cooled and damped | 25-mm (1 in) S-PAL ^TM pure-aluminum dome tweeter, ferro-fluid cooled and damped |
| Midrange Driver | 90-mm (3-1/2 in) S-PAL ^TM satin-anodized pure-aluminum cone, ferro-fluid cooled and damped, 25-mm (1 in) high-temperature voice-coil, oversize ceramic / ferrite magnets, GRIP ^TM glass-reinforced injection-molded polymer chassis | 115-mm (4-1/2 in) S-PAL ^TM satin-anodized pure-aluminum cone, ferro-fluid cooled and damped, 25-mm (1 in) high-temperature voice-coil, oversize ceramic / ferrite magnets, GRIP ^TM glass-reinforced injection-molded polymer chassis |
| Bass / Midrange Driver | N/A | N/A |
| Bass Drivers | Two 140-mm (5-1/2 in) carbon-infused polypropylene cones, 25-mm (1 in) high-temperature voice-coils, oversize ceramic / ferrite magnets, GRIP ^TM glass-reinforced injection-molded polymer chassis | Two 165-mm (6-1/2 in) carbon-infused polypropylene cones, 25-mm (1 in) high-temperature voice-coils, oversize ceramic / ferrite magnets, GRIP ^TM glass-reinforced injection-molded polymer chassis |
| Low-Frequency Extension* | 49 Hz | 46 Hz |
| Frequency Response: On-Axis30° Off-Axis | ±2 dB from 75 Hz – 22 kHz±2 dB from 75 Hz – 18 kHz | ±2 dB from 66 Hz – 22 kHz±2 dB from 66 Hz – 18 kHz |
| Sensitivity – Room / Anechoic | 92 dB / 89 dB | 93 dB / 90 dB |
| Suitable Amplifier Power | 15 – 120 watts | 15 – 175 watts |
| Maximum Input Powe† | 80 watts | 120 watts |
| Impedance | Compatible with 8 ohms | Compatible with 8 ohms |
| Dimensions** (h x w x d) | 18.3 cm x 45.1 cm x 26.5 cm7-1/4 in x 11-3/4 in x 10-1/2 in | 20.0 cm x 53.7 cm x 29.8 cm7-7/8 in x 21-1/8 in x 11-3/4 in |
| Weight (unpacked) | 10.5 kg / 25 lb per speaker | 12.9 kg / 28.5 lb per speaker |
| Finishes | Black Ash, Heritage Cherry | Black Ash, Heritage Cherry |
| Paradigm Stands (sold sep.) | N/A | J-18C |
| Design | 4-driver, 2-way bi-directional surround/rear | 4-driver, 2-way bi-directional surround/rear |
| Crossover | 2nd-order electro-acoustic at 2.0 kHz | 2nd-order electro-acoustic at 2.3 kHz |
| High-Frequency Driver | Two 25-mm (1 in) S-PAL ^TM pure-aluminum dome tweeters, ferro-fluid cooled and damped | Two 25-mm (1 in) S-PAL ^TM pure-aluminum dome tweeters, ferro-fluid cooled and damped |
| Midrange Drivers | N/A | N/A |
| Bass / Midrange Drivers | Two 110-mm (4-1/2 in) M-ICP ^TM minimum-mass injection-molded co-polymer polypropylene cones, 25-mm (1 in) voice-coils, oversize ceramic / ferrite magnets, steel chassis | Two 140-mm (5-1/2 in) S-PAL ^TM satin-anodized pure-aluminum cones, 25-mm (1 in) high-temperature voice-coils, oversize ceramic / ferrite magnets, GRIP glass-reinforced injection-molded polymer chassis |
| Bass Drivers | N/A | N/A |
| Low-Frequency Extension* | 71 Hz | 53 Hz |
| Frequency Response: | ±2 dB from 120 Hz – 20 kHz (bi-directional soundfield) | ±2 dB from 90 Hz – 20 kHz (bi-directional soundfield) |
| Sensitivity – Room / Anechoic | 88 dB / 85 dB | 90 dB / 87 dB |
| Suitable Amplifier Power | 15 – 100 watts | 15 – 175 watts |
| Maximum Input Power† | 80 watts | 120 watts |
| Impedance | Compatible with 8 ohms | Compatible with 8 ohms |
| Dimensions** (h x w x d) | 21.7 cm x 23.5 cm x 13.0 cm 8-1/2 in x 9-1/4 in x 5-1/8 in | 27.0 cm x 33.0 cm x 16.8 cm 10-5/8 in x 13 in x 6-5/8 in |
| Weight (unpacked) | 3.28 kg / 7.25 lb per speaker | 6.32 kg / 13.95 lb per speaker |
| Finishes | Black | Black |
* DIN 45 500 Indicates -3 dB in a typical listening room.
† With typical program source, provided the amplifier clips no more than 10% of the time.
** Heights include base (plinth) and rubber feet. Add approximately 3/4" (2.0 cm) to cabinet height with spikes installed. Add approximately 3/4" (2.0 cm) to cabinet depth with grill installed.
LIMITED WARRANTY
Monitor Series 7 covered in this manual are warranted to be and remain free of manufacturing and/or material defects for a period of five (5) years from the date of original purchase. Within the time period specified, repair, replacement or adjustment of parts for manufacturing and/or material defects will be free of charge to the original owner.
Thermal or mechanical abuse/misuse is not covered under the Paradigm warranty.
Limitations:
- Warranty begins on date of original retail purchase from an Authorized Paradigm Dealer only. It is not transferable;
- Warranty applies to product in normal home use only. If product is subjected to any of the conditions outlined in the next section, warranty is void;
- Warranty does not apply if the product is used in professional or commercial applications.
Warranty is Void if:
- The product has been abused (intentionally or accidentally);
- The product has been used in conjunction with unsuitable or faulty equipment;
- The product has been subjected to damaging signals, derangement in transport, mechanical damage or any abnormal conditions;
- The product (including cabinet) has been tampered with or damaged by an unauthorized service facility;
- The serial number has been removed or defaced.
Owner Responsibilities:
- Provide normal/reasonable operating care and maintenance;
- Provide or pay for transportation charges for product to service facility;
- Provide proof of purchase (your sales receipt given at time of purchase from your Authorized Paradigm Dealer must be retained for proof-of-purchase date).
Should servicing be required, contact your nearest Authorized Paradigm Dealer, Paradigm Electronics Inc. or Import Distributor (outside the U.S. and Canada) to arrange, bring in or ship prepaid, any defective unit. Visit our website, www.paradigm.com for more information.
Paradigm Electronics Inc. reserves the right to improve the design of any product without assuming any obligation to modify any product previously manufactured.
This warranty is in lieu of all other warranties expressed or implied, of merchantability, fitness for any particular purpose and may not be extended or enlarged by anyone. In no event shall Paradigm Electronics Inc., their agents or representatives be responsible for any incidental or consequential damages. Some jurisdictions do not allow limitation of incidental or consequential damages, so this exclusion may not apply to you.
Retain this manual and your sales receipt for proof of warranty term and proof of purchase.
NOTES
Paradigm ^MD
MONITOR SERIE

natural_image
Abstract black ink brushstroke design on white background, no text or symbols presentMODE D'EMPLOI

text_image
CE RECOCONSTITUTDIRECTIVES EUROPEENNES SUR LE RECYCLAGE ET LE TRAITEMENT DES DECHETS
text_image
Diagram showing a grid-based structure with arrows indicating assembly or movement, labeled with number 1 and circled.FACULTATIFS :
natural_image
Diagram of a mechanical assembly with rotating components and directional arrows (no text or symbols)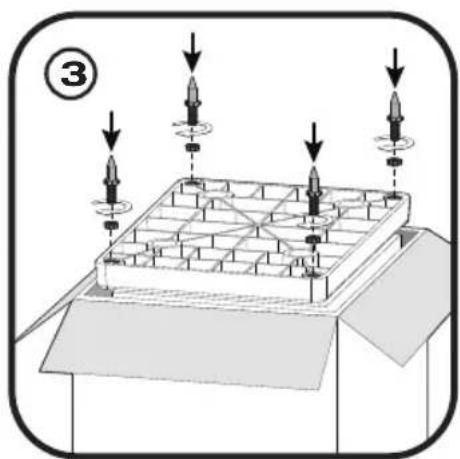
text_image
Diagram showing a mechanical assembly with labeled components and directional arrows indicating motion or force.natural_image
Pure diagram of a device with a black rectangular block and a white rectangular component, no text or symbols present.natural_image
Illustration of a person relaxing in bed with hands on head, watching TV and wall-mounted screens (no text or symbols)text_image
3/4 "X" "X"text_image
3/4 "X" "X" "X"Image optimale
natural_image
Diagram showing a sensor array above a sofa with two hands positioned at the bottom (no text or symbols)natural_image
Pure diagram of a curved mechanical or architectural component with no text, numbers, or symbols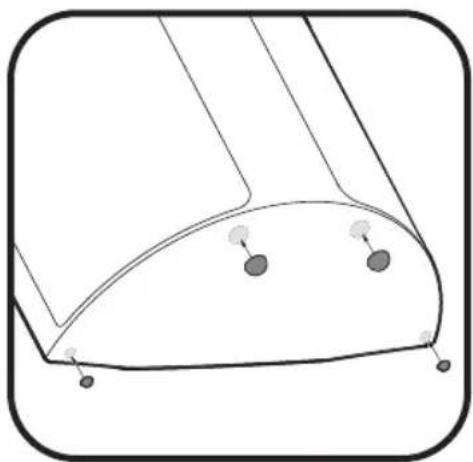
natural_image
Simple line drawing of a curved mechanical component with two circular features and mounting holes (no text or symbols)Monitor Surround 1 Monitor Surround 3
natural_image
Pure electrical circuit lines without any symbolsRaccordement Standard