
Defiance V8 - Subwoofer Paradigm - Free user manual and instructions
Find the device manual for free Defiance V8 Paradigm in PDF.

| Product type | Active subwoofer |
| Model | Defiance V8 |
| Brand | Paradigm |
| Speaker | 8 inches |
| Amplification | Built-in, Class D (estimated) |
| Maximum power | 1500 W (peak) |
| Power supply | Mains 110-240 V, 50/60 Hz |
| Inputs | Line level (RCA L/R), speaker level (banana plugs), LFE input |
| Level control | Rotary potentiometer (active in Local mode) |
| Low-pass filter | Variable from 35 Hz to Bypass |
| Phase | 0° or 180° (switch) |
| Power mode | Auto (signal sensing) or On (forced on) |
| LED indicator | White (on), Red (standby), Off (off), Flashing (error) |
| Standby consumption | < 0.5 W (estimated) |
| Dimensions (W x H x D) | Approximately 330 x 330 x 360 mm |
| Weight | Approximately 12 kg |
| Finish | Black (estimated) |
| Cleaning | Soft damp cloth, no abrasive cleaners |
| Safety | Do not expose to water, do not block ventilation, unplug before servicing |
| Warranty | 3 years (material and workmanship defects) |
| Supplied accessories | IEC power cable, user manual |
| Usage | Indoor use only |
Frequently Asked Questions - Defiance V8 Paradigm
User questions about Defiance V8 Paradigm
0 question about this device. Answer the ones you know or ask your own.
Ask a new question about this device
Download the instructions for your Subwoofer in PDF format for free! Find your manual Defiance V8 - Paradigm and take your electronic device back in hand. On this page are published all the documents necessary for the use of your device. Defiance V8 by Paradigm.
USER MANUAL Defiance V8 Paradigm
DEFIANCE SUBWOOFER
DEFIANCE V12

natural_image
Line drawing of a square speaker with a circular vent and mounting feet (no text or symbols)DEFIANCE V10

natural_image
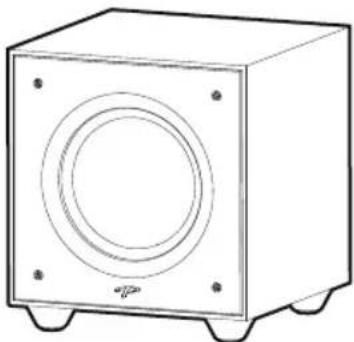
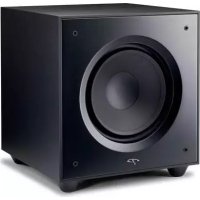
Line drawing of a rectangular speaker with a circular vent and mounting feet (no text or symbols)DEFIANCE V8

natural_image
Line drawing of a square speaker with a circular vent and mounting feet (no text or symbols)Owner's Manual
IMPORTANT SAFETY INSTRUCTIONS
- Read these instructions.
- Keep these instructions.
- Heed all warnings.
- Follow all instructions.
- Do not use this apparatus near water.
- Clean only with dry cloth.
- Do not block any ventilation openings. Install in accordance with the manufacturer's instructions.
- Do not install near any heat sources such as radiators, heat registers, stoves, or other apparatus (including amplifiers) that produce heat.
- Do not defeat the safety purpose of the polarized or grounding-type plug. A polarized plug has two blades with one wider than the other. A grounding type plug has two blades and a third grounding prong. The wide blade or the third prong are provided for your safety. If the provided plug does not fit into your outlet, consult an electrician for replacement of the obsolete outlet.
- Protect the power cord from being walked on or pinched, particularly at plugs, convenience receptacles, and the point where they exit from the apparatus.
-
Only use attachments/accessories specified by the manufacturer.
-
Up with the cart, stand, tripod,

bracket, or table specified by the manufacturer, or sold with the apparatus. When a cart is used,
use caution when moving the cart/apparatus combination to avoid injury from tip-over.
- Unplug this apparatus during lightning storms or when unused for long periods of time.
- Refer all servicing to qualified service personnel. Servicing is required when the apparatus has been damaged in any way, such as power supply cord or plug is damaged, liquid has been spilled or objects have fallen into the apparatus, the apparatus has been exposed to rain or moisture, does not operate normally, or has been dropped.
- To reduce the risk of fire or electric shock, do not expose this apparatus to rain or moisture. The apparatus shall not be exposed to dripping or splashing and that objects filled with liquids, such as vases, shall not be placed on apparatus.
- Where the mains plug or an appliance coupler is used as the disconnect device, the disconnect device shall remain readily operable.
- Do not overload wall outlets or extension cords beyond their rated capacity as this can cause electric shock or fire.
- No naked flame sources, such as lighted candles, should be placed on the apparatus.
- Maintain a minimum of 20-30cm distance around the apparatus for sufficient ventilation.
- The ventilation should not be impeded by covering the ventilation openings with items, such as newspapers, tablecloths, curtains, etc.
- Apparatus may be used in tropical climates.
EU COMPLIANCE INFORMATION
Hereby, SVI Holdings (US) Inc.'s declares that this Defiance Suwoofer is in compliance with the essential requirements and other relevant provisions of the following EU Compliance Directive Information.
- Conforms to European Union Low Voltage Directive 2014/35/EU;
• European Union EMC Directive 2014/30/EU; - Defiance V10/V12 ONLY: European Union Radio Equipment Directive (RED) 2014/53/EU.
• European Union Eco-Design Directive 2009/125/EC;
• European Union WEEE Directive 2012/19/EU;
• European Union Restriction of Hazardous Substances Recast (RoHS2) Directive 2011/65/EU;
- European Union Registration, Evaluation, Authorization and Restriction of Chemicals (REACH) Directive 2006/121/EC;
- You may obtain a free copy of the Declaration of Conformity by contacting your dealer, distributor, or SVI Holdings (US) Inc.'s worldwide headquarters. Contact information can be found here: www.paradigm.com.
INDUSTRY CANADA (IC) COMPLIANCE NOTICE
This device complies with Industry Canada licence-exempt RSS standard(s). Operation is subject to the following two conditions:
(1) this device may not cause interference, and
(2) this device must accept any interference, including interference that may cause undesired operation of the device.
Any changes or modifications not expressly approved by the party responsible for compliance could void the user's authority to operate the equipment.
Radiation Exposure Statement:
This equipment complies with IC radiation exposure limits set forth for an uncontrolled environment. End users must follow the specific operating instructions for satisfying RF exposure compliance. To maintain with IC RF exposure compliance requirements please follow operation instruction as documented in this manual.

Contains FCC ID: QOQBGM113 and IC: 5123A-BGM113
Frequency Range: 2402.0-2480.0 MHz
Maximum Transmit Power: 2.5 dBm
This device complies with part 15 of the FCC Rules. Operation is subject to the following two conditions: (1) This device may not cause harmful interference, and (2) this device must accept any interference received, including interference that may cause undesired operation.
Per FCC regulation 47 CFR 15.21: Changes or modifications not expressly approved by the party responsible for compliance could void the user's authority to operate the equipment.
NOTE: This equipment has been tested and found to comply with the limits for a Class B digital device, pursuant to part 15 of the FCC Rules. These limits are designed to provide reasonable protection against harmful interference in a residential installation. This
equipment generates uses and can radiate radio frequency energy and, if not installed and used in accordance with the instructions, may cause harmful interference to radio communications. However, there is no guarantee that interference will not occur in a particular installation. If this equipment does cause harmful interference to radio or television reception, which can be determined by turning the equipment off and on, the user is encouraged to try to correct the interference by one or more of the following measures:
– Reorient or relocate the receiving antenna.
- Increase the separation between the equipment and receiver.
- Connect the equipment into an outlet on a circuit different from that to which the receiver is connected.
- Consult the dealer or an experienced radio/TV technician for help.

In accordance with the European Union WEEE (Waste Electrical and Electronic Equipment) directive effective August 13, 2005, we would like to notify you that this product may contain regulated
materials which upon disposal, according to the WEEE directive, require special reuse and recycling processing. For this reason Paradigm Electronics Inc. has arranged with our distributors in European Union member nations to collect and recycle this product at no cost to you.
To find your local distributor contact the dealer from whom you purchased this product, email support@paradigm.com or visit the distributor locator at www.paradigm.com.
Please note, only this product itself falls under the WEEE directive. When disposing of packaging and other related shipping materials we encourage you to recycle these items through the normal channels.

The exclamation point within an equilateral triangle is intended to alert the user to the presence of important operating and maintenance (servicing) instructions in the literature accompanying the appliance.

The lightning bolt flash with arrowhead symbol, within an equilateral triangle, is intended to alert the user to the presence of uninsulated “dangerous voltage” within the product’s enclosure that may be of sufficient magnitude to constitute a risk of electric shock.

WARNING! Do not use your subwoofer outside of the country of original sale — voltage requirements vary by country. Improper voltage can cause damage that will be potentially expensive to repair. The subwoofer is shipped to Paradigm authorized distributors with the correct power supply for use in the country of intended sale. A list of authorized distributors can be accessed at www.paradigm.com or by emailing support@paradigm.com.
Thank you!
Thank you for choosing a Paradigm ^® Defiance Subwoofer. You are about to hear the difference that Paradigm subwoofers make in your home theater system! They are the product of countless hours of comprehensive research and development and will reward you with truly exceptional sound for many years.
To ensure proper installation, please read this manual and follow all instructions. If you have further questions contact your Authorized Paradigm Dealer or visit the Q&A page on our website at www.paradigm.com.
PARADIGM ELECTRONICS RESERVES THE RIGHT TO CHANGE SPECIFICATIONS AND/OR FEATURES WITHOUT NOTICE AS DESIGN IMPROVEMENTS ARE INCORPORATED.
PARADIGM, ANTHEM, and ARC are registered trademarks of Paradigm Electronics Inc. Defiance Subwoofer is a trademark of Paradigm Electronics Inc. Copyright © Paradigm Electronics Inc. All rights reserved.
TABLE OF CONTENTS
Safety Warnings and Quick Installation 3
Your New Subwoofer 6
Subwoofer Placement 7
The Advantages of Using Two Subwoofers 8
Connecting Your Subwoofer 10
Wired Connection 10
Line Level Inputs (Left/Right) 11
Speaker Level Inputs (Left/Right) 12
Connecting The Defiance WT Wireless Transmitter (Sold Separately): Defiance V10/V12 ONLY 14
'Pairing' The Defiance WT Wireless System (Sold Separately): Defiance V10/V12 ONLY 16
Wireless Operation 16
Transmitter Operation 16
Controls & Connections: Defiance V10/V12 18
Controls & Connections: Defiance V8 21
Fine Tuning: Defiance V10/V12 24
Fine Tuning: Defiance V8 24
Setting Subwoofer Controls 25 (Crossover Set By Preamp/Receiver)
Setting Subwoofer Controls (Local Crossover Method) 26
ARC® (Anthem Room Correction) (Sold Separately): Defiance V10/V12 ONLY 27
Limited Warranty 29
SAFETY WARNINGS AND QUICK INSTALLATION

- Hazardous voltages exist inside—do not remove cover.
• Refer servicing to a qualified technician. - To prevent fire or shock hazard, do not expose this module to moisture.
- Turn amplifier off and unplug subwoofer should any abnormal conditions occur.
- The power cord should not be installed, removed, or left detached from the speaker while the other end is connected to an AC power source.
- The main power switch near the AC inlet shall remain readily operable.
- Use only with a grounded electrical outlet.
- No candles or other sources of open flame should be placed on the speaker.
- No liquids either in glasses or vases should be placed on speaker.
- Speaker should not be exposed to dripping or splashing liquids.
- The terminals marked with the lightning bolt symbol should be connected by an instructed person or by way of ready made terminals.
- The power cord should remain readily operable should any abnormal conditions occur.
We know you are eager to hear your new Paradigm subwoofer, so this section is provided to allow fast and easy set up. Once you have your subwoofer operational, please take the time to read, in depth, the rest of the information in the enclosed manual. It will give you perspective on how to attain the greatest possible performance from this most exacting woofer system.
If you should experience any difficulties in the setup or operation of your Paradigm subwoofer, please refer to the Room Acoustics, Placement or Operation sections of the enclosed owner's manual. Should you encounter a persistent problem that cannot be resolved, please contact your authorized Paradigm dealer. They will provide you with the appropriate technical analysis to alleviate the situation.
Unpacking
Remove your new subwoofer from its packaging. Please retain the original packaging materials for future use — replacement packaging may be expensive.
Placement
You may choose to begin by placing the subwoofer in a corner near the front of the room. If placed in a corner, align the subwoofer diagonally so both woofers are equidistant from the adjacent wall. Before deciding on a permanent corner placement, experiment with other positions. Locations away from corners often prove more effective in providing ideal low-frequency performance and blend with the main speakers. Please see the Placement section for details.
Signal Connection
Use the best cables you can. High quality cables, available from your specialty dealer, are recommended and will give you superior performance.
Attach your Preamp/Receiver outputs to the signal input connectors located on the subwoofer's rear panel. Please see the Controls and Connections section for details. If you plan to connect your subwoofer using Speaker Level (high level) inputs, refer to the Speaker Level Inputs section for details.
Power Connection (AC) (see warning)
Make sure the level knob is set at 0. Plug the subwoofer into a wall outlet. Review the AC Power Connection section of this manual for details.
SAFETY WARNINGS AND INSTALLATION IN BRIEF (cont'd)
Setting the Controls (Using LFE Input): Defiance V10 and V12
- Setting Control: Set the switch to 'Local'.
• Power Mode: Set the switch to 'Auto'. - Level: Set at twelve o'clock (straight up).
- Use your receiver's bass management system to adjust subwoofer integration.
Setting the Controls (Using LFE Input): Defiance V8
- Power Mode: Set the switch to 'auto'.
- Level: Set at twelve o'clock (straight up).
- Use the Low Pass Filter and set to Bypass.
Setting the Controls (Using Left/Right Inputs): Defiance V10 and V12
- Setting Control: Set the switch to 'App'.
• Power Mode: Set the switch to 'Auto'. - Download the Paradigm Sub Control app (from Google Play or the Apple App Store).
- Using the app, adjust the following settings:
- Volume (level): Set at -14dB or twelve o'clock (straight up).
- Phase: Start with 0^ .
- Low Pass Filter: Set lower than the low-end frequency response of your main speakers. If you are uncertain of your main speaker low-frequency response, start with 80Hz.
Setting the Controls (Using Left/Right Inputs): Defiance V8
- Power Mode: Set the switch to 'auto'.
- Level: Set at twelve o'clock (straight up).
- Use the Low Pass Filter and set to 80Hz.
YOUR NEW SUBWOOFER
Break In
Although Paradigm® Defiance subwoofers sound great “out of the carton,” they will sound even better once they are “broken in.” Allow them to play for several hours before you begin any critical listening.
NOTE: If your subwoofer has been transported or stored in the cold, let it warm to room temperature before use.
Cleaning
Paradigm Defiance Subwoofers have a durable premium finish. To clean, use a damp soft cloth. Do not use a strong or abrasive cleaner. Avoid getting any part of the subwoofer system wet. Do not place wet objects (drinking glasses, potted plants, etc.) on top of the subwoofer—if allowed to soak in, even a small amount of water may permanently damage the subwoofer enclosure.
Power Requirements
The ‘Watts’ (W) rating indicated on the rear panel is the maximum AC power your subwoofer will draw when producing its maximum power output. However, the actual wattage draw will vary with the bass content of the program material — more if there is a lot of deep bass, less when there is not as much bass. Although generally not required for typical music and movie program material, if the bass content of your program material is very loud and more continuous in nature, we recommend connecting subwoofers with higher wattage ratings (i.e. 1500 W) to dedicated AC circuits.
Room Acoustics
You are about to experience the astonishing bass performance of a state-of-the-art Paradigm Defiance subwoofer. These subwoofers incorporate highly advanced patented technology and set all new standards for deep bass extension, ultra-low distortion and sound power output and provide unprecedented bass articulation and slam. It is important to note that just as the amount of soft furnishings has a decided impact on mid and high frequencies, those below 150Hz are dramatically affected by the room itself — its size, shape, as well as by physical boundaries throughout the room. Experimenting with subwoofer placement and control adjustments is the best way to achieve optimal bass performance in any room. Keep in mind the following guideline when deciding on best subwoofer placement:
- Concrete floors and walls tend to aggravate low-frequency standing wave problems and are less preferred.
- Rooms where height, width and length are similar should be avoided as they can exhibit significant low-frequency standing wave problems. This may result in reduced clarity. If no other room is possible, experiment with subwoofer placement to minimize acoustic problems.
SUBWOOFER PLACEMENT

SAFETY PRECAUTION: Before proceeding with this section, be sure to read and follow all safety precaution notices at the beginning of this manual.
Bass is less and less directional as it goes down in frequency. For best sonic integration, locating your subwoofer between your front speakers or beside one of them and close to the back wall will usually provide the best bass performance. If this location is not possible your subwoofer may be placed anywhere in the room without affecting the stereo image of your front speakers or the soundstage of your multichannel speaker system.
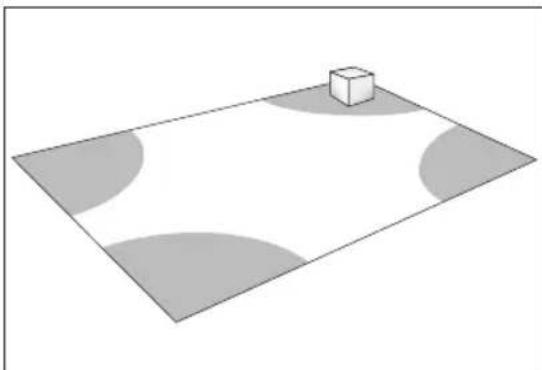
Fig. 1a and Fig. 1b highlight how bass output is generally affected by room placement. When seated in a typical listening area of your room, placing the subwoofer inside the “shaded” areas will typically result in bass performance as follows:
natural_image
Simple 3D diagram showing a cube placed on a gray plane with curved and unshaded regions (no text or symbols)Fig. 1a: Corner placement provides the most bass, but sometimes at the expense of accuracy.

natural_image
3D diagram of a checkered floor with a small cube on top (no text or symbols)Fig. 1b: A subwoofer placed near a wall usually provides a good balance of quantity and accuracy.
THE ADVANTAGE OF USING TWO SUBWOOFERS
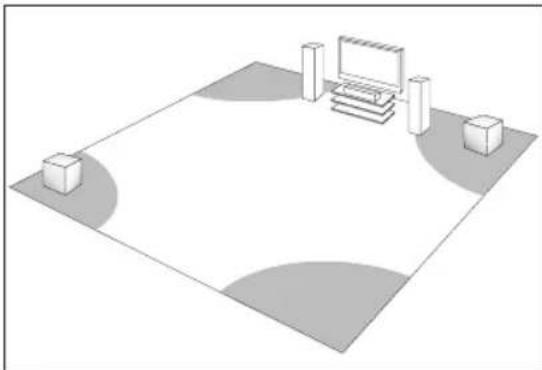
natural_image
Isometric view of a rectangular room with a monitor, chairs, and two small boxes on the sides (no text or symbols)Fig. 2: When using two subwoofers, placing one in the front of the room and the other in the rear of the room usually provides the best bass performance and sonic integration. Consult the “Fine Tuning” section of this Owners Manual for more information on adjusting phase settings. If those locations are not possible, or if you want to experiment with placement options using two subwoofers, the following procedure will be a helpful guide to achieving better bass performance. Refer to “Subwoofer Connection” (below) then proceed as follows:
- Temporarily turn all speakers off (either by turning your amplifier off or disconnecting them).
- Connect and place one subwoofer in the central area of your listening room. Follow directions for connection, as outlined in the following section.
- At a moderately loud level, play music or a video soundtrack with extended bass that is repetitive or continuous.
- Walk around your room and note where the bass sounds louder and where it sounds quieter.
- Place the first subwoofer within a louder bass area of your room; then place the second subwoofer within a quieter bass area of your room.
- Connect both subwoofers and switch all speakers back on; and switch the amplifier on, or reconnect it.
- Follow the "Fine Tuning" instructions to optimize your system's overall bass performance.
See your Dealer for connection instructions using two subwoofers.
THE ADVANTAGES OF USING TWO SUBWOOFERS IN YOUR LISTENING ROOM
(cont'd)
NOTE: The preceding is only a guideline. You may want to use a bass test disc and SPL meter to more accurately determine the bass characteristics of your listening room (see your Dealer for more information).
Remember that room acoustics vary, which means that it may take some experimenting with subwoofer placement to achieve the best subwoofer performance.
CONNECTING YOUR SUBWOOFER

SAFETY PRECAUTION: Before proceeding with this section, be sure to read and follow all safety precaution notices and warnings at the beginning of this manual.


Turn all components OFF before connecting the subwoofer.
NOTE: Speakers set to "Large" with your Preamp/Receiver will still be reproducing bass frequencies—be careful not to overdrive them!
We recommend the use of high-quality cables and connectors. (See your Dealer for more information).
WIRED CONNECTION
Line Level Input (LFE) — Recommended
Line-Level Input From Sub/LFE Output — for use with a Preamp/Receiver that has a Sub-Out/ LFE-Out jack.
Using a RCA to RCA interconnect cable (not included) connect the subwoofer as shown.

CONNECTING YOUR SUBWOOFER
(cont'd)
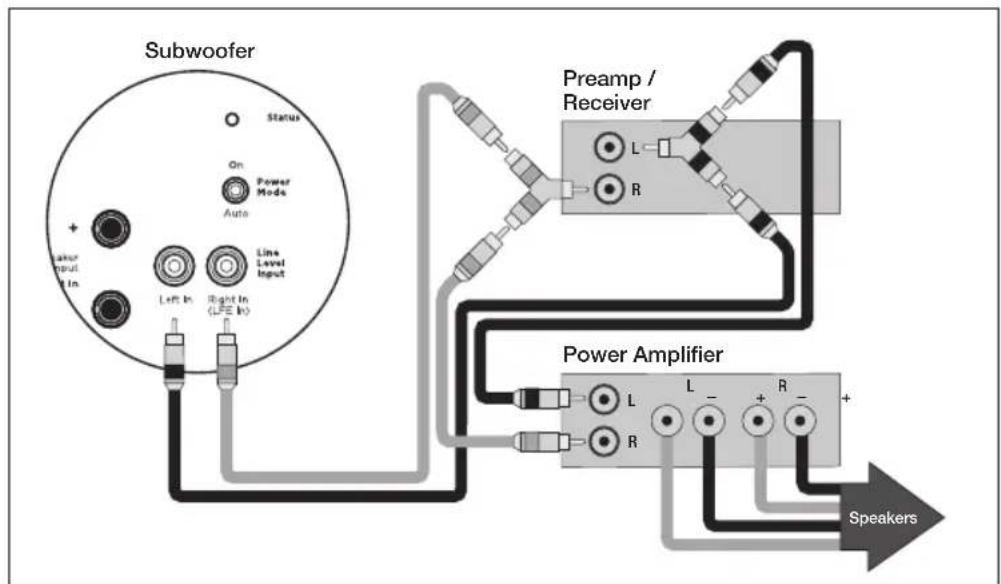
Line Level Inputs (Left/Right)
Line-Level Input From Pre-Out/Front-Out Without High-Pass Output from Sub — for use with a Preamp/Receiver and Power Amplifier with Pre-Out/Front-Out and Main-In jacks.
Using a RCA to RCA interconnect cables and 'Y' splitters (not included) connect the subwoofer as shown.
flowchart
graph TD
    A["Subwoofer"] --> B["Status"]
    A --> C["On: Power Mode"]
    A --> D["Auto: Line Level Input"]
    A --> E["Left In: LPE In"]
    A --> F["Right In: LPE In"]
    G["Pream / Receiver"] --> H["L"]
    G --> I["R"]
    J["Power Amplifier"] --> K["L"]
    J --> L["-"]
    J --> M["+"]
    J --> N["-"]
    J --> O["+"]
    P["Speakers"] --> Q["Speaker"]
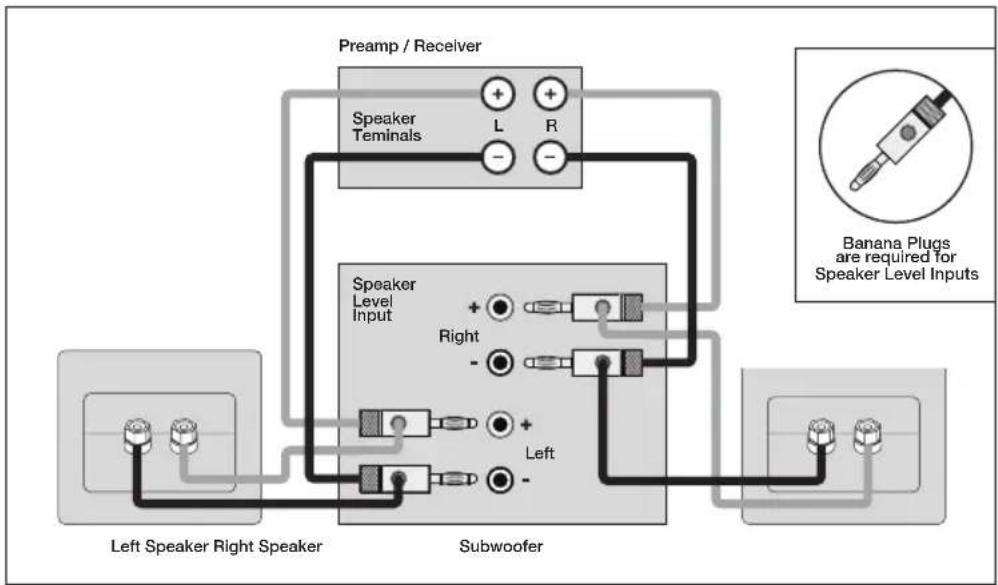
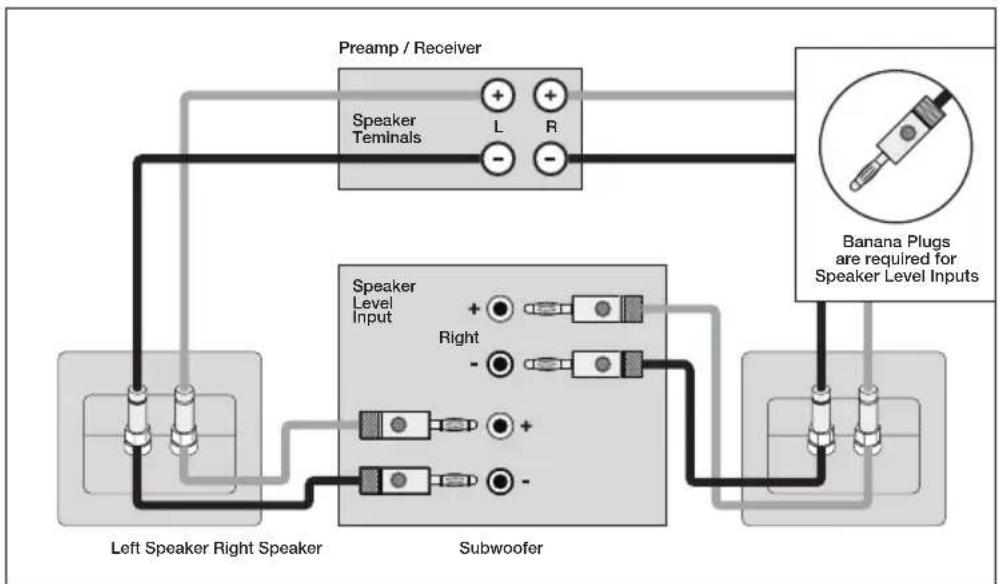
Speaker Level Inputs (Left/Right)
Speaker-Level Input — for use with a Preamp/Receiver that has no Sub-Out/LFE-Out or Pre-Out/Front-Out facilities.
Using high-quality speaker cables, connect your subwoofer as shown in either of the following connection options.
flowchart
graph TD
    A["Left Speaker Right Speaker"] --> B["Speaker Level Input"]
    B --> C["Preamp / Receiver"]
    C --> D["Speaker Terminals"]
    D --> E["Left"]
    D --> F["Right"]
    D --> G["Left"]
    D --> H["Right"]
    D --> I["Left"]
    J["Subwoofer"] --> K["Speaker Level Input"]
    K --> L["Preamp / Receiver"]
    L --> M["Speaker Terminals"]
    M --> N["Left"]
    M --> O["Right"]
    M --> P["Left"]
    M --> Q["Right"]
Option 1
flowchart
graph TD
    A["Left Speaker Right Speaker"] --> B["Speaker Level Input"]
    B --> C["Subwoofer"]
    C --> D["Speaker Terminals"]
    D --> E["Pream / Receiver"]
    E --> F["Banana Plugs are required for Speaker Level Inputs"]
    style A fill:#f9f,stroke:#333
    style B fill:#ccf,stroke:#333
    style C fill:#cfc,stroke:#333
    style D fill:#fcc,stroke:#333
    style E fill:#cff,stroke:#333
    style F fill:#ffc,stroke:#333
Option 2
CONNECTING YOUR SUBWOOFER
(cont'd)

flowchart
graph TD
    A["Left Speaker Right Speaker"] --> B["Speaker Level Input"]
    C["Preamp / Receiver"] --> D["Speaker Terminals"]
    D --> E["L"]
    D --> F["R"]
    G["Subwoofer"] --> H["Right"]
    G --> I["Left"]
    J["Banana Plugs are required for Speaker Level Inputs"] --> K["Speaker Level Input"]
    style A fill:#f9f,stroke:#333
    style C fill:#f9f,stroke:#333
    style G fill:#ccf,stroke:#333
    style J fill:#cfc,stroke:#333
Option 3
CONNECTING THE DEFIANCE WT WIRELESS TRANSMITTER (Sold Separately): Defiance V10/V12 ONLY

Before connecting a Defiance WT wireless transmitter to the Preamp/Receiver, ensure you have "paired" the subwoofer and transmitter.
Line-Level Input From Sub/LFE Output — for use with a Preamp/Receiver that has a Sub-Out/LFE-Out jack.
Using a RCA to RCA interconnect cable (not included) connect the Wireless Transmitter as shown.

CONNECTING THE DEFIANCE WT WIRELESS TRANSMITTER (Sold Separately): Defiance V10/V12 ONLY (cont'd)
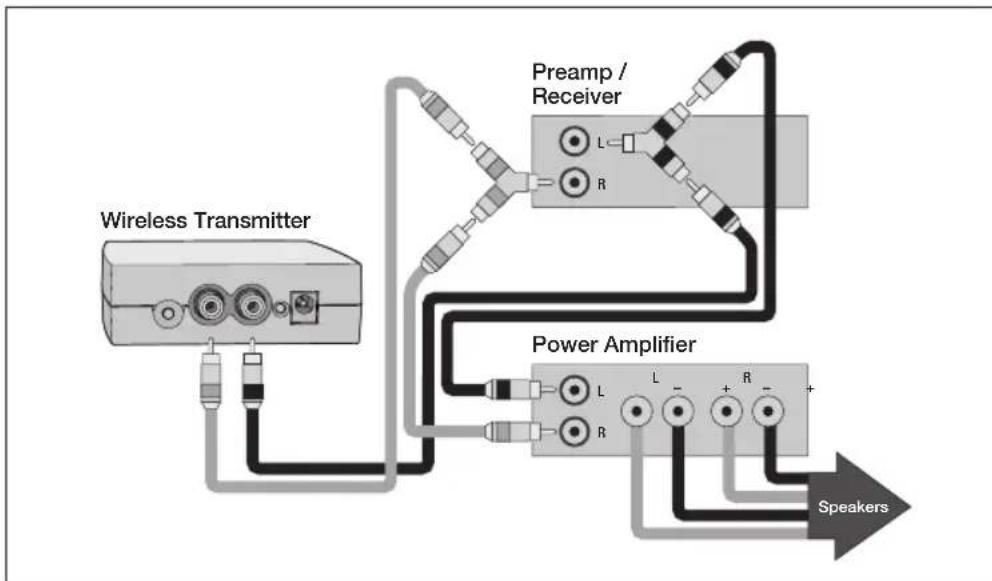
Line-Level Input From Pre-Out/Front-Out Without High-Pass Output from Subwoofer — For use with a preamp/receiver and power amplifier with Pre-Out/Front-Out and Main-In jacks.
Using RCA to RCA interconnect cables and 'Y' splitters (not included) connect the wireless transmitter as shown.
flowchart
graph TD
    A["Wireless Transmitter"] --> B["Pream / Receiver"]
    B --> C["Power Amplifier"]
    C --> D["Speakers"]
    style A fill:#f9f,stroke:#333
    style B fill:#ccf,stroke:#333
    style C fill:#cfc,stroke:#333
    style D fill:#fcc,stroke:#333
'PAIRING' THE DEFIANCE WT WIRELESS SYSTEM (Sold Separately): Defiance V10/V12 ONLY
WIRELESS OPERATION

If you are not using a wireless option on your subwoofer (Defiance V10 or V12 ONLY) skip this section.
Subwoofer placement plays a major role in optimizing bass performance. However, placement can impose the inconvenience, not to mention the unsightliness, of running long lengths of cable through walls, along baseboards and under floors and carpets. Going wireless means you no longer have to worry about placement while cable clutter becomes a thing of the past. Actual system setup time is often drastically reduced with the wireless option.
In a typical listening room your new wireless transmitter has a maximum range of 50' (15 m). Obstructions such as walls, large pieces of furniture, room dividers, etc., may reduce the wireless transmitter's range. Do not place the subwoofer and wireless transmitter farther apart than the recommended range. We do not recommend installing your wireless transmitter in another room. The wireless transmitter's compact dimensions allow it to fit neatly into a standard audio/video rack. Your wireless transmitter features a 2.4 GHz uncompressed digital self sensing design that will automatically adjust for the best wireless connection while monitoring the integrity of the data stream.
An RCA audio cable is required (not included) to connect the wireless transmitter to your Preamp/Receiver — see your dealer for cable recommendations. One wireless transmitter is required for each wireless subwoofer in operation.
'PAIRING' THE DEFIANCE WT WIRELESS SYSTEM (Sold Separately): Defiance V10/V12 ONLY (cont'd)

WARNING! To prevent signal dropouts or interference, keep the Wireless Transmitter well out of range of a microwave oven, mobile telephone or Bluetooth device operating on the same frequency.

IMPORTANT! The Wireless Transmitter and subwoofer must be no more than 50' (15 m) apart in the room.
The Defiance WT Wireless System is shipped already paired. To re-sync the wireless system:
- Verify the subwoofer is powered on and that the subwoofer's status light is red or white.
- If the Wireless Transmitter's power cord is plugged in, unplug it for 10 seconds.
- Plug in the Wireless Transmitter's power cord.
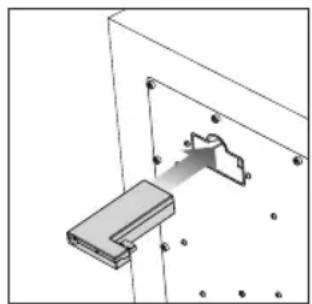
- Plug the Wireless Receiver into the "Wireless Module Connection" input on the back of the subwoofer (see diagram below).
natural_image
Technical diagram of a mechanical assembly with a bracket and mounting holes (no text or symbols)- Wait until the status lights begin flashing on both the Wireless Receiver and Wireless Transmitter.
- Push the Wireless Receiver's sync button for 5 seconds.
- Push and hold the Wireless Transmitter's sync button until the Wireless Receiver's status light turns solid.
CONTROLS & CONNECTIONS: Defiance V10/V12

1. Setting Control
The SETTING CONTROL switch adjusts how the volume/level of the subwoofer will be controlled — App or Local.
App: With the switch set to "App", all controls functions are controlled via the subwoofer control app.
Local: With the switch set to "Local", the Level (volume) knob control is active.
2. Level
The Level adjusts the subwoofers output level to match that of your speakers.
NOTE: Level knob is only active when the Setting Control is set to Local.
CONTROLS & CONNECTIONS: Defiance V10/V12 (cont'd)
3. ARC Input
The ARC USB connection is used to connect the subwoofer to PC/Laptop when running ARC (Anthem Room Correction — sold separately).
NOTE: Not required when running ARC via Bluetooth.
4. Status Indicator
The subwoofers is equipped with a multi-colored LED, (located on the rear) which indicates the current status of the subwoofer
- No illumination — Subwoofer is not on.
- White — Subwoofer is on
- Red — Subwoofer is in ‘Standby mode’
- Flashing — Subwoofer has detected an error code.
5. Power Mode
The Power Mode switch allows you to control how the subwoofer turns On & Off.
- Auto — When set to “Auto”, the subwoofer will turn on when an audio signal is detected.
NOTE: After several minutes of inactivity the subwoofer will enter Standby Mode.
- On — When set to “On”, the subwoofer will always be on.
NOTE: If the subwoofer enters Standby Mode during quiet or low level audio playback, this is likely due to a low audio output signal from the audio system. Increasing the system volume should resume normal subwoofer playback. Increasing the subwoofer output level on the Preamp/Receiver and decreasing the level on the subwoofer will solve this issue in the future for similar listening levels.
6. Speaker Level Inputs (Left/Right)
The Speaker Level Inputs allows standard speaker cable be used for the subwoofer connection. To use these connections the speaker cable should be terminated using banana style plugs.
NOTE: The setting of the Low Pass Filter control is applied to the signal received through these inputs.
7. Line Level Input (Left/Right)
The Line Level Input allows the Main-Out or Pre-Out be used on your Preamp/Receiver for the subwoofer connection.
NOTE: The setting of the Low Pass Filter control is applied to the signal received through these inputs.
8. Line Level Input (LFE)
The Line Level LFE Input allows the LFE Out/Sub-Out be used on your Preamp/Receiver for the subwoofer connection.
NOTE: The Low Pass Filter should be set to Bypass. LFE signals are controlled from your Preamp/Receiver. By default, the Low Pass Filter is set to Bypass
9. Defiance WT Wireless Module Input (Sold Separately)
The Defiance WT Wireless Module allows for wireless subwoofer integration.
NOTE: The Wireless Module must be paired with its matching transmitter – See the Paradigm Defiance WT Manual.
10. AC Power Connection

WARNING! The power cord should not be installed, removed, or left detached from the subwoofer while the other end is connected to an AC power source.
The IEC power cord should be firmly inserted into the AC power receptacle on the rear panel of the subwoofer. Then to any convenient AC wall outlet.
NOTE: The sub also integrates a signal sensing power supply that automatically switches off after sensing no music signal for several minutes (this will occur when the power switch is set to 'Auto').
CONTROLS & CONNECTIONS: Defiance V8

1. Level
The Level adjusts the subwoofers output level to match that of your speakers.
2. Low Pass Filter
The level Low Pass Filter controls the subwoofers upper frequency cut-off.
This can be set to match the low-frequency roll-off of your front speakers.
Example: If your front speakers play to approximately 80Hz, you can set the subwoofers Low Pass Filter frequency to 80Hz.
NOTE: The Low Pass Filter should be set to Bypass if a crossover has been set in your Preamp/Receiver.
3. Phase (0 or 180°)
The Phase switch inverts the low frequency signal to synchronize the subwoofer with the front speakers.
Example: The sound from your subwoofer may arrive at the listening position out of alignment with the front speakers, causing a perceived decrease bass.
NOTE: The Phase switch should be set to 0 for most applications.
4. Status Indicator
The subwoofers is equipped with a multi-colored LED, (located on the rear) which indicates the current status of the subwoofer
- No illumination — Subwoofer is not on.
- White — Subwoofer is on
- Red — Subwoofer is in 'Standby mode'
- Flashing — Subwoofer has detected an error code.
5. Power Mode
The Power Mode switch allows you to control how the subwoofer turns On & Off.
- Auto — When set to “Auto”, the subwoofer will turn on when an audio signal is detected.
NOTE: After several minutes of inactivity the subwoofer will enter Standby Mode.
- On — When set to “On”, the subwoofer will always be on.
NOTE: If the subwoofer enters Standby Mode during quiet or low level audio playback, this is likely due to a low audio output signal from the audio system. Increasing the system volume should resume normal subwoofer playback. Increasing the subwoofer output level on the Preamp/Receiver and decreasing the level on the subwoofer will solve this issue in the future for similar listening levels.
CONTROLS & CONNECTIONS: Defiance V8 (cont'd)
6. Speaker Level Inputs (Left/Right)
The Speaker Level Inputs allows standard speaker cable be used for the subwoofer connection. To use these connections the speaker cable should be terminated using banana style plugs.
NOTE: The setting of the Low Pass Filter control is applied to the signal received through these inputs.
7. Line Level Input (Left/Right)
The Line Level Input allows the Main-Out or Pre-Out be used on your Preamp/Receiver for the subwoofer connection.
NOTE: The setting of the Low Pass Filter control is applied to the signal received through these inputs.
8. Line Level Input (LFE)
The Line Level LFE Input allows the LFE Out/Sub-Out be used on your Preamp/Receiver for the subwoofer connection.
NOTE: The Low Pass Filter should be set to Bypass. LFE signals are controlled from your Preamp/Receiver.
9. AC Power Connection

WARNING! The power cord should not be installed, removed, or left detached from the subwoofer while the other end is connected to an AC power source.
The IEC power cord should be firmly inserted into the AC power receptacle on the rear panel of the subwoofer. Then to any convenient AC wall outlet.
NOTE: The sub also integrates a signal sensing power supply that automatically switches off after sensing no music signal for several minutes (this will occur when the power switch is set to 'Auto').
FINE TUNING: Defiance V10/V12
To fine tune your Paradigm Defiance V10 or V12 you will require the Paradigm Subwoofer App.
This can be downloaded from the Apple App Store or Google Play Store. All adjustments can then be made using the app.
TIP: The tuning steps below can be used as a guide when adjusting settings via the app. Reference the controls on the app with the description and function described instructions in “Setting Subwoofer Controls” (see pages 25 & 26).
FINE TUNING: Defiance V8
Once you have your speakers positioned in the room along with your speaker distances and speaker levels calibrated with your Preamp/Receiver, it's time for a little fine tuning.
When fine tuning your subwoofer to best integrate with the rest of your system, use music and video soundtracks that you know well. They should contain selections with extended bass that is continuous and repetitive.
Assess subwoofer bass output for best blend with your main speakers. It should not be overbearing or draw attention to itself, nor should it be thin and difficult to hear. It should add ‘weight’ and ‘punch’ to the overall sound and keep pace with your main speakers.
If you are using a Preamp/Receiver to set crossover points start with 80Hz & adjust the Low Pass Filter according to the Low Pass Filter instructions in "Setting Subwoofer Controls" (see pages 25 & 26).
If you are using a Preamp/Receiver with tone controls, set them to flat (i.e. '0') and switch loudness controls off.
Some subwoofer locations may result in bass frequency cancellations. If bass sounds dislocated or weak, adjust the Phase according to the Phase instructions in “Setting Subwoofer Controls” (see pages 25 & 26).
SETTING SUBWOOFER CONTROLS (Crossover Set By Preamp/Receiver)
- Turn the Level control completely counterclockwise to its minimum.
- Turn the Low Pass Filter control to its highest frequency (i.e. Bypass).
- Switch the Phase control to 0^ (if not already set to 0^ ).
- Listen to a bass music or video selection while seated in your primary listening area and have an assistant turn up the Level control until the subwoofer can be clearly heard.
- With the help of an assistant, switch the Phase to 180°. If bass response is now more pronounced, your subwoofer and front speakers are now in phase. Do not change phase alignment again unless you move the subwoofer or front speakers to a different location in your room, or move or remove any large items of furniture or room furnishings (i.e. carpet, draperies, etc.) TIP: Defiance V10/V12: Using the app, slowly rotate the Phase control until you hear the most bass.
- Turn the Level control completely counterclockwise to its minimum.
- Slowly rotate the Level control until you match the subwoofer's volume with the Volume of your front speakers. Bass should be clearly audible, but not intrusive.
NOTE: If you happen to have an SPL meter, set the meter to 80, SLOW and C weighted. Then enable the subwoofer test tones on your Preamp/Receiver. With this set repeat Step 7 until the meter reads 75dB.
SETTING SUBWOOFER CONTROLS
(Local Crossover Method)
- Turn the Level control completely counterclockwise to its minimum.
- Turn the Low Pass Filter control to its highest frequency (i.e. Bypass).
- Switch the Phase control to 0^ (if not already set to 0^ ).
- Listen to a bass music or video selection while seated in your primary listening area and have an assistant turn up the Level control until the subwoofer can be clearly heard.
- With the help of an assistant, switch the Phase to 180°. If bass response is now more pronounced, your subwoofer and front speakers are now in phase. Do not change phase alignment again unless you move the subwoofer or front speakers to a different location in your room, or move or remove any large items of furniture or room furnishings (i.e. carpet, draperies, etc.) TIP: Defiance V10/V12: Using the app, slowly rotate the Phase control until you hear the most bass.
- Turn the Level control completely counterclockwise to its minimum.
- Turn the Low Pass Filter control to its highest frequency (i.e. 35Hz).
- Slowly rotate the Level control until you match the subwoofer's volume with the Volume of your front speakers. Bass should be clearly audible, but not intrusive.
- Slowly rotate the Low Pass Filter control until you hear the best subwoofer/front speaker blend. If the sound is too thin you have not set the frequency high enough; if the sound becomes boomy you have set the frequency too high. Adjust until you find the most natural bass balance.
NOTE: If you happen to have an SPL meter, set the meter to 80, SLOW and C weighted. Then enable the subwoofer test tones on your Preamp/Receiver. With this set repeat Step 8 until the meter reads 75dB.
ARC® (ANTHEM ROOM CORRECTION) (Sold Separately): Defiance V10/V12 ONLY A True Scientific Solution to the Problems of the Room
Even when the finest speakers are perfectly positioned, the room itself still has a dramatic impact on any system's sound, an impact more profound than that of any individual component. Various solutions have fallen in and out of favor over the years, but none has solved the problem of "the room," until ARC (Anthem Room Correction) technology.
ARC technology is a proprietary digital signal processing system that allows you to quickly and accurately optimize the performance of your audio equipment to better suit the unique parameters of your room.
By listening to your room's acoustic signature, ARC can tune your equipment to correct for the performance-robbing effects (reflections, resonances, standing waves, etc.) of the various surfaces and other obstacles in your room.
ARC is easy to use, and just a few simple steps can optimize your subwoofer for your unique listening space. ARC is sophisticated, one of the most accurate and detailed digital room correction technologies available today. ARC will work tomorrow, too; with constant advances and updates available for download on the Anthem website.
Now there are THREE ways to calibrate your system using ARC or ARC Mobile — each takes only a few minutes to complete.

IMPORTANT! The listening space must be silent while performing ARC. A noisy computer fan, a dishwasher or microwave running, etc. can negatively affect ARC's measurements.
EASY
Requirements:
- iOS Device
- ARC Mobile App
Download Anthem's ARC Mobile app to your iOS device. This method uses your iOS device's built-in microphone for measurements.
This method walks you through step by step via the app.
INTERMEDIATE
Method for Apple iOS Device Users
Requirements:
- iOS Device
- ARC Mobile App
- ARC Universal Microphone (sold separately — see your Paradigm dealer for details)
Download Anthem's ARC Mobile app to an iOS device. Run the ARC app and select “ARC Universal Microphone,” connect the supplied 3.5 mm cord from your iOS device to the ARC Universal Microphone for measurements.
This method walks you through step by step via the app.
Method for Android Device Users
Requirements:
- Android Device
- ARC Mobile App
- ARC Universal Microphone (sold separately — see your Paradigm dealer for details)
- OTG USB Adapter (sold separately — see your Paradigm dealer for details)
Download Anthem's ARC Mobile app to an Android device. Run the ARC app and connect the USB OTG adapter from your Android device to the ARC Universal Microphone for measurements.
This method walks you through step by step via the app.
PROFESSIONAL
Requirements:
- Windows PC
- ARC PC Software
- ARC Universal Microphone (sold separately — see your Paradigm dealer for details)
Download and install Anthem's ARC PC software to your Windows PC. Connect either the calibrated ARC PC Microphone or ARC Universal Microphone to your Windows PC, and connect your ARC-capable speaker or electronics with either the second USB cord or through a network connection. After running your measurements, you can customize the results, set up multiple configurations, and print correction curve graphs.
LIMITED WARRANTY
PARADIGM® SUBWOOFERS: The Paradigm Subwoofers covered in this manual are warranted to be and remain free of manufacturing and/or material defects for a period of three (3) years from the date of the original retail purchase. Within the time period specified, repair, replacement or adjustment of parts for manufacturing and/or material defects will be free of charge to the original owner.
DEFIANCE WT WIRELESS SYSTEM (SOLD SEPARATELY): Details on the warranty for the Defiance WT Wireless System can be found in the Defiance WT Wireless System Owners Manual.
Thermal or mechanical abuse/misuse is not covered under warranty.
Limitations:
- Warranty begins on date of original retail purchase from an Authorized Paradigm® Dealer only. It is not transferable;
- Warranty applies to product in normal home use only. If the product is subjected to any of the conditions outlined in the next section, warranty is void;
- Warranty does not apply if the product is used in professional or commercial applications. Warranty is Void if:
- The product has been abused (intentionally or accidentally);
- The product has been used in conjunction with unsuitable or faulty equipment;
- The product has been subjected to damaging signals, derangement in transport, mechanical damage or any abnormal conditions;
- The product (including cabinet) has been tampered with or damaged by an unauthorized service facility;
- The serial number has been removed or defaced. Owner Responsibilities:
- Provide normal/reasonable operating care and maintenance;
- Provide or pay for transportation charges for product to service facility;
- Provide proof of purchase (your sales receipt given at time of purchase from your Authorized Paradigm® Dealer). Should servicing be required, contact your nearest Authorized Paradigm ® Dealer, Paradigm Electronics Inc., or Import Distributor (outside the U.S. and Canada) to arrange, bring in or ship prepaid any defective unit. Visit our website at www.paradigm.com for more information. Paradigm Electronics Inc. reserves the right to improve the design of any product without assuming any obligation to modify any product previously manufactured. This warranty is in lieu of all other warranties expressed or implied, of merchantability, fitness for any particular purpose and may not be extended or enlarged by anyone. In no event shall Paradigm Electronics Inc., their agents, or representatives be responsible for any incidental or consequential damages. Some jurisdictions do not allow limitation of incidental or consequential damages, so this exclusion may not apply to you. Retain this manual and your sales receipt for proof of warranty term and proof of purchase.

DEFIANCE SUBWOOFER
DEFIANCE V12

natural_image
Line drawing of a square speaker with a circular vent and mounting feet (no text or symbols)DEFIANCE V10
natural_image
Line drawing of a rectangular speaker with a circular vent and mounting base (no text or symbols)DEFIANCE V8

natural_image
Line drawing of a square speaker with a circular vent and mounting feet (no text or symbols)CONFORMITÉ D'INDUSTRIE CANADA (IC)
natural_image
Simple 3D diagram showing a cube placed on a plane with shaded circular regions (no text or symbols)natural_image
3D diagram of a checkered floor with a small cube on top (no text or symbols)natural_image
Isometric view of a room layout with a TV, wall-mounted monitor, and two small boxes on the floor (no text or symbols)natural_image
Technical diagram showing a mechanical assembly with a bracket and mounting holes (no text or symbols)ARC ^MD (ANTHEM ROOM CORRECTION)
ARC ^MD (ANTHEM ROOM CORRECTION)
Download Anthem's ARC Mobile app to an Android device. Run the ARC app and connect the USB OTG adapter from your Android device to the ARC Universal Microphone for measurements.


- DEFIANCE SUBWOOFER
- IMPORTANT SAFETY INSTRUCTIONS
- EU COMPLIANCE INFORMATION
- INDUSTRY CANADA (IC) COMPLIANCE NOTICE
- Radiation Exposure Statement:
- Thank you!
- TABLE OF CONTENTS
- SAFETY WARNINGS AND QUICK INSTALLATION
- Unpacking
- Placement
- Signal Connection
- Power Connection (AC) (see warning)
- SAFETY WARNINGS AND INSTALLATION IN BRIEF (cont'd)
- Setting the Controls (Using LFE Input): Defiance V10 and V12
- Setting the Controls (Using LFE Input): Defiance V8
- Setting the Controls (Using Left/Right Inputs): Defiance V10 and V12
- Setting the Controls (Using Left/Right Inputs): Defiance V8
- YOUR NEW SUBWOOFER
- Break In
- Cleaning
- Power Requirements
- Room Acoustics
- SUBWOOFER PLACEMENT
- THE ADVANTAGE OF USING TWO SUBWOOFERS
- THE ADVANTAGES OF USING TWO SUBWOOFERS IN YOUR LISTENING ROOM
- CONNECTING YOUR SUBWOOFER
- WIRED CONNECTION
- Line Level Input (LFE) — Recommended
- Line Level Inputs (Left/Right)
- Speaker Level Inputs (Left/Right)
- CONNECTING THE DEFIANCE WT WIRELESS TRANSMITTER (Sold Separately): Defiance V10/V12 ONLY
- CONNECTING THE DEFIANCE WT WIRELESS TRANSMITTER (Sold Separately): Defiance V10/V12 ONLY (cont'd)
- 'PAIRING' THE DEFIANCE WT WIRELESS SYSTEM (Sold Separately): Defiance V10/V12 ONLY
- 'PAIRING' THE DEFIANCE WT WIRELESS SYSTEM (Sold Separately): Defiance V10/V12 ONLY (cont'd)
- CONTROLS & CONNECTIONS: Defiance V10/V12
- Setting Control
- Level
- CONTROLS & CONNECTIONS: Defiance V10/V12 (cont'd)
- ARC Input
- Status Indicator
- Power Mode
- Speaker Level Inputs (Left/Right)
- Line Level Input (Left/Right)
- Line Level Input (LFE)
- Defiance WT Wireless Module Input (Sold Separately)
- AC Power Connection
- CONTROLS & CONNECTIONS: Defiance V8
- Level
- Low Pass Filter
- Phase (0 or 180°)
- CONTROLS & CONNECTIONS: Defiance V8 (cont'd)
- AC Power Connection
- FINE TUNING: Defiance V10/V12
- FINE TUNING: Defiance V8
- SETTING SUBWOOFER CONTROLS (Crossover Set By Preamp/Receiver)
- SETTING SUBWOOFER CONTROLS
- (Local Crossover Method)
- ARC® (ANTHEM ROOM CORRECTION) (Sold Separately): Defiance V10/V12 ONLY A True Scientific Solution to the Problems of the Room
- EASY
- Requirements:
- INTERMEDIATE
- Method for Apple iOS Device Users
- Method for Android Device Users
- PROFESSIONAL
- LIMITED WARRANTY
- Limitations:
- CONFORMITÉ D'INDUSTRIE CANADA (IC)
- ARC MD (ANTHEM ROOM CORRECTION)
Brand : Paradigm
Model : Defiance V8
Category : Subwoofer