
Antares 4 - Electric scooter Vermeiren - Free user manual and instructions
Find the device manual for free Antares 4 Vermeiren in PDF.
| Product type | Electric scooter |
| Brand | Vermeiren |
| Model | Antares 4 |
| Dimensions (L x W x H) | 970 x 480 x 980 mm |
| Total weight (with batteries) | 41 kg |
| Weight without batteries | 31 kg |
| Batteries | 2 x 12 V / 12 Ah (maintenance-free lead-acid) |
| Charger | 1.8 A (onboard or external charging) |
| Charging time | Approximately 6 hours (10 h recommended) |
| Maximum speed | 6 km/h |
| Range | 10 to 12 km (depending on conditions) |
| Maximum gradient | Greater than 8° |
| Maximum user weight | 115 kg (250 lbs) |
| Tire type | Solid tires (200 x 50 mm) |
| Braking system | Automatic electromagnetic brake |
| Steering system | Direct front wheels with differential |
| Control method | Speed control levers (thumb) |
| Freewheel mode | Yes (manual lever for manual movement) |
| Seat | Swivel (45° notches), height adjustable |
| Steering column | Adjustable (button release) |
| Battery indicator | 3 colors: green, yellow, red |
| Main circuit breaker | Yes (reset button) |
| Warranty | 24 months manufacturer (6 months batteries) |
| Maintenance and cleaning | Weekly cleaning with damp cloth; regular visual inspection |
| Spare parts and repairability | Available at authorized dealer; can be disassembled into 2 parts |
| Safety | Automatic brake upon release; user manual provided; automatic shutdown after 30 minutes of inactivity |
Frequently Asked Questions - Antares 4 Vermeiren
1. Onboard: set the switch to OFF, plug the charger into the mains and into the socket on the rear cover. The red and orange LEDs light up; the orange LED turns green when charging is complete. Unplug after full charge.
2. Off the scooter: remove the battery pack (open the compartment, lift by the handle), plug the charger directly into the battery. Always recharge in a ventilated area and do not smoke.
- Clean the scooter with a damp cloth once a week.
- Check tire wear (minimum tread depth 0.5 mm).
- Have the scooter checked by an authorized dealer every 6 months (first inspection after 1 month).
- Charge the batteries regularly even if the scooter is not in use.
1. Are the batteries properly connected?
2. Are the front and rear parts connected?
3. Has the main circuit breaker tripped? If so, press the reset button.
If the problem persists, contact your dealer.
User questions about Antares 4 Vermeiren
0 question about this device. Answer the ones you know or ask your own.
Ask a new question about this device
Download the instructions for your Electric scooter in PDF format for free! Find your manual Antares 4 - Vermeiren and take your electronic device back in hand. On this page are published all the documents necessary for the use of your device. Antares 4 by Vermeiren.
USER MANUAL Antares 4 Vermeiren
natural_image
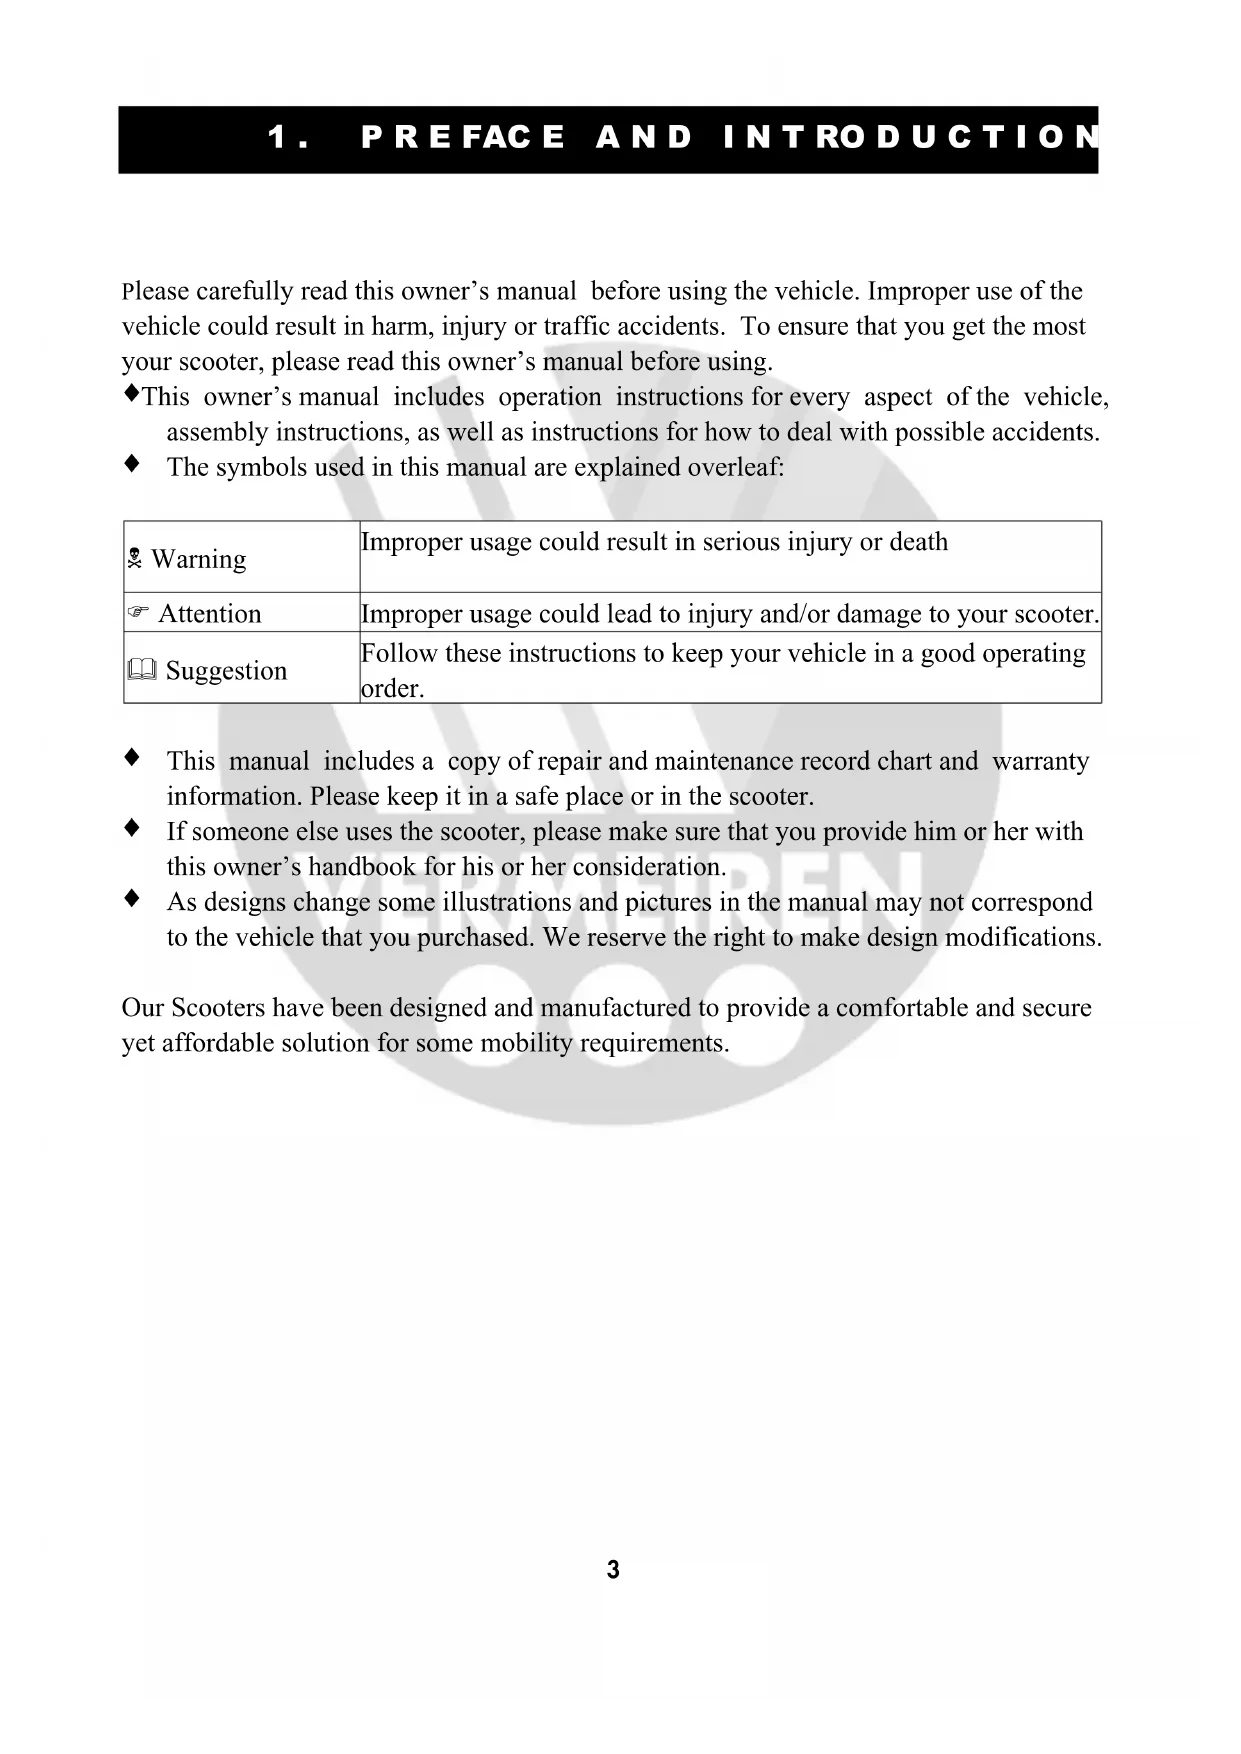
Blue electric scooter with black body, front basket, and side seat (no visible text or symbols)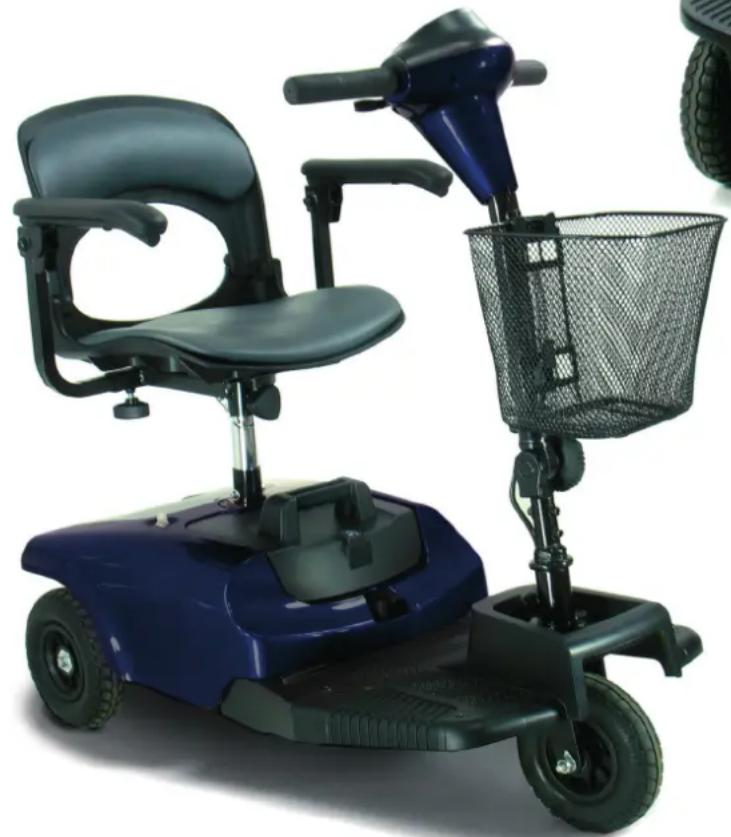
natural_image
Blue electric scooter with black seat and basket, no visible text or symbolsTABLE OF CONTENTS
- PREFACE AND INTRODUCTION ...... 3
- SAFETY NOTICE.... 4
2.1 Before driving
2.2 While driving
2.3 Labeling
2.4 EMI
- PARTS INTRODUCTION....8
- OPERATION....9
4.1 Control panel
4.2 How to operate your scooter
4.3 How to set to freewheel mode
- DRIVING ON THE ROAD....14
- BATTERY CHARGING AND CARE.... 15
6.1 Charging the battery
6.2 Battery
6.3 Replacing batteries
- INSPECTION AND MAINTENANCE....19
7.1 Inspection
7.2 Regular checking record
7.3 Battery and tire
7.4 Storage
7.5 Moving about
7.6 Disassembly
7.7 Assembly
- TROUBLESHOOTING 24
- SPECIFICATION 25
- WARRANTY....26
1. PREFACE AND INTRODUCTION
Please carefully read this owner's manual before using the vehicle. Improper use of the vehicle could result in harm, injury or traffic accidents. To ensure that you get the most your scooter, please read this owner's manual before using.
This owner's manual includes operation instructions for every aspect of the vehicle, assembly instructions, as well as instructions for how to deal with possible accidents.
◆ The symbols used in this manual are explained overleaf:
| Warning | Improper usage could result in serious injury or death |
| Attention | Improper usage could lead to injury and/or damage to your scooter. |
| Suggestion | Follow these instructions to keep your vehicle in a good operating order. |
This manual includes a copy of repair and maintenance record chart and warranty information. Please keep it in a safe place or in the scooter.
If someone else uses the scooter, please make sure that you provide him or her with this owner's handbook for his or her consideration.
As designs change some illustrations and pictures in the manual may not correspond to the vehicle that you purchased. We reserve the right to make design modifications.
Our Scooters have been designed and manufactured to provide a comfortable and secure yet affordable solution for some mobility requirements.
2. SAFETY NOTICE
2.1 BEFORE DRIVING
The user needs to be familiar with the usage and operation of this vehicle before driving. Therefore, please follow the commendations in this safety notice.
■ The same traffic rules apply to the use of this vehicle as apply to pedestrians
◆ For your safety, please follow and adhere to the same traffic laws as pedestrians.
◆ Please do not drive your scooter after consuming alcohol or when you are tired.
◆ Please be careful when driving your scooter in low light. It has not been designed for use at night.
◆ Be extremely cautions when driving you scooter in busy areas or in shopping malls.
◆ Ride on the pavement, single carriage roads, or pedestrian areas only. Never ride on motorways or dual carriageways.
♦ Be aware of traffic when crossing or using roads.
■ Practice operating your vehicle
Before using the scooter in busy or potentially dangerous areas, familiarize yourself with the operation of your scooter. Please practice in a wide and open area like a park. In order to avoid accidents with your scooter whilst driving, please bear in mind driving motions, such as accelerating, stopping, turning, reversing, up-and down ramps.
◆ Please turn the speed dial to minimum value for your initial practice.
- Be sure someone accompanies you for safety when driving on the roads for the first time.
Only use higher speed setting when you are confident that you can easily operate and control your scooter.
■ The Scooter is only to be used by one person at a time
Do not carry passengers on your scooter (including children)
■ Do not use this vehicle to carry or haul goods
◆ The maximum weight that can be carried is 115kg/250lbs (including occupant and any goods). Refer to “MAX LOAD WEIGHT” in “9. SPECIFICATION”
◆ Maximum loading weight for basket is 3kg (7 lb).
■ Please carry out daily inspections.
Refer to the section entitled "DAILY CHECKING"
2. SAFETY NOTICE
2.2 WHILE DRIVING
■ Do not use your vehicle under the circumstances below.
On surfaces that are muddy, gravelly, bumpy, narrow, snowed over, icy, or canal towpaths not guarded by any fence or hedge. Keep away from places where you might get the wheels stuck.
♦ Do not drive at night or when it is raining, snowing, misty, or windy.
- Do not drive your vehicle in an “S” pattern or make erratic turnings.
♦ Do not take the scooter onto escalators.
♦ UNDER NO CIRCUMSTANCES SHOULD THE SCOOTER BE USED AS A SEAT IN A MOTOR VEHICLE (E.G. CARS, BUSES, TRAINS, ETC).
■ About Mobile Phones and other electrical equipment
Do not use a mobile phone or other wireless communication devices while driving.
◆ Always switch off the scooter and remove the ignition key before using a mobile phone.
- Do not charge the mobile phone or any other electrical devices from your scooter's battery.
■ Automatic Power Shut Down
In order to avoid accidental battery run down, your scooter is equipped with an automatic power shut down facility. If the scooter is switched on, after remaining undisturbed for a period of thirty minutes it will automatically turn off. When this situation occurs, simply switch your scooter off and back on and it will be ready to use once again.
■ Ramps, inclines and drops
Do not drive onto steep ramps greater than the specified gradient. Refer to the section entitled “CLIMBING ANGLE” in “9. SPECIFICATION”
◆ Always use a low speed setting when ascending or descending a gradient.
Do not drive on roads with large drops or potholes. Refer to the section entitled “MAX. GROUND CLEARANCE” in “9. SPECIFICATION”.
◆ Please slow down when driving on roads with inclines.
♦ Do not make sudden turns when driving on gravel roads or ramps.
◆ Always lean forward when climbing a steep gradient.
♦ Do not travel on gradients exceeding those stated on the diagram overleaf.
2. SAFETY N OTICE
2.4 EMI
This portion of the content will provide the user with basic information that describes the problems with EMI, known sources of EMI, protective measures either to lessen the possibility or exposure or to minimize the degree of exposure, and suggested action should unexpected or erratic movement occur.
Caution: It is very important that you read this information regarding the possible effects of electromagnetic interference on your electric SCOOTER.
■ ELECTROMAGNETIC INTERFERENCE (EMI) FROM RADIO WAVE SOURCES
Powered vehicle may be susceptible to electromagnetic interference (EMI), which is interfering electromagnetic energy (EM) emitted from sources such as radio stations, TV stations, amateur radio (HAM) transmitters, two-way radios, and mobile phones. The interference (from radio wave sources) can cause the powered scooter to release its brakes, move by itself, or move in unintended directions. It can also permanently damage the powered scooter's control system. The intensity of the interfering EM energy can be measured in volts per meter (V/m). Each powered scooter can resist EMI up to a certain intensity. This is called its “immunity level”. The higher the immunity level, the greater the protection. At this time, current technology is capable of achieving at least a 20 V/m immunity level, which would provide useful protection from the more common sources of radiated EMI. This powered scooter model as shipped, with no further modification, has an immunity level of 20 V/m without any accessories.
There are a number of sources of relatively intense electromagnetic fields in the everyday environment. Some of these sources are obvious and easy to avoid. Others are not apparent and exposure is unavoidable. However, we believe that by following the warning listed below, your risk to EMI will be minimized.
The sources of radiated EMI can be broadly classified into three types:
- Hand-held portable transceivers (transmitter -receivers with the antenna mounted directly on the transmitting unit. Examples include: citizens band (CB) radios, “walkie talkie”, security, fire, and police transceivers, cellular telephones and other personal communication devices.
Note: Some mobile telephones and similar transmit signal while they are ON, even when not being used;
- Medium-range mobile transceivers, such as those used in police cars, fire trucks, ambulances and taxis. These usually have the antenna mounted on the outside of the scooter.
2. SAFETY N OTICE
- Long-range transmitters and transceivers, such as commercial broadcast transmitter (radio and TV broadcast antenna towers) and amateur (HAM) radios.
Note: Other types of hand-held devices, such as cordless phones, laptop computers, AM/FM radios, TV sets, CD player, and cassette players, and small appliances, such as electric shavers and hair dryers, so far as we know, are not likely to cause EMI problems to your powered scooter.
■ POWERED VEHICLE ELECTROMAGNETIC INTERFERENCE (EMI)
Because EM energy rapidly becomes more intense as one moves closer to the transmitting antenna (source), the EM fields from hand-held radio wave sources (transceivers) are of special concern. It is possible to unintentionally bring high levels of EM energy very close to the control system of power chair while using these devices. This can affect powered vehicle movement and braking. Therefore, the warnings listed below are recommended to prevent possible interference with the control system of the powered scooter.
WARNINGS
Electromagnetic interference (EMI) from sources such as radio and TV stations, amateur radio (HAM) transmitters, two-way radios, and mobile phones can affect powered scooter and motorized scooter. Following the warnings listed below should reduce the chance of unintended brake release or powered scooter movement which could result in serious injury.
- Do not operate hand-held transceivers-receivers), such as citizens band (CB) radios, or turn ON personal communication devices, such as cellular phones, while the powered vehicle is turned ON;
- Be aware of nearby transmitters, such as radio or TV stations, and try to avoid coming close to them;
- If unintended movement or brake release occurs, turn the powered vehicle OFF as soon as it is safe;
- Be aware that adding accessories or components, or modifying the powered vehicle, may make it more susceptible to EMI (Note: There is no easy way to evaluate their effect on the overall immunity of the powered scooter).
- Report all incidents of unintended movement or brake release to the powered scooter manufacturer, and note whether there is a source of EMI nearby,
■ IMPORTANT INFORMATION
• 20 Volts per meter (V/m) is a generally achievable and useful immunity level against EMI (the higher the level, the greater the protection);
- This product has an immunity level of 20 V/m without any accessories and connected to it.
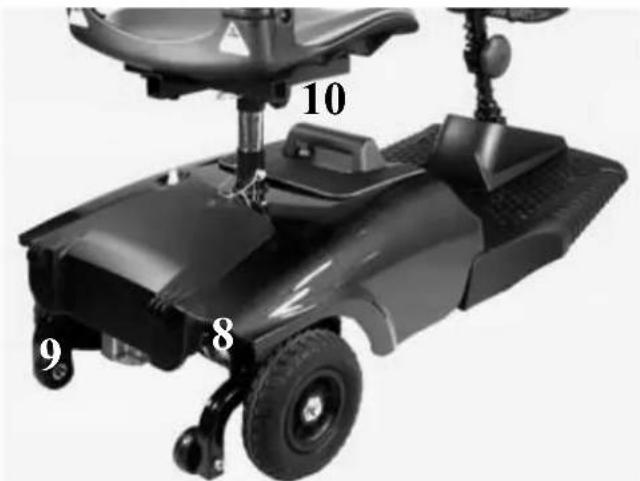
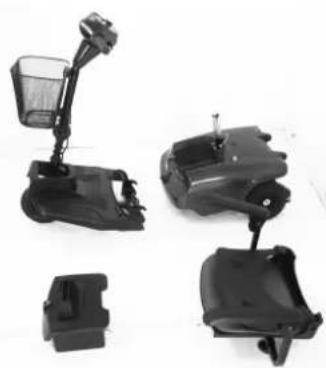
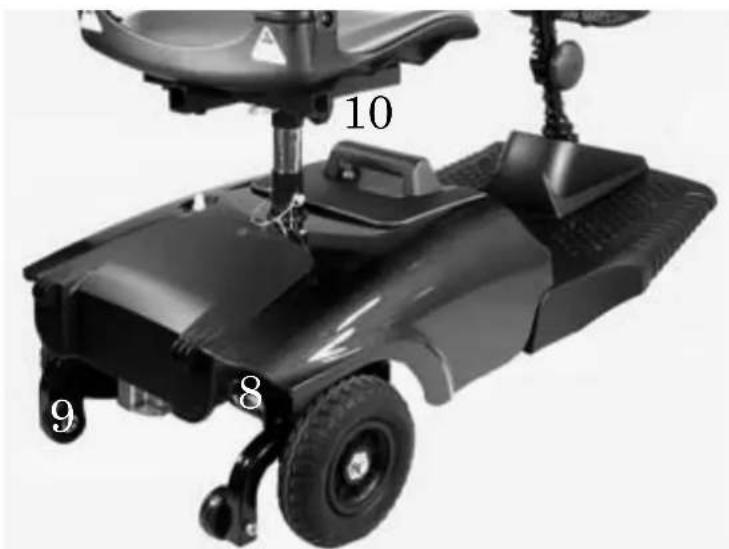
3. PARTS INTRODUCTION
PARTS DESCRIPTION
- Control panel 2. Basket
- Charger Socket 4. Tiller Adjustment Knob 5. Seat
- Seat Rotation Lever 7. Battery Pack 8. Freewheel Lever
- Anti-tip wheels 10. Seat Height Adjustment Pin

natural_image
Black electric scooter with labeled parts (8, 9, 10) and a seatbelt, no visible text or symbols beyond labels4. OPERATION
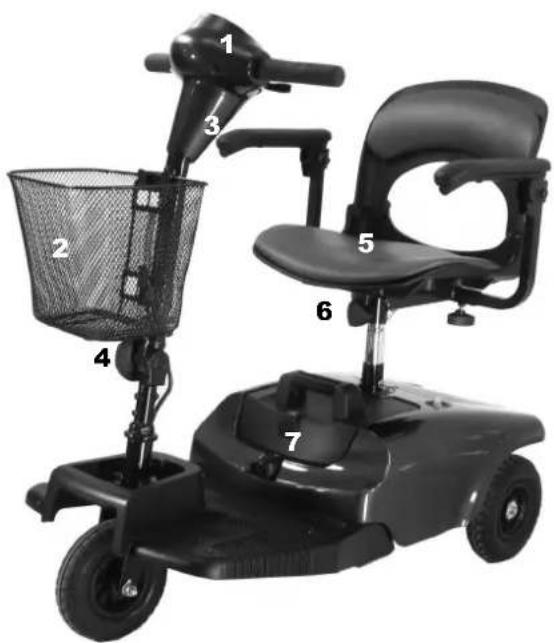
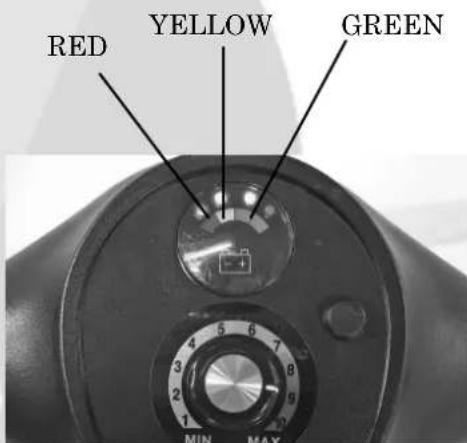
4.1 CONTROL PANEL
- Speed Dial
- Battery Indicator 4. Power Switch
4.2 HOW TO OPERATE YOUR SCOOTER
■ Power switch
◆ To switch the power on, turn the key clockwise in the ignition. The power eye should illuminate.
◆ To switch the power off, turn the key anticlockwise. The power eye should switch off and the key can be removed if required.
natural_image
Close-up of a black industrial pressure meter dial with rotary knob (no visible text or symbols)■ Moving and Braking
◆ Push the right-hand side speed control lever forwards with your right thumb and the scooter will move forward.
◆ Push the left-hand side speed control lever forwards with your left thumb and the scooter will move backward.
- To brake, release the speed control lever which will return to neutral and activate the electromagnetic brake automatically. This will bring the scooter to a prompt stop.
The speed control lever allows you to control the speed of the scooter up to a maximum speed determined by the Speed Dial. The further the speed control lever is deflected, the faster the scooter will go.
■ Braking
Electro-magnetic brake: Release the speed control lever completely, and the electromagnetic brake will be activated automatically, and the scooter will stop.
4. OPERATION
Warning
When on a gradient NEVER set the vehicle to the freewheel mode. The electromagnetic brakes will not be applied. This may result in injury or damage.
Seat
◆ The seat can be rotated and locked in position at 45 degrees intervals.
◆ Push the seat adjustment lever forward and swivel the seat.
◆ Release the lever, and then continue swiveling the seat until it locks in position.
Attention
Return the seat to the forward position before driving.
■ Battery indicator
The battery indicator on the tiller console uses a color code to indicate the approximate power remaining in your batteries. Green indicates (40\~100%) capacity, yellow a draining charge(10 \~30%), and red indicates that an immediate recharge is necessary.
The remaining power suggested by the battery indicator will vary by the actual driving time incurred and how you drive. Repeated starting, stopping, climbing will consume the power more quickly.
■ Main Circuit Breaker (Reset Button)
When the voltage in your scooter's batteries becomes low or the scooter is heavily strained because of excessive loads or steep inclines, the main circuit breaker may tip to protect the motor and electronics from damage.
- The main circuit breaker rest button pops out when the breaker trips.
When the breaker trips, the entire electrical system of your scooter shuts down.
♦ Allow a minute or two for your scooter’s electronics to “rest”.
♦ Push in the reset button to reset the main circuit breaker.

natural_image
Close-up of a black robotic device with a circular component and mechanical components (no visible text or symbols)4. OPERATION
Suggestion
- You should recharge the batteries after each time the vehicle is used to ensure maximum range. The batteries should be charged up at least once a week even if the scooter is not used.
- After charging or replacing a new battery, drive the vehicle for 2-3 minutes to make sure the battery capacity is sufficient.
- In wintertime, the battery may respond more slowly and the battery range may be reduced.
- When driving on a gradient, the battery indicator light might move up and down. This is a normal phenomenon so please do not worry.
- Even if the battery is used properly, it is natural for the battery's capacity to reduce with time, which results in reduced battery range compared to a brand new battery. Therefore, when you find the battery's range is about only 50% of the range when the batteries were new, it is time to replace the batteries. Please see your dealer about replacement batteries. If you continue to use the old battery when it should be replaced, it could lead to a rapid decline in performance.
- The battery range will be reduced when driving frequently on a slope or rough terrain, as this leads to greater consumption of power.
- The batteries have a six-month warranty covering manufacturing defects. This warranty does not cover faults due to incorrect battery recharging.
■ How to adjust the seat height
- Remove the seat from your scooter.
- Remove the pin lock from the lower seat post.
- Adjust the upper seat post to the desired seat height.
- Move the upper seat post so that there is a hole to insert the locking pin.
- Insert the pin lock and replace seat replace seat.

4. OPERATION
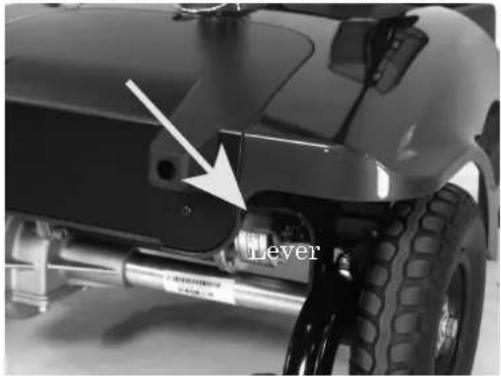
.3 How to set to freewheel mode
natural_image
Close-up of a vehicle's lower body and suspension components, showing a lever mechanism with a white arrow pointing to the lever (no text or symbols on the main subject)Fig 4.1
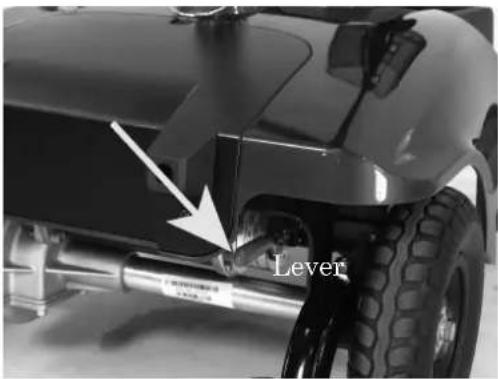
Fig 4.2
◆ Engaged mode (Fig. 4.1): Push the lever completely and the scooter can be driven by motor power.
◆Freewheel Mode (Fig 4.2) : Pull the lever up and the scooter can be moved manually.
Warning
Never operate the freewheel lever while seated on the scooter or on an incline!
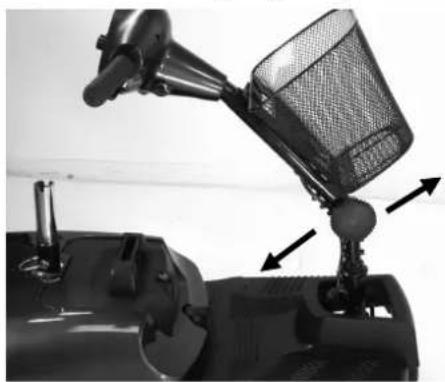
The tiller can be adjusted in to many different positions to suit each driver.
- Loosen the knob to adjust the tiller to positions you want. (Fig. 4.3)
- Once decide the position, tighten the knob to secure the tiller.(Fig.4.4)
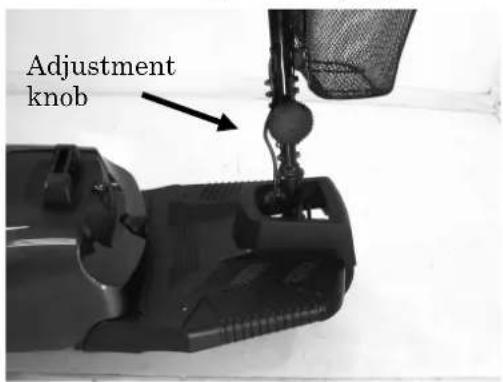
Fig. 4.3
natural_image
Close-up of a motorcycle's front-mounted steering wheel and bucket, showing mechanical components and motion arrows (no text or symbols)Fig. 4.4
4. OPERATION
Warning
◆ Please hold the tiller before loosening the tiller adjustment knob.
Before lifting or driving the scooter make certain the tiller adjustment knob is fully tightened.
♦ Never attempt to adjust the tiller while the scooter is motion.
5. DRIVING ON THE ROAD
■ Starting and Driving
• Make sure the seat is installed properly.
• Make sure the tiller has been secured properly.
- Fold down the armrests so you can rest your arms on them.
- Turn the power switch to "ON".
- Check battery indicator to see whether there is enough power for your journey. If you have any doubt about the remaining power, please recharge the batteries before departure.
- Set the speed dial to a position you feel safe and comfortable with.
- Check the forward/reverse speed lever works correctly.
• Make sure the electromagnetic brake works correctly.
• Before driving, ensure it is safe to do in the environment around you.
Attention
- Do not push both RH & LH sides of the speed control lever simultaneously. This might leave you unable to control your scooter.
- Do not turn the power switch to OFF while driving as this will lead to an emergency stop and possible risk of accident and injury.
- Do not set to the highest speeds whilst driving indoors.
- Do not adjust the speed dial whilst driving, a sudden change in speed may cause danger to you and others, and may cause damage to your scooter.
- Do not place magnetic devices near the area of the operation handle as this could affect the safe operation of your scooter. The scooter controller is located under the foot way.
- Do be careful whilst driving in heavy traffic or crowded areas.
- Whilst reversing the vehicle, beware of people or objects behind you.
♦ Stopping
- Release the speed control lever completely. The vehicle will naturally brake and stop.
- Turn the power off. Then pull out the key.
Attention
- The stopping distance will vary with your forward / reverse speed. Therefore please begin braking as early as you can.
- When parking your scooter, be sure to park on flat ground and then turn the power to "OFF" before you dismount.
6. BATTERY CHARGING AND CARE
• CHARGING THE BATTERY
■ Method 1: On board Charging (see photograph overleaf)
Follow the procedure below step by step:
- Turn the power switch to (OFF)
- Plug the charger's power cord into the mains.
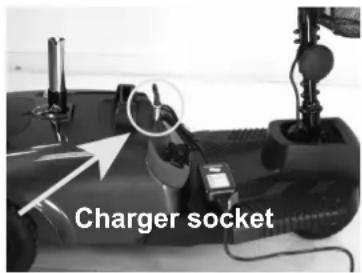
- Open the charging socket cap on the rear shroud. Then connect the charger's round plug to the charging socket.
- Switch on the charger.
- Both the charger's red and orange LED will be lit when beginning charging. The charging duration is about 6 hours. To ensure optimum performance a 10-hour charge is recommended.
- Both the charger's LED will be lit during the charging process. The orange LED will turn green when charging is complete.
- Turn off the charger, disconnect the power cord and the round plug from charger socket on the scooter.
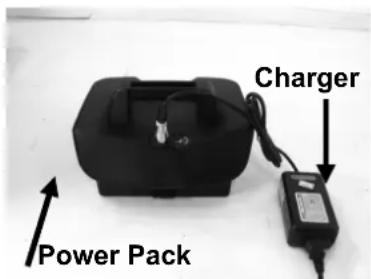
■ Method 2 Off-board Charging (see photograph overleaf)
- Turn the power switch to (OFF)
- Remove the battery pack by opening the battery compartment and lifting out the battery pack by the handle.
- Plug the charger's power cord into the mains.
-
Plug the charger's round plug into the charging socket of the battery pack.
-
Switch on the charger.
-
Both the charger's red and orange LED will be lit when beginning charging. The charging duration is about 6 hours. To ensure optimum performance a 10-hour charge is recommended.
-
Both the charger's LED will be lit during the charging process. The orange LED will turn green when charging is complete.
-
Turn off the charger, disconnect the power cord and the round plug from charger socket on the battery pack.
Attention
While returning the battery pack to the battery pack cavity of shroud, beware of finger or hands.
6. BATTERY CHARGING AND CARE
■ Charging Hours
The charging duration is about 6 hours. To ensure optimum performance a 10-hour charge is recommended. But we do not recommend a charging more than 24 consecutive hours.
■ Batteries (Inside the Pack)
- The Antares is powered by two sealed lead-acid deep-cycle batteries.
- The batteries supplied with the scooter are 12 V 12Ah batteries.
- Size : 5.94 “× 3.89 “ x 3.74 “ (Width x Height x Thickness) (151mm×99mm×95mm)
Warning
- Keep away from flammable objects while charging as it may lead to fire or explosion of battery.
- Do not smoke while charging as the battery may release hydrogen gas. Always charge your battery in a well-ventilated space.
- Never connect or disconnect the plug or cord with wet hands while charging. Do not connect or disconnect the plug or cord when they are wet, it may lead to electric shock.
Attention - Please follow the rules below to avoid accidents while charging.
- Please use the supplied charger only, and recharge the battery to its full capacity every time. You may damage the battery and scooter if you use a charger, which is not to the correct specification.
- Please charge in a well-ventilated space where it is not directly exposed to the sunlight. Do not charge in surroundings where it is humid or under rainfall and morning dews.
- Do not charge in temperatures less than -10^ C or higher than +50^ C as the charger may not work well and the batteries may become damaged.
- BATTERY
Do not expose the battery to temperatures below 10^ C or above 50^ C when charging or storing the vehicle. Under the above temperature range can cause the battery either to freeze or over heat. This will damage the batteries and shorten their life.
◆ These batteries are maintenance free and there is no need to refill with water. You are required to recharge the batteries on a regular basis. Even if the scooter is stood idle, you should charge the batteries at least once a week.
6. BATTERY CHARGING AND CARE
The batteries carry a six-month manufacturer's warranty. This warranty only covers issues relating to manufacturing faults, and not faults relating to failure to recharge the batteries as instructed above.
Suggestion – How to maximize your batteries efficiency and service life
• Fully recharge your new battery before its first time use.
- Be sure to charge the battery fully every time. The battery life will be seriously shortened or decayed if the battery is repeatedly used without being fully charged.
- Always complete the charging until the orange LED light turns green. NEVER stop charging before it is complete.
- Keep your batteries fully charged whenever possible.
- If you do not use your scooter for a long time, it should be charged at least every week to keep the battery in a fully usable condition.
- The ambient temperature will affect charging time. Charging time will be longer in the winter.
- After charging, do not leave the charger socket plugged in to the scooter, as this will cause a power drain on the scooter and temporarily reduce its range.
■ Cleaning the battery
If the batteries are contaminated by water, battery acid, dust or other substances, they will discharge quickly. The batteries supplied with the scooter are sealed and as such are maintenance free with no risk of battery leakage. Please follow the steps below to clean the battery.
- Turn the scooter power switch to OFF.
- Follow the procedure in the next section “Replacing the Batteries”.
• Use a clean cloth to wipe off the soiled area.
• Take out the battery. - Clean the battery with a clean cloth. If the terminal is covered by white powder, please wipe it clean using warm water.
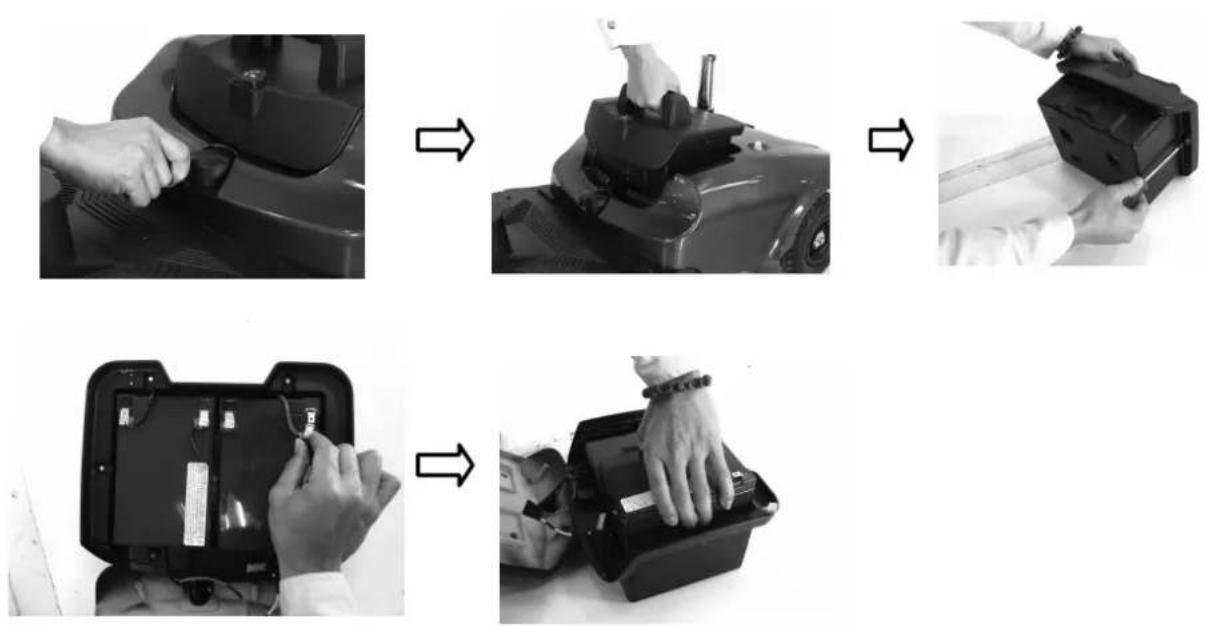
• REPLACING BATTERIES
■ Batteries replacement
Follow the procedure below step by step to replace the batteries:
- Remove the battery pack from the scooter.
- Open the battery pack then disconnect the cables from the four battery terminals.
- Remove the batteries from the battery pack.
- Place new batteries inside the pack.
- Connect the red cable to the positive(+) battery terminal and black cable to the negative(-) on the other battery.
- Connect up the fused cable between the two batteries and close the battery pack.
6. BATTERY CHARGING AND CARE
Warning
- The wiring system and charger are well situated in the battery pack while being assembled in plant. Do not attempt to re-locate the wiring system by yourself. The improper layout of wiring system may result in the wires pinched by battery box, which might result in the electronic system failure.
- Be sure the battery wires are connected to their right battery terminal.
Suggestions
If necessary, ask for help from your dealer for advice about maintaining and replacing the battery.
Suggestions
• Make sure the terminals are installed properly and put the cover back on.
- Do not use the battery to charge telecom equipment or other items.
- Battery efficiency will vary with outside conditions; the driving distances will be shorter in the winter. If the vehicle is not used for a long time, please charge the battery at least every week.
- Replace both batteries together.
7. INSPECTION AND MAINTENAN
7.1 INSPECTION
- Clean the scooter with a damp cloth and dust down approximately once a week to preserve the appearance of the scooter.
- Adjust the tiller height and return to the original position and swivel the seat once a week to ensure the parts adjust and remove smoothly and easily when required.
- Check for signs of wear and tear on the tires and the upholstery on a regular basis.
- For optimum performance and to increase the lifespan of your scooter, it is recommended that you have your scooter serviced once a year.
7.2 REGULAR CHECKING RECORD
To make sure your scooter is correctly serviced, take it to your dealer for regular maintenance checks. This should be at six months intervals after an initial inspection after one month. Your dealer may charge a fee for this. The checking record is shown overleaf.
| YEAR | 1 | 2 | 3 | 4 | YEAR | 1 | 2 | 3 | 4 |
| Service Dates | Service Dates | ||||||||
| Controller | Upholstery | ||||||||
| On/off switch | Seat | ||||||||
| Control Lever | Back | ||||||||
| Braking | Armrests | ||||||||
| Recharge point | Electrics | ||||||||
| Batteries | Connections condition | ||||||||
| Levels | Harness | ||||||||
| Connections | Test run | ||||||||
| Discharge test | Forwards | ||||||||
| Wheels and Tires | Reverse | ||||||||
| Wear | Emergency stop | ||||||||
| Pressure | Left turn | ||||||||
| Bearings | Right turn | ||||||||
| Wheel nuts | Slope test | ||||||||
| Motors | Over obstacles | ||||||||
| Wiring | List Items repaired | ||||||||
| Noise | |||||||||
| Connections | |||||||||
| Brake | |||||||||
| Brushes | |||||||||
| Chassis | |||||||||
| Condition | |||||||||
| Steering | |||||||||
7.3 BATTERY, FUSE AND TIRE
Battery
Refer to the section entitled "6. BATTERY CHARGING AND CARE".
Fuse
If the battery charger is turned on and no LED are lit, check the fuse.

Suggestion
Ask for help from your dealer to inspect or replace the fuse, since the tiller shroud has to be removed first before you can replace the fuse.
Tires
The condition of the tires depends on how you drive and use your scooter.
◆ Please check the tread depth regular.
◆ Replace the tires when the tread depth is less than 0.5 mm.

Attention
- When tread depth is below 0.5mm it can easily lead to vehicle slippage, making braking distances longer. Therefore replace the tyres as early as possible when they are found to have insufficient tread depth.
- The Antares scooter comes with solid tyres so there is no need to check tyre pressure.
7.4 STORAGE
Make sure the scooter is stored under the following circumstances:
- Ensure the seat is set in the “Forward” position
- Ensure the scooter is switched off
- Ensure the charger is disconnected when not in use

Suggestion
Please store the scooter in a location where it is out of direct sunlight, rain, or dew. When storing for a long time, please charge the battery to full power and then disconnect the battery terminal. For details inquire to your dealer.
7. INSPECTION AND MAINTENAN
7.5 MOVING ABOUT
Switch off the power with power key before moving. Always dismount from the scooter before moving.
♦ Lift the scooter by the chassis, and not by the shroud. Lifting the scooter by the bumper could cause damage or injury.
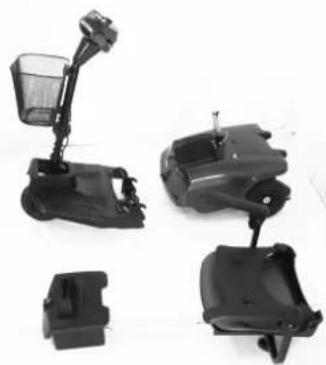
For your safety, always ask for help if required. You will need two people when moving or lifting the scooter whole. If you are on your own, please disassembly the scooter before lifting. Refer to the section below.
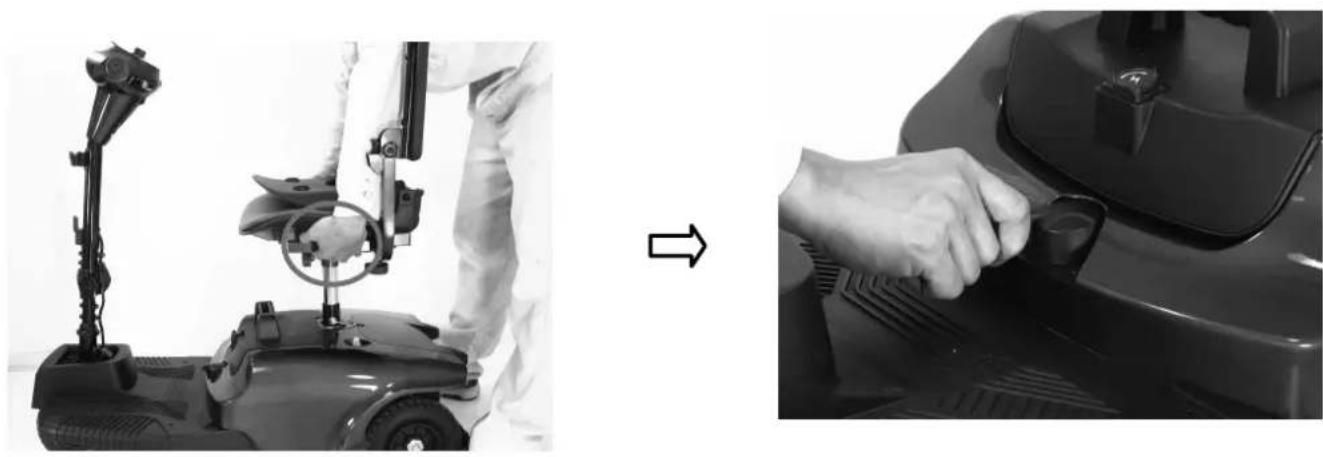
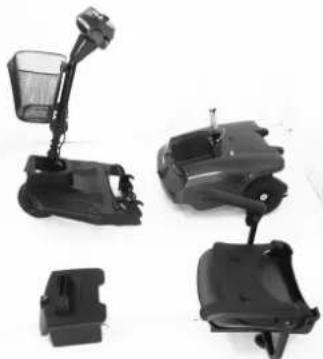
7.6 DISASSEMBLING THE SCOOTER
Please follow the steps.
- Push the Seat Rotate Lever whilst pulling up on the seat to remove.
- Loosen the seat post knob and remove the locking pin. Then remove the upper seat post
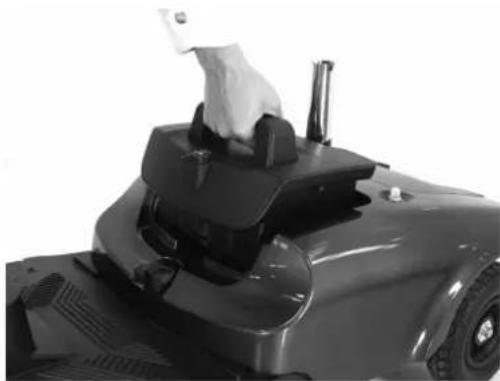
- Open the battery compartment lid and lift out the battery pack.
- Loosen the tiller adjustment knob and fold down the tiller and retighten knob.
- Lock the front wheel and tiller by pulling the wheel lock catch down.
- Push back on the seat post to pivot the scooter's rear section rearward until the rear section is standing vertically on the rear bumper.
• Unplug the electrical connector linking the front and rear sections. - Lift the front section up until the lower pegs are longer in contact with the curved locking brackets on the rear section.
Antares
natural_image
Two black-and-white photos showing a person adjusting a mobility scooter device, with no visible text or symbols.7. INSPECTION AND MAINTENAN

natural_image
Close-up of a hand operating a robotic lawn mower (no visible text or symbols)
natural_image
Comparison of four types of electric mobility scooters shown from front and side views, no text or labels present.Warning
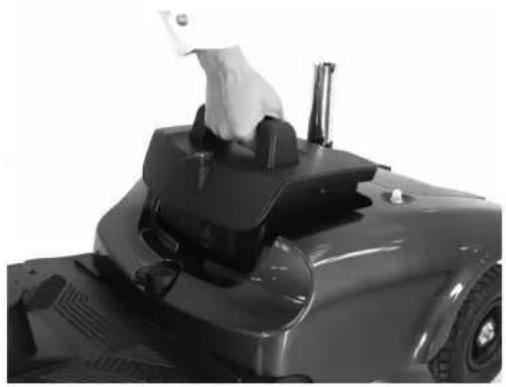
Always unplug the rear section electrical connector before separating the two sections.
7.7 ASSEMBLING THE SCOOTER

Suggestion
The assembly process is essentially the disassembly process in reverse. First study the text and photographs in the disassembly procedure before re-assembling the scooter.
7. INSPECTION AND MAINTENAN
- Position the front and rear sections of Antares
- Align the lower curved locking brackets of the front section with the corresponding pegs on the front of the rear section.
- Plug in electrical connector to connect the front and rear sections.
- Holding the lower seat post, slowly pivot the rear section forward until the curved locking brackets are fully connected on to the top rear pegs.
- Loosen tiller adjustment knob, raise the tiller to the desired position, and then tighten the tiller adjustment knob.
- Reinstall the upper seat post at the desired height. Secure with the locking pin and tighten the seat post knob.
- Reinstall the batteries by lowering it in to place.
- Replace the seat and rotate it until it locks into its correct position.

Warning
After assembling the Antares, make absolutely certain the tiller adjustment knob is fully tightened.
8. TROUBLESHOOTING
■ TROUBLE SHOOTING
If you have trouble with your scooter, you can inspect the following before taking you scooter to the dealer.
If you cannot solve the problem, contact your dealer for assistance.
| Problem | Symptom | Remedy |
| The scooter will not switch on | Batteries not connectedRear and frond sections not connectedCircuit breaker has tripped | Check batteries are connectedCheck connection on front-to-rear loomPush circuit breaker button to rest |
| The scooter switch on but will not run | Flat batteriesCharger plugged inMotor in freewheel mode | Check battery powerUnplug chargerRe-engage the freewheel lever |
| Scooter appears slow | Flat batteriesSpeed setting slow | Check battery power and/or rechargeCheck the speed dial is not set at low |
| The seat moves whilst in use | Seat note locked in position | Slowly rotate the seat until it drops in to place and is secure |
| The tiller appears loose | Tiller adjustment knob loose | Tighten the tiller adjustment knob |
| Involuntary horn sounds | There is fault on the scooter | Ensure the control lever is released and switch the scooter on and off recharge batteries |
9. SPECIFICATION
SPECIFICATIONS
| Model | Antares 3 - Antares 4 |
| Dimension (L x W x H mm)(L x W x H inch) | 965 x 480 x 980mm - 970 x 480 x 980mm38”x19”x38.5” |
| Weight(Kg),W/I batteryW/O battery | 40 kg/88 lbs - 41 kg/90 lbs |
| 30 kg/66 lbs - 31 kg/68 lbs | |
| Battery | 12V 12 Ah x 2 |
| Charger | 1.8A off board |
| Front Tire | 8”x2”/200x50mm |
| Rear Tire | 8”x2”/200x50mm |
| Driving System | Direct rear wheels (with differential gear) |
| Brake System | Electromagnetic brake |
| Control Method | By speed control lever |
| Top Speed | 6 km/hr / 4 mph |
| Climbing angle | >8° |
| Cruising range (see note) | 10~12 km / 6~7.5 miles |
| Max. User weight | 115 kg / 250 lbs |
Remark: The manufacturer reserves the right to modify the specification if necessary. The final specification is subject to the individual scooter you purchase from your dealer.
Note:
Maximum driving distance is based on an ambient temperature of 20^ C, a 75kg driver and a brand new fully charged battery by a constant driving speed at 6 km/h with 70% battery power discharged.
10. WARRANTY
Warranty Conditions:
• Any work or replacement part installation must be carried out by an authorized dealer / service agent.
• To apply the warranty should your scooter require attention please contact the designated service agent listed below.
- Warranty: 24 months of construction errors and components not subject to wear, excluding batteries (6 months). Any repaired or replaced parts will be covered by this warranty for the balance of the warranty period on the scooter.
- Consumable items supplied will not generally be covered during the normal warranty period unless such items require repair or replacement clearly as a direct result of a manufacturing or material defect.
Such items include (among others): upholstery, tires and batteries.
- The above warranty conditions apply to brand new scooters purchased at the full retail price. If you are unsure whether your scooter is covered, check with the service agent.
• Under normal circumstances, no responsibility will be accepted where the scooter has failed as a direct result of:
- The scooter part not having been maintained in accordance with the manufacturer's recommendations.
- Failure to use the manufacturer's specified parts
• The scooter or part having been damaged due to neglect, accident or improper use
- The scooter or part having been altered from the manufacturer's specifications or repairs having been attempted before the service agent is notified
Please note your local service agent's contact details in the box below. In the event of your scooter requiring attention, contact them and give all relevant details so they can act quickly.
The manufacturer reserves the right to alter without notices any weights, measurements or other technical data shown in this manual. All figures, measurements and capacities shown in this manual are approximate and do not constitute specifications.
| Name |
| Address |
| Tel |
| Postcode |
10. WARRANTY
10.1 VIN (VEHICLE INDIFICATION NUMBER)
To ensure the correct after sales service and warranty service support, please write down the vehicle identification number that is stuck on the back right-hand side of the frame.

| Model | Antares | ||
| VIN | |||
| Motor serial # | Key # | ||
Warranty Application Form
| Name | ||||
| Sex | □Male □Female | |||
| Date of Birth | Year Month Day | |||
| Address | ||||
| Model | Antares | |||
| VIN | Scooter VIN: | |||
| Motor Serial No: | Key # | |||
| Date of Purchase | Year Month Day | |||
| Purchaser Signature | ||||
TABLE DE MATIÈRES
- PRÉFACE ET INTRODUCTION.... 29
- NOTICE DE SÉCURITÉ ...... 30
natural_image
Black electric scooter with basket and seat, no visible text or symbols on the device itselfAVERTISSEMENT
4. FONCTIONNEMENT
3
4.1 TABLEAU DE BORD
natural_image
Close-up of a black industrial pressure meter dial with control knob and rotary knob (no visible text or symbols)■ Contacteur
natural_image
Close-up of a black electric scooter with a mounted sensor and a circular component, no visible text or symbols4. FONCTIONNEMENT
Suggestion
natural_image
Close-up of a car's lower body and side panel showing mechanical components and a white arrow pointing to a component (no visible text or symbols)Fig. 4.2
natural_image
Mechanical robotic arm with mesh mesh and directional arrows indicating movement or force (no text or symbols)39
Fig. 4.4
4. FONCTIONNEMENT
Avertissement
natural_image
Person in white protective suit operating a mobility scooter with hand and seat (no visible text or symbols)

natural_image
Close-up of a hand pressing down on a black vehicle hood (no visible text or symbols)7. INSPECTION ET MAINTENANC
natural_image
Close-up of a hand operating a robotic lawn device (no visible text or symbols)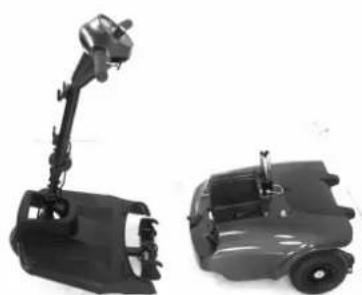
natural_image
Two black industrial robotic vehicles with articulated arms, one larger and one smaller, shown against a white background (no text or symbols visible)
natural_image
Four black automotive seatbelt components with different mounting brackets and accessories (no visible text or symbols)Avertissement
natural_image
Black electric scooter with basket and seat, shown from front and side views (no text or symbols visible)WAARSCHUWING

4. BEDIENING
4.1 BESTURINGSPANEEEL
natural_image
Close-up of a black industrial rotary dial with dual switches and a numeric display (no readable text or symbols beyond numbers)■ Snelheidsknop
natural_image
Close-up of a mechanical device with a mounted component and a circular detail, no visible text or symbols4. BEDIENING
Suggestie
natural_image
Close-up of a robotic arm with mesh mesh and directional arrows indicating movement or force (no text or symbols visible)Afbeelding 4.
4. BEDIENING
Waarschuwing
7.5 DE SCOOTER VERPLAATSEN
natural_image
Person in protective suit operating a mobility scooter with hand and wheel (no visible text or symbols)

natural_image
Close-up of a hand adjusting a black car door handle (no visible text or symbols)7. INSPECTIE EN ONDERHOUD
natural_image
Close-up of a robotic car with a hand operating the top control panel (no visible text or symbols)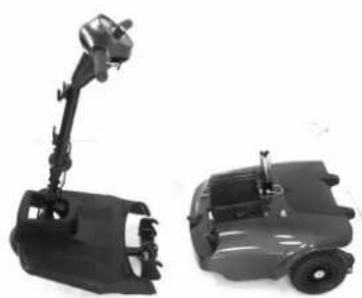
natural_image
Two black industrial robotic devices, one with a articulated arm and the other a wheeled vehicle (no visible text or symbols)
natural_image
Four black plastic car seat components with different mounting brackets, shown against a white background (no text or symbols visible)Waarschuwing

natural_image
Black electric scooter with labeled parts (8, 9, 10) and a handle, no visible text or symbols beyond labels4. BETRIEB
4.1 BEDIENFELD
natural_image
Close-up of a black industrial rotary dial with numeric labels (1, 4) and control buttons, no readable text or symbols beyond labels.4. BETRIEB
Warnung
natural_image
Close-up of a mechanical device with a mounted tool and a circular component, no visible text or symbolsnatural_image
Close-up of a black electric scooter with visible wheels and a mechanical component inserted (no text or symbols)4. BETRIEB
natural_image
Mechanical device with mounted components and directional arrows indicating motion (no visible text or symbols)Abb. 4.4
4. BETRIEB
Warnung
natural_image
Close-up of a robotic car with a hand operating the top component (no visible text or symbols)
natural_image
Two black automotive chassis components, one articulated with a boom and the other flat (no text or symbols visible)
natural_image
Four black automotive clutch assemblies with different internal components, shown from different angles (no text or symbols visible)Warnung
4. FUNZIONAMENTO
4.1 PANNELLO DI CONTROLLO
natural_image
Close-up of a black industrial device's top control panel with rotary dial and labeled buttons (no readable text beyond labels)natural_image
Close-up of a mechanical device with a circular component and an arrow pointing to it (no visible text or symbols)natural_image
Close-up of a black electric scooter with visible wheels and a mechanical component inserted (no text or symbols)4. FUNZIONAMENTO
natural_image
Mechanical device with lever and mesh structure, no visible text or symbolsFig. 4.4
4. FUNZIONAMENTO
Avvertenza
| YEAR | 1 | 2 | 3 | 4 | YEAR | 1 | 2 | 3 | 4 |
| Service Dates | Service Dates | ||||||||
| Controller | Upholstery | ||||||||
| On/off switch | Seat | ||||||||
| Control Lever | Back | ||||||||
| Braking | Armrests | ||||||||
| Recharge point | Electrics | ||||||||
| Batteries | Connections condition | ||||||||
| Levels | Harness | ||||||||
| Connections | Test run | ||||||||
| Discharge test | Forwards | ||||||||
| Wheels and Tires | Reverse | ||||||||
| Wear | Emergency stop | ||||||||
| Pressure | Left turn | ||||||||
| Bearings | Right turn | ||||||||
| Wheel nuts | Slope test | ||||||||
| Motors | Over obstacles | ||||||||
| Wiring | List Items repaired | ||||||||
| Noise | |||||||||
| Connections | |||||||||
| Brake | |||||||||
| Brushes | |||||||||
| Chassis | |||||||||
| Condition | |||||||||
| Steering | |||||||||
7.3 BATTERIA, FUSIBILE E PNEUMATICI
Batteria
natural_image
Person in protective suit operating a mobility scooter with hand valve mechanism (no visible text or symbols)

natural_image
Close-up of a hand adjusting a black car's side panel (no visible text or symbols)natural_image
Close-up of a robotic steering wheel with a hand operating the top panel (no visible text or symbols)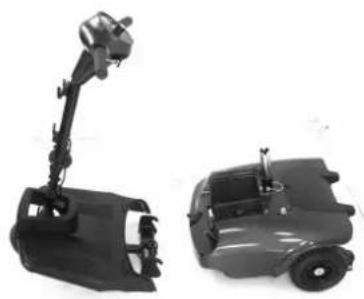
natural_image
Two black automotive chassis components, one articulated with a boom and the other a flat cab (no text or symbols visible)

natural_image
Four black automotive seat assemblies with different mounting brackets, shown against a white background (no text or symbols visible)Avvertenza
Refer to the section entitled "DAILY CHECKING"
natural_image
Black electric scooter with seven labeled parts, including a basket and seat (no text or symbols on the device itself)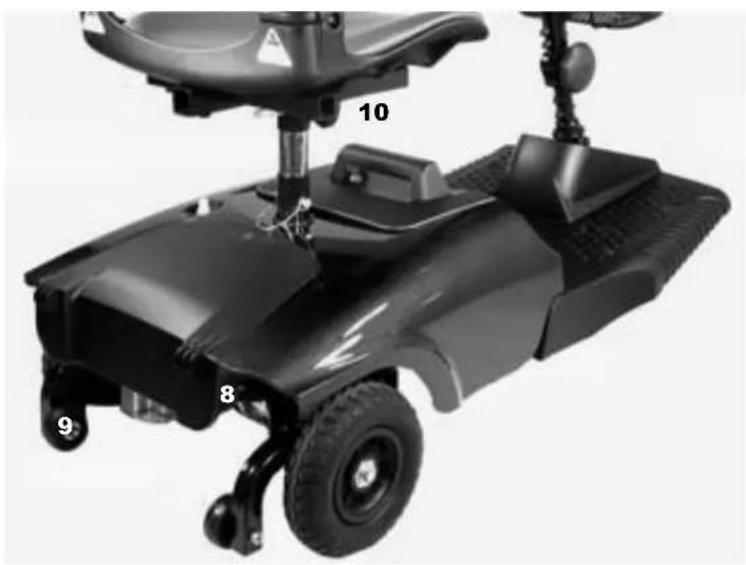
natural_image
Black electric scooter with labeled parts (8, 9, 10) and a side-mounted device (no visible text or symbols beyond labels)4. FUNCIONAMIENTO
4.1 PANEL DE CONTROL
natural_image
Close-up of a black industrial pressure regulator dial with rotary knob (no visible text or symbols)natural_image
Close-up of a black robotic device with a mechanical lever and circular component (no visible text or symbols)4. FUNCIONAMIENTO
Sugerencia
natural_image
Mechanical device with mesh handle and lever mechanism (no visible text or symbols)Fig. 4.4
Advertencia
natural_image
Person in protective suit adjusting a mobility scooter with a hand valve (no visible text or symbols)

natural_image
Close-up of a hand pressing down on a black industrial component (no visible text or symbols)natural_image
Close-up of a hand operating a robotic lawn mower (no visible text or symbols)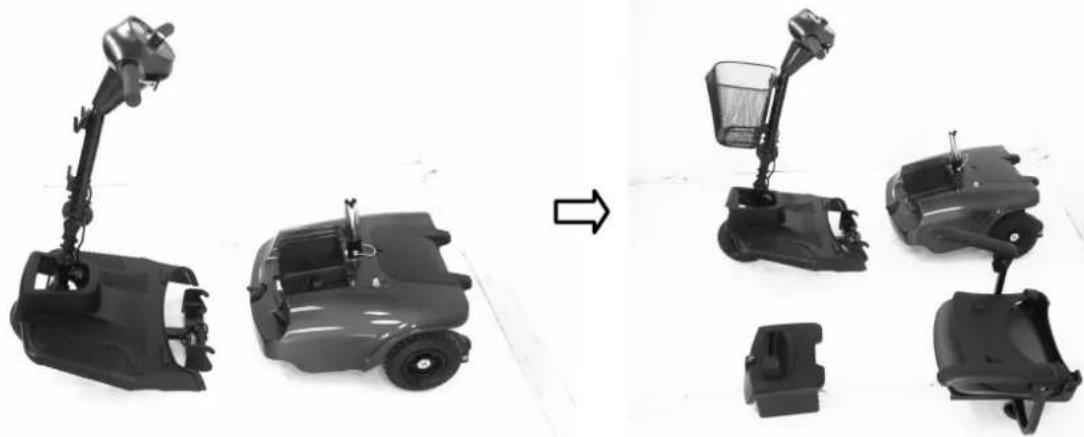
natural_image
Comparison of four types of electric scooters shown from different angles, one being rotated to others (no text or symbols visible)Advertencia
website: www.realtime.it
e-mail: info@reatime.it
Poland
Vermeiren Polska Sp. z o.o
ul. Łączna 1
PL-55-100 Trzebnica
Tel: +48(0)71 387 42 00
Fax: +48(0)71 387 05 74
website: www.vermeiren.pl
e-mail: info@vermeiren.pl
Spain
Vermeiren Iberica, S.L.
Trens Petits, 6. - Pol. Ind. Mas Xirgu.
17005 Girona
Tel: +34 902 48 72 72
Fax: +34 972 40 50 54
website: www.vermeiren.es
e-mail: info@vermeiren.es
Germany
Tel: +43(0)732 37 13 66
Fax: +43(0)732 37 13 69
website: www.vermeiren.at
e-mail: info@vermeiren.at
Switzerland
Vermeiren Suisse S.A.
- TABLE OF CONTENTS
- PREFACE AND INTRODUCTION
- SAFETY NOTICE
- BEFORE DRIVING
- ■ The same traffic rules apply to the use of this vehicle as apply to pedestrians
- ■ Practice operating your vehicle
- ■ The Scooter is only to be used by one person at a time
- ■ Do not use this vehicle to carry or haul goods
- ■ Please carry out daily inspections.
- WHILE DRIVING
- ■ Do not use your vehicle under the circumstances below.
- ■ About Mobile Phones and other electrical equipment
- ■ Automatic Power Shut Down
- ■ Ramps, inclines and drops
- SAFETY N OTICE
- EMI
- ■ ELECTROMAGNETIC INTERFERENCE (EMI) FROM RADIO WAVE SOURCES
- ■ POWERED VEHICLE ELECTROMAGNETIC INTERFERENCE (EMI)
- WARNINGS
- ■ IMPORTANT INFORMATION
- PARTS INTRODUCTION
- PARTS DESCRIPTION
- OPERATION
- CONTROL PANEL
- HOW TO OPERATE YOUR SCOOTER
- ■ Power switch
- ■ Moving and Braking
- ■ Braking
- Warning
- Seat
- Attention
- ■ Battery indicator
- ■ Main Circuit Breaker (Reset Button)
- Suggestion
- ■ How to adjust the seat height
- .3 How to set to freewheel mode
- DRIVING ON THE ROAD
- ■ Starting and Driving
- ♦ Stopping
- BATTERY CHARGING AND CARE
- • CHARGING THE BATTERY
- ■ Method 1: On board Charging (see photograph overleaf)
- ■ Method 2 Off-board Charging (see photograph overleaf)
- ■ Charging Hours
- ■ Batteries (Inside the Pack)
- Attention - Please follow the rules below to avoid accidents while charging.
- - BATTERY
- Suggestion – How to maximize your batteries efficiency and service life
- ■ Cleaning the battery
- • REPLACING BATTERIES
- ■ Batteries replacement
- Suggestions
- INSPECTION AND MAINTENAN
- INSPECTION
- REGULAR CHECKING RECORD
- BATTERY, FUSE AND TIRE
- Battery
- Fuse
- Tires
- STORAGE
- MOVING ABOUT
- DISASSEMBLING THE SCOOTER
- Antares
- ASSEMBLING THE SCOOTER
- TROUBLESHOOTING
- ■ TROUBLE SHOOTING
- SPECIFICATION
- Note:
- WARRANTY
- Warranty Conditions:
- VIN (VEHICLE INDIFICATION NUMBER)
- TABLE DE MATIÈRES
- AVERTISSEMENT
- FONCTIONNEMENT
- TABLEAU DE BORD
- ■ Contacteur
- INSPECTION ET MAINTENANC
- WAARSCHUWING
- BEDIENING
- BESTURINGSPANEEEL
- ■ Snelheidsknop
- Suggestie
- DE SCOOTER VERPLAATSEN
- INSPECTIE EN ONDERHOUD
- BETRIEB
- BEDIENFELD
- Warnung
- FUNZIONAMENTO
- PANNELLO DI CONTROLLO
- Avvertenza
- BATTERIA, FUSIBILE E PNEUMATICI
- Batteria
- FUNCIONAMIENTO
- PANEL DE CONTROL
- Sugerencia
- Advertencia
- Poland
- Spain
- Germany
- Switzerland
Brand : Vermeiren
Model : Antares 4
Category : Electric scooter