
PH 604 - Cooker Ariston Thermo - Free user manual and instructions
Find the device manual for free PH 604 Ariston Thermo in PDF.
| Product Type | Built-in electric hob |
| Brand | Ariston Thermo |
| Model | PH 604 |
| Category | Hob |
| Power supply | 230V 1N~ / 400V 3N~, 50-60 Hz |
| Total power | 7000 W |
| Number of cooking zones | 4 electric plates |
| Plate types | Normal and rapid (red indicator) |
| Plate adjustment | 6 positions (0 off to 6 maximum) |
| Operation indicator | Yes (lights up as soon as a plate is on) |
| Glass lid | Present (optional) |
| Appliance class | Class 3 |
| Use | Domestic, non-professional |
| Installation type | Built-in |
| Compatible worktop thickness | 20 to 40 mm |
| Electrical connection | Terminal block, cable not supplied (depending on voltage) |
| Earth connection | Mandatory |
| Compliance | EC Directives (Low Voltage, EMC, Marking) |
| Maintenance | Clean with damp cloth; oil plates while warm |
| Safety | Do not use barefoot or with wet hands; do not leave plates on without pans |
| Spare parts | Original only, approved after-sales service |
| Supplied accessories | Fixing hooks |
| Number of manual pages | 14 pages |
Frequently Asked Questions - PH 604 Ariston Thermo
User questions about PH 604 Ariston Thermo
0 question about this device. Answer the ones you know or ask your own.
Ask a new question about this device
Download the instructions for your Cooker in PDF format for free! Find your manual PH 604 - Ariston Thermo and take your electronic device back in hand. On this page are published all the documents necessary for the use of your device. PH 604 by Ariston Thermo.
USER MANUAL PH 604 Ariston Thermo
Congratualtions on choosing an Ariston appliance, which you will find is dependable and easy to use. We recommend that you read this manual for best performance and to extend the life of your appliance. Thank you.
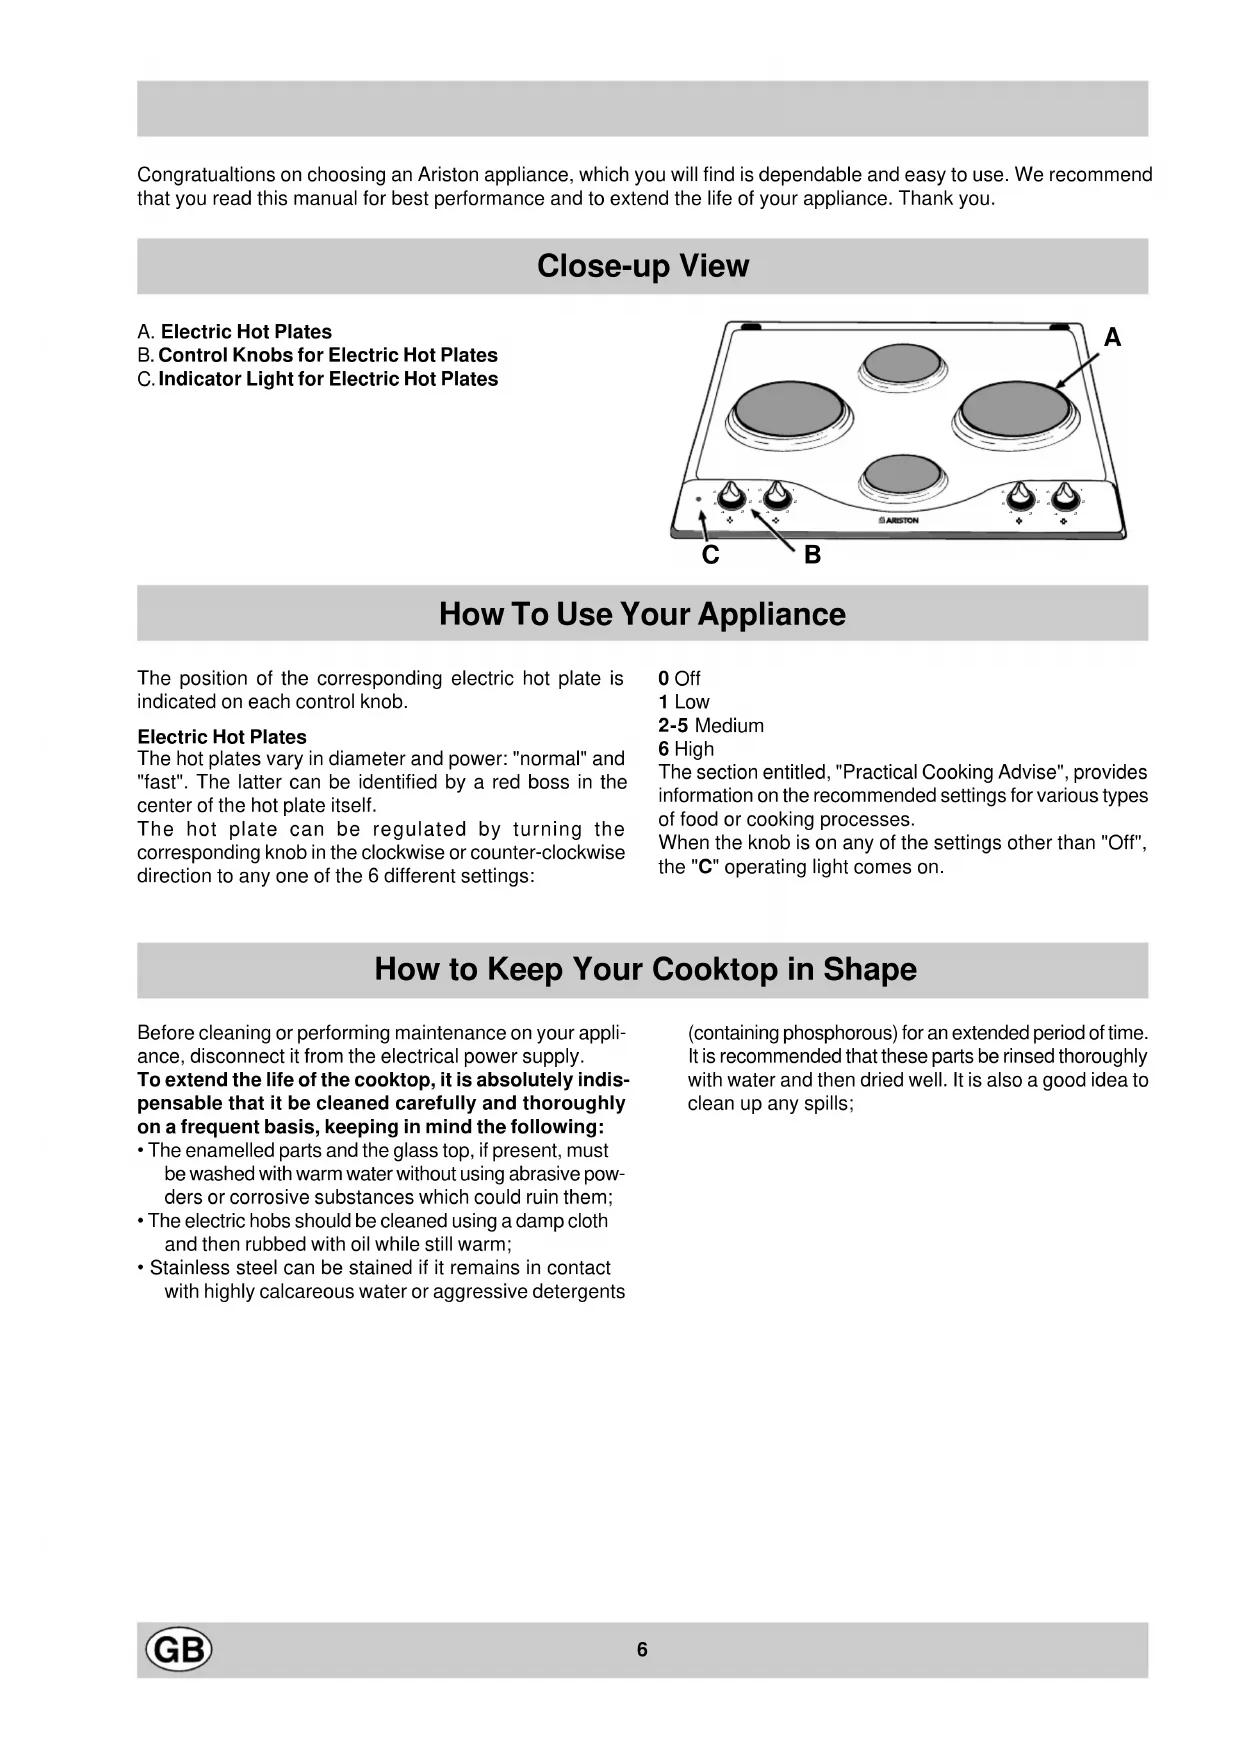
Close-up View
A. Electric Hot Plates
B. Control Knobs for Electric Hot Plates
C. Indicator Light for Electric Hot Plates

How To Use Your Appliance
The position of the corresponding electric hot plate is indicated on each control knob.
Electric Hot Plates
The hot plates vary in diameter and power: "normal" and "fast". The latter can be identified by a red boss in the center of the hot plate itself.
The hot plate can be regulated by turning the corresponding knob in the clockwise or counter-clockwise direction to any one of the 6 different settings:
0Off
1 Low
2-5 Medium
6 High
The section entitled, "Practical Cooking Advise", provides information on the recommended settings for various types of food or cooking processes.
When the knob is on any of the settings other than "Off", the "C" operating light comes on.
How to Keep Your Cooktop in Shape
Before cleaning or performing maintenance on your appliance, disconnect it from the electrical power supply.
To extend the life of the cooktop, it is absolutely indispensable that it be cleaned carefully and thoroughly on a frequent basis, keeping in mind the following:
- The enamelled parts and the glass top, if present, must be washed with warm water without using abrasive powders or corrosive substances which could ruin them;
- The electric hobs should be cleaned using a damp cloth and then rubbed with oil while still warm;
- Stainless steel can be stained if it remains in contact with highly calcareous water or aggressive detergents
(containing phosphorous) for an extended period of time. It is recommended that these parts be rinsed thoroughly with water and then dried well. It is also a good idea to clean up any spills;
Practical Cooking Advice
Practical Advice on Using the Electric Hot Plates
In order to avoid heat loss and damage to the hot plate, use cookware with a flat bottom the diameter of which is not less than that of the hot plate.
| Setting | Normal or Fast Plate |
| 0 Off | |
| 1 Cooking vegetables, fish | |
| 2 | Cooking potatoes (using steam) soups, chickpeas, beans. |
| 3 | Continuing the cooking of large quantities of food, minestrone |
| 4 For roasting (average) | |
| 5 For roasting (above average) | |
| 6 | For browning and reaching a boil in a short time. |
Using the Cooktop
To get the best performance from your appliance, there are a few fundamental rules to follow during the cooking process or when preparing food.
- Use cookware with a flat bottom to ensure that the pot or pan is in direct contact with the cooking surface.
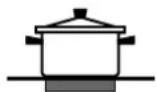
- Use cookware the diameter of which is at least as large as the cooking area so that all of the heat produced by the heating element is used.

- Make sure that the bottom of the pot is always dry and clean to insure good contact between the cookware and the cooking surface. This will also increase the life of the pots and of the ceramic glass surface as well.
Safety Is a Good Habit to Get Into
To maintain the EFFICIENCY and SAFETY of this appliance, we recommend:
- call only the Service Centers authorized by the manufacturer
-
always use original Spare Parts
-
This manual is for a class 3 built-in cooktop.
- This appliance is designed for non-professional use in the home and its features and technical characteristics must not be modified.
- These instructions are only valid for the countries the symbols for which appear on the manual and the serial plate.
- The electrical system of this appliance is safe only when it is correctly connected to an adequate earthing system, as required by current safety standards.
Prevent children and the disabled from coming into contact or having access to the following, as they are possible sources of danger:
- The controls and the appliance in general;
- The packaging (plastic bags, polystyrene, nails, etc.);
- The appliance, during and immediately after use given the heat generated by its use;
- The appliance when no longer in installed (in this case, all potentially dangerous parts must be made safe).
The following should be avoided:
- Touching the appliance with wet parts of the body;
- Using the appliance with bare feet;
- Pulling on the appliance or the power supply cord to disconnect them from the electrical outlet;
- Improper and/or dangerous use;
- Obstructing the ventilation or heat dissipation slots;
- Allowing the power supply cord of small appliances to come into contact with the hot parts of the cooktop;
- Exposure to atmospheric agents (rain, sun);
- Using flammable liquids nearby;
- Using adaptors, multiple outlet plugs and/or extensions;
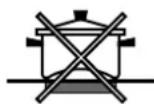
- Using unstable or deformed cookware;
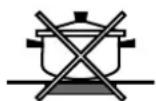
- Leaving the electric hobs on without cookware on top of them;
- Closing the glass top (if present) while the gas burners or
electrical hot plates are still hot;
- Trying to install or repair the appliance without the assistance of qualified personnel.
The assistance of qualified personnel must be called upon in the following cases:
- Installation (in accordance with the manufacturer's instructions);
- When in doubt about the operation of the appliance;
- Replacement of the electrical outlet because it is incompatible with the plug.
Contact service centers authorized by the manufacturer in the following cases:
- When in doubt about the condition of the appliance after having removed the packing;
- Damage to or replacement of the power supply cord;
- In the case of a breakdown or malfunction: ask for original spare parts.
It is recommended that you follow the guidelines below:
- Only use the appliance to cook food, avoiding all other uses;
- Check the condition of the appliance after it has been unpacked;
- Disconnect the appliance from the power supply in the event of malfunction and always before cleaning or maintenance;
- When not in use, disconnect the appliance from the power supply and turn off the gas valve (if present);
- Always check to make sure that the control knobs are on the "·"/"o" setting when the appliance is not in use;
- Cut the power supply cord after disconnecting it from the electrical mains when you decide to no longer use the appliance.
- The manufacturer will not be held liable for any damages arising out of: incorrect installation or improper, incorrect or unreasonable use.
Installation Instructions for built-in
The following instructions are intended for the installer so that the installation and maintenance procedures may be followed in the most professional and expert manner possible.
Important: Disconnect the appliance from the electrical supply before performing any maintenance or regulation upkeep work.
Installation of Built-in Cooktops
The electric cooktops have type "X" protection against overheating. Therefore, they can be installed next to cabinets which are not higher than the cooktop itself. The following precautions must be observed for proper installation:
a) If the cabinet(s) located next to the cooktop are higher than the cooktop itself, the cabinet(s) must be installed at least 110mm from the edge cooktop;
b) Hoods must be installed in accordance with the instructions contained in the installation manual for the hoods themselves, and no less than 650~mm from the cooktop;
c) The cabinets installed next to the hood must be located at a height of at least 420mm from the top, (as shown in Fig. A).
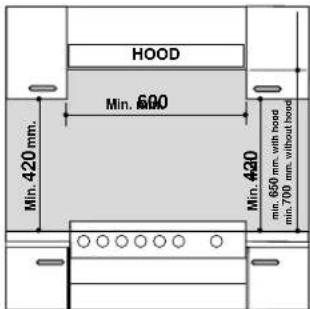
Fig. A
d) Should the cooktop be installed directly under a cupboard, the latter should be at least 700~mm (millimetres) from the top, as shown in Fig. A.
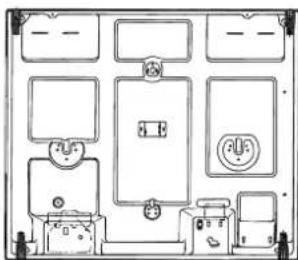
e) The dimensions of the cutout for the appliance must be those indicated in the figure B. Clamps are provided to fasten the cooktop to counters measuring from 20 to 40mm in thickness. To fasten the cooktop securely, it is recommended that all the clamps be used.
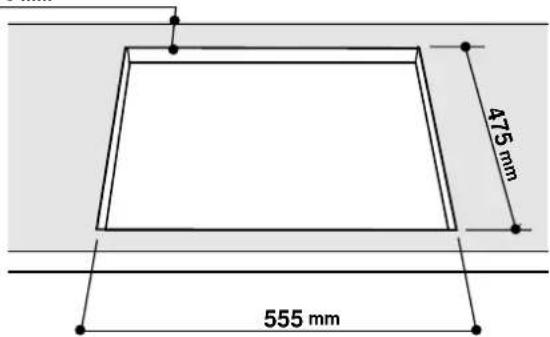
min. 55mm
Fig. B
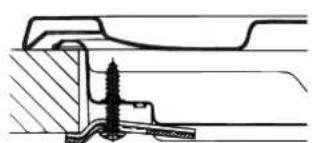
Fastening Clamps - Assembly Diagram
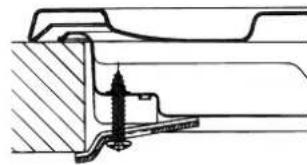
Clamp Position for Clamp Position for H=30mm top H=40mm top
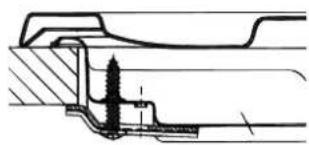
Front
Clamp Position for
H=20mm top Back
N.B: Use the clamps contained in the "accessory kit."
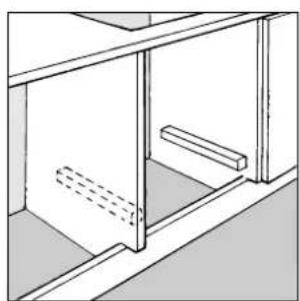
f) In the event the cooktop is not installed above a built-in oven, a wood panel must be inserted as insulation. This panel must be placed at least 20mm from the bottom of the cooktop itself.
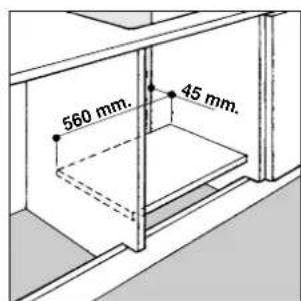
Important: When installing the cooktop above a built-in oven, the oven should be placed on two wooden strips; in the case of a joining cabinet surface, remember to leave a space of at least 45 × 560 ~mm at the back.
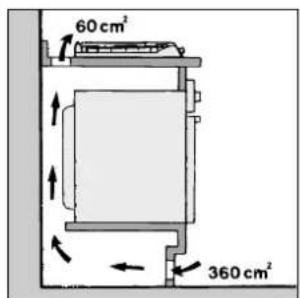
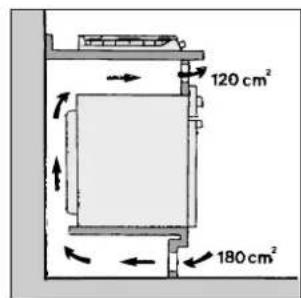
When installing the cooktop above a built-in oven without forced ventilation, ensure that there are air inlets and outlets for ventilating the interior of the cabinet adequately.
Electrical Connection
The electric cooktops are not fitted with a power supply cord because the type of cord used depends on the connection to the mains (see the wiring diagram below). To connect the cable, proceed as follows:
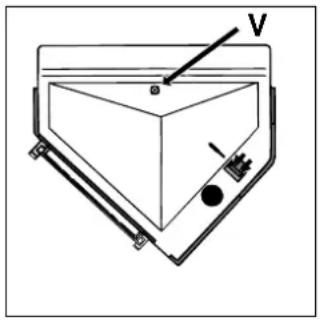
Open the terminal box by removing the "V" screw and taking off the cover.
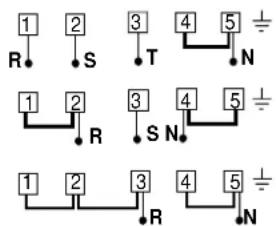
Connect the wires as shown in the diagram.
400V3N\~ H05RR-F 5× 1.5 CEI-UNEL35363
400V2N\~ H05RR-F 4x1.5 CEI-UNEL 35363
230V1N\~ H07RN-F 3x2.5 CEI-UNEL 35364
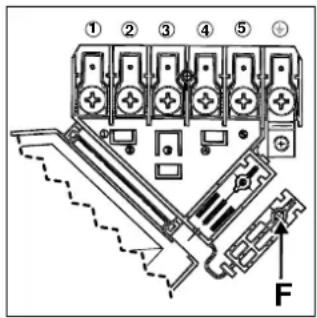
Fix the cable in place with the "F" cable clamp, close the lid and fasten it with the "V" screw.
Electrical Connection for Gas Cooktop
Fit the supply cord with a standard plug for the demand rate indicated on the rating plate or connect it directly to the electrical mains. In the latter case, a single pole switch must be placed between the appliance and the mains, with a minimum opening between the contacts of 3mm in compliance with current safety codes (the earthing wire must not be interrupted by the switch). The power supply cord must be positioned so that it does not reach a temperature in excess of 50^ above room temperature at any point.
Before making the actual connection, make sure that:
- The fuse and electrical system can withstand the load required by the appliance;
- That the electrical supply system is equipped with an efficient earth hook-up according to the norms and regulations prescribed by law;
- That the plug or switch is easily accessible.
N.B: Never use adaptors, shunts or the like because they could overheat or cuase burns.
Attention: If the appliance is installed above a built-in oven, the electrical connection for the cooktop must be independent of that for the oven not only for safety reasons, but also to facilitate removable of the oven in the future.
Technical Information
Voltage and frequency of electrical power supply:
230V 1N ~ / 400V 3N ~ 50-60Hz 7000W
CE
This appliance complies with the following European Economic Community directives:
- 73/23/EEC of 19/02/73 (Low Voltage) and subsequent modifications;
- 89/336/EEC of 03/05/89 (Electromagnetic Compatibility) and subsequent modifications;
- 93/68/EEC of 22/07/93 and subsequent modifications.

- Close-up View
- How To Use Your Appliance
- Electric Hot Plates
- How to Keep Your Cooktop in Shape
- Practical Cooking Advice
- Practical Advice on Using the Electric Hot Plates
- Using the Cooktop
- Safety Is a Good Habit to Get Into
- To maintain the EFFICIENCY and SAFETY of this appliance, we recommend:
- Prevent children and the disabled from coming into contact or having access to the following, as they are possible sources of danger:
- The following should be avoided:
- The assistance of qualified personnel must be called upon in the following cases:
- Contact service centers authorized by the manufacturer in the following cases:
- It is recommended that you follow the guidelines below:
- Installation Instructions for built-in
- Installation of Built-in Cooktops
- Clamp Position for
- H=20mm top Back
- Electrical Connection
- Electrical Connection for Gas Cooktop
- Technical Information
- This appliance complies with the following European Economic Community directives:
Brand : Ariston Thermo
Model : PH 604
Category : Cooker