
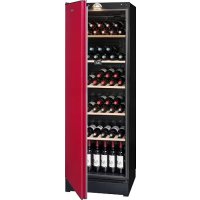
TRV250 - Fridge LA SOMMELIERE - Free user manual and instructions
Find the device manual for free TRV250 LA SOMMELIERE in PDF.



| Product type | Wine cellar |
| Brand | La Sommelière |
| Model | TRV250 |
| Estimated capacity | Approximately 25 to 30 bottles |
| Approximate dimensions (W x H x D) | 50 x 80 x 60 cm |
| Estimated net weight | 45 kg |
| Electrical supply | 220-240 V, 50 Hz |
| Ambient temperature range | 5 °C to 38 °C |
| Temperature setting range | 5 °C to 18 °C (adjustable in 1 °C increments) |
| Hygrometry control | Humidity level display (50-80 % recommended) |
| Active charcoal filter | Yes, removable, service life 1 year |
| Lighting | LED, automatic or permanent switching |
| Alarms | Door open, abnormal temperature, humidity <50 %, hot/cold circuit failure, filter life |
| Door reversibility | Yes (except models with lock) |
| Shelf material | Wood |
| Adjustable feet | Yes, by screwing/unscrewing |
| Water drip tray | Yes, to install at the back |
| Maintenance | Clean with a soft cloth, dust the condenser 2 times/year |
| Safety advice | Do not use outdoors, keep children away, do not repair yourself |
| Spare parts | Charcoal filter, handle, shelves, supports (contact customer service) |
| General information | Manual available in several languages, support by email |
Frequently Asked Questions - TRV250 LA SOMMELIERE
User questions about TRV250 LA SOMMELIERE
0 question about this device. Answer the ones you know or ask your own.
Ask a new question about this device
Download the instructions for your Fridge in PDF format for free! Find your manual TRV250 - LA SOMMELIERE and take your electronic device back in hand. On this page are published all the documents necessary for the use of your device. TRV250 by LA SOMMELIERE.
USER MANUAL TRV250 LA SOMMELIERE
HANDLEIDING VAN UW WIJNKAST
natural_image
Row of identical wine cabinets with open doors and glassware, no visible text or labels1. BESCHRIJVING VAN UW WIJNKAST
natural_image
3D rendering of a mechanical device inside a yellow and cyan enclosure with a metallic component (no text or symbols visible)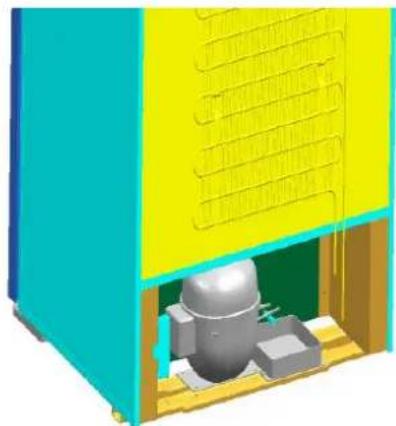
natural_image
3D rendering of a yellow industrial machine with a metallic component inside, no visible text or symbolsnatural_image
3D technical illustration of a green industrial enclosure with yellow top panel and mounting bracket (no text or symbols)3.4 De deurgreep monteren
natural_image
Technical line drawing of a vertical cabinet with an arrow indicating upward motion (no text or symbols)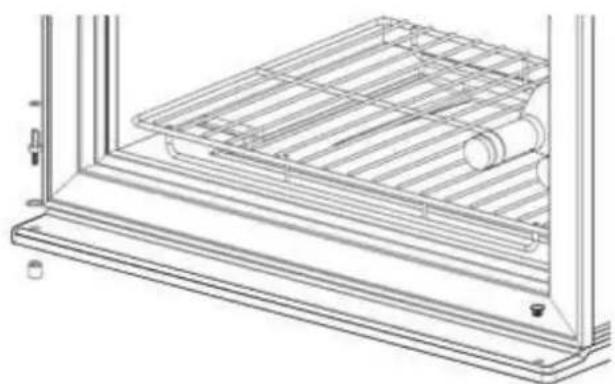
natural_image
Technical line drawing of a mechanical assembly with a grid-like structure and cylindrical components (no text or symbols)natural_image
Technical line drawing of a mechanical frame or enclosure with a downward arrow indicating direction (no text or symbols present)natural_image
Line drawing of a simple rectangular frame with a small clip and two small protrusions on top (no text or symbols)natural_image
Line drawing of a refrigerator with lid and side panel (no text or symbols)natural_image
Technical diagram of a mechanical assembly with a red curved arrow indicating motion or force direction (no text or symbols present)natural_image
Diagram showing a vehicle's side profile with a red curved arrow indicating motion, no text or symbols present.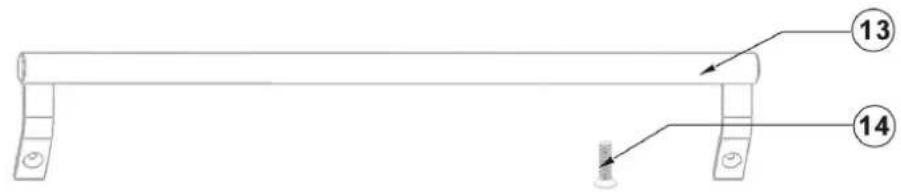
natural_image
3D rendering of a yellow industrial machine with a metallic component inside, showing internal structure and no visible text or symbols.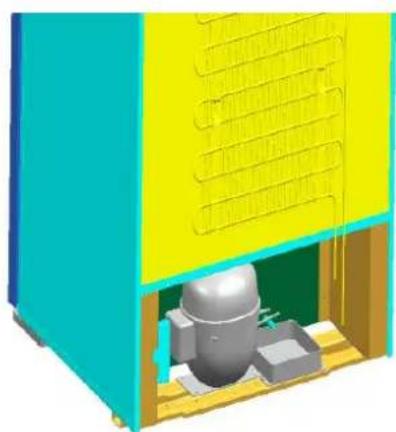
natural_image
3D rendering of a mechanical assembly with a gray component inside a yellow and cyan housing (no text or symbols visible)natural_image
3D rendering of a green industrial enclosure with yellow top and black panel, no visible text or symbolsnatural_image
Technical line drawing of a vertical cabinet with an arrow indicating upward motion (no text or symbols)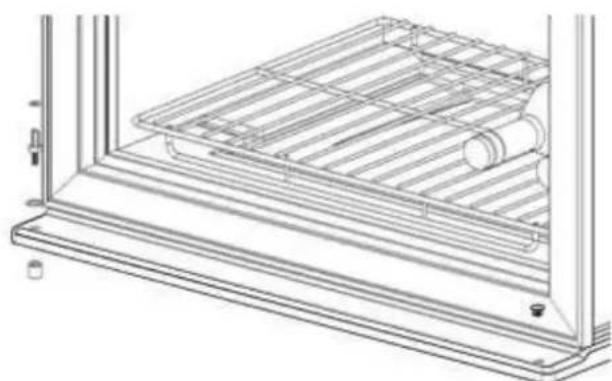
natural_image
Technical line drawing of a roof structure with grid and roller assembly (no text or symbols)natural_image
Technical line drawing of a mechanical cabinet or enclosure with an arrow indicating direction (no text or symbols present)natural_image
Line drawing of a rectangular frame with a small object on top, no text or symbols presentnatural_image
Line drawing of a refrigerator with lid and side panel (no text or symbols)natural_image
Technical diagram of a mechanical assembly with a red curved arrow indicating rotation or force direction (no text or symbols present)natural_image
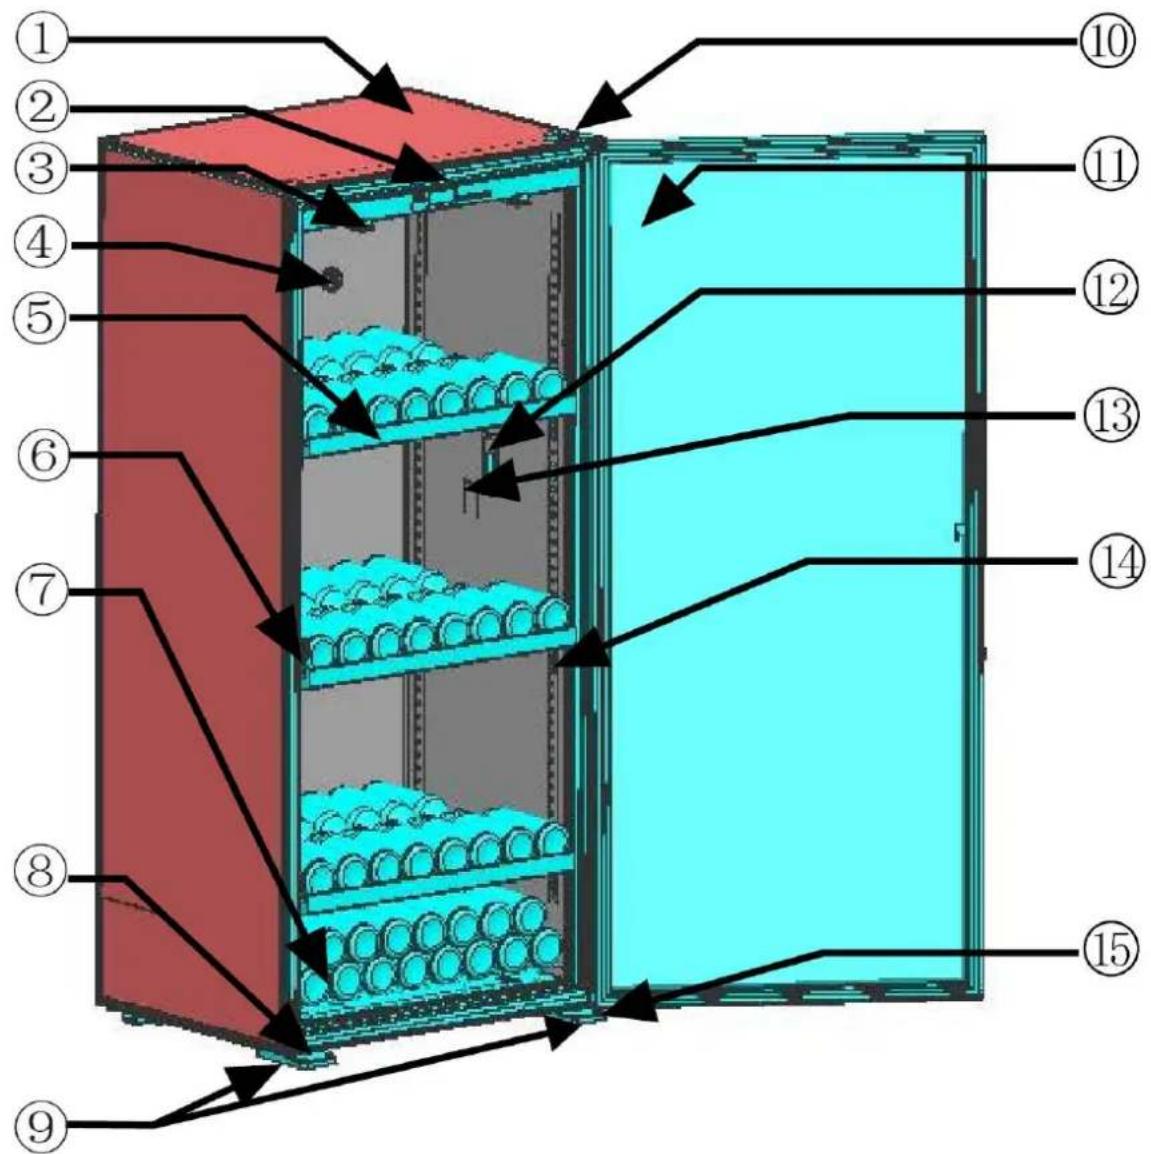
Green panel with a black ventilation grille and multiple square holes on the side (no text or symbols)Sonde hygromètre
- Cabinet case
- Control and adjustment panel
- LED lights
- Carbon filter
-
Wooden shelf
-
Closing clip 7. Steel wire shelf 8. Cabinet bracing bar 9. Bottom grid & Adjustable leveling
feet 10. Hinge 11. Door 12. Humidity sensor 13. Temperature probes 14. Shelf bracing hook
- Bottom pivot guide
Note: If your product is without lock, there is no closing clip (6)
2.PLACE YOUR CABINET
(1) When moving your wine cabinet, do not incline it more than 45^ , and always toward side where the power lead is located.
(2) In order to reduce the working time and save power, place your cabinet at where the temperature is between 5^ 38^ , and there should be space to allow air to flow around the cabinet, so the heat produced by condenser can be eliminated in time. Leaving a space of at least 8cm between the wall and the back of your wine cabinet. Please keep your wine cabinet away from other domestic appliances like fridge, electric welding machine to avoid interference.
(3) Away from heat source.
(4) Place at proper humidity location. Not too wet (wash room, utility room, etc.). Never place your wine cabinet in a location liable to flooding.
(5) Be on a flat solid floor. Gently incline the wine cabinet backwards in order to adjust the front feet (screw adjustment) so that your wine cabinet stands at perfect level.
3.INSTALLING YOUR WINE CABINET
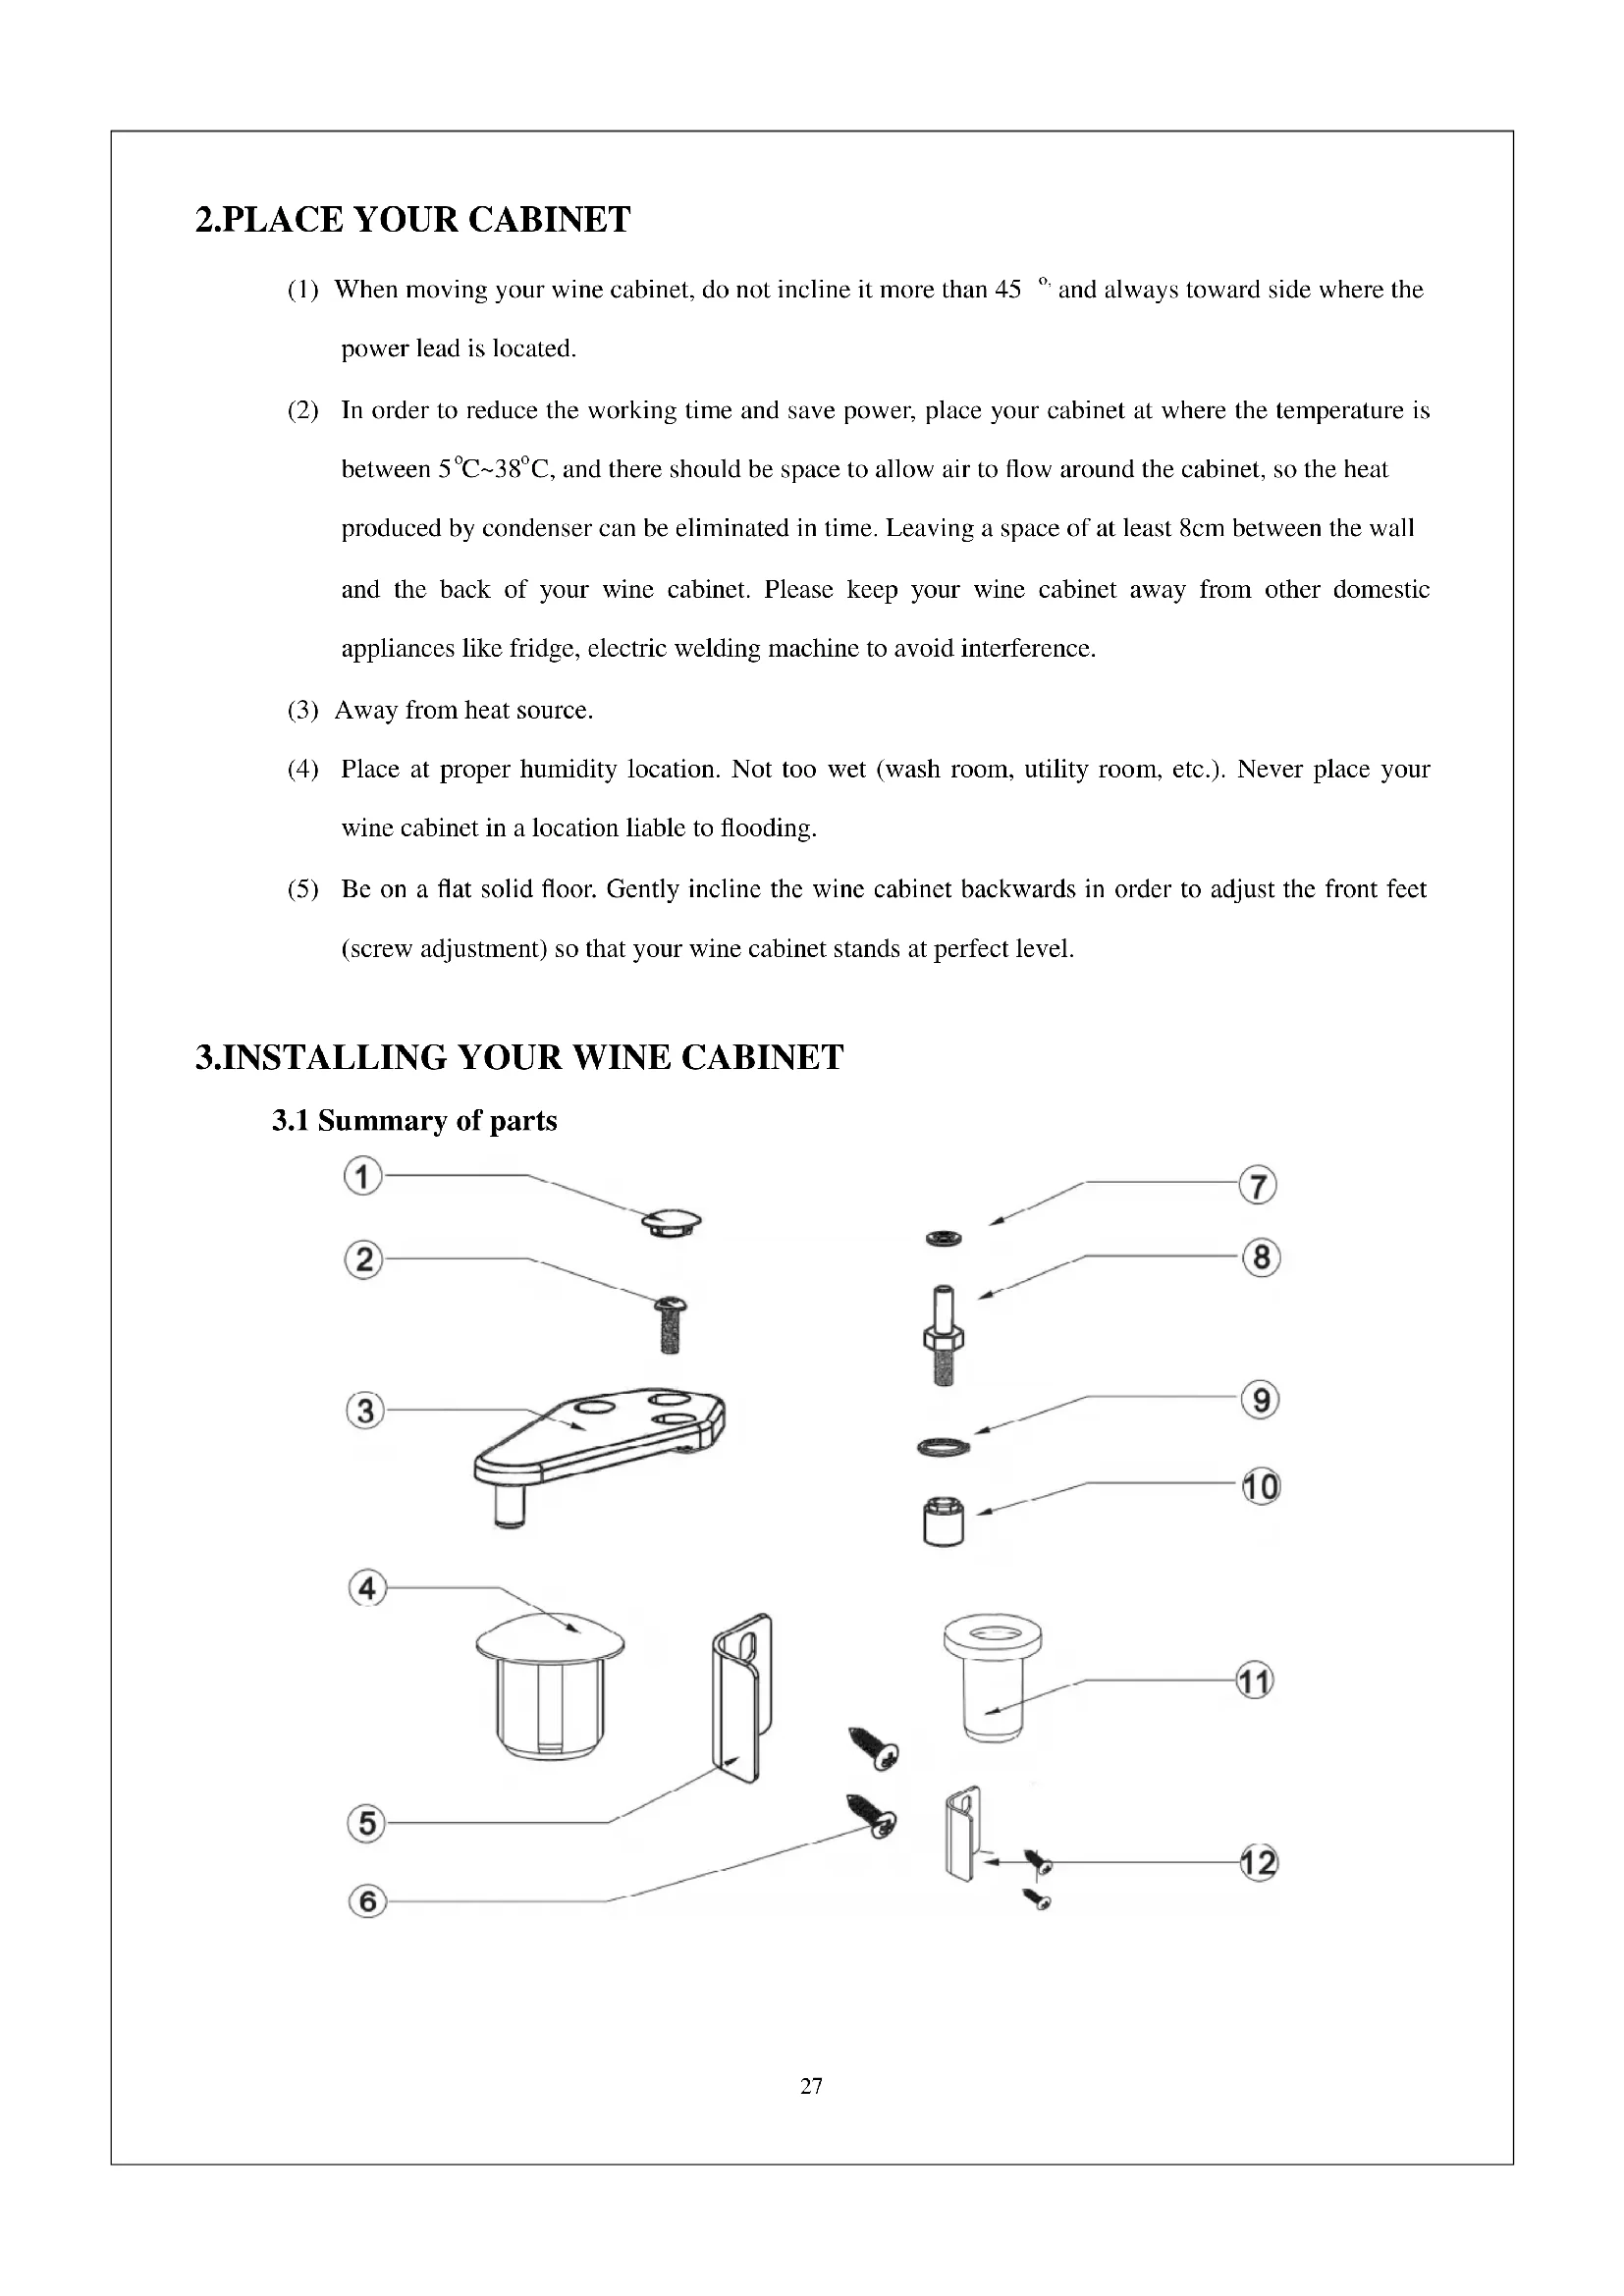
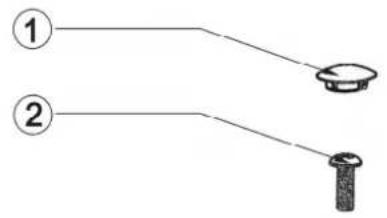
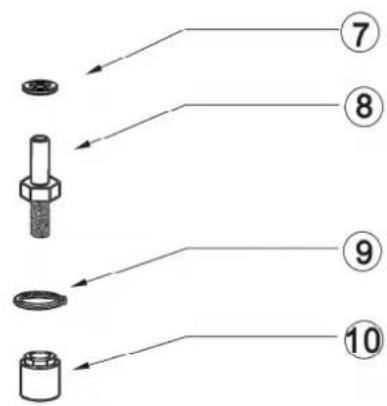
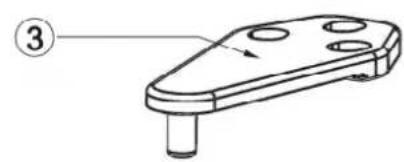
3.1 Summary of parts
natural_image
Technical line drawing of a mechanical component with a numbered label (3) pointing to a feature on the top surface.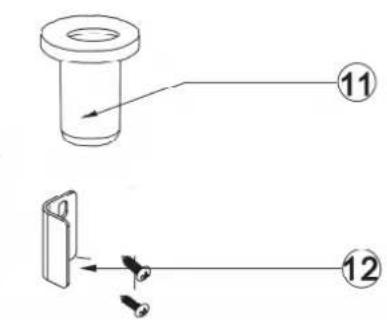
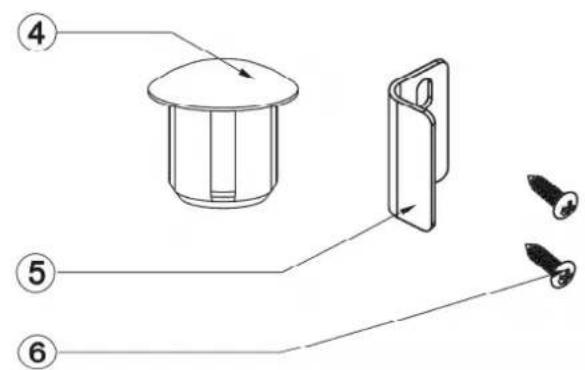
-
Grommet
-
Screw
-
Top hinge
4.Grommet
-
Closing clip
-
Phillips screw
-
Washer
-
Door pivot guide
-
Washer
-
Hinge nut
-
Pivot
-
Grommet
-
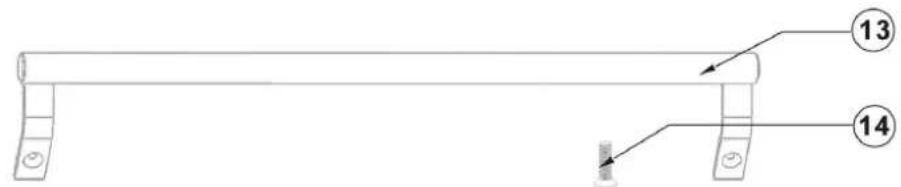
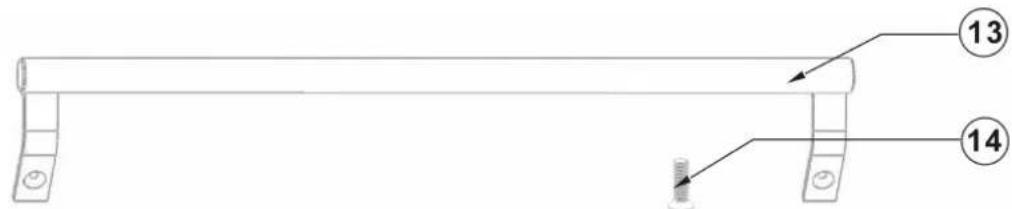
Handle of door
-
Chamfer head screw
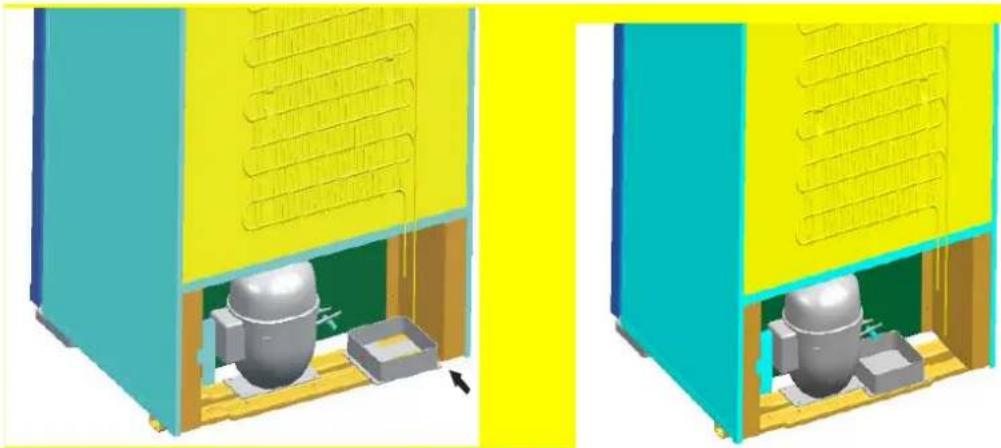
3.2 Installing the drip tray
Install the drip tray on the compressor support at the back of the cabinet, locating it under the small pipe protruding from the housing, the lower part of the tank being placed under this pipe. See diagram below:
natural_image
3D rendering of two industrial storage units with heat sinks and internal components, shown from different angles (no text or symbols visible)Installing the drip tray
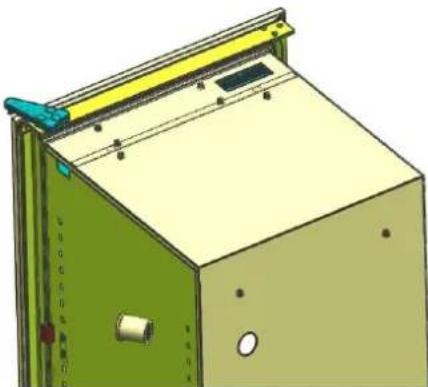
3.3 Installing the carbon filter
Install the carbon filter, which you will find inside your cabinets, by placing it in the air circulation hole located on the top inside the cabinet. The carbon filter can be used for one year, please change it thereafter. Contact your local distributor for new carbon filter. Please remove the used carbon filter before inserting the new one.
natural_image
3D technical illustration of a green industrial enclosure with yellow frame and mounting bracket (no text or symbols)3.4 Installing the handle of door
You can find a handle and two chamfer head screws in your accessories box. Following a diagram below you can fix the handle on the door.
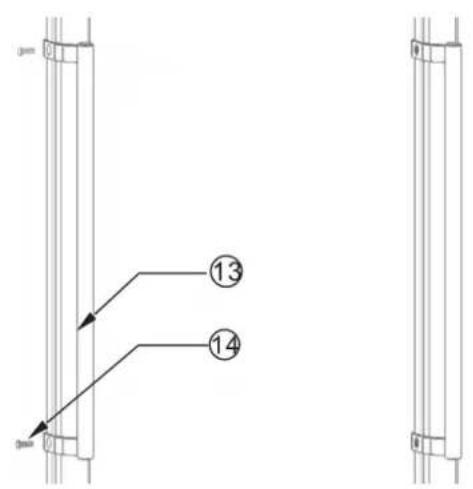
Installing the handle of door
3.5 Alternative hanging of the door (excepted full door with lock)
The door is set to be hinged right at purchase; you can change it to left. To do this, proceed as follows:
(1) Close the door.
(2) Remove the grommets gently using a fine blade, loosen the screws and remove the upper hinge.
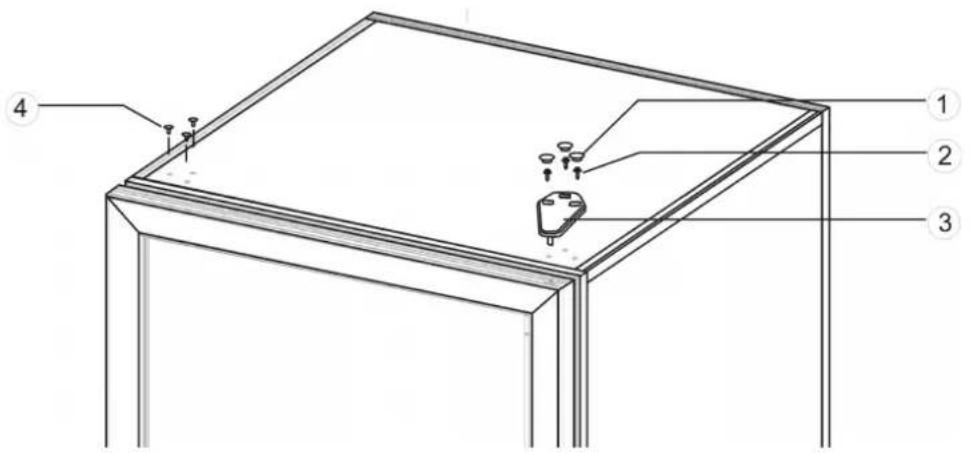
(3) Remove the door from the case by opening it slightly and then lifting.
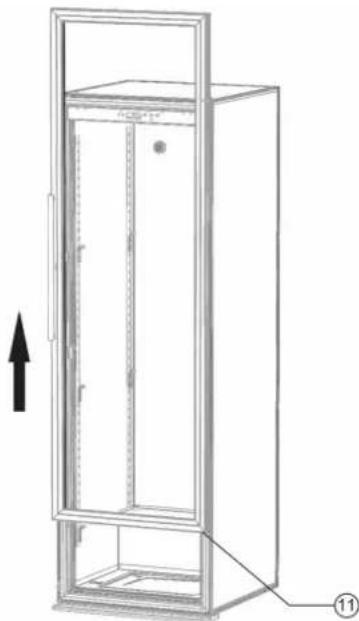
natural_image
Technical line drawing of a vertical cabinet with internal doors and mounting base, showing an upward arrow (no text or symbols)(4) Unscrew the closing clip on the left, and then fix it on the right.
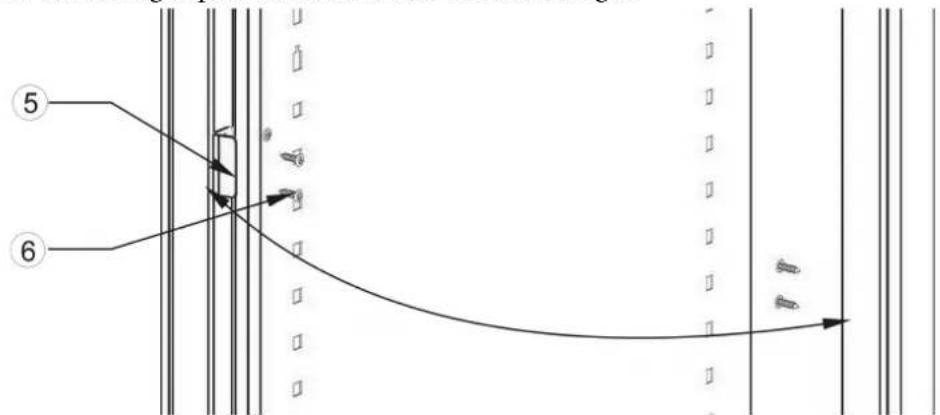
(5) Remove the grommet on the right, unscrew the door pivot guide with the washer, and then tighten nit onto the same part on the opposite side.
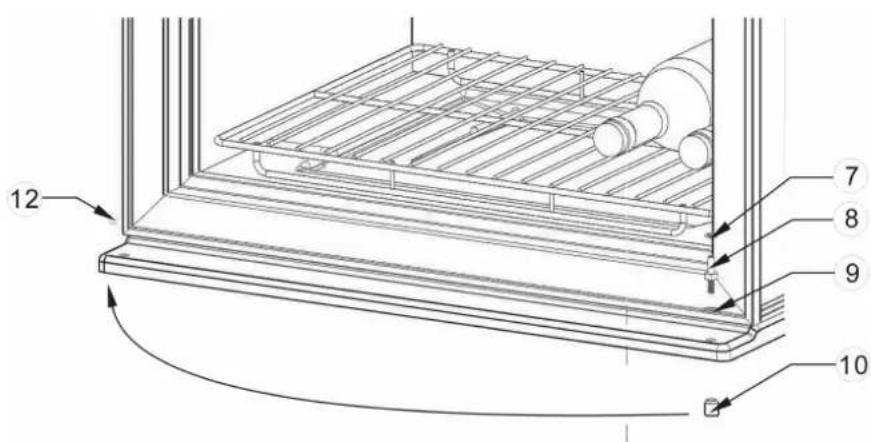
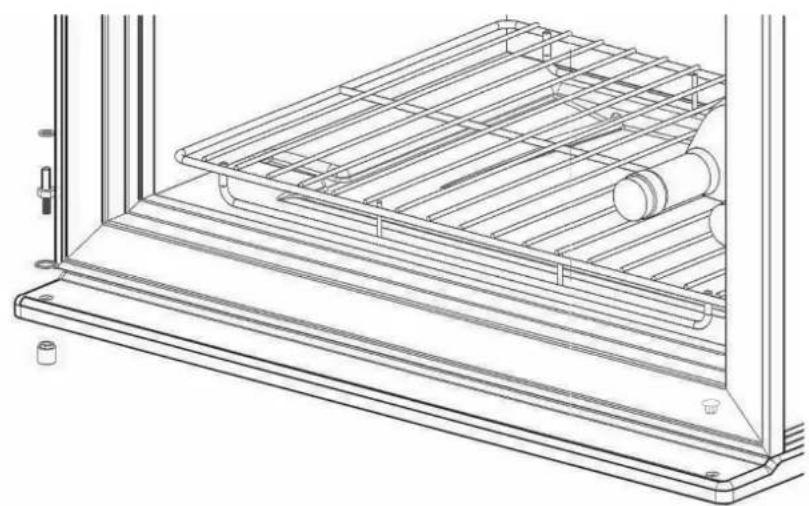
natural_image
Technical line drawing of a mechanical assembly with grid and roller components (no text or symbols)(6) Turn the door 180^ , slightly lift the door and move down, replace the door on its pivot guide.
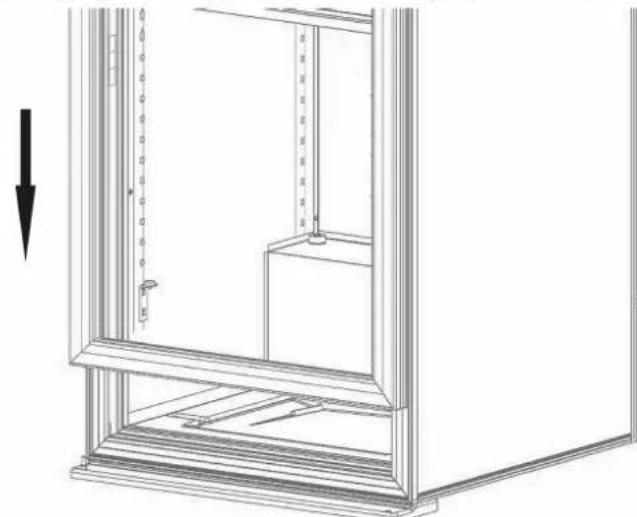
natural_image
Technical line drawing of a mechanical cabinet or enclosure with vertical supports and a downward arrow indicator (no text or symbols present)(7) Relocate the hinge, using the screws in such a way so that the door is parallel with the case. Replace the grommets.
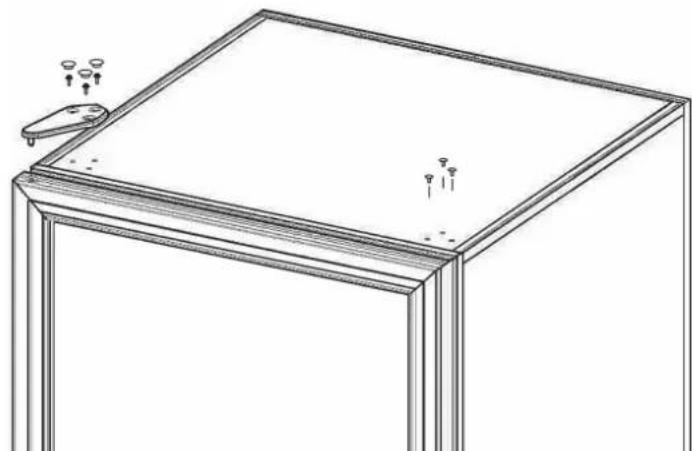
natural_image
Line drawing of a rectangular frame with a small inset showing three small items, no text or symbols present.Important : Please note that models with full doors and lock are not reversible contrary to glass door models, with or without lock, and full door without lock.
3.6 Installing the shelves
3.6.1 Installing the shelf bracing
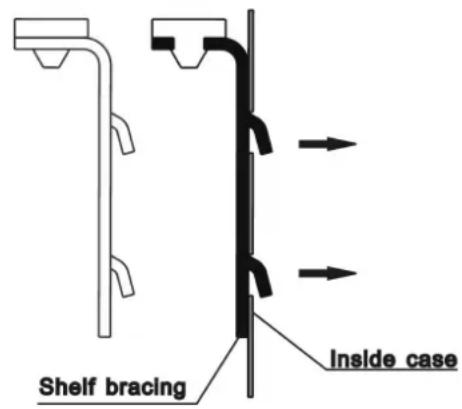
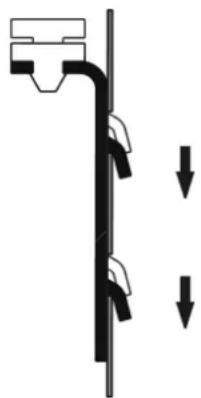
Shelf bracing should be installed before placing the shelves, the process see diagram below. Putting the shelf bracing hook in the hole inside the case and press down, this allows the shelf bracing to be hitched firmly inside the case. There are front and back shelf bracings, the longer one is back shelf bracing, should be fixed with the hook on the back inside the case; another type is front shelf bracing, should be fixed with the hook on the front inside the case. The two shelf bracings should be at the same level to keep the shelf stay at a perfect position.
natural_image
Diagram of a vertical pipe or channel with two downward arrows indicating flow or movement (no text or symbols)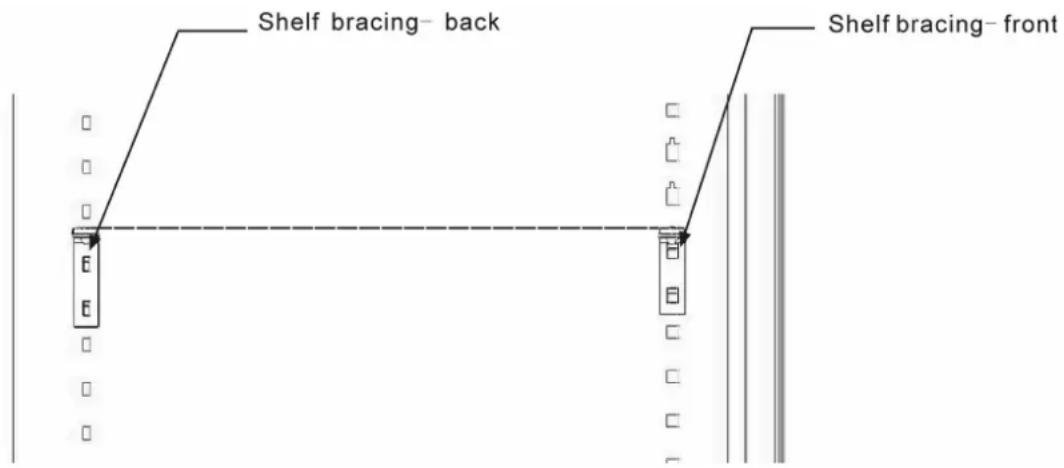
Two dumpy wires in front of the shelf should lock the shelf on the shelf bracing
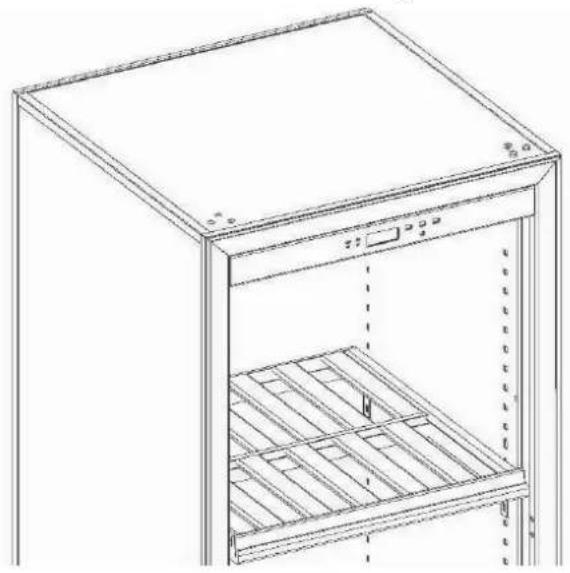
3.6.3 Installing the wooden shelf
See diagram below to install your wooden shelf. Put the shelf on the shelf bracing with the front going first. Make sure the wooden pin should be after the back shelf bracing hook. See diagram below.
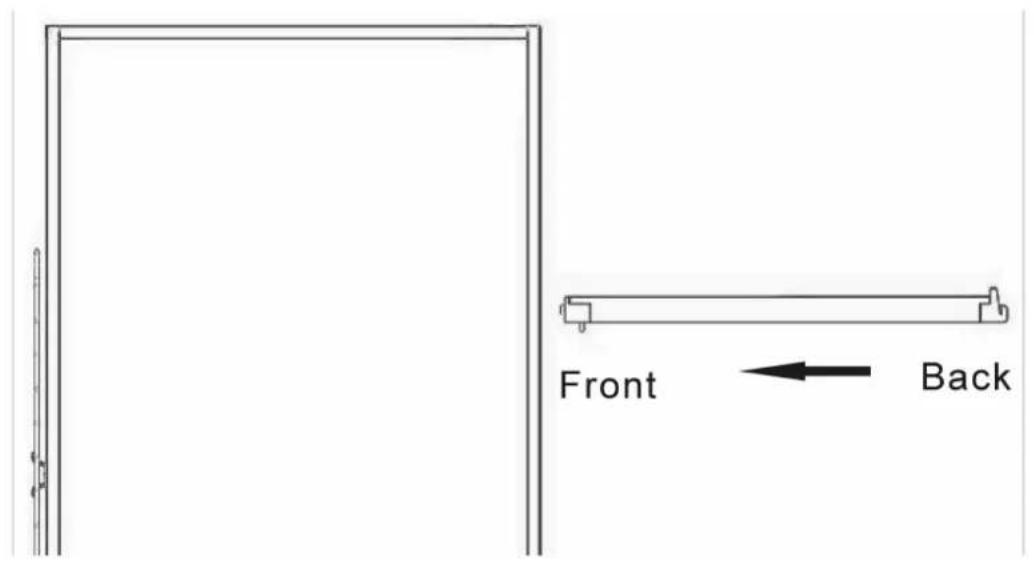
Wooden shelf installing direction
natural_image
Line drawing of a refrigerator cabinet with open door and side shelves (no text or symbols)Wooden shelf installing layout
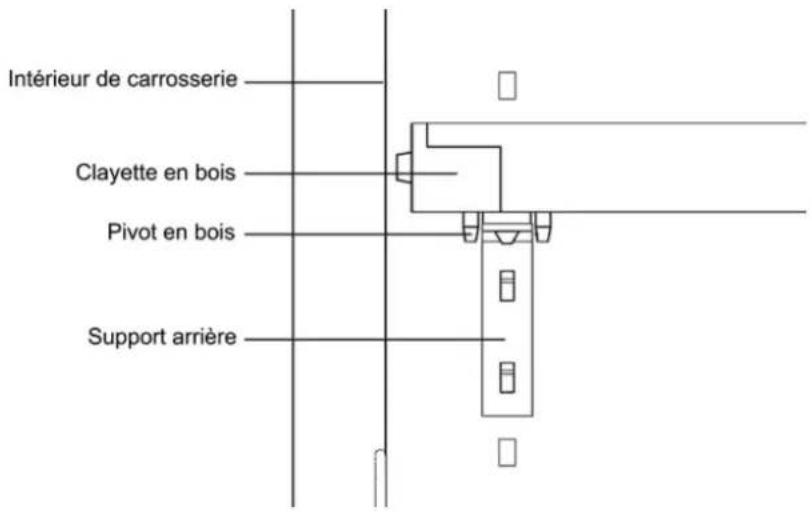
Position of wooden pin and back shelf bracing
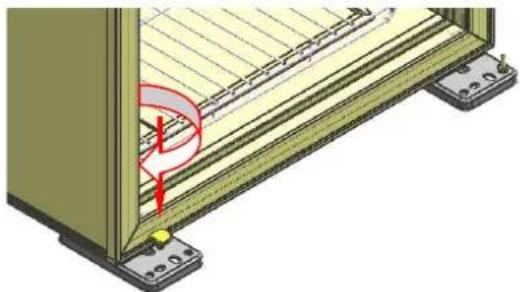
3.7 The installation of door base support
When replacing the reversible door, should change the installation direction of the base support; rotating pull up at the same time the base support can be removed; spin down at the same time the base support can be fixed.
natural_image
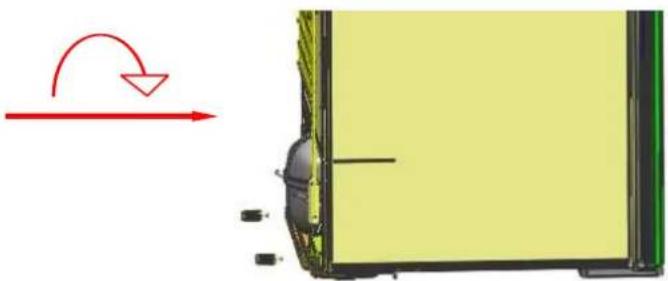
3D diagram of a mechanical assembly with no visible text or symbols3.8 The installation of the wall separate screws
When the back side of wine cellar placed against the wall, should need to install the wall separate screws. As shown, the wall separate screws were installed in the flange on both sides of compressors pallet.
natural_image
Diagram showing a vehicle's side profile with a red curved arrow indicating rotation or change, alongside a yellow rectangular panel (no text or symbols)4.1 Control and adjustment
4.1.1 Control panel description
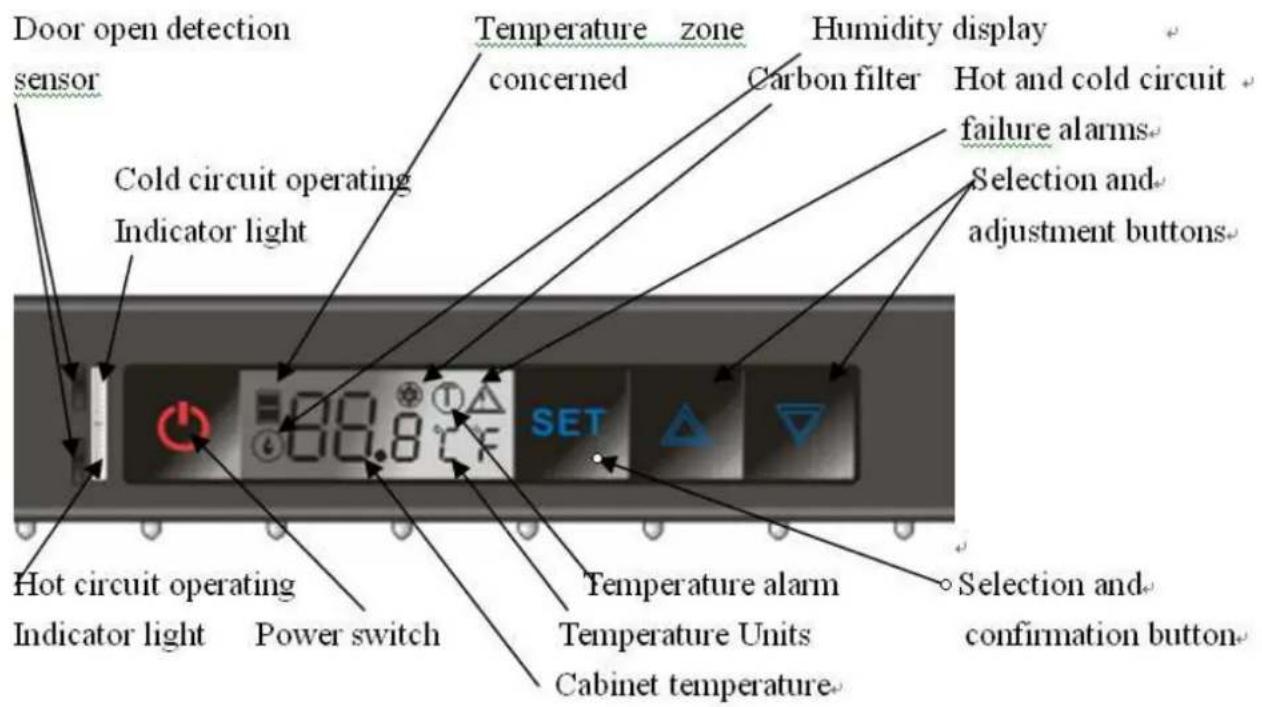
4.1.2 Temperature settings
(1)Press SET, the display start to flash, then press □ or ▼ to adjust temperature. Press SET again when finish setting.
(2)The button is disabled without pressing SET. Press and hold down for 5 seconds to display the life of carbon filter (unit: day). Otherwise the display automatically returns to the temperature display after 15 seconds.
Note: Don't press SE7 when displaying the life of carbon filter, or the number of life will be disordered.
(3)The button is disabled without pressing SET. Press and hold down for 5 seconds to display the two LED mode: Stay on mode, displaying symbol “Ec t”. When door opens, displaying symbol “Ec L”. Press to choose LED mode, then press SET when confirm. Otherwise the display automatically returns to the temperature display after 15 seconds.
(4) Press and hold ⏻ for 5 seconds, all output will be cut off including the display and LED. Gently press ⏻ to restore all output.
(5) press and together at sametime, humidity values will be displayed on the display panel, after 5 seconds, the display should be returned to the original layout automatically.
4.1.3 Alarm explanation
“Door open” alarm: will flash when door is open for more than 15 minutes and your will hear the buzzer ring three times every 30 seconds. Buzzer will stop automatically after 3 minutes.
“Invalidation of carbon filter” alarm: When the carbon filter is disabled, will flash and the buzzer will
ring. Change the carbon filter and press for 5 seconds, then the life of new carbon filter will display
when pressing SET
4.1.4 Humidity alarm display
When the relative humidity values less than 50% more than 72 hours, the display symbol “” will flashes. The symbol should lifting flash until the humidity is greater than 50%.
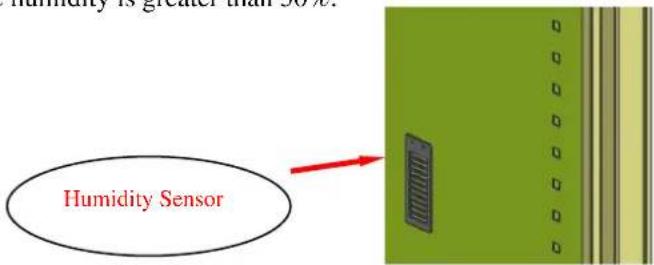
4.1.5 Operating faults
Temperature: ● will flash when the temperature excess the limit between -30^ and 60^ . Buzzer will ring every 10 seconds until pressing for
Hot and cold circuits: ⚠️ will flash when there is fault about hot and cold circuits, buzzer will ring every 10 seconds until pressing 📄 or.
4.1.6 Winter position: How does it work?
- When the setting temperature is lower than the internal temperature of the cabinet, the machine will start to work and refrigeration. The cold circuit operating indicator light will be on (green color)
- When the setting temperature is higher than the internal temperature of the cabinet, the machine will stop working and stop the cooling, heating wire will begin to work to maintain cabinet temperature equilibrium. Machines' work or stop without any environmental temperature. The hot circuit operating indicator light will be on (red color).
5. Attention
(1) After unpacking your cabinet, take the discarded packaging, the majority of which is recyclable, to a refuse collection point.
(2) Do not wipe the back of wine cabinet with wet cloth.
(3) Do not place electric appliance or food on top of the cabinet.
(4) Not for outdoor use.
(5) Clean the dust on the rear condenser at least twice a year.
(6) The compressor start working 3 minutes after switching on the power. If the compressor does not start immediately, it does not mean faulty.
(7) Switch off the power and take out the power lead before moving the wine cabinet. Take out all bottles before moving.
(8) Do not keep the door open any longer than necessary.
(9) Do not allow children to climb, sit on, stand on or hang from the shelves of the wine cabinet. They could damage the wine cabinet and cause themselves serious injury.
(10) Take care to keep keys out of reach of children in order to avoid them locking themselves in the cabinet.
(11) Do not try to repair any damaged wire or electric components. Contact your distributor or service agent.
6. Simple problem analyses
| Problem Problem | analyses Resolve method | |
| Compressor not working | Power not connected Check the power | |
| Power lead or wire damaged Contact distributor or service agent | ||
| Fuse broken Change fuse | ||
| Internal circuit fault Contact distributor or service agent | ||
| Power supply off Check if power cut | ||
| In heating process Common phenomena. When the temperature inside cabinet is lower than that you set, the cabinet will be heated automatically | ||
| Compressor noisy or frequently on or off | Power supply not stable Switch off the power, restart 3 minutes later | |
| Cabinet not on flat floor Adjust front feet until perfect level | ||
| Not cold enough Temperature | Temperature set too high Check temperature, reset it | |
| Door open too long or too often Only open when necessary | ||
| Door seal damaged | Contact your distributor or service agent | |
| LED do not light | Electric circuit problem | Contact your distributor or service agent |
| LED damaged | Contact your distributor or service agent | |
| Can not close door properly | Cabinet not on level | Adjust front feet until perfect level |
| Door installation incorrect after change hanging side | See Alternative hanging of door and install it correctly | |
| Shelf extend out of the case | Put the shelf back to right position | |
Setting temperature and measured temperature may be different (2 or 3°C). This is normal, the reason can be temperature sensor position or external conditions
CE
La Sommelière Int.


- HANDLEIDING VAN UW WIJNKAST
- BESCHRIJVING VAN UW WIJNKAST
- De deurgreep monteren
- 2.PLACE YOUR CABINET
- 3.INSTALLING YOUR WINE CABINET
- Summary of parts
- Installing the drip tray
- Installing the carbon filter
- Installing the handle of door
- Alternative hanging of the door (excepted full door with lock)
- Installing the shelves
- Installing the shelf bracing
- Installing the wooden shelf
- The installation of door base support
- The installation of the wall separate screws
- Control and adjustment
- Control panel description
- Temperature settings
- Alarm explanation
- Humidity alarm display
- Operating faults
- Winter position: How does it work?
- Attention
- Simple problem analyses
Brand : LA SOMMELIERE
Model : TRV250
Category : Fridge