K3 C55 MCXR - Cooker INDESIT - Free user manual and instructions
Find the device manual for free K3 C55 MCXR INDESIT in PDF.

User questions about K3 C55 MCXR INDESIT
0 question about this device. Answer the ones you know or ask your own.
Ask a new question about this device
Download the instructions for your Cooker in PDF format for free! Find your manual K3 C55 MCXR - INDESIT and take your electronic device back in hand. On this page are published all the documents necessary for the use of your device. K3 C55 MCXR by INDESIT.
USER MANUAL K3 C55 MCXR INDESIT
Installation and use
Herd
Installation un gebrauch
GB Cooker with electric multifunction oven 5 programs
Instructions for installation and use 3
In order to guarantee that your appliance operates in a safe and efficient manner:
- seek help only from authorised technical assistance centres;
• always insist on the use of original spare parts.
1 This appliance was designed for domestic use inside the home.
2 These instructions are only valid for the countries whose symbols appear in the manual and on the serial number plate located on the appliance.
3 This is a class 1 (insulated) or class 2 - subclass 1 (recessed between 2 cabinets) appliance.
4 Before using the appliance, please read this instruction booklet carefully as it contains important information regarding the safe installation, use and maintenance of the cooker. Keep this booklet in a safe place so that, if necessary, it may be consulted at a later date.
5 After the packaging has been removed, ensure that the appliance is intact and not damaged in any way. If there is any doubt, contact a professionally qualified technician and do not use the appliance. All packaging (plastic bags, polystyrene foam, staples, etc.) should be kept out of reach of children as it is potentially dangerous.
6 The appliance must be installed by a qualified person in compliance with the instructions provided. The manufacturer shall not be held responsible for any harm caused to persons or animals or for any damage to personal property resulting from incorrect installation.
7 The electrical safety of this appliance is only guaranteed when it has been correctly connected to an efficient earthed electricity supply in compliance with current electrical safety regulations. This is a fundamental safety requirement that must be checked and, if there is any doubt, you should ask a professionally qualified technician to carry out a thorough check of the supply system. The manufacturer may not be held responsible for any damage caused by a mains supply that has not been earthed correctly.
8 Before connecting the appliance, make sure its rating (which can be found on the appliance itself and/or on the packaging) corresponds to the power supply.
9 Make sure that the mains supply and the electrical sockets can withstand the maximum power of the appliance, which is indicated on the serial number plate. If there is any doubt, contact a professionally qualified technician.
10 The appliance must be connected to the mains by means of an omnipolar switch with a minimum contact opening of 3 mm.
11 If the socket is incompatible with the plug, ask a professionally qualified technician to replace it with a suitable one. The technician should also make sure that the power cables attached to the socket can withstand the maximum power of the appliance. In general, it is not advisable to use adaptors, multiple sockets and/or extension cords. If this cannot be avoided, only use single or multiple adaptors and extension cords that comply with current safety regulations. Never exceed the maximum current capacity indicated on the single adaptor or extension cord, or the maximum power level indicated on the multiple adaptor.
12 Do not leave the appliance plugged in if it is not in use. Shut off the main switch for the appliance when it is not being used.
13 The openings used for ventilation and dispersion of heat must never be covered.
14 Do not attempt to replace the power supply cable yourself. If the cable is damaged or needs replacing, contact a technical assistance centre that has been authorised by the manufacturer.
15 This appliance should only be used for the purpose for which it was designed. Any other purpose (for example, heating the room) constitutes improper use of the oven and is dangerous. The manufacturer may not be held responsible for any damage caused as a result of improper, incorrect and unreasonable use of the appliance.
16 All users of electrical appliances should observe several basic rules. These include:
- Do not touch the appliance with wet or damp hands or feet.
- Do not use the appliance when barefoot.
- Do not use extension cords. If this cannot be avoided, be especially careful.
- When unplugging the appliance always pull the plug from the mains socket, do not pull on the cable.
- Do not leave the appliance exposed to atmospheric agents (rain, sunlight, etc.)
- Do not allow children or disabled individuals to operate the appliance without supervision.
17 Always disconnect the appliance from the mains supply (either by unplugging it or by shutting off the switch) before cleaning it or carrying out any maintenance work.
18 Before disposing of the appliance, make it unusable by unplugging it and cutting off the power supply cable. It is also advisable to remove any potentially hazardous parts, especially with regard to children who may use the old appliance as a toy.
19 Do not use unstable or misshapen pans on the electric cooking zones; this will help to avoid accidental spills. Make sure pan handles are turned towards the centre of the hob in order to avoid accidental burns.
20 Do not use flammable liquids (alcohol, petrol, etc...) near the appliance while it is in use.
21 If you are using small domestic appliances near the hob, ensure that their power supply cables do not come into contact with the hot parts of the surface.
22 Always make sure that the knobs are in the "•"/" ""/" " position when the appliance is not in use.
23 The heating elements and certain parts of the oven door become extremely hot when the appliance is in use. Do not touch these parts yourself and keep children well away from the appliance.
24 If the cooker is placed on a pedestal, take all necessary precautions to ensure that the appliance does not slide off this pedestal.
25 If the surface of the glass cracks, unplug the appliance immediately. For any repairs, contact only an authorised after-sales service centre and demand original spare parts. Failure to comply with the above may compromise the safety appliance.
26 The glass ceramic hob is resistant to thermal and mechanical shocks. However, it may break due to a shock caused by a sharp object, such as tool for example. In this case, unplug the appliance immediately and contact an authorised after-sales service centre to have it repaired.
27 Remember that the heating area stays hot for at least half an hour after being turned off; please refrain from placing any cookware or other items on the cooking zone while still hot
Installation
The following instructions should be carried out by a qualified technician to ensure that the appliance is installed, adjusted and technically serviced correctly in compliance with current regulations.
Important: always disconnect the cooker from the power supply cable before carrying out any maintenance operations or adjustments, etc.
Positioning
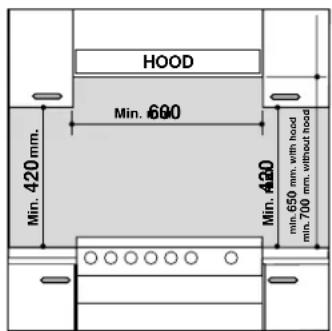
The appliance may be installed next to cabinets that are not taller than the worktop. The following precautions must be taken when installing the cooker:
a) Kitchen cabinets adjacent to the appliance and taller than the worktop must be at least 200 mm from the edge of the top.
b) Hoods must be installed according to their relative installation instruction manuals and at a minimum distance of 650 mm from the worktop.
c) Position the wall cabinets adjacent to the hood at a minimum height of 420 mm from the worktop (see figure).
d) If the hob is installed beneath a wall cabinet, the latter must be situated at a minimum of 700 mm (millimetres) above the worktop as shown in the figure.
e) The installation cavity should have the dimensions indicated in the figure.
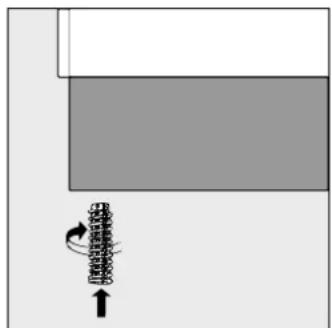
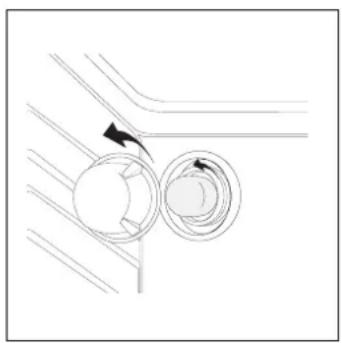
Levelling
Adjustable feet (see fig. 1) are supplied with the cooker in order to ensure it is perfectly level. These may be screwed into the holes provided on each corner of the base of the cooker.
text_image
HOOD Min. 680 Min. 420 mm. Min. 650 mm. with hood min. 700 mm. without hood Min. 420Electrical connection
The cable should be suited to the type of electrical connection used (see connection diagram below).
natural_image
Diagram showing a mechanical component with rotational motion indicated by an arrow (no text or symbols present)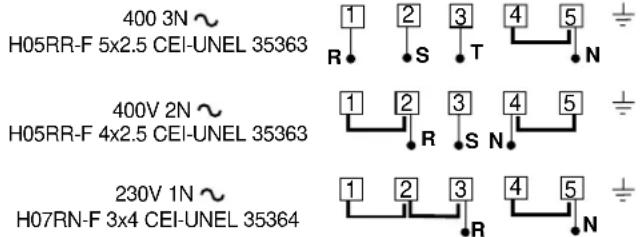
text_image
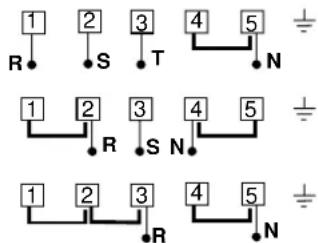
400 3N ~ H05RR-F 5x2.5 CEI-UNEL 35363 400V 2N ~ H05RR-F 4x2.5 CEI-UNEL 35363 230V 1N ~ H07RN-F 3x4 CEI-UNEL 35364Installing the power supply cable
To open the terminal board:
- Loosen the screw "V".
- Remove the junction block cover by pulling it.
To install the power supply cable, follow the instructions below: - position the small A-B connection according to the type of connection you wish to carry out, following the diagram in figure 3.
Note: the Factory prepares small connections for 230V single-phase connection (contacts 1-2-3 are connected to each other). The 4-5 jumper is located on the lower area of the terminal board.
text_image
Technical diagram showing electrical switch installation and motor assembly with labeled components- Position the cables (N and ± ) as demonstrated in the figure and tighten the corresponding screws.
- Fasten the remaining cables to terminals 1-2-3.
- Secure the power supply cable by fastening the cable clamp screw then replace the cover using the screw "V".
Connecting the supply cable to the mains
Install a standardised plug corresponding to the load indicated on the data plate. If the appliance is directly connected to the mains supply, an omnipolar circuit-breaker (switch) should be fitted, with a minimum contact opening of 3 mm. This switch must be able to withstand the maximum load of the appliance and must conform to all current safety regulations (the earth wire should not be interrupted by the switch). The power supply cable should be positioned in such a way that it does not reach temperatures of more than 50°C over the temperature of the room, along its whole length. Before connecting the appliance to the power supply, make sure that:
- The modulating valve and the electricity supply can withstand the maximum power of the appliance (see data plate for details).
- The power supply has an efficient earthing system that conforms to current regulations.
- the socket or the switch is easily accessible once the cooker has been installed.
Technical characteristics
Oven
Measurements (LxDxH) 39x41x34 cm
Volume 54 I
Max. oven consumption 2100 W
Ceramic hob
Front Left 1200 W
Back Left 1700 W
Back Right 1200 W
Front Right 1700 W
Max. ceramic hob consumption 5800 W
ENERGY LABEL
Directive 2002/40/EC on the label of electric ovens
Standard EN 50304
Forced convection energy consumption
heating mode: Fan-assisted
Declared natural convection energy consumption
heating mode: Static
Voltage and Frequency
see data plate
Useful measurements relating to the oven compartment:
Width: 42 cm
Depth: 44 cm
Height: 23 cm

This appliance conforms to the following European Economic Community directives:
- 73/23/EEC dated 19/02/73 (Low Voltage) and subsequent amendments;
- 89/336/EEC dated 03/05/89 (Electromagnetic Compatibility) and subsequent amendments;
- 93/68/EEC dated 22/07/93 and subsequent amendments.
text_image
104 60 50 85/90Disposal of old electrical appliances
The European Directive 2002/96/EC on Waste Electrical and Electronic Equipment (WEEE), requires that old household electrical appliances must not be disposed of in the normal unsorted municipal waste stream. Old appliances must be collected separately in order to optimise the recovery and recycling of the materials they contain and reduce the impact on human health and the environment. The crossed out "wheeled bin" symbol on the product reminds you of your obligation, that when you dispose of the appliance it must be separately collected.
Consumers may take their old appliance to public waste collection areas, other communal collection areas, or if national legislation allows return it to a retailer when purchasing a similar new product.
All major household appliance manufacturers are active in the creation of systems to manage the collection and disposal of old appliances.
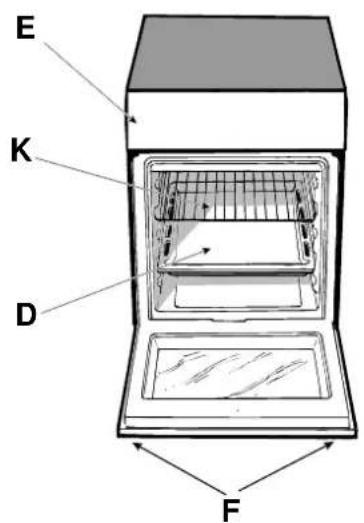
Cooker with multifunctional oven and glass ceramic hob
D. Dripping pan or baking sheet
E. Control panel
F. Adjustable feet or legs
H. Cooking zone indicator light
1. Control knobs for cooking zones
K. Oven grill rack
L. Thermostat indicator light
M. Thermostat knob
N. Selector knob
Q. Clock with timer function
text_image
Diagram of a control panel with labeled buttons and indicators, showing a sequence of rotary switches and directional arrows.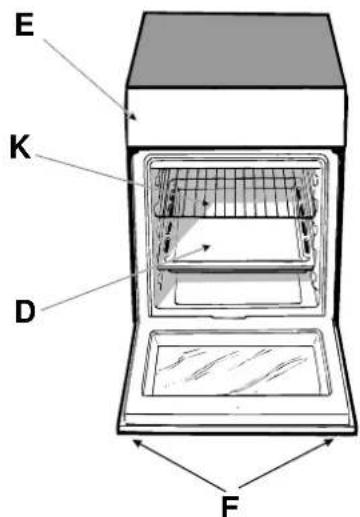
text_image
E K D FUsing the cooker
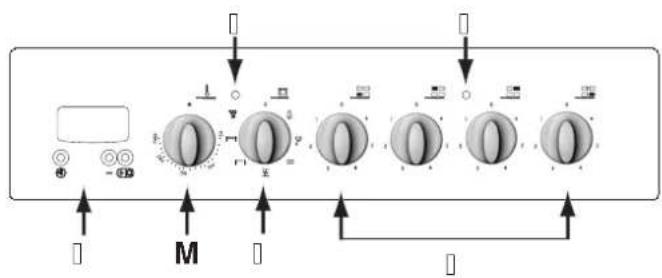
The various features of cooker may be controlled using the knobs and buttons located on the control panel.
Warning: before using the oven and grill for the first time, leave it to heat up for approximately 30 minutes. Check that the oven is empty, the thermostat is set to maximum, the door is shut and that the room is well-ventilated. The oven may emit a slightly unpleasant odour during this time due to the evaporation of the protective substances applied to the oven and grill at the end of the manufacturing process.
Warning: Only use the lowest shelf when cooking with the turnspit (if provided). Never use the lowest shelf for any other type of cooking, and never place any objects on the bottom of the oven while it is operating, as this could damage the enamel coating. Always place cookware (dishes, aluminium trays, etc.) on the rack provided, ensuring the rack is correctly positioned using the guide rails inside the oven.
Oven control knobs
The “5-programme” oven combines the advantages of a traditional “static” oven with those of a modern “fan-assisted” oven.
The “5-programme” oven is extremely versatile and offers 5 different cooking modes that are both simple and safe. Use the knobs to select the different cooking functions offered by the “5-programme” oven.
N - Programme selector knob
M - Thermostat knob
If the selector knob is in any other position than the off position (marked with "o"), the oven light will illuminate; if the knob is turned to the position the light may be switched on without any of the heating elements being activated. The position marked with the 8 symbol enables the light to be switched on without any of the heating elements being activated. When the oven light is on, this shows that the oven is in use; the light will remain on until the oven is switched off.
"Defrosting" programme
Turn the thermostat knob "M": to any position
The fan at the bottom of the oven circulates room-temperature air around the food. This programme is suitable for defrosting any type of food, especially delicate items that should not be heated, for example: ice-cream cakes or cakes made with custard, cream or fruit. The defrosting time will be approximately halved. When defrosting meat, fish or bread, the process may be accelerated by using the “multi-cooking” mode and setting a temperature between 80°C and 100°C.
Static oven
Position the thermostat knob "M": Between 50°C and Max.
This position activates both the top and bottom heating elements. This is the classic traditional oven that has been modified to ensure an exceptional level of heat distribution while limiting the amount of energy consumed. The static oven remains unsurpassed in the cooking of dishes with ingredients consisting of two or more elements, which are combined to make a single dish, for example: cabbage with pork ribs, Spanish-style dried cod, Ancona-style stockfish, tender veal with rice, etc... This cooking mode is the best way of cooking beef or veal-based dishes, for example: braised meat, stews, goulash, game meat, pork leg and loin, etc... as these must be cooked slowly, with liquid added regularly. It is also the best way of cooking deserts, fruit and dishes that require covered recipients designed for use in the oven. When using the oven in static mode, use only one shelf (using more than one shelf may adversely affect heat distribution). By using the different shelves available, the heat distribution between the top and bottom of the oven may be balanced as desired. If a dish requires more heat at the top or bottom of the oven, use the lower or upper shelves respectively.
Fan-assisted oven
Turn the thermostat knob "M": Between 50°C and Max.
The heating elements and the fan are activated. Because the heat is distributed evenly throughout the oven, the air cooks and browns food in a uniform manner. You may also cook different dishes at the same time, provided that the cooking temperatures are similar. It is possible to use a maximum of 2 racks at the same time, following the instructions given in the paragraph entitled "Cooking on several shelves simultaneously".
This function is particularly suitable for cooking dishes “au gratin”, or for dishes requiring a reasonably long cooking time, for example: lasagne, pasta bake dishes, roast chicken and potatoes, etc... There are substantial advantages to this mode when cooking roast meats, as the improved temperature distribution enables lower temperatures to be set, thus reducing the amount of juices that escape from the meat, making it less likely to shrink in the oven and more tender to eat. The fan-assisted mode is particularly useful when cooking fish, which can be cooked in this way with a minimal amount of liquid added, therefore maintaining its original taste and appearance.
Dessert: this mode is completely safe to use when cooking leavened cakes.
The “fan-assisted” function may also be used for defrosting red or white meat or bread quickly, by setting the temperature to 80^ C. To defrost more delicate foods, set the temperature to 60^ C or use the cold air circulation by setting the temperature knob to 0^ C.
"Top" oven | —
Turn the thermostat knob "M": Between 50°C and Max.
The top heating element comes on.
This mode can be used to brown food at the end of cooking.
Grill |
Position the thermostat knob "M": Between 50°C and Max. The central top heating element and the turnspit will be activated.
The extremely high and direct temperature of the grill makes it possible to brown the surface of meats and roasts while locking in the juices to keep them tender. The grill is also highly recommended for dishes that require a high surface temperature: such as beef steaks, veal, rib steak, fillets, hamburgers etc...
Some grilling examples are included in the “Practical cooking advice” section.
Fan-assisted Grill
Position the thermostat knob "M": Between 50°C and Max.
The central top heating element and the fan will be activated. This combination of features increases the effectiveness of the unidirectional thermal radiation of the heating elements through forced circulation of the air throughout the oven. This helps prevent food from burning on the surface, allowing the heat to penetrate right into the food. Excellent results are obtained by using the fan-assisted grill to cook mixed meat and vegetable kebabs, sausages, pork ribs, lamb cutlets, spicy chicken, sage-dressed quail, pork fillet etc...
Cook dishes "au gratin" in this mode with the oven door
closed.
"Gratin" is the best way of cooking sliced perch, tuna, swordfish, stuffed squid, etc...
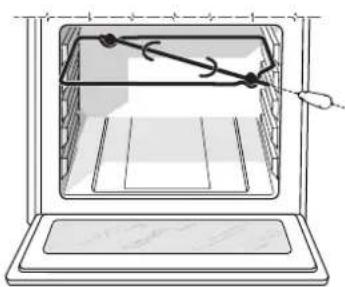
The turnspit
To activate the turnspit, follow the instructions below:
a) Place the dripping pan on the 1st rack.
b) Position the rotisserie support on the 3rd rack and insert the spit towards the rear, threading it through the hole provided.
c) Start the rotisserie by turning knob "N" to the |W| position.
natural_image
Line drawing of an oven with a handle and internal structure, no text or symbols presentOven light
This is switched on by turning knob "N" to the 🔔 symbol. The oven lights up and remains lit as long as any of the electric heating elements of the oven are in operation.
Thermostat indicator light (L)
This indicates the heating-up phase of the oven; as soon as the inside of the oven reaches the set temperature the light switches off. At this point the indicator light will switch on and off intermittently; this shows that the thermostat is operating correctly in order to maintain a constant temperature inside the oven.
The electronic timer (Q)
Warning
Keep children away from the oven door as it can become extremely hot when the oven is in operation.
This function displays the time and works as a timer which counts down to zero.
Note: all functions will be implemented approximately 7 seconds after they have been set.
Resetting the clock
After the appliance has been connected to the power supply, or after a power cut, the clock display will automatically reset to 0:00 and begin to blink.
- Press button and then buttons _ and _ to set the exact time. Press and hold the buttons to quicken the count upwards.
Any necessary modifications can be made by repeating the above process.
Timer feature
This function may be accessed by pressing the button, after which the display will show the symbol “.” Every time the button is pressed it corresponds to a time increase of 10 seconds, until it reaches 99 minutes and 50 seconds. After this point, each press of the button represents an increase of one minute, up to a maximum of 10 hours.
Pressing the _ button reduces the time.
After the time period has been set, the timer will begin to count down. When the timer reaches zero, the buzzer will sound (this may be stopped by pressing any button).
The time may be displayed by pressing the button, and the " " symbol indicates that the timer function has been set. After approximately 7 seconds, the display will automatically revert to the timer.
Cancelling a time that has already been set
Press the _ button until the display shows 0·00.
Adjusting the buzzer volume
After selecting and confirming the clock settings, use the _ button to adjust the volume of the alarm buzzer.
Practical cooking advice
The oven offers a wide range of options, enabling each food to be cooked in the most suitable way. It takes time to understand how to get the best out of this versatile appliance, therefore the notes below are only intended as a set of guidelines, which may then be expanded as you gain more personal experience.
Baking cakes
The oven must be preheated when a cake is placed inside; wait for the preheating phase to finish (approximately 10-15 minutes). Cooking temperatures for cakes vary between 160^ C and 200^ C. Do not open the door while you are baking a cake as this could cause it to collapse.
Cake is too dry
Next time you bake a cake, set the temperature 10^ C higher and reduce the cooking time.
Cake collapses
Use less liquid or lower the temperature by 10^ C.
Cake is burnt on to
Place it on a lower rack, set a lower temperature and extend the cooking time.
Cooked well on the outside, but sticky in the centre
Use less liquid, reduce the temperature and increase the cooking time.
Cake sticks to the mould
Grease the mould well and dust with a little flour, or use baking paper.
Having used several rack positions (in the “fan-assisted” mode), not all the cakes are cooking at the same rate
Set a lower temperature.
Racks inserted at the same time should not necessarily be taken out at the same time.
Cooking fish and meat
Use low temperatures when cooking white meat, game and fish. (150°C-175°C). If you wish red meat to be cooked well on the outside but juicy on the inside, start with a high temperature (200-220°C) for a short time and then reduce it. As a general rule, the more meat there is, the lower the temperature and the longer the cooking time should be. Place the meat in the centre of the rack and position a container underneath to collect drops of fat. Place the rack in the centre of the oven. If the cooking method requires more heat coming from below the meat, use the lowest shelf.
Cooking on several shelves simultaneously
Whenever it is necessary to use two racks, only use the “fan-assisted oven” function, which is really the only option available when cooking in this manner.
- The oven has 5 different rack positions. Only use the two central positions when cooking in the fan-assisted mode:
the outer rack positions (higher and lower) receive more direct heat and more delicate foods may burn.
- In general, use the second and fourth rack positions (when counting from the bottom of the oven upwards), placing the food that needs more heat on the second rack position. For example: if you wish to cook a roast with another type of food, put the roast on the second rack position and the more delicate food on the fourth.
- When cooking foods that require different cooking times and temperatures, set the temperature to a value halfway between the two recommended values and place the more delicate food on the fourth rack position. Remove the food that needs less cooking time first.
- Place the dripping pan on the lowest rack position and the grill on the highest.
- When cooking pizzas on more than one rack with the temperature set to 220°C, remember to preheat the oven for at least 15 minutes. Generally, cooking on the fourth rack takes longer; for this reason it is advisable to remove the pizza on the lower shelf first, leaving the other pizza inside for a few minutes.
Using the grill
The oven offers two different grilling methods: Use the "top oven" function for small items. The energy consumption for this mode is only 1200 W. It is therefore ideal for grilling smaller dishes: for example toast, hot dogs, etc.
Position the food in the centre of the grill, as only the central part of the top heating element will be switched on in this mode. Food placed at the corners of the grill will not be cooked.
The “grill” position enables the whole surface of the grill to be used. Use this mode when there is a uniform distribution of food and you wish to brown the top of the food evenly.
Important: To obtain the best results and to save energy (approximately 10%), always keep the oven door closed when using the grill function.
When using the grill function, we recommend that you set the thermostat to its maximum value. However, this does not mean that you cannot use lower temperatures.
When using the grill function, position the grill on the highest shelf (see cooking advice table) and place the dripping pan underneath it to collect any drips of fat.
The “Fan-assisted grill” position is extremely useful for grilling foods quickly as it distributes the heat emitted by the grill, allowing the surface of the food to brown while the inside is actually being cooked. It enables large pieces of meat or poultry to be grilled without using the turnspit. It can also be used in the final part of the cooking process for dishes that require a little browning on the surface, for example it is an ideal way of browning the top of a baked pasta dish after it has been cooked.
When cooking in this mode place the grill on the 2nd or 3rd rack position from the bottom of the oven (see cooking advice table), then position a dripping pan on the lowest shelf to collect drips of fat and avoid the formation of smoke. By using this mode in conjunction with the spit (selected models only) it is possible to cook dishes in the dripping pan on the lowest shelf, for example: potatoes, etc...
Instructions for using glass ceramic hobs
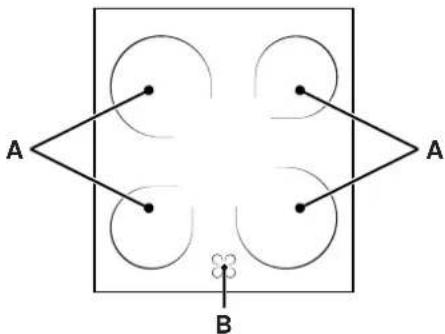
Description
The hob is fitted with electric heating elements located just under the surface of the hob (in the areas that become red when the elements are switched on).
A. Cooking zone (A).
B. Lights indicating that the temperature of the corresponding elements have exceeded 60^ ; these remain lit even if the hob has been switched off.
flowchart
graph TD
    A1["•"] --> A2["•"]
    A2 --> A3["•"]
    A3 --> B1["•"]
    A4["•"] --> A5["•"]
    A5 --> A6["•"]
    A7["•"] --> A8["•"]
    A8 --> A9["•"]
    style A1 fill:#fff,stroke:#000
    style A2 fill:#fff,stroke:#000
    style A3 fill:#fff,stroke:#000
    style A4 fill:#fff,stroke:#000
    style A5 fill:#fff,stroke:#000
    style A6 fill:#fff,stroke:#000
    style A7 fill:#fff,stroke:#000
    style A8 fill:#fff,stroke:#000
    style B1 fill:#fff,stroke:#000
    style B2 fill:#fff,stroke:#000
    style B3 fill:#fff,stroke:#000
    style B4 fill:#fff,stroke:#000
    style B5 fill:#fff,stroke:#000
    style B6 fill:#fff,stroke:#000
Description of the heating elements
The radiant heating elements are circular and become red 10 - 20 seconds after they have been switched on.
Instructions for using glass ceramic hobs
To obtain the best possible results from your hob, follow a few simple rules when preparing or cooking food.
- All types of saucepan or frying pan can be used on glass ceramic hobs. However, the base of the pan must be perfectly flat. Of course, the thicker the base of the saucepan or frying pan, the more evenly heat will be distributed.

natural_image
Three identical line-drawn icons of cooking pots with crossed x marks, no text or symbols present.- Make sure that the base of the pan completely covers the ring: this enables all the emitted heat to be used.

natural_image
Three schematic symbols showing crossed-out electrical components on a surface, no text or labels present• Always make sure that the base of the pan is clean and dry: this not only guarantees optimal contact between the base of the pan and the hob, but also means they will suffer less wear and tear and ultimately last longer.
- Do not use pans that have been used on gas burners, as the heat from this type of burner can distort the base of the pan, which, if then used on a glass ceramic hob, will be less effective than a pan with a completely flat base.
Practical advice on using the cooking zones
Control knobs for the cooking zones on the hob (I)
Cookers may be fitted with a series of rapid and automatic cooking zones in various combinations (rapid cooking zones may be distinguished from the others by a red spot in the centre while the automatic zones have an aluminium disc in the centre).
To avoid heat loss and damage to the cooking zones, use cookware with a flat base, whose diameter is no smaller than that of the cooking zone itself.
The table shows the relationship between the position of the knobs and the type of cooking recommended for cooking zones.
| Pos. | Normal or rapid cooking zone |
| 0 | Off |
| 1 | Cooking fish and vegetables |
| 2 | Cooking potatoes (steaming), soups, pulses |
| 3 | Continuing to cook large quantities of food, chunky soups |
| 4 | Roasting (medium) |
| 5 | Roasting (well done) |
| 6 | Browning or reaching boiling point in a short period of time |
Cooking zone indicator light
This light illuminates when a cooking zone has been activated.
Practical cooking advice
| Selector knob position | Food to be cooked | Weight (in kg) | Rack position to be used (counting up from the bottom) | Preheating time (minutes) | Thermostat knob position | Cooking time (minutes) |
| Defrosting | All frozen foods | |||||
| Static | Duck | 1 | 3 | 15 | 200 | 65-75 |
| Roast veal or beef | 1 | 3 | 15 | 200 | 70-75 | |
| Roast pork | 1 | 3 | 15 | 200 | 70-80 | |
| Biscuits (shortcrust pastry) | - | 3 | 15 | 180 | 15-20 | |
| Tarts | 1 | 3 | 15 | 180 | 30-35 | |
| Fan-assisted | Pizza (on 2 racks) | 1 | 2-4 | 15 | 220 | 15-20 |
| Lasagne | 1 | 3 | 10 | 200 | 30-35 | |
| Lamb | 1 | 2 | 10 | 180 | 50-60 | |
| Roast chicken + potatoes | 1 | 2-4 | 10 | 180 | 60-75 | |
| Mackerel | 1 | 2 | 10 | 180 | 30-35 | |
| Sponge cake made with yoghurt | 1 | 2 | 10 | 170 | 40-50 | |
| Cream puffs (on 2 racks) | 0.5 | 2-4 | 10 | 190 | 20-25 | |
| Biscuits (on 2 racks) | 0.5 | 2-4 | 10 | 180 | 10-15 | |
| Sponge cake (on 1 rack) | 0.5 | 2 | 10 | 170 | 15-20 | |
| Sponge cake (on 2 racks) | 1.0 | 2-4 | 10 | 170 | 20-25 | |
| Savoury pies | 1.5 | 3 | 15 | 200 | 25-30 | |
| Top oven |—| | Browning food as a finishing touch - 3/4 15 220 - | |||||
| Grill |→| | Sole and cuttlefish | 1 | 4 | 5 | Max | 8-10 |
| Squid and prawn kebabs | 1 | 4 | 5 | Max | 6-8 | |
| Cod fillet | 1 | 4 | 5 | Max | 10 | |
| Grilled vegetables | 1 | 3/4 | 5 | Max | 10-15 | |
| Veal steak | 1 | 4 | 5 | Max | 15-20 | |
| Cutlets | 1 | 4 | 5 | Max | 15-20 | |
| Hamburgers | 1 | 4 | 5 | Max | 7-10 | |
| Mackerel | 1 | 4 | 5 | Max | 15-20 | |
| Toast | n.° 4 | 4 | 5 | Max | 2-3 | |
| With the turnspit | ||||||
| Spit-roast veal | 1.0 | - | 5 | Max | 80-90 | |
| Spit-roast chicken | 1.5 | - | 5 | Max | 70-80 | |
| Spit-roast lamb | 1.0 | - | 5 | Max | 70-80 | |
| Fan-assisted grill | Grilled chicken | 1.5 | 3 | 5 | 200 | 55-60 |
| Cuttlefish | 1.5 | 3 | 5 | 200 | 30-35 | |
N.B.: The cooking times listed above are intended as guidelines only and may be modified according to personal tastes. When cooking with the grill or the fan-assisted grill, the dripping pan should be placed on the lowest shelf.
Routine maintenance and cleaning
Disconnect the oven from the electricity supply before cleaning it or carrying out any maintenance work. Clean the oven thoroughly and regularly in order to increase its durability, following the instructions below:
- Do not use steam cleaners on the appliance.
- The enamel-coated parts and self-cleaning panels should be washed in hot water. Do not use abrasive powder detergents or corrosive substances as these could damage the finish.
- The inside of the oven should be cleaned at regular intervals while it is still warm, using hot water and detergent then rinsing and drying it thoroughly.
- Stainless steel can be marked by hard water that has been left on the surface for a long time, or by aggressive detergents containing phosphorus. After cleaning, rinse well and dry thoroughly. Any water spills should also be dried.
- Prevent a build-up of dirt and grease on the control panel by cleaning it frequently. Use a non-abrasive sponge or a soft cloth to avoid scratching the shiny steel or enamel-coated parts.
Cleaning the surface of the hob
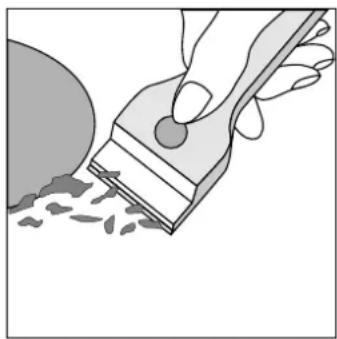
The surface of the hob should be cleaned with a damp cloth before cooking to remove dust or food residues. The surface of the hob should be cleaned regularly with a solution of warm water and light detergent. It may occasionally be necessary to use a special glass ceramic cleaning product. First remove all food and grease spills using a window scraper, preferably a razor blade-type scraper (not supplied) or, failing that, a fixed razor blade type scraper.
Then clean the hob with a paper towel and a suitable detergent while it is still hot to touch. Lastly, rinse the hob thoroughly and dry it with a clean cloth. If a piece of plastic or aluminium
natural_image
Illustration of a hand using a tool to brush a circular object with granular material (no text or symbols)foil accidentally melts on the surface of the hob, remove it from the hot cooking zone immediately using a scraper in order to avoid damaging the surface. If any sugar (or sugary food) is spilt on the hob, follow the above instructions. Do not use steel wool or any type of abrasive sponge. Do not use corrosive cleaning products such as oven cleaning sprays or stain removers.
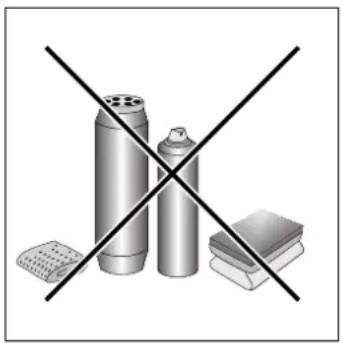
natural_image
Illustration of three spray cans crossed out by a black X mark, with other items below (no text or symbols)| Special glass ceramic cleaning products | Where to buy them |
| Razor blade scraper and replacement blades | Art & Craft shops and Hardware stores |
| Stahl-FixSWISSCLEANERWK TOPOther special glass ceramic products | Home shopsDIY storesHardware storesSupermarkets |
Changing the oven light bulb
- Remove the plug from the mains socket (if accessible) or disconnect the appliance from the electricity supply by shutting off the multipolar switch connecting the two.
- Remove the glass lid covering the lamp socket.
-
Unscrew the bulb and replace it with a new one that can withstand high temperatures (up to 300^ ) and that has the following characteristics:
-
Voltage: 230/240 V
- Power 25 W
- E14 attachment
- Replace the glass cover and reconnect the oven to the power supply.
natural_image
Pure mechanical diagram showing two circular components with directional arrows, no text or symbols presentnatural_image
Diagram showing a mechanical or structural component with an arrow indicating rotational motion (no text or symbols present)400 3N \~ H05RR-F 5x2.5 CEI-UNEL 35363
400V 2N \~ H05RR-F 4x2.5 CEI-UNEL 35363
230V 1N \~ H07RN-F 3x4 CEI-UNEL 35364
text_image
1 2 3 4 5 R S T N 1 2 3 4 5 R S N 1 2 3 4 5 R R NElektroanschluss
text_image
Technical diagram showing a device with labeled parts and an inset view of the switch mechanism.text_image
L H Q M N I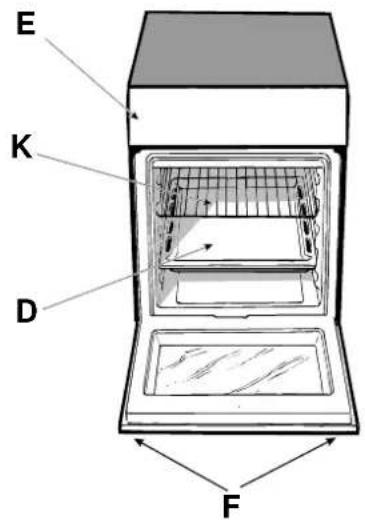
text_image
E K D FInbetriebnahme
natural_image
Diagram of a microwave oven with an open tray and a pointer indicating direction (no text or symbols)natural_image
Three identical line drawings of a cooking pot with crossed x marks, placed horizontally on a baseline (no text or symbols)natural_image
Three schematic symbols showing crossed-out electrical contacts on a surface, no text or labels presentnatural_image
Illustration of a hand using a brush to brush the surface of grains, with no text or symbols present.natural_image
Crossed black-and-white diagram showing three cylindrical objects and a book, no text or symbols presentnatural_image
Pure mechanical diagram showing two circular components with directional arrows, no text or symbols presentnatural_image
Diagram showing a mechanical or structural component with an arrow indicating rotational motion (no text or symbols present)text_image
Technical diagram showing electrical switch installation with labeled components and a magnified view of the switch mechanism.text_image
L H Q M N I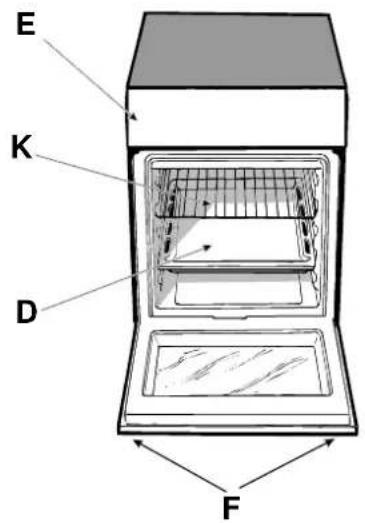
text_image
E K D Fnatural_image
Line drawing of an oven with arrows indicating direction, no text or symbols presentnatural_image
Three identical line-drawn icons of cooking pots with crossed x marks, placed horizontally on a baseline (no text or symbols)natural_image
Three schematic diagrams showing crossed-out electrical symbols: a switch, a pot, and a container (no text or labels)natural_image
Illustration of a hand using a tool to brush or paint onto a surface with scattered particles (no text or symbols)natural_image
Crossed black-and-white diagram showing three cylindrical objects and a book, no text or symbols presentnatural_image
Pure diagram of two circular components with directional arrows, no text or symbols presentOstrzeżenia
natural_image
Diagram showing a mechanical component with rotational motion indicated by an arrow (no text or symbols present)text_image
Technical diagram showing mechanical assembly with labeled components and a magnified view of a device component.text_image
L H Q M N I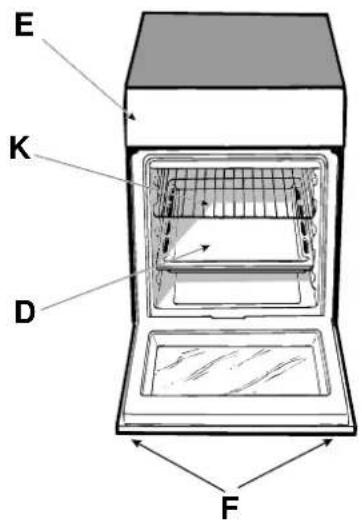
text_image
E K D Fnatural_image
Diagram of a microwave oven with a tray and door, showing internal structure and airflow direction (no text or labels)natural_image
Three identical line drawings of a cooking pot with crossed x marks, placed horizontally on a baseline (no text or symbols)natural_image
Three schematic diagrams showing crossed-out electrical symbols on a surface, no text or labels presentnatural_image
Illustration of a hand using a tool to brush or paint onto a surface, with no visible text or symbols.natural_image
Illustration of three spray cans crossed out by a black X (no text or symbols)natural_image
Diagram of two circular components with directional arrows, no text or symbols presentnatural_image
Pure diagram of a mechanical or structural component with no visible text, numbers, or symbolsnatural_image
Diagram showing a computer monitor with a close-up view of the device's internal structure (no text or symbols)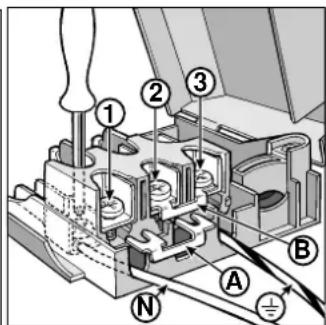
text_image
Technical diagram of a mechanical assembly with numbered components and labeled parts A, B, Ntext_image
Diagram of a control panel with labeled buttons and indicators, including 'M' and directional arrows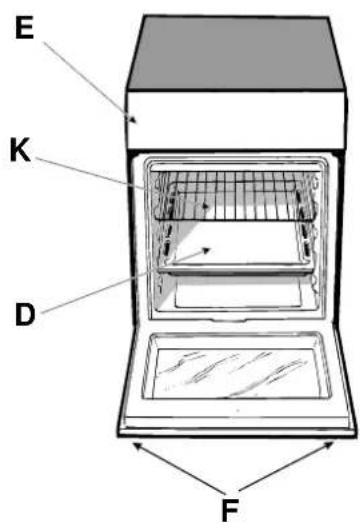
text_image
E K D FMode d'emploi
Four "Décongélation"
Position du bouton thermostat "M": quelconque
natural_image
Line drawing of an oven with a hand pointing to the interior (no text or symbols)Voyant lumineux thermostat (L)
natural_image
Three identical line-drawn icons of cooking pots with crossed x marks, placed horizontally on a baseline (no text or symbols)natural_image
Three schematic symbols showing crossed-out electrical circuit lines, no text or labels presentnatural_image
Illustration of a hand using a tool to brush or scrape material from a circular object (no text or symbols)natural_image
Illustration of three spray cans crossed out by a black X mark, with other items below (no text or symbols)natural_image
Pure mechanical diagram showing two circular components with directional arrows, no text or symbols presentAanwijzingen
natural_image
Diagram showing a mechanical component with rotational motion indicated by an arrow (no text or symbols present)text_image
Diagram showing a device with labeled component 'V' and a magnified view of the switch mechanism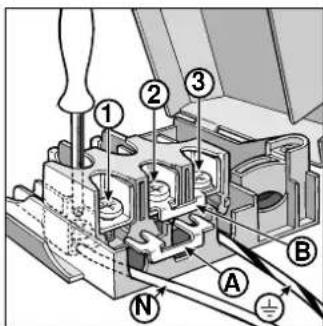
text_image
Technical diagram of a mechanical assembly with numbered components and labeled parts A, B, Ntext_image
Diagram of a control panel with labeled buttons and directional arrows, including labels M and N.