TAB1020 - Tablet LENCO - Free user manual and instructions
Find the device manual for free TAB1020 LENCO in PDF.


| Product Type | 10.1-inch Touchscreen Tablet |
| Brand | Lenco |
| Model | TAB-1020 |
| Operating System | Android 4.2 |
| Screen | Capacitive touchscreen, 25.4 cm (10.1 inches) |
| Processor | Not specified, Android 4.2 version |
| Internal Memory | Internal storage (capacity not specified) |
| Memory Expansion | Micro SD card up to 32 GB |
| Connectivity | Wi-Fi, 3G (via USB dongle), Bluetooth not mentioned |
| Ports | USB OTG, 3.5mm headphone jack, Micro SD slot, 5V DC input |
| Camera | Front and rear camera (depending on model) |
| Supported Video Formats | AVI, WMV, RM, RMVB, 3GP, MKV, ASF, VOB, MOV (up to 1080P) |
| Supported Audio Formats | MP3, WMA, OGG, FLAC, WAV, AAC |
| Supported Image Formats | JPEG, BMP, GIF, PNG |
| Power Supply | 5V DC power adapter |
| Battery | Rechargeable, battery life not specified |
| Dimensions (estimated) | Approximately 260 x 170 x 10 mm (unofficial) |
| Weight (estimated) | Approximately 500 g (unofficial) |
| Maintenance and Cleaning | Use a soft cloth for the screen, avoid moisture |
| Safety | Do not expose to rain, do not disassemble, use authorized adapter |
| Spare Parts Available | Adapter, USB cable, 3G dongle (not supplied) |
| Repairability | Warranty valid if repaired by approved center, contact retailer |
| Customer Service | www.lenco.com, support via Zendesk, phone according to country |
Frequently Asked Questions - TAB1020 LENCO
User questions about TAB1020 LENCO
0 question about this device. Answer the ones you know or ask your own.
Ask a new question about this device
Download the instructions for your Tablet in PDF format for free! Find your manual TAB1020 - LENCO and take your electronic device back in hand. On this page are published all the documents necessary for the use of your device. TAB1020 by LENCO.
USER MANUAL TAB1020 LENCO
English: User manual
For information and support
www.lenco.eu
V1.0
Table of contents
Appearance. 4
Power on/off 5
Using touch screen 5
Interfaces 5
Desktop 5
Locked screen 6
Operating programs 7
- Video Player.. 7
- Music player 7
- Recorder 8
- Camera 9
Taking pictures 9
Recording video 9
- Browser 10
- Google Play store 10
- Calendar 10
New event 11
- Clock 11
Adding alarm clock. 11
Activating alarm clock 11
Deleting alarm clock. 11 - Calculator 12
- Downloading 12
- Map 12
12.Email 12
Inbox 13
Opening an email 13
Writing a new email 13
Editing email account. 13
Deleting an email account. 14
Setting default account 14
- File manager 14
Copying files between devices 15
Deleting a file. 15
- Settings 15
Wi-Fi settings 16
3G settings 17
Use of extended storage 17
- Downloading, installing/uninstalling applications 18
Downloading and installing application from internet 18 - Connecting to a PC. 19
Charging 19
Precautions 20 - Service and support 21
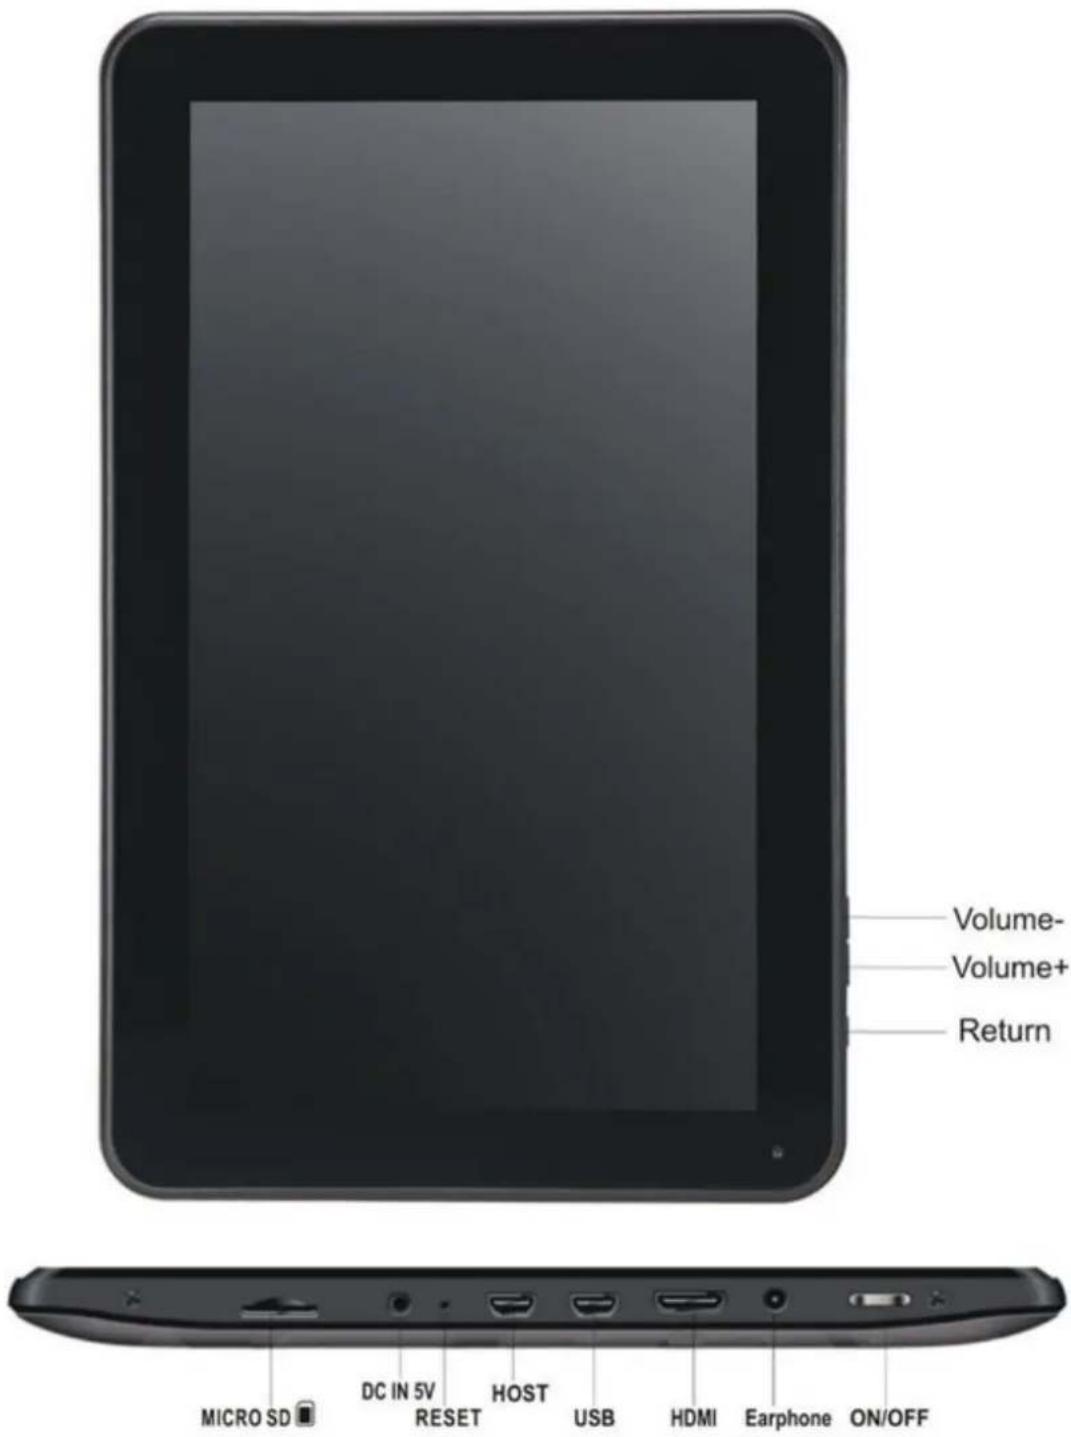
Appearance
Power on/off
- Power on: press and hold the power key for 5 seconds
- Power off: press and hold the power key for 5 seconds click Power off click OK
- Lock/unlock screen: press the power key swiftly to lock/unlock the screen
- Forced shutdown: in case of no response of the device, press the Reset key to reset the device by force
- Note: do not use forced shutdown unless necessary. Shutdown the device following power off steps.
- Reset key: press this key to reset the device.
Using touch screen
- Single click: click an icon to select the option you require.
- Press and hold: select an icon and hold to drag it to the desktop.
- Drag: drag on the desk to switch among different interfaces.
To avoid scratching or damaging the screen, never put anything on it.
Interfaces
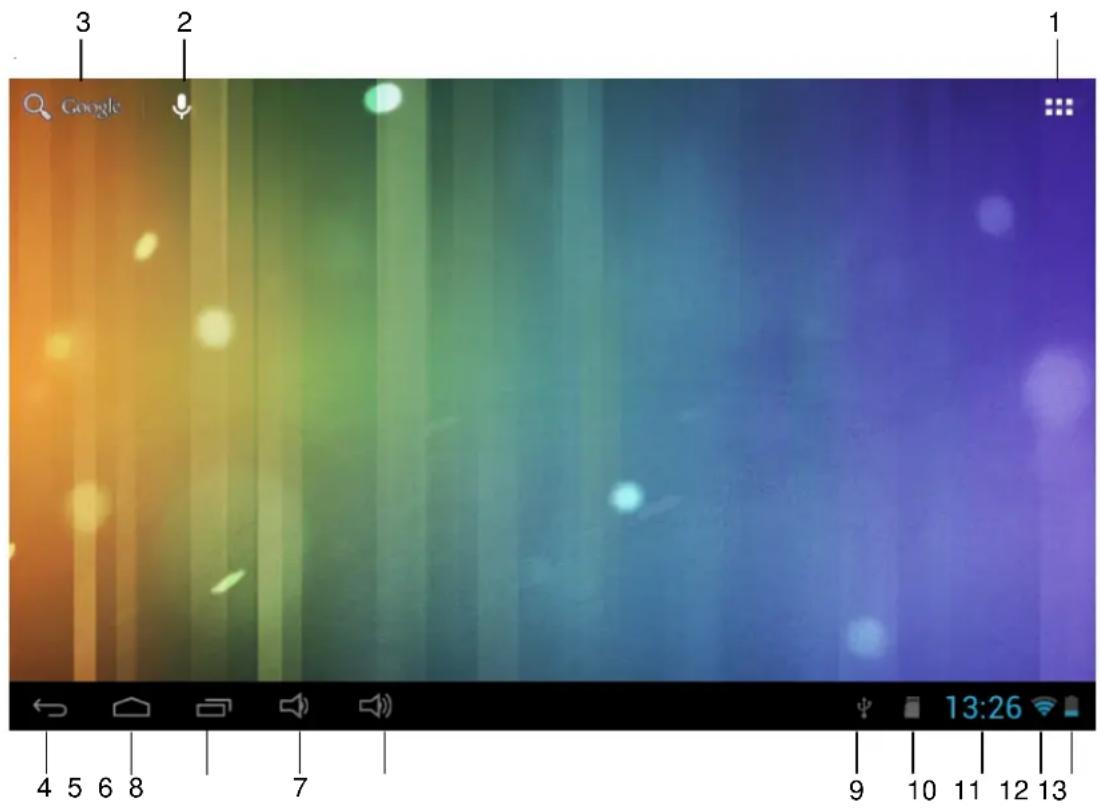
Desktop
1: View all applications
2: Shortcut to voice search
3: Google search
4: Return
5: Return to desktop
6: Select multitask
7:Volume Up
8:Volume Down
9: USB Connection indicator
10: SD card status
11: Time
12:3G/WIFI status
13: Battery indicator
Locked screen
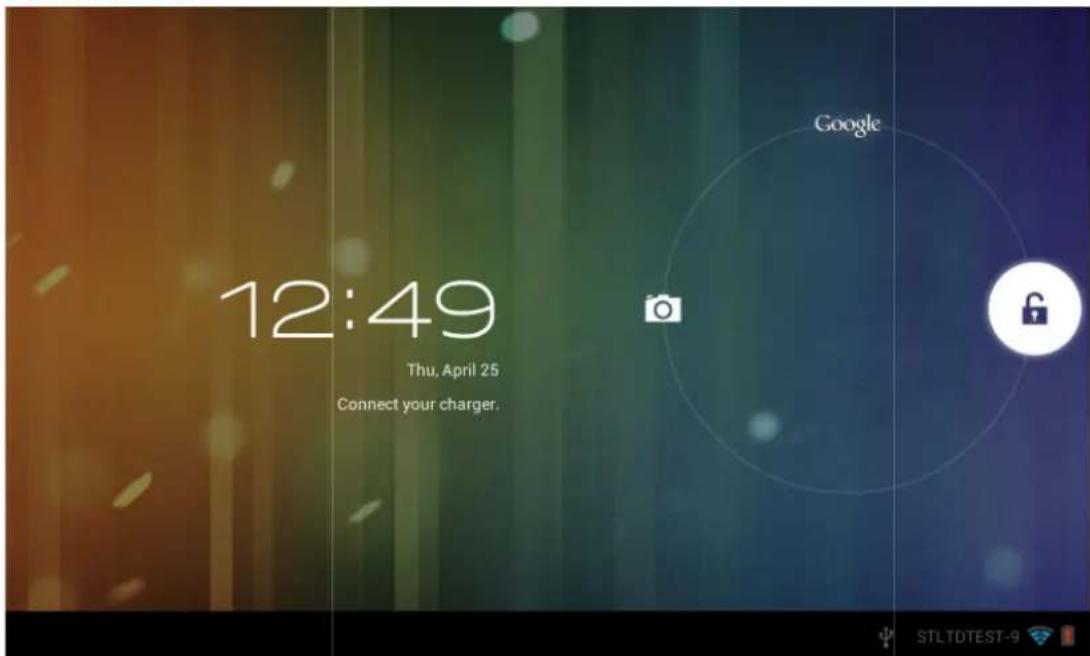
If there is no operation for a long time, or when you press the power key, the device will enter standby mode. There are two standby modes, one is sleep mode, the screen is off in this mode, and if you press the button key, it will wake up and enter nap mode, as shown

in the picture. In this mode, click and hold Lock/unlock icon , there identifiers at
A\B\C positions will appear as shown in the picture. In this interface, Camera icon is at A position, Unlock icon is at B position, and Google icon is at C position. The system will prompt you the currently activated path, as shown in the picture, the ripples at B position show the activated path. You can click and drag the Lock/unlock icon to B position to unlock the screen, to A position to activate the camera, or to C position to activate Google browser.
Operating programs
1. Video Player
Supported video formats:AVI, WMV, RM, RMVB, 3GP, MKV, ASF/OB, MOV up to 1080P HD-Definition
Supported image formats. JPEG, BMP, GIF, and PNG.
- Click Video to enter player interface.
- Select a video file to play and the system will enter video playing interface. Click icons on the screen to adjust the video accordingly (volume +/-, playing process bar, storage play, brightness +/-, pause/play, next video, screen size, desktop play, return, menu).

Note: System ver. 4.2 supports desktop multi-menu video playing mode. You can simply desktop-play the video by selecting the desktop playing menu. With this function more than one video can be played at the same time on the same device.
- Select picture to enter Picture viewing interface, and slide the screen to view pictures.
- Select icon at top right corner to view details of the video, or to select the functions such as auto viewing, rotating or cutting the pictures.
- Select icon at top right corner to delete files in the player.
2. Music player
Supported audio formats: MP3, WMA, OGG, FLAC, WAV, ACC.

- Click the icon Music to enter player interface.
-
Select the music you want to play from track/album/artist/playlist.
-
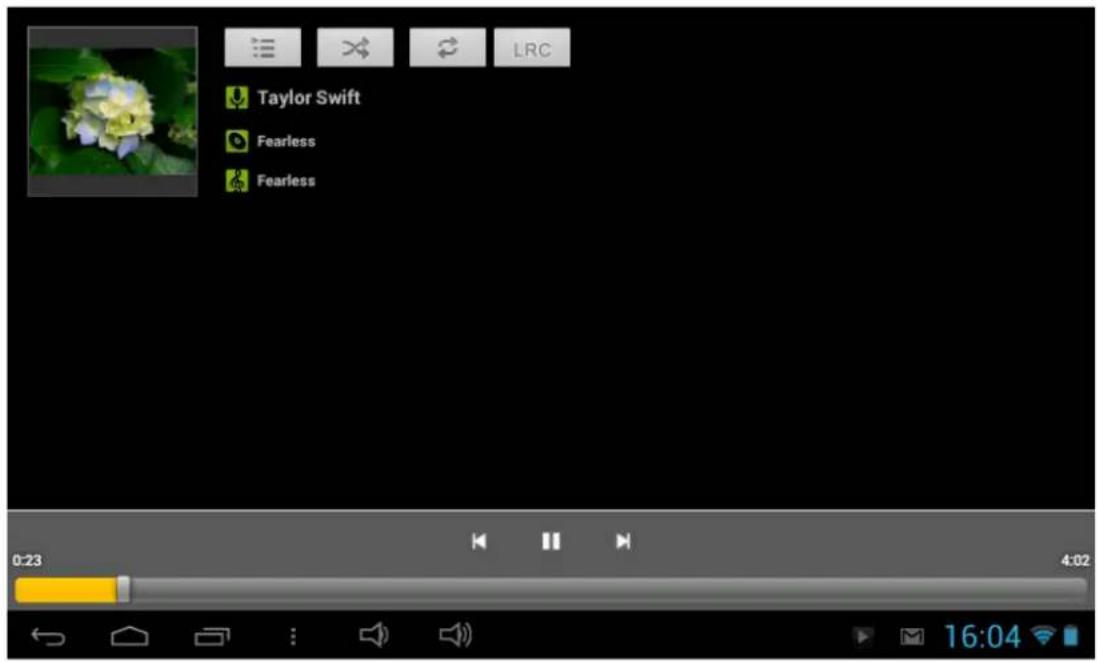
Click Previous Pause Next icons to operate the playing.
- You can click to go back to previous interface or click to return to desktop while keeping the music playing.
You can operate the playing music by using the menu key. The interface is as follow:
3. Recorder
Click icon
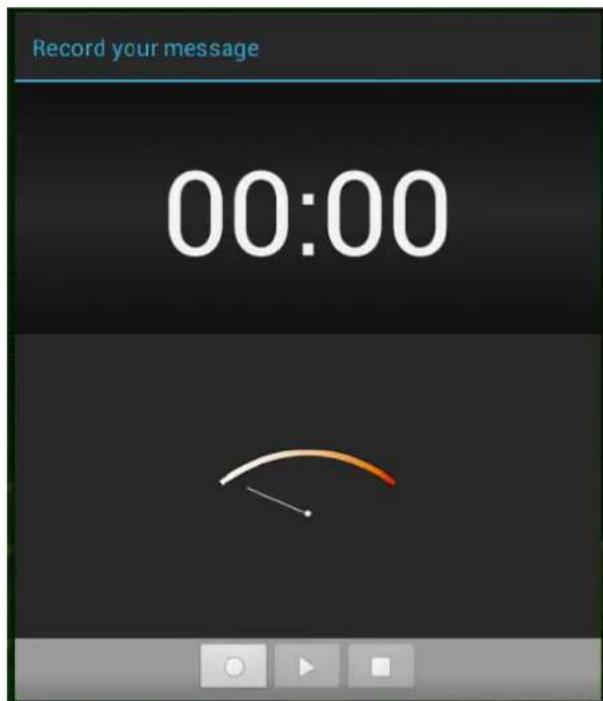
Click to start recording, and click to stop. Click to play the recorded audio. The recorded files are named according to the recording time. You can select any one to play. In the above picture, the finger shows the sound wave intensity and the time shows the recording time.
4. Camera
The camera can be used to take pictures or to make video's.
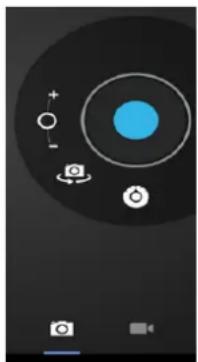
Camera interface:
Taking pictures
- Tap to take pictures. All pictures are saved automatically.
- Tap in the upper right corner on the thumbnail to view the picture.
- Move the 0 towards the + to zoom in.
- Move the 0 towards the - to zoom out.
- Press the three bars next to the - to open the camera settings.
Recording video
- Tap to switch to the video mode.
-
Tap to start recording.
-
Tap to stop recording. All videos are saved automatically.
-
Tap in the upper right corner on the thumbnail to view the movie.
- Move the 0 towards the + to zoom in.
- Move the 0 towards the - to zoom out.
-
Press the three bars next to the - to open the camera settings.
-
Press to change to the front or rear camera.
5. Browser
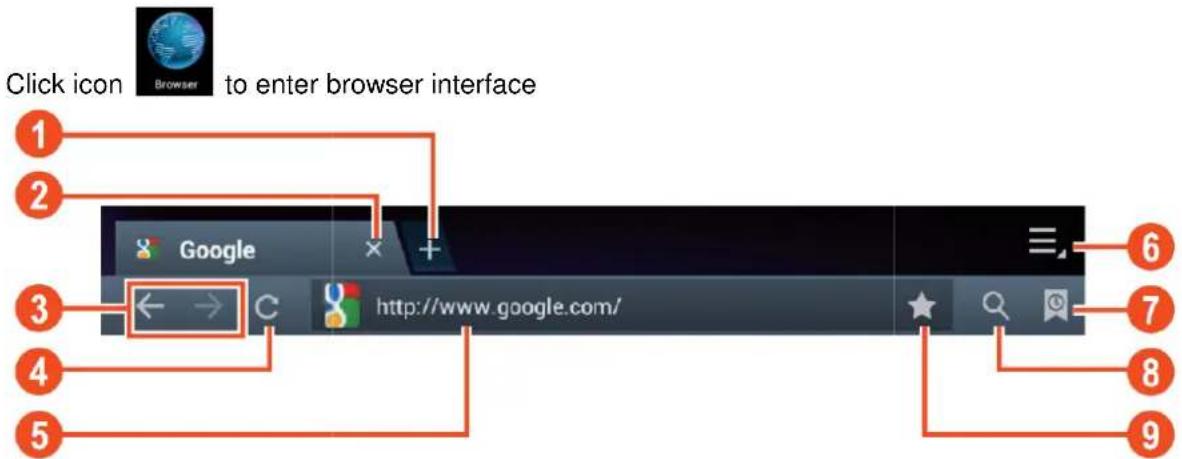
| Number | Function |
| 1 | Opens a new tab |
| 2 | Closes current tab |
| 3 | Go back or to the next website in the browser history. |
| 4 | Reloads page, if the page can't be reloaded this changes in an "X" |
| 5 | Enter web address or keyword. |
| 6 | Browser options |
| 7 | Shows favorites, history and saved pages |
| 8 | Activates an URL field |
| 9 | Saves the current web address as favorite. |
Note: The system ver. 4.2 includes Google browser. You will be asked to select browser mode when using for the first time, and you can select
any one you like. The new browser icon is
6. Google Play store
Open

to view and download applications.
When running play store for the first time, you will be asked to login with your Google account, (Visit www.google.com to create an account.).
7. Calendar
Click

calendar icon.
When running the calendar for the first time, you will be asked to login. Input your email address and password, click next, and complete the settings according to the guide. Then you can use the calendar.
New event
- In Calendar interface, click the date you want to add a new event to.
- Select the time of the event Input the details of the event in each field.
- Click Complete.
- Select the calendar interface you want according to the menu.
Date showing in gray means there is an agenda.
8. Clock
Click

icon. You can view the current date and time.
Alarm clock
You can set more than one alarm clocks at the same time.
When icon appears on the screen, it means at least one alarm clock is activated.
Adding alarm clock
icon.
1. Click
2. Click menu Add alarm clock
3. Set the alarm clock you required.
If Repeat is not selected, the alarm clock will be deleted after alarming.
4. OtdickActivate clock.
5. Click Complete.
Closing alarm clock
When reaching the set alarm time, a window with the name of the alarm clock will pop up.
If want the clock to alarm again after 10 minutes, click Pause and alarm again.
Click Cancel to stop the alarm.
Activating alarm clock
If the alarm clock is set to repeat, you may want to pause the alarm instead of deleting it.
-
In alarm clock interface, click the icon after the alarm clock you want to activate.
-
Click to reactivate.
Editing alarm clock
icon, Click

-
Click
-
Click and enter the alarm clock you want to edit Edit.
Deleting alarm clock
- Click

icon, Click

-
Click and enter the alarm clock you want to delete.
-
Click Delete alarm clock.
Click
to return to desktop.
9. Calculator
- Click

Calculator icon.
- Click numbers and operators to calculate.
- Click Clear to clear the input one by one, or click and hold Clear to clear all inputs.
10. Downloading
- Click

Downloads icon.
- You can view the downloaded software and select one to install.
11. Map
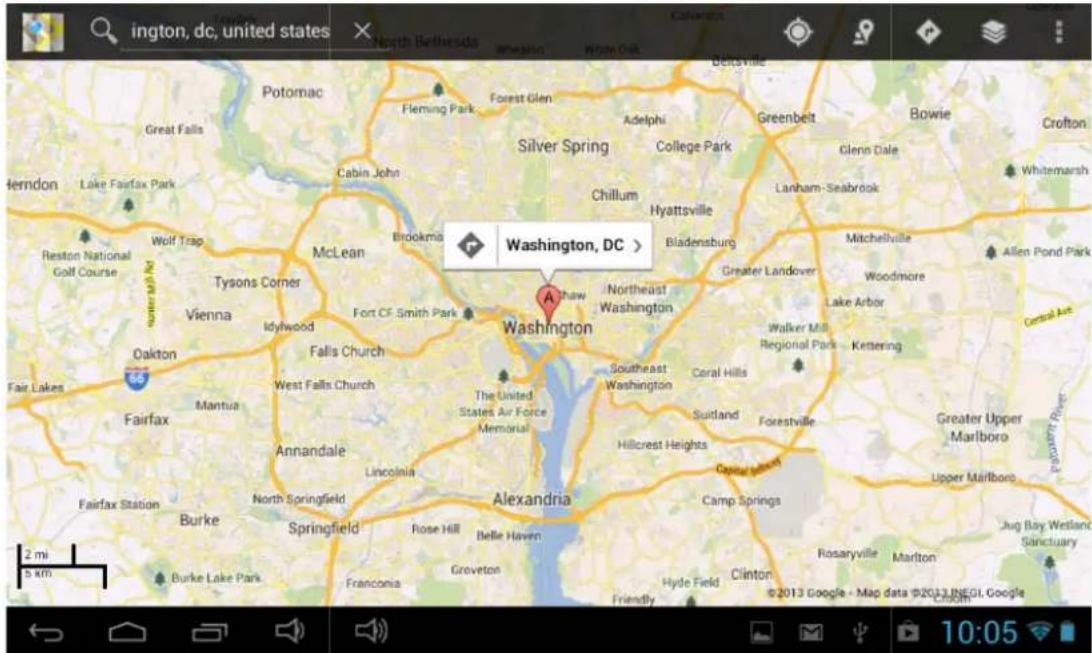
To use this function, make sure you have an Internet access.
When there is an internet access, click icon Maps to open the map where you locate. You can search for the information you want as shown in the picture.
12.Email
Supports POP3 and SMTP.
Adding email account
You can input one or more email addresses you want to use on the device.
- Click
icon.
-
In Your account interface, click Next.
-
Click E mail address option Input your email address.
-
In Password option Input your account password.
-
Click Complete.
-
Manual setting (optional): the server will select provider (gmail.com, etc.) automatically according to your email account. However, if you want to change server settings, you can click Manual setting and make changes.
-
Click Next.
-
Optional : input account name.
-
Input name to display when sending message Click Complete.
☆
After setting, if you cannot connect to a free email account, please confirm with your email provider if their server support POP and SMTP or not.
Inbox

- Click
icon.
-
If you set only one email account, it will open directly. If you set more than one email accounts, you will see the email account list.
-
Click the email account you want to open Click Inbox.
Opening an email
-
In Inbox interface, click an email to open it.
-
Click an attachment (if any) to enable a corresponding application to open it, or you can click Save to save it to SD card.
-
If I go want to Reply , Click Reply or Reply all.
a. Enter the message you want to reply in Writing email option.
b. Click Send to send the email; you can also save it as draft without sending it. The email will be deleted if you don't save or send it.
- To delete an email, click Delete.
Writing a new email
- In Inbox interface, click Menu Write
- Send to option, then enter address of the Receiver.
- If you want to cc or bcc to other receivers, click Menu → Add cc and bcc, then enter the email address of the receiver.
- Enter the subject in the title bar.
- CtdicWrite an email option to enter your personal information.
- If necessary, click Menu Add attachment to add attachment files.
- When you complete writing, click Menu Send.
Editing email account
- Click

icon.
-
In Inbox interface, click Menu Account setting.
-
Set your email account according to your needs.
-
Click
to return to Inbox interface.
Deleting an email account
If you have more than one accounts, and if you delete the default account, the next one in the list will become default.
- Click

icon.
- In Inbox interface, click Menu Account.
- Click and hold the account you want to delete.
- In the pop up Account option window, click Delete account.
- Click Yes to confirm to delete.
Setting default account
You must always have a default account. Therefore, if you have more than one email accounts, you can select one as default.
- Click

icon
- In Inbox interface, click Menu Account setting.
- Click Default account to select it.
If you delete the default account, the next one in the list will become default.
13. File manager

Click File Manag File manager icon to view all files saved in the device ( internal store, SD card, USB disk), and you can install Android applications to your device in a fast and convenient way.
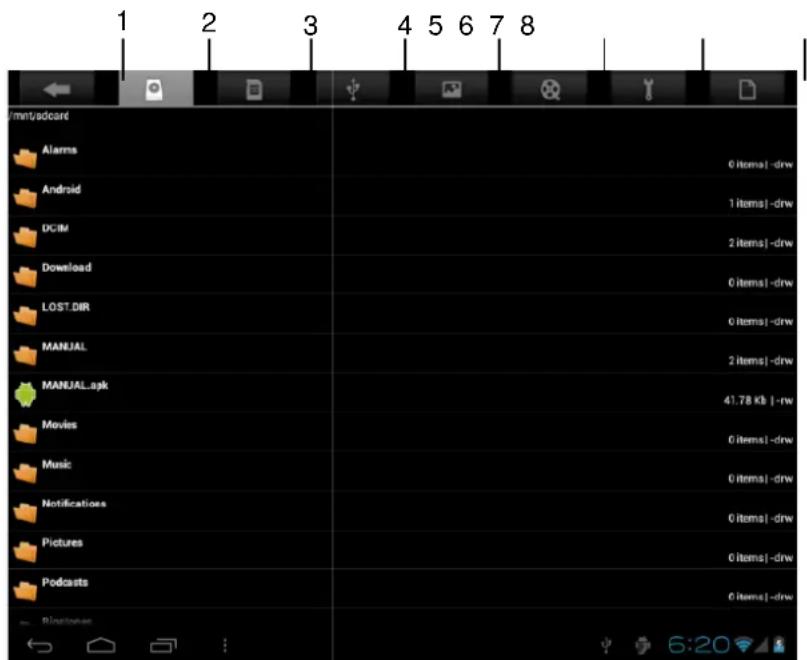
- Return
- Internal storage
- Micro SD card
- USB disk
- Pictures
- Videos
- Toolbox
- File management
Copying files between devices
You can use file browser to copy files among external storage, internal storage and PC. To copy a file into the device, you must firstly copy it to SD card or USB disk.
- Click


to display files saved in the storage device.
-
Click and hold the file or folder you want to copy click Copy.
-
Click icon to return to internal storage of the device click the folder you want to copy to click Paste.
Deleting a file
Click and hold the file or folder you want to delete Click Delete Click Yes to confirm to delete.
14. Settings
| Wireless network | ||
| Wi-Fi | Set and manage wireless access point (refer to WIFI setting for details). | |
| Traffic | Set and manage data traffic. | |
| More.. | Flight mode | Enable/disable flight mode |
| Ethernet | Configure wired network. | |
| VPN | Configure VPN network | |
| Mobile network | Set 3G network (refer to 3G settings for details) | |
| 3G support info. | Display 3G dongle model supported by the device | |
| Device | ||
| Sound | Volume | Adjust volume of media, alarm clock and notification. Click and slide to adjust volume and then click OK. |
| Notifying ringtone | Select the notifying ringtone you want. | |
| Screen lock prompt tone | Prompt tone when screen is locked/unlocked | |
| Display | Brightness | Click and slide to adjust brightness and then click OK. |
| Wallpaper | Set wallpaper | |
| Auto rotating screen | If this option is checked, the screen will switch between horizontal and vertical according to the | |
| direction of rotation. | ||
| Sleep | Adjust sleep time. | |
| Font size | Adjust font size in the interface. | |
| G-sensor coordinates | Select coordinates. Some games require special coordinates. | |
| Screen adapting | Adjust screen display size for some games. | |
| Storage | Display storage status. | |
| Format SD card | Delete all data saved in SD card. | |
| Battery | Display battery status. | |
| Applications | Manage and display status of applications in the device. | |
| Personal | ||
| Account and sync | Add and manage accounts in the device. | |
| Location service | Set Google location service and Google search applications. | |
| Security | Screen saver | Set screen saver |
| Password | Password input settings. | |
| Device management | 1. Add or delete device manager. 2. Unknown source APK installation settings. | |
| Credential storage | Manage application access surety credentials and other credentials. | |
| Language and input method | Set default language | |
| Keyboard and input method | Set default keyboard and input method | |
| Mouse/Touchpad | Adjust mouse speed. | |
| Backup and reset | 1. Backup/restore device data. 2. Restore default settings. | |
| System | ||
| Date and time | Set or adjust time and date in the device. | |
| Auxiliary functions | Set auto rotation, display font and touch screen effect. | |
| Developer options | Basic applications for developers. | |
| About the tablet PC | View system status, battery status, legal info, model, Android version, core version and version number. | |
Wi-Fi settings
Many functions require Wi-Fi connect, so we suggest you use the preset Wi-Fi network.
1. Click
gs Wireless and network
- Enable Wi-Fi.
The device will search and list all available Wi-Fi networks automatically. The icon beside Wi-Fi means you need to enter a password to connect to it.

- Click the Wi-Fi network you want to connect to if there is password, you need to enter the password Click Connect. After connecting to WIFI network, you will see icon
on the desktop.
- Click Return to desktop.
If your Wi-Fi is set to hidden, it will not be searched automatically. You need to click Add Wi-Fi network, and then enter required information to add your Wi-Fi.
3G settings
- Before connecting to a 3G network, make sure you are using a 3G network card supported by the device. This device only supports external USB 3G network card. You
Settings Wireless and
can view all 3G models supported by the device from
network More 3G support info
- After install a SIM UIM card to 3G network card, install the 3G network card on USB OTG connection wire, and the connect to the device.
Settings Wireless and
- After connecting to 3G network card, click
network More Mobile network for 3G network settings.
- Enable mobile network and check Enable data traffic Data roaming, then select Access point name, select Menu and then select: Add APN for network setting.
Take China Union 3G network for example, the settings are as following:
Name: 3GWAP / APN:3gnet / Proxy: Not set/ Port: 80 /Username: Not set/ Password: Not set/ Server: Not set/ MMSC: Not set/ MMS proxy: Not set/ MMS Port: Not set/
MCC:460/MNC:01/Authentication type: Not set/APN type: Not set/APN protocol: Not set
After setting, you will be able to connect to 3G network, when you will see the icon

in the screen. When this icon is gray, it means the system is searching for network, and
when it is blue, it means the network is successfully connected. The icon

there are data transmission.
Use of extended storage
- Using USB disk
Insert the USB disk into OTG connection wire, then insert the OTG connection wire into the USB OTG port of the device. You can use the U disk when it is ready.
Do not insert and remove USB disk repeatedly in a short time, otherwise it may damage the USB disk.
- Using TF card
The device supports up to 32GB storage card.
Insert the storage card into the card slot, and press it down with your finger, the message Preparing for SD card will display on screen. When this message disappears, it means the TF card is ready, and you can use it.
Removing TF card
Close all applications or files on the card. Click
Settings Settings TF card and device
storage Remove TF card. Tender press down the card and it will be ejected. Then move it out.
Do not insert and remove the card repeatedly in a short time, otherwise it may be damaged.
We recommend you to use card with famous brand to avoid incompatibility.
15. Downloading, installing/uninstalling applications
You can find many free interesting Android applications in the internet. Simply open the browser and search for "Android applications".
The Android applications you purchased or downloaded can be installed through

File manager in a fast and easy way.
-
Copy the .apk file you want to install to SD card or USB disk → Insert the card or connect USB disk to the device.
-
Odaik

File manager icon.
- Click


and find the folder in which .apkfile is saved.
- Select a .apk file Install. After installing, the icon of the application will display in the interface where all applications are displayed.
- Click to run the application directly, or click Complete to return to File manager interface.
Downloading and installing application from internet
You can download Android applications from internet or other e-market directly and install them into your device quickly and conveniently.
- Oddick

Browser icon to connect to internet.
- Enter address and click the download link of the application you want to download to the device.
- After downloading, click and hold the download file (in download record interface), Click Open Install.
Uninstalling application
You can uninstall any installed Android application conveniently.
- Click Menu Settings Applications Manage applications.
- Click the application you want to uninstall, Uninstall.
- Click Yes to confirm to uninstall.
16. Connecting to a PC
-
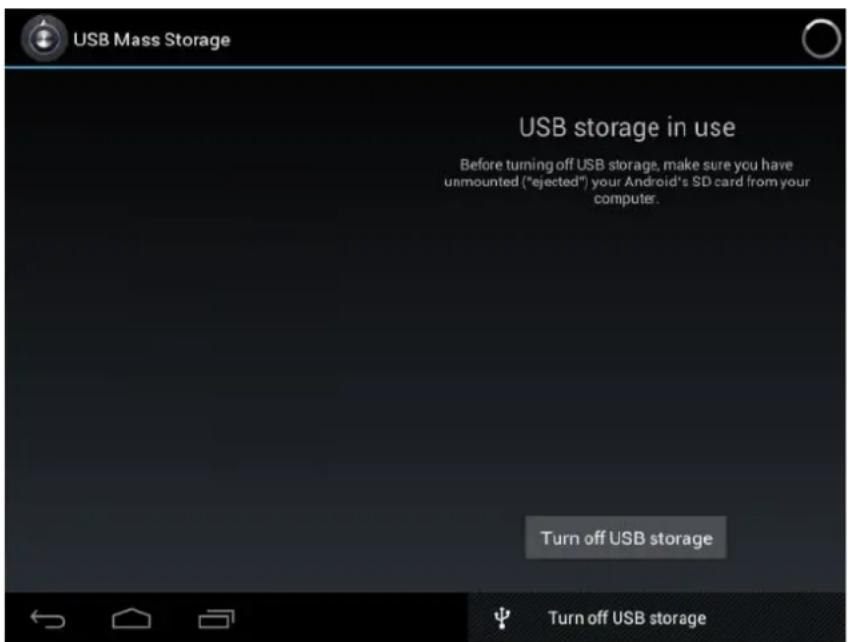
Connect the device to a PC, then this device can be used as a mobile storage device. When using a USB cable to connect to PC, connect one end of the cable to the USB OTG port of the device, and the other end to USB port of PC.
-
After connection, the device will prompt icon , and check it and select ,


then select Enable USB device, then you can save data to the device via PC, as shown in the following picture:
Charging
Connect one end of the power adaptor to supply socket, and the other end to the power socket of the device for charging.
During charging, the icon of battery will be and when charging completes,
the icon will be

- You can still use the device while charging, but this will prolong the charging time.
Use the device at least once every week.
- Fully charge the battery regularly.
- Don't keep the battery empty for a long time.
Precautions
Please follow the following safety precautions when using your device.
- Do not expose the product to direct rain or humidity.
- Keep the device away from direct sunlight or heat source.
- Protect the power cable. When connecting the power cable, do not step on it, put anything on it or press it by force. Give a special protection to the plugs of the power cable.
- Please use approved power adaptor for charging, otherwise it may cause damage.
- Never disassemble or repair your device without authorization.
- Always touch the screen tenderly. If you want to clean the fingerprint or dust on the screen, please use a soft cloth such as lens cloth but do not use a coarse cloth.
- Pictures in this manual are for demonstration purpose only and may differ from the real product.
WARNING: Prolonged exposure to loud sounds from personal music players may lead to temporary or permanent hearing loss.
17. Service and support
For information: www.lenco.com
For support: http://lencosupport.zendesk.com
Lenco helpdesk:
Germany 0900-1520530 (Local charges)
The Netherlands 0900-23553626 (Local charges + 1ct p/min)
Belgium 02-6200115 (Local charges)
France 03-81484280 (Local charges)
The helpdesk is accessible from Monday till Friday from 9 AM till 6 PM.
When contacting Lenco, you will always be asked for the model and serial number of your product. The serial number can be found on the back of the device. Please write down the serial number below:
Model: TAB-1020
Serial number:
Lenco offers service and warranty in accordance to European law, which means that in case of repairs (both during and after the warranty period) you should contact your local dealer.
Important note: It is not possible to send products that need repairs to Lenco directly.
Important note: If this unit is opened or accessed by a non-official service center in any way, the warranty expires.
This device is not suitable for professional use. In case of professional use, all warranty obligations of the manufacturer will be voided.

BEFORE SENDING YOUR TABLET TO LENCO DO NOT FORGET TO BACKUP YOU'RE DATA. LENCO IS NOT LIABLE FOR ANY DATA LOSS.
If at any time in the future you should need to dispose of this product please note that: Waste electrical products should not be disposed of with household waste. Please recycle where facilities exist. Check with your Local Authority or retailer for recycling advice. (Waste Electrical and Electronic Equipment Directive)
Lenco
TAB-1020
25 CM (10,1") TABLET MIT
ANDROID™ 4.2
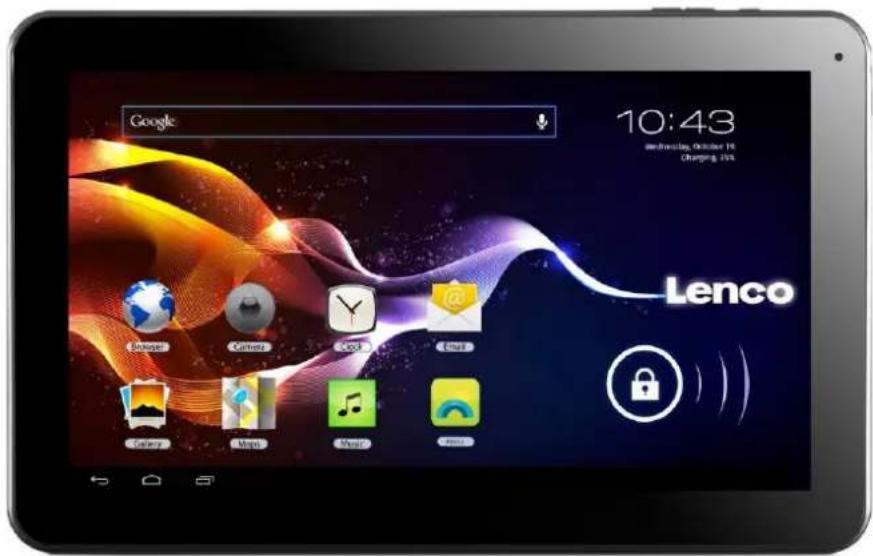
Bedienungsanleitung
www.lenco.eu
V1.0
Inhalt

- Table of contents
- Power on/off
- Using touch screen
- Interfaces
- Locked screen
- Operating programs
- Video Player
- Music player
- Recorder
- Camera
- Taking pictures
- Recording video
- Browser
- Google Play store
- Open
- Calendar
- Click
- New event
- Clock
- Alarm clock
- Adding alarm clock
- Closing alarm clock
- Activating alarm clock
- Editing alarm clock
- Deleting alarm clock
- Calculator
- Downloading
- Map
- 12.Email
- Inbox
- Opening an email
- Writing a new email
- Editing email account
- Deleting an email account
- Setting default account
- File manager
- Copying files between devices
- Deleting a file
- Settings
- Wi-Fi settings
- Click
- 3G settings
- Use of extended storage
- Downloading, installing/uninstalling applications
- Downloading and installing application from internet
- Uninstalling application
- Connecting to a PC
- Charging
- Precautions
- Service and support
- Lenco helpdesk:
- Lenco
- Inhalt
Brand : LENCO
Model : TAB1020
Category : Tablet