
SurfTab ventos 9.7 - Tablet TrekStor - Free user manual and instructions
Find the device manual for free SurfTab ventos 9.7 TrekStor in PDF.
| Product type | Tablet |
| Brand | TrekStor |
| Model | SurfTab ventos 9.7 |
| Screen size | 9.7 inches (diagonal) |
| Power supply | 100-240V power adapter |
| Battery | Built-in rechargeable (charges via power adapter or USB) |
| Wi-Fi connectivity | Yes, built-in |
| Bluetooth connectivity | Yes, built-in |
| HDMI port | Mini HDMI™ (video output) |
| USB ports | 1 micro USB (host and client), 1 additional micro USB host |
| Expandable storage | Up to 32 GB via microSD/microSDHC card |
| Cameras | Front and rear |
| Speakers | Built-in stereo |
| Headphone jack | 3.5 mm audio output connector |
| Care and cleaning | Soft, dry cloth, no solvents or chemicals |
| Operating temperature | 5°C to 40°C |
| Safety | Do not open, avoid moisture and dust, do not expose to extreme temperatures |
| Repairability | No user-serviceable parts, intervention by a professional only |
| Package contents | Tablet, micro USB cable, power adapter, cleaning cloth, quick start guide |
| Operating system | Android™ (version not specified) |
Frequently Asked Questions - SurfTab ventos 9.7 TrekStor
User questions about SurfTab ventos 9.7 TrekStor
0 question about this device. Answer the ones you know or ask your own.
Ask a new question about this device
Download the instructions for your Tablet in PDF format for free! Find your manual SurfTab ventos 9.7 - TrekStor and take your electronic device back in hand. On this page are published all the documents necessary for the use of your device. SurfTab ventos 9.7 by TrekStor.
USER MANUAL SurfTab ventos 9.7 TrekStor
natural_image
Tablet displaying a green screen with app icons and status bar (no readable text or symbols on the device itself)SurfTab ventos 9.7
IndeX
DE 4
EN 14
IT 23
FR 33
ES 43
SE 53
PL 62
PT 72
NL 82
HDMI™, the HDMI™ Logo and High-Definition Multimedia Interface are trademarks or registered trademarks of HDMI™ Licensing LLC.
Android ^™ is a trademark of Google ^™ Inc. Use of this trademark is subject to Google ^™ Permissions.
The Bluetooth ^® word mark and logos are registered trademarks owned by Bluetooth ^® SIG, Inc. and any use of such marks by TrekStor GmbH is under license. Other trademarks and trade names are those of their respective owners.

QulcK gulde
Thank you for buying the TrekStor SurfTab. We are confident that this product will be the source of much enjoyment. Please read the following instructions carefully so that you can become acquainted with the functions of this product and its use.
Current product information can be found at the TrekStor Website www.trekstor.de.
Package content
- TrekStor SurfTab
- Micro-USB cable
- USB host adapter
• Power supply (100-240V) - Cleaning cloth
- Quick guide
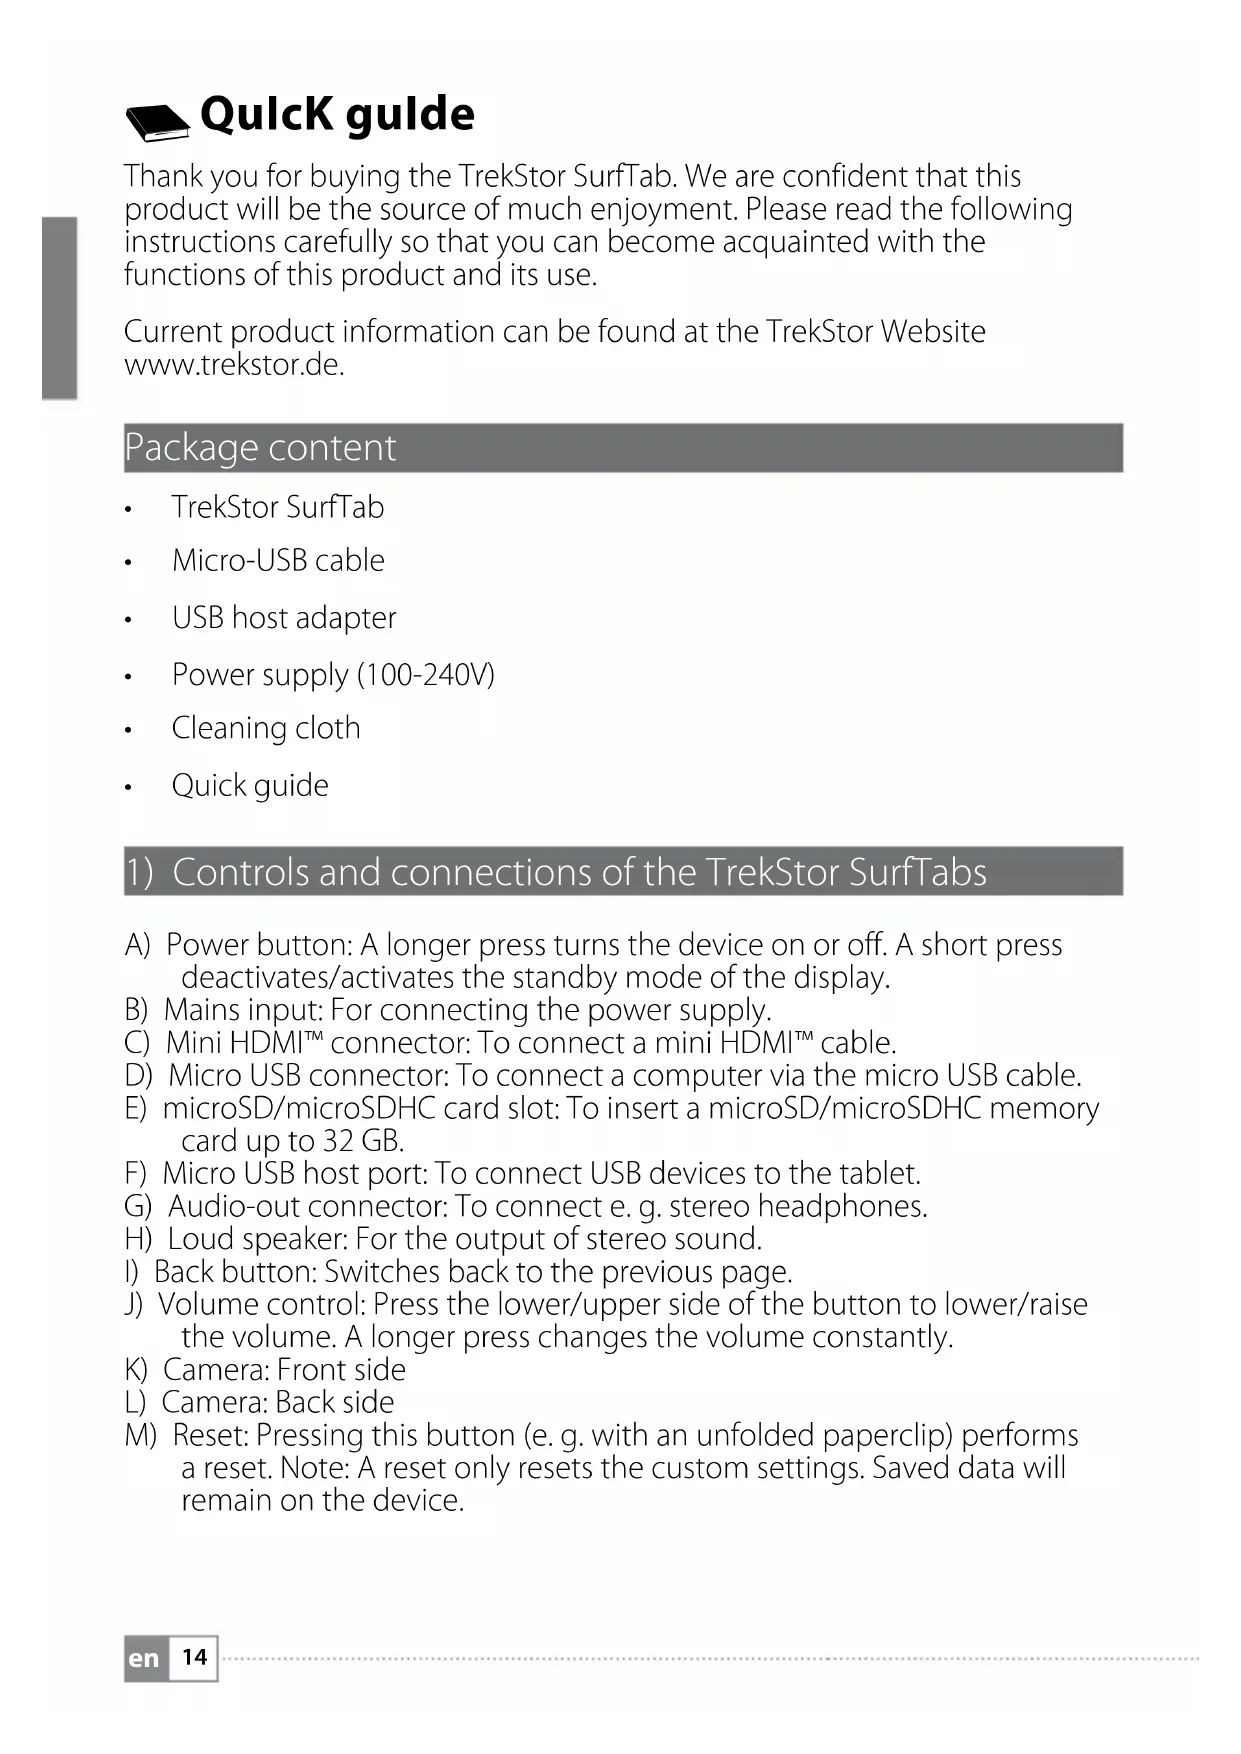
1) Controls and connections of the TrekStor SurfTabs
A) Power button: A longer press turns the device on or off. A short press deactivates/activates the standby mode of the display.
B) Mains input: For connecting the power supply.
C) Mini HDMI ^™ connector: To connect a mini HDMI ^™ cable.
D) Micro USB connector: To connect a computer via the micro USB cable.
E) microSD/microSDHC card slot: To insert a microSD/microSDHC memory card up to 32 GB.
F) Micro USB host port: To connect USB devices to the tablet.
G) Audio-out connector: To connect e. g. stereo headphones.
H) Loud speaker: For the output of stereo sound.
1) Back button: Switches back to the previous page.
J) Volume control: Press the lower/upper side of the button to lower/raise the volume. A longer press changes the volume constantly.
K) Camera: Front side
L) Camera: Back side
M) Reset: Pressing this button (e.g. with an unfolded paperclip) performs a reset. Note: A reset only resets the custom settings. Saved data will remain on the device.
2) First set up
2.1) Charging the SurfTab
Before the first use, it is recommended to fully charge the SurfTab. Connect the DC input connector with the SurfTab and connect the power supply to an electrical outlet.
2.2) Getting started
A) After charging the SurfTab, hold down the power button for 2-3 seconds to switch on the device.
B) After switching on the device, the start screen appears. To set the user interface to the desired language, please tap inside the applications menu on "SETTINGS" and afterwards on "LANGUAGE & INPUT". Tap now in the right column on the first field "LANGUAGE" and select your language.
2.3) Connecting the Internet
With the SurfTab you have the possibility to access the Internet via Wi-Fi. If you want to establish a connection to a new network, please proceed as follows:
A) Go via the applications menu to the settings and tap on "Wi-Fi" under "WIRELESS AND NETWORKS". In case the Wi-Fi function is not activated yet, first pull the on/off switch to "ON".
B) On the right side all the wireless networks are displayed. Tap on your preferred network and enter the password into the appropriate field.
C) The SurfTab then connects with the Internet. Via the browser symbol you can now surf the Internet as usual.
If you have once established a connection to a Wi-Fi network, the SurfTab automatically connects to it as soon as it is within reach.
To save power, it is advisable to turn off the wireless function, if you do not need it.
(3) Operation of the SurfTab
3.1) Switching on and off
To turn the SurfTab on, press the power button approx. 2-3 seconds. The device turns then on. To turn the device off, press also for approx. 2-3 seconds the power button. Now the following message appears: "WOULD YOU LIKE TO SHUT DOWN?". Tap on "OK" to shut down the SurfTab.
3.2) Activating/Deactivating the standby mode
If you do not want to use the SurfTablet for a while, press briefly the power button to put the tablet in the standby mode. In this way you can save power and be sure that the tablet does not use any unwanted services. To exit the standby mode, press again briefly the power button.
Once you have activated the screen again, the SurfTab first displays the screen lock. Pull the lock icon to the right edge of the circle onto the open lock, in order to unlock the tablet.
The SurfTab is locked automatically when it is not used for a certain time. A change of the interval, from when the SurfTab is supposed to go automatically into the standby mode, can be individually adjusted under "SETTINGS" → "DISPLAY" → "SLEEP".
3.3) Using the touch screen
Selecting items
Touch the screen once with your fingertip to open an element or select an option.
Move items
Keep your finger on the item that you would like to move and drag it to the desired position on the screen.
Scrolling
In order to roll a window or the screen up, down or sideways, simply slide your finger up or down respective from left to the right and vice versa.
Enlarging
On the screen, pull simultaneously two fingers apart or tap twice on the display to enlarge a website or a document.
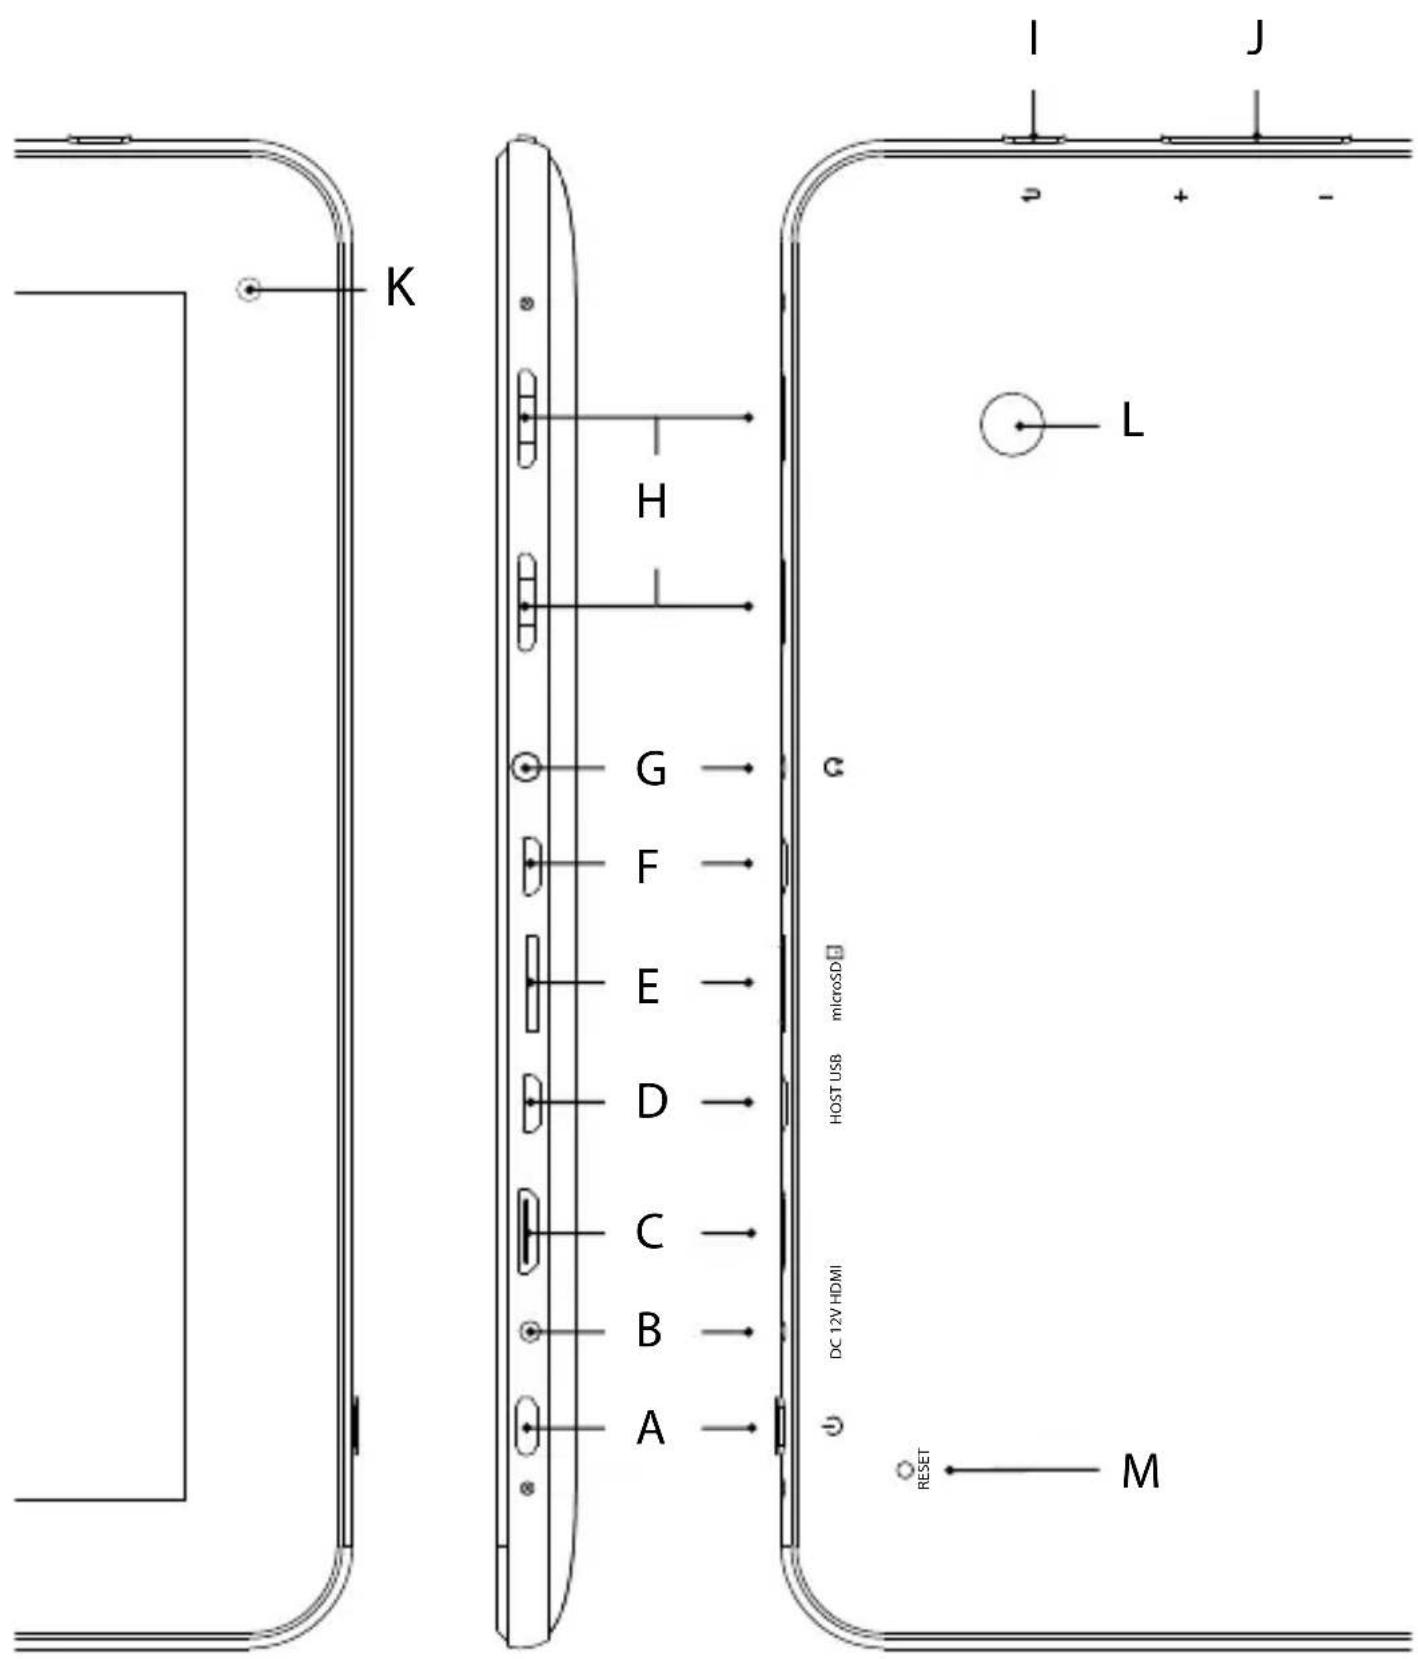
3.4) Elements on the home screen
A) Google™ search
B) Microphone function for voice entry
C) Applications menu and customizing the display
D) Back to the previous screen
E) Back to the home screen
F) View recently used applications (to exit the display, wipe your finger across the screen)
G) Status display: The lower right corner is used to display different messages (e.g. battery indicator, time, WLAN or Bluetooth® connection, available downloads).
3.5) Personalizing the start screen
The start screen has two more pages on the left and the right side, so that all together five pages are available for an individual design. To display the pages, pull the window with your finger from right to left or vice versa. You can set up the start screen individually (as well as the four additional pages) by adding or removing application shortcuts and widgets or changing the desktop background.
To customize the start screen, tap first on the application menu on the right top of the page. Then proceed as follows:
Applications
After you have tapped on the applications menu, a screen opens displaying all currently available applications. Press longer time on an application, which you would like to add to the start screen and then move it to the desired position.
If you pull up the application to the edge of the screen, you can also place the icon on the next screen.
Widgets
After you have tapped on the applications menu, a screen opens displaying all currently available applications. Tap on the left top of the picture on "WIDGETS" or pull the finger from right to left across the screen to display all available widgets.
Now press longer time on the widget, which you would like to add to the start screen and then move it to the desired position.
3.6) Removing applications from the start screen
A) To remove an application or a widget from the start screen, press as long on the appropriate icon, until "REMOVE" appears on the top of the screen.
B) Hold down the symbol and drag it on "REMOVE".
C) Once the symbol lights red, you can drop it and the application or the widget is removed from the start screen.
This process only deletes the shortcuts on the start screen but not the applications itself. An instruction how to fully delete an application from your SurfTab, can be found under point 4.2.
3.7) Changing the desktop background
A) Touch the start screen as long at any point until a window appears with the message "CHOOSE WALLPAPER FROM".
B) Now choose whether you want to use a background image from the gallery, the wallpapers or the live wallpapers (moving pictures).
C) Click on the desired image and confirm your choice with "SET WALLPAPER".
If you select a background from the gallery, you also have the option to select a specific area for your desired background motif.
3.8) The display keyboard
When you tap a text field in order to enter text (e.g. a web address), the on-screen keyboard appears. Enter the text as usual via the keys. Besides that use the keys "?123" or "\~\$" to enter numbers and special characters. For the entry of alternative letters (e.g. those with accents or umlauts), press and hold a particular letter and the available characters appear.
Go via "SETTINGS" → "LANGUAGE AND INPUT" to the menu point "ANDROID™ KEYBOARD" in order to adjust further keyboard settings.
If the SurfTab is in the standby mode, briefly press the power button to activate the device again. Then drag the lock icon onto the camera at the left edge of the circle and the camera function is activated.
Via the applications menu
Tap on the applications menu and afterwards on the camera icon to activate the function.
To press the shutter button, tap on the blue circle, which is below or right of the picture; to zoom the picture in or out, drag the small circle from the "-" to the "+" symbol and vice versa.
3.10) Creating an email account
To set up an email account, choose "EMAIL" via the applications menu and then proceed as follows:
A) Tap on the upper edit box and enter a valid email address as well as the corresponding password.
B) Tap on "NEXT" to confirm your entry.
C) In the next steps you can adjust other account settings. Once you have set up the account according to your wishes, the email application ready for use.
3.11) Removing an email account
To remove the email account, choose "EMAIL" via the applications menu and then proceed as follows:
A) Tap the top right on the three inter-related points (settings) and then select on the left the field with the name of your account.
B) Now scroll inside the right windows to the very bottom and tap on "REMOVE ACCOUNT".
C) Confirm your choice with OK and the account is deleted.
4) Using the App Center
Tap on the start screen or in the applications menu on the icon, through which you can access the App Center. In addition to the applications and widgets that are preloaded on the SurfTab already, you can find there a variety of additional programs, applications and books used to extend the functions of your SurfTabs.
If you use the App Center for the first time, you must read the terms of use and accept these. Then you can browse the App Center by category or by keywords in order to specifically look for an application.
4.1) Downloading and using applications
A) After you have selected an application, tap on "DOWNLOAD" to install the application.
B) Once the application has been downloaded and installed, it is located in the applications menu. Operate the applications either from there or add them to your start screen (see also section 3.5).
Certain applications need to be purchased before they can be downloaded. For the selection of the correct payment method, please follow the instructions of the App Center.
4.2) Uninstalling applications
If you like to uninstall an application, go via "SETTINGS" to "APPS" and select the application that you would like to delete. Tap now in the following window on "UNINSTALL" and confirm your choice once again with OK".
5) Connecting other devices
5.1) Connecting a PC
A) Connect the Micro-USB connector to the Micro-USB port of the SurfTab and the other end of the USB cable to a USB port of your computer.
B) Tap on the screen of the SurfTab on "TURN ON USB STORAGE".
C) A moment later, the internal memory of the SurfTab is displayed as an external drive inside the file explorer of the Computers. From there you can download files, copy, delete or move them.
If you like to safely remove the SurfTab from the computer, tap on "TURN OFF USB STORAGE" and disconnect it from the computer.
5.2) Connecting a USB device
USB devices, e. g. a hard drive, can be connected via the Micro-USB port.
i It might be that the current supply of the SurfTabs is not enough to fully guarantee the full function of the connected USB device. Therefore provide extra current for an external hard drive e.g. via a Y cable.
5.3) Connecting a Bluetooth® device
A) Go via "SETTINGS" to "BLUETOOTH®" and set the Bluetooth® function to "ON" in order to search for devices nearby.
B) Tap now on the device that you would like to connect from the displayed list by tapping on it.
C) Tap now on "PAIR" and follow any instructions by the SurfTab or the device that is supposed to be connected.
5.4) Connecting a TV via HDMI™
A) Go via "SETTINGS" to "HDMI™" and activate through tapping the HDMI™ function (a check mark appears on the right side of the picture, once the function is activated).
B) Now connect a Mini-HDMI™ cable (e. g. available on www.trekstor-onlineshop.de) with one end to the tablet and with the other end to the TV.
C) Select via the remote Control of your TV the HDMI™ port, to which the SurfTab was connected. Surface and contents of the tablets will now be displayed on the TV screen.
Instructions for safety and use:

Only qualified persons may perform technical work on the product. The product may not be opened or changed. The components cannot be serviced by the user.

Never expose the device to moisture, condensation and liquids.

Protect the device from extremely high and low temperatures and temperature fluctuations. Use the device within an ambient temperature of 5^ C to 40^ C.

Never place the device close to a source of heat and protect it from direct sunlight.

Make sure that the surroundings are as dust-free as possible when you use and store the device.

Never clean the surface of the device with solvents, paint thinners, cleansers or other chemical products. Instead, use a soft, dry cloth or soft brush.

n: Please note that this device uses radio technology and may only be used for its intended purpose in all countries of the European Union, Switzerland and Norway.
The manufacturer retains the right to continually improve the product. These changes may be made without being directly described in these operating instructions. For this reason, the information provided in these operating instructions may not reflect the current state of the art.
The manufacturer only guarantees suitability for the product's intended purpose. In addition, the manufacturer is not responsible for damages or loss of data and subsequent consequences.
Copyright © 2012 TrekStor GmbH. All rights reserved. Other cited product or company names may be trademarks or brand names of the respective owner.
HDMI™, the HDMI™ Logo and High-Definition Multimedia Interface are trademarks or registered trademarks of HDMI™ Licensing LLC.
Android ^™ is a trademark of Google ^™ Inc. Use of this trademark is subject to Google ^™ Permissions.
The Bluetooth® word mark and logos are registered trademarks owned by Bluetooth® SIG, Inc. and any use of such marks by TrekStor GmbH is under license. Other trademarks and trade names are those of their respective owners.

gulda raplda
Android ^™ is a trademark of Google ^™ Inc. Use of this trademark is subject to Google ^™ Permissions.
The Bluetooth® word mark and logos are registered trademarks owned by Bluetooth® SIG, Inc. and any use of such marks by TrekStor GmbH is under license. Other trademarks and trade names are those of their respective owners.

gulde aBrégé
HDMI™, the HDMI™ Logo and High-Definition Multimedia Interface are trademarks or registered trademarks of HDMI™ Licensing LLC.
Android ^™ is a trademark of Google ^™ Inc. Use of this trademark is subject to Google ^™ Permissions.
The Bluetooth® word mark and logos are registered trademarks owned by Bluetooth® SIG, Inc. and any use of such marks by TrekStor GmbH is under license. Other trademarks and trade names are those of their respective owners.

guía rÁpIda
Android ^™ is a trademark of Google ^™ Inc. Use of this trademark is subject to Google ^™ Permissions.
The Bluetooth ^® word mark and logos are registered trademarks owned by Bluetooth ^® SIG, Inc. and any use of such marks by TrekStor GmbH is under license. Other trademarks and trade names are those of their respective owners.

SnaBBgulde
HDMI™, the HDMI™ Logo and High-Definition Multimedia Interface are trademarks or registered trademarks of HDMI™ Licensing LLC.
Android ^™ is a trademark of Google ^™ Inc. Use of this trademark is subject to Google ^™ Permissions.
The Bluetooth® word mark and logos are registered trademarks owned by Bluetooth® SIG, Inc. and any use of such marks by TrekStor GmbH is under license. Other trademarks and trade names are those of their respective owners.

SKrócona InStruKcja
Android ^™ is a trademark of Google ^™ Inc. Use of this trademark is subject to Google ^™ Permissions.
The Bluetooth® word mark and logos are registered trademarks owned by Bluetooth® SIG, Inc. and any use of such marks by TrekStor GmbH is under license. Other trademarks and trade names are those of their respective owners.

Manual rÁpIdo
Android ^™ is a trademark of Google ^™ Inc. Use of this trademark is subject to Google ^™ Permissions.
The Bluetooth® word mark and logos are registered trademarks owned by Bluetooth® SIG, Inc. and any use of such marks by TrekStor GmbH is under license. Other trademarks and trade names are those of their respective owners.
Android ^™ is a trademark of Google ^™ Inc. Use of this trademark is subject to Google ^™ Permissions.
The Bluetooth® word mark and logos are registered trademarks owned by Bluetooth® SIG, Inc. and any use of such marks by TrekStor GmbH is under license. Other trademarks and trade names are those of their respective owners
Akku-Entsorgung
Reporting requirement according to the Battery Directive (BattV)
Batteries are not part of the domestic waste. The consumer is obliged to return no longer used batteries properly. Please dispose of them by a specialized trade or a battery collection point. Hereby you make an important contribution to environmental protection.
Since 1998 the German Battery Directive compels all citizens to dispose of used batteries exclusively through the trader or specially equipped departments (legal return obligation).
Trade and manufacturers are committed to take back batteries for free and to exploit it properly or to remove it as special waste (legal take-back obligation).

The built-in lithium-polymer battery of this device is marked with the adjoining symbol, consisting of a crossed out bin and the used battery type.
Remove battery

Before you return a disused device for disposal, the battery has to be removed from the device.
EC DECLARATION OF CONFORMITY
As manufacturer and importer respectively:
TrekStor GmbH
Kastanienallee 8 - 10
D-64653 Lorsch, Germany
herewith declares that the products
Product: SurfTab ventos 9.7 (ST97216)
Type: Mobile Internet Device
comply with the following directive(s):
- 99/5/EC Radio Equipment and Telecommunications Terminal Equipment
• 2004/108/EC EMC Directive: Electromagnetic Compatibility
• 2006/95/EC Low Voltage Directive
The following norms were consulted to assess conformity:
• EN 300 328 V1.7.1 (2006-10)
Electromagnetic compatibility and Radio spectrum Matters (ERM); Data transmission equipment operating in the 2,4 GHz ISM band and using wide band modulation techniques
- EN 301 489-1 V1.8.1 (2008-04)
EMC and ERM: EMC standard for radio equipment and services; Part 1: Common technical requirements
• EN 301 489-17 V1.3.2 (2008-04)
Electromagnetic compatibility and Radio spectrum Matters (ERM); ElectroMagnetic Compatibility (EMC) standard for radio equipment; Part 17: Specific conditions for 2,4 GHz wideband transmission systems.
• EN 60065:2002 + A1:2006 + Corrigendum:2006
Audio, video and similar electronic apparatus – Safety requirements
The CE symbol confirms that this product conforms with the above mentioned norms and regulations.
The manufacturer also declares the conformity of the product according to the following directives:
• 2001/95/EC General Product Safety
- 2002/95/EC RoHS: Hazardous substances in electrical and electronic equipment
Lorsch, 12.09.2012
T. Koroscha
Thorsten Koroscha, LPM
Supportinformationen
If you have any questions regarding your TrekStor product, please proceed as follows:
- Check the features as well as the functions of your device (apparent on the packaging), in order to use the correct settings.
- Read the manual carefully.
- Inform yourself on our website www.trekstor.de/en about the up-to-date information concerning your product (e.g. available most recent firmware releases).
In the case you have further questions regarding your product, please note the following TrekStor support options:
FAQ The FAQ area of our website offers you a wide range of problem solving hints. Here you can obtain answers to the most frequently asked questions concerning our products.
E-Mail Please fill in the support form on our website or send an E-Mail to support.en@trekstor.de. You can find mailing addresses for other countries when you click "SERVICE" at the menu bar on our website.
Phone support Please find the number of the support hotline for your country on our website under "SERVICE" as well.