3FS 2520 - Fridge BALAY - Free user manual and instructions
Find the device manual for free 3FS 2520 BALAY in PDF.
User questions about 3FS 2520 BALAY
0 question about this device. Answer the ones you know or ask your own.
Ask a new question about this device
Download the instructions for your Fridge in PDF format for free! Find your manual 3FS 2520 - BALAY and take your electronic device back in hand. On this page are published all the documents necessary for the use of your device. 3FS 2520 by BALAY.
USER MANUAL 3FS 2520 BALAY
Safety indicators and requirements
Getting to know the appliance
Installing the appliance
Turning on and temperature selections 5
Station reported and reporting out of use.
Amarging feed: 8
Frocering foods peaches sleep
10.2.100 and 10.2.7.5
Cler Conv III
Energy source: 10
and problems in value 11.12
Custom service 12
• Correlate in the case • In the case is a positive point. 91, 92
- 2017年1月1日
[1]
1.2.3.4.5.6.7.8.9.10.11.12.13.14.15.16.17.18.19.20.21.22.23.24.25.26.27.28.29.30.31.32.33.34.35.36.37.38.39.40.41.42.43.44.45.46.47.48.49.50.51.52.53.54.55.56.57.58.59.60.61.62.63.64.65.66.67.68.69.70.71.72.73.74.75.76.77.78.79.80.81.82.83.84.85.86.87.88.89.90.91.92.93.94.95.96.97.98.99.100
Nose on service of oblique
de la température :
17
[Unreadable]
Contract prices: \$10.00
koa pod ko a preman 23-24
Service services 24
Notice: Insulation
ES Indice
Conductors in the process
• 2017.
text_image
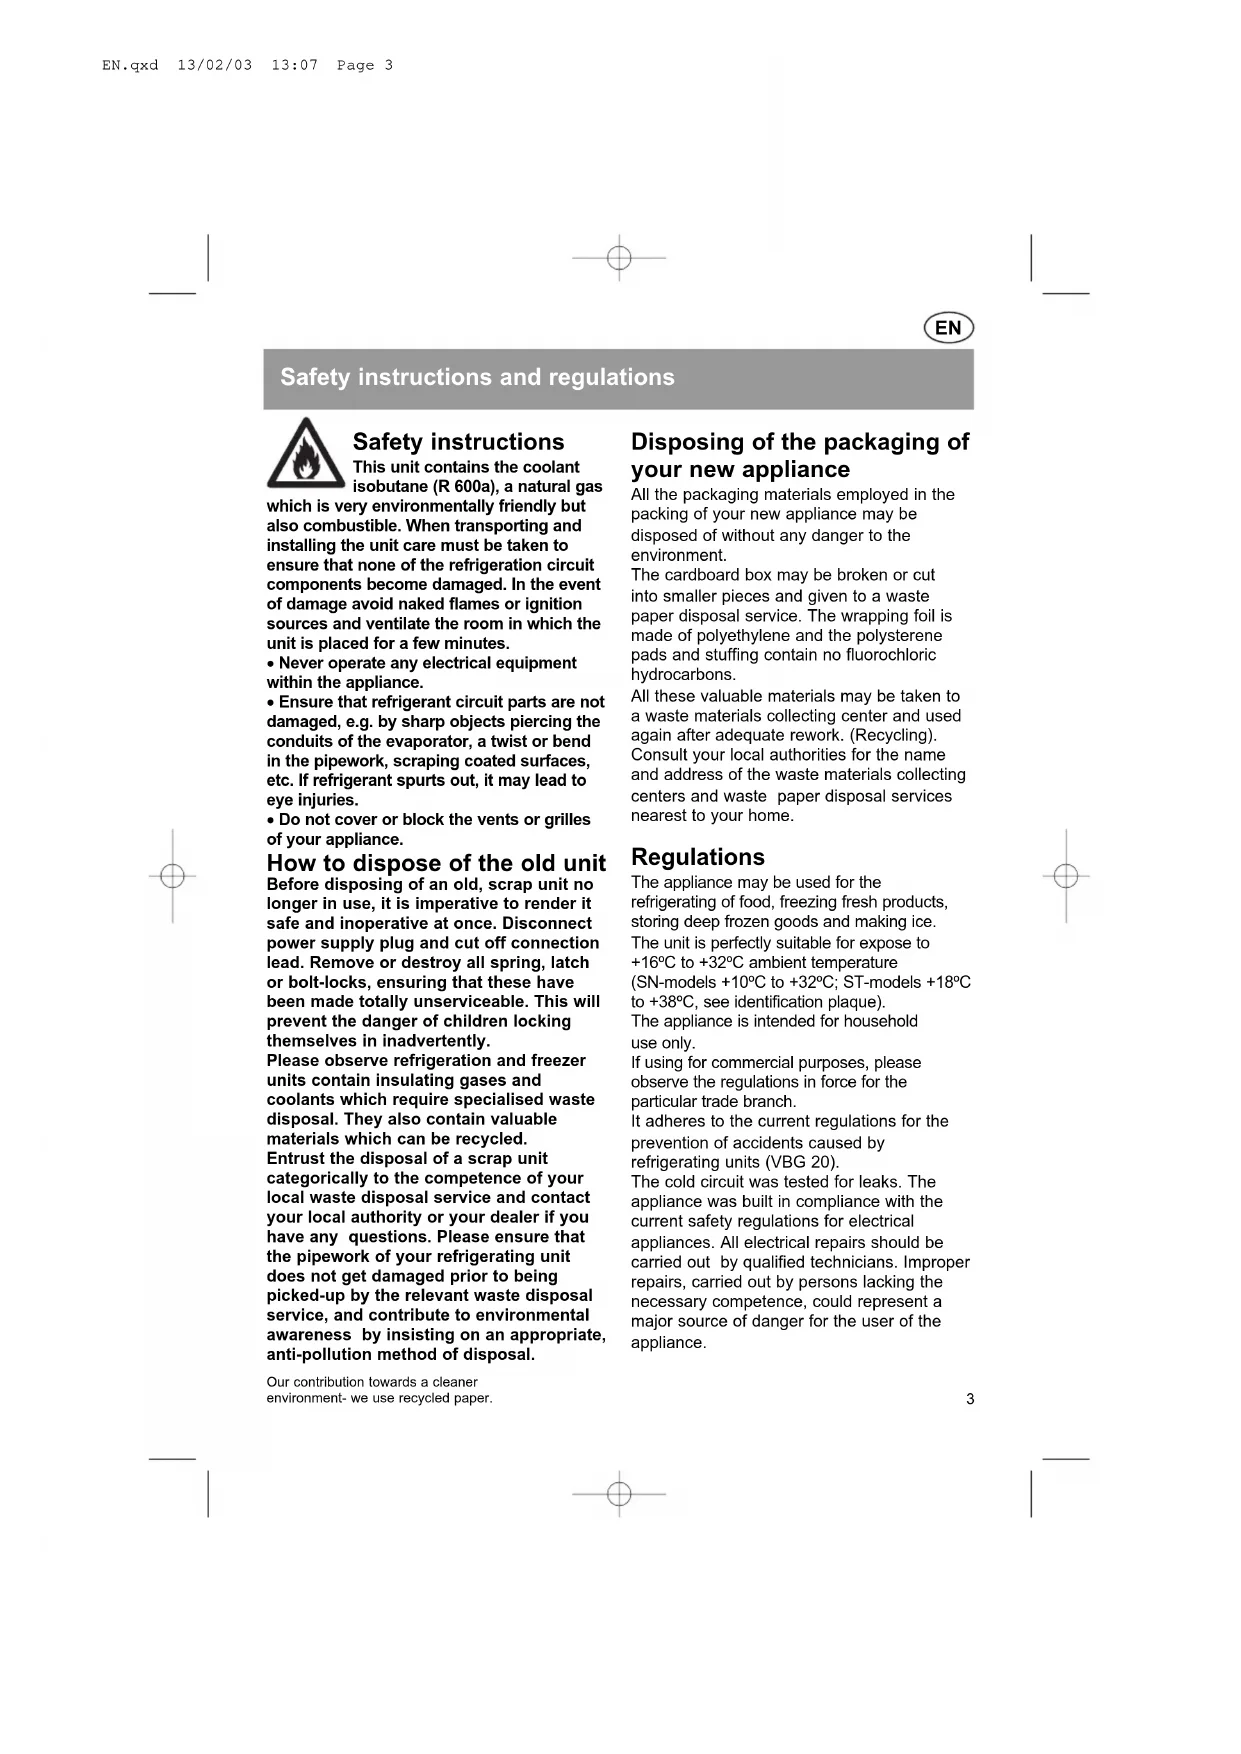
Technical diagram of a mechanical assembly with numbered components and labeled partsSubject to modification
natural_image
Illustration of a refrigerator with open doors and internal compartments (no text or symbols visible)Safety instructions and regulations
Safety instructions
This unit contains the coolant isobutane (R 600a), a natural gas
which is very environmentally friendly but also combustible. When transporting and installing the unit care must be taken to ensure that none of the refrigeration circuit components become damaged. In the event of damage avoid naked flames or ignition sources and ventilate the room in which the unit is placed for a few minutes.
- Never operate any electrical equipment within the appliance.
- Ensure that refrigerant circuit parts are not damaged, e.g. by sharp objects piercing the conduits of the evaporator, a twist or bend in the pipework, scraping coated surfaces, etc. If refrigerant spurts out, it may lead to eye injuries.
- Do not cover or block the vents or grilles of your appliance.
How to dispose of the old unit Before disposing of an old, scrap unit no longer in use, it is imperative to render it safe and inoperative at once. Disconnect power supply plug and cut off connection lead. Remove or destroy all spring, latch or bolt-locks, ensuring that these have been made totally unserviceable. This will prevent the danger of children locking themselves in inadvertently.
Please observe refrigeration and freezer units contain insulating gases and coolants which require specialised waste disposal. They also contain valuable materials which can be recycled. Entrust the disposal of a scrap unit categorically to the competence of your local waste disposal service and contact your local authority or your dealer if you have any questions. Please ensure that the pipework of your refrigerating unit does not get damaged prior to being picked-up by the relevant waste disposal service, and contribute to environmental awareness by insisting on an appropriate, anti-pollution method of disposal.
Our contribution towards a cleaner
environment- we use recycled paper.
Disposing of the packaging of your new appliance
All the packaging materials employed in the packing of your new appliance may be disposed of without any danger to the environment.
The cardboard box may be broken or cut into smaller pieces and given to a waste paper disposal service. The wrapping foil is made of polyethylene and the polysterene pads and stuffing contain no fluorochloric hydrocarbons.
All these valuable materials may be taken to a waste materials collecting center and used again after adequate rework. (Recycling).
Consult your local authorities for the name and address of the waste materials collecting centers and waste paper disposal services nearest to your home.
Regulations
The appliance may be used for the refrigerating of food, freezing fresh products, storing deep frozen goods and making ice. The unit is perfectly suitable for expose to +16°C to +32°C ambient temperature (SN-models +10°C to +32°C; ST-models +18°C to +38°C, see identification plaque).
The appliance is intended for household use only.
If using for commercial purposes, please observe the regulations in force for the particular trade branch.
It adheres to the current regulations for the prevention of accidents caused by refrigerating units (VBG 20).
The cold circuit was tested for leaks. The appliance was built in compliance with the current safety regulations for electrical appliances. All electrical repairs should be carried out by qualified technicians. Improper repairs, carried out by persons lacking the necessary competence, could represent a major source of danger for the user of the appliance.
EN
Getting to know the appliance
Before reading on, please unfold the illustrated pages at the back of this booklet.
The operating instructions apply for several different models; it is possible, therefore, that the featured illustrations may not tally exactly with the particular characteristics of your own appliance.
Overview
Figure 1
1 Ventilation grid
2 Ice-cube tray
3 Temperature selector/inner light
4 Racks
5 Meat container
7 Discharge gutter for thaw-water
8 Shelf
9 Vegetable bin
10 Kickstrip with ventilation outlet
12 Egg rack
13 Cheese compartment
14 Butter compartment
15 Container
17 Big shelf
18 Door seal
22 Freezer switch (Fig. 3)
A Deep-freezing compartment
B Refrigerator
Installing the appliance
Where to install
A dry, well ventilated room, is a suitable place for installing the appliance.
Ensure that the appliance is not exposed to direct sunlight or placed near a source of heat such as:
cookers, radiators, heaters, etc.
If this is not to be avoided, make use of an adequate insulating plate to protect the appliance or, observe the following clearances between appliance and heat source:
electrical cookers 3 cm. clearance oil- or coal-fired stoves 30 cm. clearance
If the appliance is placed right next to another refrigerator or depp-freezer, observe a minimum clearance of 2 cm between the two of them. This will prevent condensed moisture formation.
How to change the direction of door closure
See attached assembly instructions.
Lining-up the appliance
The appliance must stand firm and on even flooring. If the floor is not even the appliance should be levelled using the adjustable feet at the front edge of the cabinet. (Figure 2).
Electrical connection
Connect appliance to 220-230 V volts / 50 cycles a.c. Plug into a duly installed socket and protect socket with a 13 A fuse.
Ventilation
Ensure that the air caused to warm-up by the rear side of the appliance can ventilate unhindered. Otherwise, the refrigerating unit will be forced to increase its output and this will result in a higher rate of energy consumption. Observe, therefore, that the relief grid and ventilation outlets are never covered or blocked.
EN
Turning on and temperature selection
Clean the inside of the appliance thoroughly, before using the first time (see cleaning).
Turning on
Turn temperature selector (Figure 3) out of the position "O".
The refrigerating process begins.
Should the door of the freezer compartment refuse to come open shortly after having closed it, please wait for two or three minutes for the suction produced, when the door was first opened, to release.
Temperature selection
Use the temperature selector (Figure 3) to adjust the temperature of both freezer and refrigerating compartments. Observe the high figures yield low degrees of temperature.
When the temperature selector is placed at setting "O" the refrigerating process is turned off. From setting "1" onwards it starts and increases.
We suggest a medium temperature setting (approximately "2-3").
To freeze foods, rotate the temperature control to "3" (see also "Freezing").
Observe the following for the storage of frozen food:
If the temperature of the room where the appliance has been placed drops below +20°C the freezer switch should be connected. A red mark will indicate it is on (figure 3/22). On connecting the switch, the inner light will remain on at reduced power. This ensures that the temperature required in the freezer compartment for long-life storage of food is maintained.
Switching-off and setting out of use
Switching-off
Turn the temperature selector (Figure 3) to the setting "O". The refrigerating process stops for the whole appliance.
Setting out of use
If the appliance is set out of use for a long period of time, unplug, allow to defrost and clean. Leave the door of the freezer compartment and appliance's door open.
EN
Arranging food
How to rearrange the inner fittings
The shelf racks in the refrigerator area may be adjusted to different levels. To adjust, pull rack forward, push it down and reinstall at the desired position. (Fig.4).
The bottle holders can be fitted at an angle
The containers on the inside of the door may be taken out for cleaning (Fig.6).
Please observe the following when arranging food inside the appliance:
- Allow warm food or beverages to cool down before placing inside the appliance.
- Wrap or cover food well before placing inside the appliance.
- Oil or fat should not be allowed to come in contact with the plastic parts of the appliance or with the door seal (these are materials which tend to become easily porous).
- Do not store explosive substances inside the appliance.
- Keep high-proof alcoholic beverages in air-tight bottles or jars and store in upright position.
- The coldest areas in the refrigerator are the rear wall and the area around the bottom shelf.
Arranging food
Example of arrangement
Figure 1
In the freezer compartment (A): freezing of fresh products, storage of deep-frozen goods and making ice cubes.
In the refrigerator (B):
On racks (4), from top to bottom: pastries, ready-cooked meals, dairy products.
In the meat containers (5) meat and cold slices.
On the shelf (8):
meat, sausages and cold slices. In the vegetable bin (9): vegetables, lettuce and fruit.
In the egg rack (12): eggs.
In the compartments (13 and 14): butter and cheese.
In the door compartment (15): tubes and small tins.
On the large shelf (17): large bottles.
Note refrigeration zones in the refrigerator compartment!
The air circulation in the refrigerator compartment means that there are zones at different temperatures.
Depending on the model, the zone for sensitive foods is right at the bottom between the arrow on the side and the glass surface below (fig. 11/1 and 2) or between the two arrows (fig. 12/1 and 2). Ideal for storing meat, fish, sausage and salad mixtures, etc.
EN
Freezing fresh products storing frozen food and making ice
Observe the following when purchasing deep-frozen food:
- Inspect the package and ensure that it is perfect conditions.
- Check the expiry date stamped on the package; make sure it has not run out.
- Check the thermometer in the freezer of the store where you purchase your goods; it should indicate a temperature lower than -18°C.
- When shopping, ensure that the deep-frozen products are the last items to be purchased; wrap them up in newspaper or place in a insulating bag and take them home at once, place in the home freeze right away.
Wrapping-up
If home freezing, ensure that the products of your choice are absolutely fresh and in perfect condition. Pack food airtight so that it does not lose its taste or dehydrate.
Suitable wrapping material:
Plastic film, polyethylene bags, alu-foil and freezing containers.
All these products are available at your local dealers and most large supermarkets.
Unsuitable wrapping material:
Wrapping paper, wax-coated paper, butcher's paper, cellophane, rubbish bags or used carried bags.
Wrap-up food, press down on parcel to remove all air and seal airtight.
Suitable sealing material:
Rubber bands, plastic clips, string, waterproof adhesive tape or similar. Plastic and polyethylen bags may be heat-sealed with an appropriate machine.
Label package indicating contents and date of freezing before storing in the freezer compartment.
EN
Freezing fresh products, storing frozen food and making ice
Freezing capacity
Depending on the type of freezer, you can freeze the following amounts of food at one time:
KESV32M5
SF-28N/2TA
SF-24N/2TA
SF-21N/2TA
3,5kg/24h.
Place the products flat (widest side down) on the bottom of the freezer compartment. Ensure that the fresh food to be frozen does not come in contact with any frozen products stored in the appliance.
Adjust temperature selector to freezing and switch on freezing process
Turn temperature selector to an average temperature setting (approx. "3") whenever fresh products are put in to freeze.
This temperature setting is sufficient for freezing up to 1,5 kg of food. For larger amounts you should additionally actuate the freezing switch (Fig. 3/22).
(Press the rocker switch -red marking appears).
If takes approximately 24 hours for the freezing process to reach full completion; once the food is thoroughly frozen, you may disengege the freezing switch.
Please observe following when putting fresh food into the freezer compartment:
Please carefully ensure that freshly freezing food does not come into contact with food which is already frozen.
Observe the following tips for better storage of frozen food:
If the temperature of the room where the appliance has been placed drops below +20°C the freezer switch should be connected. A red mark will indicate it is on (figure 3/22). On connecting the switch, the inner light will remain on at reduced power. This ensures that the temperature required in the freezer compartment for long-life storage of food is maintained.
Storage life
To avoid quality loss, it is important not to be exceed the admissible storage life assigned to each product. The length of admissible storage varies from product to product. Fish, cold slices, ready-cooked meals bread and pastries will keep out to two months at a temperature of -18^ C. At the same degree of temperature you may keep meat, poultry and cheese for up to four months and fruit and vegetables for up to six months.
Defrosting frozen products
Depending on the type of food and the use intended for it, you may choose among any of the following defrosting methods:
- at ambient temperature,
- in the refrigerator,
- in an electric oven.
- with/without fanheater,
- in a microwave oven.
You may refreeze food that has partially or totally defrosted provided that:
- in the case of meat and fish, these products were not kept for longer than a day at a temperature of 3^ C or higher;
- in the case of other products, these were not kept for longer than three days at a temperature of 3^ C or higher.
Otherwise, check food for smell, appearance and flavour, if these have remained unaltered, boil, fry, roast or cook food to some kind of ready meal and refreeze. Observe that the maximum admissible storage life in this case is shorter than average.
Making ice
Figure 7
Fill ice tray 3/4 full with water and place on the bottom of the freezer compartment. Ice cubes will be easier to remove if the tray is given a gentle twist.
EN
Defrosting
Refrigerator
The refrigerator defrosts automatically. The thaw-water collects in the discharge gutter (figure 8/7) and is then conducted to the refrigerating unit to evaporate. Ensure that the discharge gutter and the discharge outlet (figure 8/19) are clean at all times, so that water may drain unhindered.
Freezer compartment
For safety reasons, the freezer compartment (Figure 1/A) does not defrost automatically, since the products stored in this area, are not supposed to accidentally thaw out. Intensive frost and ice build-up adversely influence the cold transmission to the frozen products and cause the rate of energy consumption to increase.
Scrape off frost build-ups
To remove frost build-ups you may use the standard frost scrapers available at most local dealers and large supermarkets. Ensure that the freezer compartment is not damaged when frost is scraped. Never use sharp or pointed items or metal utensils to remove frost.
Allow ice coats to thaw out
If a thick ice coat has built up inside the freezer compartment, it should be allowed to thaw out. If there are still frozen products in the freezer switch on the freezer switch (Fig. 3/22) about 4 hours before defrosting so that the food is once again deep frozen. Observe the following procedure:
- Remove frozen products, wrap up well in newspaper and store in a cool place.
- Turn the temperature selector (Figure 1/3) to setting "O" or unplug. Do not allow thaw water to run into the temperature selector.
- Leave door open and wipe-up thaw water with a cloth or sponge.
- Rub freezer compartment dry, switch appliance on once more and reinsert frozen products.
Defrosting advice
To speed up defrosting, it is best to place a saucepan with hot water on one of the freezer grids.
Under no circumstances should an electric heater, a petroleum lamp or candles be used to defrost the freezer.
Caution when using defrosting sprays as these may form explosive gases or else contain solvents or propellants which can damage the plastic fittings inside the appliance. They can also be a potential hazard to your health or cause corrosion.
Never scrape off ice or frost with any sharp metal objects as this can damage the surface of the freezer grids which will then rust. If any pipework is pierced, refrigerant spurting out may cause eye injuries or else it may ignite.
EN
Cleaning Energy saving tips
Before cleaning, make it a rule to unplug the appliance and/or disengage the fuse.
Use luke-warm water with a little desinfectant and washing-up liquid to clean the entire appliance, except for the door seal. Never use sand, abrasive cleansers or acids, e.g. chemical solvents.
Clean the door seal (Figure 1/18) with clear water and dry thoroughly afterwards.
Do not allow cleaning water to get into the temperature selector.
The discharge gutter (Figure 8/7) and the discharge outlet (Figure 8/19) should be cleaned more frequently to ensure that thawwater can drain unhindered. Pierce the discharge outlet with a toothpick or similar object to get it clean. Try to prevent cleaning water from getting into discharge outlet and running through to the evaporating plate.
In you so wish, you may additionally use a standard furniture polish to clean the outer cabinet panels. Ensure that the door of the appliance is closed while doing this, to prevent the polish from getting to the door seal or to the plastic parts inside the appliance.
• Install appliance in a cool and well ventilated room, do not expose to direct sunlight and keep away from heat sources (radiators, cookers etc.).
- Allow warm food and beverages to cool down before storing in the appliance.
- When defrosting, place the deep-frozen goods inside the refrigerator. The cold loss from the frozen goods can be effectively used-up to assist the cooling process inside the refrigerator.
- Allow freezer compartment to thaw out when ice has built-up. A thick coat of ice adversely affects the cold transmission to the frozen goods and causes the rate of energy consumption to increase.
- When putting in or taking out food, avoid keeping the door of the appliance open for too long.
EN
Small problems for self-help
Before calling the service engineer, check the following points and see if you can solve the problem yourself. If the service engineer is simply called-in for advice, i.e. if he finds no real fault with the appliance when he visits, you will be charged the full cost of service time, even before the guarantee period has run out.
| Problem | Possible cause |
| Unusual noises: | - The appliance may not be standing level or some kind of object is caught near the refrigerating unit.- A part on the rear wall of the appliance cannot turn freely and rubs against the appliance or against the wall. In this case, bend part carefully away. |
| The inner light does not work: | - The bulb has burnt out. Pull plug out of supply socket. Remove screen (Fig. 9) then remove bulb and exchange for a new one, maximum 15W, 220-240 V, E 14 base.- The light switch sitcks (figure 5/1). Try to get the switch to move. If it doesn't budge call customer service.- The temperature selector (figure 9/3) is on setting “O”. |
| The temperature inside the refrigerator is too cold: | - Temperature setting dial is set at a too low position.- Fresh food was put into freeze without switching on the super-freeze (Fig. 3/22). |
| Cooling output deteriorates: | - The door was opened too often.- A large amount of food was placed in the refrigerator.- A thick layer of frost has built up inside the freezer.- The relief outlet and the ventilation grid are covered.- Some kind of object is caught between the refrigerating unit and the wall. |
| Total lack of cooling: | - Plug does not fit properly into socket.- The fuse has disengaged.- Temperature selector (figure 1/3) is on setting “O”. |
EN
Small problems for self-help
If you have not managed to solve the problem with help of the above mentioned tips, call customer service.
Do not insist on solving the problem yourself. Above all, refrain from working on the electrical parts.
Try not to open the door of the appliance unnecessarily to avoid cooling loss.
Customer service
Identification plate
When calling customer service, please quote the following numbers: Appliance's number (Figure 10/23) and FD-number (Figure 10/24).
These details are found to the lower left hand side of the appliance on the identification plate.
EN
Installation instructions
Before reading these instructions, please unfold the pages with the illustrations.
Installation
• Install your combined freezer-refrigerator in a dry, well ventilated room. In a damp room the moisture in the air will form condensation on the outside of the appliance.
- If the unit is placed next to a heat source or another refrigerator, then the following minimum lateral clearances must be maintained (or an insulating panel used):
from electric cookers 3 cm. from oil or coal-fired cookers 30 cm. from other refrigerators 2 cm.
- Since warm air generated at the back of the refrigerator must be allowed to escape unhindered, you must never block the space between it and the wall nor cover the ventilation grid at the base.
- The appliance must stand firm and level. To compensate for any unevenness in the floor set the ajustable feet at the front, fig ②. Two rollers underneath the appliance allow it to be easily positioned in a niche.
Electrical connection
- The refrigerator must be connected to a 220-240 V (SN/N), 220-230 V (ST) AC (50 Hz) supply only, and must be protected by a 13 Amp fuse. The connection must be made via a properly installed socket with a non-fused earthing contact.
Changing the opening direction of the doors
Fig. 13
• Take off the strip (1) by removing the screws (2) and then pulling it upwards.
- Unscrew the upper hinge (3) and remove the freezer compartment door (5).
- Unscrew the centre hinge (6) and remove the refrigerator door (7).
- Remove the plastic plugs (8) (two pieces) from the opposite side, and press them into the holes left by the centre hinge once it has been removed.
- Remove the protective cover (9).
- Unscrew the lower hinge pin (10) and fix it on the opposite side.
- Fit the refrigerator door (7) without forgetting the separator (11), and screw the centre hinge on.
- Fit the freezer compartment door (5) without forgetting the adjusting washer (12).
- Fix the upper hinge (3) onto the opposite side and then unscrew the hinge pin (4) and fit it into the other threaded hole, without forgetting to fit the door separator (13).
- Screw the strip (1) back on (2).
- On some models the door handles (14) must also be changed to the opposite side.
Our contribution towards a cleaner environment - we use recycled paper.