MWH022N - Boiler WAECO - Free user manual and instructions
Find the device manual for free MWH022N WAECO in PDF.

| Product type | Water heater (boiler) for boats and motorhomes |
| Brand | Waeco |
| Model | MWH022N |
| Tank capacity | 22 liters |
| Maximum height | 297 mm |
| Weight (empty, estimated) | 12 kg |
| Power supply | 220 V, 50 Hz (AC) |
| Power consumption | Not specified (estimated 1000-1500 W) |
| Thermostat temperature range | 0 to 80 °C |
| Maximum working pressure | 7 kg/cm² (0.7 MPa) |
| Insulation material | Self-extinguishing polyurethane foam |
| Installation | Vertical or horizontal, on floor or wall |
| Fresh water connection | Inlet (blue) and outlet (red) with rubber rings |
| Engine connection | Closed circuit via heat exchanger (red for outlet, blue for inlet) |
| Safety | Automatic cut-off, overheat protection, safety valve, 10 A fuse |
| Main functions | Electric and engine heating (via cooling water) |
| Maintenance | Regular check of electrical and hydraulic connections, descaling if necessary |
| Drainage | Systematic in case of frost risk; drain valve at low point |
| Warranty | According to Waeco general conditions |
| Spare parts | Heating cartridge, thermostat, safety valve, rubber rings |
Frequently Asked Questions - MWH022N WAECO
User questions about MWH022N WAECO
0 question about this device. Answer the ones you know or ask your own.
Ask a new question about this device
Download the instructions for your Boiler in PDF format for free! Find your manual MWH022N - WAECO and take your electronic device back in hand. On this page are published all the documents necessary for the use of your device. MWH022N by WAECO.
USER MANUAL MWH022N WAECO
natural_image
Exterior view of a cylindrical industrial device labeled 'Bitherm' with warning labels and mounting hardware (no readable text beyond label)Mobitherm
MWH-020/N, MWH-022/N, MWH-030/N, MWH-040/N, MWH-060/N
Installation and Operating Manual
FR 39 Chauffe-eau
NL 90 Warmwaterboiler
We will be happy to provide you with further information about WAECO products. Please order our free catalogue with no obligation to buy on our homepage: www.waeco.com
F
natural_image
Pure geometric diagram with concentric circles and crosshairs, no text or symbols presentMobitherm
1
TOP
2
natural_image
Close-up of a device component with a black X-shaped crosshair and 'TOP' label, no readable text or symbols beyond the label.Mobitherm
3

4
natural_image
3D mechanical part with angular annotation (0–45°) and label 'A' (no readable text or symbols beyond annotations)B

Mobitherm

Mobitherm
natural_image
Pure geometric diagram with crosshair and circular shapes without any text or symbols
natural_image
Pure geometric diagram with crosshair and circular shapes without any text or symbolsnatural_image
Pure geometric diagram with crosshair and circular shapes without any text or symbolsnatural_image
Pure geometric diagram with crosshair and circular shapes without any text or symbolsPlease read this manual carefully before installing and starting up the device and store it in a safe place. If the device is handed over to another person, this operating manual must be handed over along with it.
Contents
1 Notes on using the manual 24
2 Safety and installation instructions. 24
3 Scope of delivery 25
4 Accessories 26
5 Intended use 26
6 Technical description 26
7 Mounting the water heater 27
8 Connecting the water heater 29
9 Switching on the water heater 33
10 Draining the water heater.... 34
11 Servicing the water heater 34
12 Troubleshooting 35
13 Guarantee 37
14 Disposal 38
15 Technical data 38

Notes on using the manual Mobitherm
1 Notes on using the manual

Caution
Safety instruction: failure to observe this instruction can cause material damage and impair the function of the device.
Caution
Safety instruction relating to danger emanating from electrical currents or voltage: failure to observe this instruction can cause material damage or personal injury and impair the function of the device.

Note
Supplementary information on operating the device.
▶ Action: This symbol indicates that action is required on your part. The required action is described step-by-step.
√This symbol describes the result of an action.
Fig. 4 5, page 4: This refers to an element in an illustration: in this case, "item 5 in figure 4 on page 4".
Please observe the following safety instructions.
2 Safety and installation instructions

Caution!
WAECO International will not be held liable for claims for damage resulting from the following:
- Installation errors
– Damage to the appliance resulting from mechanical influences and excess voltage
– Alterations made to the device without the explicit permission of WAECO International - Use for purposes other than those described in the operating manual


natural_image
Pure geometric diagram with crosshair and circular shapes without any text or symbolsMobitherm Scope of delivery

- Only use the device for the intended purpose. - Maintenance and repair work may only be carried out by qualified personnel who are familiar with the risks involved and the relevant regulations.
- Electrical devices are not toys! Keep electrical appliances out of reach of children or infirm persons. Do not let them use the appliances without supervision.
- Always empty the appliance if there is a danger of frost. The appliance will be irreversibly damaged if water freezes in it. - All water heaters are insulated with self-extinguishing polyurethane foam. Because this material gives off small amounts of toxic gases at temperatures above 500 °C, all work such as welding, cutting and drilling should be carried out in well-ventilated rooms.
- Always take out the power plug before taking off the plastic cover of the water heater. - Always comply with the applicable standards and regulations for electrical work and connections. - Electrical installations from the domestic supply must always be carried out by a qualified specialist. In the event of a faulty thermostat or heating cartridge, it is usually simpler to remove the entire water heater and send it to a service centre for repair.
3 Scope of delivery
Quantity Description
1 Water heater 1 Operating manual
Accessories Mobitherm
4 Accessories
Special stainless brackets are available as accessories:
● Water heaters up to 297 mm in height: MWH-022 (item no. 15.125)
● Water heaters up to 358 mm in height: MWH-020/30/40/60 (item no. 15.126)
5 Intended use
The water heater is for heating fresh water in enclosed, frost-free rooms, for example on boats or in caravans.
6 Technical description
Mobitherm water heaters are made of materials designed to withstand the harsh conditions at sea. As well as on boats, they are suitable for all mobile applications, such as for fitting in caravans.
The water heater heats fresh water from a tank and supplies it to a tap or a shower. It has two heating circuits for this: the water can be electrically heated, or alternatively, the waste heat of the engine cooling system can be used. Because of its greater efficiency, always use the electric connection if there is an electric power source available.
The water heater is available with tanks in four different sizes: 20, 22, 30, 40 and 60 litres.
Mobitherm Mounting the water heater
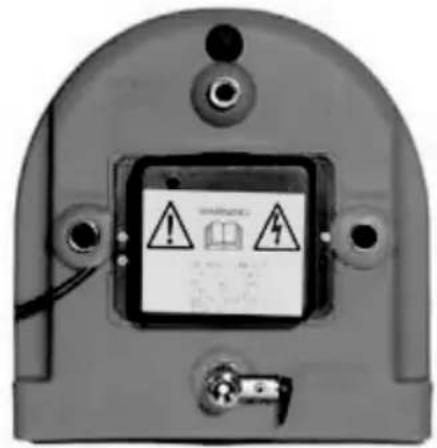
6.1 Type plate
The type plate contains the following information:
- Type designation
- Capacity
- Voltage (V)
● Power (W)
Material
● Installation type (vertical or horizontal)
● Maximum operating pressure in N/cm² - kg/cm² (safety valve setting)
7 Mounting the water heater
These mounting and operating instructions describe how to mount the appliance on a boat. It is fitted in a caravan, for example, in the same way.

Caution!
If you connect the water heater to the cooling system of an engine, always follow the engine manufacturer's recommendations.
Observe the following instructions when mounting the water heater:

Caution
Always take out the power plug before taking off the plastic cover.
- If you have any questions regarding installation, service and repair, or in the event of a complaint, contact your dealer first.
● The water heater can be mounted vertically or horizontally.
● Install the water heater somewhere where it is protected from damp and from splashing water. - It should be as close to the engine and connections as possible.
- Mount the water heater so that all the connections, the safety valve and the heating cartridge are easily accessible.


Mounting the water heater Mobitherm
- Install the water heater in a well-ventilated place, in order to avoid condensation.
● Fasten the water heater securely.
Note: the overall weight of the water heater is its own weight plus that of the water in it.
● During installation, note the information on the type plate.
The type plate is on the plastic cover on the front.
This is how to install the water heater:
▶Install the water heater in its intended position:
- f i g . 1, page 3: lying on the floor
- fig. 2, page 3: additional fastenings are required for mounting on bulkheads
- fig. 3, page 4: upright on the bulkhead
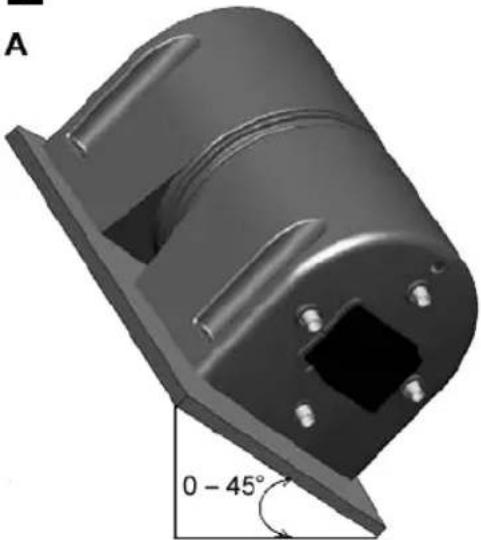
- fig. 4 A, page 4: diagonally on the floor
- fig. 4 B, page 4: diagonally on the bulkhead
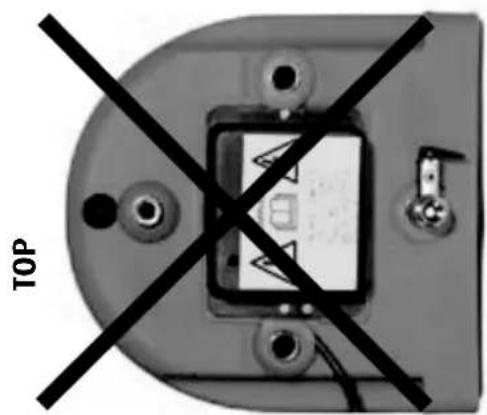
▶Check whether the side marked "TOP" is at the top.

Caution!
Fasten the water heater on all five fastening points. Use five M10 bolts and washers with a diameter of 30 mm, with a tightening torque of 6 – 10 Nm. The water heater can be damaged if the washers are too small or the bolts too tight.
▶ Bolt on the water heater using five M10 bolts and 30 mm washers.


natural_image
Pure geometric diagram with crosshair and circular shapes without any text or symbolsMobitherm Connecting the water heater
8 Connecting the water heater
8.1 Connecting to fresh water

Caution
Always follow the manufacturer's instructions when connecting the water heater to an engine cooling system. After connecting the water heater, make sure the the temperature of the engine cooling water does not rise excessively.
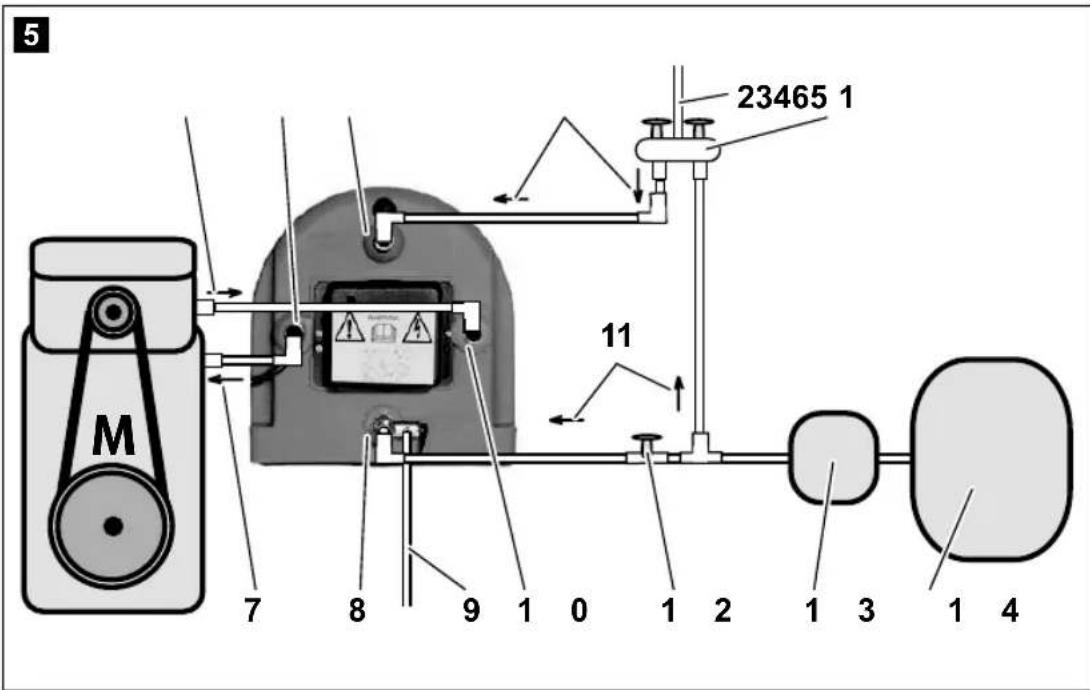
The basic circuit diagram can be found in fig. 5, page 5.
Item Meaning Item Meaning
| 1 Mixer 8 Fresh water intake (blue rubber ring) | |
| 2 Tap/shower | 9 Drain hose (pressure relief valve) |
| 3 Hot water 10 Engine circuit intake (blue rubber ring) | |
| 4 Hot water outlet (red rubber ring) | 11 Cold water |
| 5 Engine circuit outlet (red rubber ring) | 12 Ball valve/stopcock |
| 6 Cooling water from the engine | 13 Pump |
| 7 Return water to engine 14 Fresh water system | |

Note
We recommend fitting the drain cock at the lowest point in the water system, so that it can be easily drained for cleaning, servicing and if there is a danger of freezing.

Caution
Use thread seal tape or adhesive for all connections.

Connecting the water heater Mobitherm
Connect the fresh water system (fig. 5 14, page 5) to a safety valve or the cold water intake (fig. 5 8, page 5, blue rubber ring).
▶ Make sure the valve is correctly fitted: the arrow must point towards the blue rubber ring.

Note
The valve has four functions:
– Cold water intake connection
- Check valve to prevent hot water entering the fresh water
– Safety valve to prevent excess pressure in the water heater
- Drain valve
We recommend installing a ball valve, so that the water heater can be cut off from the rest of the system during maintenance.
▶ Install the ball valve (fig. 5 12, page 5) between the fresh water system and the safety valve on the water heater.
▶ Connect the hot water connection of the water heater (fig. 5 4, page 5, red rubber ring) to the mixer (fig. 5 2, page 5).
Use a connection (a pipe or hose) which is suitable for the resulting pressure (max. 7 kg/cm ^2 ) and temperature (max. 120 °C).

Caution
After mounting the water heater and before making the electrical connections, open the hot water taps (fig. 5 1, page 5) and start the pump (fig. 5 13, page 5) of the water system.
Let the water run for a few minutes to allow all air to escape from the system, so that the heating cartridge of the water heater is completely surrounded by water. Otherwise there is a risk of the heating cartridge blowing when the power is switched on.
▶Make sure all connections are tight.
▶ Attach a hose (fig. 5 9, page 5) to the safety valve and make sure that excess water drains off to the keelson or somewhere else where water and steam cannot cause injury or damage.
Pay particular care to the electrical equipment.
▶Again make sure that the cold water and hot water connections are fitted correctly, and not to the heat exchanger, which is marked with an engine symbol.


natural_image
Pure geometric diagram with crosshair and circular shapes without any text or symbolsMobitherm Connecting the water heater
8.2 Connecting to the engine cooling water system
Because most boat engines are cooled with a heat exchanger, it makes sense to supply the water heater with cooling water from the engine.

Caution
Follow the manufacturer's instructions when connecting a water heater.
The following instructions are only general in nature.
- If the engine circuit (fig. 5 6 and 7, page 5) of the water heater is connected to the engine cooling water system, you must use a hose which is flexible and suitable for the cooling water temperature.
- On engines cooled by sea water, take the water for the heater from the hottest point behind the engine.
Connect the cooling water line from the engine (fig. 5 6, page 5) to the intake of the water heater's engine circuit (fig. 5 10, page 5).
We recommend fitting an air nipple on the hose of the water heater.
- Connect the return water to the engine (fig. 5 7, page 5) to the outlet of the engine circuit of the water heater (fig. 5 5, page 5).
● Make sure the connections for the cooling water circuit of the water heater are fitted correctly and not swapped with the fresh water connections.
The water heater does not have to be mounted at the same level as the engine, but it is advisable. For efficient hot water generation, the water temperature in the engine circuit (fig. 5 6 and 7, page 5) of the water heater should not be less than 50^ .
8.3 Electrical connection
The electrical connection for the heating cartridge of the water heater is fitted with a tube and socket and can be directly connected to an earthed socket, which must be near the water heater.

Caution
Modifications to the original electrical connection of the water heater are not permitted.
Always comply with the applicable standards and regulations for electrical work and connections.


Connecting the water heater Mobitherm
Note the following instructions when making the electrical connection:
● The wire diameter may not be less than 2.5 mm^2 .
- Only use multiple-core cables (not single-core cables), because vibrations on the boat can damage them.
- Protect all electrical connections and cables against moisture and damp.
- Do not lay the cable along the keelson.
- Fasten the cable at suitable intervals using cable clips, or lay it in a cable duct.
- Protect the cable from contact with moving parts that might damage it.
Caution
Always take out the power plug before taking off the plastic cover.
▶ Make sure the AC voltage matches the information on the heating cartridge of the water heater (on the type plate under the plastic cover).
▶Make sure a residual current circuit breaker is installed in the on-board electrical system.
▶ Fit a switch (220 V/10 A) somewhere accessible so that the power for the water heater can be easily switched on and off.
▶ Protect the connection using with a fuse (220 V/10 A).


natural_image
Pure geometric diagram with crosshair and circular shapes without any text or symbolsMobitherm Switching on the water heater
9 Switching on the water heater
Before you switch on the water heater, you must set the required water temperature. The thermostat is on the heating cartridge under the black cover.
Caution
Always take out the power plug before taking off the plastic cover.
Adjust the thermostat by turning the yellow temperature controller so that the arrow points to the temperature you want.
The temperature range is from 0 to 80 °C.
▶Make sure the water heater is filled with water.
▶Switch on the power.
√After a few minutes the water heater begins heating the water.
9.1 Resetting the overheating protection device
The thermostat has an overheating protection device which operates electromechanically and interrupts the power supply to the heating cartridge is there is a fault. The overheating protection device is installed under the temperature controller.
This is how to reset the overheating protection device:

Caution
Always take out the power plug before taking off the plastic cover.
▶Turn the temperature controller to 80 °C.
▶ Reset the overheating protection device by pushing a ballpoint pen or similar implement into the small hole under the controller.
Draining the water heater Mobitherm
10 Draining the water heater

Caution
Always drain the water heater if there is a risk of freezing.
The water heater will be permanently damaged if water freezes in it.
▶ Make sure the power is off, so that the heating cartridge cannot be activated when the water heater is empty.
▶Connect the water supply to the water heater.
▶Open the pressure/drain valve by lifting the valve lever.
The water must drain directly into the keelson or another suitable place.
▶Release the pressure control valve (if fitted) or open the hot water connection (fig. 5 8, page 5, red rubber ring).
▶Drain the water heater completely.
11 Servicing the water heater

Caution
Always take out the power plug before taking off the plastic cover.
Call in a service engineer for repairs.
▶Regularly check the electrical connections.
▶Regularly check that all water connections are tight.
▶Replace any corroded screws, bolts and brackets immediately.


natural_image
Pure geometric diagram with crosshair and circular shapes without any text or symbolsMobitherm Troubleshooting
12 Troubleshooting
The engine does not heat the water.
▶ Make sure there is no air in the engine circuit of the water heater.
If there is air in it, open the air nipple (if fitted) or the connections on the water heater (red rubber ring) and let the air out.
▶ Check that the temperature of the engine cooling water is above 50^ C.
▶Check if the water is circulating.
▶Check that the connections to the taps are tight.
The heating cartridge does not heat the water.
Caution
Always take out the power plug before taking off the plastic cover.
▶Check if there is power.
▶Make sure the water heater is suitable for the voltage applied.
▶Check if the thermostat control is working properly, and switches on and off.
▶Make sure the automatic fuse of the thermostat has not blown.
If the fuse has blown, reset it (see chapter „Resetting the overheating protection device“ on page 33):
If the water gets very hot and the fuse blows again, have the thermostat and the heating cartridge inspected and if necessary replaced.

Caution
Always call a specialist to inspect and replace the thermostat and heating cartridge.
▶ Take off the black plastic cover above the electrical connections and check for traces of lime deposits.
Clean the connections when necessary.
▶Check that the connections to the taps are tight.


Troubleshooting Mobitherm
Hot water comes out of the cold water taps.
▶Make sure the return valve is not damaged, so that hot water cannot flow back into the cold water tank.
▶Check that the water heater is correctly connected.
▶ If the water heater boils despite the automatic fuse, switch off the power.

Caution
The water is very hot.
Carefully turn the tap on.
Replace the thermostat.
Water leaks out.
▶ Check that the water heater is fitted in a well-ventilated place.
Otherwise condensation and leaking water are easily confused.
▶Make sure that no water is dripping from outside onto the water heater.
▶Check that all connections are tight.
If water is actually leaking, replace the water heater.

Note
If the water heater is more than five years old, check the zinc anodes of the boat. The water heater has probably been damaged by galvanic flow.
Cooling water comes out of the taps.
▶Check if the engine circuit of the water heater is leaking.
If the engine circuit is damaged, the water heater must be replaced.

Note
If the water heater is more than five years old, check the zinc anodes of the boat. The water heater has probably been damaged by galvanic flow.


natural_image
Pure geometric diagram with crosshair and circular shapes without any text or symbolsMobitherm Guarantee
The safety valve leaks water.

Note
If the leaking water is no more than 0.2 – 0.3 litres per heating cycle and only happens when the water heater is in operation, then no action is necessary.
▶Make sure the valve and connection are tight.
If there is constant leakage, check there are no objects or particles stuck in the valve.
Otherwise, replace the valve.
The automatic fuse blows during operation.
▶Check the electric cables and the thermostat connection.
▶Make sure the heating cartridge is earthed.
Caution
Always call a specialist to inspect faults in the electrical system and to replace the thermostat and heating cartridge.
13 Guarantee
Our general guarantee conditions apply. If the product is defective, please return it to the WAECO branch in your country (see the back of the instruction manual for the addresses) or to your dealer. For repair and guarantee processing, please include the following documents when you send in the appliance:
● A copy of the receipt with purchasing date
● A reason for the claim or description of the fault
Disposal Mobitherm
14 Disposal
▶ If possible, always take the packaging material for recycling.
If you wish to finally dispose of the appliance, ask your local recycling centre or specialist dealer for details about how to do this in keeping with the applicable regulations.
15 Technical data
The volume of cooling water in the heat exchange of the water heater is:
| Item number | MWH-020/N | MWH-022/N | MWH-030/N | MWH-040/N | MWH-060/N |
| Volume in water tank: 20 | 22 | 30 | 40 | 60 l | ||||
| Cooling water volume in heat exchanger: | 0.5 | 0.8 l | ||||
| Thermostat temperature range: 0 to 80 °C | |||||
| Electrical connection: 220 V | |||||
Variations, technical improvements and delivery options reserved.

natural_image
Pure geometric diagram with crosshair and circular shapes without any text or symbolsMobitherm
natural_image
Pure geometric diagram with crosshair and circular shapes without any text or symbolsnatural_image
Pure geometric diagram with crosshair and circular shapes without any text or symbolsMobitherm Description technique
6 Description technique
natural_image
Pure geometric diagram with crosshair and circular shapes without any text or symbolsMobitherm Raccordement du chauffe-eau
2 Robinet / douche 9 Tuyau drainage (clapet surpression)
natural_image
Pure geometric diagram with crosshair and circular shapes without any text or symbolsMobitherm Raccordement du chauffe-eau
natural_image
Pure geometric diagram with crosshair and circular shapes without any text or symbols
Mobitherm Recherche des pannes
natural_image
Pure geometric diagram with concentric circles and crosshairs, no text or symbols presentMobitherm Volumen de entrega
natural_image
Pure geometric diagram with crosshair and circular shapes without any text or symbolsnatural_image
Pure geometric diagram with crosshair and circular shapes without any text or symbolsnatural_image
Pure geometric diagram with crosshair and circular shapes without any text or symbolsnatural_image
Pure geometric diagram with crosshair and circular shapes without any text or symbolsnatural_image
Pure geometric diagram with crosshair and circular shapes without any text or symbolsnatural_image
Pure geometric diagram with crosshair and circular shapes without any text or symbolsnatural_image
Pure geometric diagram with crosshair and circular shapes without any text or symbolsnatural_image
Pure geometric diagram with crosshair and circular shapes without any text or symbolsnatural_image
Pure geometric diagram with crosshair and circular shapes without any text or symbolsMobitherm Garanzia
13 Garanzia
natural_image
Pure geometric diagram with crosshair and circular shapes without any text or symbolsnatural_image
Pure geometric diagram with crosshair and circular shapes without any text or symbolsMobitherm Omvang van de levering
natural_image
Pure geometric diagram with crosshair and circular shapes (no text or symbols)
Mobitherm Warmwaterboiler monteren
natural_image
Pure geometric diagram with crosshair and circular shapes without any text or symbolsnatural_image
Pure geometric diagram with crosshair and circular shapes without any text or symbolsMobitherm Warmwaterboiler legen
10 Warmwaterboiler legen

Waarschuwing!
natural_image
Pure geometric diagram with concentric circles and radial lines, no text or symbols present
natural_image
Pure geometric diagram with crosshair and circular shapes without any text or symbolsnatural_image
Pure geometric diagram with concentric circles and crosshairs, no text or symbols presentnatural_image
Pure geometric diagram with crosshair and circular shapes without any text or symbolsnatural_image
Pure geometric diagram with crosshair and circular shapes without any text or symbols
natural_image
Pure geometric diagram with crosshair and circular shapes (no text or symbols)Mobitherm Garanti
13 Garanti
natural_image
Pure geometric diagram with concentric circles and crosshairs, no text or symbols presentMobitherm Tillbehör
4 Tillbehör
natural_image
Pure geometric diagram with crosshair and circular shapes without any text or symbolsnatural_image
Pure geometric diagram with crosshair and circular shapes without any text or symbolsnatural_image
Pure geometric diagram with crosshair and circular shapes (no text or symbols)natural_image
Pure geometric diagram with crosshair and circular shapes without any text or symbolsMobitherm Montering av varmtvannsbereder
natural_image
Pure geometric diagram with crosshair and circular shapes without any text or symbolsMobitherm Koble til varmtvannsberederen
8.3 Elektrisk tilkobling
natural_image
Pure geometric diagram with crosshair and circular shapes without any text or symbolsnatural_image
Pure geometric diagram with concentric circles and radial lines, no text or symbols presentnatural_image
Pure geometric diagram with crosshair and circular shapes without any text or symbolsMobitherm Vianetsintä
natural_image
Pure geometric diagram with crosshair and circular shapes without any text or symbolsMobitherm Takuu
13 Takuu
Roman Hill Business Park
UK-Broadmayne
+44 1305 854000
+44 1305 854288
Mail: sales@waeco.co.uk
Overseas + Middle East

WAECO Pacific Pty. Ltd.
1 John Duncan Court
Varsity Lakes QLD 4227
+61 7 55076000
+61 7 55076001
Mail: sales@waeco.com.au

WAECO Impex Ltd.
Suites 3210-12 · 32/F · Tower 2
The Gateway·25 Canton Road
Tsim Sha Tsui · Kowloon
Hong Kong
+852 24632750
+852 24639067
Mail: info@waeco.com.hk

WAECO Impex Ltd.
Taipei Office
2 FL-3 · No. 56 Tunhua South Rd, Sec 2
Taipei 106, Taiwan
+886 2 27014090
+886 2 27060119
Mail: marketing@waeco.com.tw

WAECO Middle East FZCO
R/A 8, SD 6
Jebel Ali, Dubai
+971 4 8833858
+971 4 8833868
Mail: waeco@emirates.net.ae

WAECO USA, Inc.
8 Heritage Park Road
Clinton, CT 06413
+1 860 6644911
+1 860 6644912
Mail: customercare@waecousa.com

www.waeco.com