
MG7770 - Tondeuse à barbe PHILIPS - Free user manual and instructions
Find the device manual for free MG7770 PHILIPS in PDF.
Download the instructions for your Tondeuse à barbe in PDF format for free! Find your manual MG7770 - PHILIPS and take your electronic device back in hand. On this page are published all the documents necessary for the use of your device. MG7770 by PHILIPS.
USER MANUAL MG7770 PHILIPS
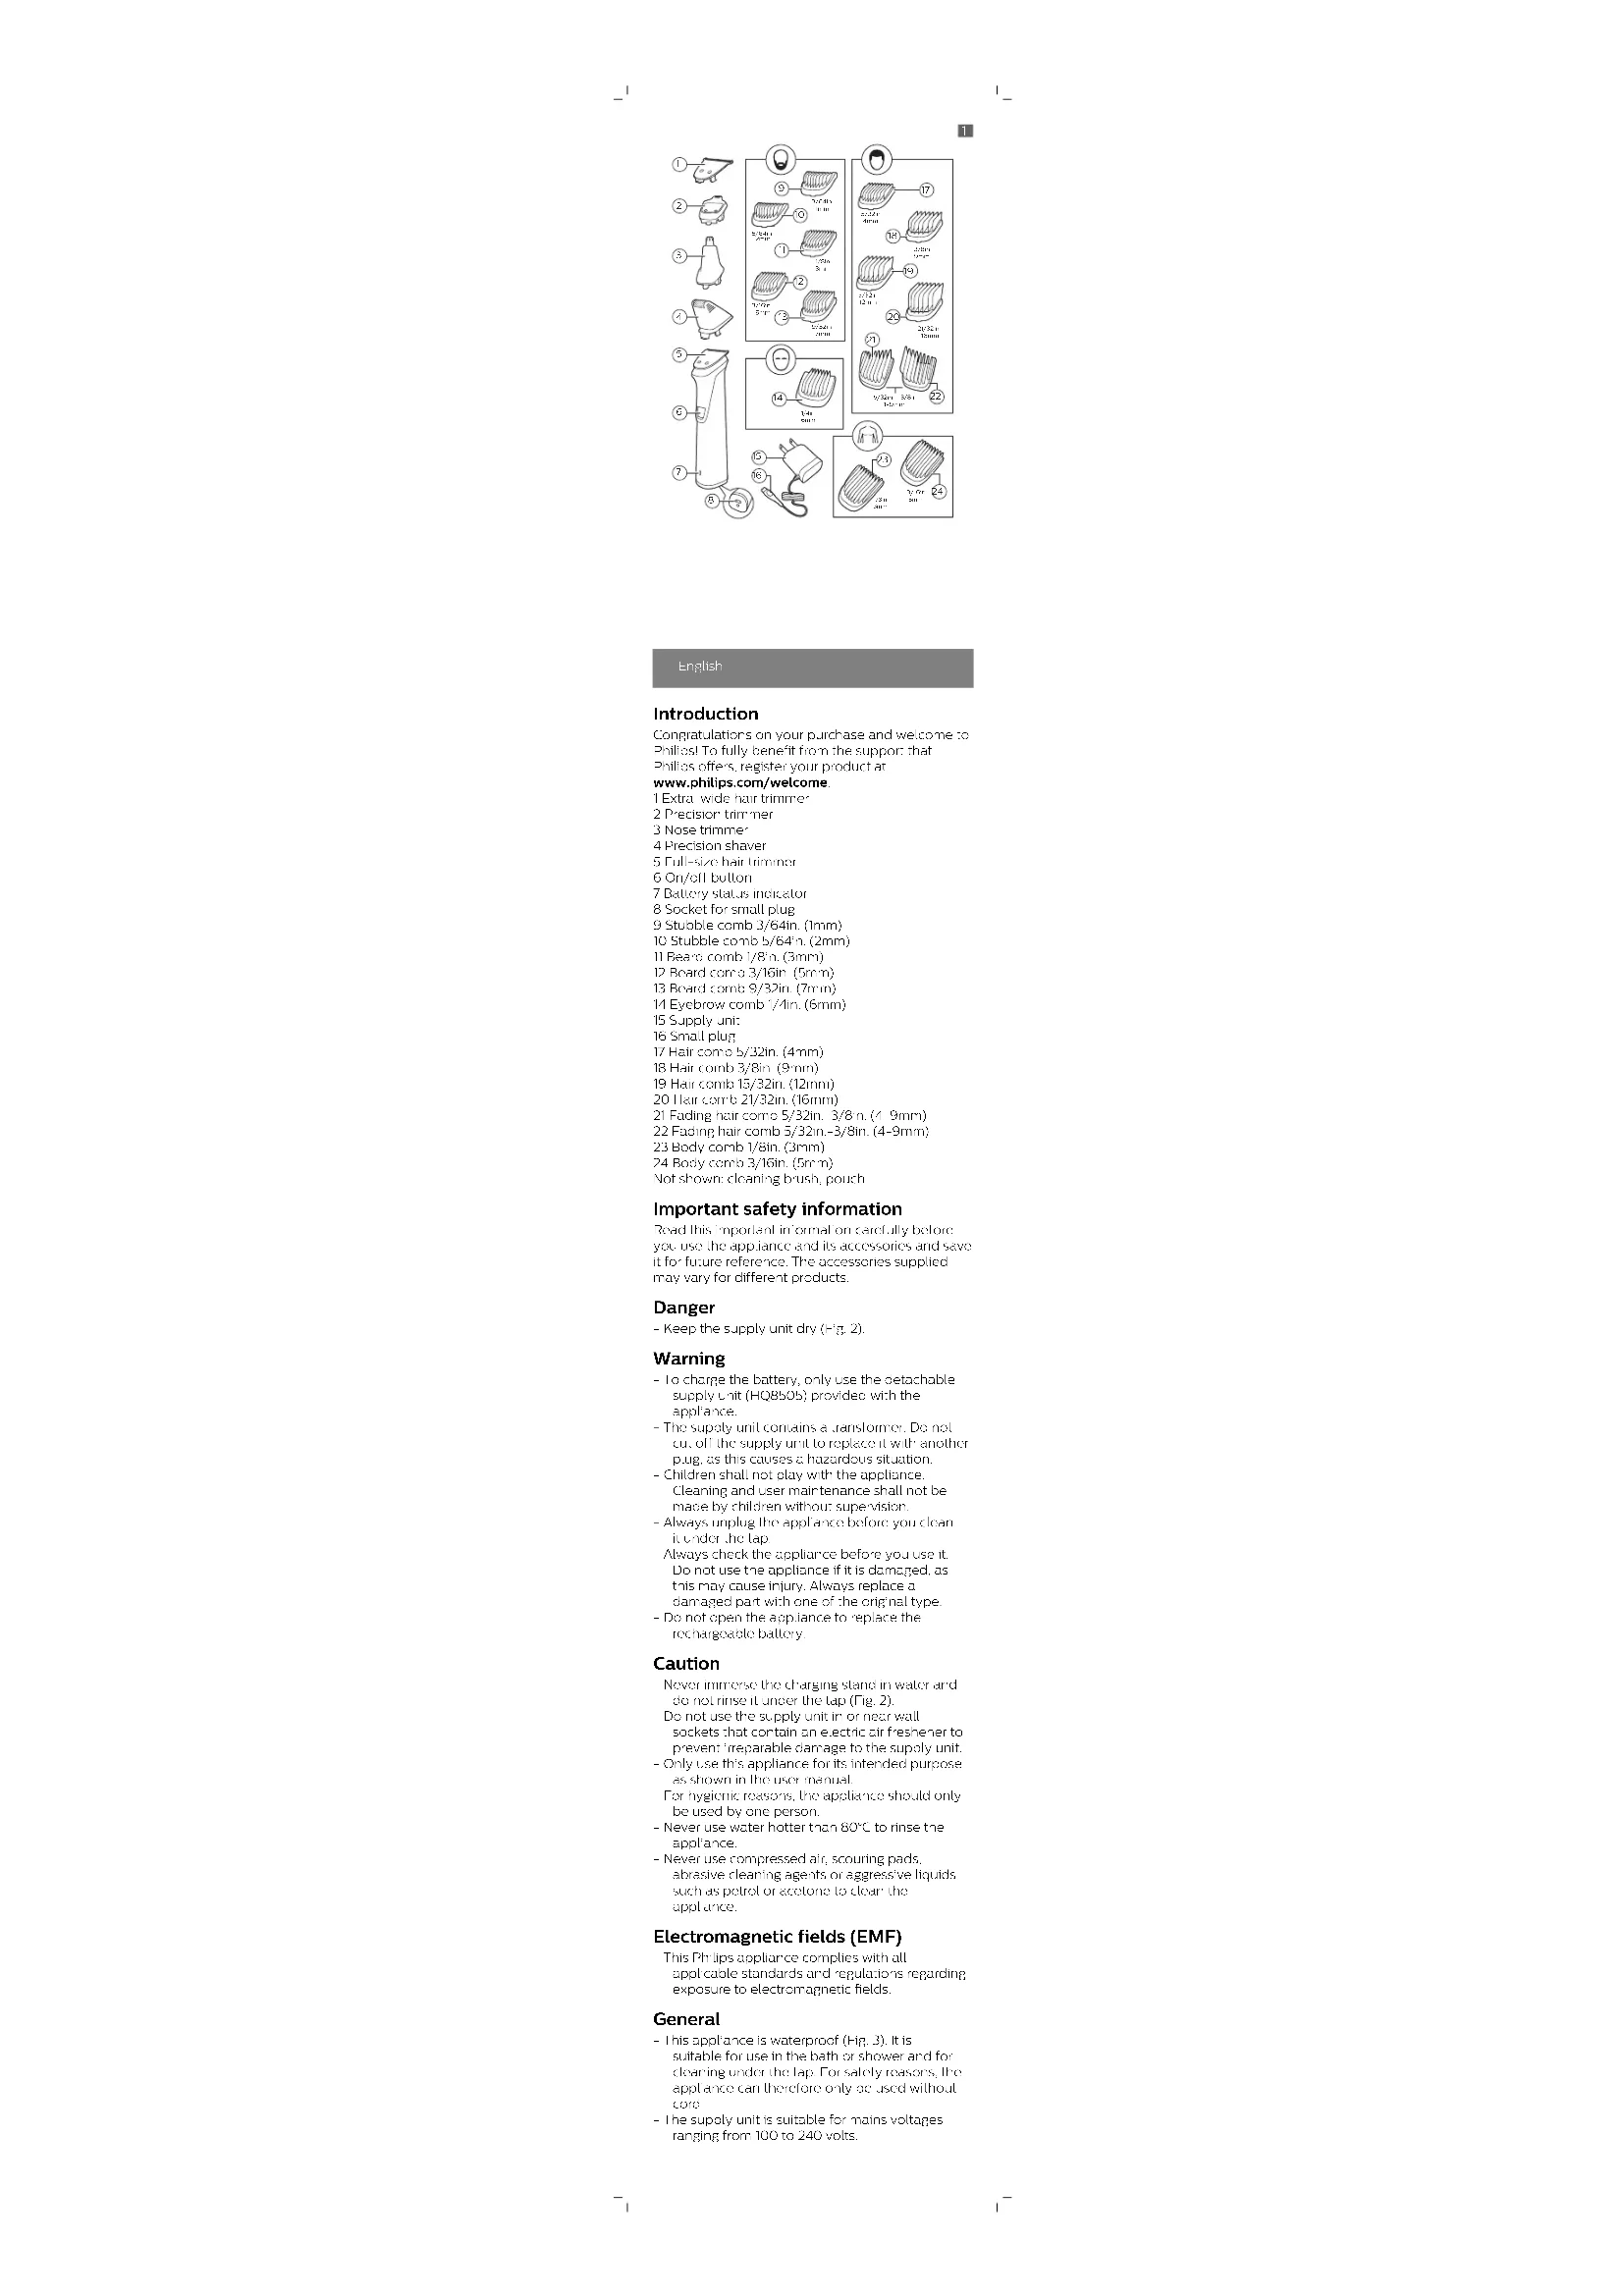
>75% recycled paper>75% papier recycléEnglish Introduction Congratulations on your purchase and welcome to Philips! To fully benefit from the support that Philips offers, register your product at www.philips.com/welcome. 1 Extra-wide hair trimmer 2 Precision trimmer 3 Nose trimmer 4 Precision shaver 5 Full-size hair trimmer 6 On/off button 7 Battery status indicator 8 Socket for small plug 9 Stubble comb 3/64in. (1mm) 10 Stubble comb 5/64in. (2mm) 11 Beard comb 1/8in. (3mm) 12 Beard comb 3/16in. (5mm) 13 Beard comb 9/32in. (7mm) 14 Eyebrow comb 1/4in. (6mm) 15 Supply unit 16 Small plug 17 Hair comb 5/32in. (4mm) 18 Hair comb 3/8in. (9mm) 19 Hair comb 15/32in. (12mm) 20 Hair comb 21/32in. (16mm) 21 Fading hair comb 5/32in.-3/8in. (4-9mm) 22 Fading hair comb 5/32in.-3/8in. (4-9mm) 23 Body comb 1/8in. (3mm) 24 Body comb 3/16in. (5mm) Not shown: cleaning brush, pouch Important safety information Read this important information carefully before you use the appliance and its accessories and save it for future reference. The accessories supplied may vary for different products. Danger - Keep the supply unit dry (Fig. 2). Warning - To charge the battery, only use the detachable supply unit (HQ8505) provided with the appliance. - The supply unit contains a transformer. Do not cut off the supply unit to replace it with another plug, as this causes a hazardous situation. - Children shall not play with the appliance. Cleaning and user maintenance shall not be made by children without supervision. - Always unplug the appliance before you clean it under the tap. - Always check the appliance before you use it. Do not use the appliance if it is damaged, as this may cause injury. Always replace a damaged part with one of the original type. - Do not open the appliance to replace the rechargeable battery. Caution - Never immerse the charging stand in water and do not rinse it under the tap (Fig. 2). - Do not use the supply unit in or near wall sockets that contain an electric air freshener to prevent irreparable damage to the supply unit. - Only use this appliance for its intended purpose as shown in the user manual. - For hygienic reasons, the appliance should only be used by one person. - Never use water hotter than 80°C to rinse the appliance. - Never use compressed air, scouring pads, abrasive cleaning agents or aggressive liquids such as petrol or acetone to clean the appliance. Electromagnetic fields (EMF) - This Philips appliance complies with all applicable standards and regulations regarding exposure to electromagnetic fields. General - This appliance is waterproof (Fig. 3). It is suitable for use in the bath or shower and for cleaning under the tap. For safety reasons, the appliance can therefore only be used without cord. - The supply unit is suitable for mains voltages ranging from 100 to 240 volts. 5/64in 2mm 3/16in 5mm 3/64in 1mm 1/8in 3mm 9/32in 7mm 5/32in 4mm 21/32in 16mm 15/32in 12mm 3/8in 9mm
5/32in – 3/8in 4-9mm
3/16in 5mm 1/8in 3mm
1- The supply unit transforms 100-240 volts to a
safe low voltage of less than 24 volts. Charging Battery status indications - When the battery is almost empty, the battery status indicator flashes orange (Fig. 4). - When the appliance is charging, the battery status indicator flashes white slowly (Fig. 5). - During quick charge, the battery status indicator flashes white quickly. After approx. 5 minutes of charging, the battery indicator flashes white slowly. The appliance now contains enough power for one cordless trimming session. - When the battery is fully charged, the battery status indicator lights up white continuously (Fig. 6). Note: After approx. 30 minutes, the light goes out automatically. Charging Charge the appliance before you use it for the first time and when the display indicates that the battery is almost empty. When the appliance has charged for 3 hours, it has a cordless operating time of up to 5 hours. 1 Make sure the appliance is switched off. 2 Insert the small plug into the appliance and put the supply unit in the wall socket (Fig. 7). 3 After charging, remove the supply unit from the wall outlet and pull the small plug out of the appliance. Quick charge After approx. 5 minutes charging, the appliance contains enough power for one cordless trimming session. Using the appliance Note: This appliance can only be used without cord. Note: Switch off and clean the appliance after each use. Detaching and attaching cutting elements 1 To detach a cutting element, push upwards against the teeth of the cutting element and take it off the handle (Fig. 8). 2 To attach a cutting element, insert the lug of the cutting element into the guiding slot at the front and push the back of the cutting element onto the appliance ('click') (Fig. 9). Detaching the precision shaver and nose trimmer 1 Place your finger on the arrow at the back of the attachment and push it off the handle in the direction of the arrow (Fig. 10). Attaching and detaching combs 1 To attach any type of guard onto a cutting element, slide the front part of the guard onto the teeth of the cutting element. Then push down the center of the guard with your fingers or the palm of your hand ('click') (Fig. 11). 2 To detach any type of comb from the cutting element, carefully pull its back part off the appliance and then slide it off the cutting element (Fig. 12). Note: When trimming for the first time, start by using the comb with the maximum trimming length setting to familiarize yourself with the appliance. Turning the appliance on and off Press the on/off button once to turn the appliance on or off (Fig. 13). Attachments for use on beard Full-size hair trimmer Use the full-size hair trimmer without a comb to trim hair close to the skin (to a length of 1/32in (0.5mm) or to create clean lines around your beard, neck and sideburns. 1 To trim hair close to the skin, place the flat side of the cutting element against your skin and make strokes against the direction of hair growth (Fig. 14). 2 For contouring, hold the cutting element perpendicular to the skin and move it upwards or downwards with gentle pressure (Fig. 15). Beard combs Attach a beard comb to the full-size hair trimmer to trim your beard and moustache evenly. The appliance comes with 5 beard combs. The hair length settings are indicated on the combs. The settings correspond to the remaining hair length after trimming. Comb inch mm Stubble comb 3/64in. 1mm Stubble comb 5/64in. 2mm Beard comb 1/8in. 3mm Beard comb 3/16in. 5mm Beard comb 9/32in. 7mm 1 Attach the comb to the full-size hair trimmer. 2 To trim the most effective way, move the comb against the direction of hair growth. Make sure the surface of the comb always stays in contact with the skin. Attachments for use on body - Use the green body combs to trim body hair. - When you trim for the first time, use the 5mm/3/16in. body comb to familiarize yourself with the appliance. - Make sure hair is clean and dry as wet hair tends to stick to the body and, when trimming sensitive areas, always use a body comb. - Since all hairs do not grow in the same direction, you may want to try different trimming positions (i.e. upwards, downwards, or across). Practice is best for optimum results.- Always make smooth and gentle movements and be sure the surface of the comb always stays in contact with your skin. - When too many hairs have accumulated on the appliance, blow the hairs out before use, for best trimming results. Body combs Attach a body comb to the full-size hair trimmer to trim hairs below the neckline. The appliance comes with 2 body combs. The hair length settings are indicated on the combs. The settings correspond to the remaining hair length after trimming. Comb inch mm Body comb (green) 1/8in. 3mm Body comb (green) 3/16in. 5mm 1 Attach a body comb to the full-size hair trimmer. 2 To trim in the most effective way, stretch the skin with your free hand and move the comb against the direction of hair growth (Fig. 16). Make sure the surface of the comb always stays in contact with the skin. Attachments for use on head Extra-wide hair trimmer Use the extra-wide hair trimmer without a comb to clip the hair on your head very close to the skin (1/32in (0.5mm) or to contour the neckline and area around the ears. 1 To contour the hairline around the ears, comb the hair ends over the ears. 2 Tilt the appliance in such a way that only one edge of the cutter blades touches the hair ends when you shape the contours around the ears. 3 To contour the nape of the neck or sideburns, turn the appliance and make downward strokes (Fig. 17). 4 Move the appliance slowly and smoothly following the natural hairline. Hair combs Attach a hair comb to the extra-wide hair trimmer to evenly trim the hairs on your head. The appliance comes with 4 hair combs. The hair length settings are indicated on the combs. The settings correspond to the remaining hair length after trimming. Comb inch mm Hair comb 5/32in. 4mm Hair comb 3/8in. 9mm Hair comb 15/32in. 12mm Hair comb 21/32in. 16mm 1 Attach a comb to the extra-wide hair trimmer. 2 Move the trimmer slowly over the crown from different directions to achieve an even result. Make sure the surface of the comb always stays in contact with the skin.
Always move the trimmer against the direction of hair growth (Fig. 18). Press lightly.