
Sonicare AirFloss HX8460 - Interdental brush PHILIPS - Free user manual and instructions
Find the device manual for free Sonicare AirFloss HX8460 PHILIPS in PDF.
| Product Type | Interdental brush (AirFloss) |
| Brand | Philips |
| Model | Sonicare AirFloss HX8460 |
| Power Source | Rechargeable via charging station or separate charger |
| Charger Type | Included charger, detachable for travel |
| Station Reservoir Capacity | Approximately 23 refills for AirFloss Pro, 40 for AirFloss original |
| Handle Reservoir Fill Time | 10 seconds |
| Initial Charging Time | 24 hours before first use |
| Recommended Liquid | Antimicrobial mouthwash (e.g., Philips Sonicare BreathRx) – avoid water |
| Liquids to Avoid | Those containing isopropyl myristate, high concentrations of essential oils, hydrogen peroxide, or sold in opaque/ceramic/glass containers |
| Main Functions | Interdental cleaning with liquid jet, automatic refill, filling and charging station, detachable travel charger, cord storage |
| Charging Compatibility | Also charges Philips Sonicare electric toothbrushes (Series 3, Flexcare, Flexcare+, HealthyWhite, HealthyWhite+, EasyClean) |
| Maintenance and Cleaning | Clean every 4 weeks if using mouthwash, weekly if using water; rinse with warm water via refill cycles |
| Safety | Do not use isopropyl alcohol, hot water; do not immerse station; use only recommended accessories |
| Spare Parts and Repairability | Interchangeable reservoir door (two sizes), detachable handle vessel, detachable charger; no user-repairable parts |
| Warranty | 2 years from date of purchase |
| Customer Service (North America) | 1-800-682-7664 |
| Website | www.sonicare.com (North America) or www.philips.com |
Frequently Asked Questions - Sonicare AirFloss HX8460 PHILIPS
User questions about Sonicare AirFloss HX8460 PHILIPS
0 question about this device. Answer the ones you know or ask your own.
Ask a new question about this device
Download the instructions for your Interdental brush in PDF format for free! Find your manual Sonicare AirFloss HX8460 - PHILIPS and take your electronic device back in hand. On this page are published all the documents necessary for the use of your device. Sonicare AirFloss HX8460 by PHILIPS.
USER MANUAL Sonicare AirFloss HX8460 PHILIPS
Congratulations on your purchase and welcome to Philips! To fully benefit from the support that Philips offers, register your product at
www.philips.com/welcome
Use AirFloss with your favorite mouthwash as part of your oral care routine. In addition to brushing, AirFloss helps reduce the plaque in between teeth in order to improve your gum health.
IMPORTANT SAFEGUARDS
Warning: READ ALL INSTRUCTIONS BEFORE USE
DANGERS
To reduce the risk of electrocution:
1 Always place and store the Fill & Charge station and/or charger at a safe distance from water.
2 Do not reach for a Fill & Charge station and/or charger that has fallen into water. Unplug immediately.
3 After cleaning, make sure the charger is completely dry before you connect it to an electrical outlet.
WARNING
To reduce the risk of burns, electrocution, fire or physical injury:
1 Do not use isopropyl alcohol or any other cleaners not indicated in this manual that may be an ingestion hazard in the water reservoir of AirFloss or the Fill & Charge station.
2 Do not use hot water in the AirFloss reservoir to avoid physical injury.
3 The AirFloss Pro and Fill & Charge station needs to be cleaned on a regular basis to assure proper function and to minimize build up of unwanted biofilm. (see 'Cleaning')
4 Do not drop or insert any foreign objects into the reservoir.
5 Do not use attachments other than those recommended by the manufacturer.
6 Do not use the charger/Fill & Charge station outdoors.
7 Use only charger type included in this package as provided by Philips.
8 Never force the plug into an outlet; if the plug does not easily fit into the outlet, discontinue use.
9 Keep the cord away from heated surfaces.
10 Discontinue use if the AirFloss, Fill & Charge station, charger, or cord appears damaged in any way.
11 The mains cord cannot be replaced. If the mains cord is damaged, discard the charger and replace with a Philips charger of the same model type.
12 This product contains no user-serviceable parts. Refer to 'Warranty and support' if the product no longer works properly or needs repair.
8 English
13 Use this product only for its intended use as described in this document or as recommended by your dental professional.
14 This product is not intended for use by persons (including children) with reduced physical, sensory, or mental capabilities, or lack of experience and knowledge, unless they have been given supervision or instruction concerning use of the appliance by a person responsible for their safety.
15 Children should be supervised to ensure that they do not play with the product.
MEDICALWARNINGS
1 The Fill & Charge station promotes the storage of liquid for an extended period of time. At room temperature organisms present in untreated water can multiply and potentially cause a hazard to health if ingested. To avoid this, do not use water with this product but instead use mouthwash as indicated.
2 Consult your dentist before you use this product if you have had recent oral or gum surgery, suffer from an ongoing dental condition, had extensive dental work in the previous two (2) months, or have suspected issues with your dental work (filings, crowns, etc.).
3 Contact your dental professional if excessive bleeding occurs after using this product or bleeding continues to occur after four (4) weeks of use.
4 Discontinue use of this product and contact a physician/dentist if discomfort or pain is experienced.
5 This product complies with the safety standards for electromagnetic devices. If you have a pacemaker or other implanted device, contact your physician or the device manufacturer prior to use.
6 Consult your physician if you have other medical concerns.
Electromagnetic fields (EMF)
This Philips device complies with all applicable standards and regulations regarding exposure to electromagnetic fields.
SAVE THESE INSTRUCTIONS
Your Philips Sonicare Fill & Charge station (Fig. 1)
1 Eject button
2 Removable handle cup
3 Removable reservoir
4 Reservoir lid
5 Original AirFloss reservoir door
6 AirFloss Pro reservoir door
Getting started
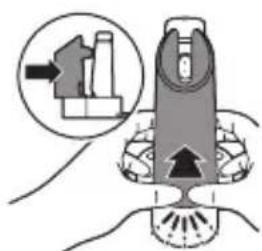
Replacing the AirFloss reservoir door
1 Because you have purchased the Fill & Charge station as a separate accessory, you will need to replace the reservoir door on your AirFloss handle before use.
10
English
2 Identify if you are using the original AirFloss or AirFloss Pro:
a The original AirFloss (type number HX81XX or HX82XX found on bottom of handle) will only have (1) LED on the handle.
b AirFloss Pro (type number HX83XX found on bottom of handle) will have (3) LEDs on the handle, and will have a metallic accent ring just below where the nozzle connects to the handle.
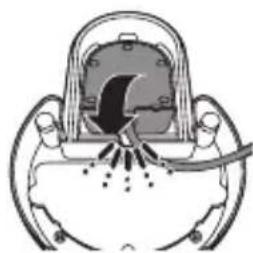
3 Remove the reservoir door from your existing AirFloss or AirFloss Pro handle by opening the door, grabbing the door by the base, and twisting.
4 Insert your new reservoir door (the smaller door included is for the original AirFloss and the larger door is for AirFloss Pro) by:
a Inserting the tube into the handle reservoir with the tube facing up.
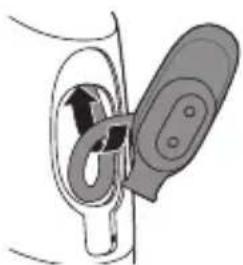
b Placing one pin of the door hinge into one side of the handle just beneath the door opening.

c Grabbing the door at the base and twisting until the door snaps into place.
d Test the door by opening and closing. You should feel resistance when opening and closing.
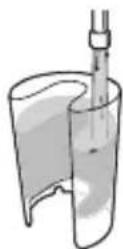
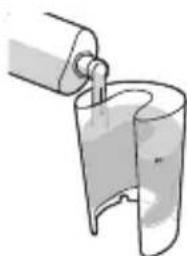
Filling the Fill & Charge station
| Before first use, plug in Fill & Charge station and place handle in handle cup to charge for 24 hours. | |
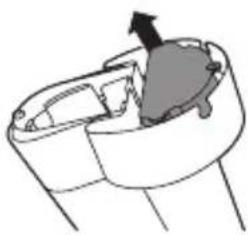
| 1 Remove the reservoir from the Fill & Charge station base. | |
| 2 Remove the reservoir lid and fill the reservoir. For optimal results with your AirFloss, we recommend you use an antimicrobial mouth rinse (such as Philips Sonicare BreathRx). | |
| Note: Recommended to not use with water. | |
| Note: Fill the reservoir only up to the MAX indication. | |
| 3 Place the reservoir lid on the reservoir. | |
| 4 Place the reservoir on the base. | |
| Note: The Fill & Charge station reservoir holds enough liquid for approximately 23 fillings of your AirFloss Pro or 40 fillings of your original AirFloss. | |
| Note: Do not use with mouthwash containing isopropyl myristate (e.g. Dental Active) or high concentrations of essential oils, as it may damage the product. This includes all mouthwash sold in glass or ceramic packaging. Also, do not use with mouthwashes containing hydrogen peroxide, or rinses sold with opaque packaging. |
12 English
Charging
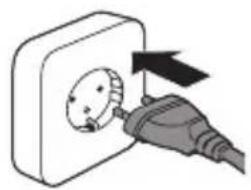
1 Plug the charger into an electrical outlet.
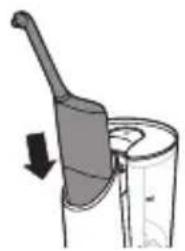
2 Place the AirFloss handle into the Fill & Charge station cup, with the AirFloss reservoir door facing toward the Fill & Charge station. Make sure the handle is fully inserted into the handle cup such that the holes in the handle reservoir door align with ports in the Fill & Charge station post.
Note 1: The AirFloss will only charge if placed in the direction indicated above.
Note 2: The Fill & Charge station can charge other Philips Sonicare devices, including the following Philips Sonicare Rechargeable Power Toothbrushes: 3-Series, Flexcare, Flexcare+, HealthyWhite, HealthyWhite+ and EasyClean.
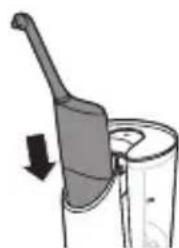
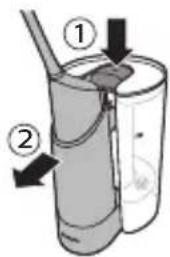
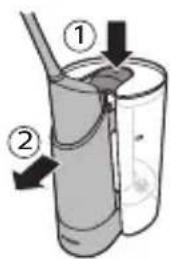
Using your Fill & Charge station
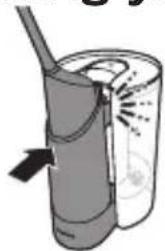
1 Lock the AirFloss handle and handle cup into the Fill & Charge station (click). When you hear a click, the AirFloss is fully engaged and will start to fill automatically (you may be able to hear the pump fill and/or see bubbles indicating filling).
Note: The Fill & Charge station fills your AirFloss handle in 10 seconds.

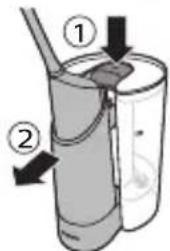
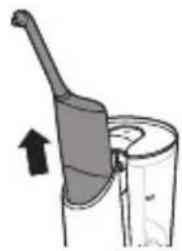
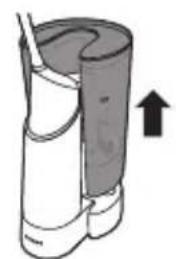
2 Once filled, press the eject button to release the AirFloss handle and the handle cup (if the eject button is pressed before the pump stops, the pump shuts off automatically but your AirFloss handle reservoir may not be full).
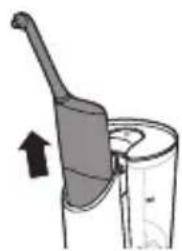
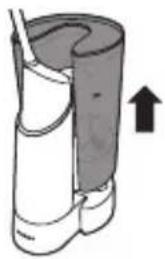
3 Remove the AirFloss handle and begin using your AirFloss.
4 In order to minimize time for your daily oral care routine, we suggest you refill your AirFloss handle immediately after use so that it is ready immediately for the following day's routine.
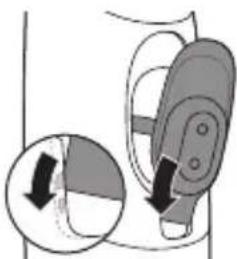
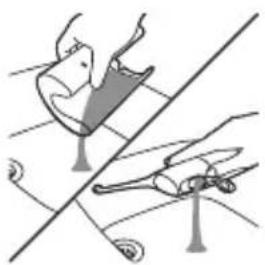
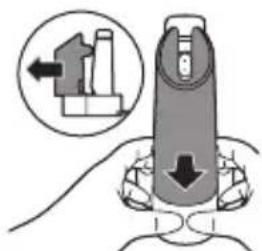
Charger insertion and removal instructions
Your Fill & Charge station charger can be removed and used separately as a standalone charger for your AirFloss and many other Philips Sonicare toothbrush handles.
To remove the charger
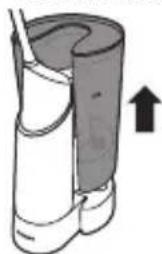
1 Remove the reservoir from the Fill & Charge station base.
2 Place the Fill & Charge station base upside down or on its side.

3 Pull the charger cord from the bottom of the base and pull the charger out.
To insert the charger
1 Remove the reservoir from the Fill & Charge station base.
2 Place the Fill & Charge station base upside down or on its side.
3 Insert the charger base from the bottom of the Fill & Charge station, with the charger peg sticking up. You will hear a click sound once it is fully engaged.
4 Use the cord wrap around the Fill & Charge station to your desired length.
Fill & Charge station features
1 Auto-fill that begins immediately upon handle engagement
2 Quick-fill that fills your AirFloss handle reservoir completely in just 10 seconds
3 Removable reservoir for easy filling and cleaning
4 Reservoir lid to ensure no contamination of reservoir fluid
5 Removable handle cup for easy cleaning
6 Removable travel charger (pre-installed) to allow for on-the-go use of your AirFloss while away from home longer than 2 weeks
7 Cord wrap for customization to your bathroom storage needs
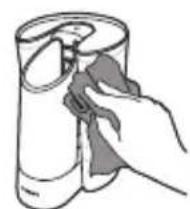
Cleaning
The product needs to be cleaned regularly as follows:
- When using mouthwash in the device, clean it every 4 weeks.
-When using water in the device, clean it every week.
Clean the device as follows:
1 Empty mouthwash from Fill & Charge station reservoir and handle reservoir.
2 Fill the station reservoir with warm water.
3 Place handle in handle cup and engage with Fill & Charge station; letting the station fill the handle until the motor stops (10 seconds).
4 Eject the AirFloss handle and handle cup from the Fill & Charge station, but do not remove the AirFloss handle from handle cup. Re-engage AirFloss handle and handle cup to run the Fill & Charge station a second time.
5 Repeat this once more for a total of three fill cycles.
6 Eject the handle cup and remove the AirFloss handle from the handle cup. Press and hold the activation button to flush the handle until the handle reservoir is empty.
7 Empty water from the Fill & Charge station reservoir.
8 Place the AirFloss handle in the handle cup and engage handle cup to Fill & Charge station, running one more cycle and purging any remaining fluid in between the reservoir and the handle in the Fill & Charge station.
9 Eject the AirFloss handle and handle cup, remove the AirFloss handle from the handle cup, open the door of the AirFloss handle to dump out remaining water, or press activation button on the handle to spray any residual water from the AirFloss nozzle until the handle reservoir is empty.
10 The handle cup of the Fill & Charge station can be easily removed in order to clean your Fill & Charge station:
a Remove the reservoir from the Fill & Charge station base.
b Eject the AirFloss handle and handle cup and remove the AirFloss handle from the handle cup.
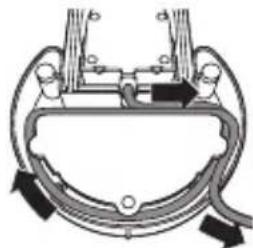
c To remove the handle cup: pinch the bottom of the handle cup (using both hands) at its base from the front and back. Clean the handle cup with warm water.
d To insert the handle cup: slide the handle cup into the base. You will hear a click once it is engaged.
11 Empty and dry Fill & Charge station reservoir.
12 Fill the Fill & Charge station reservoir with new mouthrinse, place the handle in the handle cup and engage with the Fill & Charge station to fill the handle reservoir.
13 Your AirFloss is now ready to use.
Storage
If you are not going to use the Fill & Charge station for an extended period of time, unplug it from the electrical outlet, clean it and store it in a cool and dry place away from direct sunlight. You can use the cord wrap to store the power cord in an organized manner. The charger can be removed from the Fill & Charge station and can be used separately to charge your AirFloss or other compatible Philips Sonicare devices.
Disposal
This product may contain lead and mercury. Disposal of these materials may be regulated due to environmental considerations. For disposal or recycling information, please contact your local authorities or visit www.recycle.philips.com.
This product contains batteries:
-
Dispose of batteries properly. Do not incinerate. Batteries may explode if overheated.
-Do not wrap in metal or aluminum foil. Tape the waste battery terminals before discarding.
-It is suggested that you contact your local town or city to determine proper battery redemption site(s) in your area. -
Please visit www.call2recycle.org for additional information on a recycling center in your area for rechargeable batteries.
Removing the rechargeable battery
Please note that this process is not reversible.
To remove the battery, you need a Philips-Head screwdriver and scissors. Observe basic safety precautions when you follow the procedure outlined below. Be sure to protect your eyes, hands, fingers, and the surface on which you work.
1 Unplug the device.
2 Remove the AirFloss handle, reservoir, and charger from the Fill & Charge station.
3 Using a Philips-head screwdriver, remove the 2 screws shown in the image. Also remove the 2 screws beneath the rubber feet.
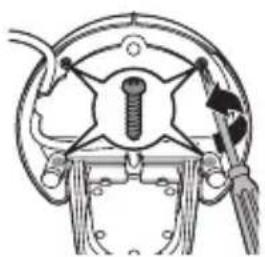
4 Remove the screws and plastic bottom of the Fill & Charge station.
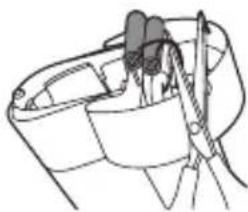
5 Cut the wires to separate the rechargeable batteries from the appliance.
6 Dispose of the batteries properly.
Warranty and support
Philips warrants its products for two years after the date of purchase. Defects due to faulty materials will be replaced at Philips' expense provided that convincing proof of purchase in the qualifying period is provided. Any attempt to repair Airfloss and Fill & Charge station will void this warranty. Contact our Consumer Care Center at 1-800-682-7664 (North America), outside North America contact your local Philips Consumer Care Center. Internet information: www.sonicare.com (North America) or www.philips.com (outside North America).
WARRANTY EXCLUSIONS
What is not covered under warranty:
-Damage caused by use of unauthorized replacement parts.
-Damage caused by misuse, abuse, neglect, alterations or unauthorized repair.
-Normal wear and tear, including chips, scratches, abrasions, discoloration or fading.
LIMITATION OF REMEDIES
IN NO EVENT SHALL PHILIPS OR ANY OF ITS AFFILIATED OR SUBSIDIARY COMPANIES BE LIABLE FOR ANY SPECIAL, INCIDENTAL OR CONSEQUENTIAL DAMAGES BASED UPON BREACH OF WARRANTY, BREACH OF CONTRACT, NEGLIGENCE, TORT, OR ANY OTHER LEGAL THEORY. SUCH DAMAGES INCLUDE, WITHOUT LIMITATION, LOSS OF SAVINGS OR REVENUE; LOSS OF PROFIT; LOSS OF USE; THE CLAIMS OF THIRD PARTIES INCLUDING, WITHOUT LIMITATION, DENTISTS AND DENTAL HYGIENISTS; AND COST OF ANY SUBSTITUTE EQUIPMENT OR SERVICES. SOME STATES DO NOT ALLOW THE EXCLUSION OR LIMITATION OF INCIDENTAL OR CONSEQUENTIAL DAMAGES.

IMPLIED WARRANTYIS
ANY IMPLIED WARRANTY, INCLUDING IMPLIED WARRANTY OF MERCHANTABILITY AND FITNESS FOR A PARTICULAR PURPOSE, SHALL BE LIMITED TO THE DURATION OF THE EXPRESS WARRANTY SET FORTH ABOVE. IN SOME STATES LIMITATIONS ON DURATION OF IMPLIED WARRANTY DO NOT APPLY.
Introduccion
MISES EN GARDE D'ORDRE MEDICAL
EXCLUSIONS DE GARANTIE
www.philips.com/Sonicare
©2016 Koninklijke Philips N.V. (KPNV). All rights reserved. Philips and the Philips shield are trademarks of KPNV. Sonicare and the Sonicare logo are trademarks of Philips Oral Healthcare, LLC and/or KPNV.
75% recycled paper
75% papier recyclé
4235.021.1633.1