
MCI220 - Loudspeaker LENCO - Free user manual and instructions
Find the device manual for free MCI220 LENCO in PDF.
| Product type | Micro hi-fi system with iPod/iPhone docking station |
| Brand | Lenco |
| Model | MCI220 |
| Main unit dimensions | 152 (W) x 222 (D) x 218 (H) mm |
| Speaker dimensions | 140 (W) x 222 (D) x 218 (H) mm |
| Net weight | 5.45 kg |
| Power supply | 230-240 V~, 50 Hz |
| Output power | 2 x 20 Watts |
| Radio bands | FM 87.5-108 MHz, DAB/DAB+ 174-240 MHz |
| Disc player | CD, CD-R, CD-RW, MP3, WMA |
| Compatible storage media | USB flash drive, SD/SDHC card (up to 32 GB) |
| Connectivity | iPod/iPhone docking station, AUX input (3.5 mm), headphone jack, USB port, SD slot, RCA video output |
| Remote control | Supplied (AAA batteries not included) |
| Main functions | DAB/FM radio with presets (30 stations), CD/MP3/WMA playback, shuffle and repeat play, track programming, DAB synchronized clock, timer, sleep, preset EQ, mute mode |
| Antenna | DAB/FM wire antenna (unfold completely for best reception) |
| Care and cleaning | Clean with a soft, dry cloth; for discs, wipe from center to edge |
| Safety | Do not expose to moisture, drips or splashes; do not block ventilation openings; do not open the casing (risk of electric shock) |
| Remote control batteries | 2 AAA batteries (not supplied) |
| Included accessories | Remote control, power cord, speaker cables (not detailed) |
| General information | Indoor use only; environmental: do not dispose of with household waste |
Frequently Asked Questions - MCI220 LENCO
User questions about MCI220 LENCO
0 question about this device. Answer the ones you know or ask your own.
Ask a new question about this device
Download the instructions for your Loudspeaker in PDF format for free! Find your manual MCI220 - LENCO and take your electronic device back in hand. On this page are published all the documents necessary for the use of your device. MCI220 by LENCO.
USER MANUAL MCI220 LENCO
Micro Hi-Fi System with Docking for iPhone & iPod
MCI-220

iPod & iPhone are trademarks of Apple Inc., registered in the U.S. and other countries.
"Made for iPod" and "Made for iPhone" mean that an electronic accessory has been designed to connect specifically to iPod or iPhone respectively, and has
been certified by the developer to meet Apple performance standards.
Apple is not responsible for the operation of this device or its compliance with safety and regulatory standards.
Please note that the use of this accessory with iPod or iPhone may affect wireless performance.
SAFETY PRECAUTIONS
To achieve the utmost in enjoyment and performance, please read this manual carefully before attempting to operate the unit in order to became familiar with its features, and assure you years of faithful, trouble free performance and listening pleasure.
Important Safety instruction
Keep instructions the safety and operating instructions should be retained for future reference.
Avoid installing the unit in locations described below:
Places exposed to direct sunlight or close to heat radiating
appliances such as electric heaters. On top of other stereo equipment that radiate too much heat. Places lacking ventilation or dusty places.
Places subject to constant vibration. Humid or moist places.
Make sure not to obstruct the ventilation openings.
Before turning on the power for the first time, make sure the power cord is properly installed.
Mains plug is used as the disconnect device and it shall remain readily operable completely.
The product shall not be exposed to dripping or splashing and that no objects filled with liquids, such as vases, shall be placed on the product.
Clean only with dry cloth.
To be completely disconnect the power input, the mains plug of apparatus shall be disconnected from the mains.
When the stand-by LED gives no color, the apparatus is completely disconnected from mains.
Minimum distances 10cm around the apparatus for sufficient ventilations.
Attention should be drawn to the environmental aspects of battery disposal.
The use of apparatus in moderate climates.
The mains plug should not be obstructed or should be easily accessed during intended use.
The ventilation should not be impeded by covering the ventilation openings with items such as newspaper, table-clothes, curtains etc.
No naked flame sources such as lighted candles should be placed on the apparatus.
Battery shall not be exposed to excessive heat such as sunshine, fire or the like.
Do not defeat the safety purpose of the polarized or grounding-type plug. A polarized plug has two blades with one wider than the other.
A grounding type plug has two blades and a third grounding prong. The wide blade or the third prong are provided for your safety. If the
provided plug does not fit into your outlet. Consult an electrician for replacement of the obsolete outlet.
For safety reasons, do not remove any covers or attempt to gain access to the inside of the product. Refer any servicing to qualified personnel. Do not attempt to remove any screws, or open the casing of the unit; there are no user serviceable parts inside, refer all servicing to qualified service personnel.


CAUTION : TO REDUCE THE RISK OF ELECTRIC SHOCK DO NOT REMOVE COVER (OR BACK), NO USER SERVICEMAN LE PARTS INSIDE, REFER SERVICING TO QUALIFIED SERVICE PERSONNEL.

DANGEROUS VOLTAGE
Conductor dangerous voltage, that may be of sufficient magnitude to constitute a risk of electric shock to persons is present within this products enclosure.

ATTENTION
The owners manual contains important operating and maintenance instructions, for your safety, it is necessary to refer to the manual.
WARNING : TO PREVENT FIRE OR SHOCK HAZARD, DO NOT EXPOSE THIS APPLIANCE TO DRIPPING OR SPLASHING.
Note:
This unit will become warm when used for a long period of time. This is normal and does not indicate a problem with the unit.
The CD player includes micro-processors which may malfunction as a result of external electrical interference or noise.
If the CD player is not working properly, disconnect the power source and then reconnect it.
Excessive sound pressure from earphones and headphones can cause hearing loss.
If an unusual conditions occurs in the display window or key button, switch the unit off, then turn on the unit again.
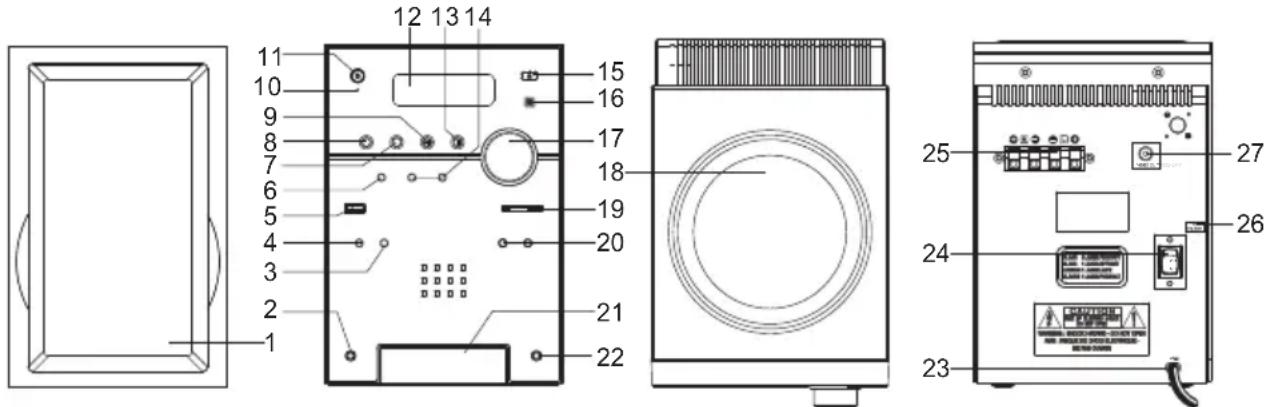
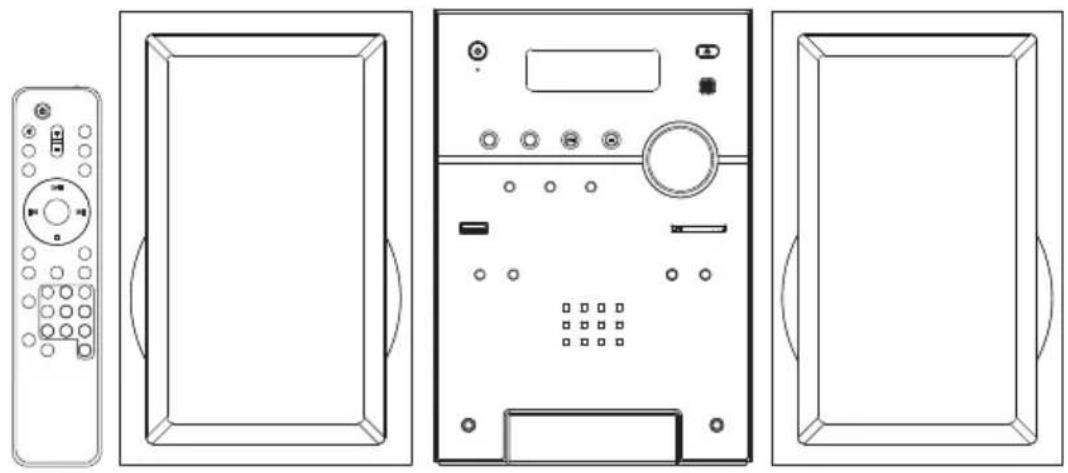
FEATURES AND CONTROLS
- SPEAKER
- LINE IN JACK
3.REPEATBUTTON - iPod/ID3/MEM/C-AD.J.BUTION
- USB DEVICE IN PORT
- SELECT/FM MO./ST. BUTTON
- CD/iPod/USB/CARD BUTTON
- DAB/FM/AUX BUTTON
- PLAY/PAUSE/SCAN/ENTER BUTTON
10.STANDBY LED INDICATOR
11. STANDDBY
12.LCD DISPLAY WINDOW
13. STOP/MENU/INFO BUTTON
14.SKIP/TUNE (UP or DOWN) BUTTON
15. OPEN/CLOSE BUTTON
16.IR SENSOR
17.VOLUME (+ or-) KNOB
18.CD DOOR
19.SD CARD IN SLOT
20.FOLDER(UP or DOWN)
BUTTON
21.iPod DOCK DOOR
22.HEADPHONES JACK
23.AC CORD
24.AC POWER SWITCH
25.SPEAKER TERMINALS
26.FM ANTENNA
27.VIDEO OUT JACK
INSTALLING THE UNIVERSAL DOCK

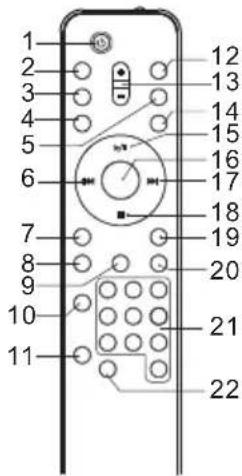
REMOTE CONTROL
- STANDBY BUTTON
- MUTE BUTTON
- OPEN/CLOSE BUTTON
- CLOCK DISP BUTTON
- DAB/FM/AUX BUTTON
- SKIP/TUNE SEARCH DOWN BUTTON
- TIMER BUTTON
- SLEEP BUTTON
- ID3/iPod/MEM/C-ADJ.BUTION
10.RANDOM BUTTON
11.REPEAT BUTTON
12.CD/iPod/USB/CARD BUTTON
13.VOLUME (+ or-)BUTTON
14.EQ BUTTON
15.PLAY/PAUSE/SCAN BUTTON
16.SELECT/MONO/ST. BUTTO
17.SKIP/TUNE SEARCH UP BUTTON
18.STOP/MENU/INFO BUTTON
19.FOLDER UP BUTTON
20.FOLDERDOWNBUTTON
21.NUMBER SEARCH BUTTON
22. INTRO BUTTON
PUTTING THE BATTERIES INTO THE REMOTE CONTROL UNIT
Press down the compartment cover, and slide the cover off to open the compartment. Place the two (UM4), (AAA), (R03) batteries in the remote control according to the polarity markings (^ + ^ and " - inside the compartment and on the batteries. Place the cover over the compartment, press down lightly, and push it upward until it snaps on.
Note: Remove the batteries from the remote control if not in use for long period of the time. Do not mix normal batteries with rechargeable batteries, when the batteries become weak, remote control will not function and replace with new batteries.
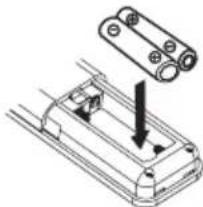
BATTERIES NOT INCLUDED
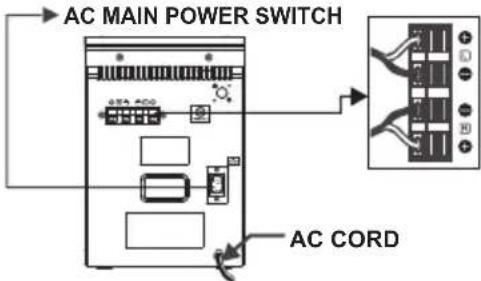
INSTALLING THE SPEAKER WIRE TO THE SPEAKER TERMINALS
- Speakers Connection
Extend the SPEAKER WIRES and connect them to the SPEAKER TERMINALS.
- Power Cord Connection
Before using, connect the AC Power Cord to the AC outlet. Then turn on the main switch of the unit. Standby indicator will light on.
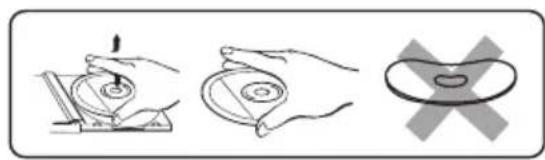
COMPACT DISC
- Always use a compact discs bearing the mark as shown.
- Notes on handling discs
Removing the disc from its storage case and loading it. - Do not touch the reflective recorded surface.
- Do not stick paper or write anything on the surface.
- Do not bend the disc.
- Storage
- Store the disc in its case.
- Do not expose discs to direct sunlight or high temperatures, high humidity or dusty places.
- Cleaning a disc
- Should the disc become soiled, wipe off dust, dirt and fingerprints with a soft cloth.
- The disc should be cleaned from the center to the edge.
- Never use benzene, thinners, record cleaner fluid or anti static spray.
- Be sure to close the CD door so the lens is not contaminated by dust.
- Do not touch the lens.


OPERATING THE UNIT
When you first plug the unit into the AC outlet, then press the power switch on the rear of the unit, the unit will be in standby mode, the black light of standby is red. You can now press the STANDBY/ON button on the unit or on the remote control to switch the unit ON. Pull the AC plug out of the wall socket if you want to switch off completely.
POWER/STANDBY
- Press the STANDBY/ON button on the unit or on the remote control to switch the unit on.
- Select the sound source (CD, iPod, USB, CARD) and (DAB, TUNER, AUX) by pressing the (CD, iPod, USB, CARD) and (DAB, FM, AUX) button on the unit (or remote control). The corresponding display will light up.
- Adjust the volume with the VOLUME (+ or -) control knob on the unit (or remote control).
- Press the STANDBY/ON button on the unit (or remote control) again to turn off the unit.
Note:
- If there is no signal under the CD/USB DEVICES/ SD CARD/ modpthe main unit will be switched off within 15 minutes automatically.
- During in the iPod mode, if there is no iPod Player on the iPod deck bracket; the main unit will also turn off within 15 minutes automatically.
- During in standby mode, press any button/ key can make the display light for 10 seconds.
- Please turn the main switch off to save energy, when you do not use the unit.
CLOCK SETTING
The clock will be automatically synchronized to the DAB clock if you can receive DAB signals in your location. If you can only receive FM, then you have to set the clock manually. The manual clock setting must be done in standby mode.
Manual clock setting
- When the unit is first connected to the AC mains outlet, it will be in standby mode, and the display will show "00:00:00" and flash.
- Press and hold the ID3/iPod/MEMC-ADJ button until the "24 Hour or 12 Hour" shows on the display and flash, then press the SKIP/TUNE SEARCH(UP or DOWN) button to adjust 24-hour or 12-hour digit.
- Press the ID3/iPod/MEM/C-ADJ. button again, the HOUR digit will flash on the display, press the SKIP/TUNE SEARCH(UP or DOWN) button to adjust HOUR digit.
- Press the ID3/iPod/MEM/C-ADJ. button once more, the MINUTE digit will flash on the display, press the SKIP/TUNE SEARCH(UP or DOWN) button to adjust MINUTE digit. Press the ID3/iPod/MEM/C-ADJ. button again to confirm the time.
Note: 1. Each enable state as shown above will be cleared if the key is not pushed in 10 seconds.
- Turn on the unit and press the CLOCK DISP button on the remote in any mode, the display will show the time and disappear about 10 seconds, then return to the original condition.
Synchronise the clock to DAB local time
- Press the STANDBY/ON button on the unit(or remote control) once to switch the unit on.
- Press the DAB/FM/AUX button on the unit(or remote control) to select DAB mode.
- Tune to a DAB station and the clock will be automatically synchronized to the DAB local time.
TIMER SETTING(on the remote control)
This function allows you to switch on and off the system at your desired time and mode:
1. Press the TIMER button on the remote control to toggle the timer function between on and off, the display will show "Timer on" or "Timer Off". The display will show "B" to indicate timer function on.
2. To set the On Timer clock, press and hold the TIMER button on the remote control until the display shows "On Timer" and the "hour" digit of the timer clock will flash.
3. Press the SKIP/TUNE SEARCH (UP or DOWN) button to set to the desired hour, then press the TIMER button on the remote control to confirm, first set the hour and finally the minute, the On Timer clock is set.
4. Then you will enter into the Off Timer clock setting, the display will show "Off Timer" and the "hour" digit will flash. Press the SKIP/TUNE SEARCH (UP or DOWN) button to set to the desired hour, then press the TIMER button on the remote control to confirm, first set the hour and finally the minute, the Off Timer clock is set.
5. Finally press the SKIP/TUNE SEARCH (UP or DOWN) button to select the timer on mode - FM, CD, iPod, USB, CARD or DAB then press the TIMER button to confirm. The timer setting is now completed.
6. Press the TIMER button again, the timer "VOL 13" indicator appears on the display and flashes, adjust the timer volume high or low by pressing the SKIP/TUNE SEARCH (UP or DOWN) button.
7. To check the timer setting, repeatedly press the TIMER button, until the display shows the on timer and the off timer setting.
TO SET SLEEP FUNCTION (on the remote control)
This function allows you to program the system to switch off itself after a set period of time. You can set your sleep time in power on mode:
- To activate the sleep function, press the SLEEP button on the remote, the display will show "SLEEP-90,80,70,60, 50,40,30,20,10,OFF" and flash.
- When the display shows your desired sleep time, release the button, the sleep timer is now activated. The display will show "Sleep 10" in which, When the sleep time counts to zero, the unit will go off.
- To cancel sleep, press the SLEEP button once again, the sleep function will turn off.
Hints for better reception
This unit carries a single lead wire DAB/FM antenna, to obtain the best performance, you should fully extend the wire antenna and adjust the position as well as the direction until you find the best reception.
For ideal DAB reception, always maintain the lead wire antenna in a vertical position (holding it upward or downward behind the unit) is highly recommended.
DAB/DAB+mode
When the unit is powered up for the first time, it will be in standby mode. Press the STANDBY/ON button on the unit (or remote control) to turn the radio on, the display will show "Welcome to Digital Radio", then it will automatically enter into the DAB/DAB+ mode and perform full scan function.
During scan, the display will show "Searching ..." together with a slide bar that indicates the progress of the scan and the amount of stations that have been found so far.
Once the scan has finished, the radio will select the first alphanumericly found station. To explore the found stations, Press the SKIP/TUNE SEARCH (UP or DOWN) button to your desired station.
DAB/DAB+ Autotune Full scan modes
Full scan will search for all DAB/DAB+ Band III channels. After the scan has finished, the first alphanumericly found station will be automatically selected.
- To activate autotune full scan, press the PLAY/PAUSE/SCAN/ENTER button on the unit (or remote control) once to enter into the "Autotune Full scan" mode, the display will show "Searching..." and a slower progressing slide bar.
- All the stations that have been found will be stored automatically, to explore the stations that have been found, ptheskIP/TUNE SEARCH( UP or DOWN) button for selection.
DAB/DAB+ manual tune
- To select manual tune, press the SELECT/FM MONO/ST. button on the unit (or remote control) to enter into the "Manual tune" mode.
- Press the SKIP/TUNE SEARCH (UP or DOWN) button to scroll through the DAB/DAB+ channels, the display will show "5A to 13F" and their associated frequencies.
- When your desired frequency appears in the display, press the SELECT/FM MONO/ST. button to confirm. The name of the station group (ensemble/multiplex) will be displayed.
- Press the STOP/MENU/INFO button o see what stations are present on the found ensemble/multiplex.
Secondary Services
On some occasions you will see a “>” symbol appeared after the name of the station, this indicates that there are secondary services available to that station. These secondary services contain extra services that relate to the primary station. E.g. a sports station may want to add extra commentaries. The secondary services are inserted directly after the primary station. To select the secondary station, press the SELECT/FM MONO/ST. button on the remote control when the “>” appears in the display.
FM mode
- To select FM, press the DAB/FM/AUX button on the unit (or remote control), the display will show FM and the frequency.
- To activate frequency auto search, press and hold the SKIP/TUNE SEARCH (UP or DOWN) or PLAY/PAUSE/SCAN /ENTER button on the unit (or remote control) until it starts to scan down or up the frequency band; it will stop automatically once a station has been found.
- You can also press the SKIP/TUNE SEARCH(UP or DOWN) button on the unit (or remote control) to select your desired frequency.
- Press the SELECT/FM MONO/ST. button on the unit (or remote control) to toggle select between the FM "STEREO" and "MONO" reception.
STORING AND RECALLING STORED PRESET STATIONS
In either DAB or FM mode, you can store up to 30 stations to the favourite presets; this will enable you to get direct access to your favourite stations.
- To store a preset, first tune to your desired station, then press and hold the iPod/ID3/MEM/C-ADJ. button on the remote control, the display will show frequency and the "#" flash.
- Press the SKIP/TUNE SEARCH (UP or DOWN) button on the remote control until the display will show "Preset Empty #" and the "#" flash. to select your desired station preset number, then press the ID3/iPod/MEM/C-ADJ. button on the remote control to confirm your selection; the display will show "Preset # stored" in DAB/FM mode.
- To recall a preset station, press the button Open/End/DefaultPress the SKIP/TUNE SEARCH (UP or DOWN) button to select the stations that you have stored, then press the button PiPod/MEM/C-ADJ. the remote control to confirm your selection.
Note: 1. The stored stations will be saved into its memory and power off will not erase it. Storing a new station into a preset location will erase the previously stored station in that location.
- During the unit in STANDBY mode, press and hold the STOP/MENU/INFO button to erase all preset memory.
DISPLAY MODES
Every time you press the STOP/MENU/INFO button, the display will cycle through the following display modes:
In FM mode:

In DAB/DAB+ mode:

Auto(Mono) Frequency
FM Streco and Mono.
Signal strength
The display will show a slide bar to indicate the signal strength, the stronger the signal, the longer the bar will be from left to right.
Time and date
The time and date will be automatically updated by the broadcasted information; there is no need to set the clock manually. In the unlikely event that no clock information is received, the display will show
Audio bit rate
The display will show the digital audio bit rate being received.
The frequency of the present station will be displayed.
Ensemble/Multiplex (Group name)
The Ensemble/Multiplex is a collection of radio stations that are bundled and transmitted together in a single frequency. There are national and local multiplexes, local ones contain stations that are specific to that area.
Programme type
This describes the style of the programme that is being broadcast. If the information is not available, the display will show "
DLS
DLS stands for Dynamic Label Segment which is a scrolling message that the broadcaster may include in their transmissions. The message usually includes information such as programme details ...etc.
- Press the CD/iPod/USB/CARD button on the unit (or remote control) is select to CD/MP3 mode. The unit will read the CD/MP3/WMA disc automatically.
- Prst the CD DOOR OPEN/CLOSE button on the main unit only, and then the CD door will open automatically.
- Insert the CD/MP3 disc into the CD compartment, press the CD to cORENvCDSE button
Note: 1. This unit can play CD, CD-R, CD-RW, MP3 and WMA discs. It also play the "8 cm" and "Multi Section" of MP3 DISC. - The "Playback Transfer Bit Rate in MP3 is 32 - 320 kbps and WAM is 64 - 320 kbps.
- The "Max Readable 99 folders and 999 tracks. If no disc or can not read the TCO, "NO DISC" will be displayed.
Playing The Entire CD/MP3/WMA
-CD
- Insert the CD disc into the CD compartment, the main unit will automatically read the total number of the folders and tracks at the same time, the unit will play the first track automatically.(F2)
- Press the PLAY/PAUSE/SCAN button once, the time elapsed indicator will flash.(F3)
- Press the SKIP/TUNE SEARCH(UP or DOWN) button once to change Track NO., press and hold the SKIP/TUNE SEARCH (UP or DOWN) button to skip fast forward or backward of each song.
- Press the PLAY/PAUSE/SCAN/ENTER button once more to resume the playback. To stop by pressing the STOP/MENU/INFO button.
F1 F2
OPEN
DISC CD T--001 00:01
F3
DISC CD T--001 08:01
MP3/WMA
- Insert the MP3/WMA disc into the CD compartment, the main unit will automatically read the total number of the folders and tracks at the same time, the unit will play the first track automatically.
- Press the PLAY/PAUSE/SCAN/ENTER button once, the time elapsed indicator will flash.
- Press the SKIP/TUNE SEARCH(UP or DOWN) button once to change Track NO., press and hold the SKIP/TUNE SEARCH(UP or DOWN) button on the unit once (or remote control) to skip fast forward or backward of each song.
- To resume playback, press the PLAY/PAUSE/SCAN/ENTER button once more again.
- To change the ALBUM NO., press the FOLDER/ARROW (UP or DOWN) button on the remote control once.
- To stop playback, press the STOP/MENU/ button once on the unit (or remote control).
Note: If the main unit is not working properly, disconnect the power source and then reconnect it again.
During in the STANDBY mode
- Insert the USB DEVICE or SD CARD, and then press the STANDBY/ON button on the unit (or remote control) to power"ON" the unit.
- Press the CD/iPod/USB/CARD button on the unit (or remote control) to select the USB or SD CARD mode. The main unit will automatically read the total number of the folders and tracks at the same time. (F4,F5) The unit will play the first track automatically.
- If the USB memory device more than one folder.
a. Press the FOLDER(UP or DOWN) button on the remote control to select each folder.
b. Press the SKIP/TUNE SEARCH (UP or DOWN) button on the unit (or remote control) to select current track in desired folder.
Note: 1. The main unit can play MP3 and WMA only in this mode.
2. This unit can support most of USB devices and SD/SDHC cards (up-to 32GB memory capacity for
SDHC). It cannot access (or, need longer time to access) those devices with big memory capacity.
3. The main unit does not support the WMA file which is protected by "DRM FILE". It just supports USB version 1.1 and 2.0.
F4

F5

Playing The Entire flash disc
- Press the PLAY/PAUSE/SCAN/ENTER button once, the time elapsed indicator will flash.
- Press the SKIP/TUNE SEARCH(UP or DOWN) button once to change Track NO., press and hold the SKIP/TUNE SEARCH(UP or DOWN) button on the unit once (or remote control) to skip fast forward or backward of each song.
- To resume playback, press the PLAY/PAUSE/SCAN/ENTER button once more again.
- To change the ALBUM NO., press the FOLDER(UP or DOWN) button on the remote control once.
- To stop playback, press the STOP/MENU/ buttFonce on the unit (or remote control).
Note : In any time, the USB DEVICE or SD CARD must be fixed well under in the STANDBY mode to avoid the main unit and USB DEVICE or SD CARD were damaged.
ID3 OPERATION
During in the MP3/WMA mode
- Press the ID3/iPod/MEM/C-ADJ. Button on the unit (or remote control) once to open the ID3 function.
- If the MP3/WMA file is written "ID3", it will automatically search the information of "TITLE NAME", "ARTIST NAME" and "ALBUM NAME" indicated on the display.
- Press the ID3/iPod/MEM/C-ADJ. button on the unit (or remote control) again. Then the unit will resume to play normally.
→TITLE NAME→ARTIST NAME→ALBUM NAME
CURRENT TIME
REPEAT PLAY FUNCTION
-CD
- Press the REPEAT button once, REP_1 is displayed. CD will play the current track repeatedly.
- Press the REPEAT button twice, REP_ALL is displayed. CD will play all tracks repeatedly.
- Press the REPEAT button once more again, REPEAT function will be off.
- MP3/WMA/USB/SD CARD
- Press the REPEAT button once, then REP_1 is displayed. It will play the current track repeatedly.
- Press the REPEAT button twice, REP_ALL is displayed. It will play all tracks repeatedly.
- Press the REPEAT button thrice, REP_ALBUM is displayed. It will play all tracks in the current folder repeatedly.
- Press the REPEAT button once more again, then REPEAT function will be off.
PROGRAM FUNCTION (on the remote control)
User can make the program up to 32 tracks in CD mode or 64 tracks in MP3/WMA/USB/SD CARD mode in any desired order. Program mode is activated while in stop mode.
1. How to play the program
-CD
- Press the ID@BrodMemsr#d control, shift to MEMORY mode.(F6)
- Press the SKIP/TUNE SEARCH(UP or DOWN) button on the unit (or remote control), the track number will be changed.
- Press the IDGrodMEntControl to confirm the track number.
- MP3/WMA
- Press the ID@t#oM@MeM@eA@d control, shift to MEMORY mode. The album number is flashing. (F7)
- Press the FOLDER(UP or DOWN) button on the remote control, the album number will be changed.
- Press the ID@tdmMEMmendcontrol, the first track number will be displayed.(F8)
- Press the SKIP/TUNE SEARCH(UP or DOWN) button on the unit (or remote control), the track number will be changed.
- Press the iPod/ID3/MEM/C-ADJ. button on the remote control to confirm the favorite track number.
F6 F7 F8
MEMORY P-01 T-000
MEMORY P-01 F-000
MEMORY P-02 F-000
2.PROGRAM PLAY
Press the PLAY/PAUSE/SCAN/ENTER button on the unit (or remote control). The unit will play the first track of the program. When all tracks have been played, the unit display will show the number of tracks and the playing time of the CD/MP3/WMA songs.
3. CANCEL PROGRAM
Press the STOP/MENU/ button on the unit (or remote control) twice, or open the CD tray door and close it again that the memory will be erased. Set a new program, the existing one will be cleared
Note: During in the program mode.
- Press the Rrrn the remote control once, the indicator willRrrn the display. Then the unit will repeat the current track.
- Press the RERAtvice, the will light oRER_Auay. Then the unit will repeat all the total number of tracks.
- Press the Rereonnce more again. The unit will return to play the program in normally.
RANDOM PLAY(on the remote control)
You can press the RANDOM button on the remote control to select the random play function:
- During CD stop, press the RANDOM button once to select random play, the display will show "RANDOM", one track will be randomly selected and started playing.
- During playback, first press the RANDOM button once, the display will show "RANDOM", then press the SKIP/TUNE SEARCH(UP or DOWN) button on the unit (or remote control), one track will be randomly selected and started to play.
- To resume normal playback, press the RANDOM button again.
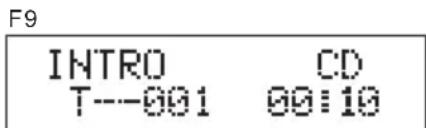
INTRO PLAY(on the remote control)
- Press the INTRO button once, and then INTRO is displayed. The main unit will play the first 10 seconds of each track.(F9)
- Press the INTRO button twice, and then resume to normal play.
During the unit in STANDBY mode:
- Press the STANDBY/ON button on the unit or on remote control to switch the unit on.
- PresseheCDAEABDUGABDArd button on the unit (or remote control)
- Push threePipedBoxToPaper playErodinoe.iPod docking bracket ixedy, the iPod indicator will appear on the main unit display. (F10)
F10
iPod
During the unit in iPhone/iPod mode:
- Press the PLAY/PAUSE/SCAN/ENTER button once to start the iPhone/iPod playing. Adjust the volume control by turning the ToCoppThe currentbptlaying, press the STOP/MENU/INFO button once.
- Press the PLAY/PAUSE/SCAN/ENTER button once to pause the current track. To resume the playback, press the PLAY/PAUSE/SCAN/ENTER button once again.
- To skip forwards or backwards, press the (UPKOPOWSENSEARGto select the desired track.
- Press the REPEAT or RANDOM button to onathe tereiBocnHd playing repeatedly or randomly.
Note: 1. iPod touch version 1.1.4 or above can support REPEAT or RANDOM function.
- When the iPod touch & iPhone screen has been locked, above operation are still available.
During the unit in iPod/iPhone MENU mode:
Note: iPod touch&iPhone series needs to manual into the music menu first, then proceeding the next operation.
- During the unit in iPod/iPhone mode, press the butts/IMeMUIU. enter to the iPod/iPhone MENU mode. The iPod MENU indicator will appear on the unit display.
- Press the STOP/MENU/INFO button return to the iPod/iPhone menu.
a. To select the current menu as belows :
Music > Extras > Photo Import (without this function display on the iPod Mini) > Settings > Shuffle Songs > Backlight > Now Playing will show on the iPod/iPhone Player display.
b. Press the SUIPOURDROB ACRsH on the unit (or remote control) to search the current menu.
- Press the PLAY/PAUSE/SCAN/ENTER button enter to the desired menu folder.
a. Press the SKPPFURNEAER on the unit (or remote control) to search the current content in the each desired menu folder.
b. If you want return to the iPod/iPhone menu, press the STOP/MENU/INFO button again.
- To resume playback, press the iPod/ID3/MEM/C-ADJ. button once again, the unit will return to iPod mode.
Charging the iPod/iPhone Player battery through the main unit:
- iPod/iPhone Player has a internal nonremovable battery, the battery may need to be charged that is not used for a while.
- You can charge the iPod/iPhone Player through the main unit automatically under the STANDBY or POWER ON mode.
Notes:1. The iPod/iPhone Player battery is 80-percent charged in about an hour, and fully charged in about a few hours. If you charge it while playing music, it may take longer.
- It is not better to charge under the TUNER mode. It may interfere the reception.
- In any time, you can control the iPod/iPhone player on the main unit, remote control or iPod/iPhone player itself while the unit in the "iPod" mode.
- In any time, the iPod/iPhone player must be fixed well under in the STANDBY mode to avoid the unit and iPod/iPhone player were damaged.
- During the unit in iPod mode. The video function of the iPod with abnormal working normally. Update the latest version of the iPod video function from the apple web-site.
VIDEO OUT SETTING (for i-Pod Video only and Video cable "RCA-type cable"
not included)
- During the unit in the STANDBY mode : Connect the TV set with a videos cable (RCA-type cables) to the VIDEO out jack on the feible unit.
- During the unit in the iPod mode : Press the "MENU" button on the iPod Click Wheel to set the video function.
- To set iPod to display videos on a TV :
(a) Choose Videos > Video Settings, and then set TV Out to Ask or On.
(b) If you set TV Out to Ask, iPod gives you the option of showing videos on TV or on iPod while every time you play a video.
Note :1. The Video mode only support that the iPod players have a Video function.
- iPod classic 80/160GB, iPod nano 3rd & 4th & 5th & 6th generation Video) screen and iPod touch screen should be fixed well under in the STANDBY mode before operation of the Video function.
AUX IN PLAY
The AUX input is located at the left of the unit. Use a 3.5mm stereo jack cable to connect audio equipment through the LINE IN jack.
- To select the AUX input function, repeatedly the prBbAUX on the unit (or remote control) until the AUX is indicated on the display.
- Adjausthe second input device control knob
Note: LINE in cable not included.
EQ CONTROL (on the remote control)
When you press the EQ button, the sound tone changes as below:

MUTE SETTING (on the remote control)
Press the MUTE button on the remote control to stop the sound from the speakers temporarily, the sound stops and the display will show "MUTE". To cancel mute, press the MUTE button again or press the VOLUME +/-, "MUTE" disappears in the display and the sound is restored.
LISTEN TO THE MUSIC BY USING HEADPHONE
Plug your headphones (3.5mm mini-stereo plug) into the headphones jack on the light of the preinaThe sound will be heard through the headphones, not the speaker.
SPECIFICATION
POWER SUPPLY :
AC 230-240V~50Hz
OUTPUT POWER :
20 Watts x 2
UNIT DIMENSION :
Ventilation warning : " The normal ventilation of the product shall not be impeded for intended use."

If at any time in the future you should need to dispose of this product please note that: Waste electrical products should not be disposed of with household waste. Please recycle where facilities exist. Check with your Local Authority or retailer for recycling advice. (Waste Electrical and Electronic Equipment Directive)
Lenco
Ensemble/Multiplex (Gruppenname)
3.PROGRAMMA ANNULEREN
Note:Durant le mode programme

- SAFETY PRECAUTIONS
- Important Safety instruction
- DANGEROUS VOLTAGE
- ATTENTION
- Note:
- INSTALLING THE UNIVERSAL DOCK
- REMOTE CONTROL
- PUTTING THE BATTERIES INTO THE REMOTE CONTROL UNIT
- INSTALLING THE SPEAKER WIRE TO THE SPEAKER TERMINALS
- COMPACT DISC
- OPERATING THE UNIT
- POWER/STANDBY
- CLOCK SETTING
- Manual clock setting
- Synchronise the clock to DAB local time
- TIMER SETTING(on the remote control)
- TO SET SLEEP FUNCTION (on the remote control)
- Hints for better reception
- DAB/DAB+mode
- DAB/DAB+ Autotune Full scan modes
- DAB/DAB+ manual tune
- Secondary Services
- FM mode
- STORING AND RECALLING STORED PRESET STATIONS
- DISPLAY MODES
- In FM mode:
- In DAB/DAB+ mode:
- Auto(Mono) Frequency
- FM Streco and Mono.
- Signal strength
- Time and date
- Audio bit rate
- Ensemble/Multiplex (Group name)
- Programme type
- DLS
- Playing The Entire CD/MP3/WMA
- -CD
- F1 F2
- F3
- MP3/WMA
- During in the STANDBY mode
- Playing The Entire flash disc
- ID3 OPERATION
- During in the MP3/WMA mode
- REPEAT PLAY FUNCTION
- - MP3/WMA/USB/SD CARD
- PROGRAM FUNCTION (on the remote control)
- How to play the program
- - MP3/WMA
- 2.PROGRAM PLAY
- CANCEL PROGRAM
- Note: During in the program mode.
- RANDOM PLAY(on the remote control)
- INTRO PLAY(on the remote control)
- During the unit in STANDBY mode:
- iPod
- During the unit in iPhone/iPod mode:
- During the unit in iPod/iPhone MENU mode:
- Charging the iPod/iPhone Player battery through the main unit:
- VIDEO OUT SETTING (for i-Pod Video only and Video cable "RCA-type cable"
- not included)
- AUX IN PLAY
- EQ CONTROL (on the remote control)
- MUTE SETTING (on the remote control)
- LISTEN TO THE MUSIC BY USING HEADPHONE
- SPECIFICATION
- Lenco
- Ensemble/Multiplex (Gruppenname)
- 3.PROGRAMMA ANNULEREN
- Note:Durant le mode programme
Brand : LENCO
Model : MCI220
Category : Loudspeaker