
MCR1280 - DVD player Marquant - Free user manual and instructions
Find the device manual for free MCR1280 Marquant in PDF.
| Product Type | In-car DVD Player |
| Brand | Marquant |
| Model | MCR1280 |
| Supported Formats | DVD, VCD, S-VCD, MP4, MP3, WMA, CD, CD-R, CD-RW, DVD-R, DVD-RW, JPEG |
| Radio Functions | FM (3 bands), AM (2 bands), RDS, PTY, AF, TA |
| Audio Output Power | 4 x 50W max (4 ohms) |
| Power Supply | 12V DC (vehicle battery) |
| Dimensions (W x H x D) | 178 x 58 x 100 mm (DIN standard) |
| Weight | Approximately 1.5 kg |
| Main Functions | Disc playback, USB, radio, equalizer (EQ), audio/video settings, zoom, repeat, program, angle, subtitles, audio languages, clock, mute, LOUD |
| Inputs | USB, radio antenna, speaker wire connection, power supply, parking brake line |
| Outputs | Speakers (front/rear), video output (to external screen) |
| Built-in Screen | Small monitor on front panel (information display) |
| Remote Control | Supplied with specific buttons (including buttons for radio, disc, playback) |
| Maintenance and Cleaning | Clean the connector with a dry cloth; avoid solvents. Use a lens cleaning disc. |
| Security | Removable front panel to deter theft; parental code with password (default: 0000). |
| Spare Parts and Repairability | Front panel, remote control, power cables. For repairs, contact Marquant customer service. |
| General Information | User manual available in PDF. Compatible with 12V electrical systems. Make sure to connect the parking brake to activate video on the external screen. |
Frequently Asked Questions - MCR1280 Marquant
User questions about MCR1280 Marquant
0 question about this device. Answer the ones you know or ask your own.
Ask a new question about this device
Download the instructions for your DVD player in PDF format for free! Find your manual MCR1280 - Marquant and take your electronic device back in hand. On this page are published all the documents necessary for the use of your device. MCR1280 by Marquant.
USER MANUAL MCR1280 Marquant
Fully Compatible to These
Types of Discs: DVD, VCD
S-VCD,MP4,MP3,WMA,CD.
3 IN1 CAR AUDIO SYSTEM
WITH DVD.VCD.CD.MP4.MP3.WMA
DISC AND USB PLAYER AND
AM/FM-RDS DIGITAL TUNING RADIO
Remark: Any information subject to change without further notice
PRECAUTION

CAUTION
RISK OF ELECTRIC SHOCK DO NOT OPEN

WARNING: TOREDUCE THE RISK OF FIREOR ELECTRIC SHOCK,DO NOT EXPOSE THIS APPLIANCETO RAINORMOISTURE.
CAUTION: TO REDUCE THE RISK OF ELECTRIC SHOCK, DO NOTREMOVE COVER (OR BACK).NO USER SERVICEABLE PARTS INSIDE.REFER SERVICING TO QUALIFIED SERVICE PERSONNEL.

The lightning flash with arrowhead symbol, within an equilateral triangle. is intended the alertthe user to the presence of uninsulated dangerous voltage within the productsenclosure that maybe of sufficientmagnitude to constitute a risk ofelectric shock to persons.

The exclamation pointwithin an equilateral triangle is intended to alert user to the presence of important operating and maintenance (servicing) instructions in the literature accompanying the appliance.
CLASS1 LASER PRODUCT
Laser product symbol: located on the rear panel of the unit, indicate this player is a class laser product, only use weak laser and no hazardous radiation outside of the unit.
- Read through this instruction manual before installation and use.
- Do not touch the power plug with wet hand.
- Switch off the main power when the unit is not in use. (Disconnect the power plug from the power outlet when you do not intend to use the unit for a prolonged period of time.) Before moving the unit, remove the disc from the unit/ tray first.
- Do not open the cover or touch any of the components exposed out of the unit, only for qualified technicians.
- Do not expose the unit under direct sunlight or nearby objects that radiate heat to avoid damage the unit.
- Do not place the unit in moist and humid conditions, which effect the pick-up of the unit lead to out of work.
- Place the unilon a flatsurface and ventilative condition. Please ensure the ventilation holes are not covered to avoid overhealing and malfunction.
- Clear the panel and case with soft dry cloth only, don't apply any kind of thinner, alcohol or sprays. 9.The apparatus shallnot be exposed to dripping or splashing and that no objects fall with liquids, such as vases, shall be placed on the apparatus
- unplug the apparatus when not using for a longtime oriented to disconnect from the Main's power
7. Specification
General Specification
DC 12V
Maximun Power output
4× 40W(mesured at DC 14.4 V)
Dimensions(w x h x d)
1.178 x 50 x 165mm
DVD Deck Specification
DVD/VCD/CD/MP4/MP3/WMA
Video System
PAL/AUTO/NTSC
Audio System
.24 bit/96KHz
Loading System
Auto Loading
Mounting Angle.
0 to +/-30
Video Specification
16:9 and 4:3
Video Type..
Composite:1.0iA 0.2Vp-p
m - 1 0 ;
Load impedance: 75 ohms
Horizontal Resolution
500
Audio Specification
m - 1 0 ;
Audio Output(Analog audio)
2.0+1.0Vrms
Frequency Response
1.20Hz~20KHz(at 1KHz 0 dB)
S/N Ratio(Audio)
Y90dB(at 1KHz 0dB)
Separation
50dB
Radio Specification
FM Section
Frequency r
87.5MHz-108.0MHz
Usable sens
3uV
I.F Frequen
10.7MHz
AM Section
Frequency.
.522KHz - 1620KHz
THIS PRODUCT INCORPORATES COPYRIGHT PROTECTION TECHNOLOGY THAT IS PROTECTED BY U.S. PATENTS AND OTHER INTELLECTUAL PROPERTY RIGHTS. USE OF THIS COPYRIGHT PROTECTION TECHNOLOGY MUST BE AUTHIZED BY MACROVISION, AND IS INTENDED FOR HOME AND OTHER LIMITED VIEWING USES ONLY UNLESS OTHERWISE AUTHIZED BY MACROVISION. REVERSE ENGINEERING OR DISASSEMBLY IS PROHIBITED.
Manufactured under license from Dolby Laboratories.
Dolby and the double-D symbol are trademarks of Dolby Laboratories.
U.S. Patent Nos. 4,631,603;4,577,216;4,819,098;4,907,093;5,315,448 and 6,516,132.

6. The Trouble Shooting
Please read the user's manual carefully before using the DVD player. If you have any troubles in using this player, try to solve the problems by the suggestions mentioned below. If you can not remove the trouble after using all the suggestions, please contact the company or the technical service center authorized by us. For the sake of your safety, please do not open the cover and repair the player by yourself, if that, it may cause electric shock.
NO PICTURE, SOUND AND INDICATION
Ensure that the power switch is on.
Ensure that the wall inlet is ok.
* Ensure that the power cord is not damaged or the fuse is not blown.
- Ensure that the power plug is connected to the inlet tightly.
NO SOUND BUT HAVE PICTURE
* Ensure that the player s audio output has a good connection with TV s audio input.
- Check whether the audio connector is damaged.
Check whether you have turned down the volume
Ensure that you have set the right AUDIO setup of the player.
Ensure that the audio is not under mute.
NO PICTURE BUT HAVE SOUND
* Ensure that the player s video output has a good connection with TV s video input.
Ensure that you have turned your TV to the AV input channel connecting to your player.
- Check whether the video connector is damaged.
Ensure that you have set the right Video settings of the player.
BLACK AND WHITE PICTURE OR SCREEN ROLLING
Ensure that you have set the right TV SYSTEM (e.g. PAL, NTSC) setting.
FLAWS OF PICTURE OR SOUND
- Check whether the setting of AUDIO is right.
Check whether the disc is scratched or stained.
-
Check whether the AV connector and the output terminal is stained.
-
Check whether there is condensation inside the Lens. If so, leave the player off for an hour or so, then try again.
Check whether the installation angle is less than 30^
DISPLAY NO DISC OR BAD DISC
Ensure that you have put the disc on the tray.
-
Check whether the disc is put in the reverse side.
-
Check whether the disc is distorted.
Check whether the disc is stained or scratched badly.
Ensure that the disc format is compatible to the player.
-
Ensure that the temperature inside the car is not too high. If so, cool off until the ambient temperature returns to normal.
-
Replace another disc to insert it into the disc compartment.
REMOTE CONTROL IS INSENSITIVE OR DOES NOT WORK
- Check the batteries of remote control and make sure that they are to be powerful and good conductivity.
Direct the remote control to the IR sensor of the player.
- Check whether there are some obstacles between the remote control and IR sensor.
SOME FUNCTION BUTTONS DO NOT WORK
Turn off the power, then turn on again.
- Reset the unit to zero, then turn on again.
- Remove the front panel from the unit, then install it again and then turn on again.
THE RADIO DOES NOT WORK
- Check whether the antenna cable is connected firmly. Or manually tune for a station.
Contents
1.Before Operation. 3
1.1 Glossary 3
1.2 Precautions 3
1.3 Maintenance and Cleaning of Discs 4
1.4 Battery Information of the Remote Controller 4
1.5 The Remote Controller Description 5
1.6 Description of the Face of the Front Panel 6
1.7 Description of the Unit Chassis Facet After removing the Front Panel.. 6
1.8 Description of the Unit Chassis Facet After Sliding Down the Front Panel....6
1.9 Description of the Rear Cabinet 7
1.10 Description of the Input/Output Wires 7
1.11 Unit Installation 8
4.1 Begin Playback 12
4.2 Pause Playback 13
4.3 Stop Playback 13
4.4 Select Chapter/Track with the UP/DN or the >>|/<< Buttons 13
4.5 Select Chapter/Track with the Number Buttons 13
4.6 Select Chapter/Track with the Root/PBC Menu 13
4.7 Terminate the Playback 14
- Common Operation.. 9
- Radio Operation 10
- Basic Disc or USB Operation 12
- Advanced Disc or USB Operation 14
5.1 Playback with Speed 14
5.2 Playback with Slow Speed 14
5.3Playback with Still Frame 15
5.4Playback Repeatedly 15
5.4.1 One/All Repeat 15
5.4.2 A-B Repeat 15
5.5Playback in Scan Mode 16
5.6 Playback from a specified Chapter/Track or a Specified Time 16
5.7 Playback in Random 16
5.8Playback in Different Angle 16
5.9 Playback in Zoom Mode 16
5.10 Change the Caption Language 17
5.11 Change the Audio Language 17
5.12 Change the Video Signal System 17
5.13 Look over the Playback Status 17
5.14 Program Playback 18
5.15 Playback the Picture CP in IPSEG-Format 10
5.15 Playback the Picture CD in JPEG Format 18
5.16 Mp4 OPERATION
5.17 ESP and ID3 Function 19
5.18 USB Reader Operation 19
5.19 The DVD System Menu Setup Operation 19
5.20 The Parental Control 23
5.21 The Region Code 24
The Trouble Shooting. 25 - Specification 26
1. Before Operation
1.1 Glossary
PBC (playback control)
It is a kind of signalmenu) recorded in the disc with SVCD or VCD2.0 format used for the playback control. For the discs contained PBC, It can playback interactive software with the menu displayed on TV. And if the disc contain still images, it can playback high definition of still image.
Title
Generally, the title is the important part of DVD disc. for example, the theme part of movie is title 1, the part described how to make movie is title 2, the cast is title 3, etc. Every title contain a serial number that is easy to lookup.
Chapter
A title can be divided into several blocks, so that every block can be operated as a unit, the unit is called chapter. The chapter contains a unit at least.
Track
It is the biggest component of VCD. Generally, every song of karaoke disc is a track.
1.2 Precautions
Safety
- Power Source: The unit should be connected to power supply only if the type described in the operating instructions or as marked on the unit.
- The unit is designed for negative terminal of the battery which is connected to the vehicle metal. Please confirm it before installation.
- Do not allow the speaker wires to be shorted together when the unit is switched on. Otherwise it may overload or burn out the power amplifier
- Do not install the detachable panel before connecting the wire
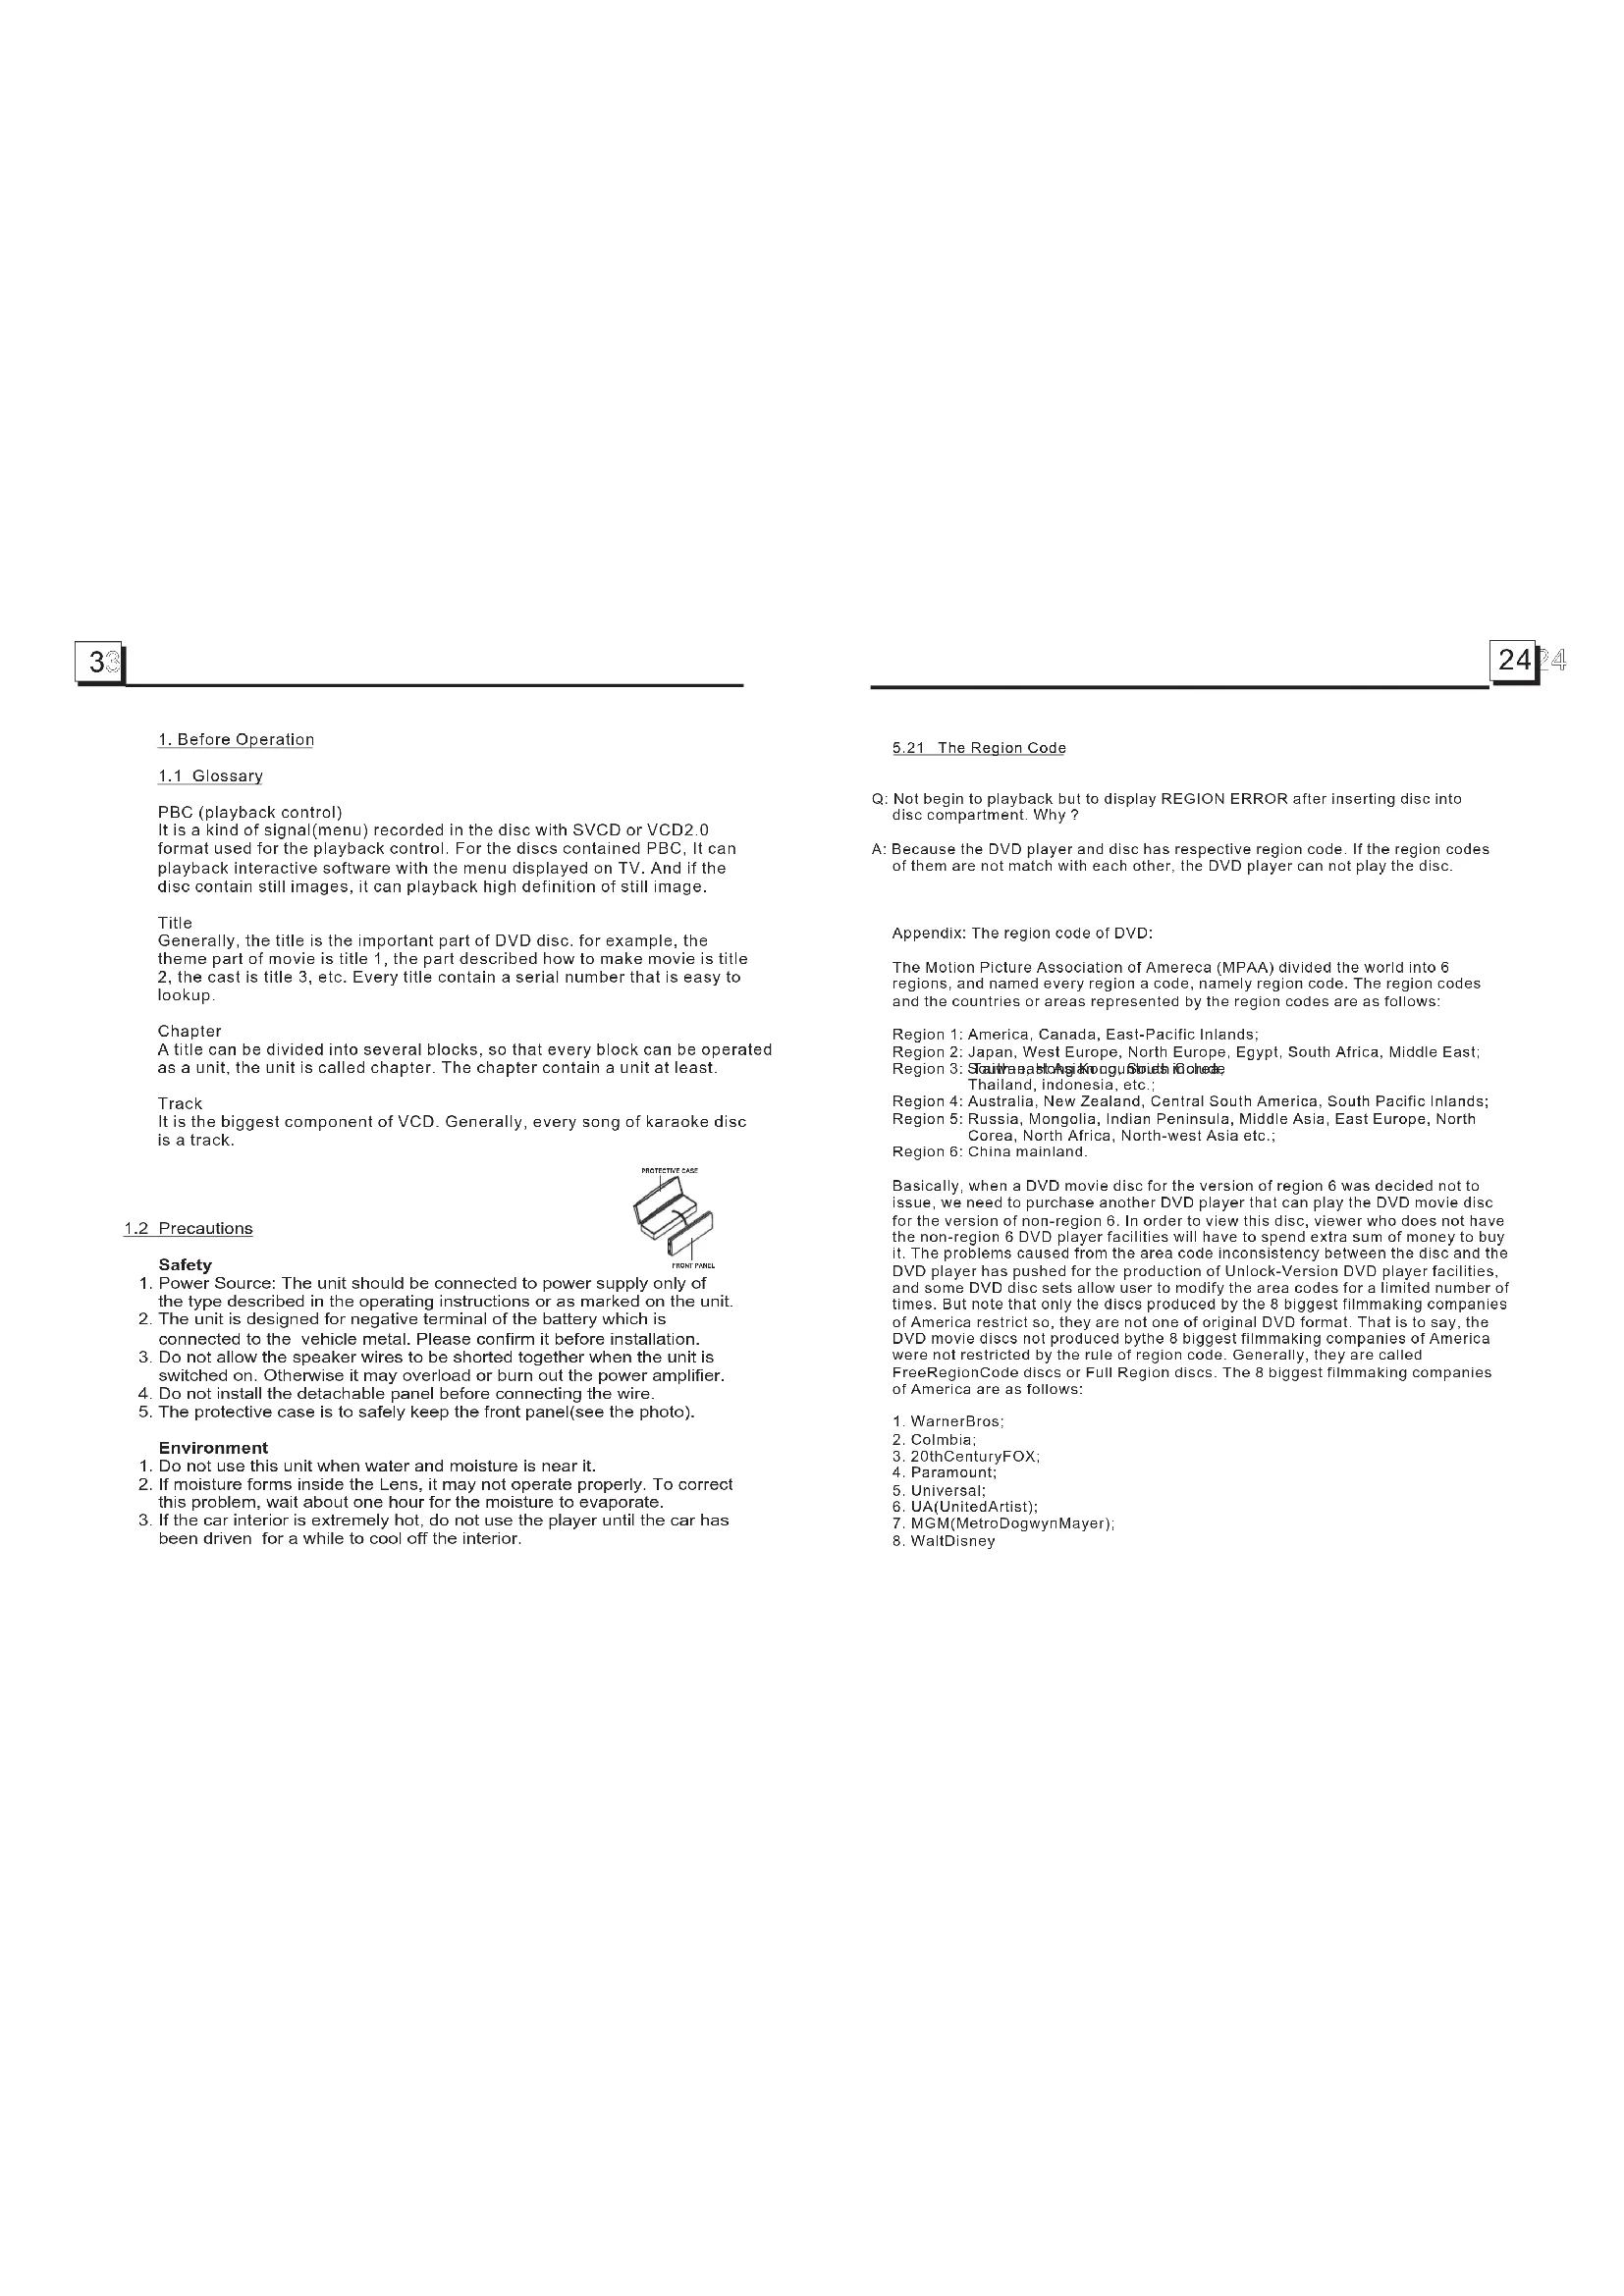
- The protective case is to safely keep the front panel(see the photo).
Environment
- Do not use this unit when water and moisture is near it.
- If moisture forms inside the Lens, it may not operate properly. To correct this problem, wait about one hour for the moisture to evaporate.
- If the car interior is extremely hot, do not use the player until the car has been driven for a while to cool off the interior.
5.21 The Region Code
Q: Not begin to playback but to display REGION ERROR after inserting disc into disc compartment. Why?
A: Because the DVD player and disc has respective region code. If the region codes of them are not match with each other, the DVD player can not play the disc.
Appendix: The region code of DVD
The Motion Picture Association of Amereca (MPAA) divided the world into 6 regions, and named every region a code, namely region code. The region codes and the countries or areas represented by the region codes are as follows:
Region 1: America, Canada, East-Pacific Inlands;
Region 2: Japan, West Europe, North Europe, Egypt, South Africa, Middle East; Region 3: SriNepal, Bhutan, Bangladesh, India, Korea
Thailand, Indonesia, etc.
Region 4: Australia, New Zealand, Central South America, South Pacific Inlands;
Region 5: Russia, Mongolia, Indian Peninsula, Middle Asia, East Europe, North Corea, North Africa, North-west Asia etc.;
Region 6: China mainland.
Basically, when a DVD movie disc for the version of region 6 was decided not to issue, we need to purchase another DVD player that can play the DVD movie disc for the version of non-region 6. In order to view this disc, viewer who does not have the non-region 6 DVD player facilities will have to spend extra sum of money to buy it. The problems caused from the area code inconsistency between the disc and the DVD player has pushed for the production of Unlock-Version DVD player facilities, and some DVD disc sets allow user to modify the area codes for a limited number of times. But note that only the discs produced by the 8 biggest filmmaking companies of America restrict so, they are not one of original DVD format. That is to say, the DVD movie discs not produced by the 8 biggest filmmaking companies of America were not restricted by the rule of region code. Generally, they are called FreeRegionCode discs or Full Region discs. The 8 biggest filmmaking companies of America are as follows:
- Warner Bros;
2.Colmbia; - 20thCenturyFOX;
- Paramount;
- Universal;
- UA(UnitedArtist);
7.MGM(MetroDogwynMayer): - WaltDisney
2323
5.20 The Parental Control
Q:After inserting DVD disc into disc compartment, it will appear a dialogue window that ask me input a password of 4 digit. Why?
A: This is because that the disc movie you are playing was rated with the Parental Control, and the current rating level of DVD player is lower than one of current disc. You must input right password and enter it to entry Parental Control setup menu and then set a equal or higher rating level than one of current disc. So that you can playback the disc.
!NOTE
* If you have not changed the password, the factory preset password for the DVD player will be empty. So that you should input a desired password and input it again to verify it to enter the Parental Control setup menu.
For the rating level setup of Parental Control of the DVD player, please refer to the relative content of LOCK setup menu for details.
Accessories: Parental Control
The Parental Control function of a DVD player can control the playback of movie rated level in a disc. Can set the DVD player(include software player in PC) to be a certain rating level with SETUP MENU on TV screen. If the rating level set in the disc is higher than one set in the DVD player, the DVD player can not playback the disc. Sometimes the Parental Control sequences in some discs are different from each other. The rating level setup can be protected by the password. Therein, if you select Unlock item, the Parental Control function will be invalid, the content of disc will be played totally.
The disc movie can be designed as that the DVD player will playback the different version of content of a same movie according to the different rating level set by Parental Control. Depend on the DVD feature of seamless switching described above, the scenes that are not fitting for children will be cleared or replaced by the other fitting scene automatically.
All rating levels of Parental Control are as follows:
Unlock
1 Kid Safe
2 G
3 PG
4 PG13
5 PGR
6
7. NC 17
8 Adult
1.3 Maintenance and Cleaning of Discs
Disc Maintenance
- Tokleep the disc clean, andle the disc by its edge, do not touch the disc surface of the play side.
- Do not stick paper or tape on the disc. If there is glue (or analog) on the disc: surface, must wipe it up before using.
- Do not expose the disc to direct sunlight, or nearby heat sources such as caliduct, or leave it in a car parked in direct sunlight where there can be a considerable rise in temperature.
- Put the disc inside disc case to keep temperature after finishing playback
Disc Cleaning
- Before playing, wipe the disc with a clean lint. wipe the disc outwards from the disc center.
- Do not use petrol, thinner, commercially cleaner or anti-stalic spray used to plastic LP to wipe disc.
1.4 Battery Information of the Remote Controller
Replace Battery in the Remote Controller
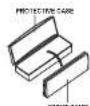
- Before using the remote controller for the first time, pull the insulating sheet out of the remote controller as the direction indicated by the arrow.(see fig.1)
- Press the movable block hold as the direction indicated by the A arrow (See fig.2), then pull the battery holder out of the remote controller as the direction indicated by the B arrow (see fig.2).
- Replace the old battery by a new battery with (+) polarity side upward. (See fig.3).
4.Insert the battery holder to the original position in remote controller. (See fig.3).
Note about the Battery of the Remote Controller:
1. Improper use of battery may cause overheating or explosion. so that Result in jury or fire .
2. Battery leakage may cause damage to the remote controller(Battery Life: 6 months with normal use in normal room temperature).
3. Do not short the battery.
4.Do not throw the battery into the fire.
5.To avoid the risk of accident, keep the battery out of reach of children.
1.5 The Remote Controller Description

16.SEARCH BUTTON
17.RDM BUTTON
18.RPT BUTTON
19. SUBTITLE BUTTON
20. TITLE/PBC BUTTON
21.ANGLE/ST BUTTON
22.ZOOM BUTTON
23.AUDIO BUTTON
24. CLK BUTTON
25.A-B BUTTON
26. INT BUTTON
27.EQ BUTTON
28. LOC/SLOW-FWD BUTTON
- TILT BUTTON
2.MENU BUTTON - POWER BUTTON
- BUTTON
5.>>BUTTON
6.>BUTTON
7.1< BUTTON - v BUTTON
- SEL BUTTON
- PLAY/PAUSE BUTTON
- NUMBER(0~10, +10)
-10)BUTFONS - 10+/PTY BUTTON
- SETUP BUTTON
- MODE BUTTON
15.P/N or APS BUTTON - MUTE BUTTON
- STOP BUTTON
- VOLUME-BUTTTON
- < BUTTON
- OK BUTTON
- VOLUME+ BUTTON
35.BAND BUTTON
36.PROGBU TTON
37.OSD BUTTON - LOUD BUTTON
- STEP BUTTON
40.TABUTTON
41.AFBUTTON
BRIGHTNESS
It is for adjusting the brightness of the video output.
CONTRAST
It is for adjusting the contrast of the video output.
HUE
It is for adjusting the hue of the video output.
SATURATION
It is for adjusting the saturation of the video output.
5.19.5 SPEAKER SETUP
SPEAKER SETUP
DOWNMIX
EXIT SETUP
It is for selecting your desired sound effect when there is not central speaker and sub-woofer. There are 3 modes: LT/RT, STERO, VSS.
LT/RT: When playing a disc with PRO LOGIC Dolby stereo effect, choose the item, so it will output audio signal with vivid theatre effect.
STEREO: If you choose the item, when outputting audio signal with 5.1 channels, it will output the left and right channels of signal; when outputting audio signal with 2 channels, it will output the common 2 channels of stereo signal.
VSS: If you choose the item, when playing a disc recorded with 5.1 channels, the main channel speakers can output audio signal with VSS effect.
5.19.6 DIGITAL SETUP
DIGITALSETUP
OR MODE
DYNAMIC RANGE
DUAL MONO
EXIT SETUP
OP MODE
It is for selecting audio output mode
LINE OUT: It can linearly compress the audio signal. So the volume level is lower.
You should select the item at night.
RF REMOD: It can make the volume level higher. You should select it at daylight.
DYNAMIC RANGE
After selecting the compression mode of LINE OUT, set the item, so you can adjust the linear compression ratio. If you set it to be FULL, the Peak-to-Peak value of the audio signal is the minimum; if you set it to be OFF, the Peak-to-Peak value is the maximum.
DUAL MONO
It is for selecting a desired audio output mode for the left and right ways of signal. It is mainly for Karaoke of Ac3. There are 4 modes in all as follows: STEREO, MONO L, MONO R, MIX MONO.

5.19.2 LANGUAGE SETUP
LANGUAGE SETUP
OSD LANGUAGE
AUDIO LANG
SUBTITLE LANG
MENINGANG
EXIT SETUP
OSD LANGUAGE
This item is for selecting the language of the SYSTEM MENU and all operating prompt interface displayed during playback.
AUDIO LANG
This item is for selecting a audio language.
SUBTITLE LANG
This item is for selecting a subtitle language.
MENULANG
This item is for selecting a disc menu language.
5.19.3 AUDIO SETUP
AUDIO SETUP
AUDIO OUT
KEY
EXIT SETUP
AUDIO OUT
there is only ANALOG mode, not optional.
KEY
It is for selecting your desired basic music tone(from low to high).
5.19.4VIDEOSETUP
VIDEO SETUP
BRIGHTNESS
CONTRAST
HOE
SATURATION
EXITSETUP
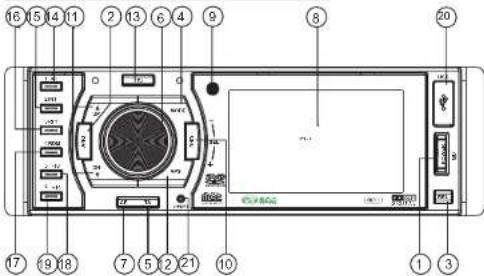
1.6 Description of the Face of the Front Panel
- POWER/MUTE BUTTON 8. SMALL MONITOR 16.3/RPT BUTTON
2.ANGIL8.TETTBOTTON1794HDBBDEBENSOR - NODE BUTTON 11,UP and DN BUTTONS 105+10 BUTTON
4.7CDBOHTTON11.0F288SNBUTTON2.05.TA BUTTON 12.AFS BUTTON 20.USB SOCKET - SEL BUTTON 13. EJECT BUTTON 21. RESET BUTTON
AND VOL KNOB 14.1PLAYPAUSE BUTTON
7.4PUBTION 13.2INFBUTTON
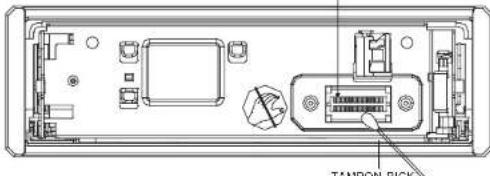
1.7 Description of the Unit Chassis Facet After removing the Front Panel
26 PIN FEMALE CONNECTOR
26 PIN FEMALE CONNECTOR: when there is some dirt on the connector.
please wipe it away from the connector.
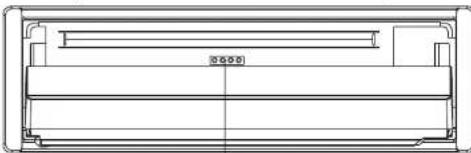
1.8 Description of the Unit Chassis Facet After Sliding Down the Front Panel
LED indicators
The LED indicators light all the time, they can help you operate during darkness.
1.9 Description of the Rear Cabinet
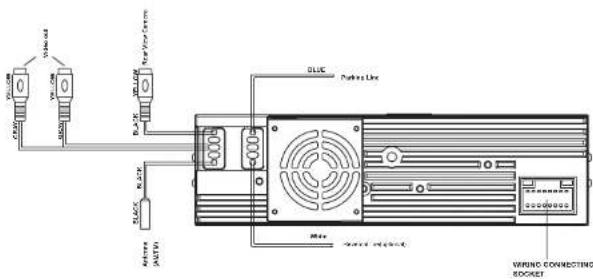
Note: after connecting the Parking Brake Line, the video on the small monitor of the front panel will be displayed only after braking the car
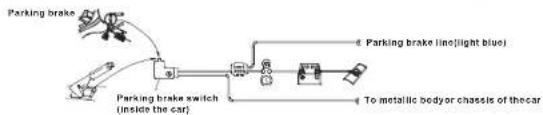
Connecting the parking brake line to the parking brakesystem built inthe car
1.10 Description of the Input/Output Wires
NOTE: In spite of having any kinds of speaker system, must use 4 ohms impedance of speaker to reduce the distortion during high volume level.
For the DVD System Menu, there are 6 setup pages in all. They display as follows:
5.19.1 SYSTEM SETUP
TV SYSTEM
This product supports output of various TV system, including NTSC, PAL, AUTO. If your TV set has only NTSC or PAL system, the screen will blink and become colorless when a wrong TV system is selected. In this case, press the N/P button on the Remote Control to switch the right TV system to match the TV color system
AUTOPLAY
Use the setup item to turn on or off the AUTO PLAY function.
IV TYPE
The setup item is for matching TV screen size.
4:3 PS: Choose the item when connecting a TV set with 4:3 screen. When playing the pictures with 16:9 size, the left and right parts of the video will be cut out, and display in full screen.
4:3 LB: Choose the item when connecting a TV set with 4:3 screen. When playing the pictures with 16:9 size, the top and bottom parts of the TV screen will be turned into a black square respectively.
16:9: Choose the item when connecting a TV set with 16:9 wide screen.
Password
This setup item is for locking or unlocking the rating level of the Parental Control. The defaulted state is locked. The defaulted password is 0000.
You can set a new password that you like: Select the PASSWORD item and then press the > button to enter it, then input the original password 0000, and then press the OK button to unlock it. Press the > button to enter it again, then input a new password that you like and then press the OK button to make it effective. Before the other persons see the Manual, you should get the password in mind and cut out the part of PASSWORD in the Manual. If you forget the password, input the permanent password 8888.
RATING
The item is for setting a new rating level of the Parental Control.
1. Select the PASSWORD item and then press the > button to enter it, then input the password mentioned above, and then press the OK button to unlock the setting of the rating level of the Parental Control.
2. Select the RATING item and then press the > button to enter it, then use the direction buttons to select your desired rating level, then press the OK button to confirm.
3. Select the PASSWORD item again and then press the > button to enter it, then input the password, and then press the OK button to lock the new setting of the rating level of the Parental Control.
DEFAULT
This item is for making all setup items change back to original status.
- During JPEG playback or pause, press one of the ≥slant s / N buttons to change the angle of viewing picture that is displaying as follows:
90 deg cw; <90deg ccw; ^A,UP .. DOWN; v: LEFT<-->RIGHT
During JPEG playback, long press the PROG button to change the mode of refresh picture.
During JPEG playback, press the STOP button to stop playing and return to the root menu.
During JPEG playback, the following buttons are not available: SLOW-FWD, MUTE, +-, SUBTITLE, TITLE, ANGLE, STEP, SEARCH, INT and A-B.
In JPEG mode, the other operations are same as ones in MP3/WMA mode.
5.16 MP4 Operation
- The root menu is displayed on TV when beginning to switch on DISC mode, then it will automatically play the first file. During playback, press the MENU or STOP button to stop playing and return to the root menu.
- When displaying the root menu, press the direction buttons to select your desired FOLDER or file, then press the OK or PLAY button to open the FOLDER, or play the selected file. When displaying the root menu, you can also use the number buttons to select the serial number of the file and play the file.
The ANGLE and TITLE/PBC button are not valid. The other functions are same as ones in DVD disc.
5.17 ESP and ID3 Function
There is ESP function for all formats of discs. In MP3/WMA mode, during playback, the information of the file name, folder name, song's title, artist and album will be scrolling on the LCD display. As long as the current playing MP3 music contains relevant ID3 tag information in version 1.0/2.0 format, the 3 items underlined above will be scrolling on the LCD display; otherwise, they will not.
5.18 USB Reader Operation
Power on the DVD player, then insert the USB storage, and then the monitor will display the root menu of the USB storage. All the operations are same as ones in JPEG mode.
5.19 The DVD System Menu Setup Operation
- Press the SETUP button on the remote controller to access the DVD System Menu on the monitor.
- There are 6 setup pages in all for the System Menu. Press the > or < button to select an desired setup page.
- Press the or v button to select an setup item in the selected setup page.
- Press the > button to enter the setup item. Then press the v or ^ button to select a desired mode of the setup item, finally press the OK button to confirm it.
- Press the < button to return to the upper level.
- Press the SETUP button again or use the direction buttons to highlight the item of the EXIT SETUP and then press the OK button to exit the System Menu.
1.11 UNIT INSTALLATION
2. Common Operation
- To turn on/off the unit
Under power off mode, press the POWER button to turn on the unit. Under power on mode, long press the POWER button on the front panel or briefly press the POWER button on the remote controller to turn off the unit. - To select function mode
Press the MODE button to select RADIO, DISC(After inserting a disc), USB (After inserting a USB storage) mode. - To adjust sound level
Rotate the VOL knob on the front panel or press or hold the + or - button on the remote controller to directly adjust the volume level. - To mute sound
Press the MUTE button on the remote controller to turn on/off MUTE mode. Briefly pressing the POWER button on the front panel also can turn on/off MUTE mode.
In MUTE mode, the MUTE mode can be released by pressing the following buttons: MUTE, EJECT, VOL or +/- , SEL, POWER, MODE. - To display and adjust the clock time
Press the CLK button on remote controller to display clock time on the small monitor of the front panel.
Long press the CLK button to flash hour of the clock, then rotate the VOL knob on the front panel or press the + or - button on the remote controller to adjust the hour; and then briefly press the CLK button to flash minute of the clock, then rolate the VOL knob on the front panel or press the + or - button on the remote controller to adjust the minute; finally briefly press the SEL button to confirm it. - To select a preset EQ mode
Press the EQ button to select the preset music equalizer curves: CLASS, ROCK, POP, CUSTOM, FLAT. The sound effect will be changed. - To take away the front panel
Press the RELEASE button on the front panel to detach the front panel from the unit, then you can remove away the front panel. - To select a optimal angle of the front panel
Press the TILT button repeatedly to select a optimal angle as follows: ANGLE1 < ANGLE2 < ANGLE3 < ANGLE4 - To turn on/off LOUD mode
Press the LOUD button on the remote controller to turn on/off LOUD mode. When turning on LOUD mode, it will enhance bass level immediately when the bass is not enough.
10.To reset the unit
Press the RESET button to rehabilitate the distorted program to zero when the display is wrong or the function buttons are not effective.
11.To adjust the sound equalizer curves and the video output mode
To adjust the sound equalizer curves, briefly press the SEL button to display the list of the sound equalizer curves of BASS(without preset EQ). TREBLE(without preset EQ), BALANCE, FADER, SUB WOOPER ON/OFF and TA VOLUME, then press the UP or DN button on the front panel or the >> or << button on the remote controller to select one of them, and then rotate the VOL knob on the front panel or press the + or - button to adjust level.
2) To adjust the video output mode, long press the SEL button to display the list of the video output modes of the Brightness, Contrast, Saturation, Hue, Sharpness, then press the UP or DN button on the front panel or the >> or |< button on the remote controller to select one of them, and then rotate the VOL knob on the front panel or press the + or - button to adjust the level.
5.14 Program Playback
It allows you to enter the order in which you want some chapters/tracks in DVD/VCD/MP3/WMA/CD disc to play.
1. During playback, press the PROG button to enter a program interface as follows:
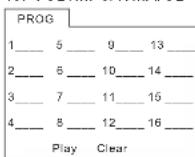
for VCD/MP3/WMA/CD
2 Use the direction buttons to move cursor onto the desired place for inputting the sequence number.
3 Use the number button to input desired sequence number of title/chapter/ track with desired sequence.
4 Use the direction button to move cursor onto Play item, then press the OK button to play the programmed titles/chapters/tracks in programmed order; only pressing the PLAY button also can play the programmed titles/chapters /tracks in programmed order.
To exit program playback, firstly press the STOP button, then press the PLAY button to enter sequence playback.
To remove the all programmed sequence numbers, move the cursor onto Clear item, then press the OK button.
To change the programmed sequence, move the cursor onto the item you want to change, input the desired sequence number.
During VCD playback, if it is in PBC ON mode, at the same time of entering the state of program playback, it turns off PBC mode.
5.15 Playback the Picture CD in JPEG Format
- The root menu is displayed on TV when beginning to switch on DISC mode. At the time, it plays MP3/WMA file.(the TITLE or MENU button is not available). In the root menu, the left file sort icon is for MP3/WMA file; the middle file sort icon is for JPEG file; the right file sort icon is for VIDEO file. If one of these 3 file sort does not exist, you can not move cursor onto the file sort icon.
- When displaying the root menu, press the direction buttons to select your desired FOLDER, file or file sort icon, then press the OK or PLAY button to open the FOLDER, or play the selected file, or play only this sort of file. When displaying the root menu, you can also use the number buttons to select the serial number of the file and play the file.
When you select a JPEG file sort icon, press the or button to select the first JPEG file, then press the v button to select the desired JPEG file, finally press the OK or PLAY/PAUSE button to display the JPEG picture in full screen from the selected JPEG picture.
17
ZOOM 2,ZOOM 3,ZOOM 4,ZOOM 1/2,ZOOM 1/3,ZOOM 1/4,ZOOM OFF.
Press one of the [4]v / v >[4]v buttons to select the area you want to enlarge.
5.10 Change the Caption Language
In the state of DVD disc playing, press the SUBTITLE button repeatedly to select the language of the caption or turn off the caption.(depend on the disc used.)
In the state of VCD/MP3/WMA/CD disc playing, the button is not available.
5.11 Change the Audio Language
- In the state of DVD disc playing, press the AUDIO button repeatedly on the IR remote controller to select the desired language type. (depend on the disc used)
- In the state of VCD/MP3/WMA/CD disc playing, press the AUDIO button repeatedly to select the sound mode of the MONO L, MONO R, and Stereo, no language function.
5.12 Change the Video Signal System
During playback of DVD/VCD disc, press the P/N button on the front panel repeatedly to change theVIDEO SIGNAL SYSTEM mode as follows: PAL->AUTO->NTSC
5.13 Look over the Playback Status
- In the state of DVD disc playing, press the OSD button repeatedly on the remote controller to turn on/off the playback status. When it is on, it will display the information such as: the serial number of the playing title, the serial number of the playing chapter, the elapsed time of the playing chapter, the remained time of the playing chapter, the elapsed time of the playing title, the remained time of the playing title, etc.
- In the state of VCD/MP3/WMA/CD disc playing, press the OSD button repeatedly on the remote controller to turn on/off the playback status. When it is on, it will display the information such as: the serial number of the playing track, the elapsed time of the playing track, the remained time of the playing track, the elapsed time of the disc, the remained time of the disc.
3. Radio Operation
1. BAND BUTTON
In RADIO mode, press the BAND button on the remote controller or on the front panel to select your desired radio band of FM1, FM2, FM3, MW1 and MW2, and the word means which band is selected will be displayed on the small monitor of the front panel.
2. TUNE/SEEK UP/DOWN BUTTONS
1) Long press the UP/DN button on the front panel or the >>|/| << button on the remote controller to automatically search up/down for a available station from the current frequency.
2) Briefly press the UP/DN button on the front panel or the / button on the remote controller to manually search up or down with step by step for your desired station from the current frequency.
3. APS BUTTON
In RADIO mode:
1) When long pressing the APS button, the radio searches from the lowest frequency and checks the signal strength level until 1 cycle search is finished. And then the 6 strongest stations are preset to the corresponding preset number memory bank. The AS operation is implemented in the each bank of the selected band. When the AS operation is finished, it will resume broadcasting on the M1.(It can store 3x6 stations for FM and 2x6 stations for AM in all)
2) When briefly pressing the APS button on the front panel or the remote controller, the radio searches for each preset station from the M1. When the field strength level is more than the threshold level of the stop level, the radio is holding at that preset number for few seconds with releasing mute, and then searches again. After finishing a circle of searching, it will stop searching on the M1.
NOTE: In FM band, FM1, FM2, FM3 is checked one at a time.
4. PRESET STATION[1-6]BUTTONS
1) To memorize the current frequency on the current band, long press any one of the six preset buttons (1-6), or press the "N" button to select a memory bank and then long press the OK button.
2) To recall the preset memory on the current band, press one of the preset buttons [1-6] or press the / button and then press the OK button to confirm.
5.STEREO/MONO BUTTON
Press the ST button on the remote controller to select the STEREO or MONO sound mode for FM band.
6. LOC BUTTON
1) In FM mode, when the signal of the distance radio station are very weak and the receiving effect is bad during tuning, check whether there is the word LOC on LCD. If there is the word LOC on LCD, press this button to turn off the LOC function, then tune again for the distance radio station;
2) In FM mode, when the signal of the local radio station are too strong to lead that the interference to the receiving effect during tuning, press this button to turn on the LOC function to display the word LOC on LCD, then tune again for the local radio station.
7.PTY(PROGRAMTYPE)BUTTON
Press the PTY button shortly to display PTY and flash NEWS. Press the PTY button hold to display NEWS and then press the VOL+ or VOL- button on the remote controller or rotate the VOL knob on the front panel to select one of PTY programs:-->NEWS-->AFFAIRS-->INFO-->SPORT-->EDUCATE--> DRAMA-->CULTURE-->SCIENCE-->VARIED-->POP M-->ROCK M--> EASY M-->LIGHT M-->CLASSICS-->OTHER M-->WEATHER-->FINANCE--> CHILDREN-->SOCIAL-->RELIGION-->PHONE IN-->TRAVEL--> LEISURE-->JAZZ-->COUNTRY-->NATION M-->OLDIES-->FOLK M--> DOCUMENT-->TEST-->ALARM-->
After selecting one of the PTY programs, press the PTY button to search for the station of the PTY program.
- AF [ALTERNATIVE FREQUENCIES] BUTTON
When pressed the AF button short, the AF switching mode is selected and the state of the AF switching mode is displayed by AF segment in display. Segment off: AF switching mode off. Segment on: AF switching mode on, and has RDS information. Segment flashing: AF switching mode on, but RDS information is not received yet.
When the AF switching mode is selected, the radio checks the signal strength of the AF all the time. The interval of checking time of each AFs depends on the signal strength of the current station, from a few minute for the strong station to a few seconds for the weak station. Every time that a new AF is stronger than the current station, it switches over to that frequency for very short time, and the NEW FREQUENCY is displayed for 1-2 second. Because the mute time of the AF switching or the checking time is very short, it is almost inaudible in case of normal program. (When AF flash on LCD, it will search for the stronger RDS station. If AF and TP flash on LCD, it can only search for the traffic announcement station). In FM mode, when AF is on, SEEK, (SCAN), AUTO-MEMORY function can only receive and save the RDS program.
- TA [TRAFFIC ANNOUNCEMENT] BUTTON
Press the TA button shortly to turn on TA search mode. When traffic announcement is transmitted:
1). If the unit is in Disc Play mode, it will switch to radio mode temporarily.
2). Temporarily switch over to an EON linked station when EON detects a traffic announcement on that other program, and TA, TP will be displayed on LCD
TA interruption function: The current traffic announcement is cancelled by pressing TA button shortly.
* When TA is on, SEEK, (SCAN), AUTO MEMORY function can be received or saved only when traffic program identification code has been received.
5.5 Playback in Scan Mode
- In the state of VCD/CD disc playing, press the INT button to play the previous 15 seconds part of each track on the disc. Press the INT button again to resume normal playback.
- In the state of DVD/MP3/WMA disc playing, the INT button is not available.
5.6 Playback from a specified chapter/track or a specified time
- In the state of DVD disc playing, press the SEARCH button to display a interface and highlight the title item, then use the number buttons to input the serial number of the title; use the direction buttons to highlight the chapter item, then use the number buttons to input the serial number of the chapter; you can still use the direction buttons to highlight the time item, then use the number buttons to input the desired time to start playback; finally press the OK or PLAY button to play the selected chapter or play from the selected time.
- In the state of VCD/MP3/WMA/CD disc playing, press the SEARCH button to display a interface and highlight the track item, then use the number buttons to input the serial number of the track; you can still use the direction buttons to highlight the time item, then use the number buttons to input the desired time to start playback; finally press the OK or PLAY button to play the selected track or play from the selected time.
5.7 Playback in Random
In the state of DVD/VCD/MP3/WMA/CD disc playing, press the RDM button to switch between RANDOM (ON)/RANDOM OFF. When in RANDOM (ON) mode, it will play in random.
5.8 Playback in Different Angle
- In the state of VCD/MP3/WMA/CD disc playing, the ANGLE button on the IR remote controller is not available.
- In the state of DVD disc playing, press the ANGLE button repeatedly on the IR remote controller to view in different angle.(This function is only for the DVD discs with ANGLE function)
5.9 Playback in Zoom Mode
In DVD/VCD mode, during playback, press the ZOOM button continuously to enlarge a certain area of the images on the screen with these multiples:
During slow forward, press the PLAY button to resume normal playback.
The function is only for video.
5.3 Playback with still frame
If the unit is currently running DVD/VCD disc, press the STEP button consecutively to display the still frame forward with step by step.
Press the PLAY button to resume normal playback.
5.4 Playback Repeatedly
5.4.1 ONE/ALL Repeat
- In the mode of DVD disc playback: Press the RPT button to select RPT CHAPTER, RPT TITLE and RPT OFF.
- In the mode of VCD(PBC OFF)/CD disc playback: press the RPT button to select RPT 1, RPT ALL or OFF. When it is in the state of PBC ON, during VCD disc playing, the RPT button are not available.
- In the mode of MP3/WMA disc playback: Press the RPT button to select RPT 1, RPT DIR, RPT ALL and OFF.
5.4.2 A-B Repeat
Press the A-B button if you want to repeat aspecific segment on a disc that you define:
- Press the A-B button at a point (A) where you want it to be the start point of the repeat segment. Press the A-B button again at a point (B) where you want it to be the terminal point of the repeat segment. Then it will play the segment repeatedly.
- To cancel the A-B repeat mode and resume normal playback, press the A-B button for the third time.
Note: During VCD/MP3/WMA/CD playback, points A and B must be within the same track. During DVD playback, points A and B can be selected from different chapters
- Basic Disc or USB Operation
4.1 Begin playback
- Press the POWER button briefly to turn on the DVD player. After turning on the DVD player, please turn on TV set, and ensure that the video output of TV is the video input from the DVD player connected with TV set.
? Common Question
Q: There is not anything is displayed on TV screen when the DVD player is turned on. How to solve the problem?
A: Ensure that the TV was set to right video input(not TV channel); for example, if you make VIDEO1 INPUT of TV and DVD player connected with each other, then you need set TV to VIDEO1. - Press the EJECT button to slide down the front panel.
- Insert Disc Into Disc Compartment(Label surface up), then the front panel will slide back to the previous angle.
!NOTE
- For some discs that are seriously scratched or poor manufacturing or recording quality, it may not play.
-
If the player can not read disc under normal condition, please try to eject and reload the disc again.
-
Remark:
1) In addition to normal CD and DVD, this unit supports to play CD-R, CD-R/W, DVD-R and DVD-R/W as well; however, depending on the conditions of the recording equipment, recording program or the disc itself, some CD-R, CD-R/W, DVD-R or DVD-R/W may not play.
2) When dealing with CD-R, CD-R/W, DVD-R or DVD-R/W recording, too high recording speed may result in poor signal quality and therefore, it is recommendable to select as lower as possible recording speed.

4.2 Pause Playback
In the state of DVD/VCD/CD/MP3/WMA disc playing, press the PAUSE button on IR remote controller to pause the playback, press the PLAY button to resume normal playback.
4.3 Stop Playback
In the state of DVD/VCD/MP3/WMA/CD disc playing, press the STOP button once to pause the playback, then press the PLAY button to resume the normal playback; press the STOP button twice to full stop the playback, then press the PLAY button to start playback from .the beginning of the first chapter/track
4.4 Select Chapter/Track with the UP/DN or the >>|/<< Button
Press the UP/IN button on the front panel or the >>| |<< button on the remote controller during playback to select the next or last chapter/track to playback.
Note: Presisitethe fullBoardDistance| | << button multiple chapters/tracks forward or backward.
4.5 Select Chapter/Track with the Number Buttons
In the state of DVD/VCD(PBC OFF)/MP3/WMA/CD disc playing, press one of the 1~9 and the 0/10 number buttons to directly select and play the 1st to 10th track/chapter (the 0/10 button is used as the 10 button). If you want to play the track/chapter that s serial number is bigger than 10, use the 10+ , 1~9 and 0/10 button. For example 1, to play the 13th track/chapter, firstly press the 10+ button once, then press the 3 button. For example 2, to play the 34th track/chapter, firstly press the 10+ button for 3 times, then press the 4 button.(the 0/10 button is used as the 0 button) Note: long pressing the +10 or -10 button can play the next 10 or last 10 chapter/track.
The 10+ button is not available for MP3/WMA.
4.6 Select Chapter/Track with the Root/PBC Menu (If the disc includes the root/PBC menu)
In the state of DVD disc playing
1. Press the TITLE button on the remote controller to display the title list.
2. Press the direction buttons to select your desired title, and then press the OK or PLAY button to open the root menu of the selected title.
3. Press the direction buttons to select your desired chapter, finally press the OK or PLAY button to play the selected chapter. During playback, pressing the MENU button can directly display the root menu of the title that is playing.
In VCD mode
- When starting to turn on the PBC function, it will play from the beginning of the disc till it display the PBC menu on TV screen if the disc include the PBC menu.
You also can press the MENU button to display the PBC menu. - Press the number buttons to select your desired track, finally press the OK or PLAY button to play the selected track.
In MP3/WMA mode
- The root menu is displayed on TV all the time(and the TITLE or MENU button is not available).
- Press the direction buttons to select your desired FOLDER, then press the OK or PLAY button to open the FOLDER, and then press the direction buttons to select your desired file, finally press the OK or PLAY button to play the selected file.
In CD mode, the TITLE, PBC, MENU buttons are disabled.
4.7 Terminate the Playback
- Press the EJECT button to slide down the front panel, then the disc in the disc compartment will come out automatically and then remove the disc away.
- Long press the POWER button on the front panel or briefly press the POWER button on the remote controller to turn off the DVD player.
5. Advanced Disc or USB Operation
5.1 Playback with Speed
During normal playback, long press the UP/DN button on the front panel or the >>|/|<< button on the remote controller continuously to fast forwards or backwards at the following speeds: x2, x4, x8, x20, normal.
During speed playback, press the PLAY button to resume normal playback
5.2Playback with Slow Speed
During playback, press the SLOW_FWD button to execute the Slow Forward function.
With each consecutive pressing of the SLOW_FWD button, the playback speed decreases. The speed levels in Slow Forward as follows: x1/2, x1/3, x1/4, x1/5, x1/6, x1/7, normal .
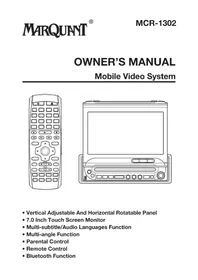
MARQUANT
MCR-1280
1.9 Description du Compartment Arriere

| PROG | |||||
| T | C | T | C | T | C |
| 1: | 5: | 9: | 13: | ||
| 2: | 6: | 10: | 14: | ||
| 3: | 7: | 11: | 15: | ||
| 4: | 8: | 12: | 16: | ||
| Play | Clear | ||||
| PROG | |||
| 1 | 5 | 9 | 13 |
| 2 | 6 | 10 | 14 |
| 3 | 7 | 11 | 15 |
| 4 | 8 | 12 | 16 |
| Play | Clear | ||
- PRECAUTION
- CAUTION
- CLASS1 LASER PRODUCT
- Specification
- The Trouble Shooting
- Contents
- Before Operation
- Glossary
- Precautions
- Safety
- Environment
- The Region Code
- Appendix: The region code of DVD
- 2323
- Disc Maintenance
- Disc Cleaning
- The Remote Controller Description
- BRIGHTNESS
- CONTRAST
- HUE
- SATURATION
- SPEAKER SETUP
- DIGITAL SETUP
- OP MODE
- DYNAMIC RANGE
- DUAL MONO
- LANGUAGE SETUP
- OSD LANGUAGE
- SUBTITLE LANG
- MENULANG
- AUDIO SETUP
- AUDIO OUT
- 5.19.4VIDEOSETUP
- Description of the Rear Cabinet
- SYSTEM SETUP
- TV SYSTEM
- AUTOPLAY
- IV TYPE
- Password
- RATING
- DEFAULT
- MP4 Operation
- ESP and ID3 Function
- USB Reader Operation
- The DVD System Menu Setup Operation
- Common Operation
- Program Playback
- Playback the Picture CD in JPEG Format
- 17
- Change the Caption Language
- Change the Audio Language
- Change the Video Signal System
- Look over the Playback Status
- Radio Operation
- BAND BUTTON
- TUNE/SEEK UP/DOWN BUTTONS
- APS BUTTON
- In RADIO mode:
- PRESET STATION[1-6]BUTTONS
- 5.STEREO/MONO BUTTON
- LOC BUTTON
- Playback in Scan Mode
- Playback from a specified chapter/track or a specified time
- Playback in Random
- Playback in Different Angle
- Playback in Zoom Mode
- Playback with still frame
- Playback Repeatedly
- ONE/ALL Repeat
- A-B Repeat
- Begin playback
- !NOTE
- Pause Playback
- Stop Playback
- Select Chapter/Track with the UP/DN or the >>|/<< Button
- Select Chapter/Track with the Number Buttons
- Select Chapter/Track with the Root/PBC Menu (If the disc includes the root/PBC menu)
- Terminate the Playback
- Advanced Disc or USB Operation
- Playback with Speed
- 5.2Playback with Slow Speed
- MARQUANT
Brand : Marquant
Model : MCR1280
Category : DVD player