
MCR1302 - DVD player Marquant - Free user manual and instructions
Find the device manual for free MCR1302 Marquant in PDF.
| Product Type | Mobile DVD player with TFT screen |
| Brand | Marquant |
| Model | MCR1302 |
| Screen | TFT 7 inches (18 cm), resolution 1440x234 |
| Disc formats | DVD-Video, CD-DA, CD-R/RW, MP3, VCD |
| Radio | FM (87.5 - 108 MHz) and MW (522 - 1620 kHz) |
| Bluetooth | Yes, for hands-free calls and audio streaming |
| USB port | Yes, for playing MP3 files |
| Remote control | Yes, with included lithium battery |
| Power supply | 12 V DC, negative ground |
| Output power | 4 x 40 W max |
| Power consumption | 15 A max |
| Audio outputs | Stereo analog L/R (2 channels) |
| Video output | Composite (1 Vp-p, 75 Ω) |
| Display functions | Angle adjustment, brightness, contrast, color, tint |
| DVD functions | Multiple subtitles, audio languages, multiple angles, zoom, A-B repeat, programming |
| Parental control | Levels 1 to 8, default password 0000 |
| Safety | Class 1 laser product – do not open |
| Disc care | Clean with a soft, dry cloth from center to edge |
| Included accessories | Remote control, removal keys, metal strap, cables |
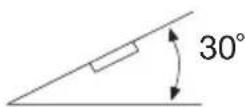
| Installation | Front or rear DIN, max horizontal angle 30° |
Frequently Asked Questions - MCR1302 Marquant
User questions about MCR1302 Marquant
0 question about this device. Answer the ones you know or ask your own.
Ask a new question about this device
Download the instructions for your DVD player in PDF format for free! Find your manual MCR1302 - Marquant and take your electronic device back in hand. On this page are published all the documents necessary for the use of your device. MCR1302 by Marquant.
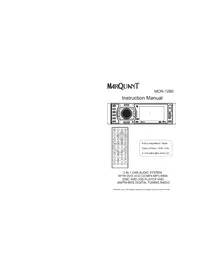
USER MANUAL MCR1302 Marquant
OWNER'S MANUAL Mobile Video System
Vertical Adjustable And Horizontal Rotatable Panel
7.0 Inch Touch Screen Monitor
- Multi-subtitle/Audio Languages Function
- Multi-angle Function
- Parental Control
Remote Control
- Bluetooth Function
Compatible with PAL DVD (Video CD) and NTSC DVD (Video CD)
This player can play discs recorded in either PAL or NTSC format.
- A single LSI chip now integrates all major DVD playback circuit functions including MPEG2 decoder, video D/A converter, and audio decoders.
L/R stereo analog audio outputs for connection to existing head unit aux inputs. Video output is composite video. - Supplied remote handles multi-function software (multi-language audio-track/subtitle, multi-angle,multi-story,etc.),plus all basic functions.
USE THIS PRODUCT SAFELY
This set has been designed and manufactured to assure personal safety. Improper use can result in electric shock or fire hazard. The safeguards incorporated in this unit protect you if you observe the following procedures for installation, use and servicing. This unit doesn't contain any parts that can be repaired by the user.
When Driving
Keep the volume level low enough to be aware of road and traffic conditions.
When Car Washing
Do not expose the product to water or excessive moisture. This could cause electrical shorts, fire or other damage.
When Parked
Parking in direct sunlight can produce very high temperatures inside your vehicle. Give the interior a chance to cool down before starting playback.
Use the Proper Power Supply
This product is designed to operate with a 12 volt DC, negative ground battery system the regular system in a North American car).
Protect the Disc Mechanism
Avoid inserting any foreign objects into the slot of this player.
Failure to observe this may cause malfunction due to the precise mechanism of this unit.
Use Authorized Service Centers
Do not attempt to disassemble or adjust this precision product. Please refer to the Service Center list included with this product for service assistance.
For Installation
The unit should be installed in a horizontal position with the front end up at a convenient angle, but not more than 30^ .
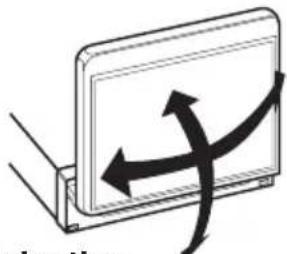
Protect the Monitor Mechanism
- The monitor is operated automatically. Do not draw the monitor out or turn it upward or downward manually. Otherwise, the mechanism construction may be harmed to some degree.
- When you operate the monitor with the remote handset, do not touch the monitor by your hands. It may harm your fingers.
Features. 2
Safety Information 4
Disc Notes 5
Installation 6
The Player. 9
Electrical Connection 11
Remote Control. 12
Location and Function of Keys. 12
Preparing the Remote Control. 14
Loading/Ejecting a disc 14
Loading a disc 14
Ejecting a disc 14
Operation. 15
Basic Operation 15
Disc (DVD, VCD, CD, MP3) Operation. 16
System Setup 22
Language Setup 22
Audio Setup 23
Radio Operation. 24
RDS (Radio Data System) Operation. 25
AVOperation. 26
USB Play Operation. 26
BLUETOOTH OPERATION 27
Trouble Shooting 29
Specification. 30
CAUTION:
MOBILE DVD PLAYER IS A CLASS I LASER PRODUCT. HOWEVER THIS MOBILE DVD PLAYER USES A VISIBLE/INVISIBLE LASER BEAM WHICH COULD CAUSE HAZARDOUS RADIATION EXPOSURE IF DIRECTED. BE SURE TO OPERATE THE MOBILE DVD PLAYER CORRECTLY AS INSTRUCTED. USE OF CONTROLS OR ADJUSTMENTS OR PERFORMANCE OF PROCEDURES OTHER THAN THOSE SPECIFIED HEREIN MAY RESULT IN HAZARDOUS RADIATION EXPOSURE. DO NOT OPEN COVERS AND -DO NO REPAIR YOURSELF. REFER SERVICIN TO QUALIFIED PERSONNEL.
WARNING:
TO REDUCE THE RISK OF FIRE OR ELECTRIC SHOCK,DO NOT EXPOSE THIS EQUIPMENT TO RAIN OR MOISTURE.
- TO REDUCE THE RISK OF FIRE OR ELECTRIC SHOCK, AND ANNOYING INTERFERENCE, USE ONLY THE RECOMMENDED ACCESSORIES.
- THIS DEVICE IS INTENDED FOR CONTINUOUS OPERATION.
This product incorporates copyright protection technology that is protected by method claims of certain U.S. patents and other intellectual property rights owned by Macrovision Corporation and other rights owners. Use of this copyright protection technology must be authorized by Macrovision Corporation, and is intended for home and other limited viewing uses only unless otherwise authorized by Macrovision Corporation. Reverse engineering or disassembly is prohibited.
Region Management Information
Region Management Information: This Mobile DVD Player is designed and manufactured to respond to the Region Management Information that is recorded on a DVD disc. If the Region number described on the DVD disc does not correspond to the Region number of this Mobile DVD Player, this Mobile DVD Player cannot play this disc.
Disc formats supported by this player

DVD 12 cm disc

Video CD 12 cm disc

CD 12 cm disc

MP3 12 cm disc
Handling and Cleaning
- Dirt, dust, scratches and warping disc will cause misoperation.
- Do not place stickers or make scratches on discs.
- Do not warp discs.
- A disc should always be kept in its case when not in use to prevent from damage.
-
Do not place discs in the following places:
-
Direct sunlight
- Dirty, dusty and damp areas
- Near car heaters
- On the seats or dashboard
Disc Cleaning
Use a dry soft cloth to wipe the surface. If the disc is quite dirty, use a soft cloth slightly moistured with isopropyl (rubbing) alcohol. Never use solvents such as benzine, thinner or conventional record cleaners as they may mar the surface of the disc.
Note:
A disc may become somewhat scratched (although not enough to make it unusable) depending on the way it is handle and conditions in the usage environment.
Note these scratches are not an indication of any problem with the player.
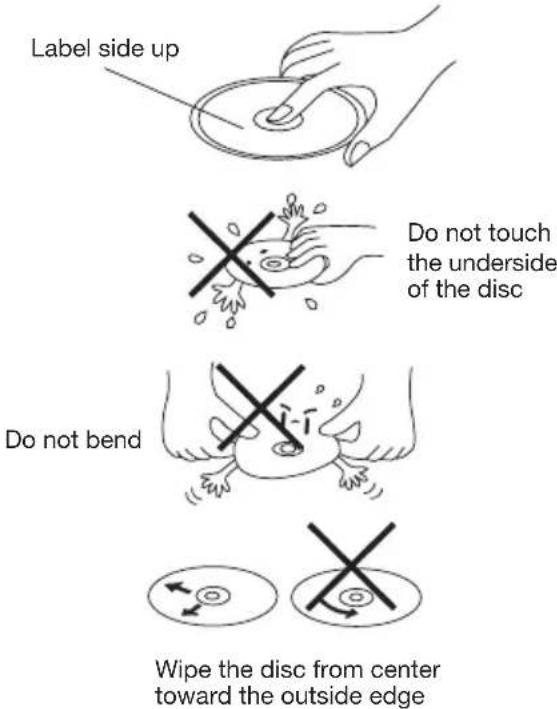
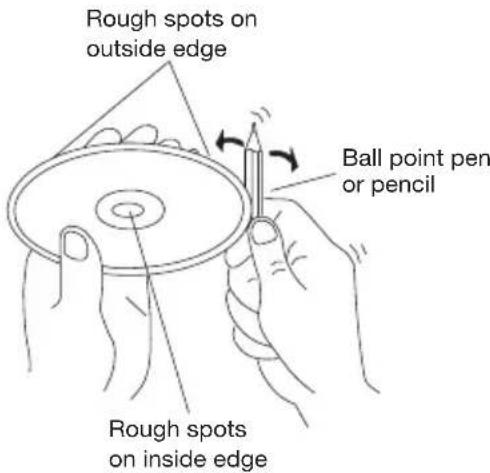
Preparing New Discs with Rough Spots
A new disc may have rough edges on its inside and outside edges. If a disc with rough edges is used, the proper setting will not be performed and the player will not play the disc. Therefore, remove the rough edges in advance by using a ball point pen or pencil as shown on the right. To remove the rough edges, press the side of the pen or pencil against the inside and outside edges of the disc.
Notes:
- Choose the mounting location where the unit will not interfere with the normal driving function of the driver.
- Before finally installing the unit, connect the wiring temporarily and make sure it is all connected up properly and the unit and the system work properly.
- Use only the parts included with the unit to ensure proper installation. The use of unauthorized parts can cause malfunctions.
- Consult with your nearest dealer if installation requires the drilling of holes or other modifications of the vehicle.
Install the unit where it does not get in the driver's way and cannot injure the passenger if there is a sudden stop, like an emergency stop.
If installation angle exceeds 30^ from horizontal, the unit might not give its optimum performance.
- Avoid installing the unit where it would be subject to high temperature, such as from direct sunlight, or from hot air, from the heater, or where it would be subject to dust, dirt or excessive vibration.
DIN FRONT/REAR-MOUNT
This unit can be properly installed either from "Front" (conventional DIN Frontmount) or "Rear" (DIN Rear-mount installation, utilizing threaded screw holes at the sides of the unit chassis). For details, refer to the following illustrated installation methods.
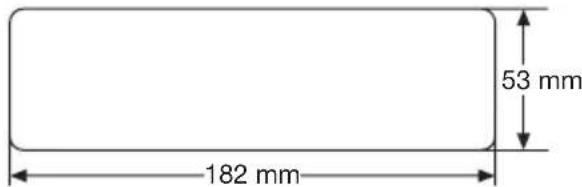
DIN FRONT-MOUNT (Method A) Installation Opening
This unit can be installed in any dashboard having an opening as show below:
Installing the unit
Be sure you test all connections first, and then follow these steps to install the unit.
- Make sure the ignition is turned off, and then disconnect the cable from the vehicle battery's negative (-) terminal.
- Disconnect the wire harness and the antenna.
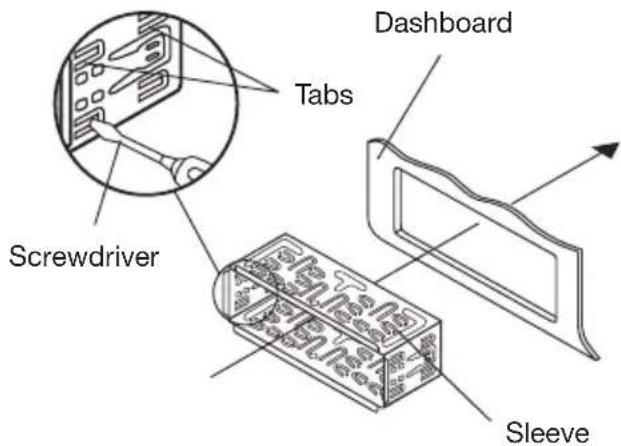
- Lift the top of the outer trim ring then pull it out to remove it.
- The two supplied keys release tabs inside the unit's sleeve so you can remove it. Insert the keys as far as they will go (with the notches facing up) into the appropriate slots at the middle left and right sides of the unit. Then slide the sleeve off the back of the unit.
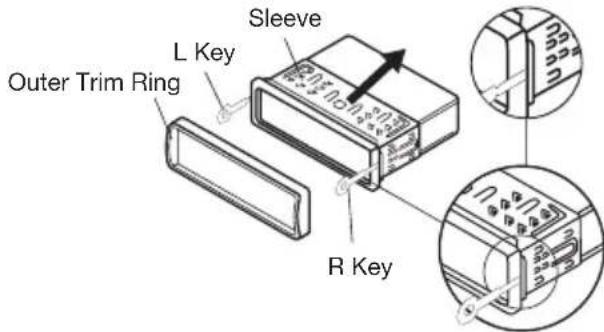
- Mount the sleeve by inserting the sleeve into the opening of the dashboard and bend open the tabs located around the sleeve with a screwdriver. Not all tabs will be able to make contact, so examine which ones will be most effective. Bending open the appropriate tabs behind the dashboard to secure the sleeve in place.
-
Reconnect the wire harness and the antenna and be careful not to pinch any wires or cables.
-
Slide the unit into the sleeve until it locks into place.
-
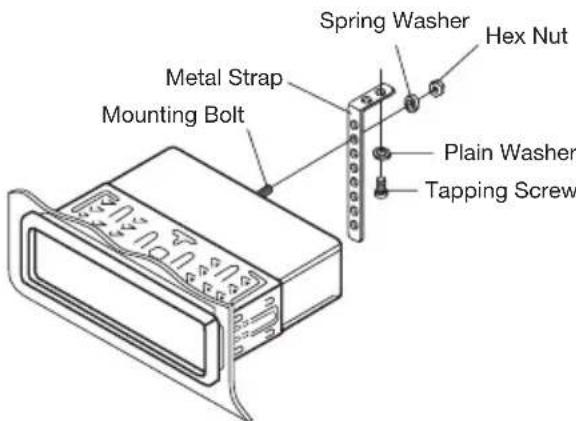
To further secure the unit, use the supplied metal strap to secure the back of the unit in place. Use the supplied hardware (Hex Nut (M5mm) and Spring Washer) to attach one end of the strap to the mounting bolt on the back of the unit. If necessary, bend the metal strap to fit your vehicle's mounting area. Then use the supplied hardware (Tapping Screw (5x25mm) and Plain Washer) to attach the other end of metal strap to a solid metal part of the vehicle under the dashboard. This strap also helps ensure proper electrical grounding of the unit.
Note to install the short threading terminal of the mounting bolt to the back of the unit and the other long threading terminal to the dashboard.
- Reconnect the cable to the vehicle battery's negative (-) terminal. Then replace the outer trim ring and install the unit's front panel. (see the steps of "using the detachable front panel").
Removing the unit
-
Make sure the ignition is turned off, and then disconnect the cable from the vehicle battery's negative (-) terminal.
-
Remove the metal strap attached the back of the unit (if attached).
-
Lift the top of the outer trim ring then pull it out to remove it.
-
Insert both of the supplied keys into the slots at the middle left and right sides of the unit, then pull the unit out of the dashboard.

DIN REAR-MOUNT (Method B)
If your vehicle is a Nissan, Toyota, follow these mounting instructions.
Use the screw holes marked T (Toyota), N (Nissan) located on both sides of the unit to fasten the unit to the factory radio mounting brackets supplied with your vehicle.

To fasten the unit to the factory radio mounting brackets.
- Align the screw holes on the bracket with the screw holes on the unit, and then tighten the screws on each side.
- Fasten with the supplied truss screws (5x5mm) or flush surface screws (4x5mm), depending on the shape of the screw holes in the bracket.
Note:
(1) The outer trim ring, sleeve and the metal strap are not used for method B installation.
(2) When the unit is on work, if you release the front panel, the unit will enter into the
power off state automatically, and you can see the indicator LED flashing. When you install the front panel the unit will resume work automatically.
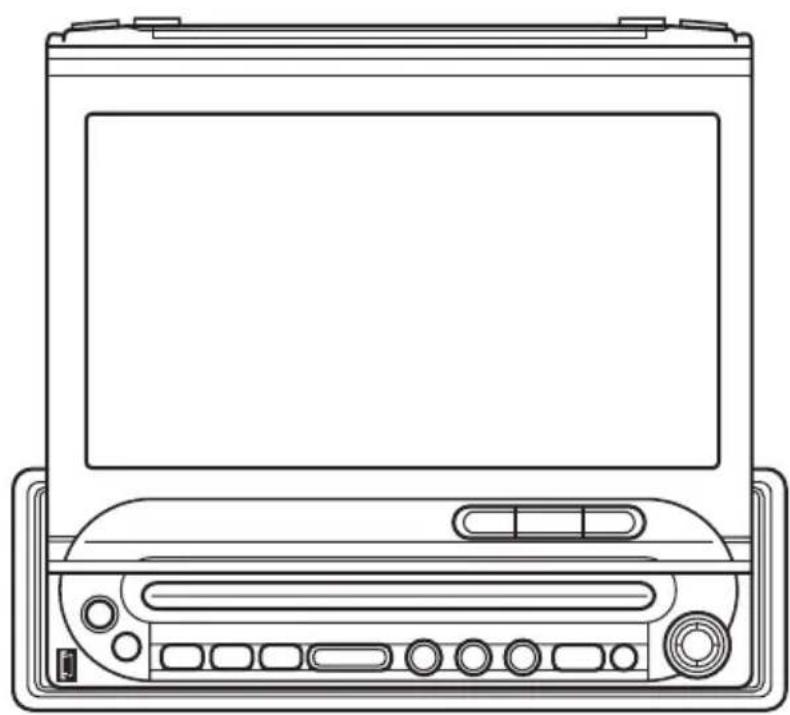
FRONT VIEW Closed Position
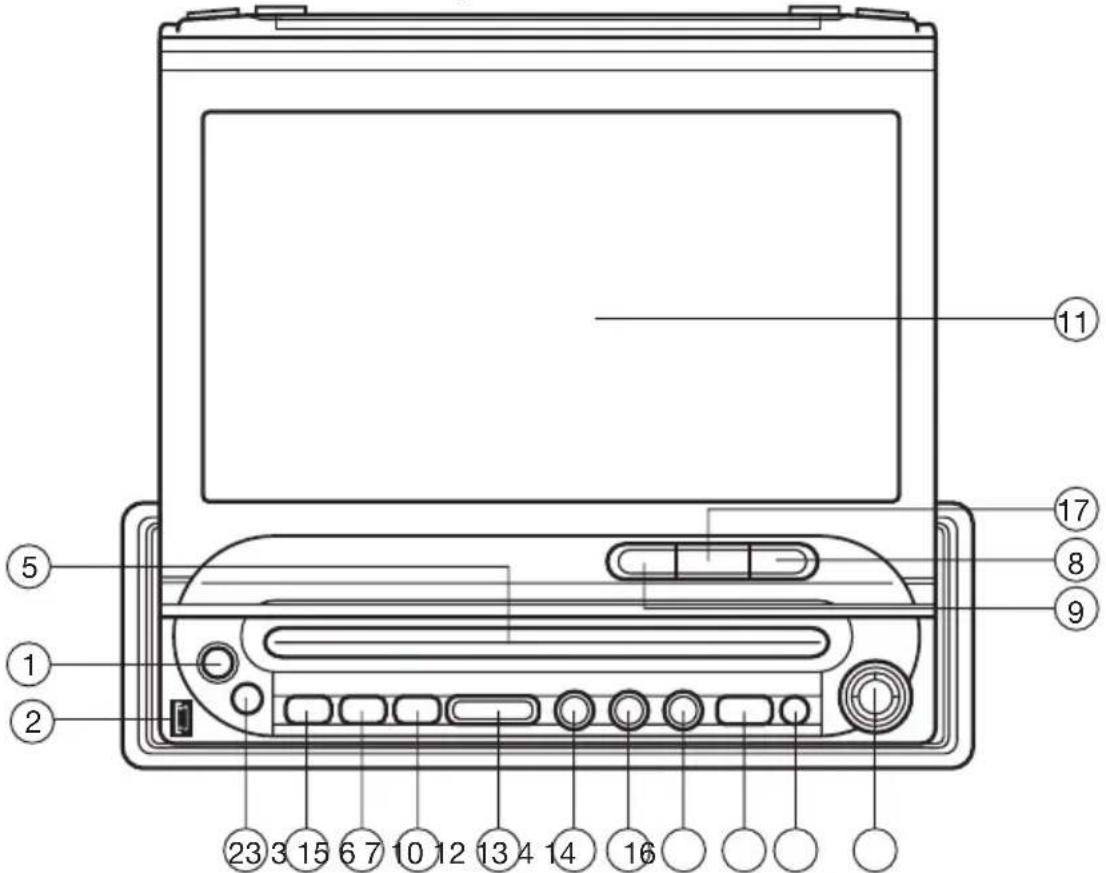
Open Position
Remove the front panel:
- (BACK) / (Hang up)
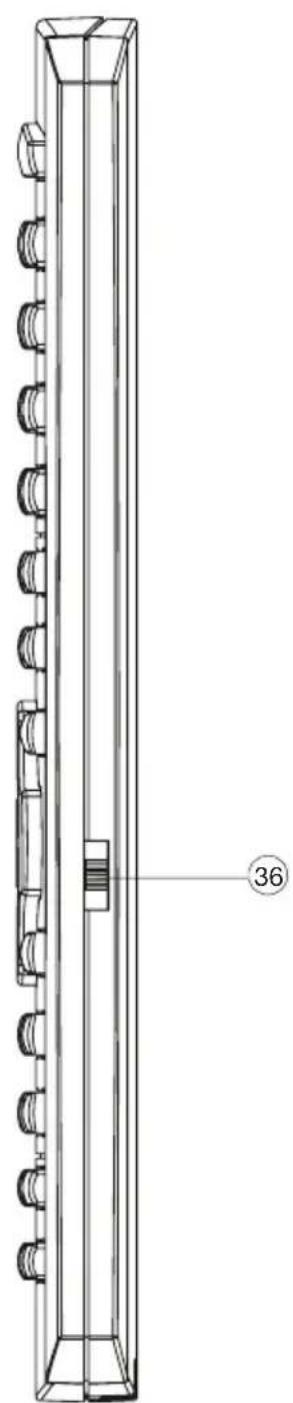
- USB INTERFACE
- (OPEN/CLOSE)
- (EJECT)
- DISC SLOT
- MODE
- VOL +/-
-
-
- II/MUT
11.7 INCH TFT TOUCH SCREEN MONITOR - S (Smart MODE)
-
(MENU)
- DSP
- ENT / (Pick up)
- SET/SRC
- TA
- AF
20.BAND - AS/PS
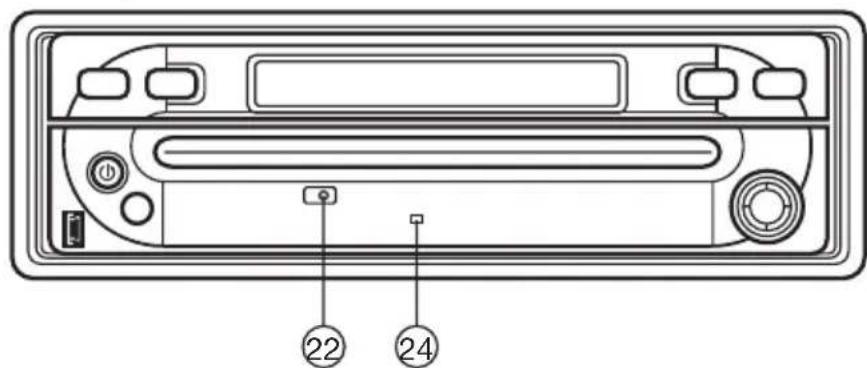
- Reset Button
- Remote Sensor
- Front Panel LED
- (Cursor Buttons), />(Pick up)
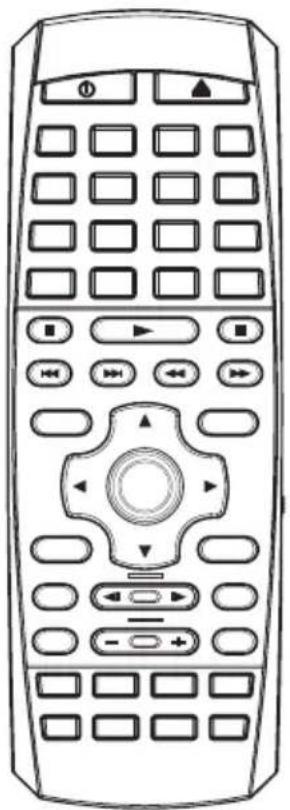
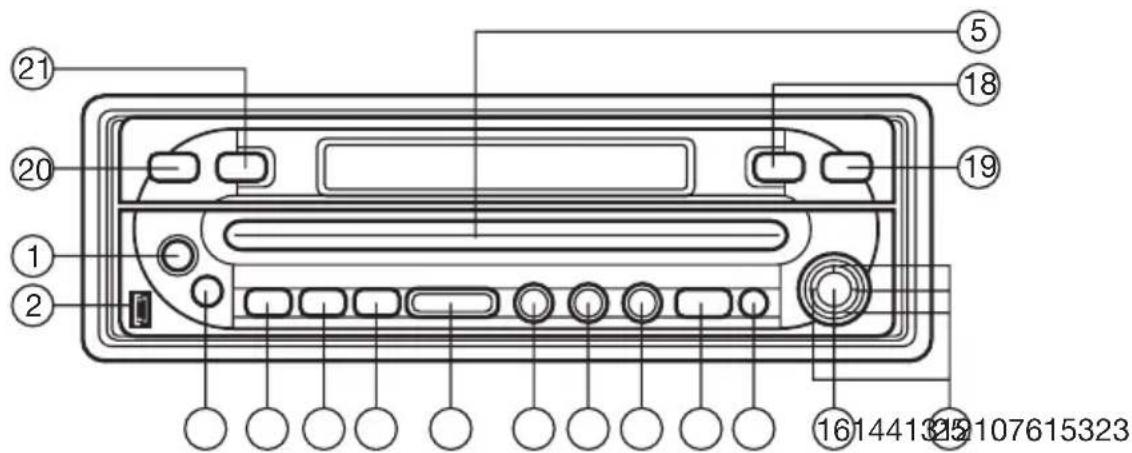
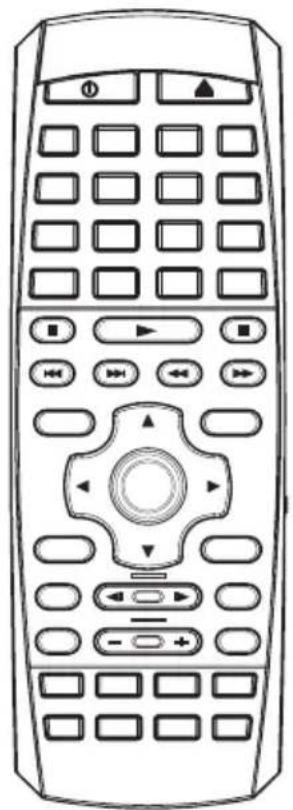
LOCATION AND FUNCTION OF KEYS
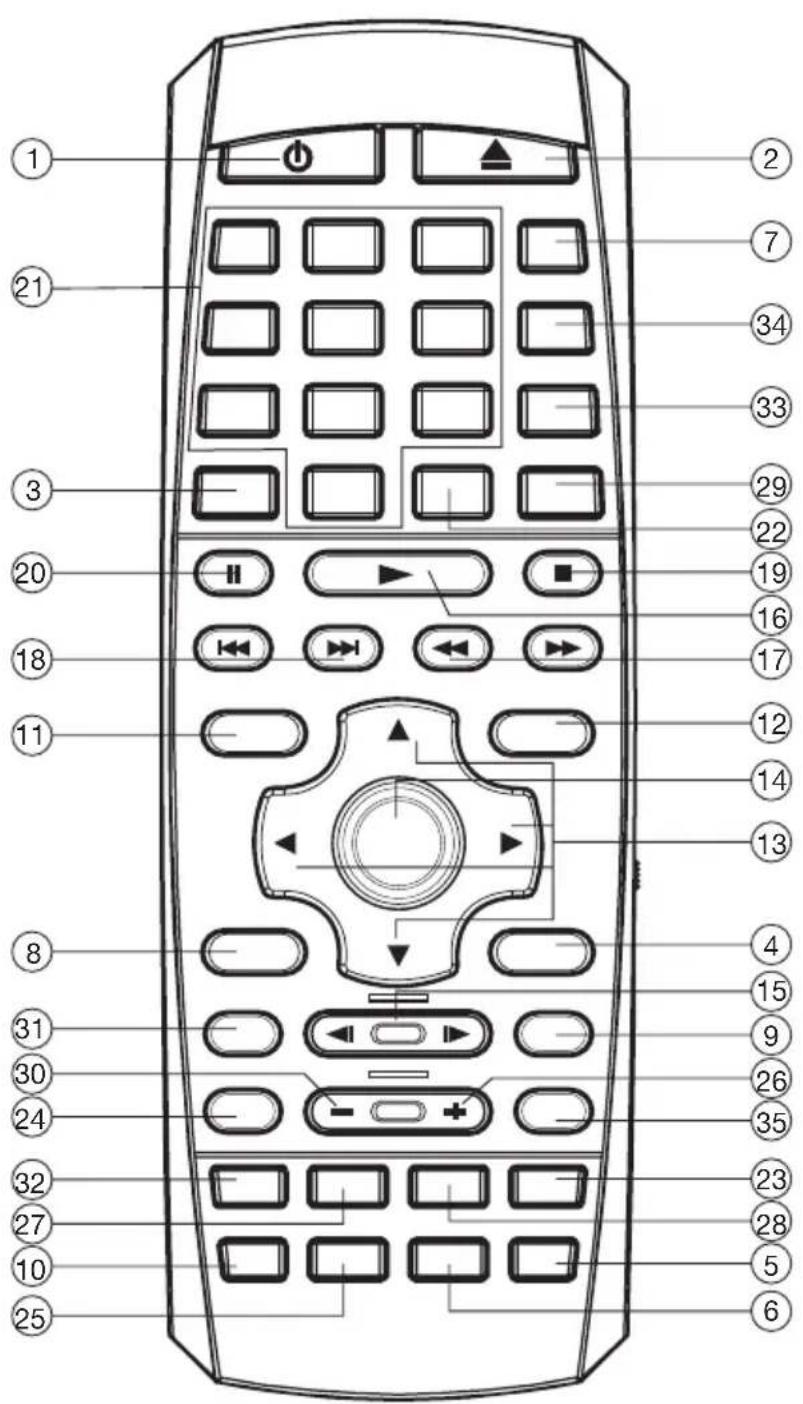
- Rthes POWER to turn the unit ON or OFF.
- Press to eject the disc.
- EQ Press it to select desired audio equalization.
- SUBT/BACK Changing of the SUBTITLE language on multi-subtitle language DVD disc. In menu operation on the screen press it to return to the previous menu.
- ANG Changing of the view angle on multi-angle DVD disc.
- DISP Display statistical disc information during playback in DVD mode.
- MODE Press to change the input source.
- SETUP Display the SETUP menu in DVD mode.
- PROG Allows the track played in the order you programmed.
- AUD Changing of the AUDIO soundtrack on multi-audio soundtrack DVD disc. Changing of the sound mode of the VCD/CD discs.
- TITLE(DSP) Display the TITLE menu that is stored in DVD disc. In other mode, press DSP to display the current mode on or off.
- MENU Display the main menu.
- / , / In case of MENU mode, / , / buttons served as cursor buttons to select item left/right, ahead/back. In FM mode, use / to choose the frequency.
- OK Confirm the Track/Chapter selected with the numeric buttons or selected with the cursor buttons on screen.
- / Changing for slow forward/reverse playback motion on DVD disc.
- Press to play the disc.
- Press to search forward rapidly & to search reverse rapidly. In FM mode, use to search the frequency.
- Press to skip to the next track & press to skip back one track. In radio mode, press to select the preset station.
- Press it to stop playback.
20.11 Press it to pause playback.
21.0-9 Numeric buttons - MO/ST In radio mode press the button to set the reception between mono mode or stereo mode.
- P/N Switch between PAL mode and NTSC mode.
- S-M Press it to enter SMART MODE function.
- ZOOM Allows the picture to be increased in size.
- VOL+ Press VOL ^+ button to increase the volume level.
- GOTO Disc search button in DVD mode, cooperatively used with numeric buttons.
- RDM (SHF) Press it to play all tracks on CD in random order.
- LOC(CLEAR) In FM mode, press it to select between local and distant stations. If you press the RESUME button, you can press CLEAR button to clear the stop point.
- VOL- Press VOL- button to decrease the volume level.
- RPT Switch the Repeat mode of discs.
- A-B A-B repeat allows a passage to be repeated continuously.
- AS/PS In radio mode, press it to activate Automatic Memory Storing/Program Scanning function.
- BAND(PBC) In radio mode, press it to select desired band.
Changing between PBC ON and PBC OFF on the VCD disc. - MUTE In radio, DVD, AV mode, press to mute the sound.
- TV/NAV-DVD- Switch it to select operation mode between DVD and AUDIO. AUDIO TV/NAV is no defining.
Preparing the Remote Control
Inserting the Batteries
- Open the battery compartment cover.
- Insert the new batteries. Make sure that the positive and negative terminals of the batteries are oriented as indicated.
-
Close the cover
-
Battery: One button cell lithium battery.
Using the Remote Control
Point the remote control towards the remote control signal receiver on the player front face.
Operation angle: About ± 30 degree in each the direction of the front of the remote sensor.
LOAD/EJECT A DISC
Loading a Disc
- Turn the ignition on to the accessory position.
- Press the button (1).
- Insert the disc with printed side facing up into the disc slot (5).
- The player will start playback automatically.
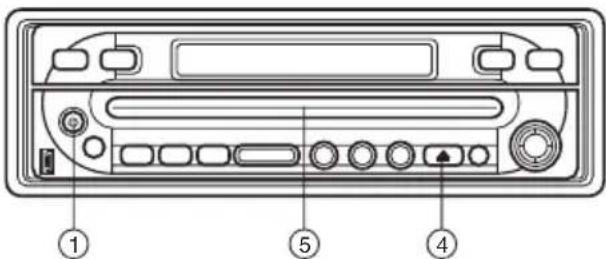
Ejecting a Disc
In any mode, press button (4) to eject the disc.
BASIC OPERATION
Turning the player on/off
Shortly press button on the front panel or on the remote control to turn the player on.
When the unit is on, press and hold button on the front panel or shortly press button on the remote control will turn the unit off.
(Note: Shortly press button on the front panel will return the previous menu.)
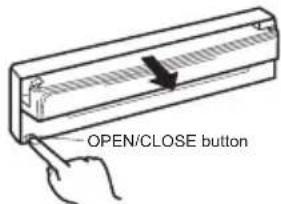
Open/Close the Monitor
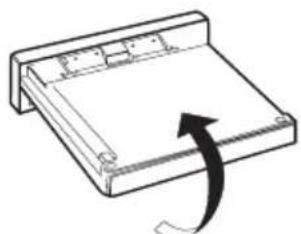
Press button on the front panel the monitor will draw out automatically.
When the monitor draws out to a certain location, it will turn upward automatically and stop at vertical position.
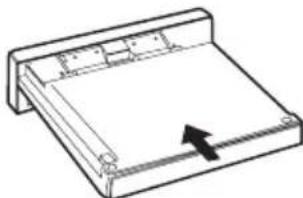
Return the monitor to the central viewing position, then press button on the front panel the monitor will turn downward automatically.

When the monitor turns downward to a certain angle, it will draw in.
Note: The panel has automatic protection function. If the panel was hit by suddenly, it would be pushed into the unit. Please wait for several seconds, the panel will slide out automatically.
Screen Adjustment (Angle/ Slide/ Picture)
1) Method A (Adjust the angle/ slide/picture):
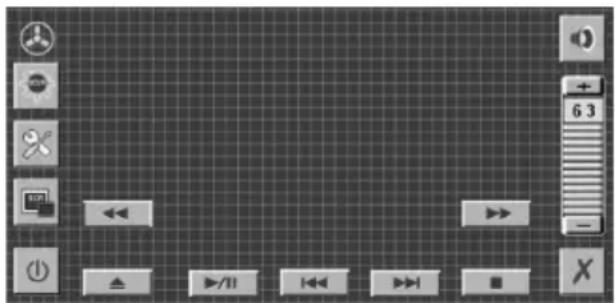
When the monitor stops moving, touch the screen you will see the following picture(for the different mode the picture has a little difference):
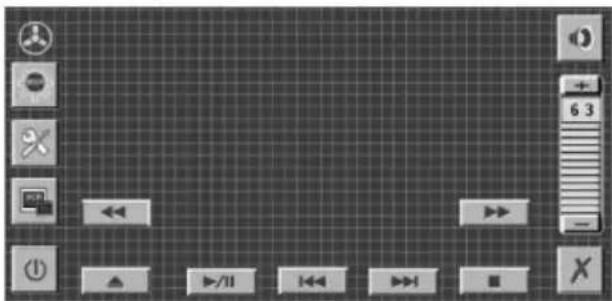
Touch the SCR icon on the screen or shortly or press SET/ SRC button on the front panel, the following picture will appear:
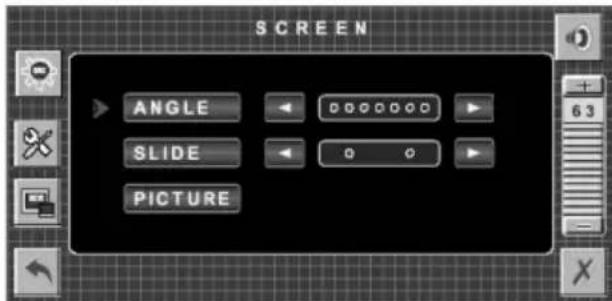
Tapicon to adjust the monitor angel upward/downward in small steps or draw the panel in/out to get a desired viewing position.
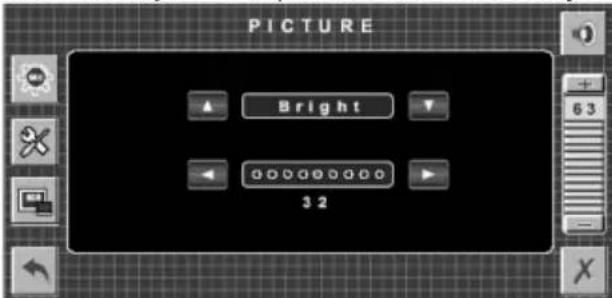
Tap the PICTURE icon on the screen, touch / to adjust the picture among Bright/contrast/Color/Tint. Or use / icon to adjust the picture continuously.
Press SET/SRC on the front panel to select Angle or Slide items. Then use +/- buttons on the front panel to turn the monitor angel upward/downward in small steps or draw the panel in/out to get a desired viewing position.
And you can rotate the monitor left and right from the central viewing position at a certain angle range manually.
Note:
- Don't rotate the monitor forcibly to avoid mechanical damage.
- When the front panel is on the outside position (Slide item select the right dot.), you can adjust the angle of the panel. Pushing the front panel into the slot, the front panel will be drawn out after several seconds.
Mode Selection
1) Tap SRC icon on the touch screen, or press and hold SET/ SRC button on the front panel for several seconds, SOURCE picture will appear:
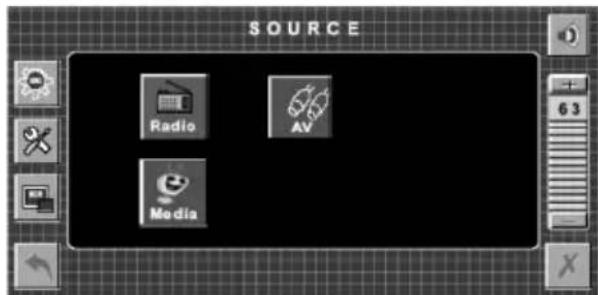
Tap the different icon on the screen to select the corresponding mode among: Radio, Media, and AV.
2) Press MODE button on the remote control to select among RADIO, MEDIA, and AV.
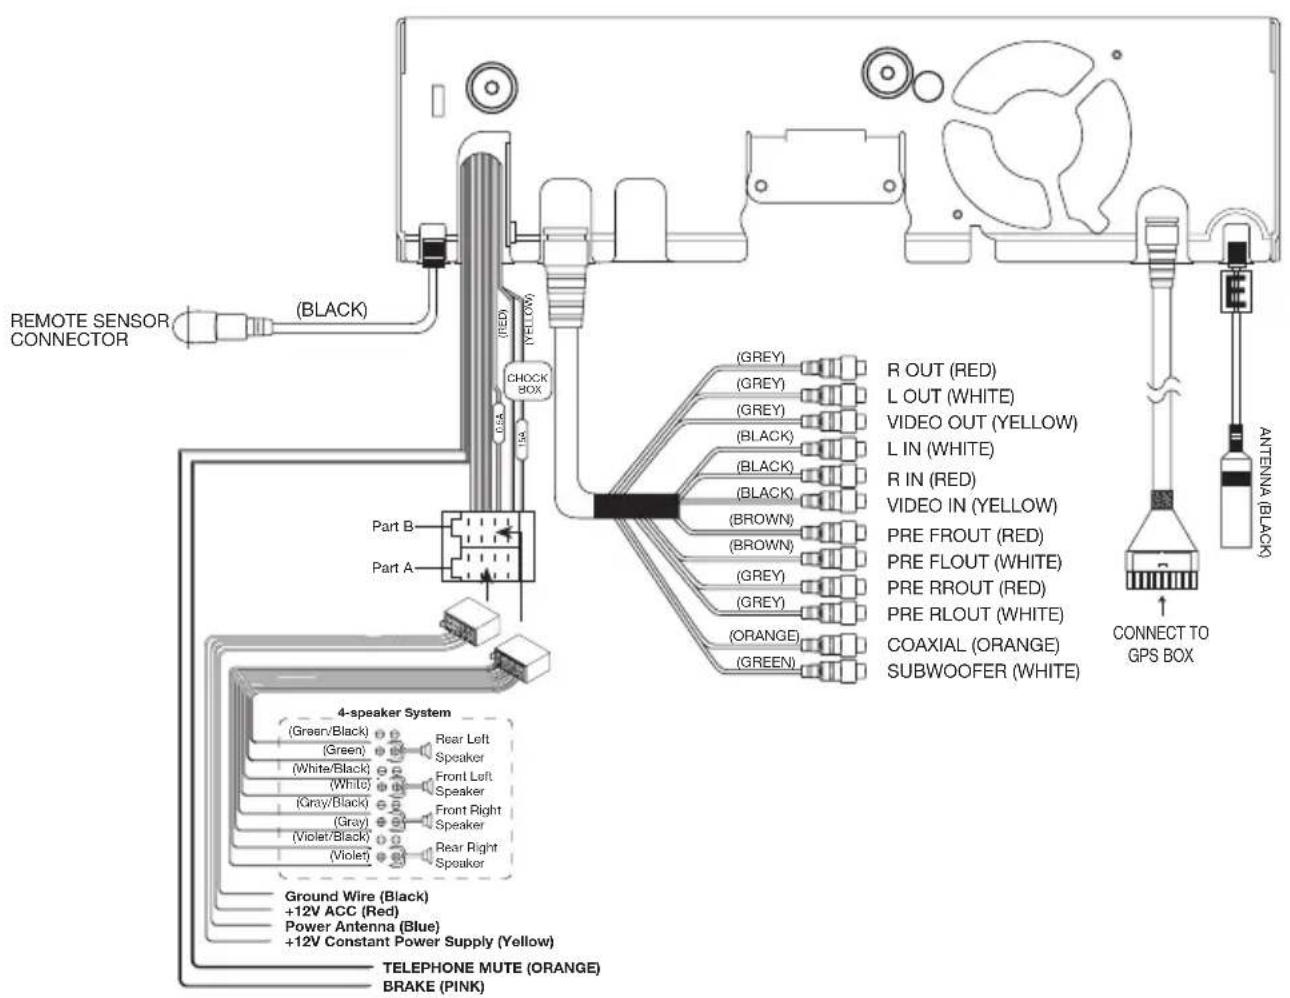
Remote Sensor
There is a remote sensor on the front panel. You can point the remote control handset to the remote sensor on the front panel and press function keys on the remote control to control the unit. The unit is also connected to an external remote receiver (See the electrical connection diagram above), and the function is the same with the remote sensor on the front panel.
7 Inch TFT Monitor Display
When the monitor stretches out, the 7 inch TFT Monitor display can show the current state of the unit.
Volume Level Adjustment
Press VOL+/- buttons on the remote control or +/- icon on the right side of the screen to increase or decrease the volume level.
Shortly press MUT on the front panel or MUTE on the remote control or tap
the icon on the right side of the screen will mute the sound. Shortly
press MUT or MUTE or tap again the sound will resume

Note: if there is no operation of the volume bar, the volume bar will disappear automatically. Tap the right place of the screen, it will appear.
Reset
Press on the front panel to release the front panel you will see the Reset button (See THE PLAYER picture above.) It must be activated with either a ballpoint pen or thin metal object. The reset button is to be activated for the following reasons:
- Initial installation of the unit when all wiring is completed.
- All the function buttons do not operate.
- Error symbol on the display.
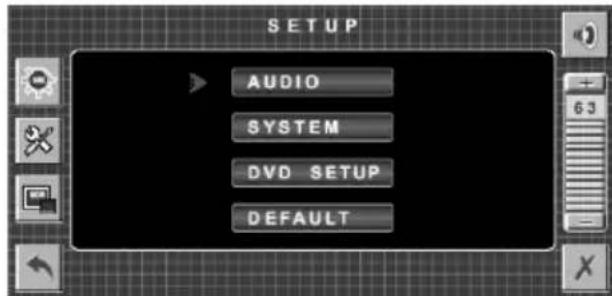
Setup
Press MENU button on the remote control or tap any place on the screen
main menu will appear. Then tap icon on the left of the screen will enter the SETUP interface like followed picture :
Note:
For all the operation on the screen, you can tap the corresponding icon on the screen or use / and OK buttons on the remote control to select and confirm.
Tap will return to the previous menu, tap to turn off the current menu.
1) AUDIO
Tap AUDIO bar to enter the AUDIO menu.
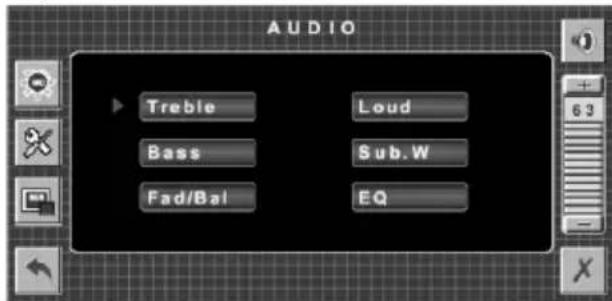
Tap the Treble, Loud, Bass, Sub.W, Fad/Bal, EQ bar to adjust the different items. (Note: when the unit has not subwoofer function, tapping Sub.W bar on the screen doesn't work.)
A: Treble Adjustment
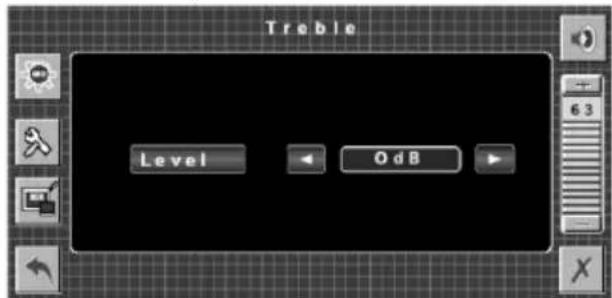
Use to adjust the treble level between -14dB~14dB.
B: Loud Selection

Use to select loud ON or OFF.
C: Bass Adjustment
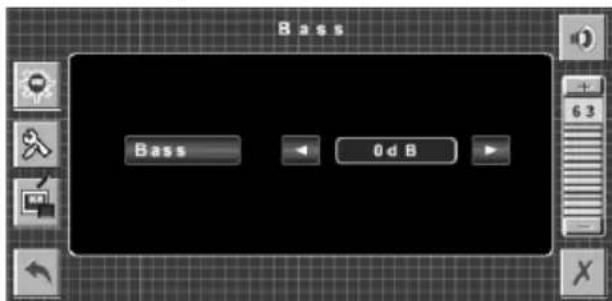
Use to adjust the bass level between -14dB~14dB.
D: Subwoofer Selection
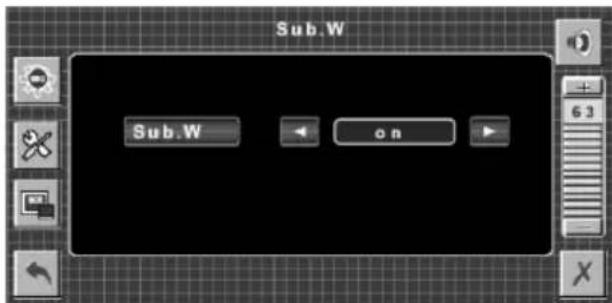
Use to select subwoofer on or off.
E: Fader/Balance Adjustment
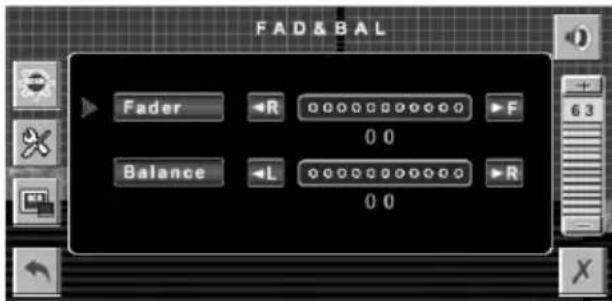
Use R to adjust the sound level of the front/rear speaker.
Use L / R to adjust sound level of the left/right speaker.
F: EQ selection
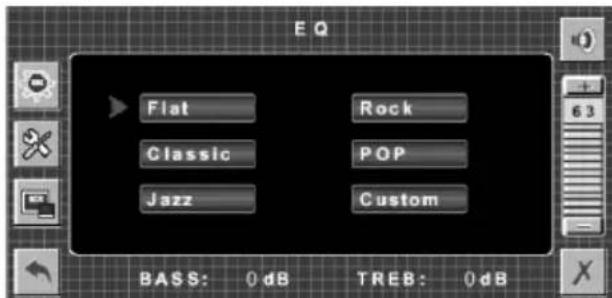
Tap the corresponding bar to select the deferent sound mode: Flat, Rock, Classic, POP, Jazz, Custom.
Note: when you select different sound mode, the corresponding value of BASS and TREBLE will be displayed on the screen.
2)SYSTEM
Tap the SYSTEM bar to enter SYSTEM menu.
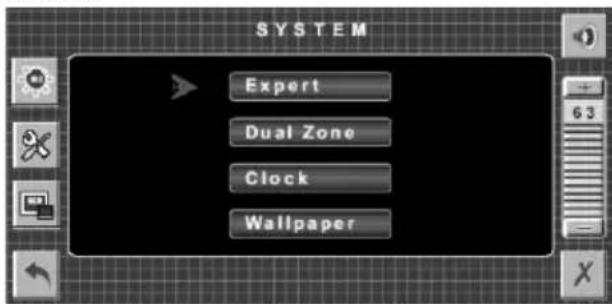
A: Expert menu
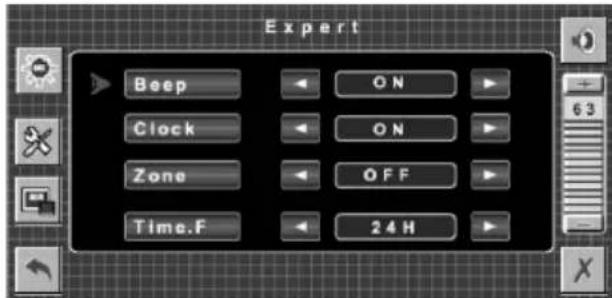
In expert menu, the following operation will be allowed:
- Use to select Beep on or off.
- Use / to turn the Clock display on or off.
Note: With the expert menu on, when select clock on, the current time will be displayed on the up right of the screen, and you can see the time is changing. When exit the expert menu the clock will be displayed on the up right of the screen.
When select clock off, the current clock will be stopped, when you exit the expert menu, the clock display will be turned off.
- Use to turn the Zone on or off. (only in radio mode, you can change Zone to ON.)
- Use / to select the mode of time between 12H/24H per day.
B: Dual Zone (Only turn the Zone on in the expert menu, can Dual Zone be operated.)

For the front zone, use to select the sound of TUNER.
For the rear zone, use to select the sound of MEDIA and AV.
C:Clock adjustment
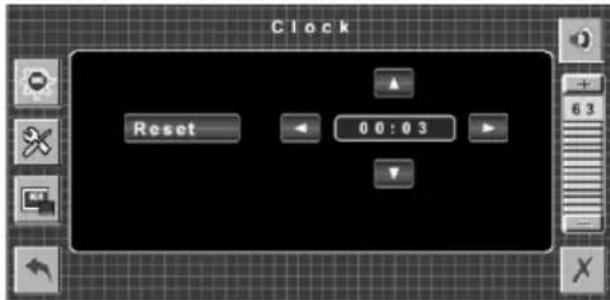
Using to select the hour and minute. Then using to change the value of the hour and minute.
Note: Tap the Reset bar on the screen will reset the time to "00:00".
D:Wallpaper selection
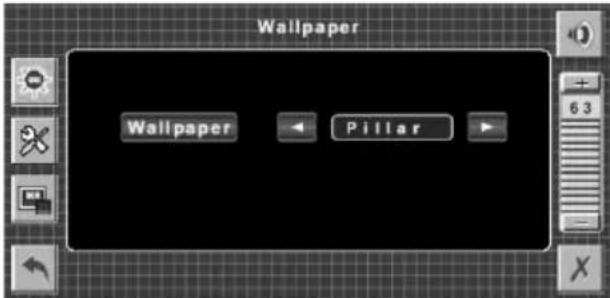
Use to select the wallpaper among: Blue, Black and Cyan.
3) DVD SETUP
Please refer to the DISC (DVD, VCD, CD, MP3) OPERATION part in this instruction manual.
4) DEFAULT
Tap the DEFAULT bar on the SETUP menu, you will be asked "Are you sure to load factory default setting?", if you want to select default setting, tap ENTER bar on the screen or press OK
button on the remote control to confirm, and "Load factory ok! " will appear on the screen.
Note (FOR THE UNIT WITH TELMUTE AND BRAKE FUNCTION)
1) When there is an incoming call, the unit will be in mute state, and "TEL MUTE" appears on the screen display.
2) If the brake wire isn't connected to the ground (when driving, in BRAKE OFF), the picture will not be shown on the screen in DVD/AV mode for safety purpose. Only the audio will be heard.
Smart Mode Operation
In any mode, shortly press S-M button on the remote control or S (Smart MODE) button on the front panel to enter Smart Mode function.(in smart mode, the two rear speakers would be muted.).
At this time the front and rear zone state is TUNER mode. And you can change the rear zone (AV-OUT) state among MEDIA, and AV.
In media mode, tap anywhere of the screen the DVD menu will be displayed on the screen:
Stopping Playback
Shortly press button on the remote control or on the screen one time to prestop the unit playback. When button on the front panel or on the screen or on the remote control is pressed, normal playback will continue.
Press button twice to stop the playback and go back to the DVD LOGO.
Pausing Play/Step Play
Pressing on the front panel or on the remote control or on the screen during playback will stop playback temporarily. To return to normal playback, press again.
If you play a DVD/VCD/SVCD, second press /II on the front panel for several seconds to stop at the next picture (step function). If you play a CD/MP3/Picture CD, second press /II on the front panel for several seconds is ineffective.
Rapid Forward/Rapid Reverse
Press on the screen or on the remote control during playback.
Each time the button is pressed, the speed of rapid forward /reverse changes according to the disc as follows.
DVD/VCD/CD/MP3:
Normal Playback


Slow Motion Playback (For DVD Only)
Press the remote control during play. Each time the button is pressed, the speed of slow forward / reverse changes according to the disc as follows.
DVD:

In slow motion state, press on the remote control to recover normal playback.
Skipping Track
Press▶buttons on the remote control or on the screen or on the front panel during playback.
Press to skip to the next track, and press skip to the previous track.
Note: For some VCD2.0 discs (PBC-playback control),▶buttons may be unavailable.
DVD Video Menu Play
When playing a DVD disc in the DVD player:
1) The disc will be played automatically and stop at menu picture.
2) Use / cursor buttons to move between the highlight bars in the menu.
3) Press OK button on the remote control to confirm the selected item.
Last Play Memory
1) During disc playback, if you hold power on the DVD unit for several seconds or press power button on the remote control to turn off the unit and then press the power button on the DVD unit again to turn on the unit, the DVD unit will resume playing from the point that just interrupted.
2) During disc playback, if you press MODE button to switch to other mode, then return to DVD mode again, the unit will resume playing from the point that just interrupted.
Repeat Play/Paragraph Repeat Play
Repeat play: when you want to repeat playing the whole disc or a track or a chapter in the disc.
1) Press RPT button repeatedly to select different repeat modes.
2) For different kinds of discs, pressing RPT button has different effects.
For DVD:

For VCD/SVCD/CD/MP3/WMA:
REP:[OFF] REP:[REP1] REP:[REPALL]
Note: REPEAT feature does not support VCD2.0 (with PBC ON).
Paragraph Repeat Play: when you want to repeating play a desired paragraph.
A-B repeat allows a passage to be repeated continuously.
1) Press A-B button first at the start of the required passage:
REPEAT A-
2) Press A-B button secondly at the end of the passage:
REPEAT A-B
3) Then the unit will repeat playing the passage you just set from A to B.
4) To revert to normal playback, press A-B button again.
A-B CANCEL
Shuffle/Random Play
Press RDM/SHF button on the remote control will play the tracks in shuffle order, and "SHUFFLE" will appear on the screen. Press this button again will exit shuffle play mode, and "SHUFFLE: [OFF]" will appear on the screen.
Note: when playing a DVD disc, this button is an invalid key.
PBC Menu Playback of VCD/SVCD
For some VCD or SVCD discs, there is a menu in order to select the desired contents. This menu is called PBC (Playback Control) menu.
Press PBC button on the remote control to change between PBC ON and PBC OFF on the disc.
In PBC ON mode, REPEAT, RANDOM, BOOKMARK, A-B, PROGRAM and GOTO functions are unavailable.
ON-SCREEN DISPLAY FUNCTION
Press the DISP button during playback to display the console information of the current disc on the screen.
For DVD:
Once you press DISP button you will see the information as the following order.
DVD TT 1/1 CH 4/28 00:07:12C
1/1ENG5.1CH3/4BBE OFF
DVD TT 1/1 CH 4/28 -00:05:15C
DVD TT 1/1 CH 4/28 00:15:55T
DVD TT 1/1 CH 4/28 -01:48:33T
1) Item: TT
Function: Display the current title number and total title number.
2) Item: CH
Function: Display the current chapter number and total chapter number.
3) Item: ①
(This icon only displayed for several seconds, after several seconds it will disappeared.)
Function: Display the played time of the current chapter.
4) C:- Display the remaining time of the current chapter.
5) T: Display the player time of time current title.
6) T-: Display the remaining time of the current title.
7) C: Display the played time of the current chapter.
8) 1 / 1 ENG5.1CH3/4RBE OFF
Display the current disc's LANGUAGE, AUDIO TYPE, SUBTITLE LANGUAGE and PLAY ANGLE.
For VCD:
CD TRK 4/16 HDCD C 00:00:08
CD TRK 4/16 HDCD C-00:03:31
CD TRK 4/16 HDCD T 00:13:21
CD TRK 4/16 HDCD T-00:58:04
The meaning of the menu is the same with the DVD menu above.
GOTO FUNCTION
FOR DVD:
Press GOTO button, the screen will display the following message:
QVD
TT
03CH
00
004
00:20:00
Use the number keys to input the desired Title, Chapter or Time, then press OK key to confirm.
FOR VCD (WITH PBC OFF)/CD:
VCD
TRK
1/1
4
PBC
01
:25:17
You can input the Track and Time then press OK key to confirm.
ZOOM FUNCTION
Allows the picture to be increased in size. Press ZOOM button on the remote control to toggle among 2 scale, 3 scale and 4 scale, 1/2 scale, 1/3 scale, 1/4 scale. When the scale is 1/4 times, press ZOOM button again to cancel the zoom function.

ZOOM2 ZOOM3 ZOOM4 ZOOM-2
Multi-subtitle Language Function
Press SUBT during playback. The following information will be shown on the screen.
: [1 CHINESE]
Each time the button is pressed, the subtitle language changes in sequential order.
Notes:
- The language number is different according to the disc.
- Some discs only contain one subtitle language.
Multi-audio Language Function
Press AUD during playback. The following information will be shown on the screen.
: [3 ENGLISH 5.1CH]
Each time the button is pressed, the audio soundtrack language changes on sequential order.
Notes:
- The language number is different according to the disc.
- Some discs only contain one soundtrack language.
Multi-angle Function
Press ANG during playback. The following information will be shown on the screen.
品
[1/4]
Each time the button is pressed, the angle changes in sequential order. Notes:
- The angle number is different according to the disc.
- The function only works for discs having scenes recorded at different angles.
Program Play
In program play mode, you can play the track in your desired sequence.
To program play a disc, please follow the next instructions.
For VCD and CD:
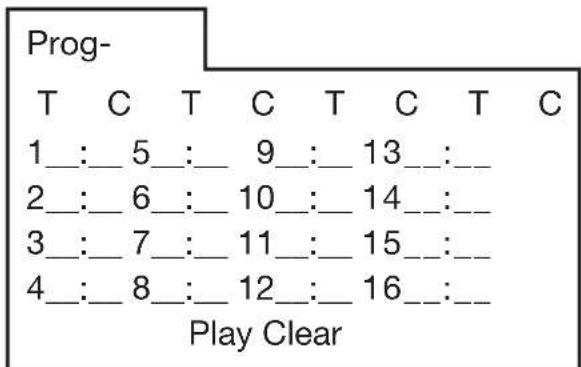
1) In PBC OFF mode. Press PROG button on the remote control to enter program edit interface.
Prog-
2) Use / or cursor buttons to select the items you want to program. The items you selected will become highlight.
3) Input the sequence number you want to program by numeric buttons (0-9) on the remote control.
4) Use cursor buttons to select PLAY character, and PROG will be highlighted, press OK button on remote control or ENT button on the front panel to confirm. And the unit will play the tracks you programmed.
5) If you want to clear the program, select CLEAR character and press OK will clear the information you have programmed.
For data disc including audio (MP3/WMA), movie(MPEG), picture (JPG) files:
The operation is the same as VCD/CD operation.
Press PROG button on the remote control the following media play window will be shown on the screen:
Note:
When playing tracks you programmed, press PROG button to enter the program interface, press PROG for second time will exit the menu and the unit will resume to normal play. When you want to return to program play, press PROG to enter program interface and select PLAY then use OK button to confirm, it will begin program play. And "PROG PLAY" will appear on the screen.
DVD SETUP
There are two method to enter the DVD SETUP menu:
Method A: In DVD mode, when the disc is playing or in stop mode, press SETUP on the remote control to enter setup menu. Method B: in SETUP menu, tap the DVD SETUP bar to enter the menu.
When the cursor is on the topside, use / buttons to move between the different pages.
-
Press button to move the cursor to the setup page below and then you can use / buttons to move between the different setup options.
-
Press button to display the choice list for each setup option and then use /▼buttons and OK button to change your selection.
1) SYSTEM SETUP
When you open the setup menu, you will see the system setup page at first, see below:
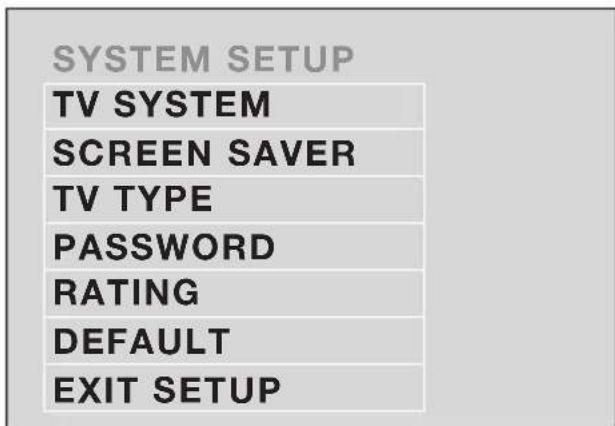
1) TV SYSTEM: Change the TV mode among NTSC, PAL and AUTO.
2) SCREEN SAVER: Change the SCREEN SAVER on or off.
3) TV TYPE: Change the TV TYPE among 4:3PS, 4:3LB and 16:9.
4) PASSWORD: Change the PASSWORD lock or unlock, the default PASSWORD is "0000".
5) RATING: Change the parental RATING among 1KID SAFE, 2G, 3PG, 4PG13, 5PG-R, 6R, 7NC-17, 8ADULT.
6) DEFAULT: Restore the system setup to the default setup.
2) LANGUAGE SETUP
- When you open the language setup menu, you will see the language setup page:
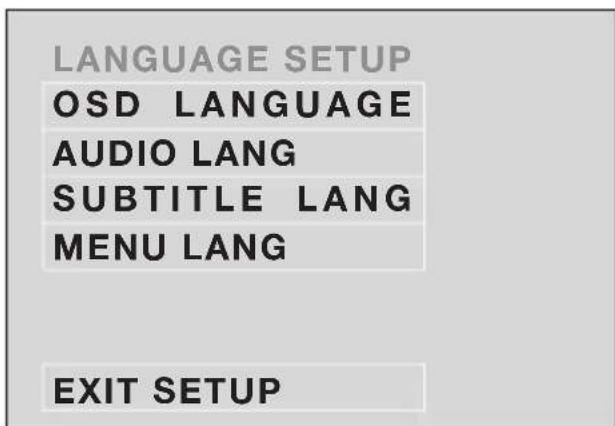
You can change the OSD LANGUAGE among: English, German, Spanish, French, Portuguese, Italian and Russian. You can change the AUDIO/ SUBTITLE/MENU language among: English, French, Spanish, German, Italian, Portuguese, Russian. And you can select audio/subtitle/menu language off.
3) AUDIO SETUP
- When you open the AUDIO menu, you will see the following picture:
AUDIO SETUP
AUDIO OUT
KEY
EXIT SETUP
1) AUDIO OUT: Change among SPDIF/OFF, SPDIF/RAW and SPDIF/PCM.
2) KEY: Change among -4, -2, 0, +2, +4.
FREQUENTLY ASKED QUESTIONS
- When inserting a DVD disc, why it can't be played, just showing "region error"? It is because that the DVD player and the discs all have the "REGION CODE". If the region number described on the DVD disc does not correspond to the region number of this DVD player, the unit cannot play the disc.
- When inserting a DVD disc, there is a window shown on the screen that requires entering 4 characters password, why?
- It is because that the current disc has "Parental Control" level, and the player's parental level is set below the level of the disc, you should enter the correct password to play the disc normally.
NOTE:
For how to set the "Parental Control" level, please refer to "SYSTEM SETUP\RATING" in the following page.
ATTACHMENT: PARENTAL CONTROL DVD discs have a parental level assigned to the disc. The range of parental controls is from 1 to 8.
The player can be set in a similar way. If the player's parental level is set to 8 it will play all discs. If the player's parental level is set below 8, only discs with a lower or equal parental level will play.
For example if the player is set to 5, only discs with parental control ratings of 5, 4, 3, 2, & 1 will play. To play a higher rated disc you must change the player's rating to a higher number.
For example, consider a disc that generally is suitable for most audiences, and is rated as level 2 for the most part. However in the middle there are also scenes rated at 5 & 7 (not suitable for children).
Alternative scenes with lower rating are included.
The player plays the highest rated scene that the parental setting allows.
A section of the disc can have several different sequences that vary in parental control level. In the above example of a disc with parental control, the player will show a different section depending on the parental control level set in the player's menu. In this way parents can control the content of films and there is no indication that any censorship has occurred.
The meaning of the levels 1 to 8 varies depending upon the country and the type of content on the disc.
The parental control levels are: Unlock
1 KID SAFE
2G
3 PG
4 PG 13
5 PG-R
6R
7 NC-17
8 ADULT
RADIO OPERATION
Switching to radio mode
Press MODE button on remote control to select radio mode or tap the Radio icon on the SOURCE menu on the screen.
In radio mode, the following information will appear on the display.
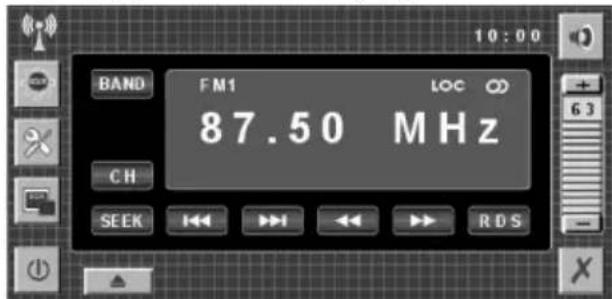
Selecting the frequency band
Press BAND on remote control or tap BAND bar on the screen to select desired band. The reception band will change in the following order:

Selecting station
During radio mode, shortly press button on the front panel or on the
remote control or tap icon on the screen to increase frequency, shortly press button on the front panel or on the remote control or tap icon on the screen to decrease frequency by one step of channel spacing. Hold the button longer for fast tuning. The frequency is updated correspondingly on display.
Press and hold / buttons on the front panel, "Manual" will appear on the screen display, you can adjust the frequency manually. If there is no operation for about 5 seconds, "Manual" will disappear. The system will exit this mode.
Setting memory
Press RADIO PRESET buttons (1~6) on remote control or press / on the front panel or on the remote control to preset stations at radio mode. With this system, a total of 24 stations (for two wave band) or 30 stations (for three wave band) can be stored in the memory of six buttons.
Each band stores up to six preset stations.
The stations might be FM1, FM2, FM3, MW band. The operation is as below:
-
Store in Memory Press and hold desired memory location button for several seconds. The current listening station will be stored into the number button.
-
Or tap "CH" character on the screen then press and hold M1~6 button bars on the screen will store the current station to the location button.
-
Retrieve a Preset Station Press any one of the RADIO PRESET buttons (1~6) on remote control to retrieve a station which had been stored in the memory in advance the chosen number is shown on display.
Automatic Memory Story & Program Scanning
- Program scanning
- Shortly press AS/PS button on remote control or on the front panel shortly tap AS/PS bar on screen to scan preset station. And it will hold at each station for about 5 seconds.
Automatic memory storing Press and hold AS/PS button on remote control or AS/PS bar on the screen for about several seconds or press AS/PS button on the front panel, the radio searches from the current frequency and checks the signal strength until one cycle search is finished. And then stations are stored into the preset number button in turn according to the strength of the stations.
When auto search is finished, it will enter into preset scan mode automatically.
Note: In FM mode press and hold 1-6 numeric buttons on the front panel or on the remote control fro about 2 seconds, will store the current station to the current numeric key position.
Mono/Stereo
Press MO/ST button on remote control to select mono or stereo mode. You can sometimes improve reception of distant stations by selecting mono operation.
Local/Distant
Press and LOC button on the remote control to select between local and distant stations.
Local setting for reception of strong Station, and a distant setting for reception of weaker stations.
When search station in LOC mode, if there is no station available, it will switch to DIS mode and search station automatically. If there is no station available too it will stop searching and return to LOC mode.
When search station in DIS mode, if there is no station available, it will stop searching in DIS mode.
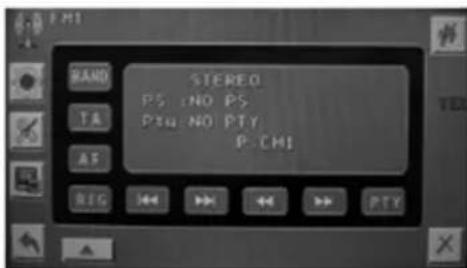
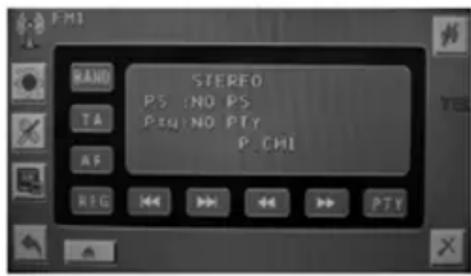
In FM mode (refer to the upper picture), tap RDS bar will enter RDS setting interface like followed:
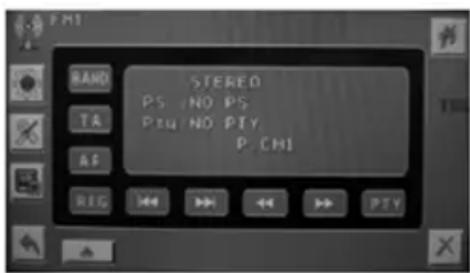
- Setting AF function
Shortly press AF button on the front panel or tap AF bar on the screen and release immediately to switch on or off AF function. In AF on mode, "AF" will flash on the screen.
- Regional Program Operation
Press and hold AF button on the front panel for several seconds or tap REG bar on the screen to switch on/off region mode. In region on mode, "REG" will be displayed on the screen. Some broadcasting stations change their program from normal broadcasting to regional broadcasting for a certain time period. When region is on, the
current listening program remains unchanged. When region is off, it allows the reception moves to the regional station.
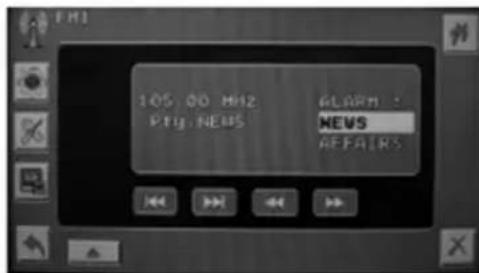
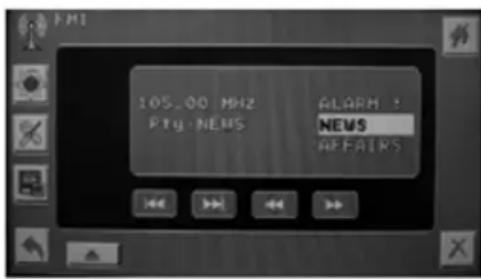
- Using PTY to Select Program
Tap PTY bar on the screen you will see the following interface:
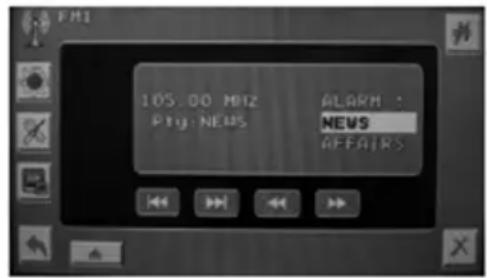
Use / on the remote control or on the front panel to select the items among:
ALARM, NEWS, AFFAIRS, INFO, SPORT, EDUCATE, DRAMA,
CULTURE, SCIENCE, VARIORED
POP M, ROCK M, EASY M, LIGHT M, CLASSICS, OTHER M,
WEATHER, FINANCE, CHILDREN, SOCIAL, RELIGION, PHONE IN, TRAVEL, LEISURE, JAZZ,
COUNTRY, NATION M,
OLDIES, FOLK M, DOCUMENT, TEST For example, if you select "CULTURE" this item, and then exit
PTY setting, the unit will search whether there is the "CULTURE"
program. If there is a culture program, the unit will change to the station automatically. If there isn't, "Pty: NO PTY" will appear on the screen.
- Listening to Traffic Announcement
TA button is operated as follows: When pressed short, it is engaging whether TA mode on or off.
In any mode, when TA mode is on and a traffic announcement is transmitted, the unit will switch temporarily to radio mode and play the traffic announcement. And when finished playing it will switch to previous state. If the volume level was under the threshold point it will be raised to the threshold point. But the user changed the volume level, which was more than the threshold point (min.
TA volume level), it will be set to the last level.
When TA mode is on, TA of individual segment is turned on.
When a TP station is received, TP of individual segment is turned on.
TA interruption function
When listening the traffic announcement, if you press the TA button, the traffic announcement will be interrupted, but the TA mode is still on. In this mode, you can press MODE button to change mode to TA mode and listen to traffic announcement. Press TA button again will stop the current traffic announcement. And the unit will return to its original station.
The RDS data used are the PI, PS, AF, TP, TA, EON and PTY data.
PI: Program Identification code Code for identifying programs
PS: Program Service Name Broadcast station name data expressed in alphanumeric characters
AF: Alternative Frequencies Frequency list of broadcasting stations transmitting the same program
TP: Traffic Program Identification Identification data for traffic information-broadcasting station
TA: Traffic Announcement Identification Identification data showing traffic information is being transmitted or not
PTY: Program Type Code Contents of programs such as news, light music, sports etc.
AV OPERATION
Switching to AV mode
There is a pair of AUDIO/VIDEO INPUT jacks on the front and back of the unit. When you connect an audio/video system through these jacks, press MODE button on the remote control or on the front panel to select AV mode.
USB PLAY OPERATION
On the front panel of the unit, there is an USB socket. An USB driver can be connected through this interface.
1) When there is no disc in the disc slot, connect an USB driver to the USB interface, and change the mode to MEDIA mode, the unit will read the files stored in the USB device automatically. When reading an USB device, if insert a disc to disc slot, the unit will read the disc automatically.
2) If there is a disc in the disc slot, connecting an USB driver to the USB interface, when changing the mode to MEDIA mode, the unit will play the disc. Press (stop) or (pause) button on the remote control or /MUT on the front panel to enter PRE-STOP, STOP or PAUSE mode, then press GOTO button to read the USB device.
- When reading the USB device, Press
■ (stop) or II(pause) button on the remote control or MUT on the front panel to enter PRE-STOP, STOP or PAUSE mode, then press GOTO button will play the disc.
-
When reading the USB device, disconnect the USB device, the unit will play the disc automatically.
-
The main unit can only support the standard USB-memory disc which is approved by Microsoft.
-
USB MP3 player is not a standard which means different brand name or different models have their own standard. So our product cannot support every MP3 player.
-
When connecting an MP3 player and there has normal battery in the player (non rechargeable battery), you should remove the battery from the MP3 player then connect it to the USB interface. Otherwise, it may cause battery burst.
-
When in USB play mode, be sure not to remove the USB driver from the USB interface.
BLUETOOTH OPERATION
Bluetooth Mode Selection
In SOURCE menu tap BT icon or press MODE button on the remote control to change the mode to Bluetooth mode. And you will see the following picture on the screen.
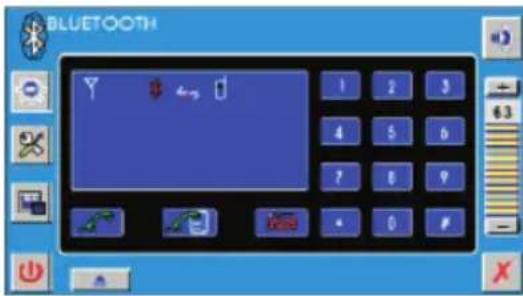
Pairing
Tap icon on the screen the following picture will appear:
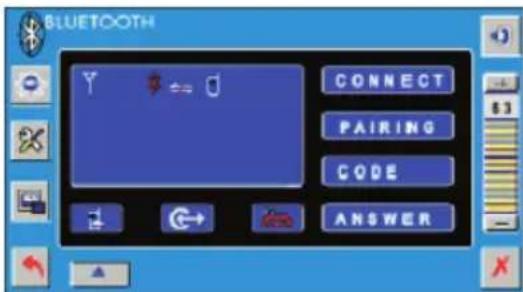
1) Tap CONNECT bar to change the mode to connect mobile. (In disconnect mode, you can not connect the unit to the phone.)
2) Tap PAIRING bar on the screen, you will see Pair allowable appearing on the screen.
3) Turn the mobile phone to Bluetooth menu, then search Bluetooth equipment and enter the pairing password (default pin is 1234) to connect Bluetooth equipment after successful search.
4) Other operation in this menu a. Tap CODE bar to check the pairing password. b. Tap ANSWER to change the answer mode between Auto Answer and Manual Answer. In auto answer mode, when a call coming the unit will answer the call automatically. In manual answer mode, when a call coming, tap to pick up the phone or to hung up
the phone.
c. Tap icon on the screen to check the information of call records. And the following picture will appear on the screen:
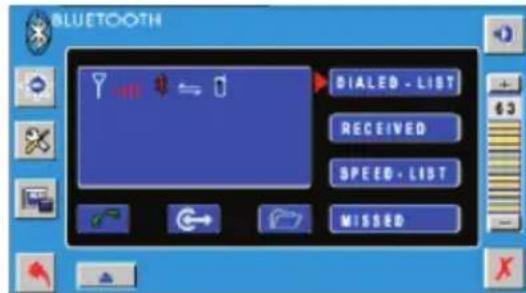
Tap DIALED-LIST bar to check dialed calls, tap RECEIVED bar to check received calls, tap SPEED-LIST bar to check the speed dial list, tap MISSED bar to check missed calls.
When you tap DIALED-LIST/ RECEIVED/ SPEED-LIST/ MISSED bar the corresponding phone number will be displayed on the screen.
Tap / to select the phone numbers up/down. And the selected number will be highlighted.
d. Tap bar will enter the following menu:
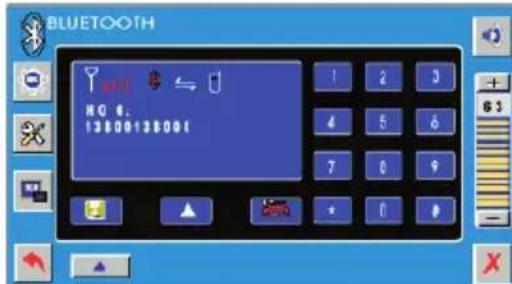
Tap 0~9 numeric bar to input the phone number you want to save, than tap
icon to save. When you input the wrong number ,tap icon to clear. Eight phone numbers can be saved
by this way. And you can tap icon to select the items.
Note: In SPEED-LIST, you can check the phone number you have saved in this menu.
Dial the Phone Number
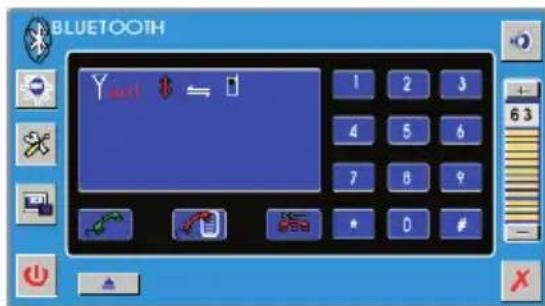
In this menu, tap the numeric icons to
input the phone number then tap to confirm.
Pick up/ Hung up a Phone Call
In auto answer mode, when a call coming the unit will answer the call automatically. In manual answer mode, when a call
coming, tap to pick up the phone. Tap to hung up the phone.
Switch the Phone Call between the Player and Phone.
Tap on the screen to switch the sound between the unit and your phone.
If it appears that your DVD unit is faulty, first consult this checklist. It may be that something simple has been overlooked.
Under no circumstances should you try to repair the player yourself, as this will invalidate the warranty. Only qualified service personnel can remove the cover or service this player.
NO POWER
- Check if the on/off button on the front of the player is set to on.
- Check if AC or DC power plug of the mains unit is properly connected.
- Check if there is power at the AC or DC outlet.
NO PICTURE
- Check if the mode it set to proper state, such as DVD mode, RADIO, TV, AV and RGB mode.
- Check the video connection.
DISTORTED PICTURE
- Check the disc for fingerprints and clean with soft cloth, wiping from centre to edge.
- Sometimes a small amount of picture distortion may appear. This is not a malfunction.
THE PICTURE IS OVER DARK, OVER BRIGHT OR HAS NO COLOR
Enter the picture setup menu (refer to the Picture mode Adjustment above) to adjust the corresponding item (BRIGHT, CONTRAST, COLOR or TINT) to proper value, then you can get an optimum picture effect.
COMPLETELY DISTORTED PICTURE
- The disc format is not according to the TV-set used (PAL/NTSC).
DISC DOES NOT PLAY
- Ensure the disc label is upwards.
Clean the disc. - Check if the disc is defective by trying another disc.
NO SOUND
- Check audio connections.
-
If using a HIFI amplifier, try another sound source.
-
Check if the volume is minimum, and adjust the VOL+ to increase the volume level.
NO RETURN TO START-UP SCREEN WHEN DISC IS REMOVED
- Press POWER to turn off the unit, then press it again to turn on the unit.
- Press Reset button on the front of the DVD unit.
THE PLAYER DOES NOT RESPOND TO THE REMOTE CONTROL
- Aim the remote control directly at the sensor on the front of the player.
- Avoid all obstacles which may interfere with the signal path.
- Inspect or replace the remote control batteries.
NO AUDIO AT DIGITAL OUTPUT
- Check the digital connections
- Check the Digital Audio menu to make sure that the digital output is correctly set.
- Check if the audio format of the selected audio language matches your receiver's capabilities.
BUTTONS DO NOT WORK
- Turn the player off and on with the power on/off button on the front of the player.
- Press Reset button on the front of the DVD unit.
Power Supply Requirements : DC12 Volts, Negative Ground
Maximum Output Power : 4 x 40 Watts
Current Drain : 15 Ampere (max.)
RADIO
FM
Frequency Coverage : 87.5 to 108 MHz
Sensitivity (S / N = 30dB):4 V
Image Rejection : > 45 dB
Stereo Separation : > 25 dB
RD PSG: < 38 dB
MW
Frequency Coverage : 522 to 1620 KHz
Sensitivity (S / N = 20dB) :36 dBu
Image Rejection : 45 dB
DVD
Signal System : Composite video 1.0Vp-p 75Ω
Discs Played : (1) DVD-VIDEO disc
5" (12 cm) single-sided, single-layer
5" (12 cm) single-sided, double-layer
(2) Compact disc (CD-DA/CD-R/CD-RW/MP3)
(3) (12 cm)VIDEO CD
Monitor Screen Size : 7.0” TFT
Resolution : 1440 x 234 dots
Note:
Specifications and design are subject to modification, without notice, due to improvements in technology.
This product incorporates copyright protection technology that is protected by method claims of certain U.S. patents and other intellectual property rights owned by Macrovision Corporation and other rights owners. Use of this copyright protection technology must be authorized by Macrovision Corporation, and is intended for home and other limited viewing uses only unless otherwise authorized by Macrovision Corporation. Reverse engineering or disassembly is prohibited.
m = 311
If at any time in the future you should need to dispose of this product please note that: Waste electrical products should not be disposed of with household waste. Please recycle where facilities exist. Check with your Local Authority or retailer for recycling advice. (Waste Electrical and Electronic Equipment Directive)
MANUEL DE L'UTILISATEUR
Système Audio/Video

REP:[OFF] REP:[REP1] REP:[REPALL]
DVD TT 1/1 CH 4/28 00:15:55T
DVD TT 1/1 CH 4/28 -01:48:33T
1) Item: TT
CD TRK 4/16 HDCD C 00:00:08
CD TRK 4/16 HDCD C-00:03:31
CD TRK 4/16 HDCD T 00:13:21
CD TRK 4/16 HDCD T -00:58:04
In FM mode (refer to the upper picture), tap RDS bar will enter RDS setting interface like followed:
- Setting AF function
Shortly press AF button on the front panel or tap AF bar on the screen and release immediately to switch on or off AF function. In AF on mode, "AF" will flash on the screen.
- Regional Program Operation
Press and hold AF button on the front panel for several seconds or tap REG bar on the screen to switch on/off region mode. In region on mode, "REG" will be displayed on the screen. Some broadcasting stations change their program from normal broadcasting to regional broadcasting for a certain time period. When region is on, the current listening program remains unchanged. When region is off, it allows the reception moves to the regional station.
- Using PTY to Select Program
Tap PTY bar on the screen you will see the following interface:
Use / on the remote control or on the front panel to select the items among:
ALARM, NEWS, AFFAIRS, INFO, SPORT, EDUCATE, DRAMA, CULTURE, SCIENCE, VARIOED, POP M, ROCK M, EASY M, LIGHT M, CLASSICS, OTHER M, WEATHER, FINANCE, CHILDREN, SOCIAL, RELIGION, PHONE IN, TRAVEL, LEISURE, JAZZ, COUNTRY, NATION M, OLDIES, FOLK M, DOCUMENT, TEST For example, if you select "CULTURE" this item, and then exit PTY setting, the unit will search whether there is the "CULTURE" program. If there is a culture program, the unit will change to the station automatically. If there isn't, "Pty: NO PTY" will appear on the screen.
- Listening to Traffic Announcement
TA button is operated as follows: When pressed short, it is engaging whether TA mode on or off.
In any mode, when TA mode is on and a traffic announcement is transmitted, the unit will switch temporarily to radio mode and play the traffic announcement. And when finished playing it will switch to previous state. If the volume level was under the threshold point it will be raised to the threshold point. But the user changed the volume level, which was more than the threshold point (min.
TA volume level), it will be set to the last level.
When TA mode is on, TA of individual segment is turned on.
When a TP station is received, TP of individual segment is turned on.
TA interruption function
When listening the traffic announcement, if you press the TA button, the traffic announcement will be interrupted, but the TA mode is still on. In this mode, you can press
MODE button to change mode to TA mode and listen to traffic announcement. Press TA button again will stop the current traffic announcement. And the unit will return to its original station.
The RDS data used are the PI, PS, AF, TP, TA, EON and PTY data.
PI: Program Identification code Code for identifying programs
PS: Program Service Name Broadcast station name data expressed in alphanumeric characters
AF: Alternative Frequencies Frequency list of broadcasting stations transmitting the same program
TP: Traffic Program Identification Identification data for traffic information-broadcasting station
TA: Traffic Announcement Identification Identification data showing traffic information is being transmitted or not
PTY: Program Type Code Contents of programs such as news, light music, sports etc.
FONCTIONNEMENT AV Basculer en mode AV
m = 311 ;
DIN FRONT-MOUNT (Methode A) DIN opening in auto
Normal Playback X2X4X8X20
REP:[OFF] REP:[REP1] REP:[REPALL]
DVD TT 1/1 CH 4/28 00:15:55T
DVD TT 1/1 CH 4/28 -01:48:33T
1) Item: TT
| CD | TRK 4/16 | HDCDex | C | 00:00:08 |
| CD | TRK 4/16 | HDCDex | C | -00:03:31 |
| CD | TRK 4/16 | HDCDex | T | 00:13:21 |
| CD | TRK 4/16 | HDCDex | T | -00:58:04 |
VOOR VCD (WITH PBC OFF)/CD:
VCD
TRK
12/14
PBC
00:25:17
Selecteer de frequently band
In FM mode (refer to the upper picture), tap RDS bar will enter RDS setting interface like followed:
- Setting AF function
-
Shortly press AF button on the front panel or tap AF bar on the screen and release immediately to switch on or off AF function. In AF on mode, "AF" will flash on the screen.
-
Regional Program Operation Press and hold AF button on the front panel for several seconds or tap REG bar on the screen to switch on/off region mode. In region on mode, "REG" will be displayed on the screen. Some broadcasting stations change their program from normal broadcasting to regional broadcasting for a certain time period. When region is on, the current listening program remains unchanged. When region is off, it allows the reception moves to the regional station.
-
Using PTY to Select Program Tap PTY bar on the screen you will see the following interface:
Use / on the remote control or / on the front panel to select the items among: ALARM, NEWS, AFFAIRS, INFO, SPORT, EDUCATE, DRAMA, CULTURE, SCIENCE, VARIOED, POP M, ROCK M, EASY M, LIGHT M, CLASSICS, OTHER M, WEATHER, FINANCE, CHILDREN, SOCIAL, RELIGION, PHONE IN, TRAVEL, LEISURE, JAZZ, COUNTRY, NATION M, OLDIES, FOLK M, DOCUMENT, TEST For example, if you select "CULTURE" this item, and then exit PTY setting, the unit will search whether there is the "CULTURE" program. If there is a culture program, the unit will change to the station automatically. If there isn't, "Pty: NO PTY" will appear on the screen.
- Listening to Traffic Announcement
TA button is operated as follows: When pressed short, it is engaging whether TA mode on or off. In any mode, when TA mode is on and a traffic announcement is transmitted, the unit will switch temporarily to radio mode and play the traffic announcement. And when finished playing it will switch to previous state. If the volume level was under the threshold point it will be raised to the threshold point. But the user changed the volume level, which was more than the threshold point (min.
TA volume level), it will be set to the last level.
When TA mode is on, TA of individual segment is turned on.
When a TP station is received, TP of individual segment is turned on.
TA interruption function
When listening the traffic
announcement, if you press the TA
button, the traffic announcement will
be interrupted, but the TA mode is still on. In this mode, you can press MODE button to change mode to TA mode and listen to traffic announcement. Press TA button again will stop the current traffic announcement. And the unit will return to its original station.
The RDS data used are the PI, PS, AF, TP, TA, EON and PTY data.
PI: Program Identification code Code for identifying programs
PS: Program Service Name Broadcast station name data expressed in alphanumeric characters
AF: Alternative Frequencies Frequency list of broadcasting stations transmitting the same program
TP: Traffic Program Identification Identification data for traffic information-broadcasting station
TA: Traffic Announcement Identification Identification data showing traffic information is being transmitted or not
PTY: Program Type Code Contents of programs such as news, light music, sports etc.
AVWERKING
OverschakelenaarAVmodus
Power Supply Requirements : DC12 Volts, Negative Ground
Maximum Output Power : 4 x 40 Watts
Current Drain : 15 Ampere (max.)
RADIO
FM
Frequency Coverage : 87.5 to 108 MHz
Sensitivity (S / N = 30dB):4 V
Image Rejection: > 45 dB
Stereo Separation: > 25 dB
RD PSG: < 38 dB
MW
Frequency Coverage : 522 to 1620 KHz
Sensitivity (S / N = 20dB) :36 dBu
Image Rejection : 45 dB
DVD
Signal System : Composite video 1.0Vp-p 75Ω
Discs Played : (1) DVD-VIDEO disc
5" (12 cm) single-sided, single-layer
5" (12 cm) single-sided, double-layer
(2) Compact disc (CD-DA/CD-R/CD-RW/MP3)
(3) (12 cm)VIDEO CD
Monitor Screen Size: 7.0" TFT
Resolution : 1440 x 234 dots
Note:
Specifications and design are subject to modification, without notice, due to improvements in technology.
This product incorporates copyright protection technology that is protected by method claims of certain U.S. patents and other intellectual property rights owned by Macrovision Corporation and other rights owners. Use of this copyright protection technology must be authorized by Macrovision Corporation, and is intended for home and other limited viewing uses only unless otherwise authorized by Macrovision Corporation. Reverse engineering or disassembly is prohibited.

- OWNER'S MANUAL Mobile Video System
- Compatible with PAL DVD (Video CD) and NTSC DVD (Video CD)
- USE THIS PRODUCT SAFELY
- When Driving
- When Car Washing
- When Parked
- Use the Proper Power Supply
- Protect the Disc Mechanism
- Use Authorized Service Centers
- For Installation
- Protect the Monitor Mechanism
- CAUTION:
- WARNING:
- Region Management Information
- Disc formats supported by this player
- Handling and Cleaning
- Disc Cleaning
- Note:
- Preparing New Discs with Rough Spots
- Notes:
- DIN FRONT/REAR-MOUNT
- DIN FRONT-MOUNT (Method A) Installation Opening
- Installing the unit
- Removing the unit
- DIN REAR-MOUNT (Method B)
- FRONT VIEW Closed Position
- LOCATION AND FUNCTION OF KEYS
- Preparing the Remote Control
- Inserting the Batteries
- Using the Remote Control
- LOAD/EJECT A DISC
- Loading a Disc
- Ejecting a Disc
- BASIC OPERATION
- Turning the player on/off
- Open/Close the Monitor
- Screen Adjustment (Angle/ Slide/ Picture)
- Mode Selection
- Remote Sensor
- Inch TFT Monitor Display
- Volume Level Adjustment
- Reset
- Setup
- 1) AUDIO
- 2)SYSTEM
- A: Expert menu
- C:Clock adjustment
- 3) DVD SETUP
- 4) DEFAULT
- Note (FOR THE UNIT WITH TELMUTE AND BRAKE FUNCTION)
- Smart Mode Operation
- Stopping Playback
- Pausing Play/Step Play
- Rapid Forward/Rapid Reverse
- Slow Motion Playback (For DVD Only)
- Skipping Track
- DVD Video Menu Play
- Last Play Memory
- Repeat Play/Paragraph Repeat Play
- Repeat play: when you want to repeat playing the whole disc or a track or a chapter in the disc.
- REPEAT A-
- REPEAT A-B
- A-B CANCEL
- Shuffle/Random Play
- PBC Menu Playback of VCD/SVCD
- ON-SCREEN DISPLAY FUNCTION
- For DVD:
- For VCD:
- GOTO FUNCTION
- ZOOM FUNCTION
- Multi-subtitle Language Function
- Multi-audio Language Function
- Multi-angle Function
- For VCD and CD:
- For data disc including audio (MP3/WMA), movie(MPEG), picture (JPG) files:
- DVD SETUP
- There are two method to enter the DVD SETUP menu:
- 1) SYSTEM SETUP
- 2) LANGUAGE SETUP
- 3) AUDIO SETUP
- FREQUENTLY ASKED QUESTIONS
- RADIO OPERATION
- Switching to radio mode
- Selecting the frequency band
- Selecting station
- Setting memory
- Automatic Memory Story & Program Scanning
- Mono/Stereo
- Local/Distant
- AV OPERATION
- Switching to AV mode
- USB PLAY OPERATION
- BLUETOOTH OPERATION
- Bluetooth Mode Selection
- Pairing
- Dial the Phone Number
- Pick up/ Hung up a Phone Call
- Switch the Phone Call between the Player and Phone.
- NO POWER
- NO PICTURE
- DISTORTED PICTURE
- THE PICTURE IS OVER DARK, OVER BRIGHT OR HAS NO COLOR
- COMPLETELY DISTORTED PICTURE
- DISC DOES NOT PLAY
- NO SOUND
- NO RETURN TO START-UP SCREEN WHEN DISC IS REMOVED
- THE PLAYER DOES NOT RESPOND TO THE REMOTE CONTROL
- NO AUDIO AT DIGITAL OUTPUT
- BUTTONS DO NOT WORK
- RADIO
- FM
- MW
- DVD
- MANUEL DE L'UTILISATEUR
- Système Audio/Video
- FONCTIONNEMENT AV Basculer en mode AV
- DIN FRONT-MOUNT (Methode A) DIN opening in auto
- AVWERKING
- OverschakelenaarAVmodus
Brand : Marquant
Model : MCR1302
Category : DVD player