
Start 1304 - Sewing machine SINGER - Free user manual and instructions
Find the device manual for free Start 1304 SINGER in PDF.

| Brand | Singer |
| Model | Start 1304 |
| Product type | Domestic sewing machine |
| Use | Domestic use |
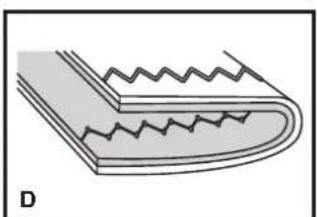
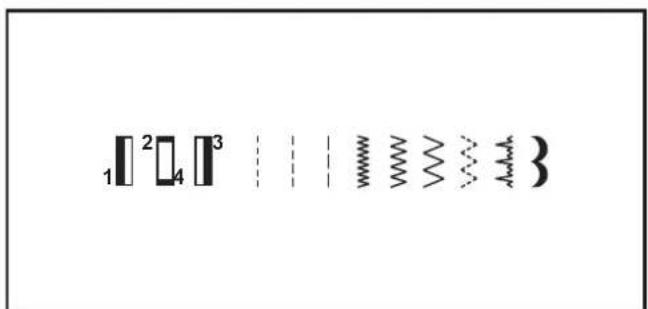
| Stitch types | Straight stitch, zigzag stitch, 4-step buttonhole, blind hem, stretch stitch, lock stitch |
| Buttonhole | Automatic 4-step |
| Stitch length | Adjustable (not specified, estimated max 4 mm) |
| Stitch width (zigzag) | Adjustable (not specified, estimated max 5 mm) |
| Sewing speed | Variable by pedal, no exact value (estimated 600 stitches/min) |
| Power supply | 220-240 V, 50/60 Hz (polarized plug) |
| Power | 60 W (estimated) |
| Lighting | Built-in LED (to be replaced by professional if damaged) |
| Dimensions (approx) | 38 x 18 x 30 cm (estimated) |
| Weight (approx) | 6 kg (estimated) |
| Removable arm | Yes, with storage for accessories |
| Included accessories | Multi-purpose foot, zipper foot, buttonhole foot, darning plate, screwdriver, brush/seam ripper, bobbin felt pads (x2), needle set (x3), bobbins (x3) |
| Safety | Double insulation, automatic stop, pedal with protection |
| Maintenance | Regular cleaning of feed dogs and hook, oiling (1-2 drops), needle check |
| Compatible pedal | KD-1902, FC-1902 (110-120V) / KD-2902, FC-2902A, FC-2902D (220-240V) / WAKARB (110-125V) / 4C-326G (230V) |
| Noise level | Less than 75 dB(A) |
Frequently Asked Questions - Start 1304 SINGER
User questions about Start 1304 SINGER
0 question about this device. Answer the ones you know or ask your own.
Ask a new question about this device
Download the instructions for your Sewing machine in PDF format for free! Find your manual Start 1304 - SINGER and take your electronic device back in hand. On this page are published all the documents necessary for the use of your device. Start 1304 by SINGER.
USER MANUAL Start 1304 SINGER
This household sewing machine is designed to comply with IEC/EN 60335-2-28 and UL1594.
IMPORTANT SAFETY INSTRUCTIONS
When using an electrical appliance, basic safety precautions should always be followed, including the following:
Read all instructions before using this household sewing machine. Keep the instructions in a suitable place close to the machine. Make sure to hand them over if the machine is given to a third party.
DANGER - To reduce the risk of electric shock :
- A sewing machine should never be left unattended when plugged in. Always unplug this sewing machine from the electric outlet immediately after using and before cleaning, removing covers, lubricating or when making any other user servicing adjustments mentioned in the instruction manual.
WARNING - To reduce the risk of burns, fire, electric shock, or injury to person :
- Do not allow to be used as a toy. Close attention is necessary when this sewing machine is used by or near children.
- Use this sewing machine only for its intended use as described in this manual. Use only attachments recommended by the manufacturer as contained in this manual.
- Never operate this sewing machine if it has a damaged cord or plug, if it is not working properly.
if it has been dropped or damaged, or dropped into water. Return the sewing machine to the nearest authorized dealer or service center for examination, repair, electrical or mechanical adjustment.
- Never operate the sewing machine with any air openings blocked. Keep ventilation openings of the sewing machine and foot control free from the accumulation of lint, dust, and loose cloth.
- Keep fingers away from all moving parts. Special care is required around the sewing machine needle.
- Always use the proper needle plate. The wrong plate can cause the needle to break.
- Do not use bent needles.
- Do not pull or push fabric while stitching. It may deflect the needle causing it to break.
- Wear safety glasses.
- Switch the sewing machine off ("O") when making any adjustment in the needle area, such as threading needle, changing needle, threading bobbin, or changing presser foot, etc.
- Never drop or insert any object into any opening.
- Do not use outdoors.
- Do not operate where aerosol (spray) products are being used or where oxygen is being administrated.
- To disconnect, turn all controls to the off ("O") position, then remove plug from outlet.
- Do not unplug by pulling on cord. To unplug, grasp the plug, not the cord.
- The foot control is used to operate the machine. Avoid placing other objects on the foot control.
- Do not use the machine if it is wet.
- If the LED lamp is damaged or broken, it must be replaced by the manufacturer or its service agent or a similarly qualified person, in order to avoid a hazard.
-
If the supply cord connected with the foot control is damaged, it must be replaced by the manufacturer or its service agent or a similarly qualified person, in order to avoid a hazard.
-
This sewing machine is provided with double insulation. Use only identical replacement parts. See instructions for Servicing of Double-Insulated Appliances.
SAVE THESE INSTRUCTIONS
For Europe only :
This appliance can be used by children aged from 8 years and above and persons with reduced physical, sensory or mental capabilities or lack of experience and knowledge if they have been given supervision or instruction concerning use of the appliance in a safe way and understand the hazards involved. Children shall not play with the appliance. Cleaning and user maintenance shall not be made by children without supervision.
The noise level under normal operating conditions is less than 75dB(A).
The machine must only be used with foot control of type KD-1902, FC-1902 (110-120V area)/
KD-2902, FC-2902A, FC-2902D (220-240V area) manufactured by ZHEJIANG FOUNDER MOTOR CORPORATION LTD. (China)/ 4C-316B (110-125V area)/ 4C-326G (230V area)
manufactured by Wakaho Electric Ind. Co., Ltd. (Vietnam)
For outside Europe :
This sewing machine is not intended for use by persons (including children) with reduced physical, sensory or mental capabilities, or lack of experience and knowledge, unless they have been given supervision or instruction concerning use of the sewing machine by a person responsible for their safety. Children should be supervised to ensure that they do not play with the sewing machine.
The noise level under normal operating conditions is less than 75dB(A).
The machine must only be used with foot control of type KD-1902, FC-1902 (110-120V area)/KD-2902, FC-2902A, FC-2902D (220-240V area) manufactured by ZHEJIANG FOUNDER MOTOR CORPORATION LTD. (China)/ 4C-316B (110-125V area)/ 4C-326G (230V area) manufactured by Wakaho Electric Ind. Co., Ltd. (Vietnam)
SERVICING OF DOUBLE INSULATED PRODUCTS
In a double-insulated product, two systems of insulation are provided instead of grounding. No ground means is provided on a double-insulated product, nor should a means for grounding be added to the product. Servicing of a double-insulated product requires extreme care and knowledge of the system and should be done only by qualified service personnel. Replacement parts for a double-insulated product must be identical to those parts in the product. A double-insulated product is marked with the words "DOUBLE INSULATION" or "DOUBLE INSULATED".
AR
aolai aale calej
: auiuui iuiuui euii uuiui uuiui uuiui uuiui uuiui
a 1
aayyssll aannn lalaa y
y 1
y
.220-240V) 15 (110-120V) 10 Jnssnnn nn nnnnnnnnnnnnnnnnnnnnnnnnnnnnnnnnnnnnnnnnnnnnnnnnnnnnnnnnnnnnnnnnnnnnnnnnnnnnnnnnnnnnnnnnnnnnnnnnnnnnnnnnnnnnnnnnnnnnnnnnn
Jalal jj Jn Jn Jn Jn Jn Jn Jn Jn Jn Jn Jn Jn Jn
Jgall 1a jyia la yaa aal 1yaaayyaiyaaaiyaiyaiyaiyaiyaiyaiyaiyaiyaiyaiyaiyaiyaiyaiyaiyaiyaiyaiyaiyaiyaiyaiyaiyaiyaiyaiyaiyaiyaiyaiyaiyaiyaiyaiyaiyaiyaiyaiyaiyaiyaiyaiyaiyaiyaiyaiyaiyaiyai
aal 1 aal 1 1 1 1 1 1 1 1 1 1 1 1 1 1 1 1 1 1 1 1
y
y 4
Aalal 5y jy yj yj yj yj yj yj yj yj yj yj yj yj yj
5y 6y y 8y 8y 8y 8y 8y 8y 8y 8y 8y 8y 8y
a 8
aallll lllllllllllllllllllllllllllllllllllllllllllllllllllllllllllllllllllllllllllllllllllllllllllllllll
Jaiy jiy jiy jiy jiy jiy jiy jiy jiy jiy jiy jiy jiy jiy jiy jiy jiy jiy jiy jiy jiy jiy jiy jiy jiy jiy jiy jiy jiy jiy jiy jiy jiy jiy jiy jiy jiy jiy jiy jiy jiy jiy jiy jiy jiy jiy jiy jiy jiy jiy jiy j iy
a 11
111 12
y 13
aannl 1slln aaiy dai yaiy aaiy aaiy aaiy aaiy aaiy aaiy aaiy aaiy aaiy aaiy aaiy aaiy aaiy aaiy aaiy aaiy aaiy aaiy aaiy aaiy aaiy aaiy aaiy aaiy aaiy aaiy aaiy aaiy aaiy aaiy aaiy aaiy aaiy aal
aai jn 10000000000000000000000000000000000000000000
Aiklallyllppln 21
Cayill
Lai jiall Jia xu li yu li
F INSTRUCTIONS IMPORTANTES DE SECURITÉ
As the owner of a new SINGER sewing machine, you are about to begin an exciting adventure in creativity. From the moment you first use your machine, you will know you are sewing on one of the easiest to use sewing machines ever made.
May we recommend that, before you start to use your sewing machine, you discover the many features and the ease of operation by going through this instruction book, step by step, seated at your machine.
To ensure that you are always provided with the most modern sewing capabilities, the manufacturer reserves the right to change the appearance, design or accessories of this sewing machine when considered necessary.
Singer and Start are exclusive trademarks of The Singer Company Limited S.à.r.l. or its Affiliates. ©2015 The Singer Company Limited S.à.r.l. or its Affiliates. All rights reserved.
AR
#
glll 1, 1e Cll 1s yjy jy Sla dllus gill 11 1ablln jg 11 1g 10 10 10 10 10 10 10 10 10 10 10 10 10 10 10 10 10 10 10 10 10 10
suiydiSuaaiai jil Ja 10j yia g aaiyai iayg, aiiinai ci jlln 10ai jiu cui 10jia 10jia
abysall calsal 2jla lal d jssll
clj gssl jpaai iSs yjy jgai ai ciail all ic sll all
Principle Parts of the Machine 2/4
Connecting Machine to Power Source 6
Two Step Presser Foot Lifter. 8
Accessories 9
Threading the Machine
Winding the Bobbin 11
Inserting the Bobbin 13
Threading the Upper Thread 15
Raising the Bobbin Thread 17
Thread Tension 19
Sewing
How to Choose Your Pattern 21
Sewing Straight Stitch 23
Reverse Sewing/ Removing the. Work./Cutting the. Thread 25
Blind Hem 27
1. Sew 4-step Buttonholes 29
Sewing on Buttons 31
Zippers and piping 33
Free Motion Darning, Stippling 35
General Information
Installing the Removable Extension Table 37
Attaching the Presser Foot Shank 39
Needle/Fabric/ThreadChart. 41
Darning Plate. 44
Maintenance and Troubleshooting
Inserting & Changing Needle 46
Maintenance. 48
Troubleshooting Guide 50
AR
Ciy gaiy
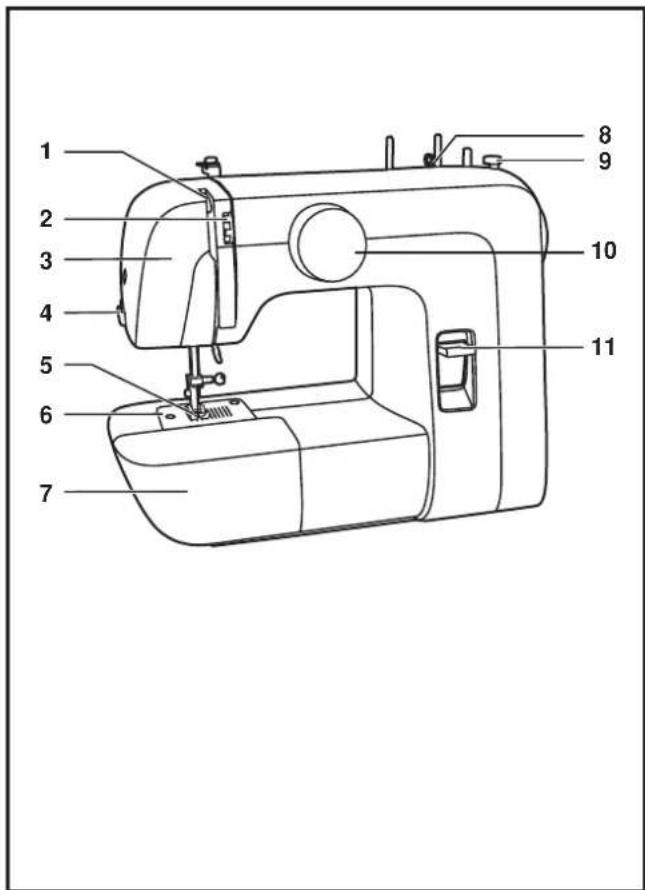
EN Principal Parts of the Machine
- Thread take-up lever
- Thread tension dial
- Face plate
- Thread cutter
- Presser foot
- Needle plate
- Removable extension table/ accessory box
- Thread guide
- Bobbin winder stopper
- Pattern selector dial
- Reverse sewing lever
AR
aill aayjll jz
1
j.2
4.4.1.4.3
- 4
Abel wall 5.5
.6
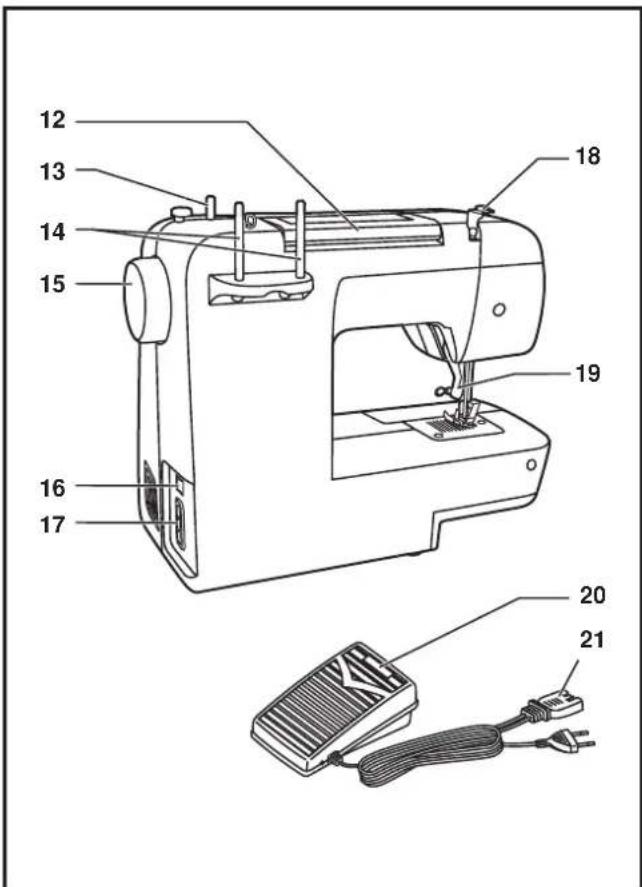
EN Principal Parts of the Machine
- Handle
- Bobbin winder spindle
- Spool pins
- Handwheel
- Power switch
- Main plug socket
- Bobbin thread guide
- Presser foot lifter
- Foot control
- Power cord
AR
4.511 4.511
Aiswll 2.12
- 13
1.1 S11 Jala.14
.15
Jusall,egull 1.16
.17
18
Abelall pail gJ.19
aessss 20
.21
F
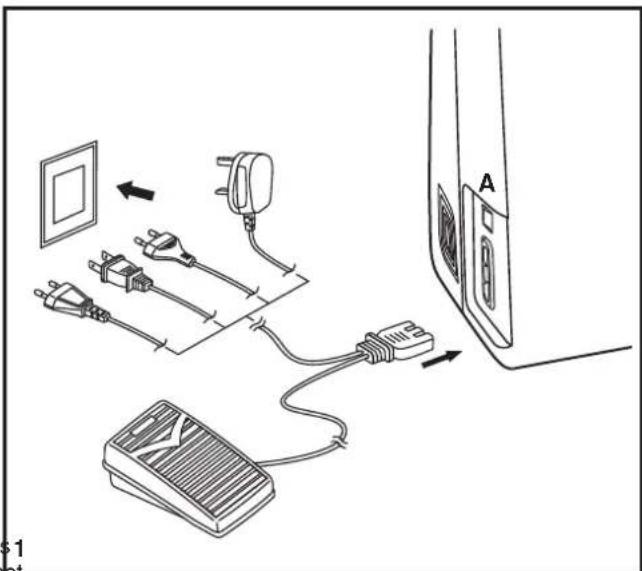
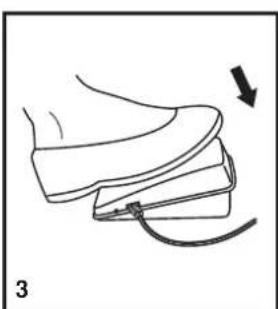
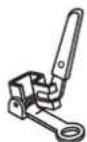
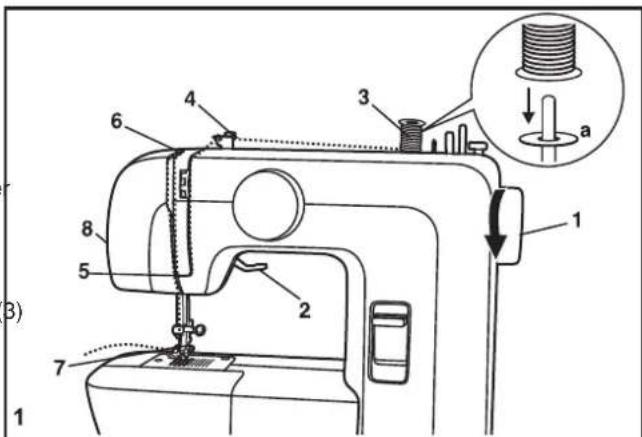
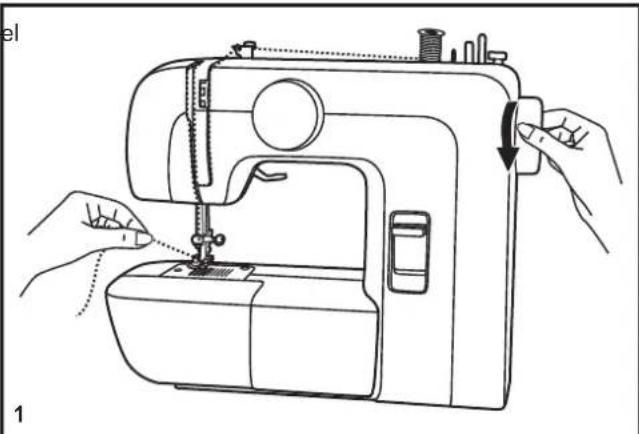
Connecting Machine to Power Source
Connect the machine to a power source as illustrated. (1) This appliance is equipped with a polarized plug which must be used with the appropriate polarized outlet. (2)
Attention:
Unplug power cord when machine is not in use.
Foot control
The foot control pedal regulates the sewing speed. (3)
Attention:
Consult a qualified electrician if in doubt of how to connect machine to power source. Unplug power cord when machine is not in use.
Sewing light
Press main switch (A) to "I" for power and light.
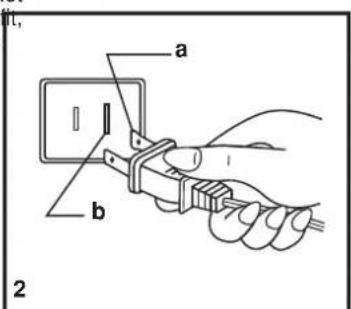
IMPORTANT NOTICE
For appliance with a polarized plug (one blade is wider than the other). To reduce the risk of electric shock, this plug intended to fit in a polarized outlet only one way. If it does fit fully in the outlet, reverse the plug. If it still does not contact a qualified electrician to install the proper outlet. Do not modify the plug in any way.
a. Polarized attachment plug
b. Conductor intended to be grounded
AR
y
Jll (1) 5y y 4y Sly aySall Jy. (2)
:olil
(3)abysall aouo
y 1
gial
ylll lll jbln (j11 n wcy c) 141 sll a
Lal cyll abai ydl p11 bai dol oal n e lyssll abai gwlil
aill
J 1000000000000000000000000000000000000000000
:
F
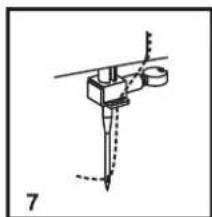
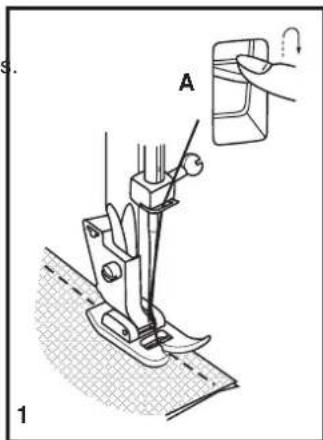
When sewing several layers or thick fabrics, the presser foot can be raised for a high speed setting of the work (A).
AR
aie aiee eae ee eae eae eae eae eae eae eae eae eae eae eae eae eae eae eae eae eae eae eae eae eae eae eae eae eae eae eae eae eae eae eae eae eae eae eae eae eae eae eae eae eae eae eae eae eae eae eae eae eae eae eee
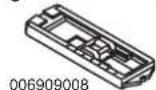
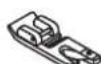
Standard accessories (1)
a. All purpose foot
b. Zipper foot
c. Buttonhole foot
d. Darning plate
e. L-screwdriver
f. Seam ripper/ brush
g. Spool pin felt (2x)
h. Pack of needles (3x)
i. Bobbin (3x)
Optional accessories (2)
(These 9 accessories are not supplied with this machine; they are however available as special accessories from your local dealer.)
j. Quilting foot
k. Overcasting foot
I. Hemmer foot
m. Blind hem foot
n. Satin stitch foot
o. Darning/ embroidery foot
p. Button sewing foot
q. Edge/ quilting guide
r. Soft cover
1

006806008
b

006905008
C
d

e

1

9

h
2

006916008

006803008
1
006800008

006812008
n

006804008
0
006016008
p

006914008
q
r
AR
CJgws
(1)
y
.1111115 jol 126 .b
0jglcd.
a. u b. d
siao.e
ailll 1
jai 5g
1.
3.22c s4a.i
F Accessoires
Accessoires standards (1)
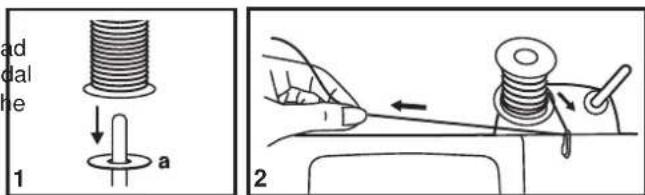
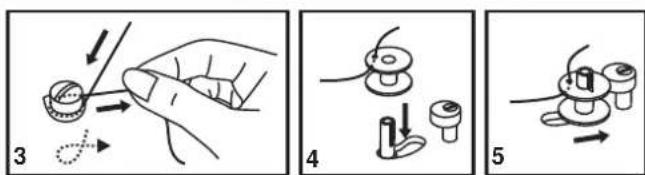
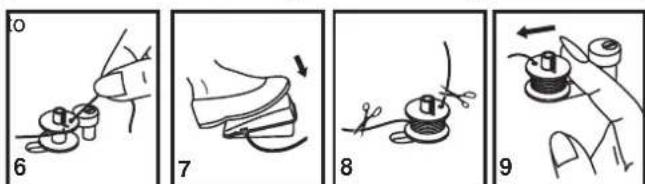
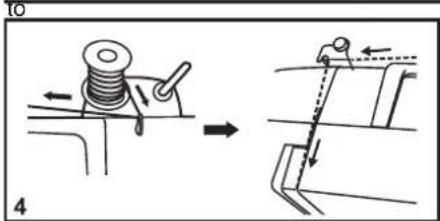
- Place the thread and spool pin felt (a) onto the spool pin. (1)
- Pass the thread through the thread guide. (2)
- Wind thread clockwise around bobbin winder tension discs. (3)
- Thread bobbin as illustrated and place on spindle. (4)
- Push bobbin spindle to right. (5)
-Hold thread end.6 - Step on foot control pedal. (7)
- Release the pedal after a few turns. Release the thread and cut as close as possible to the spool. Press the pedal again. Once the spool is full, it rotates slowly. Release the pedal and cut thread. (8)
- Push bobbin spindle to left (9) and remove.
Please Note:
When the bobbin winder spindle is in "bobbin winding" position, the machine will not sew and the hand wheel will not turn. To start sewing, push the bobbin winder spindle the left (sewing position).
AR
#
J 1
(2).
(3).Sall lal 1y Jaaell allae olly bals
(4).
(5). 证明: 1 ≤ x_0 < 23
(6).
(7). A. soliloquizes biolocal
yabaybajll Ciljao jydl aayuclall ayas
(8).
Aill jy,9) jll all gall bial
:
ablylal yllall "ell" ggyy yllall yy luee 1le baiial ablylally ell. Jn nn ydy dnyd ydl aeg
(AB
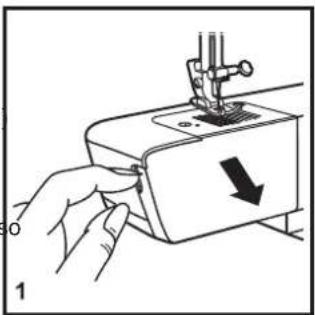
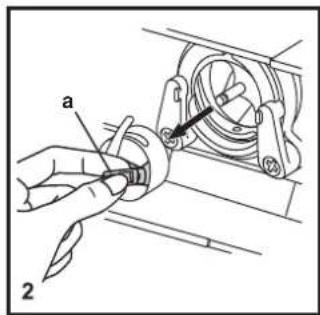
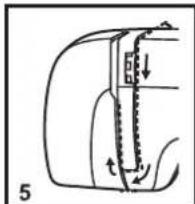
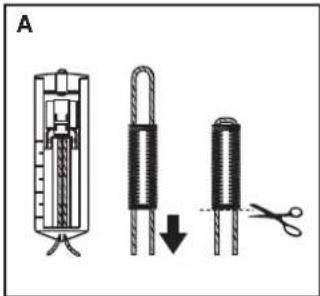
When inserting or removing the bobbin, the needle must be fully raised, to the highest position.
- Remove the extension table, then open the hinged cover. (1)
- Pull the bobbin case tab (a) and remove the bobbin case. (2)
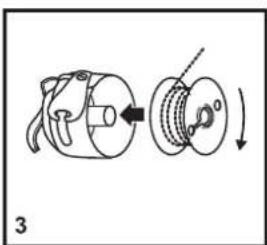
- Hold the bobbin case with one hand. Insert the bobbin that the thread runs in a clockwise direction (arrow). (3)
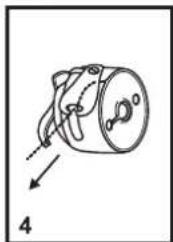
- Pull the thread through the slit and under the finger, while holding the bobbin down in the case until thread clicks into place (4) Leave a 6 inch tail of thread.
- Hold the bobbin case by the open hinged latch. (5)
- Insert the bobbin case into the shuttle, so that the bobbin case finger is aligned at 12 o'clock. (6)
Attention:
Turn power switch to off ("O") before inserting or removing the bobbin.

AR
A
. laie ie gaae 8a 855 8 a 8a 8a 8a
(1).
(2).gall g jil (a) glsall yyy (jia) jua
(3).JyAsAilSo (a)Sall s).dydy dySall eBb elnol . (paill) aIalll Jiae eo jaii ooi
all sall daiy" 100000000000000000000000000000000000000000000
(5).
aill aell olal olal oolal olal olal olal (6).
:
a#ll 1 yj ("O") jill (
F
Insertion de la canette
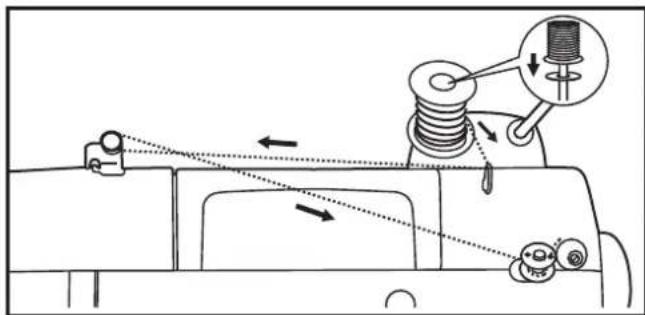
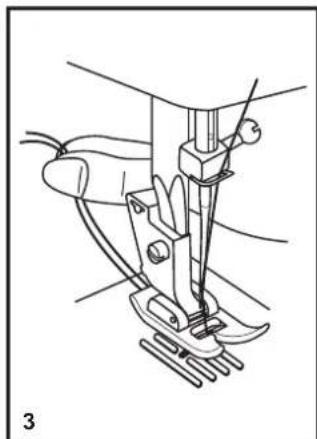
EN Threading the Upper Thread
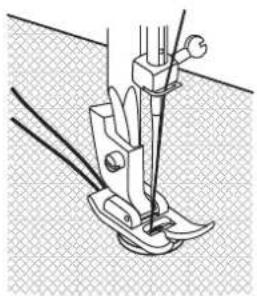
This is a simple operation but it is important to carry out correctly as by not doing so several sewing problems could result.
- Start by raising the needle to its highest point (1), and continue turning the handwheel counterclockwise until the needle just slightly begins to descend. Raise the presse foot to release the tension discs. (2)
Note: For safety, it is strongly suggested you turn off the power before threading. - Place the thread and Spool pin felt (a) onto the spool pin. (B)
- Draw thread from spool through the thread guide to the upper thread guide. (4)
- Thread tension module by leading thread down right channel and up left channel. (5) During this process it is helpful hold the thread between the spool and thread guide.
- At the top of this movement pass thread from right to left through the slotted eye of the take-up lever and then downwards again. (6)
- Now pass thread behind the thin wire needle clamp guide (7) and then down to the needle which should be threaded from front to back.
- Pull about 6-8 inches of thread to the rear beyond the needle eye. Trim thread to length with built in thread cutter. (8)

AR
sglal bai
J 1 1 1 1 1 1 1 1 1 1 1 1 1 1 1 1 1 1 1 1 1 1 1
(1)Soo Sgale all blll 12
pall 1.12 xj jjy 145 jac wsc (2).
jus jie iis ail sally gaiy aull
(3) Sall = Lal ( a) Sall = aLal Sall
(4).
Jx Jx Jx Jx Jx Jx Jx Jx Jx Jx Jx Jx Jx Jx Jx Jx Jx Jx Jx Jx Jx Jx Jx Jx Jx Jx Jx Jx Jx Jx Jx Jx Jx Jx Jx Jx Jx Jx Jx Jx Jx Jx Jx Jx Jx Jx Jx Jx Jx Jx Jx
a 6
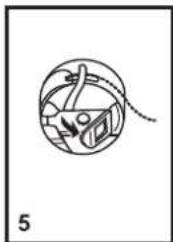
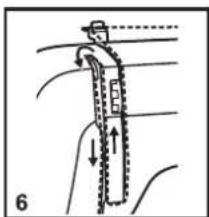
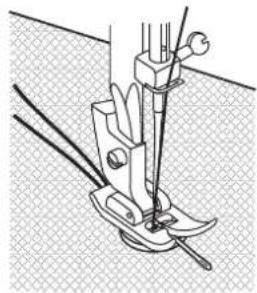
Raising the Bobbin Thread
Hold the upper thread with the left hand. Turn the handwheel (1) towards you (counterclockwise) lowering, then raising needle.
Note:
If it is difficult to raise the bobbin thread, check to make sure the thread is not trapped by the hinged cover or the Removable Extension Table.
Gently pull on the upper thread to bring the bobbin thread up through the needle plate hole. (2)
Lay both threads to the back under the presser foot. (3)

AR
all
(1)y y 5
abla 100000000000000000000000000000000000000000000000000
(2).Jalll balee 100s Jds a dall bajg jy slal bajg y jy (3) abelal pall caiiell all jay
F
Upper thread tension (1)
Basic thread tension setting: "4"
To increase the tension, turn the dial to the next number up.
To reduce the tension, turn the dial to the next number down.
A. Normal thread tension for straight stitch sewing.
B. Thread tension too loose for straight stitch sewing dial to higher number.
C. Thread tension too tight for straight stitch sewing dial to lower number.
D. Normal thread tension for zigzag and decorative Correct thread tension is when a small amount of the upper thread appears on the bottom side of fabric.
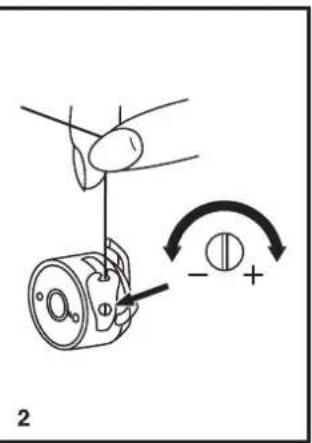
Lower thread tension (2)
To test the bobbin thread tension, remove the bobbin case and bobbin and hold it by suspending it by the thread. Jerk it once or twice. If the tension is correct, the thread will unwind by about an inch or two. If the tension is too tight, it does not unwind at all. If the tension is too loose, it will drop too much. To adjust, turn the small screw on the side of the bobbin case.
Please note:
- Proper setting of tension is important to good sewing.
- There is no single tension setting appropriate for all stitch functions, thread or fabric.
- A balanced tension (identical stitches both top and bottom) is usually only desirable for straight stitch construction sewing.
- 90% of all sewing will be between "3" and "5".
- For zig zag and decorative sewing stitch functions, thread tension should generally be less than for straight stitch sewing.
- For all decorative sewing you will always obtain a nicer stitch and less fabric puckering when the upper thread appears on the bottom side of your fabric.
AR
b
(1)."4" 200000000000000000000000000000000000000000000000000000000000000000000000000
y 1
ylll lal ylae 1
sall ablisall aagaaaall 2
g,ablisll cllac gaaaiiaaiaa 3
. 1111111111111111111111111111111111111111111111
b (jlll,glle) jilgtaa 2
jlll jlll jlll jlll jlll jlll jlll jlll jlll jlll jlll jlll jlll jlll jlll jlll jlll jlll jlll jlll jlll jlll jlll jlll jlll jlll jlll jlll jlll jlll jlll jlll jlll jlll jill
F
Tension du fil
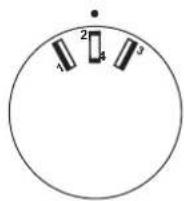
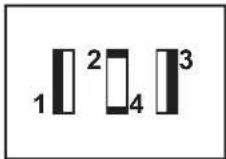
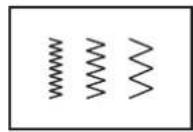
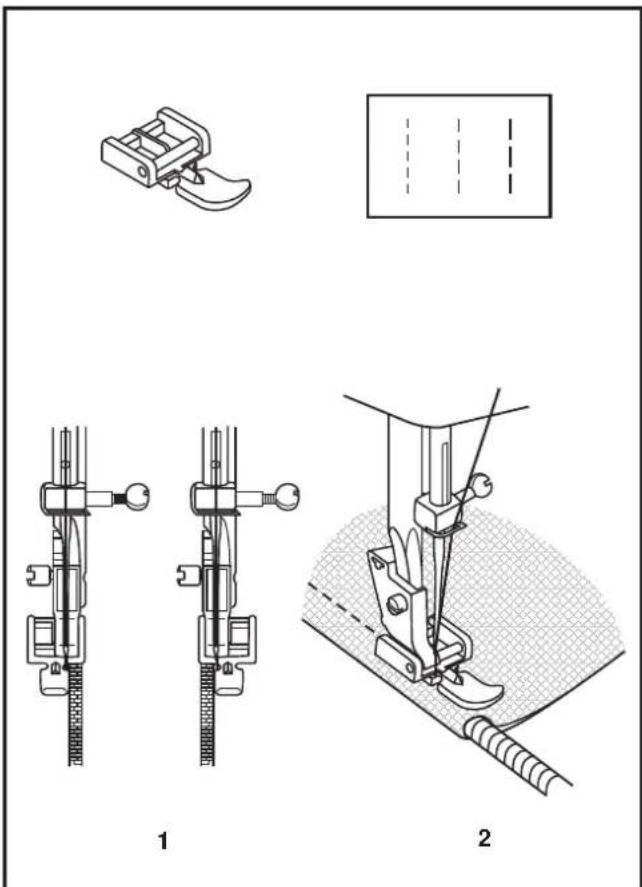
How to Choose Your Pattern
To select a stitch, simply turn the pattern selector dial. (a) The pattern selector dial may be turned in either direction.
a. Pattern Selector Dial
b. Reverse Sewing Lever

AR
(gial)jai (i
S. (a) aii jydi jia jydu bui yai yall ai i
44gai jj 100
.
aill bll aai j. b
F
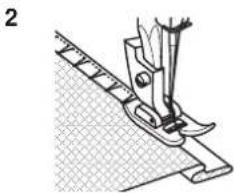
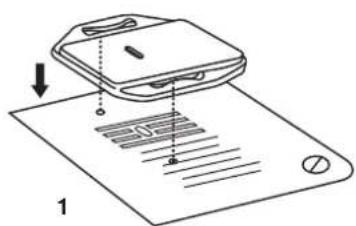
Sewing Straight Stitch
To begin sewing, set the machine for straight stitch. (1)
Place the fabric under the presser foot with the fabric edge lined up with the desired seam guide line on the needle plate. (2)
Lower the presser foot lifter, and then step on the foot controller to start sewing. (3)
AR
aaii aibii
(1) aasll abslil ayslal y as balsly
a aalaa 0 1 1 1 1 1 1 1 1 1 1 1
(2).
(3).ablyjalyaill pail auege biai pi abelial pail jil
F
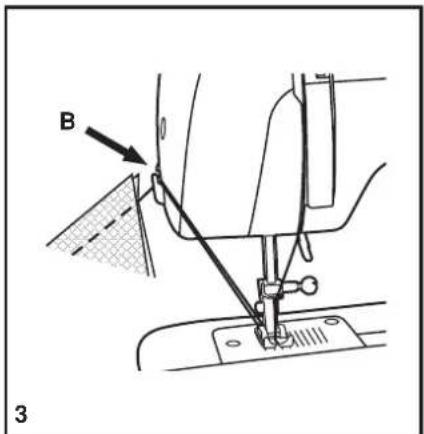
To secure the beginning and the end of a seam, press down the reverse sewing lever (A). Sew a few reverse stitches. Release the lever and the machine will sew forward again. (1)
Removing the Work
Turn the handwheel toward you (counterclockwise) to bring the thread take up lever to its highest position and the needle begins to descend, raise the presser foot and remove work behind (2)the needle and presser foot.
Cutting the Thread
Pull the threads under and behind the presser foot. Guide the threads to the side of the face plate and into thread cutter (B). Pull threads down to cut. (3)
AR
a111 a111
(A) aalbalsall gai jaiy all baiai oj jaiy ayaiy ciay (1).
F Couture en marche arriere
aalal aall 11 bgsll 4g abelal pall cals gssll (B) 111 (3).
Pour couper le fil
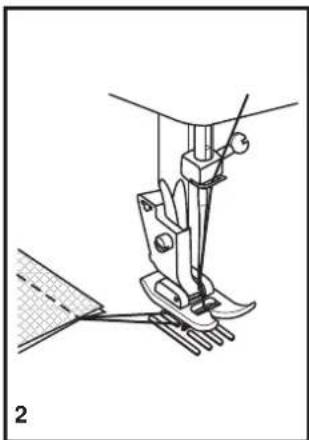
For hems, curtains, trousers, skirts, etc.
Blind hem for stretch fabrics.
Note:
It takes practice to sew blind hems. Always make a sewing test first.
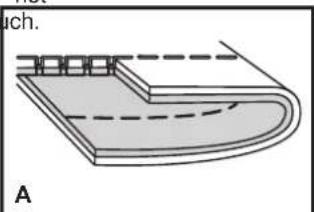
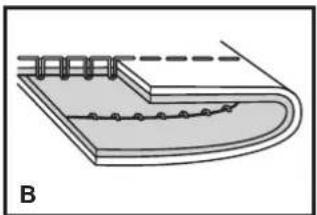
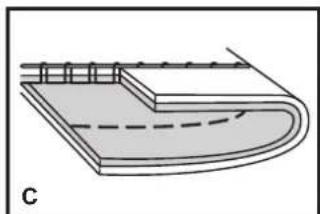
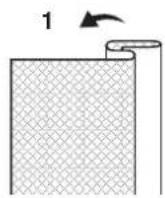
Blind Hem:
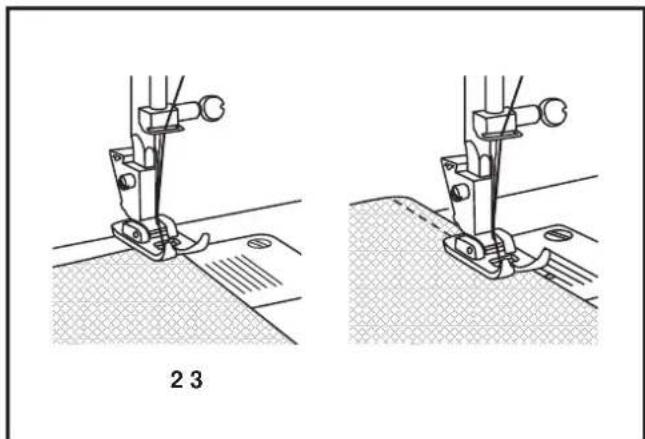
Turn up the hem to the desired width and press. Fold back (as shown in Fig. 1) against the right side of the fabric with the top edge of the hem extending about 7mm . (1/4^ ) to the right side of the folded fabric.
Start to sew slowly on the fold, making sure the needle touches slightly the folded top to catch one or two fabric threads. (2)
Unfold the fabric when hemming is completed and press.
Lingerie Stitch :
Turn up the hem to the desired width and press. Plad right side up with edge of hem to the left. Begin the needle swings off the left edge of the fabric to form a small scallop. Tightening the tension slightly will produce a deeper scallop.

AR
a
A
4k = 2
- Take off the all purpose foot and attach the buttonhole foot.
- Measure diameter and thickness of button and add 0.3cm (1/8") for bartacks to obtain correct buttonhole length; mark buttonhole size on fabric. (a)
- Place fabric under the foot, so that marking on the buttonhole foot aligns with starting marking on fabric. Lower the foot, so that the buttonhole center line marked on the fabric aligns with the center of the buttonhole foot. (b)
Note:
Density varies according to the fabric. Always test sew a buttonhole on the fabric you are using to sew the buttonhole.
Follow the 4-step sequence changing from one step to another with the pattern selector dial. When moving from step to step through the buttonhole process, be sure that the needle is raised before turning the pattern selector dial to the next step. Take care not to sew too many stitches in steps and 4. Use seam ripper and cut buttonhole open from bolt ends towards the middle.
Tips:
- Slightly reducing upper thread tension will produce better results.
- Use a stabilizer for fine or stretchy fabrics.
- It is advisable to use heavy thread or cord for stretch or knit fabrics. The zig-zag should sew over the heavy thread or cord. (A)

AR
a_0 I.
1
.2
.3
.4
Jlss aee baa jyai pa laa. Jllll nae yae aee 1
aill jlll aal y s o bna nnnnll aal l al 42 jalall g oos jyably p 10 aill
balsll aal jol ygell jyall aal
jaii
jaii
jaii
jaii
.(A)laall gbsbys
F
Position the work under the foot.
Place the button in the desired position and lower the foot.
Set the Pattern Selector Dial for zig-zag pattern, which
should correspond to the distance between the two holes of the button. Turn the handwheel toward you to check if the needle goes into the right and left hole of the button without hitting the button. Slowly sew on the button with about 10 stitches. (2)
Bring the thread tails to the back of the work, then tie off manually.
If a shank is required, place a darning needle on top of the button and sew. (3)
For buttons with 4 holes, sew through the front two holes first, push the work forward and then sew through the back two holes.
2
3
AR
1111 1111 + 0
(1)
aill jjly aolllie jjj gaaiaaii Jaoa lae i kuiy yu Lg jz jll aai ydi ic aaiil jlaiaiaiaiaiaiaiaiaiaiaiaiaiaiaiaiaiaiaiaiaiaiaiaiaiaiaiaiaiaiaiaiaiaiaiaiaiaiaiaiaiaiaiaiaiaiaiaiaiaiaiaiaiaiaiaiaiaiaiaiaiaiaiaiaiaiaiaiaiaiaiaiaiaiaiaiaiaiaia
Ls ably sbl g jll g jll s bgs 3. kdl lnnn n
F
Couture de boutons
Set the machine as illustrated.
Change to zipper foot.
The zipper foot can be attached right or left, depending on which side of the foot you are going to sew. (1)
To sew past the zipper tab, lower the needle into the fabric, raise the presser foot and push the zipper tab behind the presser foot. Lower the foot and continue to sew.
It is also possible to sew a length of cord into a bias strip to form a "welt" or piping. (2)
AR
C
Jusll i aas
1 1 1 1 1 1 1 1 1 1 1 1 1 1 1 1 1
(1)ablydy
abcllall pll clll qll lal g, abcllall pll
aill jil
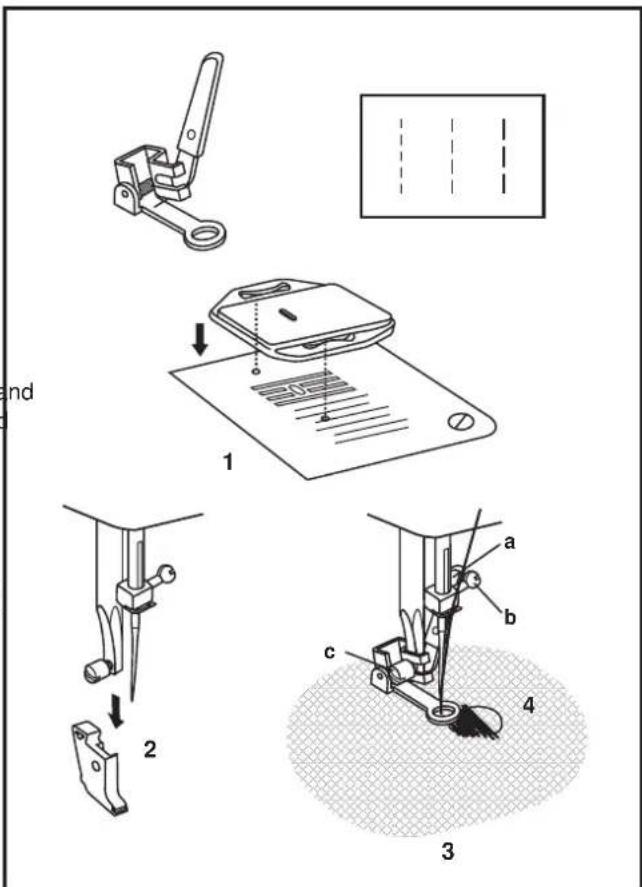
Free Motion Darning, Stippling
- The darning/ embroidery foot is an optional accessory not included with your machine.
Darning:
Install the darning plate. (1)
Remove the presser foot shank. (2)
Attach the tdahmngesessfoidebafoot
The lever (a) should be behind the needle clamp screw (b).
Press the darning/ embroidery foot on firmly from behind with your index finger and tighten the screw (c). (3)
For darning, first sew around the edge of the hole (to secure the threads). (4)
First row: Always work from left to right. Turn work by 90^ a sew over previous stitching. A darning hoop is recommended for easier sewing and better results.
Note:
Free motion darning is accomplished without the sewing machine internal feed system. Movement of the fabric is controlled by the operator. It is necessary to coordinate sewing speed and movement of fabric.
Stippling:
Set the machine for straight stitch. Using the optional darning/embroidery foot will help guide you as you sew, in a meandering fashion to create small curving lines to hold layers of fabric and batting together.
AR
1
Aisll 2000000000000000000000000000
yJusla Jus Jusay aasall oosssg yae aalld alaannnall
gaiy jaiy jaiy jaiy jaiy jaiy jaiy jaiy jaiy jaiy
F
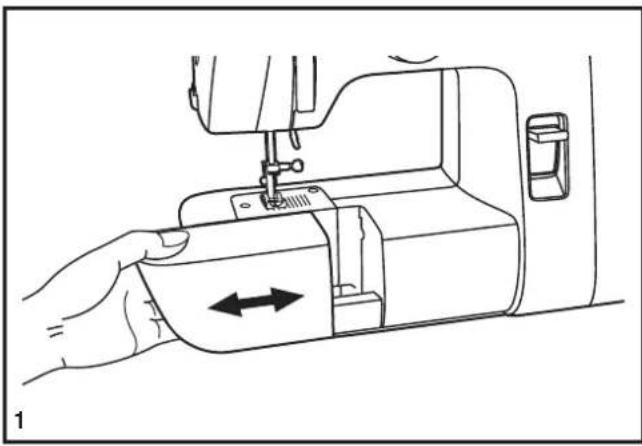
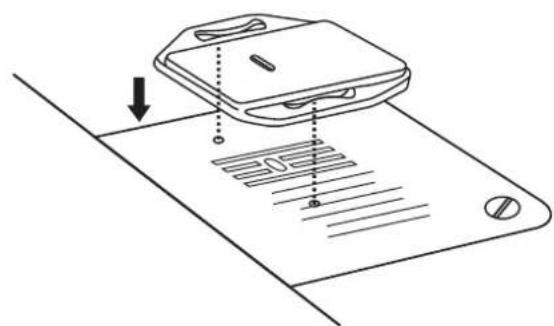
Installing the Removable Extension Table
Hold the removable extension table horizontally, and push it in the direction of the arrow. (1)
To remove the extension table, pull it toward the left.
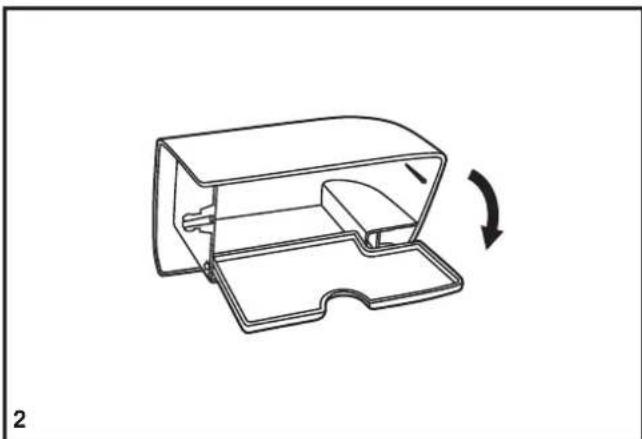
The inside of the removable extension table can be utilized as an accessory box.
To open, flip cover down as shown. (2)
AR
aalll aall alalal alal
(1).
F Installation du bras amovible
Attaching the Presser Foot Shank
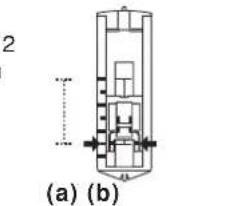
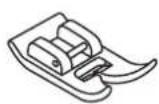
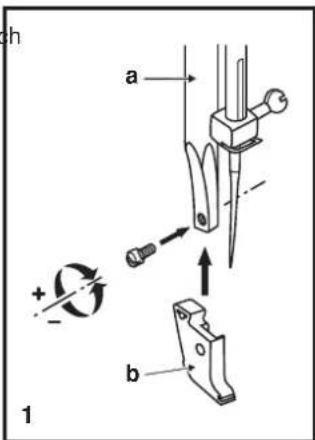
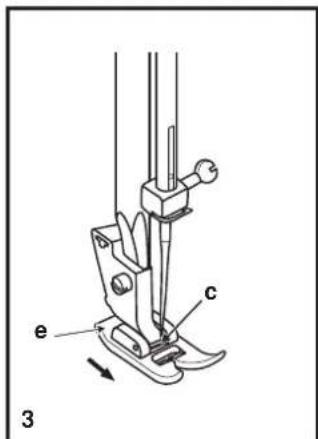
Raise the presser bar (a) with the presser foot lifter. Attach the presser foot shank (b) as illustrated. (1)
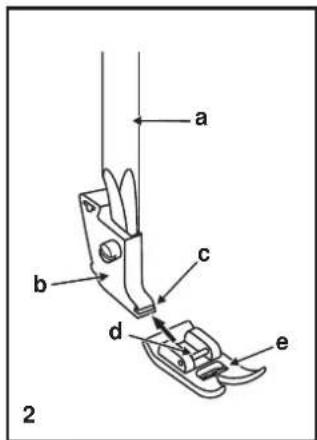
Attaching the presser foot
Install the pin (d) of the presser foot (e) into the cut-out (c) of the presser foot lifer. (2)
Removing the presser foot
Push the presser foot (e) to disengage from the cut-out (c). (3)
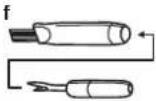
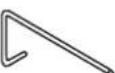
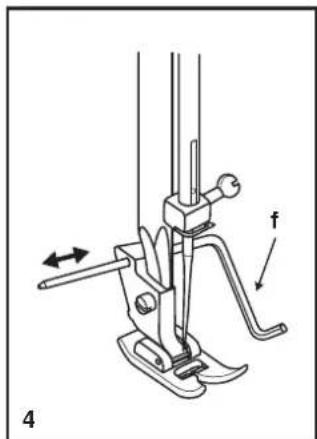
Attaching the edge/quilting guide
Attach the edge/quilting guide (f) in the slot as illustrated. Adjust as needed for hems, pleats, quilting, etc. (4)
Attention:
Turn power switch to off ("O") when carrying out any of the above operations!
AR
aalall Jala
(b) abcllall lala jy a (a) abclll p 5ae
(1).
| NEEDLE SIZE | FABRICS | THREAD |
| 9-11 (70-80) | Lightweight fabrics-thin cottons, voile, silk, muslin, interlocks, cotton knits, tricots,jerseys, crepes, woven polyester, shirt & blouse fabrics. | Light-duty thread in cotton, nylon, polyester or cotton wrapped polyester. |
| 11-14 (80-90) | Medium weight fabrics-cotton, satin, kettlecloth, sailcloth, double knits, lightweight woolens. | Most threads sold are medium size and suitable for these fabrics and needle sizes.Use polyester threads on synthetic materials and cotton on natural woven fabrics for best results.Always use the same thread on top and bottom. |
| 14 (90) | Medium weight fabrics-cotton duck, woolen, heavier knits, terrycloth, denims. | |
| 16 (100) | Heavyweight fabrics-canvas, woolens, outdoor tent and quilted fabrics, denims, upholstery material (light to medium). | |
| 18 (110) | Heavy woolen, overcoat fabrics, upholstery fabrics, some leathers and vinyls. | Heavy duty thread, carpet thread. |
IMPORTANT: Match needle size to thread size and weight of fabric.
NEEDLE, FABRIC SELECTION
| NEEDLES TYPE OF FABBIXPLANATION | |
| SINGER® 2020 | Standard sharp needles. Sizes range thin to large. 9 (70) to 18 (110). |
| SINGER® 2045 | Semi-ball point needle, scarfed. 9 (70) to 18 (110). |
| SINGER® 2032 | Leather needles. 12 (80) to 18 (110). |
Note :
1. For best sewing results always use genuine SINGER'needles
2. Replace needle often (approximately every other garment ) and/ or at first thread breakage or skipped stitches.
3. Use a backing for fine or stretchy fabrics.
AR
y / 1
y11 1
| الإستعمال | الترجمة | الإستعمال |
| الإستعمال الحرفية بلوانيس, بلوانيس الحرفية بلوانيس | الإستعمال الحرفية بلوانيس, بلوانيس الحرفية بoireت, بعبيعة, محيى, محيى, محيى, محيى, محيى, محيى, محيى, محيى, محيى, محيى, محيى, محيى, محيى, محيى, محيى, محيى, محيى, محيى, محيى, محيى, محيى, محيى, محيى, محيى, محيى, محيquine, محيquine, محيquine, محيquine, محيquine, محيquine, محيquine, محيquine, محيquine, محيquine, محيquine, محيquine, محيquine, محيquine, محيquine, محيquine, محيquine, محيquine, محيquine, محيquine, محيquine, محيquine, محيquine, محيquine, محيquine, محي啡, محي啡, محي啡, محي啡, محي啡, محي啡, محي啡, محي啡, محي啡, محي啡, محي啡, محي啡, محي啡, محي啡, محي啡, محي啡, محي啡, محي啡, محي啡, محي啡, محي啡, محي啡, محي啡, محي啡, محي啡, محيquine, محيquine, محيquine, محيquine, محيquine, محيquine, محيquine, محيquine, محيquine, محيquine, محيquine, محيquine, محيquine, محيquine, محيquine, محيquine, محيquine, محيquine, محيquine, محيquine, محيquine, محيquine, محيquine, محيquine, محيQE, محيQE, محيQE, محيQE, محيQE, محيQE, محيQE, محيQE, محيQE, محيQE, محيQE, محيQE, محيQE, محيQE, محيQE, محيQE, محيQE, محيQE, محيQE, محيQE, محيQE, محيQE, محيQE, محيQE, محيQE, محي QE, محيQE, محيQE, محيQE, محيQE, محيQE, محيQE, محيQE, محيQE, محيQE, محيQE, محيQE, محيQE, محيQE, محيQE, محيQE, محيQE, محيQE, محيQE, محيQE, محيQE, محيQE, محيQE, محيQE, محيQE, محيQS, محيQE, محيQE, محيQE, محيQE, محيQE, محيQE, محيQE, محيQE, محيQE, محيQE, محيQE, محيQE, محيQE, محيQE, محيQE, محيQE, محيQE, محيQE, محيQE, محيQE, محيQE, محيQE, محيQE, محيQE, محيQM, محيQE, محيQE, محيQE, محيQE, محيQE, محيQE, محيQE, محيQE, محيQE, محيQE, محيQE, محيQE, محيQE, محيQE, محيQE, محيQE, محيQE, محيQE, محيQE, محيQE, محيQE, محيQE, محيQE, محيQE, محيQ, محيQE, محيQE, محيQE, محيQE, محيQE, محيQE, محيQE, محيQE, محيQE, محيQE, محيQE, محيQE, محيQE, محيQE, محيQE, محيQE, محيQE, محيQE, محيQE, محيQE, محيQE, محيQE, محيQE, محيQE, محيQT, محيQT, محيQT, محيQT, محيQT, محيQT, محيQT, محيQT, محيQT, محيQT, محيQT, محيQT, محيQT, محيQT, محيQT, محيQT, محيQT, محيQT, محيQT, محيQT, محيQT, محيQT, محيQT, محيQT, محيQT, محي QT, محيQT, محيQT, محيQT, محيQT, محيQT, محيQT, محيQT, محيQT, محيQT, محيQT, محيQT, محيQT, محيQT, محيQT, محيQT, محيQT, محيQT, محيQT, محيQT, محيQT, محيQT, محيQT, محيQT, محيQT, محيQ, محيQT, محيQT, محيQT, محيQT, محيQT, محيQT, محيQT, محيQT, محيQT, محيQT, محيQT, محيQT, محيQT, محيQT, محيQT, محيQT, محيQT, محيQT, محيQT, محيQT, محيQT, محيQT, محيQT, محيQT, محيQE, محيQE, محيQE, محيQE, محيQE, محيQE, محيQE, محيQE, محيQE, محيQE, محيQE, محيQE, محيQE, محيQE, محيQE, محيQE, محيQE, محيQE, محيQE, محيQE, محيQE, محيQE, محيQE, محيQE, محيQB, محيQE, محيQE, محيQE, محيQE, محيQE, محيQE, محيQE, محيQE, محيQE, محيQE, محيQE, محيQE, محيQE, محيQE, محيQE, محيQE, محيQE, محيQE, محيQE, محيQE, محيQE, محيQE, محيQE, محيQE, محيQN, محيQE, محيQE, محيQE, محيQE, محيQE, محيQE, محيQE, محيQE, محيQE, محيQE, محيQE, محيQE, محيQE, محيQE, محيQE, محيQE, محيQE, محيQE, محيQE, محيQE, محيQE, محيQE, محيQE, محيQE, محيQR, محيQE, محيQE, محيQE, محيQE, محيQE, محيQE, محيQE, محيQE, محيQE, محيQE, محيQE, محيQE, محيQE, محيQE, محيQE, محيQE, محيQE, محيQE, محيQE, محيQE, محيQE, محيQE, محيQE, محيQE, محي QR, محيQE, محيQE, محيQE, محيQE, محيQE, محيQE, محيQE, محيQE, محيQE, محيQE, محيQE, محيQE, محيQE, محيQE, محيQE, محيQE, محيQE, محيQE, محيQE, محيQE, محيQE, محيQE, محيQE, محيQE, محي Q, محيQE, محيQE, محيQE, محيQE, محيQE, محيQE, محيQE, محيQE, محيQE, محيQE, محيQE, محيQE, محيQE, محيQE, محيQE, محيQE, محيQE, محيQE, محيQE, محيQE, محيQE, محيQE, محيQE, محيQE, محي QS, محي QS, محي QS, محي QS, محي QS, محي QS, محي QS, محي QS, محي QS, محي QS, محي QS, محي QS, محي QS, محي QS, محي QS, محي QS, محي QS, محي QS, محي QS, محي QS, محي QS, محي QS, محي QS, محي QS, محي QS, محيQS, محي QS, محي QS, محي QS, محي QS, محي QS, محي QS, محي QS, محي QS, محي QS, محي QS, محي QS, محي QS, محي QS, محي QS, محي QS, محي QS, محي QS, محي QS, محي QS, محي QS, محي QS, محي QS, محي QS, محي QS, محي Q, محي QS, محي QS, محي QS, محي QS, محي QS, محي QS, محي QS, محي QS, محي QS, محي QS, محي QS, محي QS, محي QS, محي QS, محي QS, محي QS, محي QS, محي QS, محي QS, محي QS, محي QS, محي QS, محي QS, محي QS, محي QR, محي QS, محي QS, محي QS, محي QS, محي QS, محي QS, محي QS, محي QS, محي QS, محي QS, محي QS, محي QS, محي QS, محي QS, محي QS, محي QS, محي QS, محي QS, محي QS, محي QS, محي QS, محي QS, محي QS, محي QS, محي QB, محي QS, محي QS, محي QS, محي QS, محي QS, محي QS, محي QS, محي QS, محي QS, محي QS, محي QS, محي QS, محي QS, محي QS, محي QS, محي QS, محي QS, محي QS, محي QS, محي QS, محي QS, محي QS, محي QS, محي QS, محي QT, محي QT, محي QT, محي QT, محي QT, محي QT, محي QT, محي QT, محي QT, محي QT, محي QT, محي QT, محي QT, محي QT, محي QT, محي QT, محي QT, magnetic magnetization of the magnetic field of the magnetic field of the magnetic field of the magnetic field of the magnetic field of the magnetic field of the magnetic field of the magnetic field of the magnetic field of the magnetic field of the magnetic field of the magnetic field of the magnetic field of the magnetic field of the magnetic field of the magnetic field of the magnetic field of the magnetic field of the magnetic field of the magnetic field of the magnetic field of the magnetic field of the magnetic field of the magnetic field of the magnetic field of the magneticfield of the magnetic field of the magnetic field of the magnetic field of the magnetic field of the magnetic field of the magnetic field of the magnetic field of the magnetic field of the magnetic field of the magnetic field of the magnetic field of the magnetic field of the magnetic field of the magnetic field of the magnetic field of the magnetic field of the magnetic field of the magnetic field of the magnetic field of the magnetic field of the magnetic field of the magnetic field of the magnetic field of the magnetic field of the magnetic fields of the magnetic fields of the magnetic fields of the magnetic fields of the magnetic fields of the magnetic fields of the magnetic fields of the magnetic fields of the magnetic fields of the magnetic fields of the magnetic fields of the magnetic fields of the magnetic fields of the magnetic fields of the magnetic fields of the magnetic fields of the magnetic fields of the magnetic fields of the magnetic fields of the magnetic fields of the magnetic fields of the magnetic fields of the magnetic fields of the magnetic fields of the magnetic fields of the magnetic field of the magnetic field of the magnetic field of the magnetic field of the magnetic field of the magnetic field of the magnetic field of the magnetic field of the magnetic field of the magnetic field of the magnetic field of the magnetic field of the magnetic field of the magnetic field of the magnetic field of the magnetic field of the magnetic field of the magnetic field of the magnetic field of the magnetic field of the magnetic field of the magnetic field of the magnetic field of the magnetic field of the magnetic-field of the magnetic field of the magnetic field of the magnetic field of the magnetic field of the magnetic field of the magnetic field of the magnetic field of the magnetic field of the magnetic field of the magnetic field of the magnetic field of the magnetic field of the magnetic field of the magnetic field of the magnetic field of the magnetic field of the magnetic field of the magnetic field of the magnetic field of the magnetic field of the magnetic field of the magnetic field of the magnetic field of the magnetic field of the magnetic fiqal and magnetic field of the magnetic field of the magnetic field of the magnetic field of the magnetic field of the magnetic field of the magnetic field of the magnetic field of the magnetic field of the magnetic field of the magnetic field of the magnetic field of the magnetic field of the magnetic field of the magnetic field of the magnetic field of the magnetic field of the magnetic field of the magnetic field of the magnetic field of the magnetic field of the magnetic field of the magnetic field of the magnetic field of the magnetic field ofthe magnetic field of the magnetic field of the magnetic field of the magnetic field of the magnetic field of the magnetic field of the magnetic field of the magnetic field of the magnetic field of the magnetic field of the magnetic field of the magnetic field of the magnetic field of the magnetic field of the magnetic field of the magnetic field of the magnetic field of the magnetic field of the magnetic field of the magnetic field of the magnetic field of the magnetic field of the magnetic field of the magnetic field of the magnetic field of 30000000000000000000000000000000000000000000000000000000000000000000000000000000000000000000000000000 |
aaii 1
aalil
| العربية | الإستعمال | الترجمة |
| .العربية الحرفية بधupon مزدف : مزدف مزدف مزدف مزدف مزدف مزدف مزدف مزدف مزدف مزدف مزدف مزدف مزدف مزدف مزدف مزدف مزدف مزدف مزدف مزدف مزدف مزدف مزدف مزدف مزدف مزد°F | (110) 18 (70) 9 . | 2020 |
| .العربية الحرفية بधupon مزدف : مزدف مزدف مزدف مزدف مزدف مزدف مزدف مزدف مزدف مزدف مزد°F | .(110) 18 (70) 9 . | 2045 |
| .العربية الحرفية بधupon مزدف : مزدف مزدف مزدف مزدف مزد°F | (110) 18 (80) 12 | 2032 |
:
y 1
J 2
Aeill aaiuuiuuiiueaiaea 3
For certain types of work, (e.g. darning or free-hand embroidery), the darning plate must be used.
Install the darning plate as illustrated.
For normal sewing, remove the darning plate.
For free-motion sewing it is recommended to use a darning/embroidery foot, available as an optional accessory from authorized SINGER retailers. (See page 9 for number of darning/embroidery foot)
part
AR
()
F Plaque à reprimer
Aijoo jol j Jannin
Jusu
aill 03 all j y aal bol
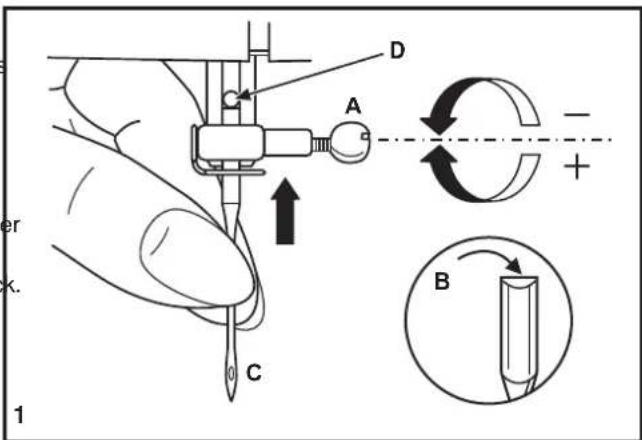
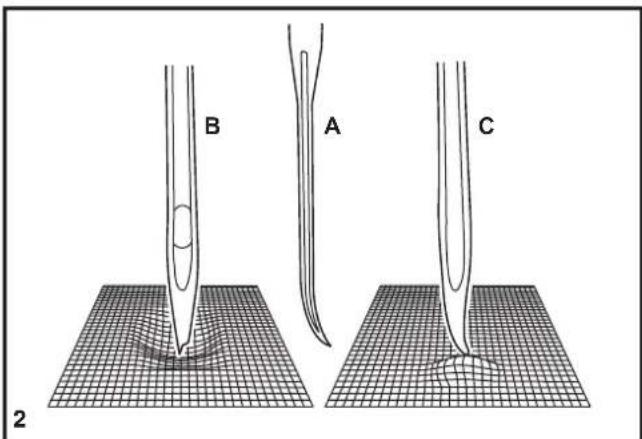
Inserting & Changing Needles
Change the needle regularly, especially if it is showing signs of wear and causing problems. For best sewing results always use SINGER Brand Needles.
Insert the needle as illustrated as follows:
A. Loosen the needle clamp screw and tighten again after inserting the new needle. (1)
B. The flat side of the shaft should be towards the back.
C/D. Insert the needle as far up as it will go.
Attention:
Turn power switch to off ("O") before inserting or removing the needle.
Needles must be in perfect condition. (2)
Problems can occur with:
A. Bent needles
B. Damaged points
C. Blunt needles
AR
y j
JSLUH CUS 131 aolis pbsu JSLU 201
Jin Jui Jiaui jiuill
ailllll aalbally gaaas laos jy
(1) 53
all jyj j yj jaiil o jai B
C/D
:
.5y11 0
(2)
:
a_i Q s = 1 - i
AiiilB
aannll C
F
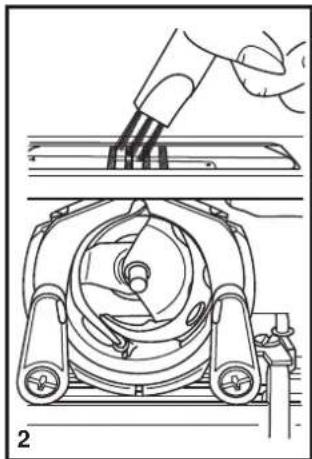
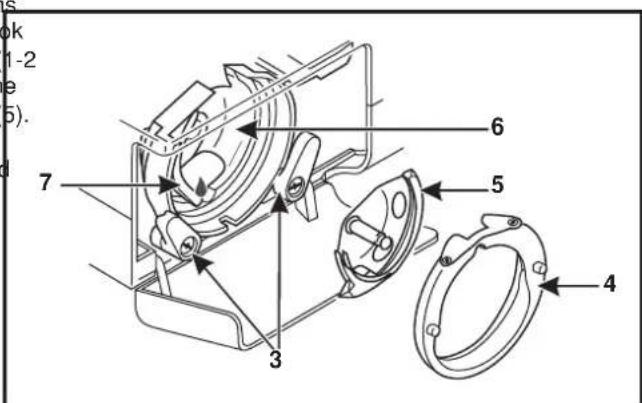
Disconnect the machine from the electrical supply by removing the plug from the main socket. When clearing the machine, it must always be disconnected from the electrical supply.
Remove the needle plate:
Turn the handwheel until the needle is fully raised. Open the hinged front cover and unscrew the needle plate screws with the screw driver. (1)
Cleaning the feed dogs:
Use the brush supplied to clean the whole area. (2)
Cleaning and lubricating the hook:
Remove the bobbin case. Snap the two hook retaining arms (3) outwards. Remove the hook race cover (4) and the hook (5) and clean with a soft cloth. Lubricate at the point (6) (1-2 drops) with sewing machine oil. Turn the handwheel until the hook race (7) is in the left position. Replace the hook (5). Replace the hook race cover and snap back the two hook retaining arms. Insert the bobbin case and bobbin and replace the needle plate.
Important:
Fabric lint and threads must be removed regularly. Your machine should be serviced at regular intervals at one of our service centers.

AR
aill
:olii 1. yll aai jyss lss yag all jy ayss ll qisll Jai 1. yll sll jayia laa n jy ayssll iji
aalal aal alae 1 (1) alal alal yalal alal alal
:alall wll kii (2)abial jL aybiil aySlal g aaggall Jae
aaii aii i 100000000000000000000000000000000000000000000000000000000000000000000000000000
:pa
J 1000000000000000000000000000000000000000000000000000000000000000
F
Entretien de la machine
Attention:
| Upper thread breaks | 1. The machine is not threaded correctly. 2. The thread tension is too tight. 3. The thread is too thick for the needle. 4. The needle is not inserted correctly. 5. The thread is wound around the spool holder pin. 6. The needle is damaged. | 1. Rethread the machine. 2. Reduce the thread tension. (lower number) 3. Select a larger needle. 4. Remove and reinsert the needle. (flat side towards the back) 5. Remove the reel and wind thread onto reel. 6. Replace the needle. |
| Lower thread breaks | 1. The bobbin case is not inserted correctly. 2. The bobbin case is threaded wrong. 3. The lower thread tension is too tight. | 1. Remove and reinsert the bobbin case and pull on the thread. The thread should pull easily. 2. Check both bobbin and bobbin case. 3. Loosen lower thread tension as described. |
| Skipped stitches | 1. The needle is not inserted correctly. 2. The needle is damaged. 3. The wrong size needle has been used. 4. The foot is not attached correctly. | 1. Remove and reinsert needle. (flat side towards the back) 2. Insert a new needle. 3. Choose a needle to suit the thread and fabric. 4. Check and attach correctly. |
| Needle breaks | 1. The needle is damaged. 2. The needle is not correctly inserted. 3. Wrong needle size for the fabric. 4. The wrong foot is attached. | 1. Insert a new needle. 2. Insert the needle correctly. (flat side towards the back) 3. Choose a needle to suit the thread and fabric. 4. Select the correct foot. |
| Loose stitches | 1. The machine is not correctly threaded. 2. The bobbin case is not correctly threaded. 3. Needle/ fabric/ thread combination is wrong. 4. Thread tension wrong. | 1. Check the threading. 2. Thread the bobbin case as illustrated. 3. The needle size must suit the fabric and thread. 4. Correct the thread tension. |
| Seams gather or pucker | 1. The needle is too thick for the fabric. 2. The stitch length is wrong adjusted. 3. The thread tension is too tight. 4. Fabric puckers. | 1. Select a finer needle. 2. Readjust the stitch length. 3. Loosen the thread tension. 4. Use a backing for fine or stretchy fabrics. |
| Uneven stitches, uneven feed | 1. Poor quality thread. 2. The bobbin case is wrong threaded. 3. Fabric has been pulled. | 1. Select a better quality thread. 2. Remove bobbin case, thread and insert correctly. 3. Do not pull on the fabric while sewing, let it be taken up by the machine. |
| The machine is noisy | 1. Lint or oil have collected on the hook or needle bar. 2. The needle is damaged. | Clean the hook and feed dog as described. 2. Replace the needle. |
| The machine jams | Thread is caught in the hook. | Remove the upper thread and bobbin case, turn the handwheel backwards and forwards by hand and remove the thread. |
AR
(j)
| الإستعمال | الإستعمال | الإستعمال |
| الإستعمال الحرفية 1 | الإستعمال الحرفية 1 | الإستعمال |
| الإستعمال الحرفية 2 | الإستعمال الحرفية 2 | الإستعمال |
| الإستعمال الحرفية 3 | الإستعمال الحرفية 3 | الإستعمال |
| الإستعمال الحرفية 4 | ال,enGLISH LEADING TO: | ال,enGLISH LEADING TO: |
| الإستعمال الحرفية 5 | ال,enGLISH LEADING TO: | ال,enGLISH LEADING TO: |
| ال,enGLISH LEADING TO: | ال,enGLISH LEADING TO: | ال,enGLISH LEADING TO: |
| (ال,enGLISH LEADING TO) | (ال,enGLISH LEADING TO) | (ال,enGLISH LEADING TO) |
| (ال,enGLISH LEADING TO) | (ال,enGLISH LEADING TO) | (ال,enGLISH LEADING TO) |
| (ال,enGLISH LEADING TO) | (ال,enGLISH LEADING TO) | (ال,enGLISH LEADING TO) |
| (ال,enGLISH LEADING TO) | (ال,enGLISH LEADING TO) | (ال,enGLISH LEADING TO) |
| (ال,enGLISH LEADING TO) | (ال,enGLISH LEADING TO) | |
| (ال,enGLISH LEADING TO) | (ال,enGLISH LEADING TO) | (ال,enGLISH LEADING TO) |
| (ال,enGLISH LEADING TO) | (ال,enGLISH LEADING TO) | (ال,enGLISH LEADING TO) |
| (ال,enGLISH LEADING TO) | (ال,enGLISH LEADING TO) | (ال,enGLISH LEADING TO) |
| (ال,enGLISH LEADING TO) | (ال,enGLISH LEADING TO) | |
| (ال,enGLISH LEADING TO) | (ال,enGLISH LEADING TO) | (ال,enGLISH LEADING TO) |
| (ال,enGLISH LEADING TO) | (ال,enGLISH LEADING TO) | (ال,enGLISH LEADING TO) |
| (ال,enGLISH LEADING TO) | (ال,enGLISH LEADING TO) | (ال=en) |
| (ال,enGLISH LEADING TO) | (ال,enGLISH LEADING TO) | (ال-en) |
| (ال,enGLISH LEADING TO) | (ال,enGLISH LEADING TO) | (ال-en) |
| (ال,enGLISH LEADING TO) | (ال,enGLISH LEADING TO) | (ال-en) |
| (ال,enGLISH LEADING TO) | (ال,enGLISH LEADING TO) | (ال-en) |
| (ال,enGLISH LEADING TO) | (ال,enGLISH LEADING TO) | (ال'en) |
| (ال,enGLISH LEADING TO) | (ال,enGLISH LEADING TO) | (ال-en) |
| (ال,enGLISH LEADING TO) | (ال,enGLISH LEADING TO) | (ال-en) |
| (ال,enGLISH LEADING TO) | (ال,enGLISH LEADING TO) | (ال-en) |
| (ال,enGLISH LEADING TO) | (ال,enGLISH LEADING TO) | (ال/en) |
| (ال,enGLISH LEADING TO) | (ال,enGLISH LEADING TO) | (ال-en) |
| (ال,enGLISH LEADING TO) | (ال,enGLISH LEADING TO) | (ال-en) |
| (ال,enGLISH LEADING TO) | (ال,enGLISH LEADING TO) | (ال-en) |
| (ال,enGLISH LEADING TO) | (ال,enGLISH LEADING TO) | (ال(en) |
| (ال,enGLISH LEADING TO) | (ال,enGLISH LEADING TO) | (ال-en) |
| (ال,enGLISH LEADING TO) | (ال,enGLISH LEADING TO) | (ال-en) |
| (ال,enGLISH LEADING TO) | (ال,enGLISH LEADING TO) | (ال-en) |
| (ال,enGLISH LEADING TO) | (ال,enGLISH LEADING TO) | (ال en) |
| (ال,enGLISH LEADING TO) | (ال,enGLISH LEADING TO) | (ال-en) |
| (ال,enGLISH LEADING TO) | (ال,enGLISH LEADING TO) | (ال-en) |
| (ال,enGLISH LEADING TO) | (ال,enGLISH LEADING TO) | (ال-en) |
| (ال,enGLISH LEADING TO) | (ال,enGLISH LEADING TO) | (ال_en) |
| (ال,enGLISH LEADING TO) | (ال,enGLISH LEADING TO) | (ال-en) |
| (ال,enGLISH LEADING TO) | (ال,enGLISH LEADING TO) | (ال-en) |
| (ال,enGLISH LEADING TO) | (ال,enGLISH LEADING TO) | (ال-en) |
| (ال,enGLISH LEADING TO) | (ال,enGLISH LEADING TO) | (ال.en) |
| (ال,enGLISH LEADING TO) | (ال,enGLISH LEADING TO) | (ال-en) |
| (ال,enGLISH LEADING TO) | (ال,enGLISH LEADING TO) | (ال-en) |
| (ال,enGLISH LEADING TO) | (ال,enGLISH LEADING TO) | (ال-en) |
| (ال,enGLISH LEADING TO) | (ال,enGLISH LEADING TO) | (ال EN) |
| (ال,enGLISH LEADING TO) | (ال,enGLISH LEADING TO) | (ال-en) |
| (ال,enGLISH LEADING TO) | (ال,enGLISH LEADING TO) | (ال-en) |
| (ال,enGLISH LEADING TO) | (ال,enGLISH LEADING TO) | (ال-en) |
| (ال,enGLISH LEADING TO) | (ال,enGLISH LEADING TO) | (الen) |
| (ال,enGLISH LEADING TO) | (ال,enGLISH LEADING TO) | (ال-en) |
| (ال,enGLISH LEADING TO) | (ال,enGLISH LEADING TO) | (ال-en) |
| (ال,enGLISH LEADING TO) | (ال,enGLISH LEADING TO) | (ال-en) |
| (ال,enGLISH LEADING TO) | (ال,enGLISH LEADING TO) | (الEn) |
| (ال,enGLISH LEADING TO) | (ال,enGLISH LEADING TO) | (ال-en) |
| (ال,enGLISH LEADING TO) | (ال,enGLISH LEADING TO) | (ال-en) |
| (ال,enGLISH LEADING TO) | (ال,enGLISH LEADING TO) | (ال-en) |
| (ال,enGLISH LEADING TO) | (ال,enGLISH LEADING TO) | (ال.En) |
| (ال,enGLISH LEADING TO) | (ال,enGLISH LEADING TO) | (ال-en) |
| (ال,enGLISH LEADING TO) | (ال,enGLISH LEADING TO) | (ال-en) |
| (ال,enGLISH LEADING TO) | (ال,enGLISH LEADING TO) | (ال-en) |
| (ال,enGLISH LEADING TO) | (ال,enGLISH LEADING TO) | (ال En) |
| (ال,enGLISH LEADING TO) | (ال,enGLISH LEADING TO) | (ال-en) |
| (ال,enGLISH LEADING TO) | (ال,enGLISH LEADING TO) | (ال-en) |
| (ال,enGLISH LEADING TO) | (ال,enGLISH LEADING TO) | (ال-en) |
| (ال,enGLISH LEADING TO) | (ال,enGLISH LEADING TO) | (ال_EN) |
| (ال,enGLISH LEADING TO) | (ال,enGLISH LEADING TO) | (ال-en) |
| (ال,enGLISH LEADING TO) | (ال,enGLISH LEADING TO) | (ال-en) |
| (ال,enGLISH LEADING TO) | (ال,enGLISH LEADING TO) | (ال-en) |
| (ال,enGLISH LEADING TO) | (ال,enGLISH LEADING TO) | (الEN) |
| (ال,enGLISH LEADING TO) | (ال,enGLISH LEADING TO) | (ال-en) |
| (ال,enGLISH LEADING TO) | (ال,enGLISH LEADING TO) | (ال-en) |
| (ال,enGLISH LEADING TO) | (ال,enGLISH LEADING TO) | (ال-en) |
| (ال,enGLISH LEADING TO) | (ال,enGLISH LEADING TO) | (الoen) |
| (ال,enGLISH LEADING TO) | (ال,enGLISH LEADING TO) | (ال-en) |
| (ال,enGLISH LEADING TO) | (ال,enGLISH LEADING TO) | (ال-en) |
| (ال,enGLISH LEADING TO) | (ال,enGLISH LEADING TO) | (ال-en) |
| (ال,enGLISH LEADING TO) | (ال,enGLISH LEADING TO) | (الeni) |
| (ال,enGLISH LEADING TO) | (ال,enGLISH LEADING TO) | (ال-en) |
| (ال,enGLISH LEADING TO) | (ال,enGLISH LEADING TO) | (ال-en) |
| (ال,enGLISH LEADING TO) | (ال,enGLISH LEADING TO) | (ال-en) |
| (ال,enGLISH LEADING TO) | (ال,enGLISH LEADING TO) | (الENA) |
| (ال,enGLISH LEADING TO) | (ال,enGLISH LEADING TO) | (ال-en) |
| (ال,enGLISH LEADING TO) | (ال,enGLISH LEADING TO) | (ال-en) |
| (ال,enGLISH LEADING TO) | (ال,enGLISH LEADING TO) | (ال-en) |
| (ال,enGLISH LEADING TO) | (ال,enGLISH LEADING TO) | (الena) |
| (ال,enGLISH LEADING TO) | (ال,enGLISH LEADING TO) | (ال-en) |
| (ال,enGLISH LEADING TO) | (ال,enGLISH LEADING TO) | (ال-en) |
| (ال,enGLISH LEADING TO) | (ال,enGLISH LEADING TO) | (ال-en) |
| (ال,enGLISH LEADING TO) | (ال,enGLISH LEADING TO) | (ال- -) - |
| (ال,enGLISH LEADING TO) | (ال,enGLISH LEADING TO) | (ال- -) - |

Guide de dépannage
Please note that on disposal, this product must be safely recycled in accordance with relevant National legislation relating to electrical/electronic products. Do not dispose of electrical appliances as unsorted municipal waste, use separate collection facilities. Contact your local government for information regarding the collection systems available. When replacing old appliances with new ones, the retailer may be legally obligated to take back your old appliance for disposal free of charge. If electrical appliances are disposed of in landfills or dumps, hazardous substances can leak into the groundwater and get into the food chain, damaging your health and well-being.